Hi @danielbpm,
I understood your problem and I just remembered it happen the same to me once but using a W10. I had several physical machines connected to the same firewall with same W10 version installed in all of them but for some reason in one of the machines anydesk wouldn’t connect to the network. I didn’t manage to fix that because I didn’t really need it.
But I might have some thoughts about the trouble, if you ensure your network works properly (as you mentioned W10 machine works, I assume your network is fine too), then you should check that Windows Defender Firewall has the following entry rules:

Also, for testing proposal you could unable the Windows Firewall temporarily. And if you need to take just the ports that Any Desk uses, these ports are stated in their FAQ — AnyDesk Help Center:
«To connect to the AnyDesk network port 80, 443 or 6568 is used. For standard listening port direct line connection is 7070 (TCP).»
It might not solve your problem, but this should be a thing to check. Also check if your W11 machine network is in public or private. Good luck and update me if you manage to solve the problem.
Best,
Isusko
Get AnyDesk up and working again with these tips for Windows 11.

AnyDesk is a popular remote desktop application that lets users connect and use computers remotely. However, users can’t utilize that app when it doesn’t work. Many users have reported on the community forums that they need to fix the AnyDesk app not launching in Windows.
So, if the AnyDesk app is slow or not launching at all in Windows 11, try implementing these potential fixes to kick-start it.
Why AnyDesk Is Not Working in Windows 11
Usually, the AnyDesk app works fine in Windows 11, but if it is not working, then the following can be the reasons behind it:
- AnyDesk servers are currently down or under maintenance.
- You are using an outdated version of the app on your computer.
- The app installation has been corrupt due to sudden system shutdowns or attacks by malicious agents.
Now that you know the major reasons behind the problem, let’s dive into solutions you can try in this situation.
1. Restart Your Computer
If the AnyDesk app is not working, then your first port of call must be restarting your computer. Third-party programs rely on many system services to run correctly. Oftentimes, apps cannot access all these important services needed to open the app.
Restarting your computer will free up system resources and restart all the services. Save up your work in any open applications and then restart your computer.
After the restart, open the AnyDesk app and check if the problem continues.
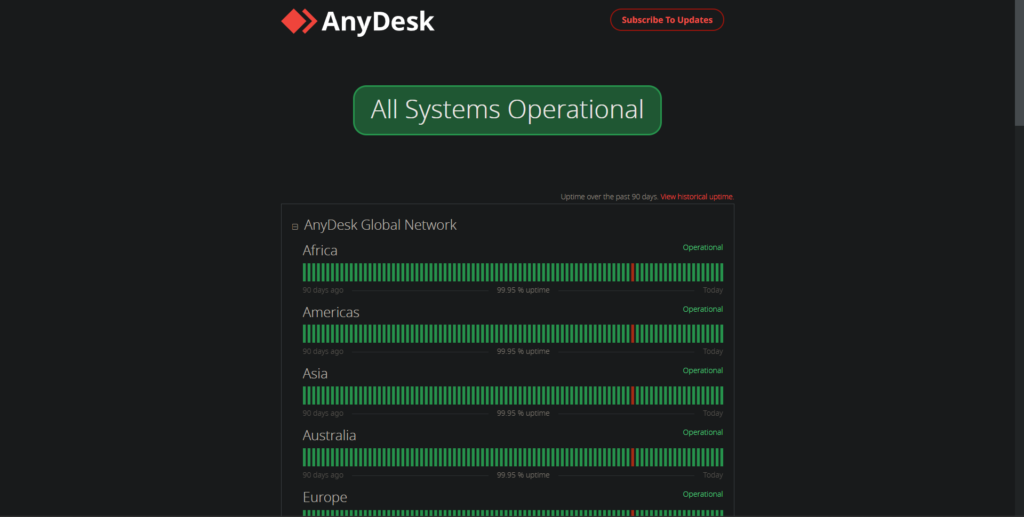
2. Check the AnyDesk App Server Status

Like any other online service, AnyDesk can experience server outages anytime. When the servers are down, you won’t be able to use or open the app at all.
You can check the AnyDesk server status by visiting its AnyDesk status website. There, check the network status of your continent.
If the servers are down, there’s nothing much you can do other than to patiently wait while AnyDesk fixes the issue.
3. Allow AnyDesk to Communicate through Windows Defender Firewall
At times, Windows Firewall can consider AnyDesk as a malicious app and stop it from opening on your computer. This usually happens when an app is blocked under the Firewall settings.
To fix this, you will have to allow AnyDesk to run through the Windows Defender Firewall. Here’s how to do it:
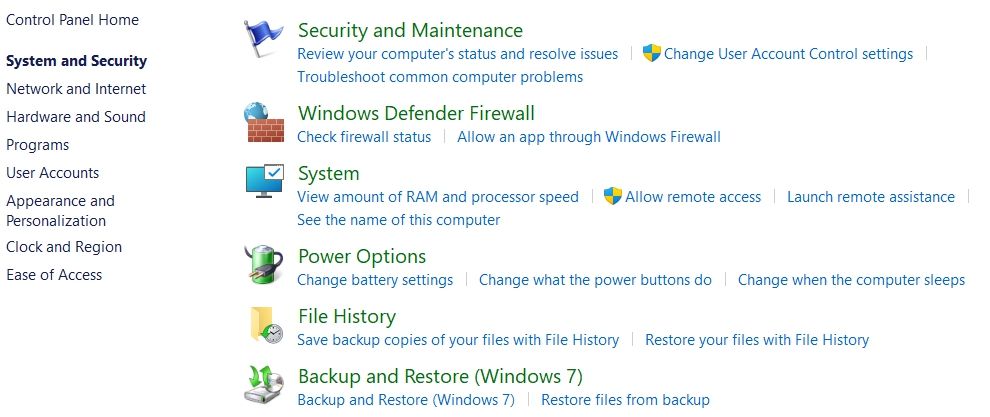
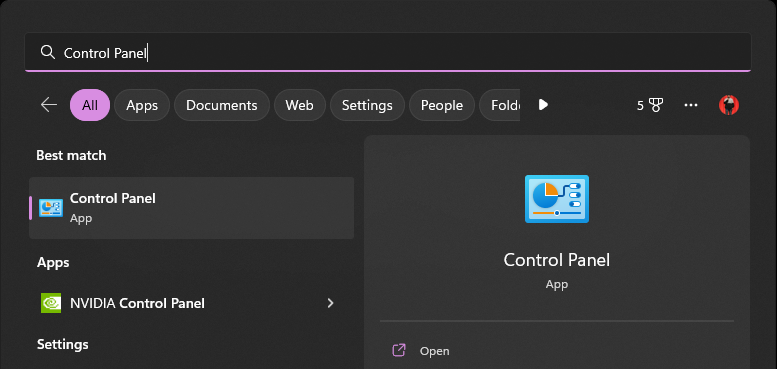
- Press the Win + S to open the Search menu.
- In the search bar, type Control Panel and press Enter.
- Change View by to Category.
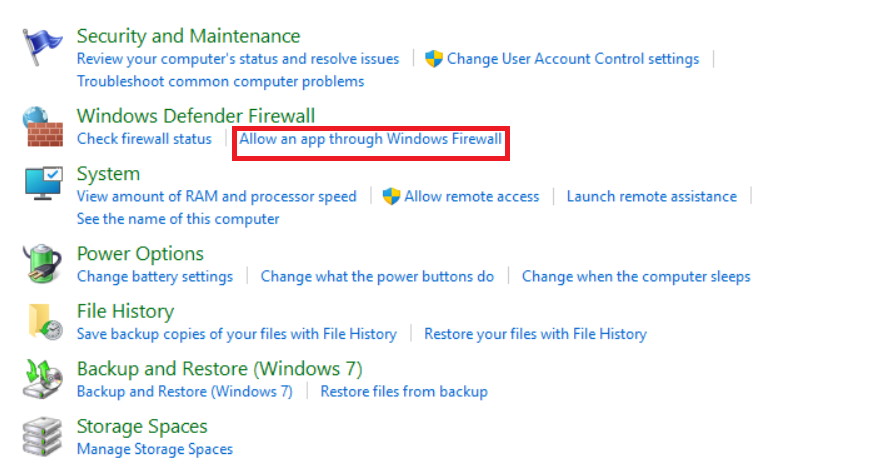
- Choose System and Security.
- Select the Allow an app through Windows Firewall option under Windows Defender Firewall section.

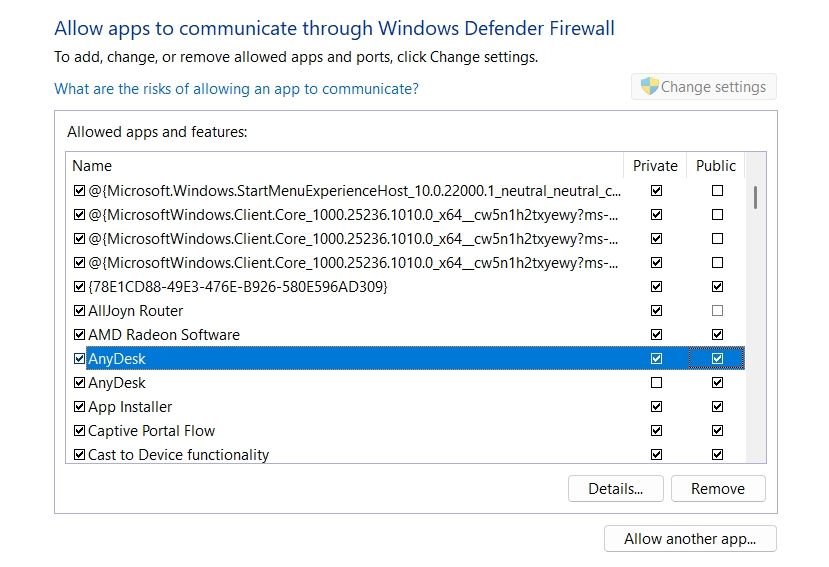
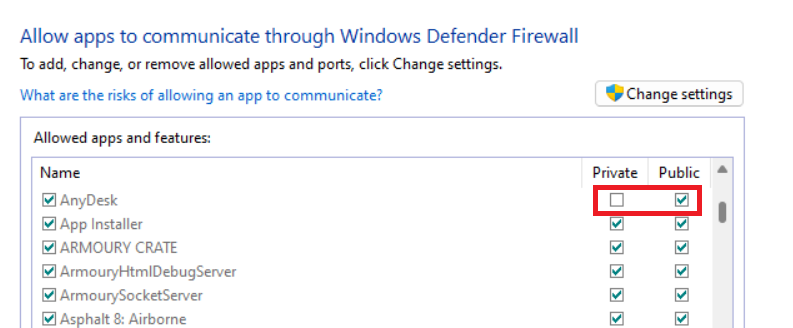
- Click the Change settings button.
- In the Allowed apps and features list, search for the AskDesk app.
- Check the Private and Public checkboxes for the AnyDesk app.

- Click OK to save the changes.
That’s it. Now restart your computer and check if the problem persists.
4. Change the System Date and Time
If the host computer or guest device shows an incorrect date and time, it can cause connection issues and stop AnyDesk from working correctly. The solution, in this case, is to synchronize both devices using an internet time saver.
Here are the steps you need to follow:
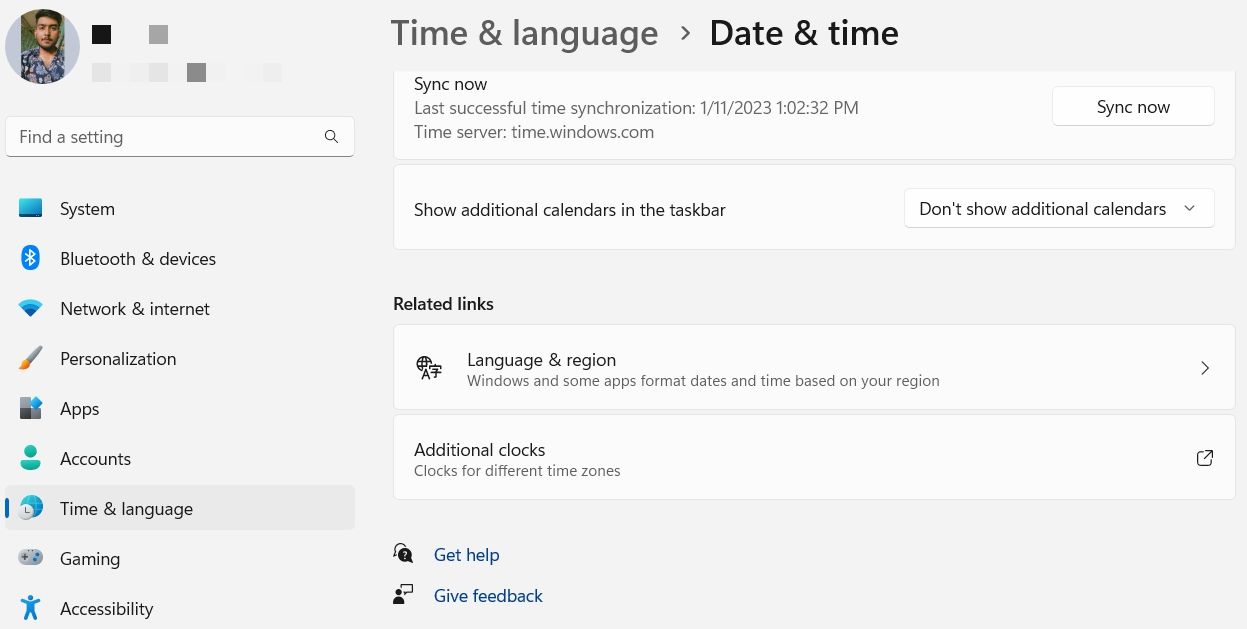
- Press the Win + I hotkeys to open the Settings app.
- Choose the Time & language option from the left sidebar.
- Under the Related links section, choose the Additional clocks option.

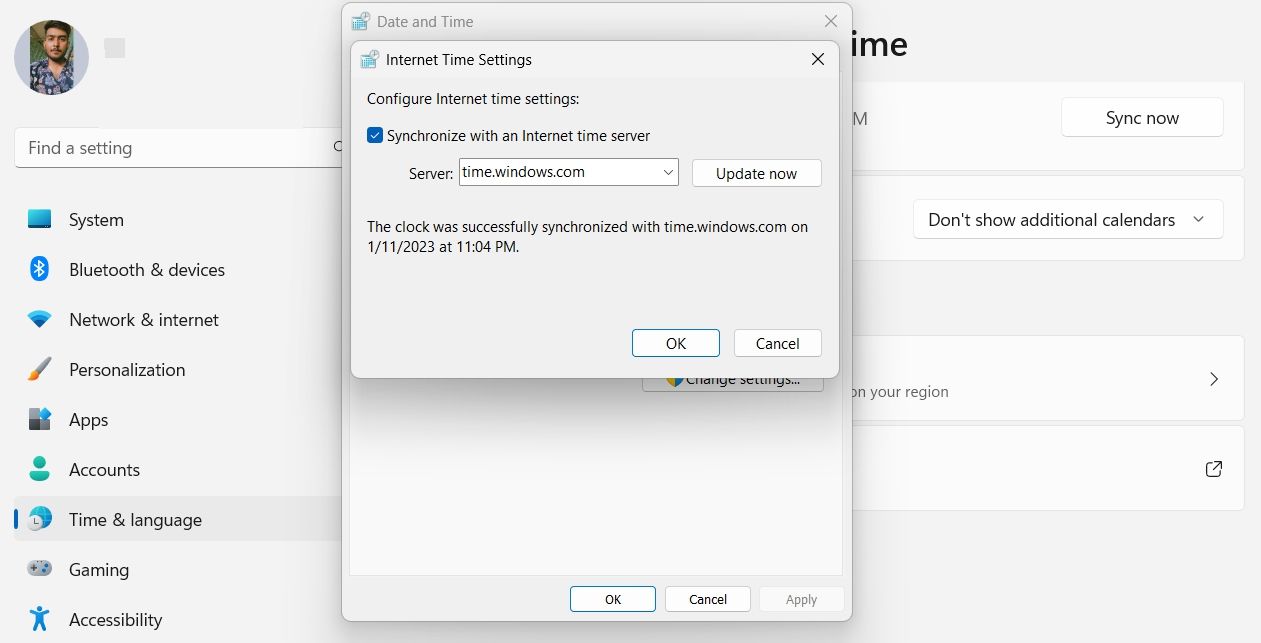
- In the Date and Time window that crops up, switch to the Internet Time tab.
- Click the Change settings button.
- Check the Synchronize with an Internet time server box, and then click the Update now button.

- Click OK to save the changes.
5. Try Networking Command Prompt Commands
Windows allows you to run various networking commands in the Command Prompt. You should try running a few of them if the AnyDesk app is still not running on your computer. To do that, open the Search menu, type CMD in the search bar, and choose Run as administrator from the right pane. It’ll open an elevated Command Prompt window.
To reset files that are necessary to connect to the internet, use these two commands:
 netsh winsock reset
netsh int ip reset
If that wasn’t helpful, consider releasing your system’s IP address and gaining a fresh one from the router using these two commands, one at a time:
 ipconfig /release
ipconfig /renew
Lastly, refresh your system’s DNS settings by executing this command:
ipconfig /flushdns
That’s it. Check if you’re still facing the problem.
If you’re interested in these commands, you can read about them (and more) in our guide on the CMD commands to manage wireless networks on Windows.
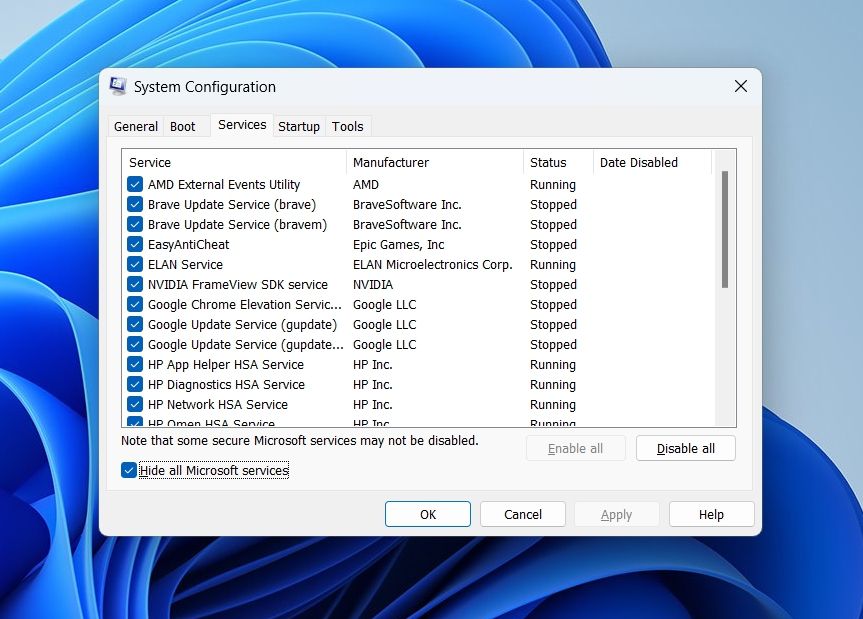
6. Perform a Clean Boot
AnyDesk app may not work on your computer if it faces any interference from a background program. The solution, in this case, is to perform a clean boot on your computer. It’ll only load important drivers and applications and stop the rest. Doing this will ensure whether a background program is causing trouble with the AnyDesk app.
To perform a clean boot, follow the below steps:
- In the Run dialog box, type msconfig and press Enter.
- The System Configuration window will appear. Switch to the Services tab and then click on the Hide all Microsoft services checkbox.

- Click the Disable all button.
- Then, switch to the Startup tab and select the Open Task Manager option.
- The Task Manager will appear with the Startup program section. Find and right-click on all the startup applications and choose Disable.
- Click the OK button in the System Configuration window. Restart your computer and launch the AnyDesk app to check if the problem continues.
7 . Update the AnyDesk App
If you haven’t updated the AnyDesk app in a while, you can face issues while launching it. As it turns out, older app versions can have bugs that impede their working and usability.
You can update the AnyDesk app by following the below instructions:
- Open the AnyDesk app and click the hamburger option at the top-right corner.
- Choose Settings from the list.
- Select Security from the left sidebar.
- Check the Enable Auto-Update — Main Channel option under the Update section.

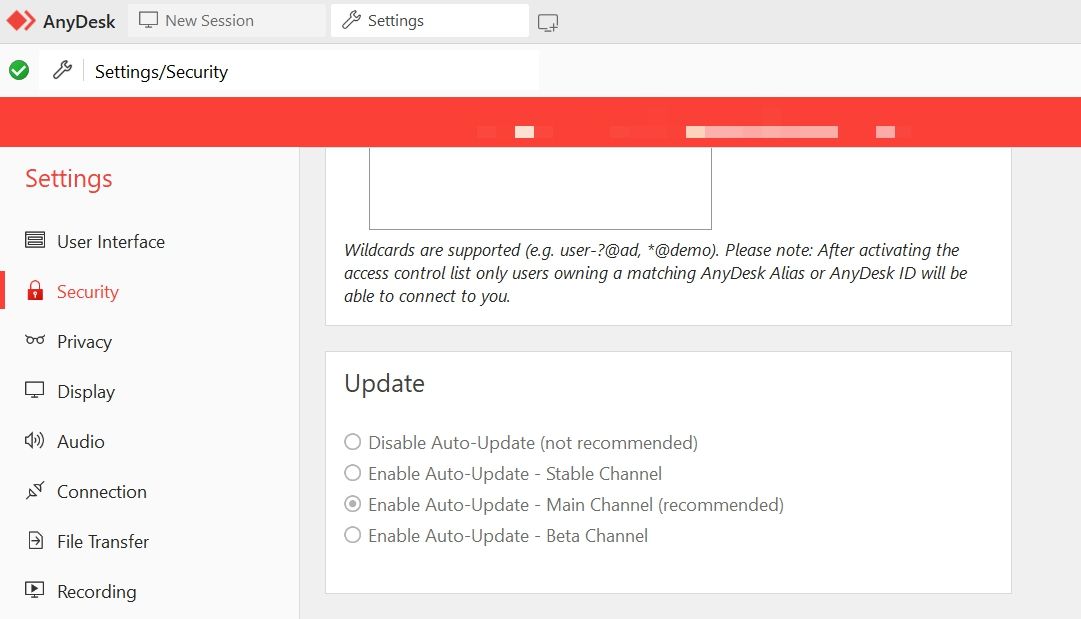
AnyDesk will now automatically download any available update on your computer.
Enjoy Remote Work With AnyDesk
Nothing worse than facing an interruption in work due to the malfunctioning of an app. Fortunately, if the AnyDesk app is not working on your Windows PC, you now know what’s causing the problem and how to fix it.
Meanwhile, you might be interested to know how use AnyDesk to connect remotely to a Windows PC.
Anydesk is a great way to remotely control your devices. You can connect from anywhere, use any connection and gain remote access from the most popular platforms. Anydesk supports Windows, macOS, Android, iOS, Linux, FreeBSD, Raspberry Pi, and Chrome OS. This makes it possible for you to gain remote access to your systems from any device.
However, many Windows 11 users worldwide have been claiming that Anydesk is not working for them. If that happens to be the case for you, then here’s how you can fix Anydesk on your Windows 11 system.
Most Anydesk issues stem from a slow internet connection, incorrectly configured firewall rules, or unexpected network changes. Here’s how you can troubleshoot and fix these issues to get Anydesk working again on your Windows 11 PC.
1. Check Your Firewall Settings
We first recommend you start by checking your firewall settings and make sure that Anydesk is allowed proper access. If you denied connections through your firewall when Anydesk was launched for the first time, then it is likely the cause of your issues. Follow the steps below to enable and allow Anydesk through your Windows 11 firewall.
1. Open the Windows Security app using the Start menu search on your PC.

2. Now click Firewall & network protection in the left sidebar.

3. Click Allow an app through firewall to check your firewall settings.

4. Click Change settings at the top to manage your firewall rules.

5. Find anydesk.exe in the list and ensure the checkbox beside it is checked. If not, click and check the box to allow anydesk.exe through your firewall.

6. Check the boxes under Private and Public as well for anydesk.exe.

7. Close the current window and open the Run app using Windows + R keyboard shortcut.
8. Type in the following command below to access advanced firewall settings.
control firewall.cpl
9. Now click Advanced settings in the left sidebar.

10. Click Inbound Rules on your left.

11. Find rules for Anydesk in the list on your right and ensure they all have the green checkmark beside them. If you find a rule with the red icon, double-click on it.

12. Click and select Allow the connection.

13. Click OK.

14. Repeat the steps above for any more Anydesk inbound rules created on your PC.
15. Similarly, click Outbound Rules on your left.

16. As we did before, allow any Anydesk rules as we did in the steps above you find to be blocked in this section.
17. Restart your PC to apply the changes.
If misconfigured firewall rules were causing issues with Anydesk on your Windows 11 Pc, then the issue should now have been fixed.
2. Check Your Internet
We now recommend you check and ensure your Internet is working as intended. Start by ensuring you can access popular websites. If you’re able to access the websites, then the next step is to check your internet speed.
Slow speed or a high ping can cause inconsistencies with your connection which can cause issues with Anydesk. Use a speed test tool to check your internet connection speed.
If you notice an unstable connection or a high ping in the test above, then it is likely the reason for issues with Anydesk. In such cases, you can try restarting your router or get in touch with your network provider to troubleshoot your network.
If, however, everything seems to be working without any issues with your network, then you can continue with the fixes below to fix Anydesk on your Windows 11 PC.
3. Try A Different Wi-Fi Network
You could now be facing issues specific to your current network. Your ISP could be blocking ports or addresses used by Anydesk to establish connections. You can test the same by trying a different Wi-Fi network. If you can use Anydesk on a different network, then your ISP was likely blocking ports or addresses used by Anydesk.
If you don’t have access to a different Wi-Fi network, you can try using public Wi-Fi or your mobile device’s hotspot. Both such connections should help you troubleshoot and identify if your ISP is to blame for issues with Anydesk.
4. Flush Your DNS
The next fix you should try is flushing your DNS. This can help clear your DNS cache, which can fix issues with Anydesk. Follow the steps below to flush your DNS on your Windows 11 PC.
1. Open Run using the Windows + R keyboard shortcut.
2. Now type cmd command below and press Ctrl + Shift + Enter on your keyboard.
3. Use the command below to flush your DNS cache.
ipconfig /flushdns
4. Now use the command below to close the command prompt.
exit
5. Restart your PC to apply the changes.
Once your PC reboots, you can try using Anydesk again. If you were facing issues due to your DNS cache, then Anydesk should now be working on your PC.
5. Run an SFC and DISM Scan
While Anydesk mostly relies on your network connection, issues with your Windows system files and image can also cause errors and prevent Anydesk from working as intended. In such cases, an SFC scan and DISM scan can help you fix most errors. Follow the steps below to run an SFC and DISM scan on your PC.
1. Open the Run app on your PC. You can use the Windows + R keyboard shortcut or search for it using your Start menu.
2. Now type cmd and press Ctrl + Shift + Enter.
3. Now use the command below to run an SFC scan.
sfc /scannow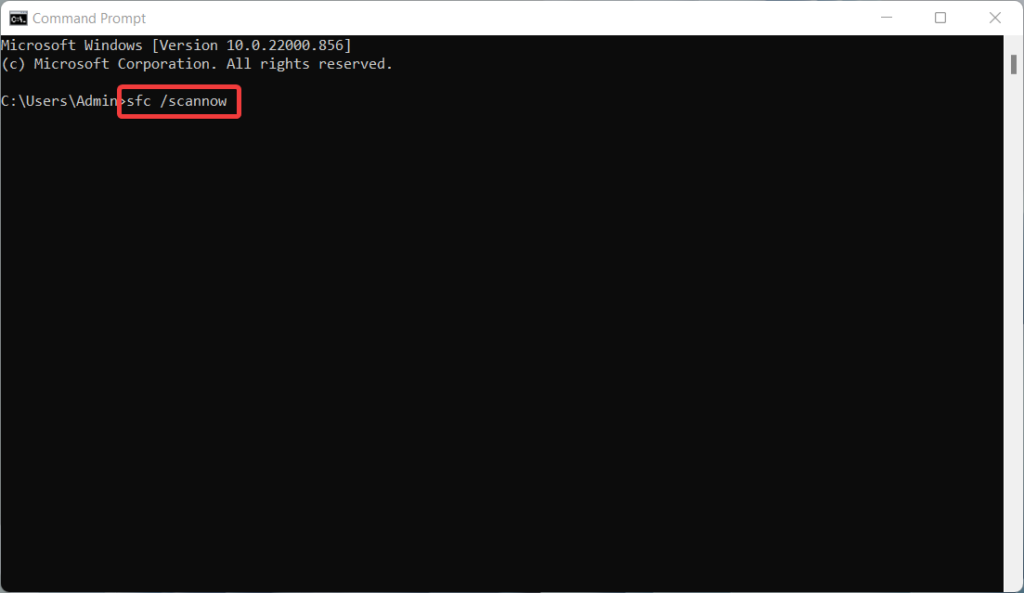
4. Once done, use the command below to run a DISM scan.
DISM /Online /Cleanup-Image /restorehealth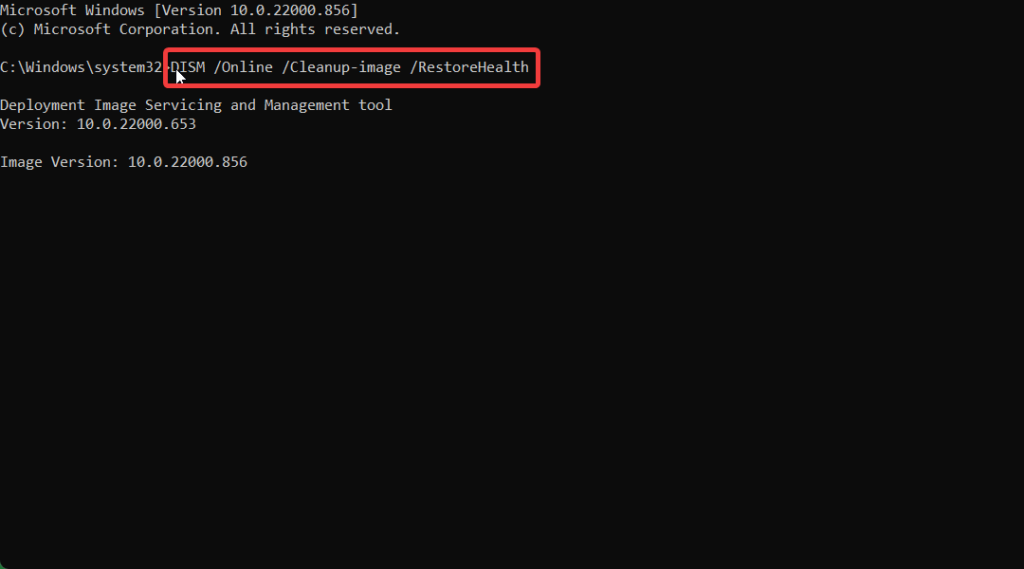
5. Use the command below to close the command prompt once the process completes.
exit
6. Restart your PC once done.
If corrupted or missing system files on your PC were causing issues with Anydesk, then the issue should now have been fixed for you.
6. Re-install Anydesk
We now recommend you re-install Anydesk. You could be facing issues with your current installation due to file errors or a corrupted cache. Re-installing the app should help fix these issues easily. Use the steps below to re-install Anydesk on your Windows 11 Pc.
1. Open the Settings app from your Start menu.
![]()
2. Now click Apps in the left sidebar.

3. Click Installed apps on your right.

4. Click the More options icon beside Anydesk in the app list on your right.

5. Select Uninstall.

6. Click Uninstall again.

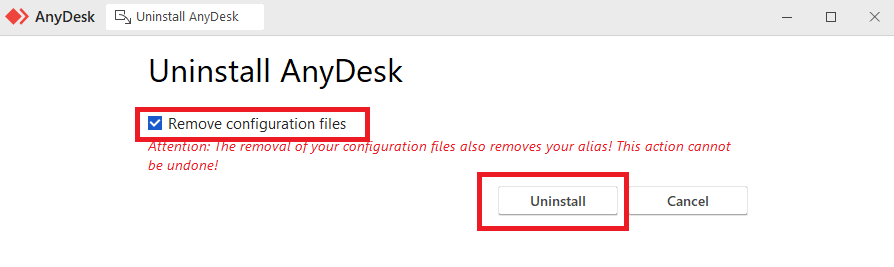
7. Anydesk uninstaller will now launch on your PC. Check the box for Remove configuration files.

8. Click Uninstall.

9. Anydesk will now be uninstalled from your PC. Restart your PC at this point to clear any leftover files.
10. Now go to this link to download the Anydesk installer for your PC.
11. Once the installer is downloaded, double-click and launch the same. Once launched, close the trial to install the app.

13. Click Yes.

14. Configure your installation using the options on your screen.

15. Click Accept & Install.

Anydesk will now be re-installed on your Windows 11 PC. You can now try remotely accessing your PC from a device. If a corrupted installation was to blame, then, Anydesk should now be working on your PC.
7. If You Have Attempted Too Many Connections
It could also be that your issue is fixed by this point, but as you have tried connecting to your PC using Anydesk too many times by now, your connection is being automatically blocked. This is the default behavior for Anydesk and is a security feature intended to prevent malicious access to devices.
You will have to wait a while in such cases as there is no way to bypass this restriction. Anydesk does not specify how long you have to wait, but according to user reports, you can connect to Anydesk again after a few hours.
8. Use a Public DNS Provider
Changing your DNS to a public provider can also help fix connection issues, especially if ports and addresses used by Anydesk are being blocked by your ISP. I recommend you try switching to Cloudflare DNS for now, but you can choose to use another provider as well on your PC if needed. Follow the steps below to use Cloudflare DNS on your PC.
1. Open the Settings app on your PC from the Start menu.
![]()
2. Now click Network & internet on your left.

3. If you’re connected to a Wi-Fi network, click Wi-Fi. Click Ethernet if you’re using an ethernet connection.

4. Click Hardware properties.

5. Now click Edit beside the DNS server assignment.

6. Click the drop-down menu and select Manual.

7. Turn on the toggle for IPv4 at the top.

8. Paste the value below under Preferred DNS.
1.1.1.1
9. Click the drop-down menu for DNS over HTTPS and select On (automatic template).

10. Paste the following value under the Alternate address.
1.0.0.1
11. Click the drop-down menu for DNS over HTTPS again and select On (automatic template).

12. Turn on the toggle for IPv6.

13. Use the following addresses below as your preferred and alternate DNS as we did above.
2606:4700:4700::11112606:4700:4700::1001
14. Select On (automatic template) for each drop-down menu for DNS over HTTPS.

15. Click Save.
Your DNS provider will now have been changed. We recommend you wait a few minutes and then try using Anydesk again. If ports and addresses were being blocked on your network previously, then Anydesk should now be working on your Windows 11 PC.
9. Contact Anydesk Support
If you’re still facing problems with Anydesk, then you could be facing issues that might be specific to your setup. Anydesk could be broken due to missing drivers, unsupported networks, hardware components in your current setup, and much more.
A support executive will help you diagnose and troubleshoot your setup better and potentially fix Anydesk not working on your PC. Use the link below to get in touch with the Anydesk support team.
Final Words
Anydesk can be a great help when you’re away from your PC. You can manage your file system, run apps, perform important tasks, and keep up with the latest updates on your PC. Anydesk not working can prevent you from performing important tasks that might be time sensitive and highly important to you. We hope the post above helped you easily fix Anydesk and get everything working on your PC.
AnyDesk is a popular remote desktop software that has gained significant recognition for its ease of use and reliable performance. However, with the recent release of Windows 11, some users have encountered difficulties while trying to run AnyDesk on this new operating system. This has left many individuals wondering why AnyDesk is not working as expected on their Windows 11 PC and seeking solutions to resolve these issues.
In this article, we will explore some common causes behind AnyDesk’s incompatibility with your Windows system and provide potential solutions to help users overcome these issues and resume their remote desktop activities seamlessly.
There are several reasons why AnyDesk might not be working properly on Windows 11. One possible reason is compatibility issues. AnyDesk may not be fully optimized or updated to work seamlessly with the new features and changes introduced in Windows 11.
Network configuration problems can also contribute to AnyDesk not working on Windows 11. If the network settings on the computer are not properly configured, it can prevent AnyDesk from establishing a stable connection.
Additionally, conflicts with other software or settings on the computer can also interfere with AnyDesk’s functionality. It’s important to identify any conflicting applications or settings that may be causing the issue.
Ways to Fix AnyDesk Not Working on Windows 11
Now that you’re aware of the potential reasons for the issues you’re experiencing with AnyDesk on Windows 11, let’s proceed to some significant solutions. Below, you’ll find some of the most common fixes to follow if AnyDesk is not working properly on your Windows PC:
1. Restart Your Computer
A simple but effective step is to restart your computer, as it can help resolve temporary software glitches and refresh system processes.
Follow these steps to restart your PC:
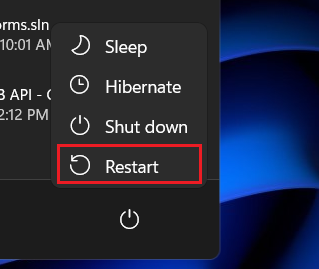
1. Press the Windows Key on your keyboard to open the search menu.
2. From here look for the Power menu option, click on it, and select Restart.

This will restart your system. After the reboot is done, try checking if AnyDesk is functional again.
2. Check the Server Status of AnyDesk

Sometimes, AnyDesk might not be working due to server issues. Similar to all other online services, AnyDesk is susceptible to server outages at any moment. During these periods of server downtime, the application will be inaccessible and unusable.
To check the server status, visit the official AnyDesk website or their social media channels. If there is a server-side problem, you can only wait until it is resolved by their technical team.
3. Restart the File Explorer
Restarting File Explorer can efficiently refresh the system and resolve potential conflicts that could impede the proper functioning of AnyDesk. Given that AnyDesk is integrated into the system tray, refreshing the Windows Explorer task can play a crucial role in rectifying errors that may lead to AnyDesk software malfunction.
To do this, follow these steps:
1. Press Ctrl + Shift + Esc to open the Task Manager.
2. Now, you need to open File Explorer by pressing Win + E to add the Windows Explorer task in Task Manager.
3. In the Task Manager window, locate the Windows Explorer process.
4. Right-click on it and select the Restart option from the context menu that appears.

5. Your entire Windows Explorer taskbar will now refresh, including AnyDesk.
After that, close the Task Manager window and try using AnyDesk again. If you are still facing the same issues, you can also try restarting AnyDesk as well.
4. Try Restarting AnyDesk
If AnyDesk is not responding or freezing during operation, try restarting the application. Restarting AnyDesk should resolve any issues you are facing.
Follow these steps to force restart AnyDesk using the task manager:
1. Click on the Arrow on the Taskbar and right-click on the AnyDesk icon. Then select Quit or Exit from the menu.
2. After that, if there are any AnyDesk tasks running in the background, you can end them from the Task Manager. To open the Task Manager, right-click in the taskbar area and select Task Manager to open it.

3. In the Task Manager window, locate the AnyDesk process.
4. Right-click on it and select the End task option from the context menu.

This will close AnyDesk completely, and then relaunch it to see if the issue is resolved
5. Check Windows Defender Firewall Settings
Windows Defender Firewall can sometimes block AnyDesk from establishing a connection. To ensure that AnyDesk is allowed through the firewall, follow these steps:
1. Open the Windows Security app by searching for it in the Start menu.

2. Click on Firewall & network protection option.

3. Here, you will get the firewall and network protection option. To allow AnyDesk through the Windows firewall, select Allow an app through firewall option.

4. Click on the AnyDesk option in the list of allowed apps and features. Then click on the Change settings button and make sure both the Private and Public checkboxes are selected for AnyDesk.
5. After that, click OK to apply the changes.

In case you see two AnyDesk options, turn on both. Now, try using AnyDesk and check the functionality of the app.
6. Change the Date and Time
Incorrect date and time settings on your computer can cause issues with AnyDesk. It is important to ensure that your system’s date and time are set correctly.
To change the date and time of your device, follow these steps:
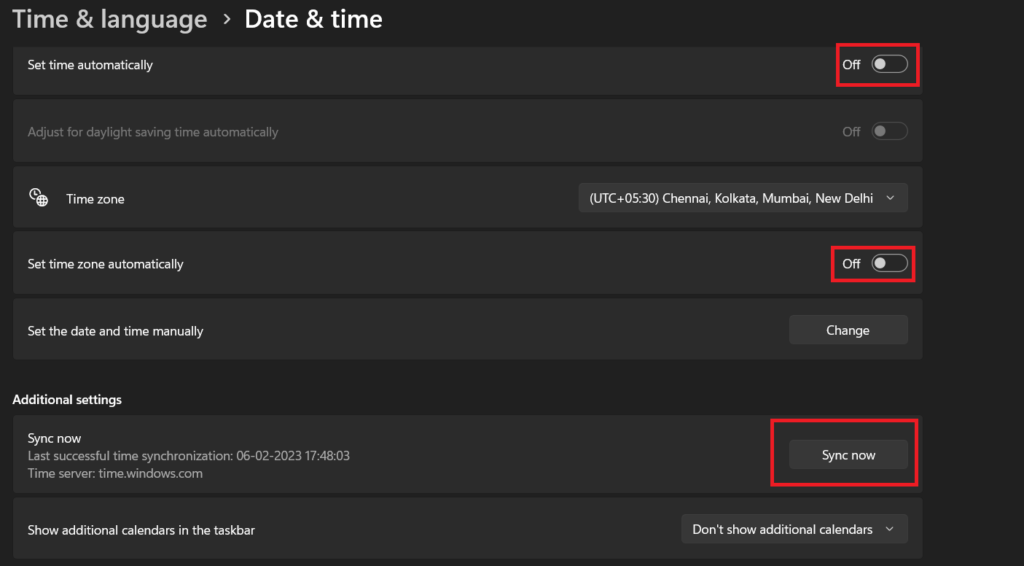
1. Open the Settings app by pressing the Windows key + I together on the keyboard.
2. Click on the Time & Language option and then select Date & Time settings from the right pane.

3. Make sure the Set time automatically and Set time zone automatically options are enabled.

4. If the time and date are incorrect, toggle off the automatic settings and manually set the correct time and date.
7. Try Networking Command Prompt Commands
Sometimes, resetting the network settings can help resolve connectivity issues with AnyDesk. To address network problems, you can execute various networking commands in the Command Prompt or Windows Terminal. Here, in this guide, we are going to use the Windows Terminal as Admin.
To do so, you can follow the following steps:
1. Press Windows + X to open the power menu. Here, select Terminal (Admin) to open the command line interface.

2. In the command prompt window, type the following commands one by one and press Enter after each:
ipconfig /flushdnsipconfig /flushdnsipconfig /registerdnsipconfig /releaseipconfig /renewnetsh winsock reset
3. Once the commands have been executed, restart your computer and check if AnyDesk is working.
8. Change Display Quality
If you have a low internet connection, you might experience video frame drops because a stable connection is required to use AnyDesk. If you encounter display quality issues during remote sessions on AnyDesk, you can attempt to adjust the display settings within the application.
Here is how you can change the Display Quality in AnyDesk:
1. Open AnyDesk and click the Settings icon in the top-right corner.

2. In the settings menu, select the Display tab from the left pane.

3. Here you can adjust the display settings according to your needs. Try a lower value to reduce bandwidth usage and potentially improve performance on slower connections.

9. Perform a Clean Boot
Performing a clean boot can assist in identifying whether third-party software or services are causing conflicts with AnyDesk. This method involves starting your computer with only essential system services active and no additional software running, aiding in isolating the source of the issue.
To perform a clean boot, follow these steps:
1. Press Windows + R to open the Run dialog box.
2. Type msconfig and press Enter to open the System Configuration window.

3. In the General tab, select Selective Startup and uncheck the Load startup items checkbox.

4. Go to the Services tab and check the Hide all Microsoft services checkbox.

5. Click on the Disable All button to disable all non-Microsoft services. Click on Apply and then OK to save the changes.

After that, Restart your computer and check if AnyDesk is working. If it is, you can gradually enable the startup items and services to identify the specific one causing the issue.
10. Update the AnyDesk App
After following the aforementioned methods to address the AnyDesk not working issues, attempting to update AnyDesk to the latest version can potentially resolve compatibility issues with Windows 11. To update AnyDesk, follow these steps:
1. Open the AnyDesk app, click the hamburger icon at the top-right corner, and choose Settings from the list.
2. Now, from the left sidebar of the app, select Security.
3. To enable this feature, click on the Enable Auto-Update – Main Channel option under the Update section.

Subsequently, the AnyDesk app will automatically check for and install any available updates on your system. This will ensure that you are consistently using the most up-to-date version of the application.
11. Reinstall AnyDesk
If none of the above solutions wyour AnyDesk system files may bes are corrupted. To rectify this, you can attempt to reinstall AnyDesk on your Windows 11 system.
To reinstall AnyDesk, follow these steps:
1. Press Windows + X to open the Power Menu and select Installed Apps.

2. Locate AnyDesk in the list of installed apps, or you can search it from the search box.
3. Click on the three-dot icon and select Uninstall from the context menu. Follow the prompts to uninstall AnyDesk completely.

4. Once successfully Uninstalled the AnyDesk application, download the app from https://anydesk.com and reinstall it.
You can also check out our guide on How to Install AnyDesk on Windows 11.
Conclusion
AnyDesk not working on Windows 11 can be frustrating, but with the solutions outlined in this guide, you should be able to resolve the issue and get back to using AnyDesk for remote desktop access.
Remember to try each solution one by one and test if AnyDesk is working after each step. If the issue persists, it may be worth reaching out to AnyDesk support for further assistance.
AnyDesk is a popular remote assistant software that allows users to remotely connect and control computers or mobile devices.
The AnyDesk app not working may affect the daily workflow of many users, so if you’re also facing issues while launching the app, here’s how to fix it.
There can be many reasons why AnyDesk is not working on your computer, like, corrupt files, third-party apps causing conflicts, compatibility issues with the Windows OS, etc.
Here are a bunch of troubleshooting methods you can try to make AnyDesk run smoothly again on your PC.
1. Restart the PC
The first and one of the basic troubleshooting methods is to restart the computer. A simple restart fixes most of the problems, as after rebooting, the number of running services in the background is less, and more RAM is free, so other apps like AnyDesk can use the needed resources and run flawlessly.
2. Restart the App
For any reason, if you can’t restart your PC, then you can also restart the app and check if AnyDesk is working or not. Here’s how to re-launch the AnyDesk app on your Windows 11 computer.
1. Close the application by clicking on the X icon or the closing button.
2. Head to the taskbar, click the Show hidden icons button, right-click on the AnyDesk icon, and select the quit option.
3. Using the quit option will stop the app from running in the background, and now you need to open the app again on your PC.

3. Check the Internet Connection on Your Computer
Slow or no internet connectivity can also be why AnyDesk is causing problems on your computer, and troubleshooting your internet may solve the issue for you.
AnyDesk can work on an internet speed as low as 100 kb/sec, but we recommend you have at least 500 kb/sec for a smoother experience.
4. Check if AnyDesk Servers Are Live
If restarting the app or the computer doesn’t make the app work, and there’s nothing wrong with your internet, then there’s a chance that the problem might not be on your side. Like other online apps, AnyDesk can also have server outages or maintenance sometimes.
When that happens, there’s nothing you can do except wait for the server to come live again. You can check the current status of AnyDesk’s servers by visiting status.anydesk.com or by clicking here.
5. Check if AnyDesk Can Communicate Through Windows Defender Firewall
Windows Firewall is known for blocking malicious apps from running on the computer. There’s a chance that your Firewall may consider AnyDesk as a malicious app and is preventing it from running on your PC.
Here’s how you remove AnyDesk from the list of malicious apps and allow it to run on your computer.
1. Open Start Menu, type Control Panel in the search bar, and press the Enter key on your keyboard.
2. Click on System and Security, and choose the Allow an app through the Windows Firewall option under the Windows Defender Firewall section.
3. Search for AnyDesk under the Allowed apps and features list and check the private and public networks boxes.
4. Click the OK button to save changes.
6. If You’re Using a VPN Service, Disable It
If you’re using a VPN or proxy, try disabling them temporarily and see if that resolves the issue. Sometimes, these services can interfere with AnyDesk’s ability to connect to other computers.
7. Change DNS Server
If your internet is causing issues with AnyDesk, changing DNS may fix the problem for you. After changing the DNS, you may notice a decrease in the loading time of webpages and other internet services. Here’s how you can change DNS on your PC:
1. Open the Settings app and select the Network & Internet option.
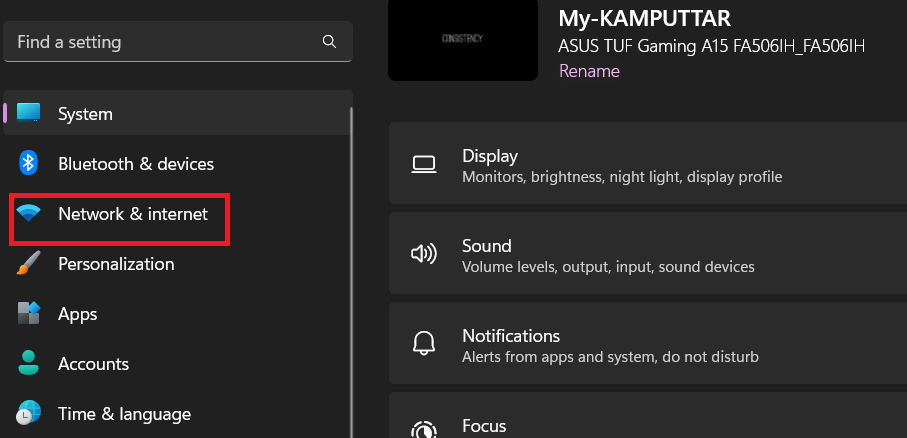
2. Scroll down, click Advanced network settings, and select the Network adapter you’re using.
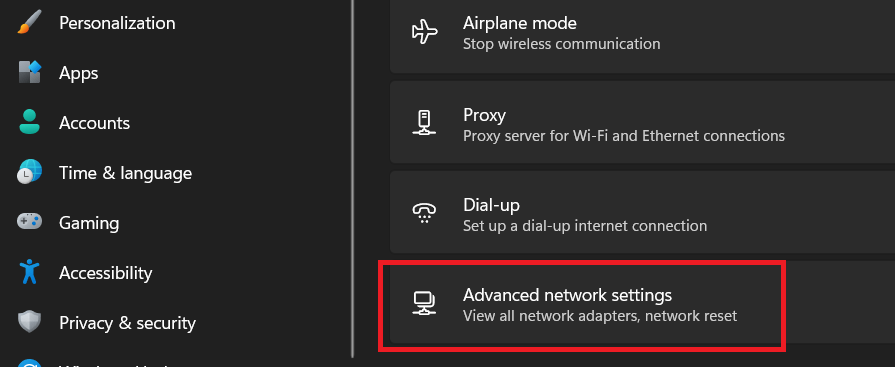
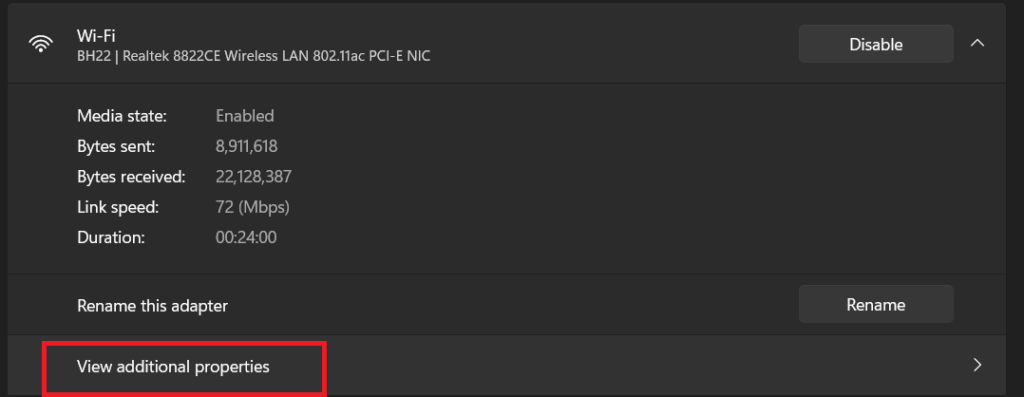
3. Click on View additional properties and then click on the Edit button next to the DNS server assignment settings.
4. Now, change the DNS setting to Manual, select one from IPv4 or IPv6, fill in the empty fields, and hit the save button.
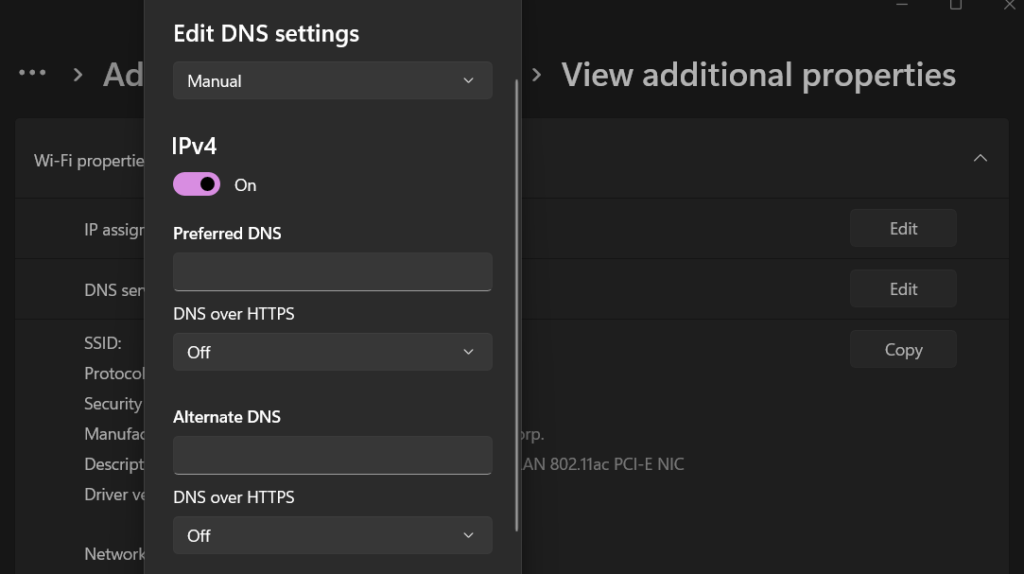
So this is how you can change the DNS server on your computer. If you haven’t used any public DNS Server before, or don’t know what to fill in the fields, don’t worry, we’ve got you covered with a list of the five best free public DNS servers.
| Provider | preferred DNS | alternate DNS |
|---|---|---|
| 8.8.8.8 | 8.8.4.4 | |
| Cloudflare | 1.1.1.1 | 1.0.0.1 |
| AdGuard DNS | 94.140.14.14 | 94.140.15.15 |
| OpenDNS Home | 208.67.222.222 | 208.67.220.220 |
| CleanBrowsing | 185.228.168.9 | 185.228.169.9 |
8. Check if the System’s Date and Time Are Correct
If the date or time is incorrect on the guest or the host’s system, AnyDesk will fail to work. Also, if the date and time are set manually on any of the two PC, there are chances that both devices are not on the same time, and this can cause connection issues with AnyDesk.
The solution to this problem is to synchronize the date and time on both devices using an internet time saver. Here’s how you can set the correct date and time on your computer:
1. Use any method out of the five mentioned in this post to open the Settings app on your PC.
2. Click on Time & language.
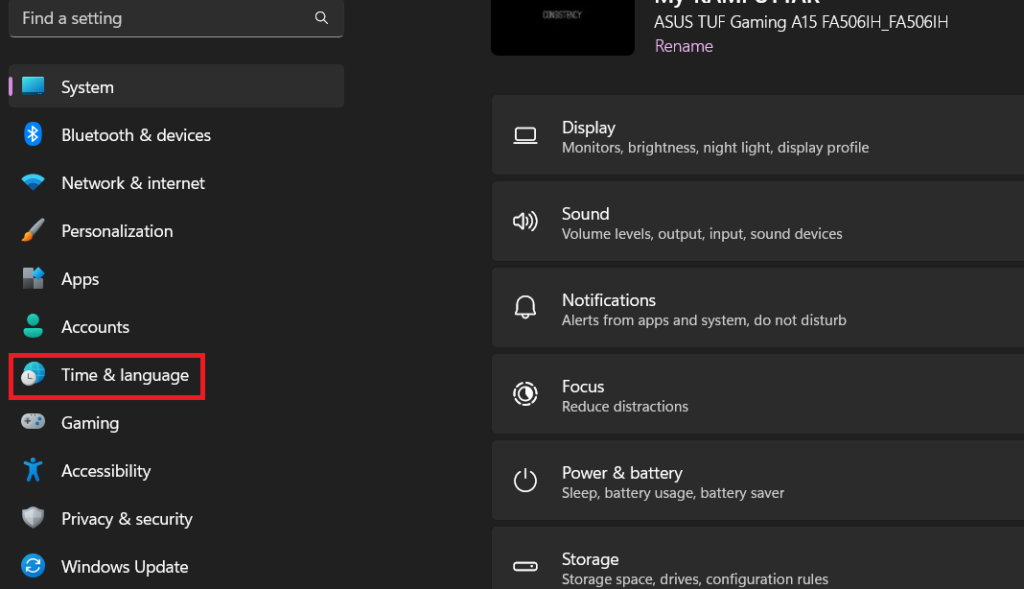
3. Click on Date & time, turn on the toggle for Set time automatically and Set time zone automatically, and hit the Sync now button under the Additional settings menu.
9. Disable Third-Party Anti-Virus Software
We all know that third-party anti-virus software adds an extra layer of protection to the security of your computer, but they also have a history of causing issues with other applications installed on your system. So if you’re facing an issue while launching AnyDesk, try temporarily disabling your anti-virus software and see if that resolves your problem.
10. Re-Install AnyDesk on your Computer
If none of the above troubleshooting methods worked, you should try re-installing the app. Re-installing fixes the problem most of the time, as when you re-install an app fresh data files are created, helping the app to function properly. The re-installation process has two things, deletion of the existing app, and installation of a new fresh app.
Before moving further, note that following this method will remove AnyDesk from your computer, including all the system files, and when you install the app, you’ll need to sign in again. Here’s how to re-install AnyDesk on your PC:
Uninstall Anydesk
1. Open the Start menu, search for Add or remove programs and press the enter key on your keyboard.
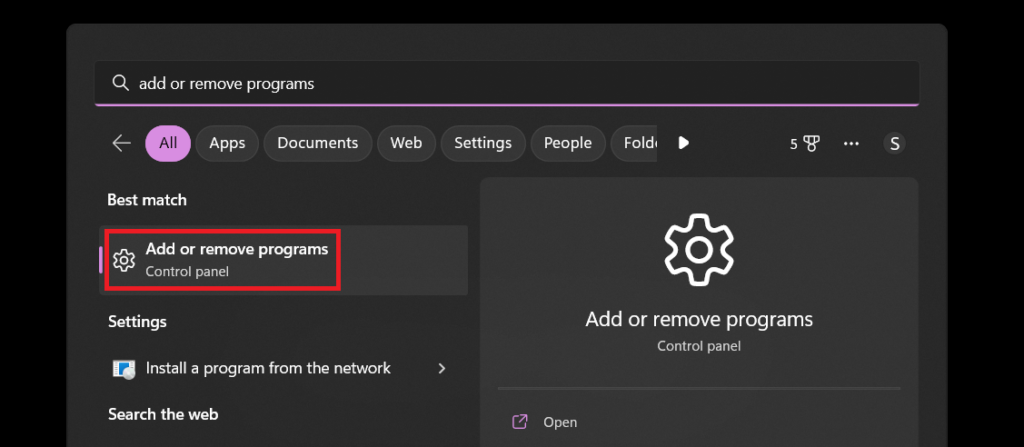
2. Search for AnyDesk and click on the three dots next to it.
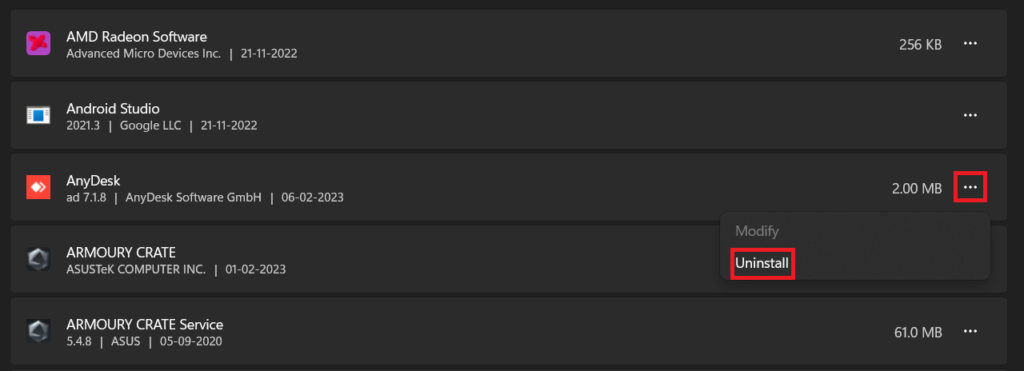
3. Choose the Uninstall option. It will ask for confirmation, and you can confirm by clicking the Uninstall button.
4. When you click the Uninstall button for confirmation, it will open AnyDesk on your computer. In the AnyDesk app, select the checkbox for removing configuration files and click the Uninstall button.
Now AnyDesk is removed from your computer, and you need to install it again. Before installing, check and delete if there are any system files of AnyDesk in your computer, and restart the PC to remove all the temporary files.
Once you’ve completed the above steps, here’s how to install AnyDesk on your PC:
Install Anydesk
1. Fire up your browser and search Download AnyDesk and click on the first link. (or click here)
2. Select Windows in the platform choosing option and click on the Download Now button.
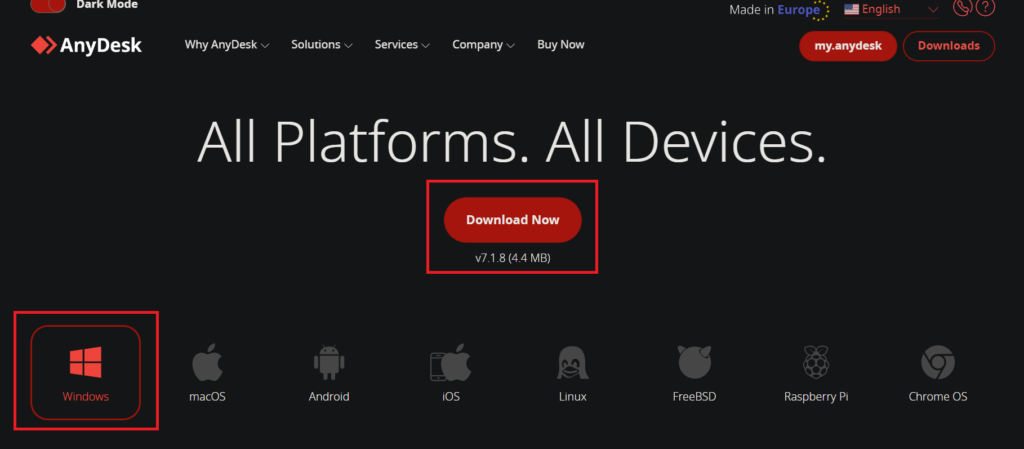
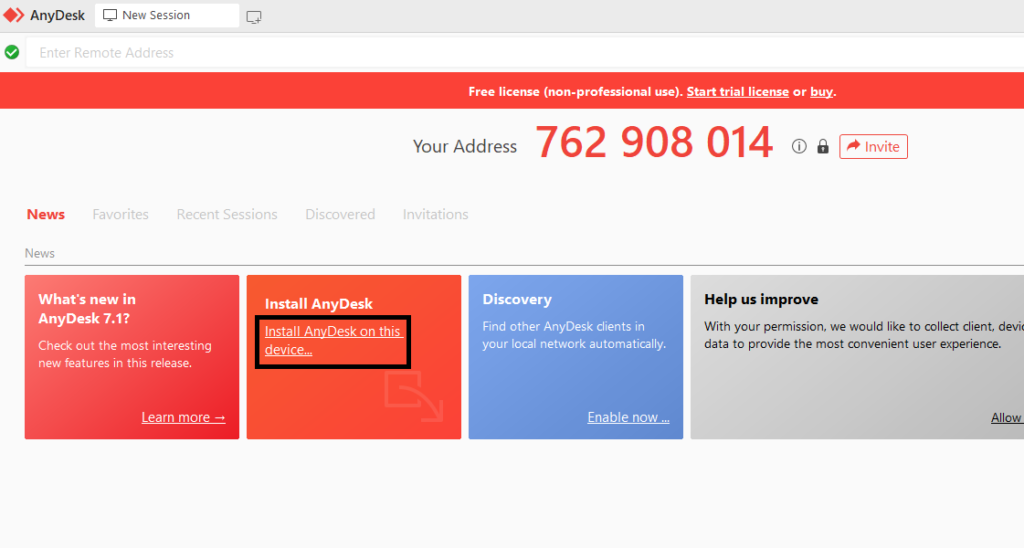
3. It will download a 4MB testing package for AnyDesk on your computer. Once the download is complete, install the package and open it.
4. Now on the home screen of the testing package, click on the install AnyDesk on this device button in the Install AnyDesk section, and installation of the full version will begin on your device.
Final Words
AnyDesk is a powerful remote access software that can be a great tool for remotely controlling and accessing other computers. However, if you encounter issues with AnyDesk not working on Windows, there are several steps you can take to troubleshoot and resolve the problem. By following the fixes outlined in this blog post, you should be able to get AnyDesk up and running again in no time.