Hi @danielbpm,
I understood your problem and I just remembered it happen the same to me once but using a W10. I had several physical machines connected to the same firewall with same W10 version installed in all of them but for some reason in one of the machines anydesk wouldn’t connect to the network. I didn’t manage to fix that because I didn’t really need it.
But I might have some thoughts about the trouble, if you ensure your network works properly (as you mentioned W10 machine works, I assume your network is fine too), then you should check that Windows Defender Firewall has the following entry rules:

Also, for testing proposal you could unable the Windows Firewall temporarily. And if you need to take just the ports that Any Desk uses, these ports are stated in their FAQ — AnyDesk Help Center:
«To connect to the AnyDesk network port 80, 443 or 6568 is used. For standard listening port direct line connection is 7070 (TCP).»
It might not solve your problem, but this should be a thing to check. Also check if your W11 machine network is in public or private. Good luck and update me if you manage to solve the problem.
Best,
Isusko
Предисловие
AnyDesk представляет собой программное обеспечение удаленного доступа, которое позволяет пользователям управлять компьютерами из любой точки мира. Одним из главных преимуществ AnyDesk является возможность подключения к удаленному компьютеру в режиме реального времени.
AnyDesk использует серверы-релеи (от английского: relay), которые играют ключевую роль в установлении связи. Релеи — это серверы, которые выдают клиенту уникальный идентификатор и обеспечивают установление соединения с другими клиентами.
При запуске, AnyDesk соединяется с бут-сервером (англ.: boot), получает список релей-серверов, и пытается подключиться к этим релеям.
Если при попытке подключения AnyDesk не может получить доступ к одному релей-серверу, то он переключается на следующий сервер в списке. Если и к следующему серверу доступ не удалось, то AnyDesk продолжает попытки подключения к другим серверам в списке до тех пор, пока не будет найден релей-сервер, с которым компьютер сможет установить связь.
В данной статье мы рассмотрим проблему с подключением AnyDesk к своим серверам.
Описание проблемы
Проблема выражается в том, что AnyDesk, по той или иной причине, не может подключиться к бут-серверу или релеям, попеременно меняя статус между: «Подключение к сети AnyDesk» и «Отключён от сети AnyDesk».
Несмотря на то, что причины такого поведения бывают разные, в данной статье мы рассмотрим основные из них. Если вы столкнулись с проблемой подключения AnyDesk, то эта информация поможет вам определить причину и, возможно, решить её.
Решение проблемы
1. Проверьте соединение с Интернетом
В первую очередь стоит проверить непосредственно соединение с Интернетом, поскольку AnyDesk не может работать без соединения с сетью.
Для этого сделайте простое действие: откройте любой сайт, например Яндекс или Google.
Также не было бы лишним выполнить команду ping через Командную строку, Терминал или PowerShell:
ping google.com
ping yandex.ru
ping 8.8.8.8
ping 77.88.8.8
Проверьте количество потерь пакетов до каждого из ресурсов. В норме процент потерь должен быть нулевой.
- Если пакеты до IP-адресов (8.8.8.8 и 77.88.8.8) доходят, а до google.com и yandex.ru – нет, проверьте настройки DNS на компьютере и/или роутере, а также выполните команду в Командной строке, запущенной от имени администратора, команду:
ipconfig /flushdns
Данная команда сбросит кэш DNS. После этого заново попробуйте пропинговать ресурсы google.com и yandex.ru - Если процент потерь пакетов – 100% до всех ресурсов, выполните пинг до localhost:
ping 127.0.0.1- Если до localhost пакеты доходят, а до внешних серверов – нет, имеют место быть проблемы на стороне провайдера, проблемы с промежуточным сетевым оборудованием или компьютер не подключен к Wi-Fi / не вставлен кабель.
- Если и до localhost не доходят пакеты, вероятно, проблемы в сетевом адаптере вашего компьютера.
2. Проверьте соединение с boot-узлом AnyDesk
Через Командную строку, Терминал Windows или PowerShell выполните следующую команду:
ping boot.net.anydesk.com
Посмотрите, доступен ли данный ресурс. Он является основным для AnyDesk: с помощью него AnyDesk получает список релеев.
Если данный ресурс недоступен, а остальные ресурсы – работают, то проблема может быть в межсетевом экране на вашем компьютере (например брандмауэр/файерволл в антивирусе) или на промежуточном сетевом оборудовании.
3. Проверьте дату, время и часовой пояс
Часто пользователи AnyDesk (да и мы сами, честности ради) сталкиваются с проблемой подключения к релеям, которая возникает при некорректных настройках даты, времени и/или часового пояса на компьютере.
Дело в том, что AnyDesk по неведомой причине иногда не может установить соединение с серверами, если системное время на компьютере отличается от регионального времени даже на несколько минут. Такое расхождение может привести к длительному ожиданию подключения к серверу, которое может оказаться бесконечным.
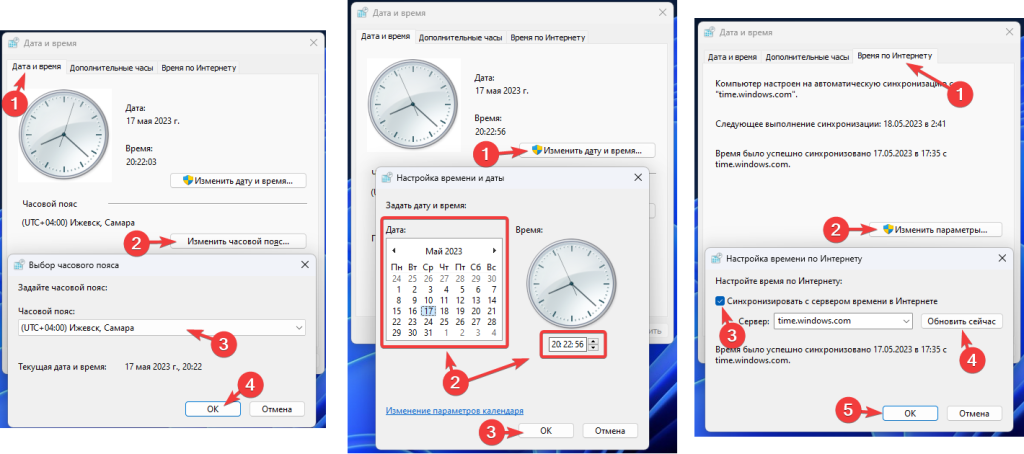
Для проверки настроек даты, времени и часового пояса, перейдите в Панель управления – Дата и время. Либо нажмите правой кнопкой мыши по Пуску – Выполнить. Введите в окне timedate.cpl и нажмите ОК.
Во вкладке «Дата и время» нажмите на кнопку «Изменить часовой пояс…», выберите верный и нажмите «ОК». Также в этом окне нажмите «Изменить дату и время…», выберите приблизительно верное время и нажмите «ОК».
Далее перейдите на вкладку «Время по Интернету», нажмите «Изменить параметры…», установите галочку на «Синхронизировать с сервером времени в Интернете» и нажмите «Обновить сейчас» 5-7 раз. Время компьютера должно синхронизироваться с сервером времени.
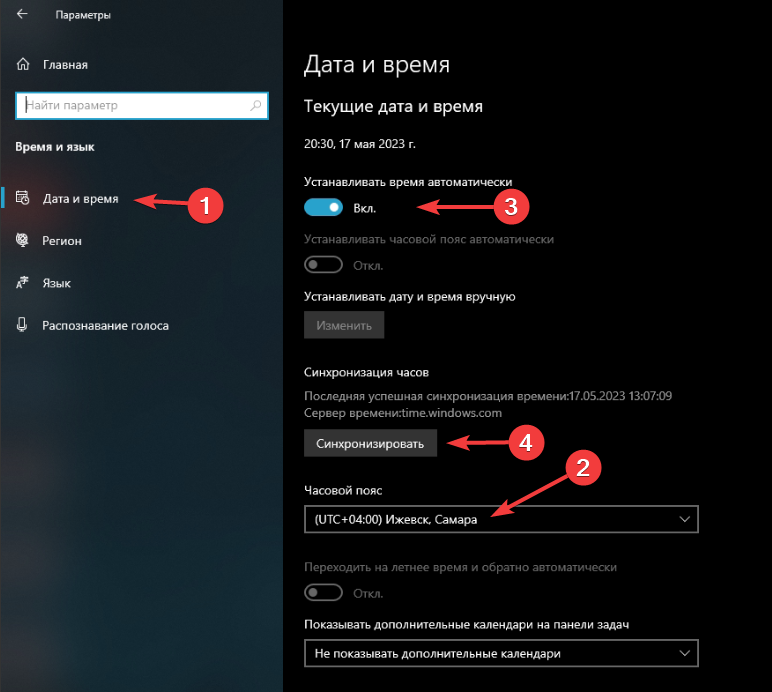
В Windows 10 и Windows 11 это также можно сделать через приложение «Параметры»:
Windows 10 (в «Параметрах» – Время и язык и далее как на снимке экрана):
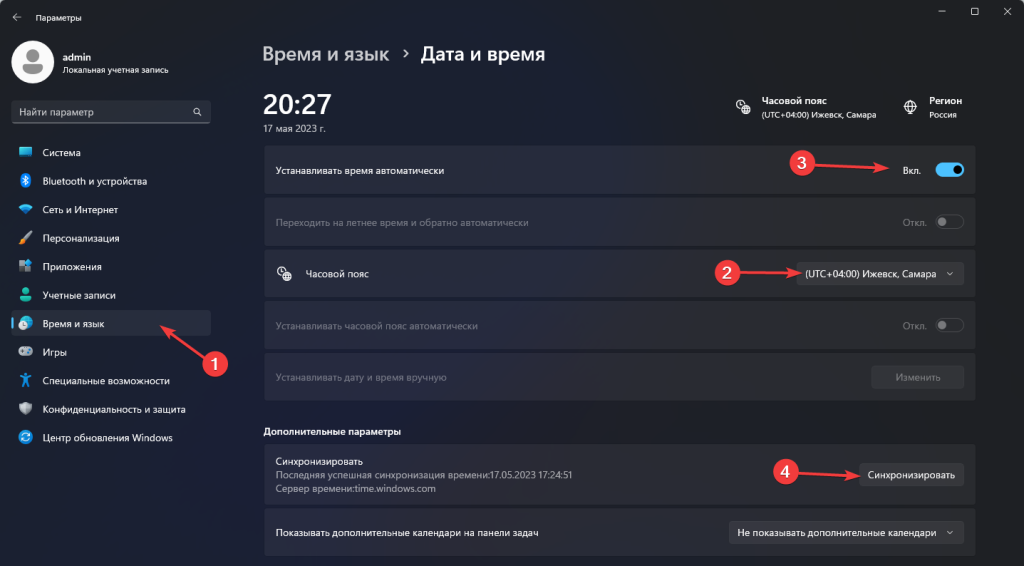
Windows 11:
После установки корректного часового пояса и времени, завершите работу программы AnyDesk (в трее около часов ПКМ по значку AnyDesk — Выход), запустите программу и подождите 1-2 минуты.
Если у вас изначально стояли правильные дата, время и часовой пояс – попробуйте изменить дату/время, откатив их на пару лет назад, перезапустить AnyDesk, поменять дату/время обратно на корректное и вновь перезапустить AnyDesk.
Если данное действие не помогло, переходите к следующему шагу.
4. Удаление конфигурационных файлов
Этот вариант, на нашей практике, помогает с решением проблемы подключения AnyDesk к своей сети в 90% случаев.
К слову, с помощью этого варианта можно избавиться от проблемы уведомления о слишком частых подключениях, когда AnyDesk думает, что вы используете его в коммерческих целях (но мы вам этого не говорили /ᐠ。ꞈ。ᐟ\).
Для очистки конфигурационных файлов AnyDesk следует завершить работу AnyDesk (в трее около часов ПКМ — Выход; убедитесь, что AnyDesk не остался висеть в фоне через Диспетчер задач) и удалить две папки:
- Папка AnyDesk в AppData\Roaming
- Папка AnyDesk в C:\ProgramData (папка ProgramData по умолчанию скрыта)
Также вы можете использовать следующие команды в Командной строке, Терминале Windows или в PowerShell (необходимо запустить от имени администратора):
taskkill /f /im "AnyDesk.exe"
rd /S /Q "C:\ProgramData\AnyDesk"
rd /S /Q "%appdata%\AnyDesk"
Первая команда принудительно завершит процесс AnyDesk, а вторая и третья – удалят папки конфигурационных файлов AnyDesk.
После удаления конфигурационных данных, вновь запустите AnyDesk. В течение 1-2 минут клиент должен будет подключиться к сети и получить новый ID.
Обратите внимание: при удалении конфигурационных файлов AnyDesk, удалятся также и следующие настройки и данные:
- Идентификатор клиента, то есть те самые цифры, по которым вы могли подключаться к компьютеру, на котором удалили конфигурационные файлы. При подключении к сети, клиент AnyDesk автоматически получит новый идентификатор
- Пароли, установленные для профилей доступа к этому компьютеру. Если вы используете пароль, например, для неконтролируемого доступа к этому компьютеру, он пропадёт, и подключиться к компьютеру станет возможно только тогда, когда кто-нибудь за этим компьютером примет запрос на подключение.
- Сохранённые пароли для доступа к другим компьютерам. В случае, если вы периодически подключаетесь к другим компьютерам через AnyDesk, и сохранили пароль для подключения к этим компьютерам, эти пароли удалятся из памяти вашего компьютера. Пароли придётся ввести заново
- Список последних подключений. Если вы уже подключались к каким-либо компьютерам, они отображаются в «Недавних» в программе AnyDesk. После удаления этих конфигурационных файлов, все компьютеры из списка «Недавних» пропадут.
Словом: вы получите чистый, будто только что установленный клиент AnyDesk.
Если вы хотите сохранить эти данные, перед удалением конфигурационных файлов скопируйте два файла в любую другую папку:
- %appdata%\AnyDesk\user.conf
- C:\ProgramData\AnyDesk\service.conf
Также по желанию можете скопировать папку %appdata%\AnyDesk\thumbnails – в ней хранятся миниатюры рабочих столов компьютеров, к которым вы подключались.
Далее выйдите из AnyDesk, удалите перечисленные выше папки с конфигурационными файлами, запустите AnyDesk, вновь его закройте (убедитесь, что процесс завершён), верните на место оба скопированных файла и вновь запустите AnyDesk.
После совершения этих действий, с 90% вероятностью, AnyDesk в течение 1-2 минут после запуска сможет подключиться к своей сети.
5. Переустановка
Данный вариант должен помочь, если не помогла даже очистка конфигурационных файлов. На нашей практике не случалось ни разу, чтобы этот вариант не помог.
Для выполнения переустановки вы можете скачать:
- Последнюю версию с официального сайта AnyDesk: Скачать
- Версию 7.0.14.0 с нашего сайта: Скачать
Версия 7.0.14.0 хоть и считается уже относительно устаревшей, но на момент написания статьи эта версия живёт и здравствует, корректно работая и выдавая сообщения а-ля: «Нам показалось, что вы используете AnyDesk в коммерческих целях» значительно реже своего новейшего брата-близнеца, а также не показывает сообщение, мол: «Вы используете бесплатную версию» в углу экрана при подключении к другому компьютеру.
Мы рекомендуем выполнять переустановку AnyDesk через командную строку, используя следующую команду:
%userprofile%\Downloads\AnyDesk.exe --install "%programfiles%\AnyDesk" --start-with-win --create-shortcuts --create-desktop-icon --remove-first --update-disabled
Данная команда сработает, если загруженный файл AnyDesk находится в папке «Загрузки» текущего пользователя. Если вы скачали AnyDesk в другое место – замените часть %userprofile%\Downloads\AnyDesk.exe на путь к скачанному файлу.
Данная команда за счёт аргумента —remove-first предварительно удалит существующую версию AnyDesk и все её файлы, после чего установит AnyDesk заново.
Отметим: данный аргумент не всегда удаляет все конфигурационные файлы AnyDesk (плавает от версии к версии, от системы к системе), поэтому рекомендуем предварительно, перед установкой, выполнить пункт 4 (очистку конфигурационных файлов).
После установки и запуска AnyDesk, подождите 1-2 минуты. В течение этого времени клиент должен будет подключиться к сети и получить ID.
Альтернативный вариант
Если вам не хочется мучаться с выполнением всех перечисленных действий, вы можете скачать файл recover_anydesk.zip, разархивировать bat-файл в любое удобное место и запустить его от имени администратора.
Данный файл проведёт небольшую диагностику сети, если потребуется – спросит и сохранит пользовательские данные из конфигурационных файлов, скачает и переустановит AnyDesk.
Description:
This message is shown if the AnyDesk client is unable to connect to the AnyDesk servers. There are three main causes for this message:
- Communication request from the AnyDesk client never reached the AnyDesk servers.
- Communication request from the AnyDesk client was rejected by the AnyDesk servers.
- Communication response from the AnyDesk server never reached the AnyDesk client.
Potential Solutions:
- For Cloud versions of AnyDesk, please make sure that:
- The device has an active internet connection.
- The device and network DNS resolvers can resolve AnyDesk URLs
- All device and network-level security solutions have been configured to allow communication to and from our servers. For more information, please see Firewall.
- Synchronize the operating system time with an online time server. In many cases, this resolves certificate validation issues.
- For On-Premises versions of AnyDesk, please ensure that:
- The device is able to connect to your On-Premises server.
- Synchronize the operating system time with an online time server. In many cases, this resolves certificate validation issues.
Download Windows Speedup Tool to fix errors and make PC run faster
If AnyDesk is not working and keeps getting disconnected on your Windows 11/10 PC, then this post is sure to help you. Anydesk is a remote desktop application that offers platform-independent remote access to personal computers and other devices. It also provides remote control, file transfer, and VPN functionality.

Why is AnyDesk not working in Windows 11?
Usually, an unstable internet connection or misconfigured firewall settings can make AnyDesk stop working. At times you may notice that AnyDesk keeps disconnecting from the AnyDesk network. Some other reasons could be:
- Hardware Incompatibility
- Corrupted Installation
- Anydesk Service not running
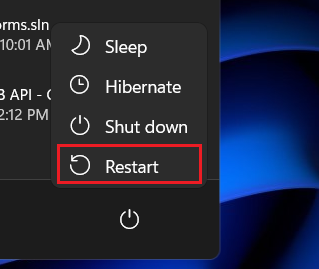
If AnyDesk is not working or if you see a message Disconnected from AnyDesk network, restart your device and network router and see. However, if that doesn’t work, here are some more fixes to help you:
- Check AnyDesk Server Status
- Run AnyDesk as an Admin
- Allow AnyDesk through Firewall
- Disable IPv6
- Update AnyDesk to its latest version
- Run AnyDesk in Clean Boot State
- Run Network Commands
- Reinstall AnyDesk
Disconnected from AnyDesk network
Apart from an unstable internet connection, if the AnyDesk server is down or keeps going down, you may notice that AnyDesk is not connecting or keeps getting disconnected. Some users reported that disabling IPv6 can help fix the issue. Anyway, now let us see these in detail.
1] Check AnyDesk Server Status
Before getting started with different troubleshooting methods, check if Anydesk servers are up and running. You can do so by visiting the Anydesk Website. If they are down, you can do nothing instead of waiting till Anydesk fixes the issue.
2] Run AnyDesk as an Admin
AnyDesk may not work on your Windows device due to a lack of permissions. Right-click on AnyDesk icon and select Run as administrator. See if that helps.
3] Allow AnyDesk through Firewall
Windows Firewall settings can sometimes disable applications from running properly on your device. Allowing AnyDesk through the Windows firewall can help fix the error. Here’s how:
- Press the Windows key + I to open Settings.
- Navigate to Privacy & Security > Windows Security > Firewall & network protection.
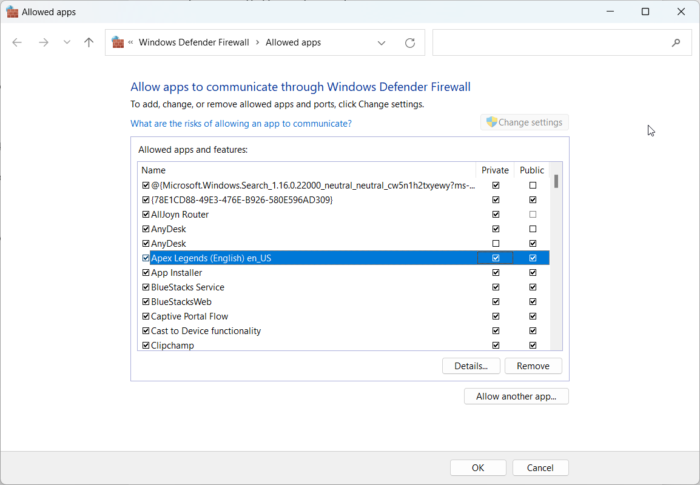
- In the Firewall tab, click on Allow an app through firewall.
- On the next page, click on Change settings and select Allow another app.
- On the Allowed apps window, locate AnyDesk and check both the Private and Public boxes.
4] Disable IPv6
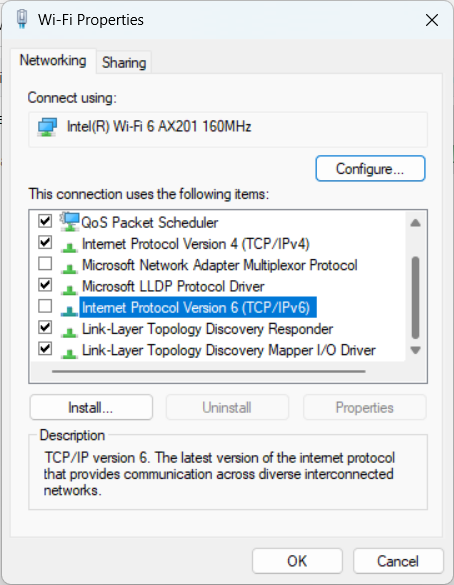
IPv6, or Internet Protocol Version 6, is a communication protocol that offers an identification and location system for computers on networks. Some users have reported that disabling IPv6 can help fix the issue. Here’s how:
- Click on Start, search for Control Panel and open it.
- Select Network and Internet > Network and Sharing Center > Change adapter settings.
- Right-click on the network you’re connected to and select Properties.
- Uncheck Internet Protocol Version 6 (TCP/IPv6) option and click on OK to save the changes.
- Close the Control Panel and try launching Anydesk again.
5] Update AnyDesk to its latest version
Bugs and errors could occur if you haven’t updated Anydesk in a while. Old versions of applications can have bugs that can impair their functionality and cause them to malfunction. Update Anydesk to its latest version and check if the error gets fixed.
6] Run AnyDesk in Clean Boot State
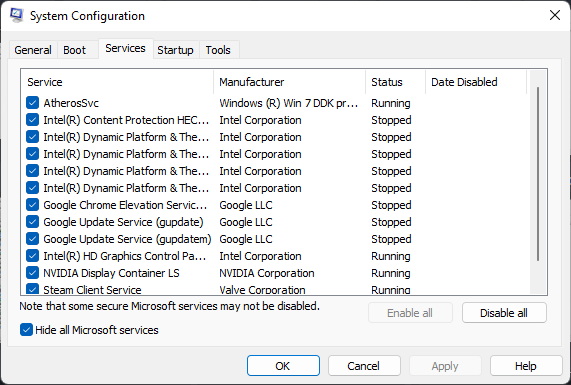
Third-party applications can sometimes cause apps to malfunction. To fix this, perform a Clean Boot to ensure your operating system loads with minimal system files and device drivers.
If the error doesn’t appear in the Clean Boot State, you may need to manually enable one process after another and see who the culprit is. Once you’ve identified it, disable or uninstall the software.
7] Run Network Commands
Running the network commands will reset the TCP/IP stack, renew the IP address, Reset Winsock and flush the DNS client resolver cache. Here’s how you can do it:
- Press the Windows key, search for Command Prompt, and select Run as Administrator.
- Type the following commands one by one and hit Enter.
netsh winsock reset
netsh int IP reset
ipconfig /release
ipconfig /renew
ipconfig /flushdns
- Restart your device once done.
8] Reinstall the App
If none of these steps can help you, consider reinstalling the game. This has been known to help most gamers get over this error.
All the best.
Shubham is a graduate in Information Technology who likes to write about Windows Troubleshooting as well as Gaming Tips. He’s always engaged with new tech and gadgets. When not writing, he enjoys reading books, watching movies, and exploring new technologies.
Anydesk is a great way to remotely control your devices. You can connect from anywhere, use any connection and gain remote access from the most popular platforms. Anydesk supports Windows, macOS, Android, iOS, Linux, FreeBSD, Raspberry Pi, and Chrome OS. This makes it possible for you to gain remote access to your systems from any device.
However, many Windows 11 users worldwide have been claiming that Anydesk is not working for them. If that happens to be the case for you, then here’s how you can fix Anydesk on your Windows 11 system.
Most Anydesk issues stem from a slow internet connection, incorrectly configured firewall rules, or unexpected network changes. Here’s how you can troubleshoot and fix these issues to get Anydesk working again on your Windows 11 PC.
1. Check Your Firewall Settings
We first recommend you start by checking your firewall settings and make sure that Anydesk is allowed proper access. If you denied connections through your firewall when Anydesk was launched for the first time, then it is likely the cause of your issues. Follow the steps below to enable and allow Anydesk through your Windows 11 firewall.
1. Open the Windows Security app using the Start menu search on your PC.

2. Now click Firewall & network protection in the left sidebar.

3. Click Allow an app through firewall to check your firewall settings.

4. Click Change settings at the top to manage your firewall rules.

5. Find anydesk.exe in the list and ensure the checkbox beside it is checked. If not, click and check the box to allow anydesk.exe through your firewall.

6. Check the boxes under Private and Public as well for anydesk.exe.

7. Close the current window and open the Run app using Windows + R keyboard shortcut.
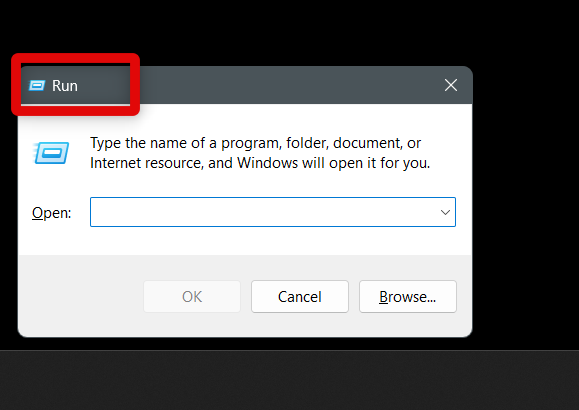
8. Type in the following command below to access advanced firewall settings.
control firewall.cpl
9. Now click Advanced settings in the left sidebar.

10. Click Inbound Rules on your left.

11. Find rules for Anydesk in the list on your right and ensure they all have the green checkmark beside them. If you find a rule with the red icon, double-click on it.

12. Click and select Allow the connection.

13. Click OK.

14. Repeat the steps above for any more Anydesk inbound rules created on your PC.
15. Similarly, click Outbound Rules on your left.

16. As we did before, allow any Anydesk rules as we did in the steps above you find to be blocked in this section.
17. Restart your PC to apply the changes.
If misconfigured firewall rules were causing issues with Anydesk on your Windows 11 Pc, then the issue should now have been fixed.
2. Check Your Internet
We now recommend you check and ensure your Internet is working as intended. Start by ensuring you can access popular websites. If you’re able to access the websites, then the next step is to check your internet speed.
Slow speed or a high ping can cause inconsistencies with your connection which can cause issues with Anydesk. Use a speed test tool to check your internet connection speed.
If you notice an unstable connection or a high ping in the test above, then it is likely the reason for issues with Anydesk. In such cases, you can try restarting your router or get in touch with your network provider to troubleshoot your network.
If, however, everything seems to be working without any issues with your network, then you can continue with the fixes below to fix Anydesk on your Windows 11 PC.
3. Try A Different Wi-Fi Network
You could now be facing issues specific to your current network. Your ISP could be blocking ports or addresses used by Anydesk to establish connections. You can test the same by trying a different Wi-Fi network. If you can use Anydesk on a different network, then your ISP was likely blocking ports or addresses used by Anydesk.
If you don’t have access to a different Wi-Fi network, you can try using public Wi-Fi or your mobile device’s hotspot. Both such connections should help you troubleshoot and identify if your ISP is to blame for issues with Anydesk.
4. Flush Your DNS
The next fix you should try is flushing your DNS. This can help clear your DNS cache, which can fix issues with Anydesk. Follow the steps below to flush your DNS on your Windows 11 PC.
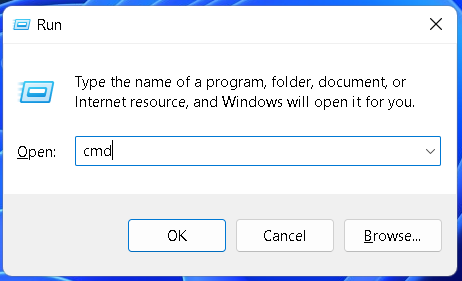
1. Open Run using the Windows + R keyboard shortcut.
2. Now type cmd command below and press Ctrl + Shift + Enter on your keyboard.
3. Use the command below to flush your DNS cache.
ipconfig /flushdns
4. Now use the command below to close the command prompt.
exit
5. Restart your PC to apply the changes.
Once your PC reboots, you can try using Anydesk again. If you were facing issues due to your DNS cache, then Anydesk should now be working on your PC.
5. Run an SFC and DISM Scan
While Anydesk mostly relies on your network connection, issues with your Windows system files and image can also cause errors and prevent Anydesk from working as intended. In such cases, an SFC scan and DISM scan can help you fix most errors. Follow the steps below to run an SFC and DISM scan on your PC.
1. Open the Run app on your PC. You can use the Windows + R keyboard shortcut or search for it using your Start menu.
2. Now type cmd and press Ctrl + Shift + Enter.
3. Now use the command below to run an SFC scan.
sfc /scannow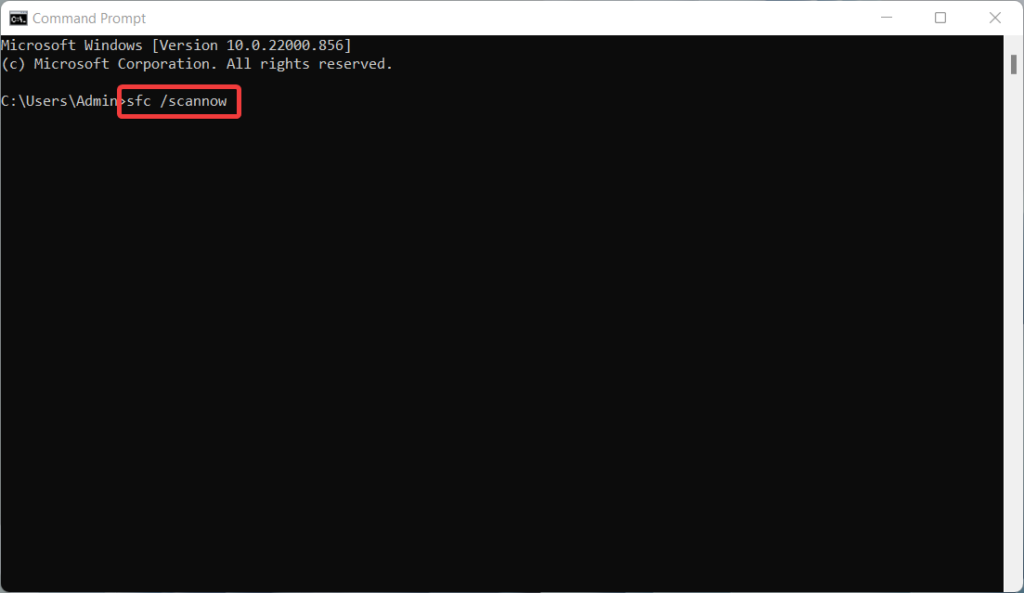
4. Once done, use the command below to run a DISM scan.
DISM /Online /Cleanup-Image /restorehealth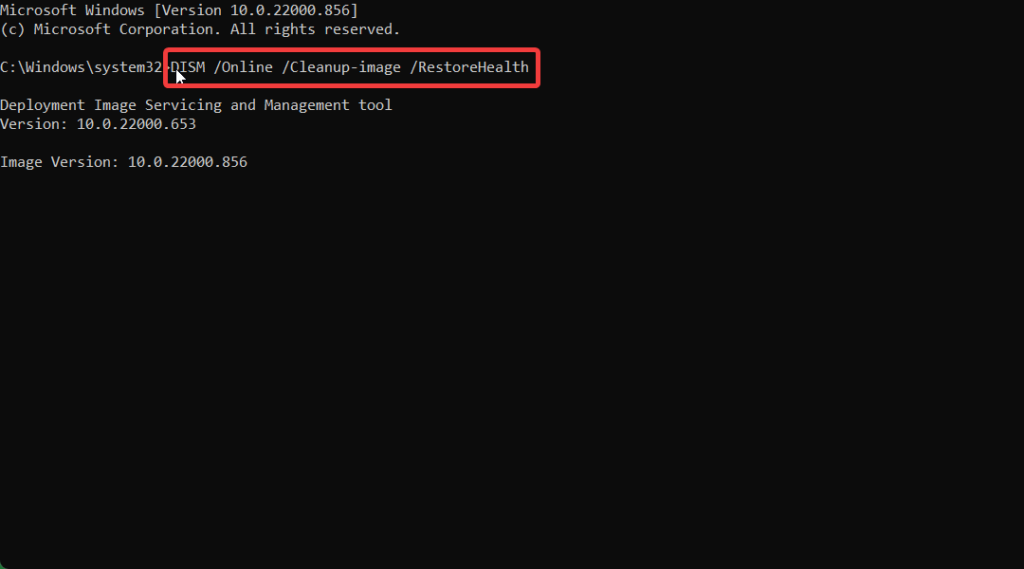
5. Use the command below to close the command prompt once the process completes.
exit
6. Restart your PC once done.
If corrupted or missing system files on your PC were causing issues with Anydesk, then the issue should now have been fixed for you.
6. Re-install Anydesk
We now recommend you re-install Anydesk. You could be facing issues with your current installation due to file errors or a corrupted cache. Re-installing the app should help fix these issues easily. Use the steps below to re-install Anydesk on your Windows 11 Pc.
1. Open the Settings app from your Start menu.
![]()
2. Now click Apps in the left sidebar.

3. Click Installed apps on your right.

4. Click the More options icon beside Anydesk in the app list on your right.

5. Select Uninstall.

6. Click Uninstall again.

7. Anydesk uninstaller will now launch on your PC. Check the box for Remove configuration files.

8. Click Uninstall.

9. Anydesk will now be uninstalled from your PC. Restart your PC at this point to clear any leftover files.
10. Now go to this link to download the Anydesk installer for your PC.
11. Once the installer is downloaded, double-click and launch the same. Once launched, close the trial to install the app.

13. Click Yes.

14. Configure your installation using the options on your screen.

15. Click Accept & Install.

Anydesk will now be re-installed on your Windows 11 PC. You can now try remotely accessing your PC from a device. If a corrupted installation was to blame, then, Anydesk should now be working on your PC.
7. If You Have Attempted Too Many Connections
It could also be that your issue is fixed by this point, but as you have tried connecting to your PC using Anydesk too many times by now, your connection is being automatically blocked. This is the default behavior for Anydesk and is a security feature intended to prevent malicious access to devices.
You will have to wait a while in such cases as there is no way to bypass this restriction. Anydesk does not specify how long you have to wait, but according to user reports, you can connect to Anydesk again after a few hours.
8. Use a Public DNS Provider
Changing your DNS to a public provider can also help fix connection issues, especially if ports and addresses used by Anydesk are being blocked by your ISP. I recommend you try switching to Cloudflare DNS for now, but you can choose to use another provider as well on your PC if needed. Follow the steps below to use Cloudflare DNS on your PC.
1. Open the Settings app on your PC from the Start menu.
![]()
2. Now click Network & internet on your left.

3. If you’re connected to a Wi-Fi network, click Wi-Fi. Click Ethernet if you’re using an ethernet connection.

4. Click Hardware properties.

5. Now click Edit beside the DNS server assignment.

6. Click the drop-down menu and select Manual.

7. Turn on the toggle for IPv4 at the top.

8. Paste the value below under Preferred DNS.
1.1.1.1
9. Click the drop-down menu for DNS over HTTPS and select On (automatic template).

10. Paste the following value under the Alternate address.
1.0.0.1
11. Click the drop-down menu for DNS over HTTPS again and select On (automatic template).

12. Turn on the toggle for IPv6.

13. Use the following addresses below as your preferred and alternate DNS as we did above.
2606:4700:4700::11112606:4700:4700::1001
14. Select On (automatic template) for each drop-down menu for DNS over HTTPS.

15. Click Save.
Your DNS provider will now have been changed. We recommend you wait a few minutes and then try using Anydesk again. If ports and addresses were being blocked on your network previously, then Anydesk should now be working on your Windows 11 PC.
9. Contact Anydesk Support
If you’re still facing problems with Anydesk, then you could be facing issues that might be specific to your setup. Anydesk could be broken due to missing drivers, unsupported networks, hardware components in your current setup, and much more.
A support executive will help you diagnose and troubleshoot your setup better and potentially fix Anydesk not working on your PC. Use the link below to get in touch with the Anydesk support team.
Final Words
Anydesk can be a great help when you’re away from your PC. You can manage your file system, run apps, perform important tasks, and keep up with the latest updates on your PC. Anydesk not working can prevent you from performing important tasks that might be time sensitive and highly important to you. We hope the post above helped you easily fix Anydesk and get everything working on your PC.