![]()
![]()
![]()
![]()
![]()
![]()
![]()
![]()
1.6 M скачиваний
![]()
Среда для программирования под Android
Приложения, рекомендуемые для вас
![]()
Браузер, ориентированный на игроков
![]()
Заботьтесь о своем компьютере и повышайте его производительность
![]()
Новая среда программирования для Android
![]()
Надежный, универсальный и настраиваемый браузер
![]()
Самый простой эмулятор Android для Windows
![]()
Автоматизация нажатий мышкой на компьютере
![]()
Используйте WhatsApp на своем компьютере
![]()
Эмулируйте любые Android-приложения на своем ПК
Больше информации
| Лицензия | Бесплатно | |
| ОС | Windows | |
| Раздел | Общие | |
| Язык | Pусский | |
| Автор | Google, Inc | |
| Размер | 5.71 MB | |
| Загрузки | 1,644,985 | |
| Дата | 21 авг 2023 | |
| Тип файла | ZIP | |
| SHA256 | 520a453af1d0baf1939a80038a816cb8de40d000542b1a71bf60ba6fc80784d9 | |
| Почему это приложение опубликовано на Uptodown? |
(Больше информации) |
Похожие на Android SDK
![]()
Объектно-ориентированный динамический язык программирования
![]()
Полнофункциональный текстовый редактор для программистов от GitHub
![]()
Многоплатформенный редактор кода для Microsoft
![]()
Динамическая среда для веб-разработки
![]()
Новая среда программирования для Android
![]()
Среда IDE, адаптированная для программирования на динамических языках
![]()
Самая популярная среда разработки
![]()
icsharpcode.net
![]()
Создавайте собственные игры для любых платформ
![]()
Комплексный движок с открытым исходным кодом для разработки игр
![]()
Многоплатформенный редактор кода для Microsoft
![]()
Caphyon
![]()
Универсальный инструмент для создания видеоигр
![]()
Создавайте видеоигры в HTML5 даже без знаний программирования
![]()
Postman, Inc.
![]()
DbVis Software AB
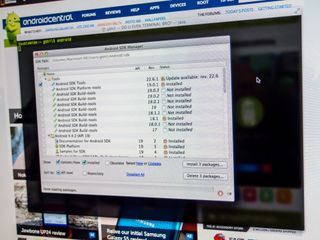
(Image credit: Android Central)
Most of us will never need to install the Android SDK. The reason why is right in the name — Software Development Kit. It’s built for people writing Android apps who need tools to work with Android from a computer.
But those tools can also be handy for folks wanting to do some more advanced stuff. Stuff like manually updating software or rooting their phone. Fastboot and ADB are vital if you’re into «hacking» at the Android software. And Google provides it free for everyone.
What to choose?
There are two ways to get a working set of Android tools on your computer. The easy way is just to install Android Studio. Everything needed to run and use the Android command line tools is part of Android Studio, as well as a way to keep the tools updated. While it’s designed for folks who want a complete development environment and includes a code editor, Android emulator, and compiler, you can use just the command line tools and never open the rest.
If you’re not afraid to get your feet wet, you can install just the SDK components outside of Android Studio. Installing them is easy (they’re inside a zip file), but setting up your computer to use them isn’t a straightforward process.
Manually installing the Android SDK
Download the SDK direct from Google by clicking here. Scroll down a bit and find the section marked «Get just the command line tools» and save it somewhere easy to get to, like your desktop. We’ll be extracting it to a better location in the next step.
The file you downloaded is compressed. You’ll need to be familiar with compressed files — and how to extract them — to go any further. If you’re not, stop here and spend the time to learn about them.
Extract your compressed file into the following location:
- Windows: The root of your C: drive
- OS X: Your home folder
- Linux: Your home folder
Rename the extracted folder to «Android». This will make the rest of this guide, and your time with the SDK, much easier.
Prerequisites

You’ll need a working version of Java to run the SDK components. For most things, you’ll be doing with the SDK, both Open Java and Sun Java from Oracle (yes, that Oracle) will work.
- On a Mac, it’s pretty easy because you’ll already have it installed unless you uninstalled it. If you did, install it again — you should know how to do that if you knew how to uninstall it.
- On Windows, head to the Oracle website and download the correct version (32- or 64-bit) for your computer. Again, if this gives you any trouble, stop what you’re doing and learn a bit more about your computer. If you can’t install Java, maybe you’re not yet ready to use the Android SDK.
- On a Linux computer, you’ll also need to install Java. You can find x86 and x64 binaries for Sun Java from Oracle at their website. OpenJDK also works for most things you’ll need to do with the SDK. (OpenJDK is now bundled with Android Studio which includes the SDK as well as a development environment) and you’ll find complete instructions to get it installed at the OpenJDK website. If you need more assistance or want to use a package manager to install Sun Java, you’ll need to refer to the documentation for your particular distro.
Linux users will also have to make sure they have some 32-bit libraries installed if they are running a 64-bit version of the operating system. If you’re using Ubuntu or another Debian variant, install ncurses5 and stdc++6 through your terminal:
sudo apt-get install lib32ncurses5 lib32stdc++6If you’re using a different flavor of Linux, find the correct packages for ncurses5 and stdc++6 and install them.
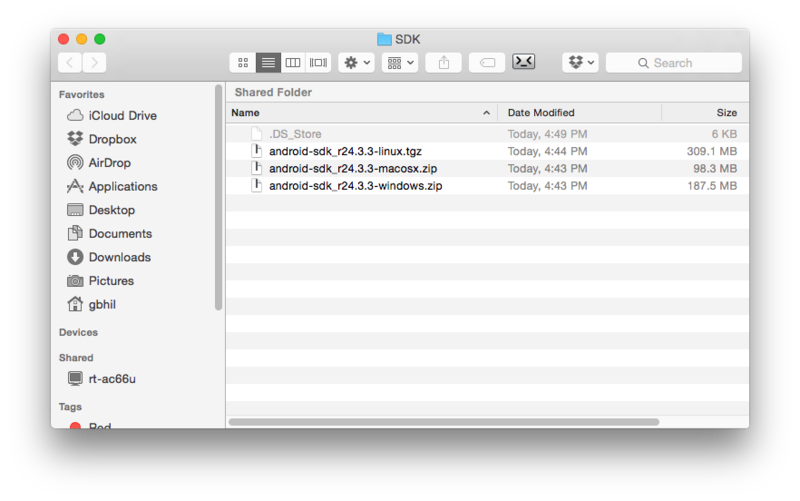
Extract the file you downloaded above into a folder named Android on the root of your C drive (Windows) or into your Home folder (Mac, Linux). You might notice a few things are missing if you’ve ever downloaded the command line tools before as the tools and platform-tools folders are missing. That’s OK; we’re about to get them using the included SDK manager.
Open the bin folder in the extracted download and find the SDK manager executable file. It may look like a terminal or shell command, but it will open a GUI as long as you have Java installed correctly.
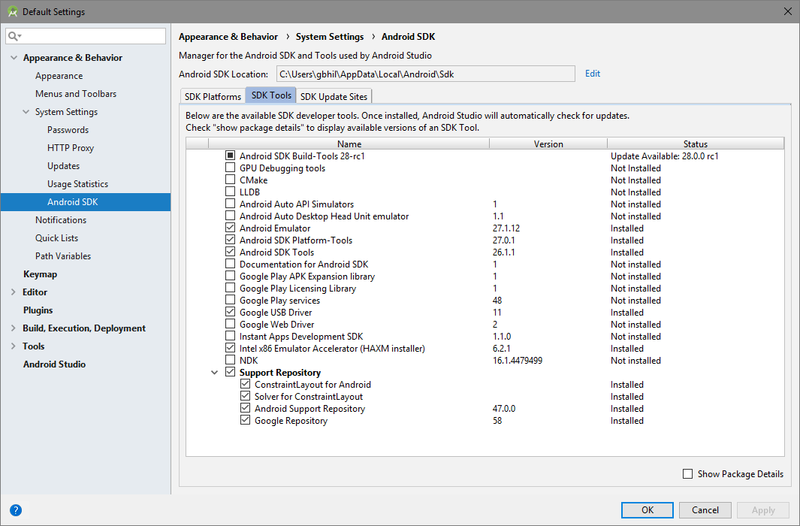
In the SDK manager, you’ll choose to install Android SDK Tools and Android SDK Platform-Tools. If you’re using Windows, you’ll also want to install the Google USB Driver, and if you plan on building AOSP from the source, you may want to install the Android SDK Build-Tools.
Choose the correct files and proceed through the process (it will show you a license agreement you should read), and both tools folders will be installed. But you’re not quite finished!
The tools will be installed into the application data folder. On Windows, it’s in Windows\users\YourUserName\AppData\Local\Android, and on a Mac or Linux, it’s in .Android (notice the dot!) in your home folder. Create a symbolic link (information for Windows users here) for both tools folders in the Android folder you created earlier. This will help get them into your PATH and make life a lot easier.
Setting your PATH
The PATH variable in your computer’s operating system tells it where to look when you want to run a command from a terminal or the command line. For example, to run the ADB command, you either need to type and provide the complete path — ie, the folder ADB is actually in, inside the SDK folder — or have the location set in the PATH variable itself. It’s a bit confusing, but the good news is that doing it is easier than explaining it.
For these directions to work as written, you will have to have extracted and renamed the SDK download folder as mentioned above, and to the correct location for this tutorial.
On Windows
Unless you’re still using an older version of Windows, you no longer can set the PATH in the autoexec.bat file or autoexec.nt file. You’ll need to update the system Environment Variable settings instead. Here’s how it’s done on a Windows 10 machine:
- Hit the Start key on your Keyboard.
- Start typing the words Environment Variables.
- As you type, you’ll see the choice to Edit the system environment variables. Choose it.
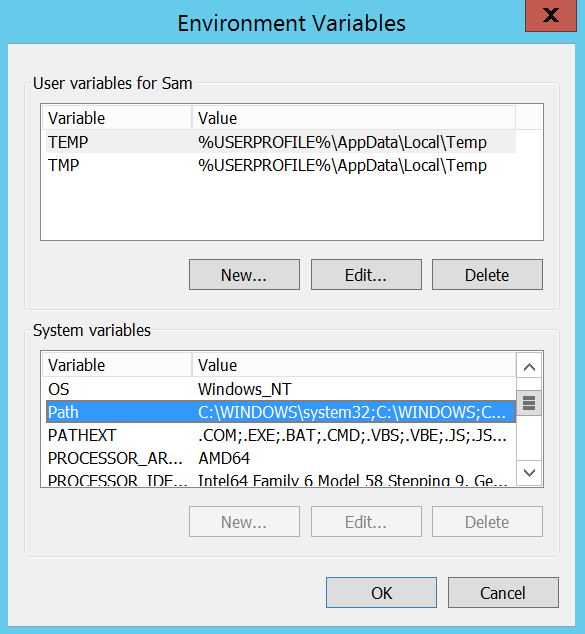
- In the Environment Variables window, select the PATH line item in the User variables for (your user name) section, then click the Edit button.
Add the full path to the Android SDK tools and Android SDK platform-tools folders in the edit box, separated by a semi-colon. It should look something like this:
C:\Android\tools;C:\Android\platform-toolsFor older versions of Windows, refer to the documentation that came with your computer for assistance on setting the PATH. And, again: If you’ve installed your SDK somewhere other than \Android, you’ll need to adjust accordingly.
On a Mac

You can set your PATH variable on a machine running OS X in your bash profile. Doing so is easy, and is all done in one file.
In your Home folder is a file named .bash_profile. Open it with any text editor. Never touch the .bashrc or .bash_profile files you might find in the /etc. directory!
You may see a blank file, or it may be full of other information. All we need to do is add a couple of lines to the top of the file:
export PATH="$HOME/Android/tools:$PATH"export PATH="$HOME/Android/platform-tools:$PATH"(Did we mention that if your SDK is in another location, you’ll need to adjust things accordingly? Good.)
Save the file and reboot your computer so that the new PATH is sourced properly.
On Linux
Setting the PATH on a Linux computer is almost the same as on a Mac, you just edit a different file.
Using your favorite text editor, open the ~/.bashrc file. It will probably exist and have multiple entries. If you get an error that the file does not exist, simply create a new file and save it as ~/.bashrc when finished.
You’ll want to add the following two lines to the END of the .bashrc file:
export PATH="$HOME/Android/tools:$PATH"export PATH="$HOME/Android/platform-tools:$PATH"Save the file and close the terminal window. Open a new instance of the terminal and type this command:
source ~/.bashrcYour session will reference the changes you made, and the SDK will be in your PATH.
Wrapping it up

You should now have a working set of Android command-line tools and be able to do things like flash the latest factory images or manually update your phone with a zip file. And because you did it yourself, you have what you need to fix it when things go wrong.
Good luck, and have fun!
Have you listened to this week’s Android Central Podcast?

Every week, the Android Central Podcast brings you the latest tech news, analysis and hot takes, with familiar co-hosts and special guests.
- Subscribe in Pocket Casts: Audio
- Subscribe in Spotify: Audio
- Subscribe in iTunes: Audio
Instant access to breaking news, the hottest reviews, great deals and helpful tips.
Jerry is an amateur woodworker and struggling shade tree mechanic. There’s nothing he can’t take apart, but many things he can’t reassemble. You’ll find him writing and speaking his loud opinion on Android Central and occasionally on Twitter.
Most Popular
In this tutorial, we will discuss all the steps required to install Android Platform Tools and SDK Manager on Windows 10. This tutorial provides the steps for Windows 10, though the steps should be the same on other versions of Windows.
This post is useful for the developers using Android Platform Tools and SDK manager without installing Android Studio for the use cases including hybrid app development using Ionic. It also assumes that a valid JAVA_HOME environment variable exists pointing to the installation directory of Java.
You can follow How To Install Java 8 On Windows 10, How To Install Java 11 On Windows, How To Install Java 15 On Windows, or How To Install OpenJDK 15 On Windows to install Java on Windows. In case you are interested in developing Android applications using Android Studio, you can also follow How To Install Android Studio On Windows.
Step 1 — Download SDK Tools
Open the download tab of Android Studio and scroll down to the Command line tools only section. This section shows various options to download the SDK tools as shown in Fig 1.

Fig 1
Click the first link having the download option for Windows as highlighted in Fig 1. It will ask to accept to terms and conditions as shown in Fig 2.

Fig 2
Go through the details, agree on the terms and conditions and click the Download Button to start the download.
Step 2 — Install Command Line Tools
In this step, we will install the Android Command Line Tools on Windows 10. Create the directory android-sdk at your preferred location and extract the content of the downloaded SDK Tools zip to this directory. Make sure that the extracted content is available within the android-sdk directory created by us as shown in Fig 3.

Fig 3
Step 3 — Install Platform Tools
In this step, we will install the Android Platform Tools on Windows 10. Follow the same steps similar to Android SDK Tools to install Android Platform Tools using the download link as shown in Fig 4, Fig 5, and Fig 6.

Fig 4

Fig 5

Fig 6
Step 4 — Configure Environment Variable
Right-click the My Computer or This PC on the desktop and click the Properties Option. Now click the Advanced system settings. It will show the System Properties dialog having Advanced Tab options as shown in Fig 7.

Fig 7
Click the Environment Variables Button and click the New Button in the first section. Set the Variable Name field to ANDROID_HOME and Variable Value to the android-sdk directory created by us in the previous step.
Similarly, also configure the environment variable ANDROID_SDK_ROOT to the android-sdk directory.
Also, make sure that the JAVA_HOME environment variable is set to the JDK installation directory. It must not end with the bin as we do with the system path variable.

Fig 8
Step 5 — Configure Commands
In previous steps, we have downloaded and extracted the Command Line Tools and Platform Tools to the android-sdk directory. Both the tools provide several command-line utilities which we need to run by going to the appropriate directory having the executable files.
We can make these commands available at the system level without going to these directories by adding the path to tools, tools\bin, and platform-tools to the system path as shown in Fig 9. Make sure that these executables do not break other commands having the same name before adding these paths to the PATH environment variable.

Fig 9
Now open the Command Prompt and check the ADB and SDK Manager versions as shown in Fig 10. You might be required to restart the system to apply the environment variables set by us.
# Check adb version
adb --version# It must show the installed adb version
Android Debug Bridge version 1.0.41
Version 31.0.0-7110759
Installed as E:\tools\java\android-sdk\platform-tools\adb.exe# Check sdkmanager version
sdkmanager --version# It will show the error as shown below
Error: Could not determine SDK root.
Error: Either specify it explicitly with --sdk_root= or move this package into its expected location: <sdk>\cmdline-tools\latest\
We can see that the ADB command works well and shows the version details, but the sdkmanager shows an error — «error: could not determine sdk root. error: either specify it explicitly with —sdk_root= or move this package into its expected location: <sdk>\cmdline-tools\latest\» since it expects the Command Line Tools in a version-specific directory. Now open the source.properties file from the cmdline-tools directory to check the version. It will show the version details as shown below.
Pkg.Revision=3.0
Pkg.Path=cmdline-tools;3.0
Pkg.Desc=Android SDK Command-line Tools
Now move all the files to the directory cmdline-tools/3.0 as shown in Fig 10.

Fig 10
Also, update the system path as shown in Fig 11.

Fig 11
Now close and open the Command Prompt. Also, check the ADB and SDK Manager versions as shown in Fig 12.

Fig 12
Step 6 — Using the SDK Manager
List — We can list the installed and available packages and images using the list command as shown below.
// List all the installed and available platforms, system images and other resources
sdkmanager --list// Output should look like
Installed packages:=====================] 100% Computing updates...
  Path           | Version | Description                   | Location
  -------        | ------- | -------                       | -------
  platform-tools | 31.0.0  | Android SDK Platform-Tools 31 | platform-tools\Available Packages:
  Path                                                                                     | Version      | Description
  -------                                                                                  | -------      | -------
  add-ons;addon-google_apis-google-15                                                      | 3            | Google APIs
...
...// We can see that it shows the tools and platform-tools installed by us
Install Platform — Use the below-mentioned command to install the Android 10 (API level 30) using the SDK manager.
# Go to the SDK Tools bin directory to access sdkmanager
# Start download the most recent package
sdkmanager "platforms;android-30"
It will ask to accept the terms and conditions as shown in Fig 13. Enter y and hit Enter Key to accept the terms and conditions. This command creates the directory platforms within android-sdk and installs the package android-30 having all the required files to run the emulator for Android 10.

Fig 13
If we again check the installed packages, the list command shows the installed options as shown below.
sdkmanager --list
Installed packages:=====================] 100% Computing updates...
  Path                 | Version | Description                   | Location
  -------              | ------- | -------                       | -------
  platform-tools       | 31.0.0  | Android SDK Platform-Tools 31 | platform-tools\
  platforms;android-30 | 3       | Android SDK Platform 30       | platforms\android-30\Available Packages:
  Path                                                                                     | Version      | Description
  -------                                                                                  | -------      | -------
  add-ons;addon-google_apis-google-15                                                      | 3            | Google APIs
  add-ons;addon-google_apis-google-16                                                      | 4            | Google APIs
...
...
Update SDK Manager — Update the SDK manager using the below-mentioned command.
sdkmanager --updateAdd System Image — We can add system images from available images shown by the list command using the SDK manager as shown below. We are adding the most recent default 64-bit system image.
// Install default system image for platform android-30
sdkmanager "system-images;android-30;google_apis;x86_64"
Accept the License Agreement to complete the download.
There are several projects which need Google Play Services. We need system images specific to Google Play Services as shown below.
// Install Google Play Services system image
sdkmanager "system-images;android-30;google_apis_playstore;x86_64"
Accept the License Agreement to complete the download.
Install Emulator — We need to install the emulator before creating the AVD using SDK Manager.
// Install Emulator
sdkmanager --channel=3 emulator
Accept the License Agreement to complete the download.
Install Build Tools — Install the most recent build tool listed by the list command.
// Install Build Tools
sdkmanager "<build tools version>"// Example
sdkmanager "build-tools;30.0.3"
Step 7 — Using the Emulator and AVD Manager
Create Android Emulator — Create the emulator using the system image downloaded in the previous step as shown below. Replace <emulator name> with the actual name preferred by you.
// Create the emulator using default system image
avdmanager create avd -n <emulator name> -k "system-images;android-30;google_apis;x86_64" -g "google_apis"// Example:
avdmanager create avd -n emulator30 -k "system-images;android-30;google_apis;x86_64" -g "google_apis"// Create emulator using Google Play Services system image
avdmanager create avd -n <emulator name> -k "system-images;android-30;google_apis_playstore;x86_64"// Example:
avdmanager create avd -n emulator30ps -k "system-images;android-30;google_apis_playstore;x86_64"
The above commands ask a bunch of questions to configure the AVD if we choose the custom hardware profile option. We have excluded the details of these options from this tutorial since these configuration details depend on the actual needs. After completing all the configurations, it creates the AVD using the name provided by us while configuring it.
Similarly, we can also install the AVD of older versions as shown below.
// Create the emulator using default system image
avdmanager create avd -n <emulator name> -k "system-images;android-29;default;x86_64" -g "default"// Example:
avdmanager create avd -n emulator29 -k "system-images;android-29;default;x86_64" -g "default"// Create emulator using Google Play Services system image
avdmanager create avd -n <emulator name> -k "system-images;android-29;google_apis_playstore;x86_64"// Example:
avdmanager create avd -n emulator29ps -k "system-images;android-29;google_apis_playstore;x86_64"
List Android Emulators — Now go to the tools directory on the command line and check the installed platform as shown below.
Notes: Add Emulator to the system path as shown in Fig 14.

Fig 14
Close and re-open the Command Prompt to check the AVDs created by us in the previous steps.
// List the available emulators
emulator -list-avds// Output
default28
emulator30
emulator30ps
It will list all the AVDs installed by us.
Run Emulator — We can run the emulator created by us as shown below.
// Run Emulator
emulator -avd <emulator name>// Example
emulator -avd emulator30
The emulator will take some time to completely launch the AVD. The final results should look similar to Fig 15.

Fig 15
Delete Emulator — We can also delete an existing emulator as shown below.
// Delete Emulator
avdmanager delete avd -n <emulator name>
Summary
This tutorial provided all the steps required to install Android Platform Tools and Android SDK Manager on Windows 10. It also provided the steps required to create and launch the AVDs using the Emulator.
Выберите вариант загрузки:
- скачать с сервера SoftPortal (установочный exe-файл)
Android SDK — универсальная оболочка для моделирования и разработки различных программных продуктов под операционную систему Android (полное описание…)

Рекомендуем популярное
![]() DS4Windows 3.2.9
DS4Windows 3.2.9
Эмулятор контроллера Xbox 360 для использования геймпада Sony DualShock 4 во многих компьютерных…
![]() Remix OS 3.0.207
Remix OS 3.0.207
Remix OS — отличная возможность получить полноценную ОС Android на своем настольном ПК или…
 BotMek 1.6.3
Универсальный автокликер, предназначенный облегчить игровой процесс в онлайн играх….
Well the folks who are trying to download either on *ix or Ec2 machine would suggest to clean approach in below steps:
$ mkdir android-sdk
$ cd android-sdk
$ mkdir cmdline-tools
$ cd cmdline-tools
$ wget https://dl.google.com/android/repository/commandlinetools-linux-*.zip
$ unzip commandlinetools-linux-*.zip
The king — sdkmanager lives inside
cmdline-tools/tools/bin
, you’d better set in PATH environment variable.
but cmdline-tools should not be set as ANDROID_HOME. Because later, when updating Android SDK, or installing more packages, the other packages will be placed under ANDROID_HOME, but not under cmdline-tools.
The final, complete ANDROID_HOME directory structure should look like below, consist of quite a few sub-directories:
build-tools, cmdline-tools, emulator, licenses, patcher, platform-tools, platforms, tools.
You can easily point out that build-tools and cmdline-tools are siblings, all resides inside the parent ANDROID_HOME.
Add SDK tools directory in PATH environment variable to make executable available globally. Add below line either in ~/.bashrc or ~/.profile file to make it permanent.
In order to edit the ~/.bashrc simply can be editable in vim mode
$ vim .bashrc
Now set your preferred ANDROID_HOME in .bashrc file :
export ANDROID_HOME=/home/<user>/android-sdk
export PATH=${PATH}:$ANDROID_HOME/cmdline-tools/tools/bin:$ANDROID_HOME/platform-tools
here strange thing that we haven’t download the platform-tools directory as of now but mentoning it under path but let it be as it will help you avoid remodification on the same file later.
Now go inside the same directory:
$ cd android-sdk
NOTE: well in first attempt sdkmanager command didnt found for me so I close the terminal and again created the connection or you can also refresh the same if it works for you.
after that use the sdkmanager to list and install the packages needed:
$ sdkmanager "platform-tools" "platforms;android-27" "build-tools;27.0.3"
Hence Sdkmanager path is already set it will be accessible from anywhere:
$ sdkmanager --update


$ sdkmanager --list
Installed packages:=====================] 100% Computing updates...
  Path                 | Version | Description                    | Location
  -------              | ------- | -------                        | -------
  build-tools;27.0.3   | 27.0.3  | Android SDK Build-Tools 27.0.3 | build-tools/27.0.3/
  emulator             | 30.0.12 | Android Emulator               | emulator/
  patcher;v4           | 1       | SDK Patch Applier v4           | patcher/v4/
  platform-tools       | 30.0.1  | Android SDK Platform-Tools     | platform-tools/
  platforms;android-27 | 3       | Android SDK Platform 27        | platforms/android-27/