- Click to view our Accessibility Policy
- Skip to content
Looking for other Java downloads?
Java 21 and Java 17 available now
JDK 21 is the latest long-term support release of Java SE Platform.
- JDK 21
- JDK 17
- GraalVM for JDK 21
- GraalVM for JDK 17
JDK Development Kit 21 downloads
JDK 21 binaries are free to use in production and free to redistribute, at no cost, under the Oracle No-Fee Terms and Conditions (NFTC).
JDK 21 will receive updates under the NFTC, until September 2026, a year after the release of the next LTS. Subsequent JDK 21 updates will be licensed under the Java SE OTN License (OTN) and production use beyond the limited free grants of the OTN license will require a fee.
- Linux
- macOS
- Windows
Release information
- Online Documentation
-
Installation
Instructions - Release Notes
- Documentation License
-
JDK 21 Licensing Information User Manual (includes
third-party licenses) - Certified System Configurations
- Readme
GraalVM for JDK 21 downloads
GraalVM for JDK 21 binaries are free to use in production and free to redistribute, at no cost, under the
GraalVM Free Terms and
Conditions (GFTC).
GraalVM for JDK 21 will receive updates under the GFTC, until September 2026, a year after the release of the next LTS. Subsequent updates of GraalVM for JDK 21 will be licensed under the GraalVM OTN License Including License for Early Adopter Versions (GOTN) and production use beyond the limited free grants of the GraalVM OTN license will require a fee.
Oracle GraalVM uses the Graal just-in-time compiler and includes the Native Image feature as optional early adopter technology.
Native Image is extensively tested and supported for use in production, but is not a conformant implementation of the Java Platform. GraalVM for JDK 21 without the Native Image feature included is available for customers at My Oracle Support.
- Linux
- macOS
- Windows
GraalVM for JDK 17.0.8 downloads
GraalVM for JDK 17 binaries are free to use in production and free to redistribute, at no cost, under the
GraalVM Free Terms and
Conditions (GFTC).
GraalVM for JDK 17 will receive updates under the GFTC, until September 2024. Subsequent updates of GraalVM for JDK 17 will be licensed under the GraalVM OTN License Including License for Early Adopter Versions (GOTN) and production use beyond the limited free grants of the GraalVM OTN license will require a fee.
Oracle GraalVM uses the Graal just-in-time compiler and includes the Native Image feature as optional early adopter technology.
Native Image is extensively tested and supported for use in production, but is not a conformant implementation of the Java Platform. GraalVM for JDK 17 without the Native Image feature included is available for customers at My Oracle Support.
- Linux
- macOS
- Windows
![]()
Protect your investment—and more
Java SE subscribers get support for JDK 17, receive updates until at least October 2029, are entitled to GraalVM
Enterprise, Java Management Service, and bundled patch releases (BPRs) with fixes not yet available to
nonsubscribers, and more.
Java SE subscribers have more choices
Also available for development, personal use, and to run other licensed Oracle products.
- Java 8
- Java 8 Enterprise Performance Pack
- Java 11
- Linux
- macOS
- Solaris
- Windows
-
JRE 8
- Linux
- macOS
- Solaris
- Windows
-
Server JRE 8
- Linux
- Solaris
- Windows
Which Java 8 package do I need?
-
Software developers: Java SE Development Kit (JDK)
For Java developers. Includes a complete JRE plus tools for developing, debugging, and monitoring Java applications.
-
Running headless Linux workloads at or near your systems’ CPU or memory limits
Enterprise Performance Pack brings significant memory and performance improvements including modern garbage collection algorithms, reduced memory usage and many other optimizations.
Learn more
-
Administrators running applications on a server
Server Java Runtime Environment (Server JRE). For deploying Java applications on servers. Includes tools for JVM monitoring and tools commonly required for server applications, but does not include browser integration (Java plug-in), auto-update, or an installer.
Learn more
-
End user running Java on a desktop: Java Runtime Environment (JRE)
Covers most end-users needs. Contains everything required to run Java applications on your system.
Release information
- Online Documentation
- Installation Instructions
- Release Notes
-
Java SE Licensing Information User Manual (includes
third-party licenses) -
Certified System
Configurations - JDK ReadMe
- JRE ReadMe
- Demos and Samples Archive
Java SE Development Kit 11.0.20
Java SE subscribers will receive JDK 11 updates until at least
September 2026.
These downloads can be used for development, personal use, or to run Oracle licensed products. Use for other
purposes, including production or commercial use, requires a Java SE Universal Subscription or another Oracle license.
Commercial license and support are available for a low cost with
Java SE Universal Subscription.
JDK 11 software is licensed under the
Oracle Technology Network
License Agreement for Oracle Java SE.
JDK 11.0.20 checksums
- Linux
- macOS
- Solaris
- Windows
Release information
- Online Documentation
- Installation instructions
- Release Notes
- Documentation license
-
Java SE 11 Licensing Information User Manual
(includes 3rd party licenses) -
Certified System
Configurations - Readme
- Linux
Android Studio, Java JDK & SDK is part of Android Development for building Android Apps. In this post, we’re going to learn “How to install & Setup Android Studio Java JDK & SDK“. We’ll also see, how to download the Android Studio and Java JDK, as well as the SDK (Software Development Kit) setup. If you are a beginner and you don’t know, what is Android Studio, Java JDK, and SDK? So let me give you an overview.
- Java.
- Android Studio
- SDK
Page Contents
The Android developers mostly used Java programming languages to build Android apps. If we want to use Java tools or functionality, so for that we have need to download and install Java Development Kit (JDK) is a distribution of Java Technology by Oracle Corporation.
It implements the Java Language Specification and the Java Virtual Machine Specification and provides the Standard Edition of the Java Application Programming Interface.
2. Android Studio
Android Studio is an IDE. What is IDE? IDE is an integrated development environment. In simple words, this is a tool that gives us an environment to create an Android app. There are many tools are available in the market for different purposes like MS word for documentation creation, PowerPoint for presentation making, and Photoshop for photo editing, and much more, the same as Android studio is a tool or IDE for building Android apps.
3. SDK
The Android SDK stands for a software development kit. It is a set of development tools that are used to develop applications. The Android SDK includes the following:
- Required libraries
- Debugger
- An emulator
- Offline documentation for the Android application program
- Tutorials for the Android OS
- more.
The Android SDK includes The Following:
- Platform-tools
Platform tools are used to help the features for the current android platform including ADB, which is working as a bridge to communicate with emulators or devices.
- Build-tools
Android SDK Tools is a part of the Android SDK. It is required for building Android apps.
- SDK-tools
SDK is a part of the Android SDK and it includes the complete set of development and debugging tools, such as an emulator, SD card, SQLite, APK builder, etc.
- The Android Debug Bridge (ADB)
ADB is a tool that gives us to communicate with the device, such as installing and debugging the Android apps.
- Android Emulator
The Android Emulator is a virtual Android device. It’s called an emulator and it provides to live test your application on different devices including the Android API level without needing to have each physical device. The emulator provides you with almost all of the functionality of a real Android device.
Install & Setup Android Studio Java JDK & SDK
- Before installing the Android SDK, you need to install the JDK (Java Development Kit). if you want to verify the java version then go to run (start button+R) and open CMD after typing”
javac -version“.
1. Install JAVA JDK
The Java Development Kit (JDK), officially called “Java SE”, is needed for writing Java programs. The JDK is freely available from Sun Micro-systems, now it is part of Oracle. check it– http://www.oracle.com/technetwork/java/javase/overview/index.html.
Un-Install Older Version(s) of JDK/JRE
- Install only the newest Java JDK.
- If you have installed the older versions of JDK/JRE, uninstall all of them.
- Go to Control Panel >> “Programs” >> Select Programs and Features” >> Uninstall ALL programs begin with “Java”, like “Java SE Development Kit, etc.
Step 1: Download JDK
- Goto Java SE download site http://www.oracle.com/technetwork/java/javase/downloads/index.html.
- Click the “Oracle JDK Download” button.
- Check “Accept License Agreement”.
- Choose the JDK as per your system requirement.
Step 2: Install JDK
- Double clicks on download to setup and Run.
- By default, JDK is installed in the directory “
C:\Program Files\Java\jdk-13.0.“, Accept the defaults.
Step 3: Verify the JDK Installation
Open a CMD via the following steps:
Click the Search button and Type “cmd” ⇒ Choose “Command Prompt”, or Right-click “Start” button ⇒ run ⇒ enter “cmd”.
the following commands to verify that JDK/JRE is properly installed and display their version.
2. Install “Android Studio IDE”
Android Studio, which is an Integrated Development Environment (IDE) based on IntelliJ is a popular Java IDE
Reference: “Install Android Studio” at https://developer.android.com/studio/install.
(For Windows)
- Verify that environment variable
JAVA_HOMEis set to the JDK installation directory by the using command “set JAVA_HOME“. - Check the system requirements for Android Studio and SDK ( https://developer.android.com/studio#Requirements) e.g > For Windows 7,8,10, recommended 4GB of RAM, 4GB of disk space, and 1280×800 minimum screen resolution.
- Go to “Android Studio” @ https://developer.android.com/studio ⇒ Click “Download Android Studio for Windows 64-bit.
- Run .exe step >> Launch Android Studio. Continue to the Next Step.
Android Studio IDE by default will be installed in “
C:\Program Files\Android\Android Studio“.Android SDK by default will be installed in the”
c:\Users\username\AppData\Local\Android\Sdk“.
3. Installing the Android SDK
Note: You can copy the SDK from your friends or any other computer with the same OS because the download size is 3GB of zip data and expand to 5 GB of disk data.
- Start Android Studio.
- Select >Tools > SDK Manager.
- As you can see default Settings dialog box, click these tabs to install Android SDK platform packages and developer tools.
- SDK Platforms: Select the latest Android SDK package.
- SDK Tools: Select these Android SDK tools:
- Android SDK Build-Tools.
- NDK.
- Android SDK Platform-Tools.
- Android SDK Tools.

4. Click Apply. Android Studio starts installing your selected packages. After completing the installation, the Status of the installed packages and tools changes from Not Installed to Installed.
5. Click OK.
4. Now ready to launch your First Android App
Android native apps are basically written in Java and Kotlin and XML is use for UI design. I’ll hope that you have some basic knowledge of Java and XML.
5. Create a New Android Project
- Launch Android Studio.
- Choose “Start a new Android Studio Project”.
- Select a Project Template >> select “Phone and Tablet” tab >> Empty Activity >> Next.
- Configure your project :
- 1- ⇒ Set “Name” to “Hello Android” (this will be the “Title” in your phone’s app menu)
- 2- ⇒ The “Package name” and “Save Location” will be updated automatically
- 3- ⇒ In “Language”, select “Java”
- 4- ⇒ Leave the “Minimum API Level” and the rest to default ⇒ Finish.
- It could take a few minutes to set up your first app.
6. Run the App on Real Android Phones
Run the app on a real device. Follow step by step.
- Connect the real device to your computer. Make sure that you have the “USB Driver” for your device installed on your computer. If not, go to https://developer.android.com/studio/run/oem-usb.html to Install OEM USB Drivers.
- Enable “USB Debugging” mode on your real device:
Enable “Developer options” through “Settings” ⇒ About Phone ⇒ Scroll to the bottom and tap “Build number” seven (3 or 4) times until “Developer Mode” is displayed. - Return to the previous screen to find “Developer options” ⇒ Open “Developer options” ⇒ Enable “USB debugging”.
- Go to “Settings” ⇒ Select Developer options” ⇒ Check “USB Debugging“.
- In Android Studio, select the “Run” menu⇒ “Run app”⇒ Your device will be listed under “Choose a running device” ⇒ Select the device and press OK ⇒ “Hello-world” will appear on your phone.
All setup are done, Congratulation for your first Android App 🙂
Warp Up
And this wraps up this short blog post ! You could’ve been doing a million other things, but you decided to sit and read through this article to know How to Install & Setup Android Studio Java JDK & SDK. It shows that you’re committed to improving your skills in Android development ! It shows your passion for Android development! Hopefully, you found this blog post helpful! If you liked this article, you can checkout my other articles. As always, I would like to thank you for taking the time to read this article :). I wish you the best of luck! Happy coding
  ! Cheers!
You May Also Like:
- Kotlin tutorial for beginners.
- How To Make An Android App For Beginners
- Android Interview Questions For Fresher.
- Shimmer Effect Android Using Kotlin.
- Top 5 Things To Avoid While Developing Android Apps.
- 5 Best GitHub Repositories For Android Developer.
- 15 Best Useful Sites For Online Learning.
Post Views: 31,662
Google’s Android Studio is a developer-focused IDE (Integrated Development Environment). It is one of the greatest platforms for developing Android apps. It provides a vast collection of features and built-in tools for producing specialized Android apps.
Today in this blog post, we are going to learn how to install and set up Android Studio on your Windows 10 and 11 PC/Laptop.
So without further ado, let’s get started.
- A Laptop/PC running on 64-Bit Microsoft Windows 7/8/10/11.
- A minimum of 8GB RAM or more.
- Minimum 12GB of Disk Space. (SSD or HDD)
- Screen resolution of your Laptop/PC should not be less than 1200⨯800 pixels.
- Intel 2nd Gen Processor or a 2nd Gen AMD processor with Hypervisor.
But before we go ahead and install the Android on Windows 10 and 11, you must install the Java JDK and configure the Java environment before you can install Android Studio.
The JDK is a development kit necessary for developing Java-based applications.
How to Install Java JDK
To download and install the most recent Java JDK for the Windows version, follow these steps:
- Tap on this link to head over to the official page of Oracle.

- Now tap on the “Windows” option and choose the “✕64 Installer” file to download it.

- After downloading the file, go to your downloads folder and “Double-Click” on the file, and follow the on-screen prompts to install it.

After successful installation of the Java JDK file, to make it simple for Android Studio to locate Java on your desktop, you must set up a Java environment.
Also Read: 4 Easy Ways to Debloat Windows 11
How to Set Up the Java Environment
- Tap on the “Search Bar” on your computer from the “TaskBar” type “Edit Environment variables” and hit “Enter.”

- A pop-up window of “Environment Variables” in from of you.
- Under the “System Variables” table click on “Path” and click on the “Edit” button.

- Now under the editing environment variable window press the “New” button and now copy the location of the folder containing the JDK binaries. Ours is “C:\Program Files\Java\jdk-18.0.1.1\bin” It might be different in your case.

- Now head back to the “Environment Variables” window and under “User Variables” click on the “Path”.
- Type “JAVA_HOME” in the “Variable Name” and copy-paste the exact location of JDK binaries but without the “\bin” i.e, “C:\Program Files\Java\jdk-18.0.1.1”

- Now press the “OK” to save the settings.
Now everything is in the place to run the Android Studio smoothly on your computer. Let us take a look at the steps involved in the installation process of Android Studio.
Read Also: 10 Best Android PC Suite For Windows 10/8/7 In 2022
How to Install Android Studio on Windows 10,11
- Click on this link to go on to the official website of Android Developers.”
- After landing on the page, click the “Download Android Studio” button.

- Once downloaded, head over to your “Downloads: section, right-click on the “.exe” file of Android Studio, and choose the “Run as Administrator” option to install it.

- Now just follow on-screen instructions to install Android Studio for Windows 10.

After the successful installation of Android Studio now, we are ready to set up Android Studio for your new project.
How to Set up Android Studio on Windows 10,11
To set up the Android Studio, follow these below-mentioned steps:
Now, when you launch your Android studio for the first time on your Windows 11 operating system, it will prompt you to import certain settings. Suppose you don’t already have Android Studio installed on your Windows 11 operating system. In that case, you can simply select “Do not Import Settings” option and click “ok,” which will launch Android Studio on your Windows 11 operating system.

- Now in the “Android Studio Setup Wizard,” it will ask you if you want to share the data with Google. Depending on your choice, choose the option and click on the “Next” button.

- A “Welcome Android studio” screen will appear in front of you. Click “Next
- Click “Next” after selecting the “Standard” alternative to use the suggested settings.


- Now Select the UI theme and again click on Next.

- Lastly, on the Licence Agreement page, click on “Accept” and “Finish” buttons to save the changes.
- Now it will take some to download all the necessary packages and components to run Android Studio.

- Click the “Finish” button, and now you will be greeted by the “Welcome to Android Studio” Window.
Read Also: How to Transfer WhatsApp Data From Android To iPhone Officially

To Wrap This Up
So, that’s it for today, guys. This is how you can easily install and set up Android Studio on Windows 10 and 11. I hope you’ve liked this article, and if yes, then share it with your friends and family. And let us know what you will do with the Android Studio on your device.
Quick Reaction:

Sourabh Baghel, a tech content creator, blogger, and gadget geek who loves to be around gadgets. Always looking forward to something new and interesting in the gadget industry. Love to read and write about different types of gadgets i.e., smartphones, laptops, tablets, and much more. An ardent reader of technology blogs and love to read about the latest tech trends.
install-android-studio
Required
- JDK (Java Development Kit)
- Android Studio
| Windows | Mac |
|---|---|
| Microsoft® Windows® 7/8/10 (32- or 64-bit) | Mac® OS X® 10.10 (Yosemite) or newer, up to 10.13 (macOS High Sierra) |
| Minimum RAM of 3GB, recommended RAM of 8GB; Add 1 GB for Android Emulator or use your phone to run project | Minimum RAM of 3GB, recommended RAM of 8GB; Add 1 GB for Android Emulator or use your phone to run project |
| The minimum available disk space is 2GB, | The minimum available disk space is 2GB, |
| 4GB recommended (500MB for IDE + 1.5GB for Android SDK and image system emulator) | 4GB recommended (500MB for IDE + 1.5GB for Android SDK and image system emulator) |
Step 1: Download the JDK
You can download the JDK for free here
- Click the Download button under the JDK for the latest Java SE version.
- Select Accept License Agreement.
- Choose the JDK for your operating system.
Step 2: Install the JDK (for Mac)
From either the Downloads window of the browser, or from the file browser, double-click the .dmg file to launch the install file.
- A Finder window appears with an icon of an open box and the name of the
.pkgfile. - Double-click the package icon to launch the installation app, and follow the prompts as they appear.
- You might need to enter the administrator password to continue.
- After the installation is complete, feel free to delete the
.dmgfile to save space.
Step 2: Install the JDK and JRE (for Windows)
- Run the downloaded installer (for example,
jdk-12_windows-x64_bin.exe), which installs both the JDK and the JRE. By default, the JDK is installed in theC:\Program Files\Java\jdk-12directory. The JRE is installed inC:\Program Files\Java\jre1.8.0_x, wherexdenotes the version number. - Accept the defaults, and follow the on-screen instructions to install the JDK.
Step 3: Add the JDK and JRE installation directories to PATH (Windows only)
Windows searches the current directory and the directories listed in the PATH environment variable (system variable) for executable programs.
- Open Control Panel > System > Advanced system settings > Environment Variables.
- Under System variables, click New and add a variable named JAVA_HOME with the JRE’s directory for a value. For example, C:\Program Files\Java\jre1.8.0_x, where x is the version number.
- Under System variables, scroll down to select Path, then click Edit.
- Add the JRE’s
bindirectory to the start of thePath, followed by a semicolon:%JAVA_HOME%\bin; - Append the JDK’s
bindirectory to end of thePath, preceded by a semicolon. For example,;C:\Program Files\Java\jdk-12\bin.
Step 4: Verify the JDK installation
To verify that the JDK was installed correctly, type the following commands in a terminal window:
java -version
javac -version
Windows users: If you receive an error from either command, confirm you’ve added the correct paths for the JRE (java) and the JDK (javac).
Step 5: Download and Install Android Studio
Download the application Here and install as usual
This article shows you the JDK 17 installation on Windows 10 operating system. The JDK 17 is the latest Long Term Support (LTS) release by Oracle as of January 2022.
The Java Development Kit (JDK) is a development environment for building applications and components using the Java programming language. The JDK includes tools for developing and testing programs written in the Java programming language and running on the Java platform.
Other JDK Downloads for Windows 10
Java 8, Java 11, Java 17, Java 19, Java 20
Other JDK Downloads for Windows 11
Java 8, Java 11, Java 17, Java 19
Table of Contents
Software Dependency
- JDK 17
- Windows 10
Here we are going to download JDK 17 and install it on the 64-bit Windows 10 Operating System.
How to Download JDK 17 and Install it on Windows 10?
The installation process of the Java Development Kit (JDK) on the Windows operating system is very simple. Just follow the below steps:
- JDK 17 Download for Windows 10 64-bit
- JDK 17 Installation on Windows
- Setup System Environment Variables
- Verify the Java Installation
Step-1: Download JDK 17 for Windows 10 64-bit
To download JDK software, visit its official website Oracle Website’s Java and go to Java SE Development Kit 17.0.2 and click on the highlighted link as shown in the below image.

Once you click on the link (https://download.oracle.com/java/17/archive/jdk-17.0.2_windows-x64_bin.exe), it will start the downloading of JDK software.
NOTE: Oracle requires an account (sign-in) to download older versions of Java that are no longer available to the public. You can download publicly available versions of Java without signing in which is the latest version only.
Step-2: JDK 17 Installation on Windows
Once you have downloaded the JDK 17 software (jdk-17.0.2_windows-x64_bin.exe), double-click on it to see the start of the installation process.

Now click Next to see the below image, Here you have a choice to change the Java installation directory by clicking on the change… button otherwise simply go with the default path by clicking the Next > button. I am going here with the default path only.

Once you click Next, you will see the start of the installation process as below image. After successful installation, you just close the installation wizard.


Step-3: Setup System Environment Variables
System Environment Variables path: Right-click on MyComputer -> properties -> Advanced System Settings -> Environment variables

Now click on the Environment Variables button > add JAVA_HOME & Path as shown in the below images:

Now we should have to add Java Path. If the Path variable is already there then simply we can click on the Edit… button > then click the New button to add the path as below image.

Step-4: Verify the Java Installation
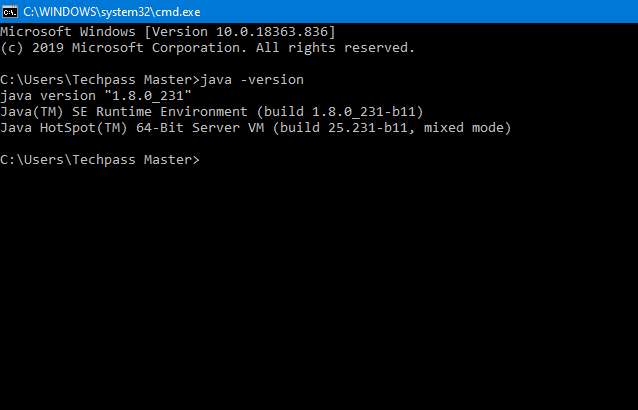
To verify the installation open the command prompt(Win+R key and type cmd) and then type java -version and press Enter key.

Congratulations! You have successfully installed the Java Development Kit (JDK) 17 on your Windows system.
Now create the first Java Program Hello World!
Conclusion
In this article, you have seen how you install Java Development Kit (JDK) 17 on the Windows 64-bit Operating system. You have also seen how can you verify the successful installation of JDK software on your machine.
Start learning Top Java Logical Programs now.
FAQ
Does JDK 17 include JRE?
No, In JDK 17, JRE is no longer available. In this release, the JRE or Server JRE is no longer offered. Only the JDK is offered.
Related articles:
- How to Download and Install JDK 11 on Windows 10?
- JDK 8 Installation on Windows 10 [step-by-step]
- How to install Maven on Windows System
- How to install and configure Tomcat Server in Eclipse?
- Install MySQL Server 8.0.27 [zip Archive] on Windows 10
You may also like:
- File Upload in Java Servlet Example
- Spring Boot File Upload with Advance Progress bar in Ajax
- How to write Excel files in Java using Apache POI?
- Drag and drop file upload using Javascript