Android Studio — быстрый эмулятор смартфонов от Google позволяет запускать на компьютере последние версии операционной системы Android и тестировать необходимые вам приложения.

Эмулятор Android Studio предоставляет практически все возможности реального Android-устройства (смартфона или планшета) прямо с компьютера. Вы можете имитировать телефонные звонки и сообщения, указывать местоположение, имитировать вращение и другие аппаратные датчики, получать доступ к Google Play и многое другое.
Навигация:
Наше руководство покажет как установить и использовать эмулятор смартфонов Android Studio для тестирования разнообразных приложений и последних версий операционных систем Android.
Примечание. Эмулятор Android поддерживает только 64-разрядные версии Windows 10 / 8 / 7 и требует как минимум 4 гигабайта оперативной памяти. Необходима поддержка и активация функций виртуализации «Intel Virtualization Technology» или «AMD Virtualization Technology» в BIOS материнской платы.
Как установить и подготовить Android Studio
Для начала, перейдите на официальную
страницу загрузки
и скачайте 64-битную версию.

Запустите дистрибутив, нажмите кнопку «Next» и выполните установку следуя инструкциям.

По завершении, нажмите «Finish«.

Если у вас нет сохраненных настроек программы, выберите «Do not import settings» и подтвердите нажав «OK«.

Откажитесь от передачи статистики в Google кнопкой «Dont send«.

Пропустите страницу приветствия.

Выберите индивидуальные настройки.

Задайте подходящую тему оформления.

Отметьте галочкой «Android Virtual Device» и проследуйте дальше.

Задайте объём оперативной памяти руководствуясь вашей конфигурацией компьютера.

В следующем окне нажмите кнопку «Finish«.

Подождите пока загрузятся необходимые компоненты.

И финишируйте одноименной кнопкой.

Как подготовить эмулятор Android Studio
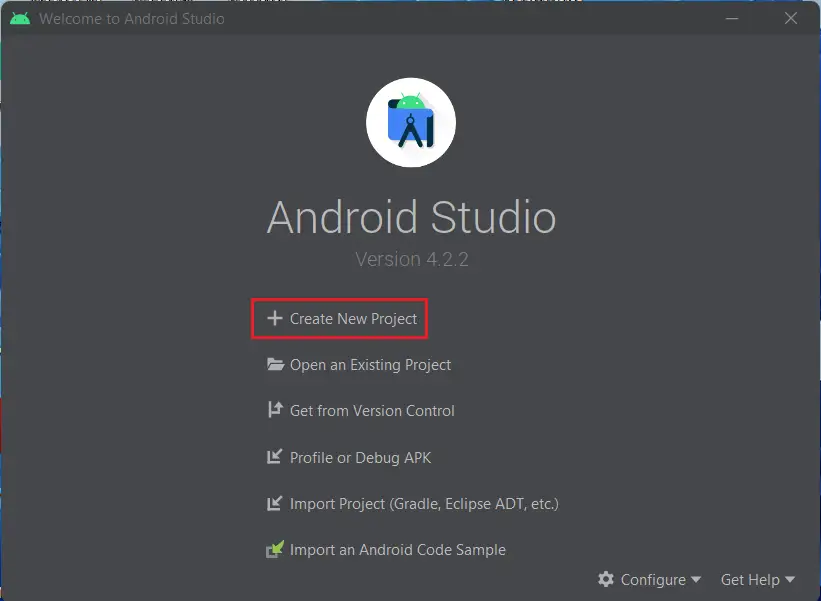
В окне «Welcome to Android Studio» нажмите «Start a new Android Studio project«.

Выберите «Basic Activity«.

Задайте «Версию Android», мы выбрали последнюю Android 10 (Q) и нажмите «Finish«.

Как настроить и запустить эмулятор Android Studio
Запустите Android Studio и нажмите кнопку менеджера виртуального Android-устройства.

В нем будет готовое устройство «Nexus 5 X» которое можно удалить из-за отсутствия сервиса Play Store.

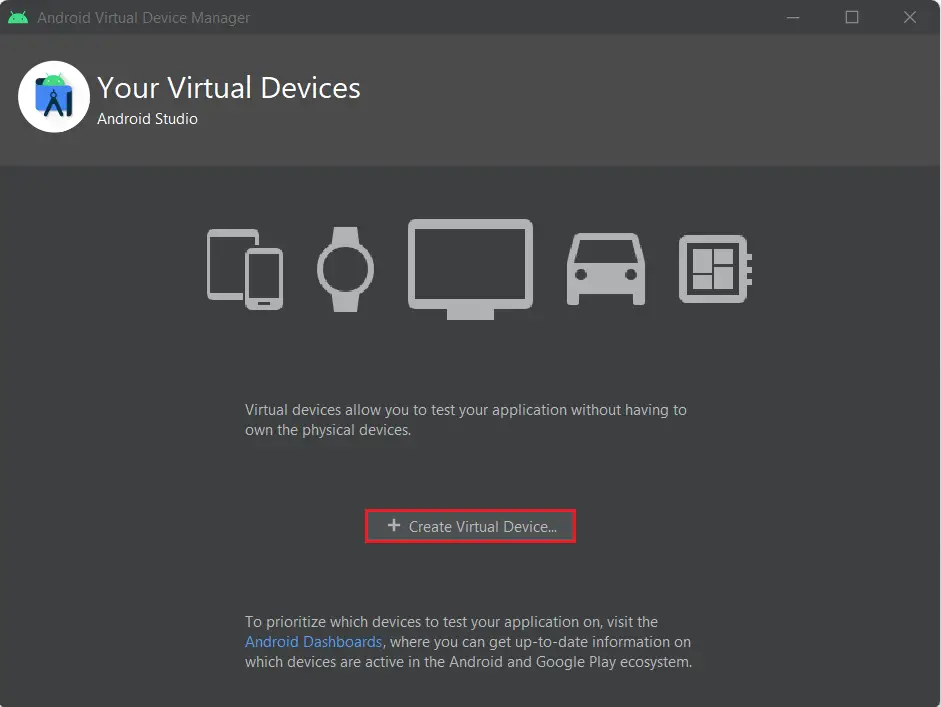
После чего, создадим своё нажав «Create Virtual Device«.

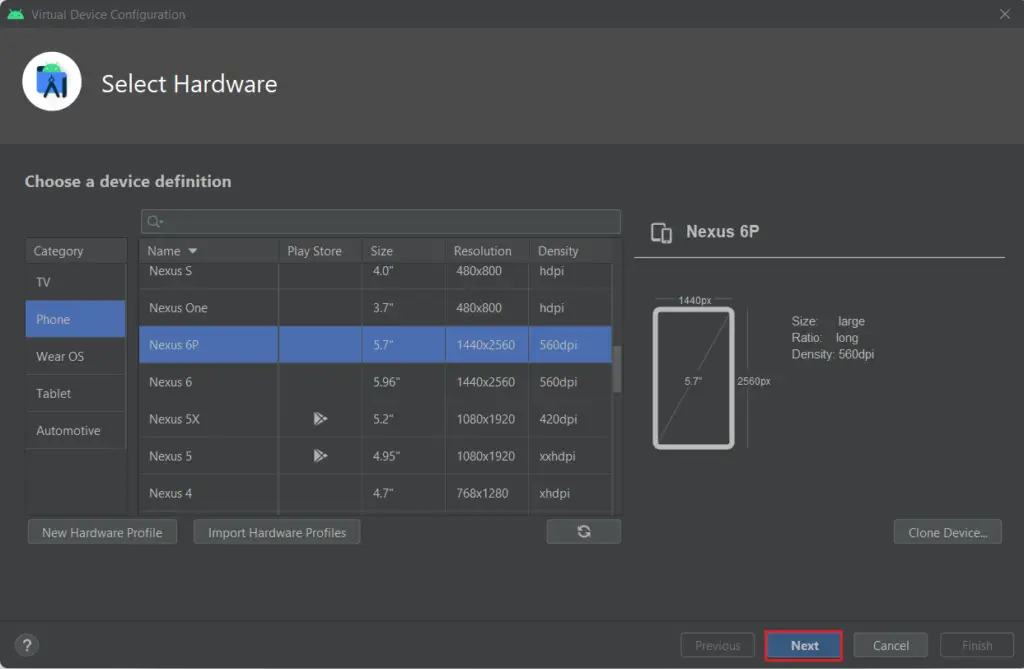
Отметим категорию устройства, это может быть смартфон, планшет либо другое. Мы выберем «Phone» и эмулируем смартфон, «Pixel 2» со значком «Play Store» отлично подойдет.

Теперь скачаем операционную систему Android 10 с сервисом Google Play нажав «Download«.

Примем соглашение.

Дождемся скачивания и распаковки системы.

Нажмем на «Finish«.

И пойдем дальше.

Здесь можно задать новое имя устройству, выбрать положение экрана, посмотреть расширенные настройки и завершить приготовления.

После чего, нажать кнопку запуска эмулятора Android и дождаться загрузки системы.


Когда устройство будет загружено, перейдите в настройки Android, прокрутите в низ и зайдите в раздел «System«.

Пройдите по такому пути Languages & input > Languages.

Добавьте «Русский язык» через кнопку «Add a Language«, поставьте «Русский» первым языком.

Пользуйтесь операционной системой Android и тестируйте разнообразные приложения из Google Play на своем компьютере.
In this blog, I am going to create an Android app with Android Studio Emulator. These steps will teach you the fundamentals of how to build an Android app via the Android Studio development environment.
As Android devices become progressively more common, demanding new apps will increase. Android Studio is a free and easy-to-use development environment to learn on.
It’s best if you have a working knowledge of the Java programming language for this article because it is the language used by Android. It will take approximately 20-30 minutes, it’s depending on your computer and internet you are able to download and install Android Studio. After following this article, you will be able to create your first Android app, you can promise a career in mobile development.
Table of Contents
- Download Android Studio
- Video
- Create a new Android Studio Project
- Installing Requested Components
- Creating Android Virual Device with AVD Manager
- Create Your Virtual Devices
- Android Virtual Device (AVD)
- Install Intel HAXM in Windows
- What is Intel HAXM?
- Open Your First Device
Download Android Studio
Download Android Studio Emulator from Android Studio
How to install Android Studio Emulator
Video
Create a new Android Studio Project
You will need an Android Studio project to (design, develop, and build) your mobile app.
Welcome to Android Studio wizard, select Start a new Android Studio project.
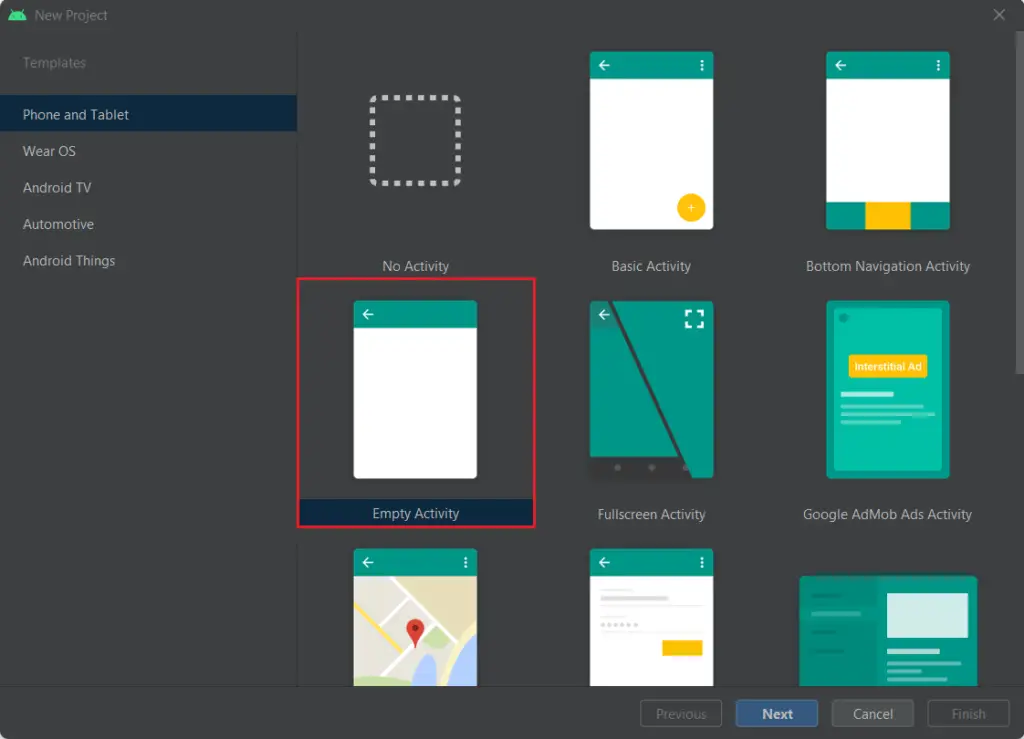
You can customize the Activity after you choose your template. For example, the Empty Activity choice provides a single Activity with a single layout resource for the screen, click next.
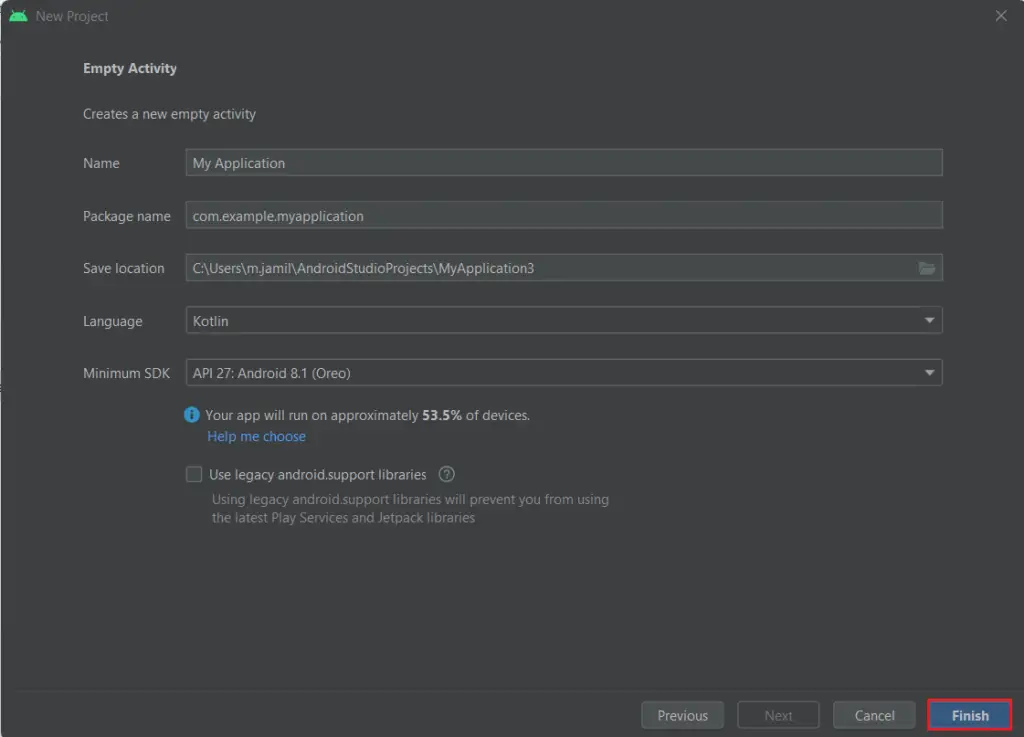
New project wizard, type a name that users will see on their Android phones when they install this app.
The package name is a unique identifier for your Android app on Google Play Store. In this article, the app’s name is my application and you work for a corporation their website address is (example.com), so the package name must ideally be com.example.myapplication.
Here you can decide the programming language you wish to use while coding the app. Click Finish.
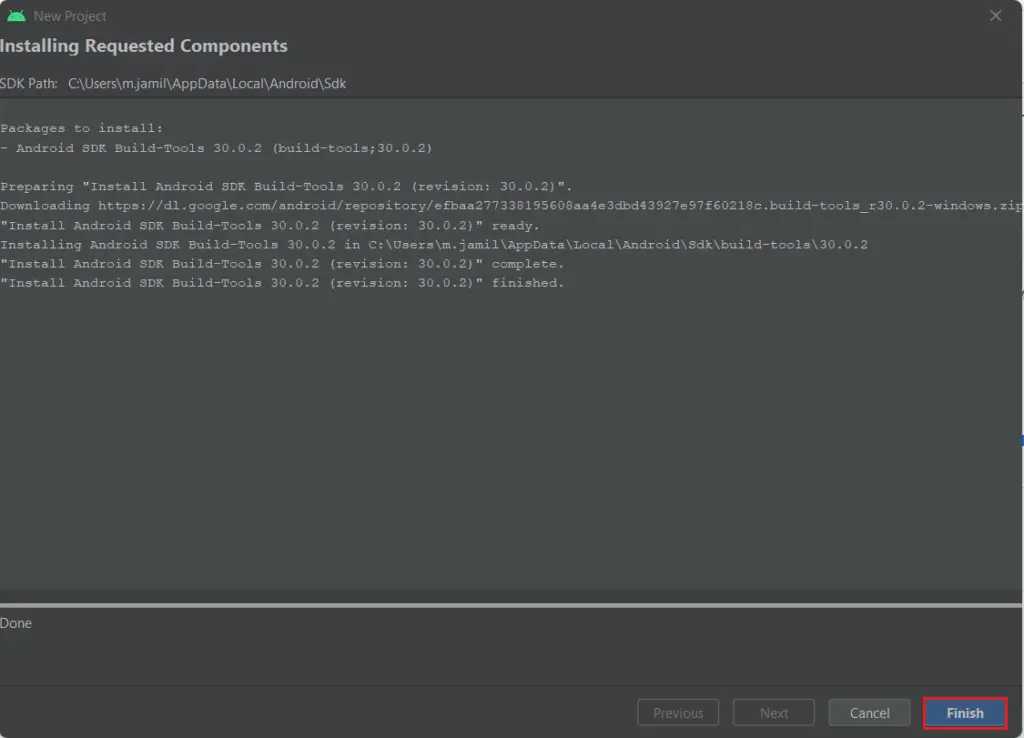
Installing Requested Components
Downloading the requested component for your first android app.
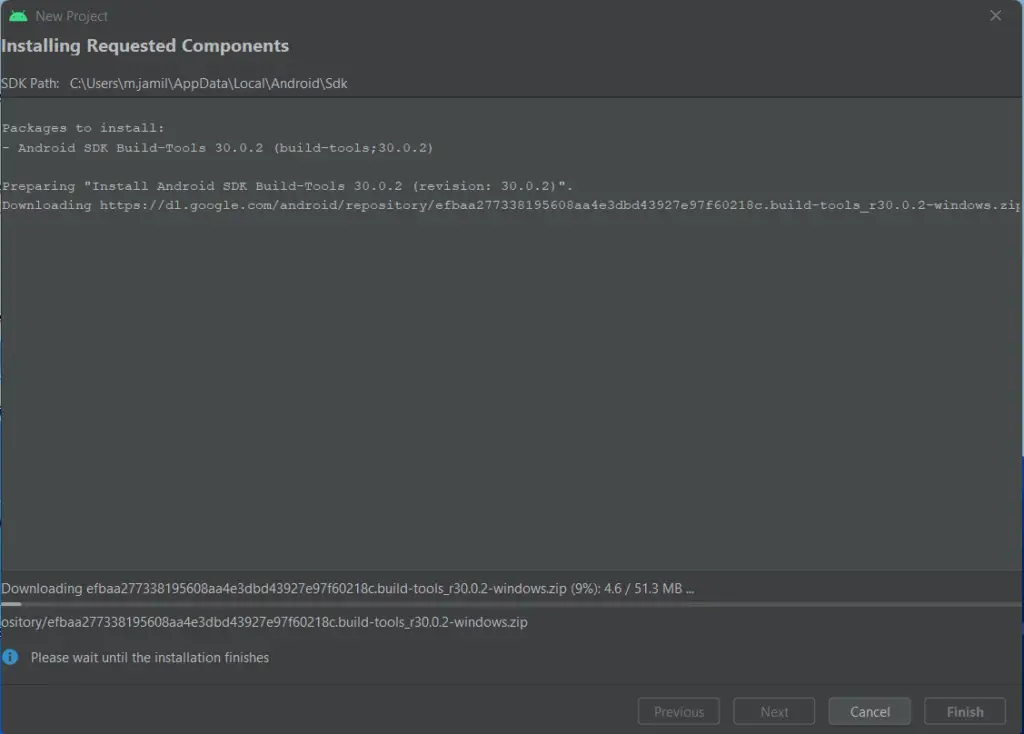
Android SDK builds tool successfully installed, click finish.
Creating Android Virtual Device with AVD Manager
In the below steps, you will learn what is AVD Manager and how to create an Android Virtual Device (AVD) to test our first android application.
The AVD (Android Virtual Device) is a device configuration that can run on the Android Emulator. It provides a virtual device specification, Android Environment where we can install and then test our Android Application. Android Virtual Device Manager is a part of SDK Manager to create and manage virtual devices.
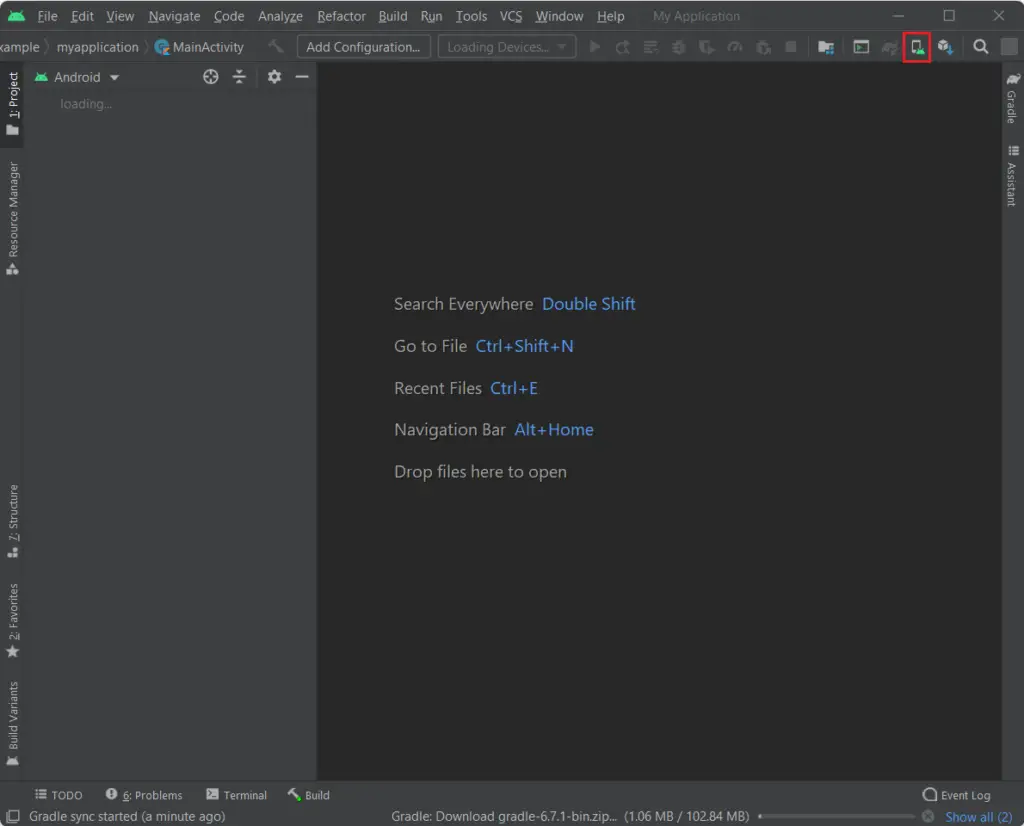
To launch AVD manager, go to your Android tools and then AVD Manager Icon as shown in the below image.
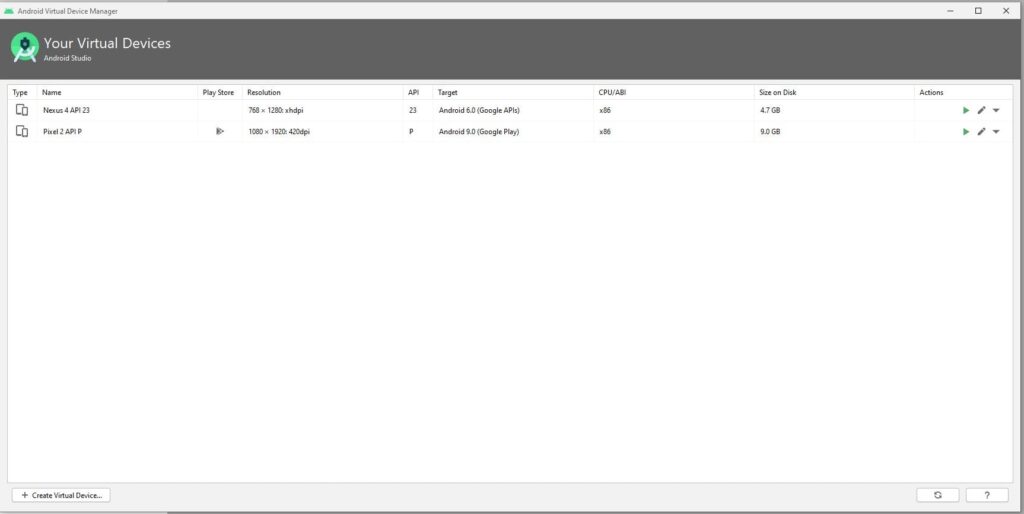
Android virtual device manager wizard, with a list of created virtual devices. It might be empty because we have not created any device yet.
Create Your Virtual Devices
To create a new device, select Create Virtual Device.
A new window pops up to Select Hardware type for your virtual device. This list comprehends almost all the Android devices with their individual settings. Choose one from the listed devices, with your required configuration (Size of the screen, Resolution, Density), and then click next.
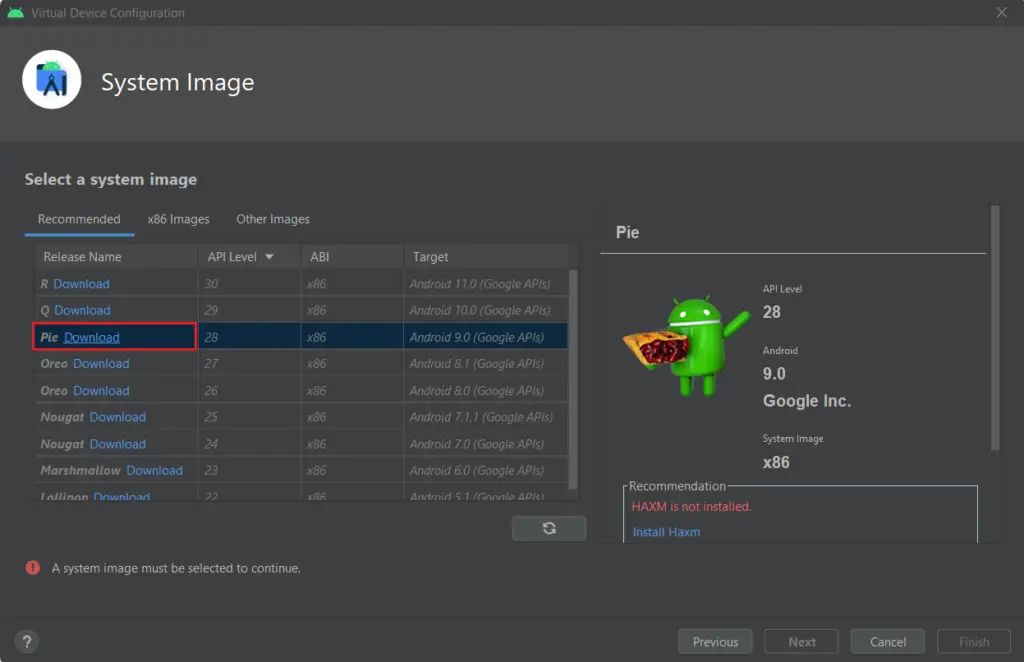
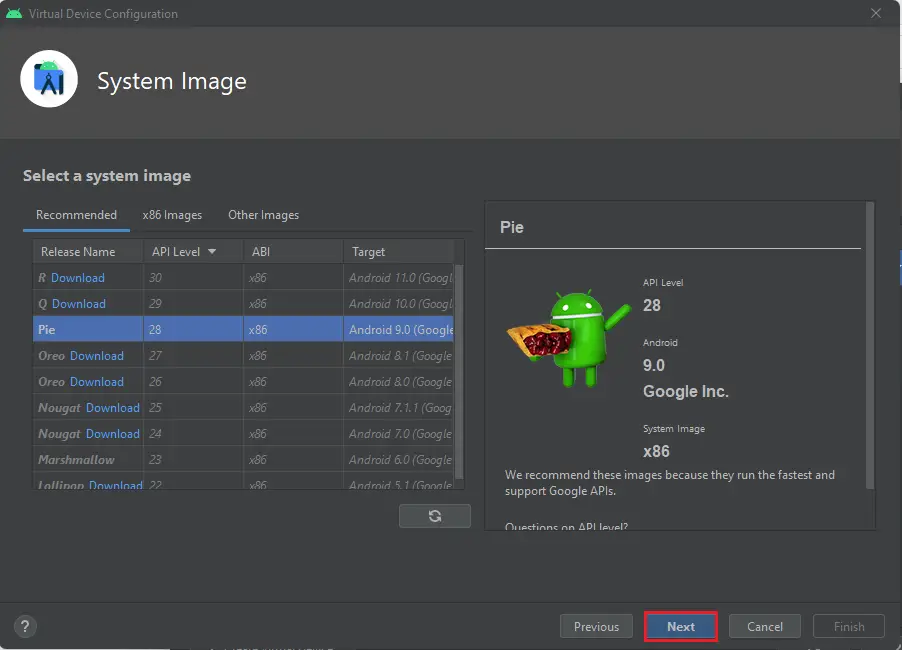
Select a System Image window opened that is running Android Version for your recently created virtual device. You can select any Android system images that are already available in the Android Studio, or you can download one, by clicking on the Download hyperlink available with the names. Under recommended section, the best choices are available as per the latest updates. The x86 Images are mostly used and the other Images are also listed Google Play Services.
Select one as per your Android app configuration and then click Next.
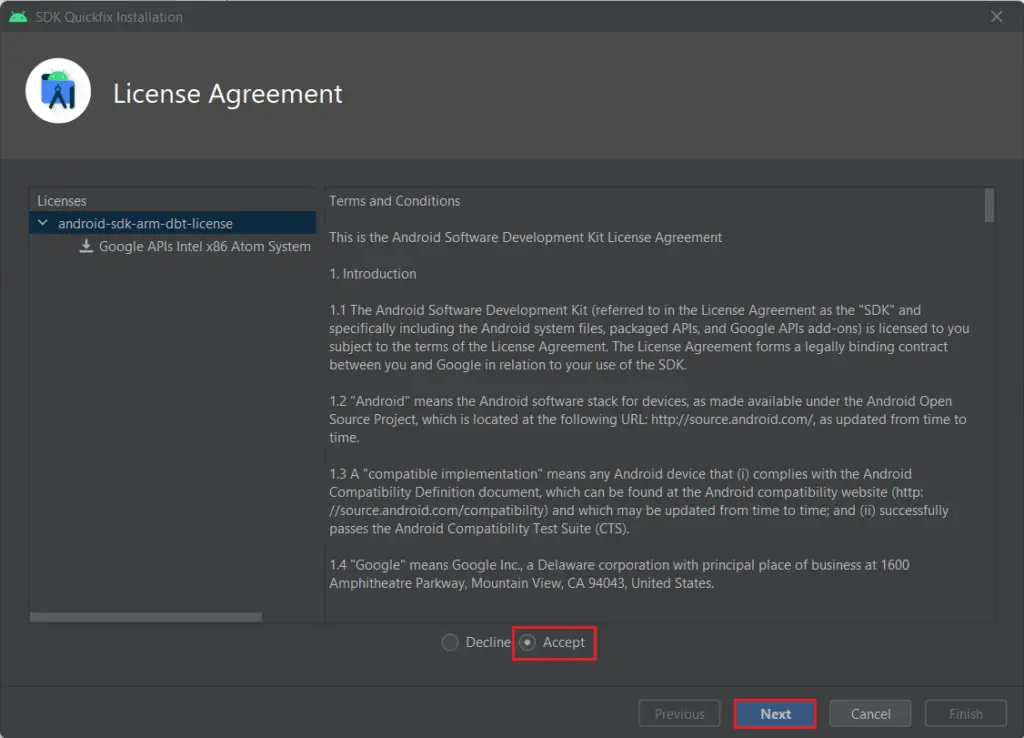
Android software development Kit License Agreement, select the Accept option and click next.
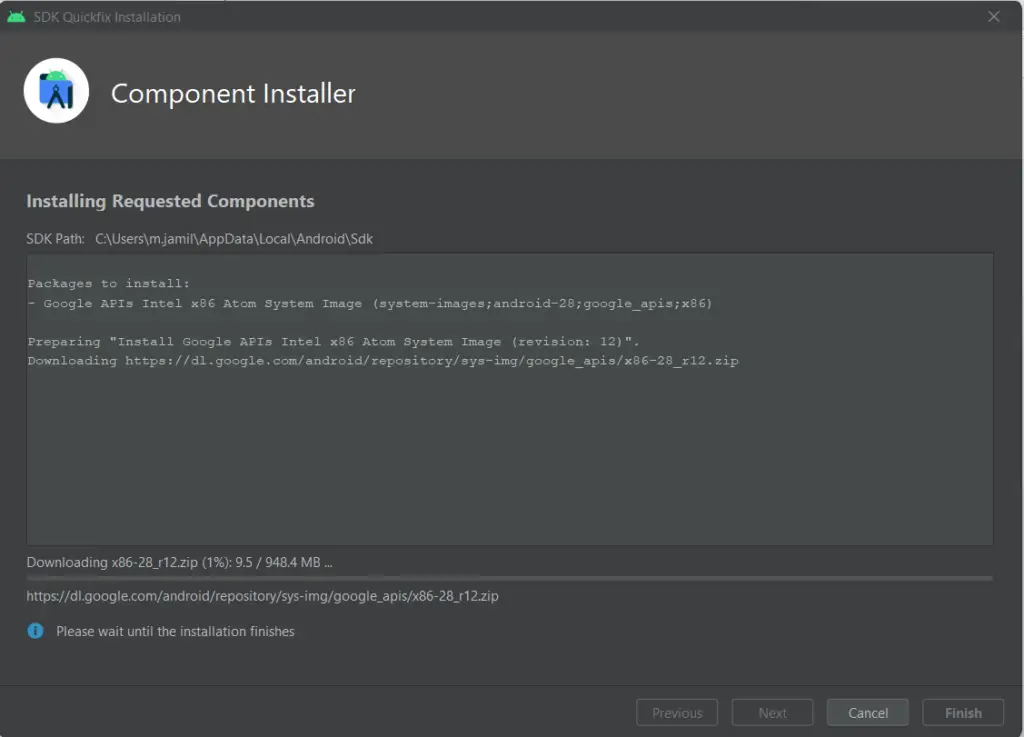
SDK quickfix downloading is in progress.
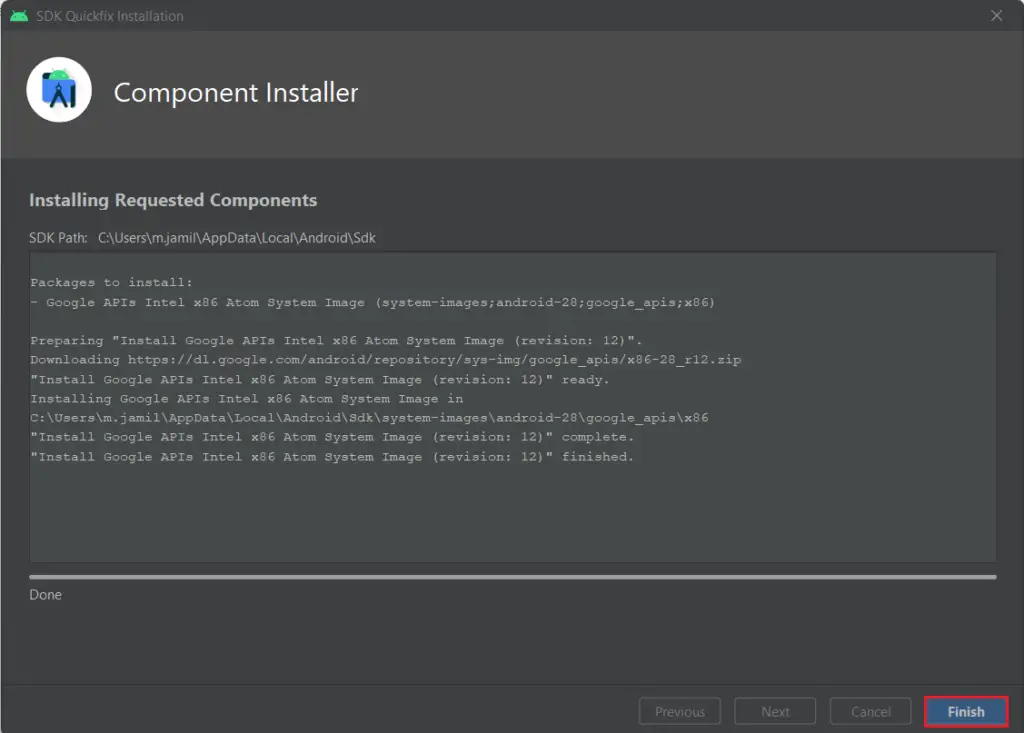
SDK requested component successfully download, click finish.
Select a system image and click next.
Android Virtual Device (AVD)
Enter your android virtual device a friendly name for the identification, you can change (device type, API configuration, setup size, orientation, and Graphics) for your AVD.
You can configure your device as per your requirements and then select Finish.
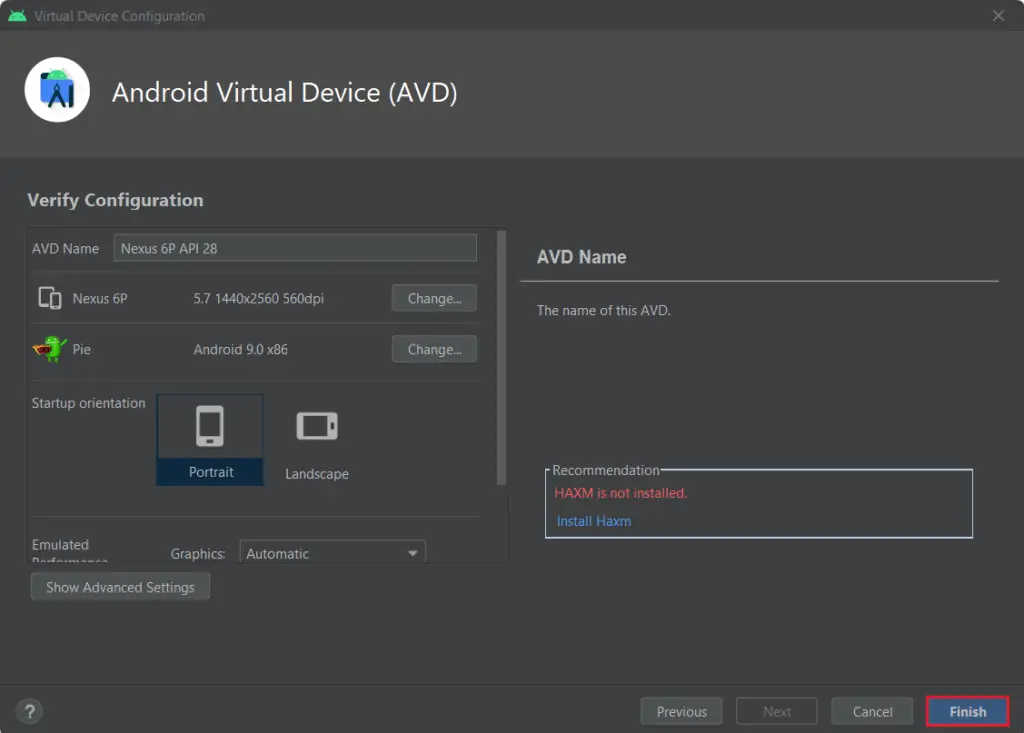
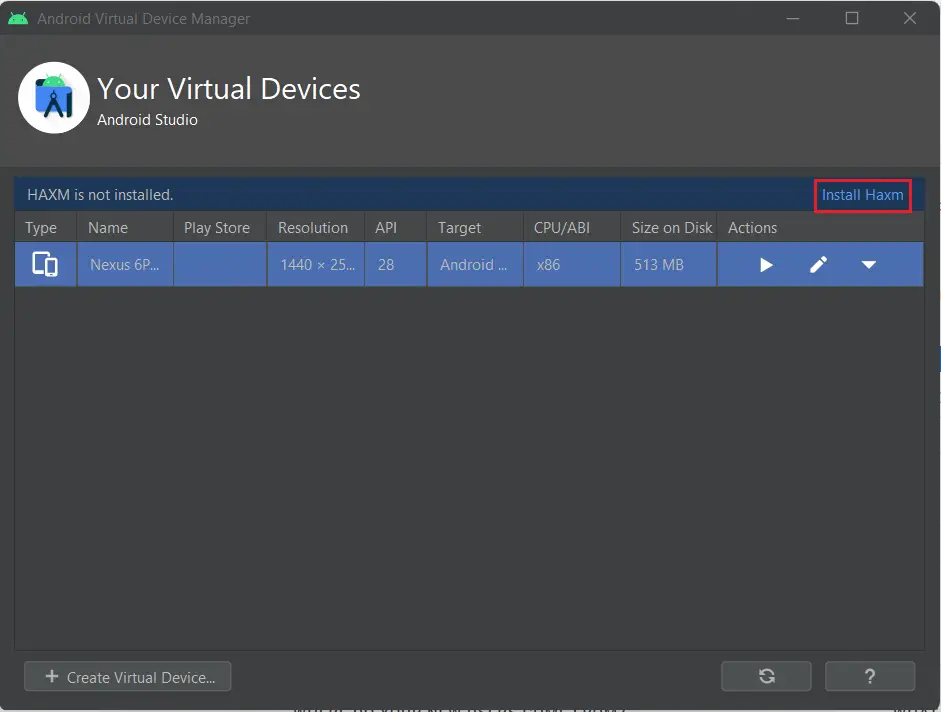
Android Studio will instantly start building AVD with the chosen configurations and it will take some time. Once completed, you can see the AVD Manager window will list out the virtual device in the available devices list.
HAXM is not installed.
Install Intel HAXM in Windows
Click on the install Haxm hyperlink.
What is Intel HAXM?
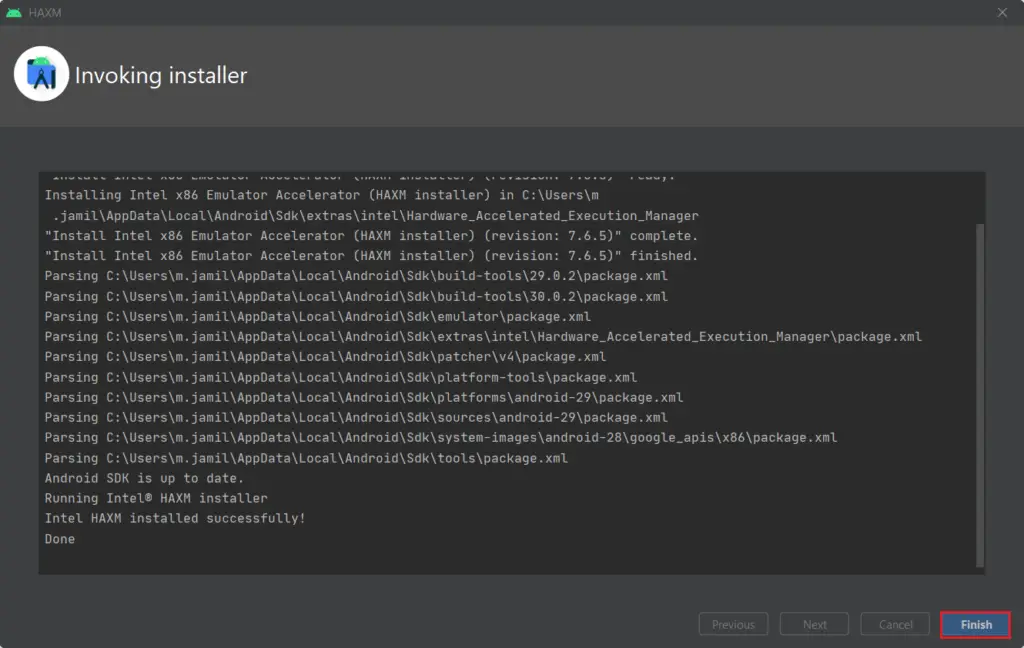
The HAXM means is Hardware Accelerated Execution Manager. It is a cross platform hardware-helped virtualization engine. The Android Emulator uses Hardware Accelerated Execution Manager in Intel platforms to speed up and improve performance.
HAXM Android Emulator settings, click next

Intel HAXM installed successfully, click finish.
Open Your First Device
Android Virtual Device Manager, here are your Android Studio Virtual Devices, select one and then select the start button under the Action menu.
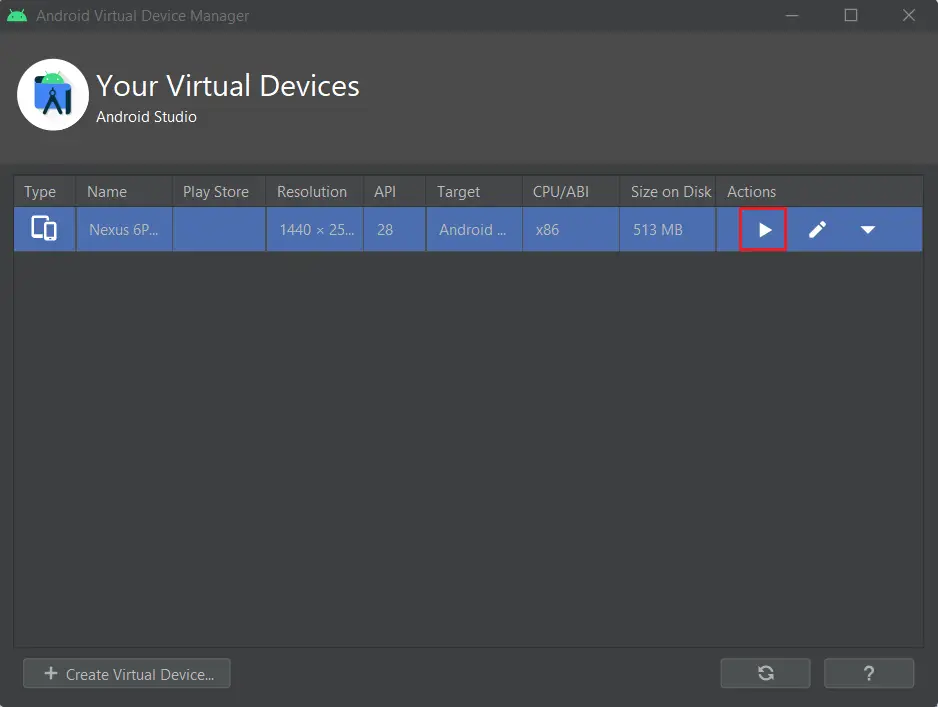
An Android Virtual Device started as shown in the below image. Side toolbar comprehends buttons to perform actions (like the power button, volume up-down, go back, go home, and more).
Android Studio virtual device Nexus 6P API.
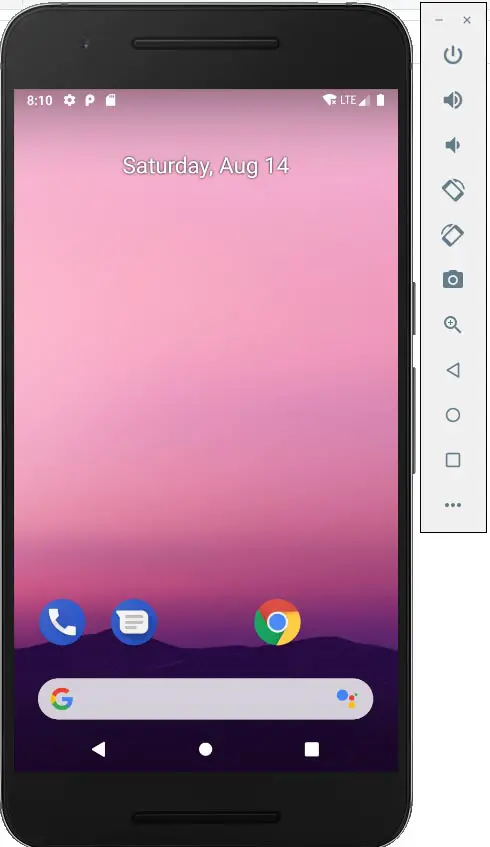
Now you can see your own Android Virtual Device running on your computer. In this device, you can test several Android Application Projects. Likewise, you can create AVD like Android TV and etc.
Jamil Parvezhttps://www.xpertstec.com
Jamil Pervez works as a Network Administrator, based in Kuwait with a Primary focus on Microsoft technologies. Microsoft Certified MCSE, MCTP, MCITP, CCNP, CCIP, CCVP with 20 years of experience in administering Windows Servers, Exchange, VMWare, Veeam B&R, Veritas BackupExec.
Emulator for windows 10-You may need an android emulator to develop and run your mobile app project. In this article, we will set up and android emulator step by step. The best and simple solution for setup the emulator using Android Studio.
So first of all you need to install Android Studio, the install android emulator with a require android operation system.
Step by step guide to Install Android Studio
After install android studio don’t forget to configure environment variables otherwise the system will not work.
To install and configure android emulator just open android studio and click on ADV Manager.
AVD Manager will appear like below. Now Create Virtual Device to install a version of android os.
After click on it following window will appear, now you need to select an os version to start install. Then click on the next and complete the installation process.

After completion of installation emulator you will find the device in Virtual Device Manager. To run the emulator just click on play option from the device list.
Run android emulator without open android studio.
Create a batch file and write the following code. Save the file with .bat extension. Now run the batch file to run the emulator.
c:
cd "C:\Users\Your_user_name\AppData\Local\Android\Sdk\emulator"
emulator -avd Pixel_2_API_P
Please change the device name with your device name.
You can test your Android application with Android Studio in a few ways.
Let’s say that you are developing an application. To test and debug it, you can generate a testing APK file using Android Studio and then install it on your Android device. However, you would ideally want to see how your application is performing on a phone’s screen as you make small changes. For example, if your application is not yet complete but you are trying some new font styles, you want to see how they look.
Generating a new APK file after every new addition to your application would be way too tedious. So, to check out how your changes are performing on the screen, Android Studio allows you to test your app on the go with its built-in Android Emulator.
It can be tricky to set up Android Emulator, but this tutorial is here to your rescue. Continue reading to learn how to set up an Android emulator, create a virtual device, and run your application on it.
Setting Up the Android Emulator
To use the Android Emulator, you will need to download it first. You can download it from the SDK manager located in the tools.


Select Tools > SDK Manager. Then, from the settings window, choose Android Emulator. Click Apply, and Android Studio will download the emulator for you.


An Android emulator cannot run on your computer without a virtualization tool for hardware acceleration. Fortunately, Windows 10 comes preloaded with Hyper-V, which is one of the best virtualization tools in the market.
You can discover Hyper-V’s status on your computer by running the systeminfo.exe command in your command prompt.


If Hyper-V is not installed on your computer, then Android Studio allows you to install HAXM through its SDK manager. HAXM is another hardware acceleration tool. HAXM is downloaded and installed through the same window you used to download the Android emulator.
If you install HAXM with Hyper-V already working on your computer, it is bound to cause problems.
Wait for the installations to complete, and then restart your computer and Android Studio.
Now, select Tools > AVD Manager (for Android Virtual Device), and explore the virtual devices.


Downloading a Virtual Device
There’ll be a default virtual device in your AVD manager when you download the Android emulator. However, you can download the device of your choice that has a different screen size or other specifications to test your application for your specific purpose or on a larger scale.
When you open the AVD manager, look at the bottom left corner and you’ll see a button for creating a new virtual device.


Each virtual device comprises some hardware and software configurations. The system image of a virtual device represents its software components.
When you set out to create a new virtual device, you’ll have to determine its hardware first. This is where you select settings like the screen size, screen resolution, screen pixel density, and RAM. You can define the hardware from scratch or use the default hardware options offered by Android Studio.
In the hardware selection menu, you’ll also get to see a Play Store icon beside some of the hardware choices. The system image of these devices will have a Play Store integrated into their interfaces.


Once you’re done selecting the hardware configurations, click next and you’ll be taken to the system image menu.
A system image comprises the Android version, its API level, and ABI. These selections have to be in accordance with your project.


Android Studio asks you about the minimum SDK requirements when creating a new project. These requirements include the API level and the Android version. Recall this information and select the system image accordingly.


Lastly, the ABI tells you about the processor architecture that the system image supports. Assuming you are a beginning Android developer, I would suggest you opt for the ABI that supports x86 architecture.
Select the most relevant system image, and click Next to download it if it isn’t downloaded already.
Further customizations take place on the last screen for creating a new virtual device. If you look at the bottom, you’ll see a button for the advanced settings. Here you can explore the camera settings, network settings, performance, and storage of your virtual device as per your application’s needs.


The performance section of the settings gives you three options:
- Cold boot: It will start your device as if you’re turning it on for the first time.
- Quick boot: It will remember the last state of your device, and the next time you run the Android emulator it will show you the same screen.
- Snapshot: This refers to the state of the Android emulator. You get to save the state yourself, and it’ll kick off from the same page the next time you run the emulator.
With all the settings in place, you’ve successfully created a new virtual device, and it should now show up in your AVD manager.
If you want to see how it looks, open the drop-down menu from the Actions column and select Cold Boot Now. The emulator will show up on your screen.


Running Your Application in the Android Emulator
If you want to test the code for your application, you will have to build and run it so that it shows up on the Android emulator.
There’s a green hammer on the top toolbar above. This builds your application. If there are no errors during the build, then look for a green play button on the same toolbar. This will run your application!


Sometimes, the emulator pops up showing you the home screen instead of your application. If this happens for you, just hit the play button again without closing the emulator, and your application will execute on the virtual device screen.
Running a Sample Project
If you do not have an application to run in the emulator and just want to experiment with it, Android Studio lets you download and run a sample project. To import a sample project, open the File menu and select New. In there, you’ll find an option for importing a sample project.


This way, you can build and run a sample project on your Android emulator.
Choosing From Multiple Virtual Devices
If you’ve downloaded more than one virtual device in your AVD Manager, then you’ll have to choose which device to use for running your application.
In the same toolbar where the green play button is located, you’ll find two dropdown menus. One of those is for virtual devices. If you open the menu, you’ll see a list of your virtual devices. You can select a single device or run the application on multiple devices to compare its responsiveness and performance.


Summary
Running your device on an Android emulator is an important part of the development process. It makes it much easier to debug and test your app. Without the emulator, developing your app can become considerably more challenging.
To set up the Android emulator, you need to:
- install the Android emulator
- enable virtualization on your computer
- set up a virtual device
- build your code
- and finally, run it!
This tutorial guides you through these steps to make sure you run your emulator smoothly so you can get to the more pressing task of developing your app.
Did you find this post useful?

Freelance Content Writer
Arooha Arif is a Freelance Content Writer.
She is great at copy but her love for long-form content — articles and blogs — exceeds all other forms of writing. This is mainly because she believes that long-form content is the most valuable asset because it helps the users along with building a business or brand’s trust and authority.
Arooha is dedicated to writing tech tutorials for Envato. She got interested in tech when she started a book blog back in high school. Since then, she has learned to code and can research out and solve any tech-related issue she faces as a full-time freelance writer.
Arooha Arif has majored in English Literature which is also where her passion lies. When she is not writing, she is reading classic novels or Rilke’s poetry. She believes an article does not only have to provide value; it must be a smooth and aesthetic experience for a reader.
Tech is only a small part of her expertise. Other than that, she likes to write content that is related to SaaS, marketing, and Personal Development.
If you want to contact her, reach out to her via her email address: aruha.arif07@gmail.com
Google’s latest mobile operating system » Android 12 » (codename Snow Cone) with API Level 31 has been released to Android de…
Google’s latest mobile operating system «Android 12» (codename Snow Cone) with API Level 31 has been released to Android developers, general public users, and mobile device manufacturers like Samsung, Huawei, Nokia, Sony, LG, HTC, Motorola, Lenovo, Xiaomi, Honor, Oppo, Realme, OnePlus, Vivo, Meizu, Asus, ZTE, Infinix, Tecno and many others for testing and experimenting of various Android Apps, Games and its compatibility with latest «Android 12 Update». After the recent announcement from Microsoft regarding the running of Android Apps on Windows 11-powered computers and laptops every Android developer and the general public user is excited and wants to install and run Android 12 on PC to experience all-new Android 12 features and functions on the big screen. So if you own Windows, macOS, or Linux computer or laptop then Android 12 Emulator is the best free way to run android apps on a computer via Android Studio software. In this article, we are sharing a detailed guide and tutorial on How to Install and Run Android 12 on PC with Android 12 Emulator integrated into Android Studio software.

There are several Android Emulators available online but I will recommend you to choose the official Google’s Android Studio Emulator tool to Install, Run, and Test Android Apps and Games for Android 12 Version on Computer without having Google Play Store and Android 12 compatible smartphones like Google Pixel. The full-fledged Android 12 installation on Windows, Mac, or Linux computers is not required when you use the Android 12 Emulator provided by Android Studio. So let’s start step-by-step guide below.
Step # 1: Download and install Java Tools (Choose Oracle JDK) as per your computer operating system.
Step # 2: Download and install Android Studio .EXE / .DMG / .TAR.GZ software for Windows, Mac or Linux.
Step # 3: Open Android Studio software on PC and create a new Android Development project. Navigate to Tools >> Android >> AVD Manager option at the top menu.
Step # 4: Create a new Virtual Device for the Android 12 version. Now inside AVD Manager, click on the «Create Virtual Device» option.
Step # 5: Select your Android device to emulate. Select «Google Pixel» device for the latest Android 12 Emulator for your computer or you can also select any other Android phone. Press «Next».
Step # 6: Now you can select Android OS Version. Just select «Android 12» and ensure API Level 31 is appearing at the right panel, now press the «Finish» button.
Step # 7: To begin the official Android 12 System Image download and installation, select «Accept», and press the «Next» option.
Step # 8: After the download and extraction process is completed, click «Finish».
Step # 9: Now Android Studio will display the System Image screen, just choose «Android 12» and ensure it’s showing API Level 31.
Step # 10: Android 12 Emulator will show the name for your AVD, enter any name and press the «Finish» button.
Step # 11: To Run Android 12 on Computer, just select the recently created Android Virtual Device (AVD) name on the Android Virtual Device Manager screen, and press the «Green Play Button» on the actions tab. Android 12 Emulator will run Android 12 on PC in few seconds and the home screen will also show.