- Активация «Платформы виртуальной машины» в Windows 11
- Установка Windows Subsystem for Android
- Установка WSATools
- Установка Android Debugging Bridge (ADB)
- Настройка Windows Subsystem for Android
- Настройка WSATools
- Установка APK-приложения в Windows 11
Раньше запуск Android-приложений на Windows-компьютерах мог осуществляться только при использовании программ-эмуляторов Android, например, BlueStacks или Nox App Player. Сейчас существует альтернативный способ — использование «Платформы виртуальной машины» и подсистемы «Windows Subsystem for Android» (WSA). Первая уже есть в составе Windows 11 — нужно лишь включить ее. Подсистему WSA потребуется установить отдельно через Microsoft Store.
Однако на активации виртуальной машины и инсталляции Windows Subsystem for Android дело не заканчивается. Следующая задача, с которой столкнется пользователь, это установка на компьютер APK-файла (т.е. Android-приложения). Существует, как минимум, два способа сделать это:
- Ручной. Предполагает установку инструментов Android Debugging Bridge (ADB), управление которыми осуществляется через терминал Windows при помощи специальных команд.
- Автоматический. Предполагает использование утилиты WSATools (также распространяется через Microsoft Store), которая возьмет задачу по работе с Android Debugging Bridge (т.е. инструменты эти все равно придется устанавливать) и терминалом Windows на себя.
Ручной способ рассматривать не будем (даже в автоматическом довольно много чего нужно проделать).
Активация «Платформы виртуальной машины» в Windows 11
Здесь все просто:
- Запустите системную утилиту Выполнить, используя комбинацию клавиш Win + R, впишите в нее команду OptionalFeatures и нажмите ОК:

- Откроется новое окно Компоненты Windows. Найдите в списке компонент Платформа виртуальной машины, установите галочку перед ним и нажмите ОК:
- Дождитесь окончания активации виртуальной машины, что может занять несколько минут:
- Далее нужно будет перезагрузить компьютер.
Установка Windows Subsystem for Android
Программное обеспечение Windows Subsystem for Android распространяется через Microsoft Store, однако попытки найти его непосредственно через приложение магазина могут не увенчаться успехом (почему-то в результатах поиска отображается «Windows Subsystem for Linux»). В этом случае действуем по следующей схеме:
- Запускаем любой браузер и переходим по этой ссылке (ведет на страницу загрузки Windows Subsystem for Android на сайт Microsoft Store) и нажимаем кнопку Get in Store app в правом верхнем углу:
- Теперь в приложении Microsoft Store на компьютере откроется нужная нам страница — нажимаем кнопку Установить:
- Откроется еще одно небольшое окно. Нажимаем в нем несколько раз Далее и дожидаемся окончания скачивания и установки Windows Subsystem for Android (размер приложение составляет примерно 1 ГБ, потому нужно будет подождать).
Установка WSATools
С этим приложением не должно возникнуть никаких проблем. Просто выполните поиск по запросу «WSATools» в Microsoft Store и установите программу, кликнув по кнопке Получить:
Установка Android Debugging Bridge (ADB)
Инструменты Android Debugging Bridge распространяются в виде портативных утили в ZIP-архиве. Нам нужно скачать его, распаковать в любой папке на компьютере, а затем указать в настройках WSATools место распаковки:
- Перейдите на официальную страницу ADB.
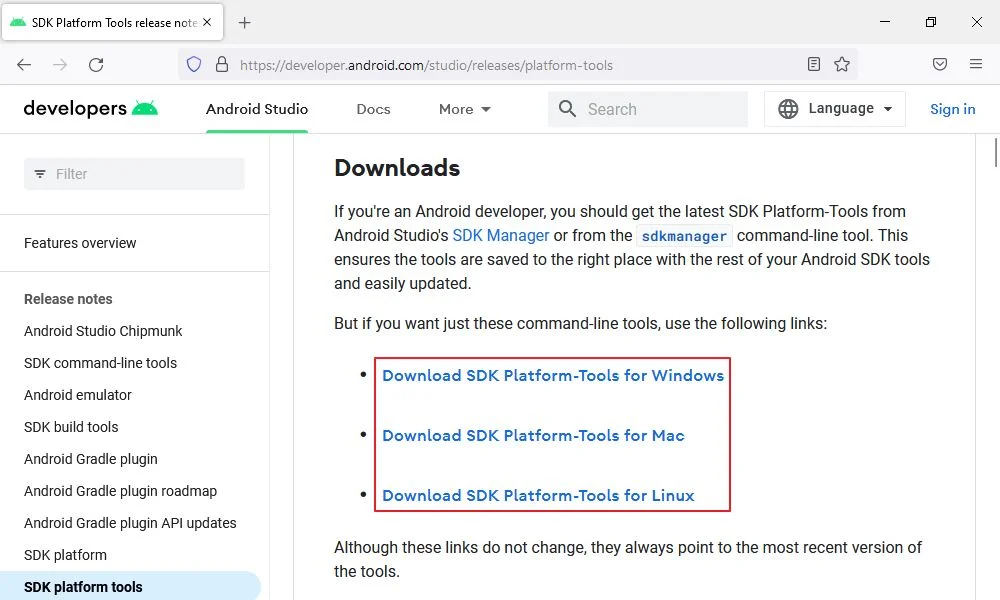
- Прокрутите страницу до раздела Downloads и кликните по ссылке Download SDK Platform-Tools Windows.
- Сохраните ZIP-архив «platform-tools» в любой папке на компьютере и распакуйте его.
Теперь перейдем к настройке всего того, что было скачано.
Настройка Windows Subsystem for Android
При установке приложений из Microsoft Store ярлыки для их запуска не появляются на рабочем столе, но их можно найти в меню Пуск или в специальной папке Приложения через Проводник. Второй вариант удобнее. Просто скопируйте в адресную строку Проводника или в системную утилиту Выполнить команду:
shell:::{AD1405D2-30CF-4877-8468-1EE1C52C759F}\Apps
Кликните пару раз по значку Параметры подсистемы Windows для Android:
В открывшемся окне перейдите во вкладку Разработчик и активируйте Режим разработчика:
Настройка WSATools
Запустите утилиту WSATools из папки Приложения по аналогии с запуском подсистемы Windows для Android. Дальнейшие действия:
- В главном окне WSATools кликните по значку с изображением шестеренки, чтобы перейти в настройки программы:
- Раскройте блок Custom ADB Location, затем кликните по кнопке Select adb.exe и укажите путь до файла «adb.exe», который хранится в папке, куда был распакован ранее архив «platform-tools»:
- Нажмите Save для сохранения настроек.
Оставьте программу запущенной. Переходим к завершающей части нашей инструкции.
Установка APK-приложения в Windows 11
После сохранения настроек WSATools кликните по кнопке Install an APK в главном окне программы. Если все правильно установлено и настроено, должно открыться окно выбора APK-файла. В качестве примера мы установим и запустим Android-версию браузера Opera:
Скорее всего (зависит от того, откуда был скачан APK-файл), WSATools выведет сообщение о невозможности получения информации об устанавливаемом приложении. Нажмите Install Anyway, чтобы проигнорировать это:
Далее в левом нижнем углу кликните по кнопке Install. Это приведет к отображению нового окна Разрешить отладку ADB?. Поставьте флажок напротив Всегда разрешать с этого компьютера и нажмите кнопку Разрешить (если галочку не ставить, то это окно будет появляться при каждой установке APK):
Дождитесь окончания установки APK-приложения:
Если все прошло успешно надпись «Application installed successfully» отобразится на зеленом фоне (если он будет красным, значит, APK не был установлен). Кликните по кнопке Open App:
Последнее действие не обязательно приведет к запуску установленного APK. Не страшно. Откройте меню Пуск, перейдите в нем в раздел Все приложения и найдите имя только что установленного приложения (можно также воспользоваться поиском). В нашем случае это «Opera»:
Дождитесь запуска подсистемы Windows для Android:
Наконец, мобильный браузер Opera был запущен в Windows 11. Перейдем на сайт 2ip.ru, чтобы привести доказательства:
Как можно видеть, напротив графы Операционная система написано «Android 13».
- There’s a way to sideload Android apps APK installers using ADB and WSA. Learn how below:
- With Windows 11 one of the most touted features was the ability to run Android apps.
- The only problem currently is that you can only install Android apps from the Amazon Appstore.
One of the staples of Android is the ability to install anything you want. You will most likely install and update new apps from the Google Play store, but you can, if you wish, download apps from somewhere else and install them like you would in a standard operating system.
Windows 11 offers the same option, but it’s not very straightforward, such as installing WSA (Windows Subsystem for Android) and the Amazon Appstore (follow our full guide here). Let’s see how it’s done.
CONTENTS
- 1 Download ADB (Android Debugging Bridge)
- 2 Set Up WSA for Debugging and Get the Virtual Device IP
- 3 Download APKs for the Android Apps You Want to ADB Sideload
- 4 Use Command Prompt to Connect to WSA with ADB and Install Android APKs
Download ADB (Android Debugging Bridge)
First, download the official Android SDK Platform Tools, which we’ll use to connect to the WSA virtual machine which is seen as an Android device.
ADB is available for Windows, Mac, and Linux. I’ve downloaded the archive for Windows and then extract its contents into a platform-tools inside the Download folder in the current user account. You can download and extract it anywhere you wish, just remember where you did it. You’ll need it later.
Set Up WSA for Debugging and Get the Virtual Device IP
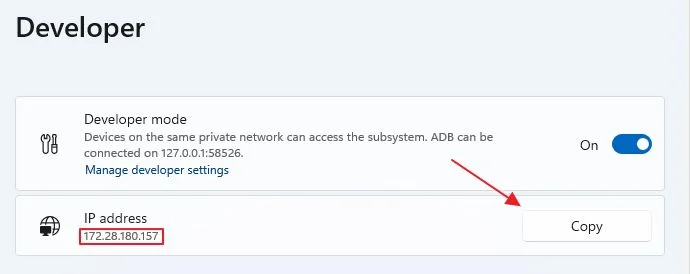
Open the Windows Subsystem for Android Settings, head on to the Developer menu on the left side, turn on Developer mode, then hit refresh below to get an IP address.
It’s likely that at first, you’ll see Unavailable under the IP address. Click above, on the Manage developer settings link to force the WSA virtual machine service to start. You can then copy the new IP.
Download APKs for the Android Apps You Want to ADB Sideload
This is a tricky part because you must be careful where you download apps from. It’s easy to get a hacked version from “somewhere” that can cause serious troubles, even in a sandboxed virtual machine. I’m not recommending any website, in particular, I’m just warning you.
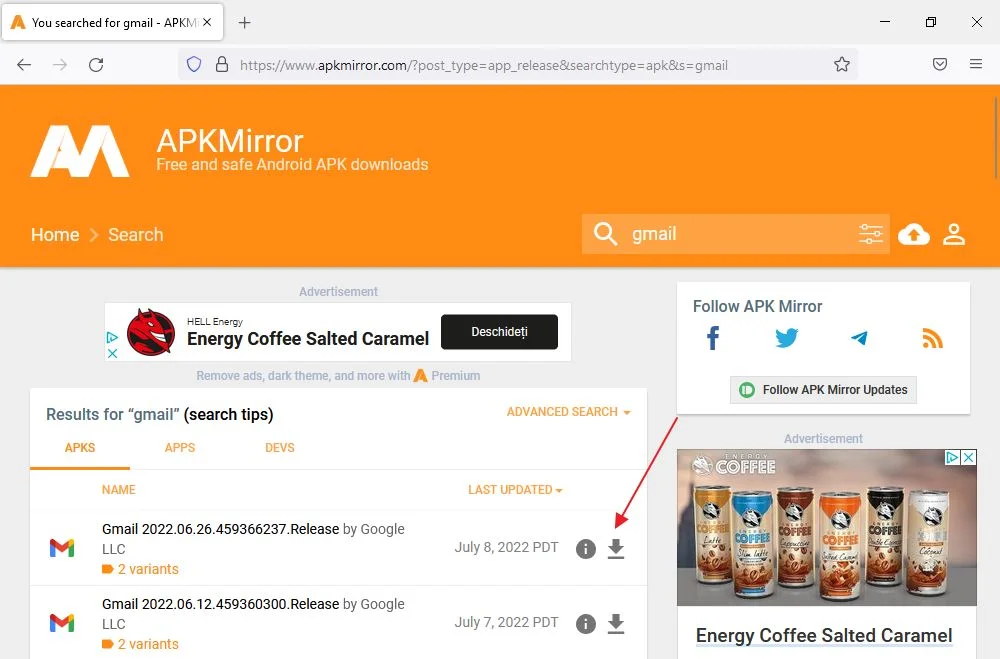
For this example, I’m using APKMirror. Use the (1) search bar and find the app you want, (2) download and (3) rename the files to something easier to type and (4) move the APKs to the same folder where you have extracted ADB archive contents.
Use Command Prompt to Connect to WSA with ADB and Install Android APKs
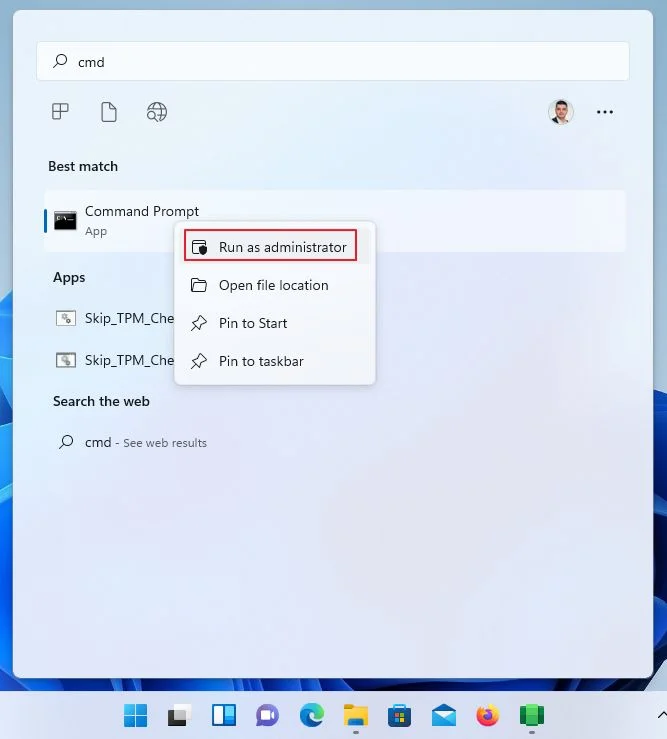
Now let’s get to business. You need to launch Command Prompt (type cmd in the Start menu) and Run as Administrator.
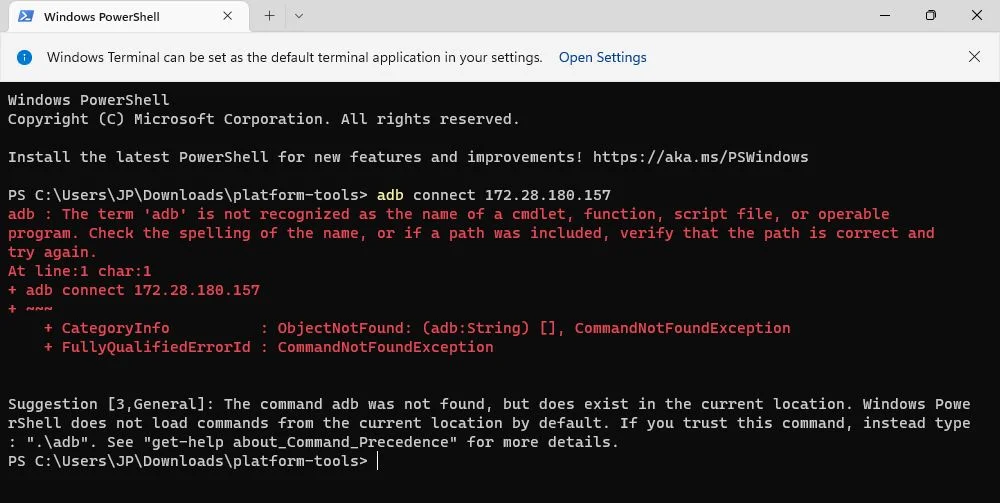
For some reason, you can’t use the Terminal app or PowerShell. You must use Command Prompt and you must start the app with administrator rights.
Navigate to the folder you extracted ADB using the Command Prompt basic commands from this article. My sequence, which won’t apply to you, was:
cd\
cd Users
cd JP
cd Downloads
cd platform-tools
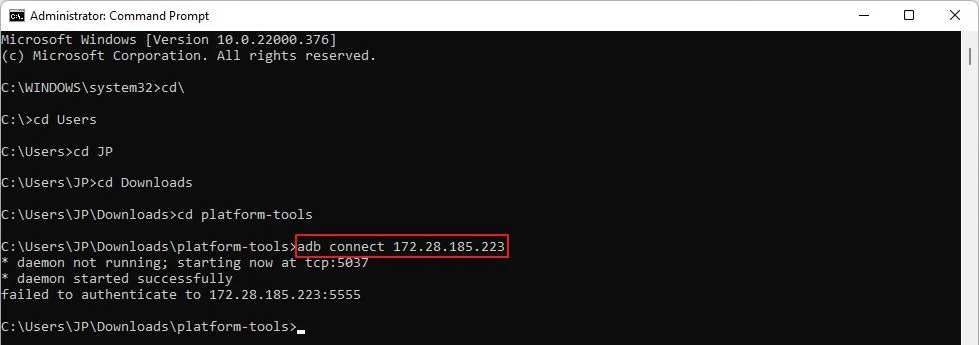
To connect to the Android virtual device type and use the IP address copied from the WSA developer menu:
adb connect IP_ADDRESSYou’ll know you got it wrong if you see this message:
If everything is OK you’ll see a success message:
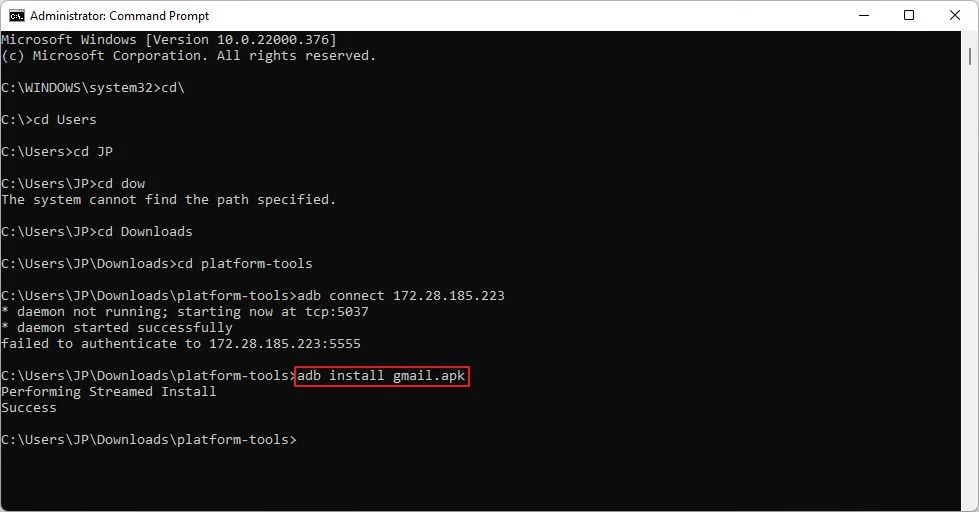
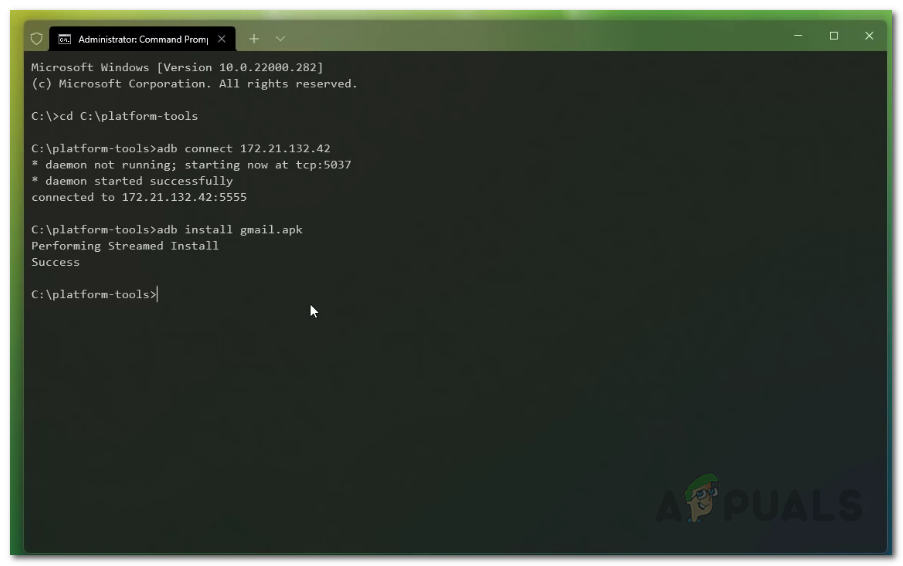
Next, we will install the Gmail app. For simplicity, I’ve renamed it gmail.apk. Type the following ADB sideload command:
adb install gmail.apkAfter a few seconds, you should see a success message like this:
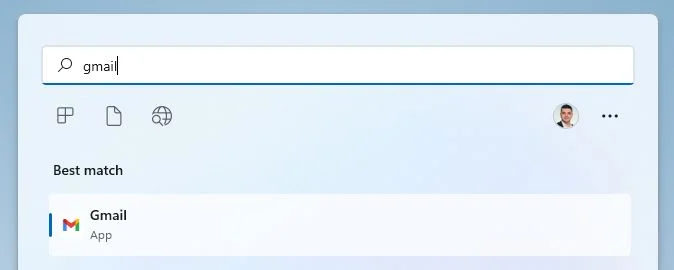
Now the app is installed just like any other Windows app. Open the start menu and type Gmail to open:
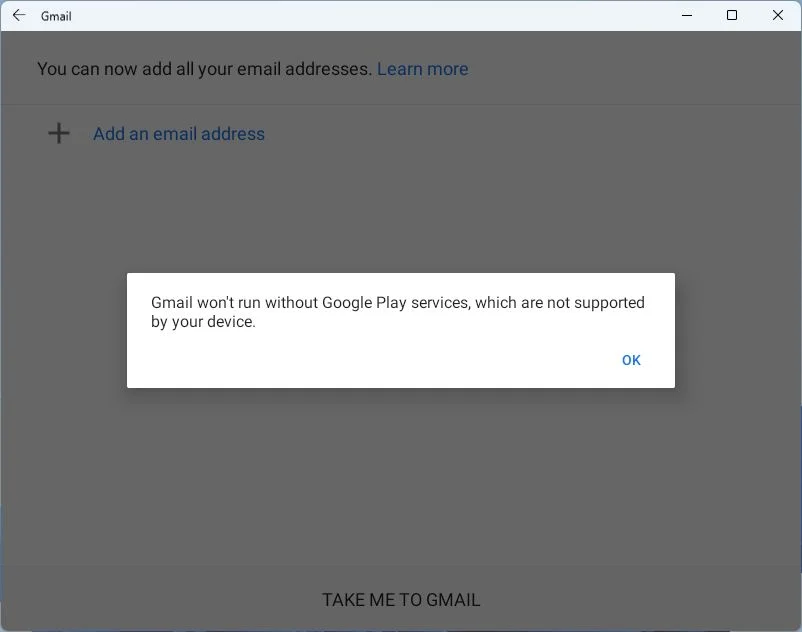
While you can install most Android Apps from the Google Play store there’s currently no way to install Google Play Services in WSA, so apps that rely on them won’t work, such as Gmail and Google Photos.
Yeap, Gmail starts, but won’t actually function properly because currently there’s no official way to use the Google Play Store and its underlying services that run in the background. There are unofficial ways, which we’ll explore in a different article.
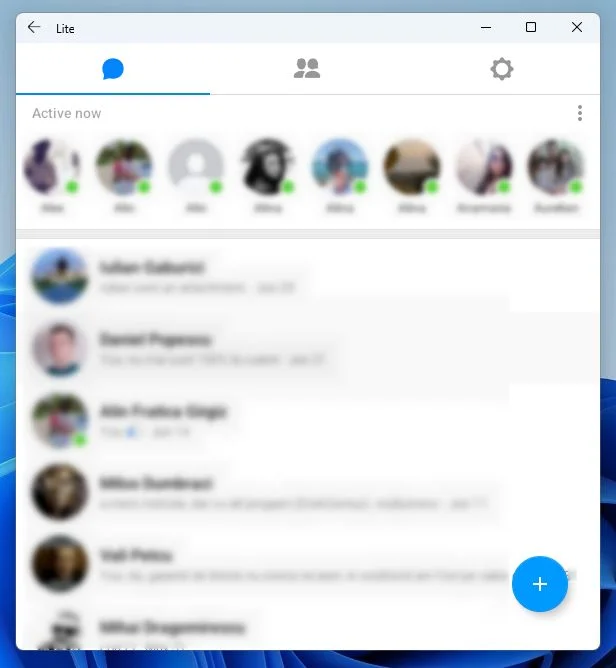
That’s a bit of a bummer, but there are plenty of other Android apps you can run under Windows 11. I’ve tried the Facebook Messenger Lite app and it ran flawlessly. See below:
As I’ve previously said, I get the feeling Microsoft still needs to figure out where it wants to go with the functionality to run Android apps in Windows 11. Most users are not interested in this, but if the process is easy enough to replicate it might get quite a few people on board eventually.
Right now that’s not happening because you only get access to the Amazon Appstore, and only if you’re in the US. For more advanced users there’s the option to sideload Android apps in Windows. I hope this guide helps you do just that.
I’m passionate about technology, science, and movies. I write about tech since 2003.
Table of Contents
Let’s look at how to use Windows Subsystem for Android and Android Debugging Bridge (ADB) to install any standard Android app package (APK) in Windows 11. This guide will cover the complete process to help you run any Android app in Windows 11.
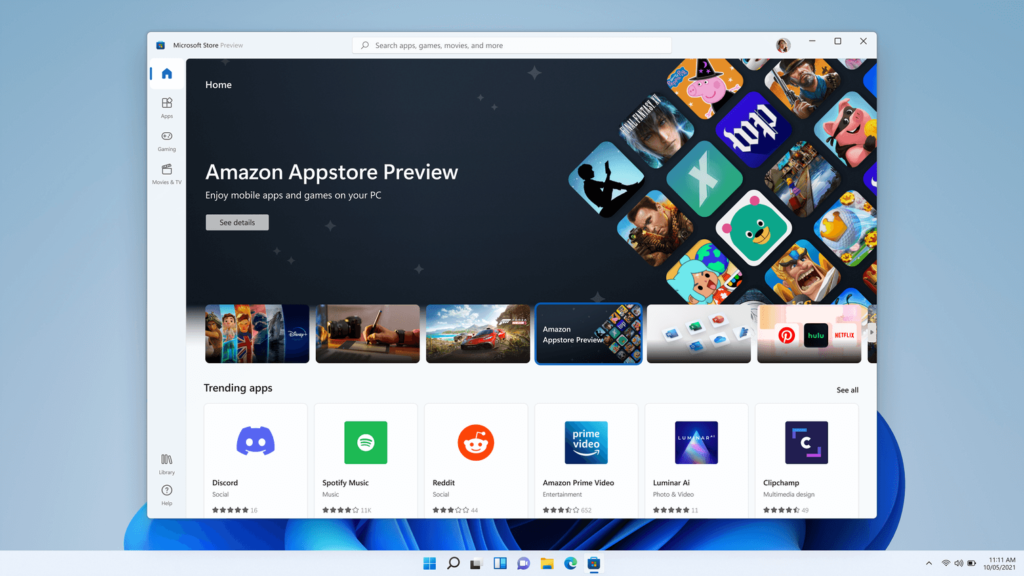
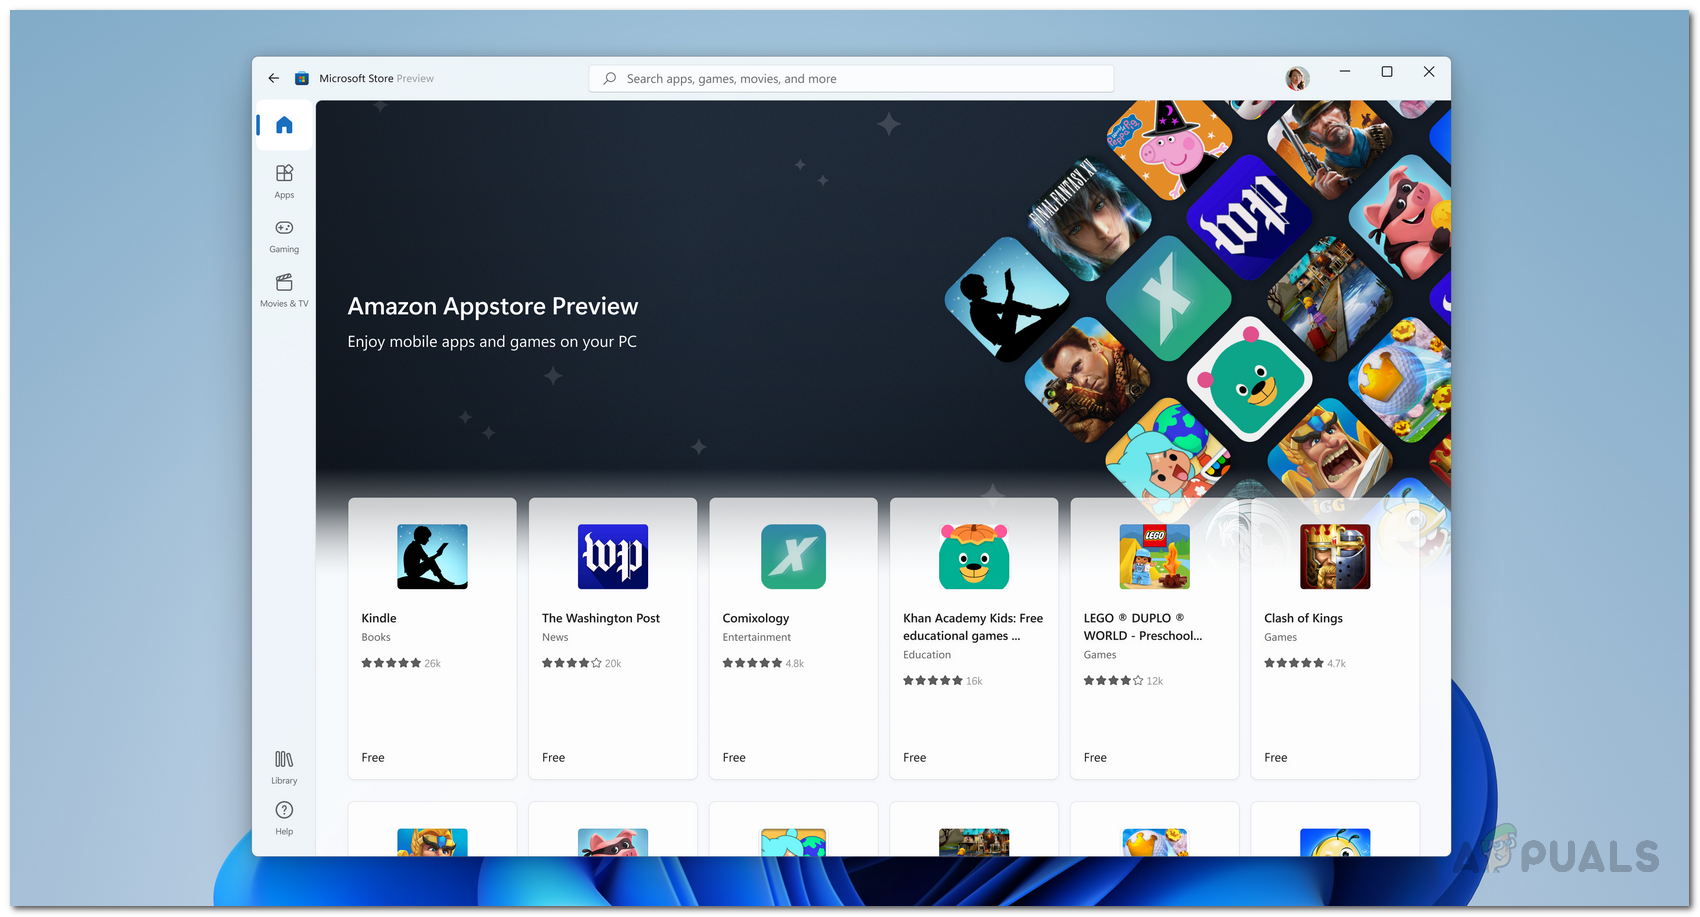
Microsoft is partnering with Amazon to implement the integration of the Amazon AppStore with the Microsoft Store. This means you can’t officially access the vast library of apps on the Google Play store. At the moment, not even all applications from the Amazon AppStore are available for testing. Insiders can only test Microsoft and Amazon’s approved 50 selected apps.
Fortunately, Microsoft immediately enabled debugging of the Windows Subsystem for Android. As a result, you can access and debug the Android virtual layer on the Windows 11 host system using the Android Debugging Bridge (ADB) tool. You can use ADB to install any standard Android app package (APK), including uploading to the subsystem of applications that are not available in the Amazon AppStore.
How to Install any Android App in Windows 11
Part 1: Install Windows Subsystem for Android on Windows 11
The Windows subsystem for Android is in beta testing. Applications approved by Microsoft and Amazon were likely further optimized for the subsystem, so they secured their places in the first batch. There is no guarantee that other applications will work correctly right away. The only way to test compatibility in practice is to run the application in the Windows Subsystem for Android.
Step 1: Enable Virtualization in Windows 11
Here is a complete guide that you can use: How to Enable Virtualization in Windows 11? Easy Guide – TechRechard
Step 2: Enable Virtual Machine Platform
Press Win+R and enter optionalfeatures and press Enter.
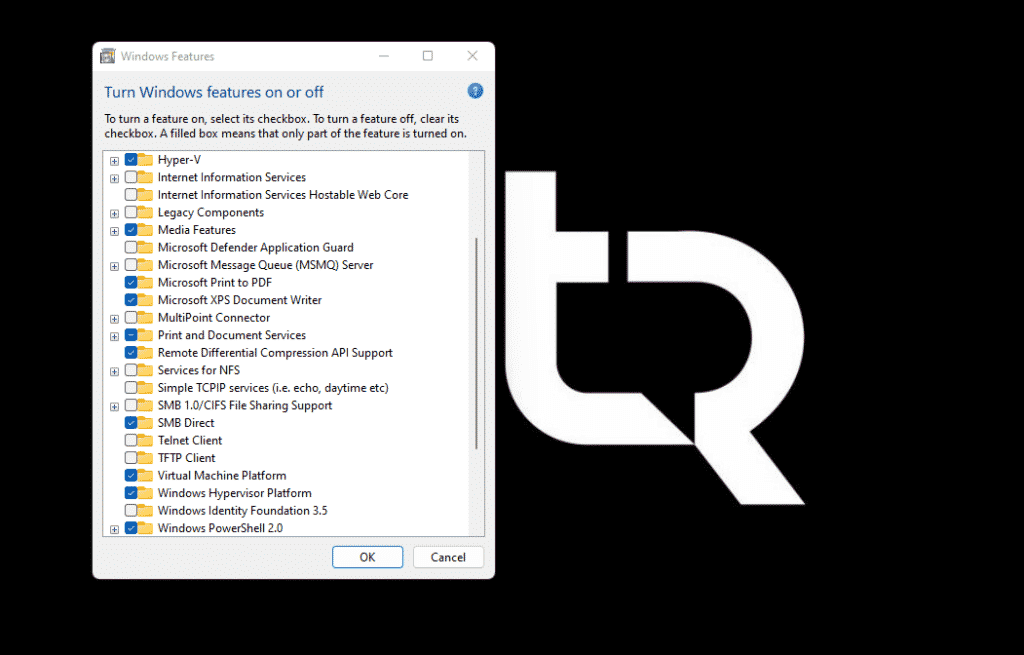
In the Windows Features window, enable “Virtual Machine Platform,” “Windows Hypervisor Platform,” and “Hyper-V.” Once completed, kindly restart your PC.
Step 3: Install Windows Subsystem for Android from Microsoft Store or Archive.
If you are from the U.S., you can use this direct link. Or, follow the steps below.
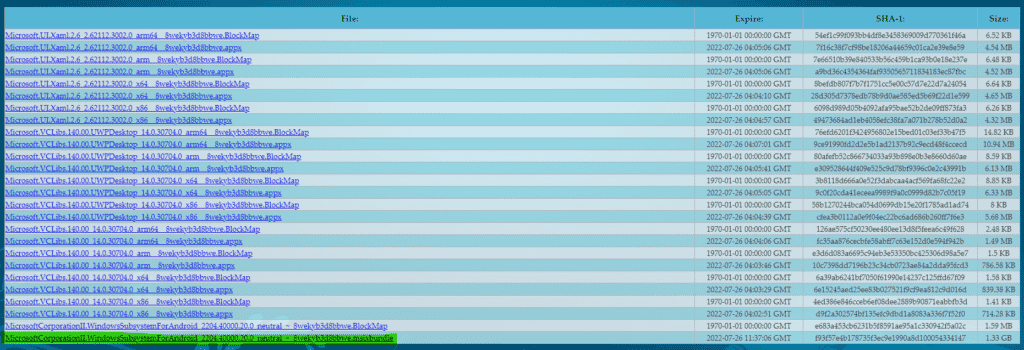
The first thing to do is download the latest MSIX package for Windows Subsystem for Android (Android 12.1) from the link here. Open the link and choose “ProductID” in the left drop-down menu. After that, paste 9P3395VX91NR in the text field and keep “RP” as it is. Now, click on the “Done” button on the right.
Scroll down below and download file named: MicrosoftCorporationII.WindowsSubsystemForAndroid_2204.40000.20.0_neutral_~_8wekyb3d8bbwe.msixbundle
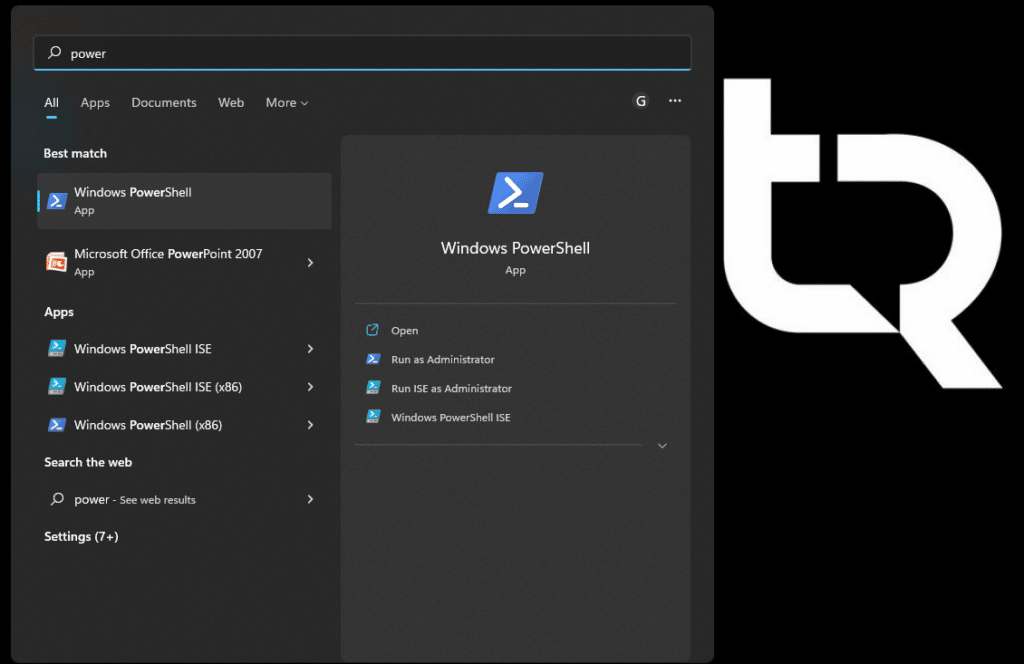
Now, open Powershell as administrator.
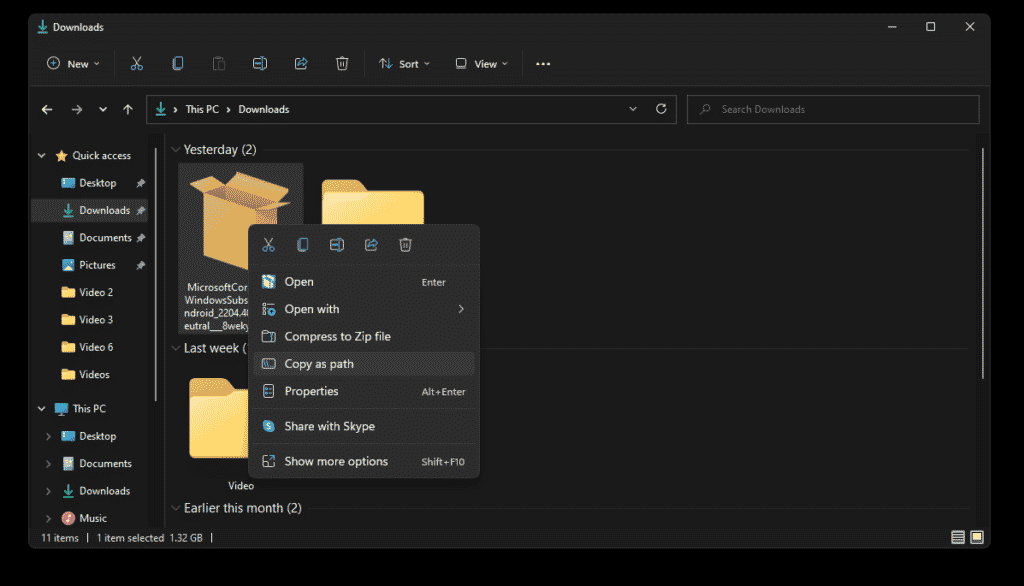
Copy the path of the msibundle file you just downloaded.
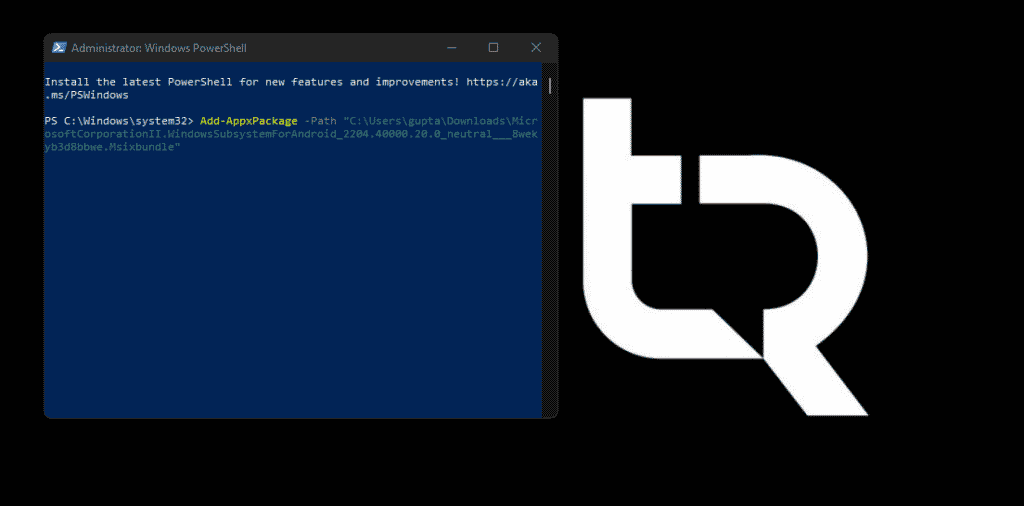
On Powershell, type:
Add-AppxPackage -Path filepath
Part 2: Install any Android App in Windows 11
To download any Android app to Windows 11 for Android, follow these steps:
- Download the APK file of your desired application or game from a trusted source.
- Projects supported by the community are available in third-party forums (XDA etc.).
- Open source application APKs are often found on GitHub repositories or on third-party sites such as F-Droid.
- Finally, there are third-party resources with APKs, such as the Mirror APK and APKPure.
- Once you have obtained the APK file, start the Windows Subsystem environment for Android. Go to the Start menu > All Apps > Windows Subsystem for Android.
- Subsystem settings will open. You need to activate the Developer Mode switch.
- Since the Android environment runs next to the kernel of the Windows host system, we can access it through the localhost interface (127.0.0.1). The Android layer also communicates with a random IP from the private network 172.30.0.0/24, which is visible under the IP address.
- If you cannot see the IP address in the form 172.30.x.x, click on the Files option at the top of the Settings screen to go to the subsystem file system in the built-in Explorer. Then click the Refresh button next to the IP address option to get the IP address. Now you can copy it at the touch of a button.
- Now we can connect using ADB from the Windows 11 host system. To establish a connection, you can use localhost (127.0.0.1) with port 58526 or the IP address shown in the settings window.
- Configure ADB:
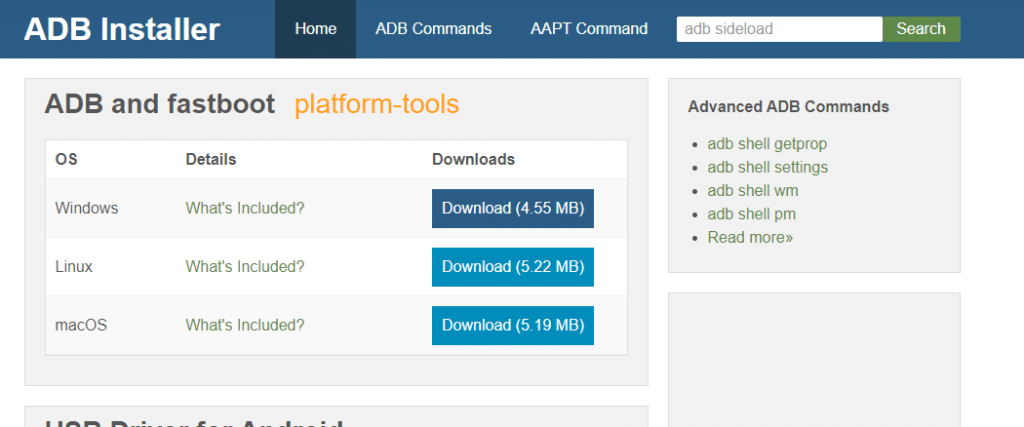
- Open the ADB Installer website and download platform-tools for Windows under ADB and fastboot.
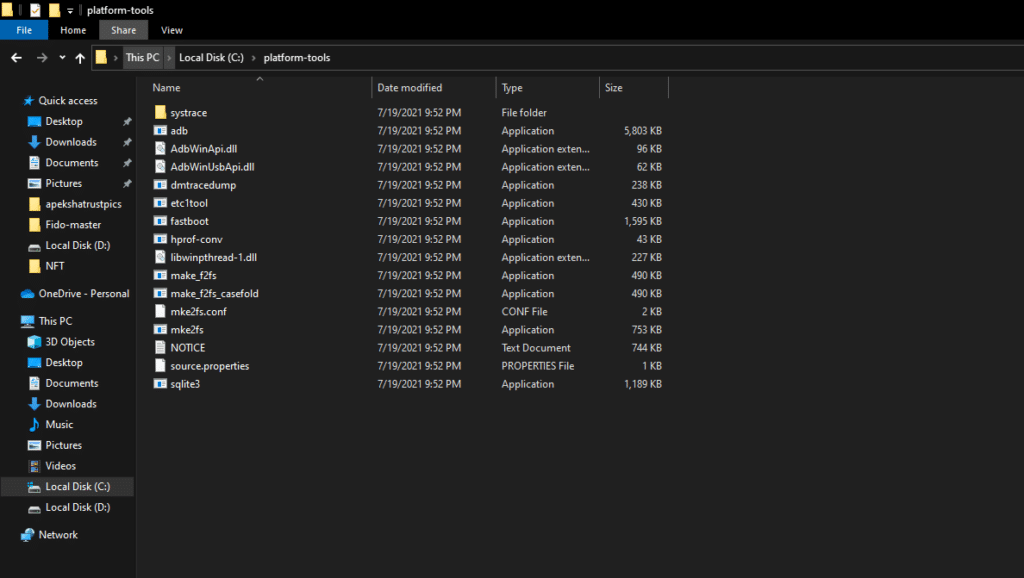
- Unpack the downloaded archive and move the platform-tools folder to a convenient location. In our example, this will be
C:\platform-tools
- Open a new Windows terminal window and navigate to the ADB location:
cd C:\platform-tools
- Next, type one of the following commands:
adb connect 127.0.0.1:58526
or
adb connect IP-address
(Replace the IP address with your IP address from the previous step.)
- Now you can install our APK via ADB. The command should be as follows:
adb install "spark.apk"
- In our example, we downloaded the Spark email client apk file on the Apk Mirror website.
- If it goes correctly, the shortcut to the Android app will be created in the Start menu. Tap the shortcut to launch the app.
- If you can’t find the Shortcut to the Android app, you can manually launch it using the following command:
%LOCALAPPDATA%\Microsoft\WindowsApps\MicrosoftCorporationII.WindowsSubsystemForAndroid_8wekyb3d8bbwe\WsaClient.exe /launch wsa://<PACKAGENAME>
- For example, to run the Spark application, type the following in the Run on Windows window:
%LOCALAPPDATA%\Microsoft\WindowsApps\MicrosoftCorporationII.WindowsSubsystemForAndroid_8wekyb3d8bbwe\WsaClient.exe /launch wsa://com.readdle.spark
- You can also call the application directly from the ADB Shell window:
adb shell monkey -p <PACKAGENAME> 1
- To run a Spark application, the command must be:
adb shell monkey -p com.readdle.spark 1
You’re done!
Conclusion:
I hope this guide on How to run any Android app in Windows 11 was easy. If you face any issues, please comment below.
Also, note that unofficial applications will have access to the network. Thus, you can install and use popular mobile browsers inside the Windows subsystem for Android, such as Firefox. Browsers can be used to download other applications. Windows 11 also allows you to apply firewall rules to Android apps. Although you can install an app that depends on Google Apps, it won’t start because it doesn’t exist. As a workaround, you can use microG.
Android Debug Bridge (ADB) is a useful command-line tool Google created for developers who want to access the hidden settings of different Android devices.
It has three components that work together to establish communication between your computer and a device: a client, a daemon (adbd), and a server. The client represents your PC that you will connect to your handheld device, and this is the component that sends commands using a USB cable. Meanwhile, a daemon runs commands on a device, while the server is the one that manages communication between the client and the daemon. Unlike the daemon that runs as a background process on a device, the server runs as a background process on the computer.
ADB can be used on different computer systems, such as Windows, macOS, and even Linux. But in this case, we will highlight its use on Windows 11. It is important to note, however, that ADB is not a tool readily installed on your computer. You need to initiate its download, but the good news is that Google provides direct links to where you can download the ADB for Windows 11.
Nonetheless, understanding the tool’s use is crucial before you download it. Google created ADB for developers, which means it will give you high-level tweaks for your phone or other Android devices. Specifically, it establishes communication between the device and the computer, allowing you to debug the former’s system and its apps, access a Unix shell, and perform other commands.
Installing ADB drivers on your Windows 11 PC
Here is a step-by-step process to install the ADB drivers on your Windows 11 PC.
- On an ADB user guide page provided by Google, you can access the link to the download page of the ADB tool. It offers the ADB drivers in three options, depending on your computer’s operating system. Choose the first one to get the latest version you can use for your Windows 11.
- Clicking the “Download SDK Platform-Tools for Windows” option will bring you to a prompt page. Just check the box and click the Download Android SDK Platform-Tools for Windows button to start the download.
- Once the ZIP file is downloaded, you have to move and then extract the folder to a folder you can easily access. We recommend having it on your Windows 11 PC’s root (C:\) drive.
- To perform the extraction process, just right-click the ZIP file and select the “Extract all…” option. After that, a prompt will appear. Just select the “Extract” button to continue.
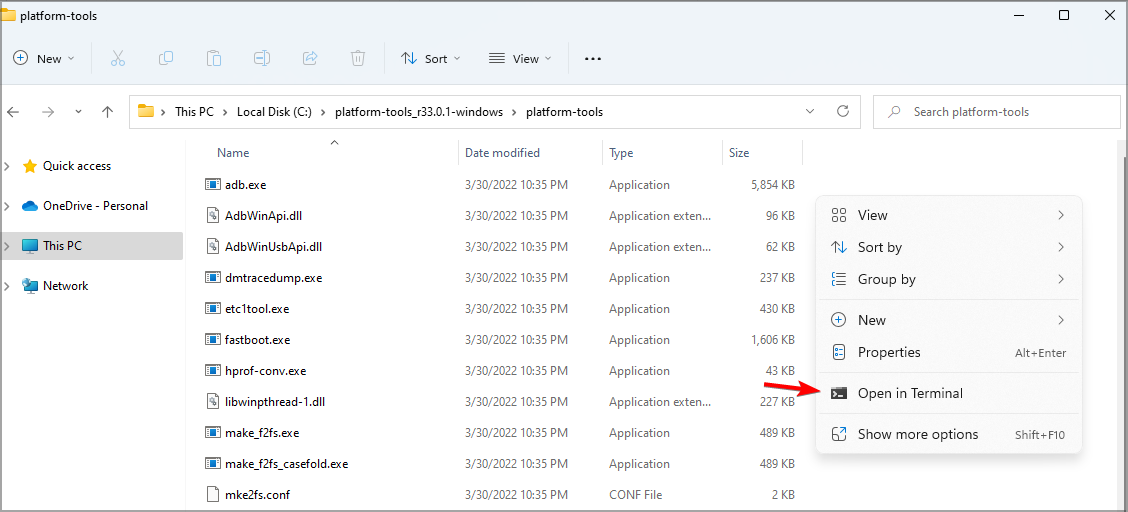
- Open the folder you extracted and right-click within it. Select the “Open in Terminal” option to launch Windows PowerShell command prompt.
Activating ADB debugging on Android device
Downloading the ADB drivers is not just the only thing you should do in order to run ADB commands on Android devices. You also have to prepare your phone or tablet for the communication between the ADB components to work. Here’s how you can enable ADB debugging on your device.
- You need to enable the Developer Mode, which is hidden by default. To do it, go to Settings > About Phone > Build Number. Quickly tap the Build number seven times to activate the mode.
- Once activated, the Developer Options of the device’s system will appear. The placement of the section differs depending on your phone mode or brand. You can find it upon opening the Settings; sometimes, it is inside the Systems and Updates area and other places. It could also be named differently on other devices.
- Go to the Developer Options and activate the USB Debugging option under the Debugging section.
- Connect your device to the Windows 11 PC using a USB cable, and change the USB mode to “file transfer (MTP)” mode.
- Your device will show a dialog asking permission for USB Debugging that allows debugging through this computer. Tap “OK” to continue. You can also check the box within the dialog box, so you won’t have to do it every time you connect the device to the PC.
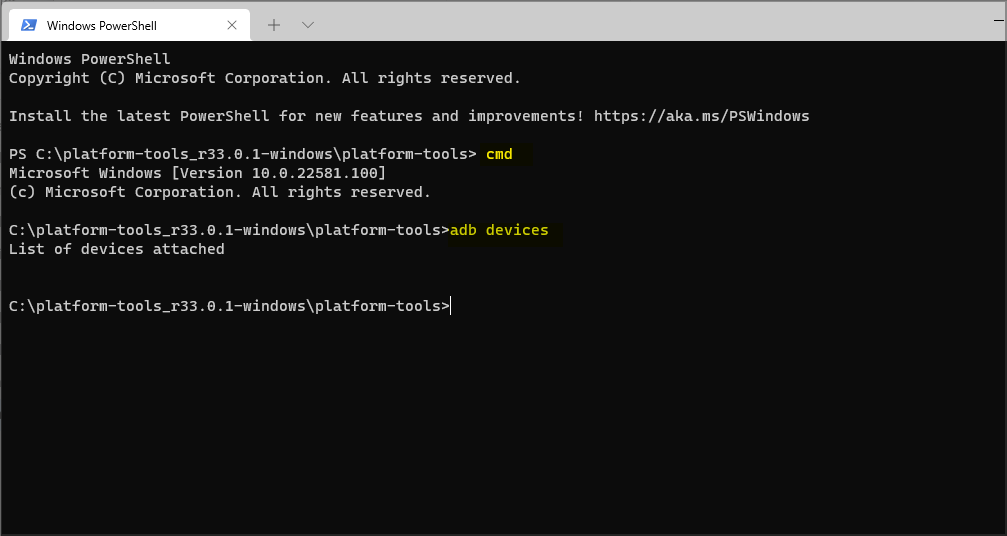
Once everything is set (ADB driver is installed, the Developer Options of handheld Android device is activated, and the device itself is connected to PC via USB cable), you can verify if your device is successfully connected to the PC. Just execute on the Command Prompt window of your PC the commands “cmd” and “adb devices.” Doing so will show you the “List of devices attached.”
Using a USB cable when performing ADB debugging is commonly used by developers, but it can also be done wirelessly on specific devices connected over Wi-Fi. Setting up the devices require more work, but it removes common USB connection issues like driver installation.
ADB can be used on devices running different Android operating system versions. However, note that the instructions for wireless debugging differ on devices running Android 11 or higher and Android 10 and lower. Here’s how you can do it.
Wireless debugging for devices running Android 11 and higher
- Before starting, it is required that the Windows 11 PC and the device are both connected to the same wireless network.
- Enable the Developer Options of your device using the same steps mentioned above.
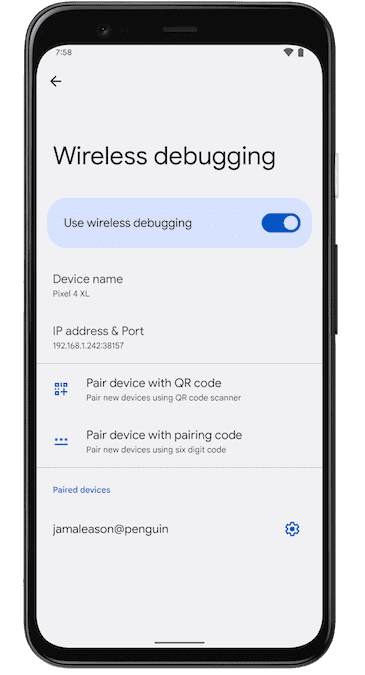
- In the Developer Options, go to the Debugging section and activate “Wireless debugging.” Select “Allow” when you receive a prompt.
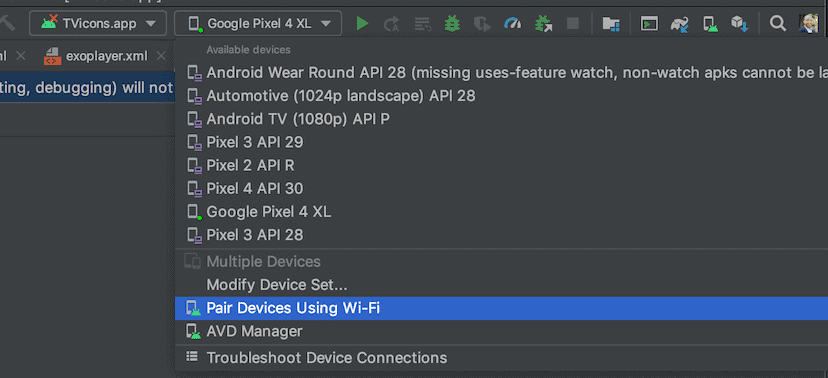
- Launch the Android Studio Bumblebee on your PC, and select “Pair Devices Using Wi-Fi,” which you can access through its run configurations dropdown menu. You’ll see a popup window to pair devices either using a QR code or a pairing code.
- Check your device and tap “Wireless debugging” to start the pairing. As said, there are two ways to do it: via a QR code or a pairing code. Choose which one suits you better.
Wireless debugging for devices running Android 10 and lower
- Connect your device and PC to the same Wi-Fi network.
- Connect the device to the PC using a USB cable, and set the device to wait for a TCP/IP connection on port 5555.
- Disconnect the device from the Windows 11 PC by removing the USB cable.
- You can now connect to the PC using the IP address of your Android device.
- In case the connection is lost, just execute the “adb connect” or “adb kill-server” commands, with the latter requiring you to repeat the process all over again.
There are instances that you could encounter problems establishing the connection between the Windows 11 PC and your Android device, and the reasons might differ depending on the type of debugging you are using. For instance, wireless debugging can be problematic if the PC and device are separately connected to two different networks. It could also happen if no ADB drivers are installed on the PC or when they are outdated. For wired debugging, a faulty USB can also lead to problems.
Once everything is fixed, using the ADB can give you a lot of things to explore on your Android devices. It can deliver a wide variety of commands, from copying files to customizing the OEM features or user interfaces and many more. In the Android Studio Users Guide document, Google provides a list you can try to run commands to set up port forwarding, stop the ADB server, issue shell commands, and more.
Using them, you can get more control over the Android device and make relevant tweaks. Nonetheless, while ADB is not generally harmful (it doesn’t make changes to PC), inappropriately using it can lead to some problems. With this, you might want to assess your reasons for using it and your skills and knowledge before installing ADB drivers and executing ADB commands.
Microsoft has recently made Windows Subsystem for Android available to the Windows 11 Beta channel users. Windows Subsystem for Android is essentially the infrastructure that will allow everyone, hopefully in the near future, to run Android apps natively on the operating system. This will get rid of any third party emulators that you might have been using to run Android apps on your Windows machine. This feature is currently only available in the Windows Insider Program, however, it won’t be long before everyone gets to enjoy running the apps natively. In addition to all of that, Microsoft, at this current time, only allows you to run a few selected apps on your operating system and more apps will be made available as the beta phase moves on.
As it turns out, Microsoft has partnered with Amazon to use the Amazon Appstore on Windows machines to download Android apps. While this sounds really cool, to be able to run Android apps on Windows 11, some users may be disappointed a little. The reason being that Amazon Appstore is supported which means that you are not allowed to make use of the vast library of apps and games that are present in the Google Play Store — at least officially. Thankfully, we are here to change that and by following this article, you will be able to run almost any Android app on your Windows machine.
How does this work?
Like we have mentioned initially, at the core of all of this, is the Windows Subsystem for Android environment. Fortunately, this environment has a debugging option available that can be used to install other Android apps on your system.
Now, in order to use this said debugging option, we will be making use of the Android Debugging Bridge binary which can be used any Android APK file on a device. With the help of ADB, we will be able to sideload any Android apk files which gives you a wider range of applications other than the ones that are just available on the Amazon Appstore. With that said, let us get started and show you how to sideload Android apps on Windows 11.
As it turns out, the first thing that you need to do in order to sideload Android apps is to download the Android Debugging Bridge binary on your computer. To do this, follow the instructions down below:
- First of all, open up this link in your browser which will automatically download the latest version of the Android SDK Platform Tools on your computer.
- Once you have downloaded the zip file, extract it to any desired location like your C: drive. Doing this will give you a platform-tools folder in your C: drive.
- And you are done.
Now that you have downloaded Android Debugging Bridge on your computer, we can use it to sideload Android apps on Windows 11 operating system. Before proceeding, it is important to note that the Windows Subsystem for Android is currently available in Insiders Preview only which means that it is currently in the beta phase. Therefore, there are going to be bugs with the environment and it may not always work flawlessly which is something you should keep in mind.
In addition to that, there is the issue of compatibility. The reason that you are able to run only selected apps through the Amazon Appstore itself right now is that those apps are probably highly optimized for Windows Subsystem for Android. This means that not all the apps that you try may work initially due to certain issues. However, having said that, since there is an underlying Android layer, you should be able to sideload most of the standard Android apps without facing any issues. Assuming that you have already installed Windows Subsystem for Android, let us get started and show you how to sideload Android apps:
- To start off, you will need to download the APK file of the app that you wish to sideload. There are different ways you can get the APK file, for example, in the case of an application that is driven by a community, you will be able to find it on forums. Alternatively, there are third-party websites available as well that host the APK files such as APK Mirror and more.
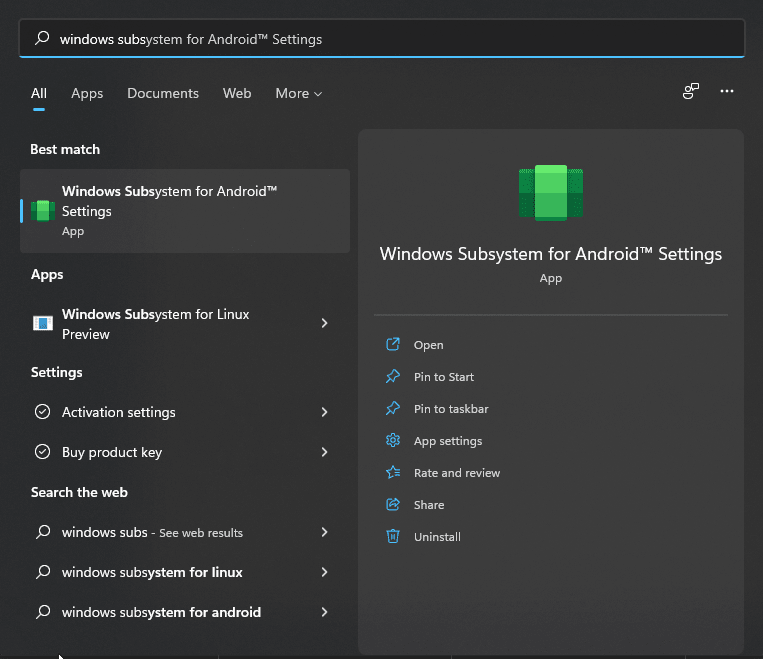
- Once you have downloaded the APK file, go ahead and open up the Windows Subsystem for Android settings window by searching for it in the Start Menu.
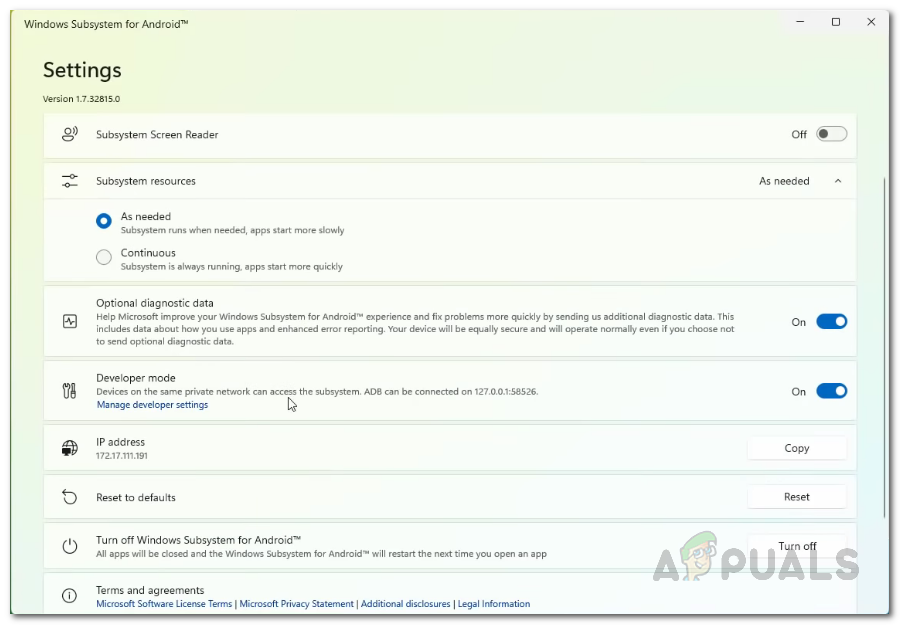
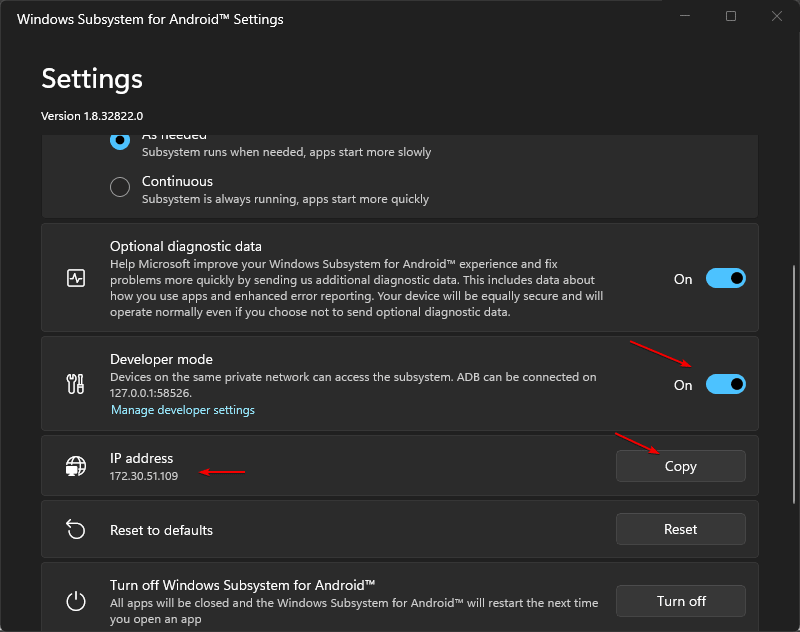
- In the Settings window, go ahead and enable Developer mode by clicking the slider provided.
Enabling Developer Mode in Windows Subsystem for Android Settings - In addition to that, make sure that an IP address is provided under the IP address option. In case it says Unavailable, click on the Refresh button next to it.
- Once you have done that, the Android layer can now be accessed through the IP address provided or via your localhost (127.0.0.1).
- At this point, we will be using the Android Debugging Bridge to install the application.
- Before that, go ahead and rename your download APK file to something easier and then move it to the platform-tools folder that you extracted earlier.
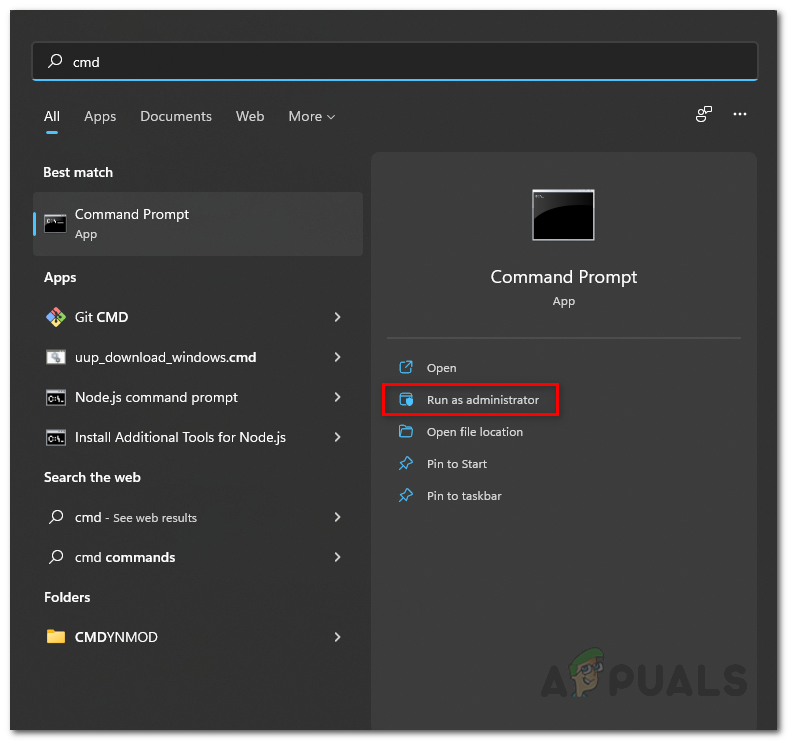
- After doing that, open up a Command Prompt window by searching for it in the Start Menu. You can also use the Windows Terminal if you wish to.
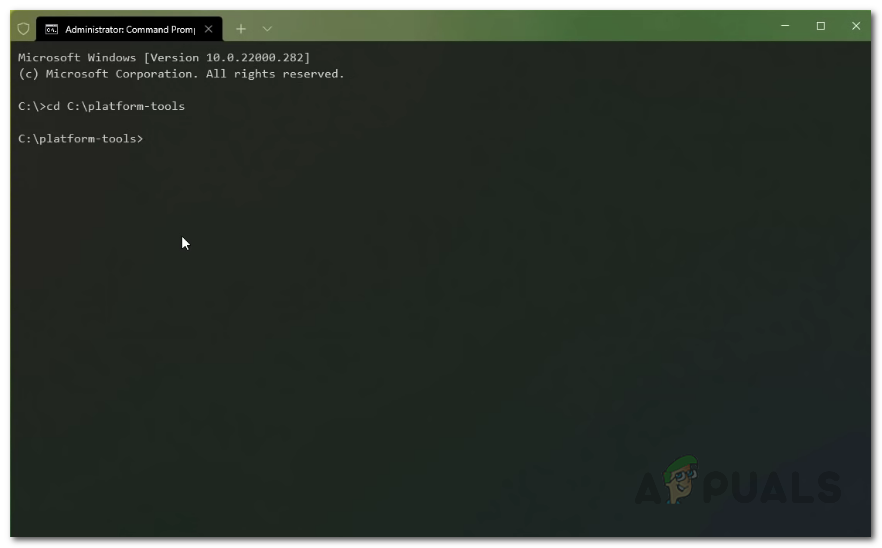
Opening up Command Prompt - Then, in the command prompt window, you will have to navigate to the platform-tools folder. If you followed our instructions earlier and extracted the folder to the C: drive, you can use the following command to navigate to it. Otherwise, you will have to edit the path as per your respective case:
cd C:platform-tools
Navigating to Platform Tools Folder - Once you are inside the platform-tools folder, type in the following command to connect to the Android layer:
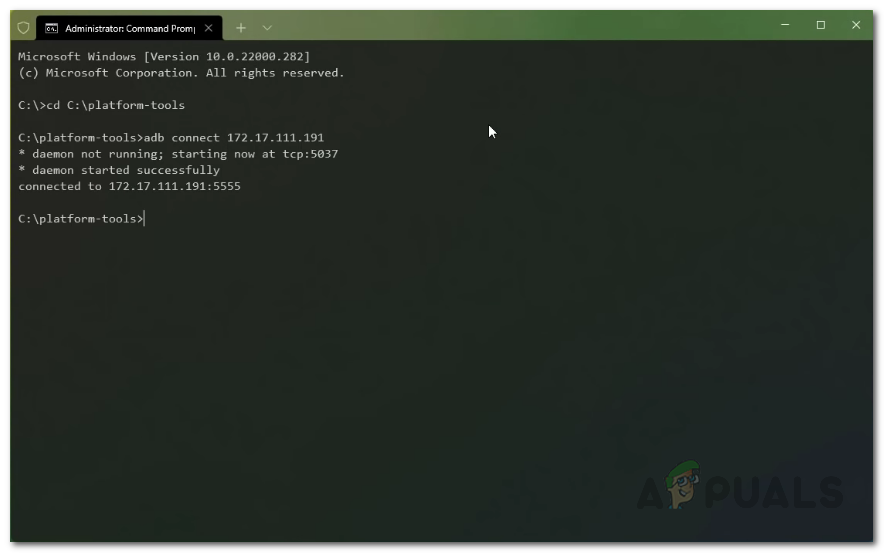
adb connect <IP Address>
Connecting to Android Layer - Make sure to replace the <IP Address> in the above command with the IP address that is shown in the Windows Subsystem for Android Settings window. Thus, it should look something like this:
adb connect 172.17.111.191
- After you have connected to the Android layer, type in the following command to install the downloaded APK file using ADB:
adb install <filename>.apk
Installing Android Application - Here, you need to make sure that the APK file is in the platform-tools folder. In addition to that, replace <filename> with the name of the APK file.
- Once you have done that, the app should now be installed on your computer.
- You can open up the app by searching for it in the Start Menu.
- That’s it, you have successfully sideloaded an Android application on Windows 11.
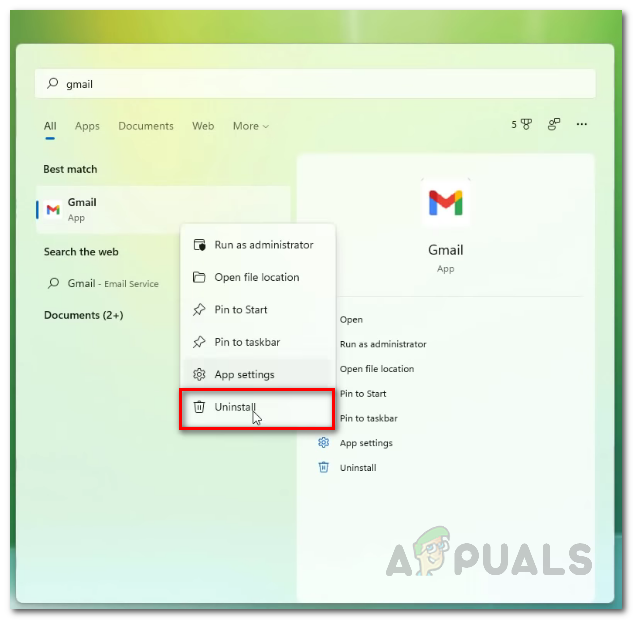
Now, in case you are wondering how to uninstall an Android application that you have installed using this method, you can do so by simply searching for the application in the Start Menu. Then, right click on the result shown and from the drop down menu, click the Uninstall option. That should take care of uninstalling the app from your computer.
Kamil Anwar
Kamil is a certified MCITP, CCNA (W), CCNA (S) and a former British Computer Society Member with over 9 years of experience Configuring, Deploying and Managing Switches, Firewalls and Domain Controllers also an old-school still active on FreeNode.
Let’s look at how to use Windows Subsystem for Android and Android Debugging Bridge (ADB) to install any standard Android app package (APK) in Windows 11. This guide will cover the complete process to help you run any Android app in Windows 11.
Microsoft is partnering with Amazon to implement the integration of the Amazon AppStore with the Microsoft Store. This means you can’t officially access the vast library of apps on the Google Play store. At the moment, not even all applications from the Amazon AppStore are available for testing. Insiders can only test Microsoft and Amazon’s approved 50 selected apps.
Fortunately, Microsoft immediately enabled debugging of the Windows Subsystem for Android. As a result, you can access and debug the Android virtual layer on the Windows 11 host system using the Android Debugging Bridge (ADB) tool. You can use ADB to install any standard Android app package (APK), including uploading to the subsystem of applications that are not available in the Amazon AppStore.
How to Install any Android App in Windows 11
Part 1: Install Windows Subsystem for Android on Windows 11
The Windows subsystem for Android is in beta testing. Applications approved by Microsoft and Amazon were likely further optimized for the subsystem, so they secured their places in the first batch. There is no guarantee that other applications will work correctly right away. The only way to test compatibility in practice is to run the application in the Windows Subsystem for Android.
Step 1: Enable Virtualization in Windows 11
Here is a complete guide that you can use: How to Enable Virtualization in Windows 11? Easy Guide – TechRechard
Step 2: Enable Virtual Machine Platform
Press Win+R and enter optionalfeatures and press Enter.
In the Windows Features window, enable “Virtual Machine Platform,” “Windows Hypervisor Platform,” and “Hyper-V.” Once completed, kindly restart your PC.
Step 3: Install Windows Subsystem for Android from Microsoft Store or Archive.
If you are from the U.S., you can use this direct link. Or, follow the steps below.
The first thing to do is download the latest MSIX package for Windows Subsystem for Android (Android 12.1) from the link here. Open the link and choose “ProductID” in the left drop-down menu. After that, paste 9P3395VX91NR in the text field and keep “RP” as it is. Now, click on the “Done” button on the right.
Scroll down below and download file named: MicrosoftCorporationII.WindowsSubsystemForAndroid_2204.40000.20.0_neutral_~_8wekyb3d8bbwe.msixbundle
Now, open Powershell as administrator.
Copy the path of the msibundle file you just downloaded.
On Powershell, type:
Add-AppxPackage -Path filepath
Part 2: Install any Android App in Windows 11
To download any Android app to Windows 11 for Android, follow these steps:
- Download the APK file of your desired application or game from a trusted source.
- Projects supported by the community are available in third-party forums (XDA etc.).
- Open source application APKs are often found on GitHub repositories or on third-party sites such as F-Droid.
- Finally, there are third-party resources with APKs, such as the Mirror APK and APKPure.
- Once you have obtained the APK file, start the Windows Subsystem environment for Android. Go to the Start menu > All Apps > Windows Subsystem for Android.
- Subsystem settings will open. You need to activate the Developer Mode switch.
- Since the Android environment runs next to the kernel of the Windows host system, we can access it through the localhost interface (127.0.0.1). The Android layer also communicates with a random IP from the private network 172.30.0.0/24, which is visible under the IP address.
- If you cannot see the IP address in the form 172.30.x.x, click on the Files option at the top of the Settings screen to go to the subsystem file system in the built-in Explorer. Then click the Refresh button next to the IP address option to get the IP address. Now you can copy it at the touch of a button.
- Now we can connect using ADB from the Windows 11 host system. To establish a connection, you can use localhost (127.0.0.1) with port 58526 or the IP address shown in the settings window.
- Configure ADB:
- Open the ADB Installer website and download platform-tools for Windows under ADB and fastboot.
- Unpack the downloaded archive and move the platform-tools folder to a convenient location. In our example, this will be
C:platform-tools
- Open a new Windows terminal window and navigate to the ADB location:
cd C:platform-tools
- Next, type one of the following commands:
adb connect 127.0.0.1:58526
or
adb connect IP-address
(Replace the IP address with your IP address from the previous step.)
- Now you can install our APK via ADB. The command should be as follows:
adb install "spark.apk"
- In our example, we downloaded the Spark email client apk file on the Apk Mirror website.
- If it goes correctly, the shortcut to the Android app will be created in the Start menu. Tap the shortcut to launch the app.
- If you can’t find the Shortcut to the Android app, you can manually launch it using the following command:
%LOCALAPPDATA%MicrosoftWindowsAppsMicrosoftCorporationII.WindowsSubsystemForAndroid_8wekyb3d8bbweWsaClient.exe /launch wsa://<PACKAGENAME>
- For example, to run the Spark application, type the following in the Run on Windows window:
%LOCALAPPDATA%MicrosoftWindowsAppsMicrosoftCorporationII.WindowsSubsystemForAndroid_8wekyb3d8bbweWsaClient.exe /launch wsa://com.readdle.spark
- You can also call the application directly from the ADB Shell window:
adb shell monkey -p <PACKAGENAME> 1
- To run a Spark application, the command must be:
adb shell monkey -p com.readdle.spark 1
You’re done!
Conclusion:
I hope this guide on How to run any Android app in Windows 11 was easy. If you face any issues, please comment below.
Also, note that unofficial applications will have access to the network. Thus, you can install and use popular mobile browsers inside the Windows subsystem for Android, such as Firefox. Browsers can be used to download other applications. Windows 11 also allows you to apply firewall rules to Android apps. Although you can install an app that depends on Google Apps, it won’t start because it doesn’t exist. As a workaround, you can use microG.
Windows 11 is out there and it is blowing many users’ minds with its new looks. It does not offer lots of new features, but some of them are impressive. One of the frequently discussed Windows 11 features is the support of Android apps natively. Yes with Windows 11 it is possible to sideload Android apps natively without any third-party application. But of course, there is a catch. Windows 11 supported android apps are only available on the Amazon app store. If you are looking for another process to custom sideload android apps on Windows 11, then you should go through this article in full.
But before you jump into the process, remember that loading Android apps on Windows 11 is not as easy as loading the same on an Android device. To sideload Android apps on Windows 11, you need to use the ADB (Android Debug Bridge) and you also have to run some commands in the terminal.
Get Windows 11 22000.xxx Build
Before you start the main process, you need to be sure whether your PC has Amazon Appstore configured and running or not. If yes, then you can skip this section and go to the next one. Also, if you are using the Amazon Appstore already, and you just need more apps that are not present in the library, then you can also skip this step and go to the next one.
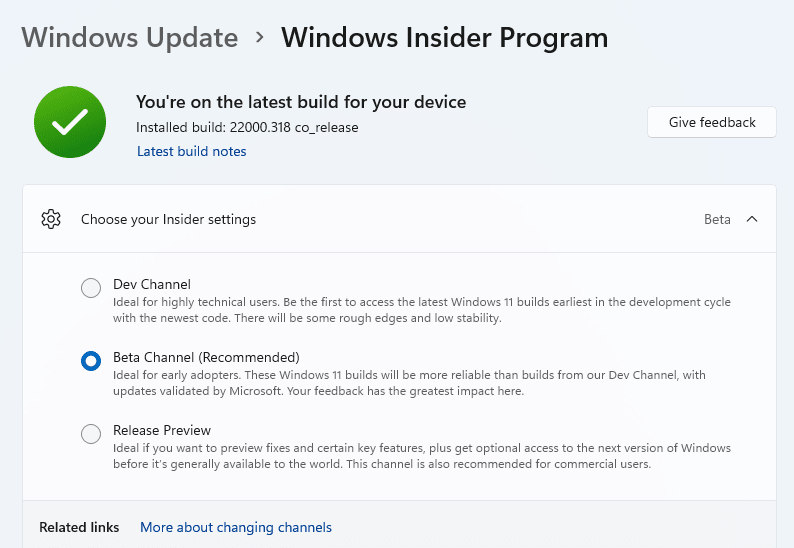
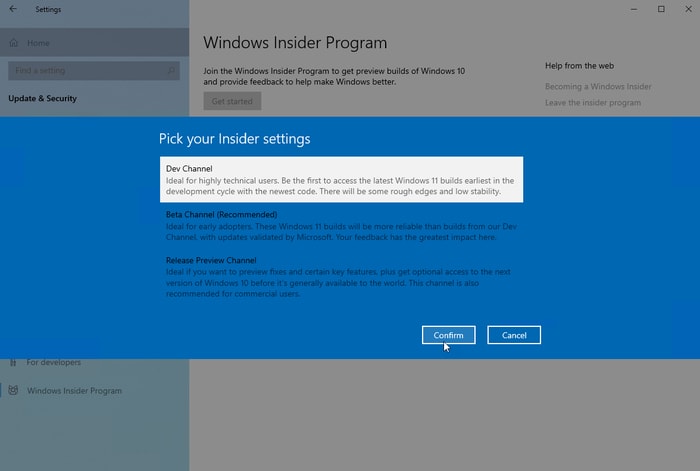
You have to make sure you are using Windows Insider Beta Channel, build 22000.282, or a higher version. If you want to know how to switch to Windows Insider Beta Channel just follow the process below.
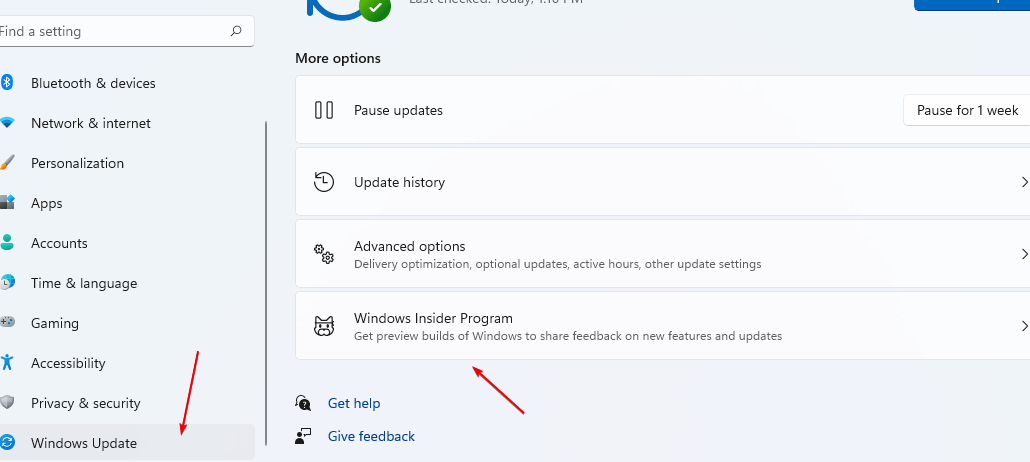
Step 1: Press Windows+i to open the Settings app
Step 2: In the Settings menu, select “Windows Update” from the left sidebar
Step 3: In the Windows Update window, click on the “Windows Insider Program”
Step 4: Inside the “Windows Insider Program” settings, click on “Choose your Insider Settings”
Step 5: In the dropdown menu check the button “Beta Channel (Recommended)” to select it
Step 6: Close the settings app directly and your selection would be saved automatically.
Remember one thing, the Beta Channel is not as stable as the DEv channel, so, your PC may perform a little weirdly, and you may encounter bugs & glitches.
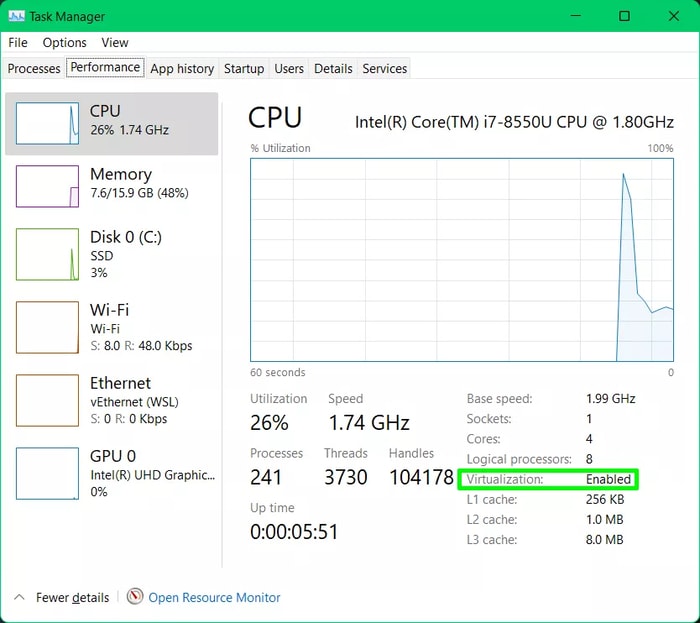
Now another prerequisite is to enable the virtualization mode of your PC. You might know that Windows 11 runs Android in a virtual machine setup, which is why enabling virtualization is so needed. To check if it is enabled or not, just press the Ctrl+Shift+Del to open Task Manager and go to the Performance Tab, and check it as shown in the image below.
If the virtualization is disabled then you need to enable it from your PC’s UEFI firmware (Formerly BIOS). If you want to learn how to enable virtualization on your UEFI firmware then follow the process below.
- Restart your pc, and start pressing the del button.
- Once the UEFI is opened, locate the Intel VT-X on the menu, if you are using Intel CPU.
- If you are an AMD CPU user, locate and enable the AMD-V in the UEFI firmware.
- Then press F10 to save and exit, and let the PC start again.
- Then check again in the Task Manager, if the Virtualization is enabled now or not.
Now you are ready to go, but you should double-check everything before preceding further to avoid any complications later.
Enable Virtual Machine Platform
- In the Windows Search box
- Type- Turn Windows Features on or off, when it appears click on it to access the same.
- Select the “Virtual Machine Platform” box and hit the OK button.
- Now, Restart your system.
Download Windows Subsystem for Android
There are two ways for getting “Windows Subsystem for Android” one is via Microsoft Store and another using Adguard.net’s Store app downloader.
Ist Method:
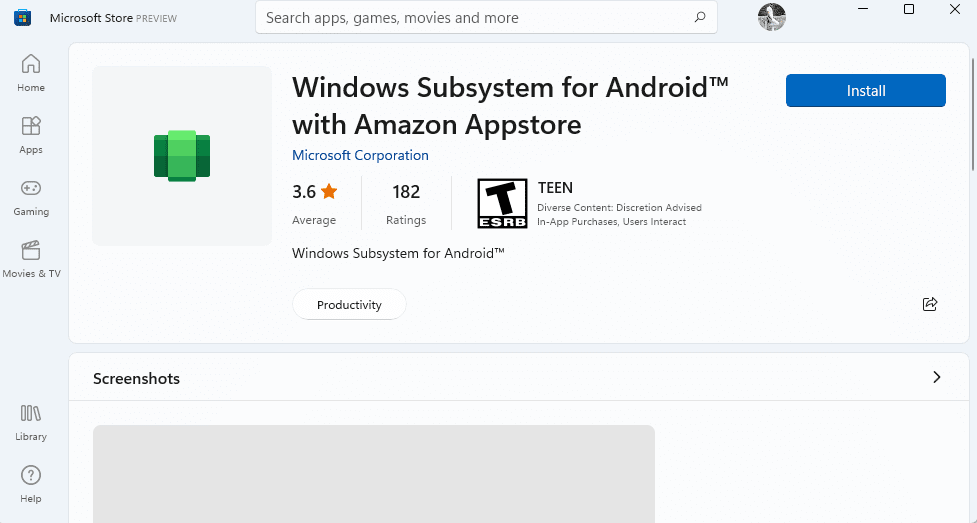
The users who are living in the U.S while writing this tutorial will only be able to download the Windows Subsystem for Android from the Microsoft Store. Click on the link and hit the Install button this will ask you to open Windows 11 Microsoft Store to download and install Subsystem for Android. Note: Your system must have at least 8GB of RAM to install this platform.
Note: Well, those who are not in the USA and still want to try out Windows Subsystem for Android with Amazon Appstore then change your Windows 11 Default location, first.
2nd Method:
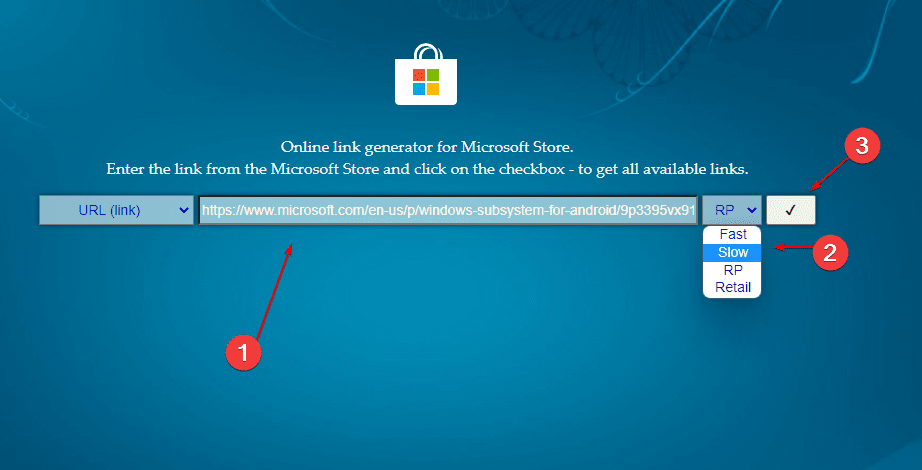
Step 1: Go to Adguard.net‘s Store app downloader.
Step 2: In the Search Box, enter the following: https://www.microsoft.com/en-us/p/windows-subsystem-for-android/9p3395vx91nr
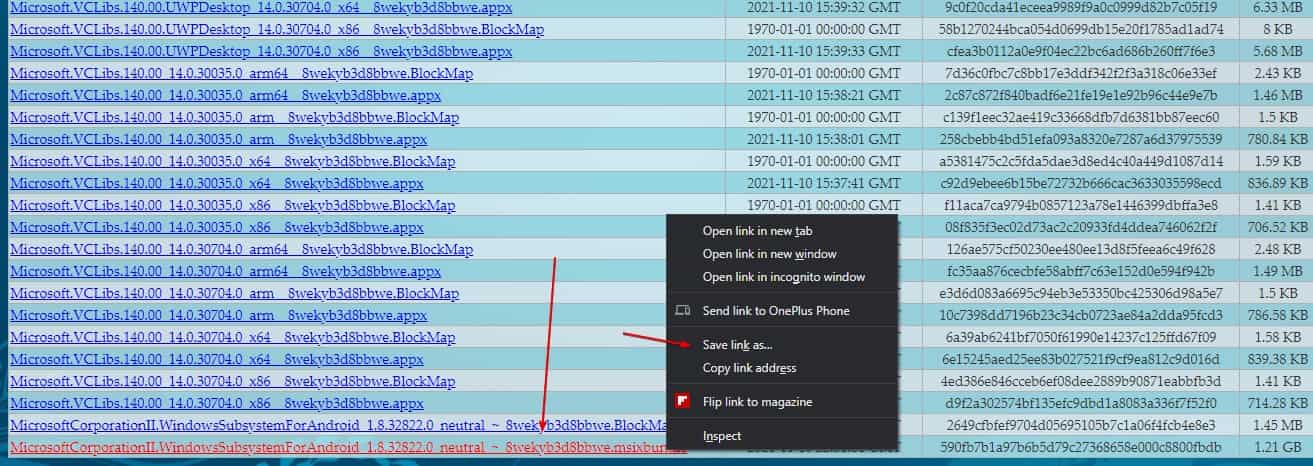
Step 3: In the search result, go to the end of the list, right-click on the xxxxx..msixbundle file name, and select “Save link as…” to download the file on your system.
Step 4: Right-click on the Windows 11 Start button and run Windows Terminal (Admin).
Switch to the directory where you have saved the downloaded file.
Add-AppxPackage path-to-the-downloaded-file
Example:
Add-AppxPackage .MicrosoftCorporationII.WindowsSubsystemForAndroid_1.8.32822.0_neutral_~_8wekyb3d8bbwe.Msixbundle
Configuring ADB (Android Debug Bridge) on Windows 11
Now you have to understand and configure the ADB to proceed. Without the ADB (Android Debug Bridge) the Android filesystem can not talk to the Windows file system. In simple words, there is no way of getting APK files into the Android filesystem without the ADB (Android Debug Bridge). If you want to learn how to set up ABD (Android Debug Bridge) in Windows 11 follow the process outlined below.
The above method is described for Windows 10 and Windows 11 PC. But ADB is a universal program that can be used on Linux, macOS, and Android platforms also. Once you have set up the ADB in your Windows 11 system along with the Virtualization enabled and switched to Windows Insider Beta Channel, you are all set to install Android APK files from third-party sources like APKMirror.com
How to Sideload Android Apps on Windows 11
Step 1: Now open the “Windows Subsystem for Android” from the Start Menu. Tap the Search icon and type “Windows Subsystem for Android”, you will find the icon easily.
Step 2: From the Windows Subsystem for Android, switch on the “Developer Mode”.
Step 3: Now you have to find the IP address of the Android instance.
Step 4: Now click on the “Refresh” button beside “IP Address”. After that click on the “Copy” button. Don’t close the app immediately once done.
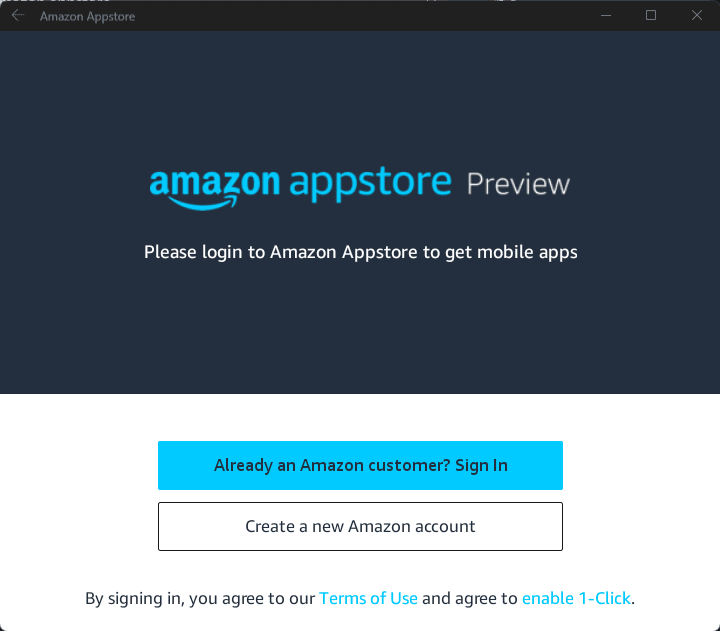
Step 5: After getting the Ip-address, sign in to the Amazon App store that will automatically get installed after installing the Window subsystem for Android. Go to the Search box of Windows 11 and search for Amazon Appstore. Once its icon appears, click to run.
Step 4: Sign in to your Amazon account. If you don’t have one then create the one.
Use ADB (Android Debug Bridge) and begin Android App sideloading.
Step 1: Launch “Command Prompt” from the Start Menu. Or you right-click on the Windows 11 start button, then select “Windows Terminal”.
Step 2: Then connect to the Android instance. To that enter the command with the IP address flashing on the “Subsystem for Android Settings” that we asked to copy. The command is “ADB connect [IP address]”
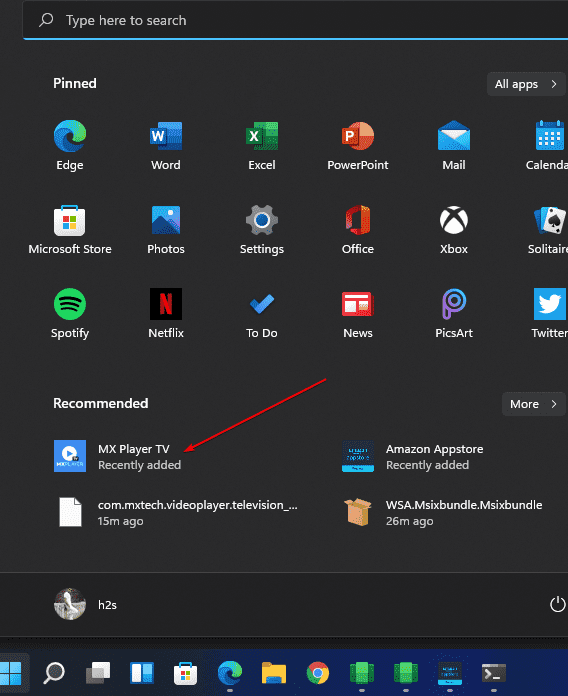
Step 3: Now you have to browse the internet for trusted APK files that you can download and install. APKMirror.com is one of the most well-known and trusted APK file repositories. You have to download the APK files only, not the app bundle, so pay attention while downloading. Also remember where you downloaded the file, as it would be needed later. Here we are downloading an APK of an Android App called MX Player from Apkmirror.com.
Step 4: Once you have the APK file on your Windows 11 that you want to install. Go to Windows Terminal or Command prompt and type adb install path-to-your-andriod.apk
If everything goes perfectly, you’ll get a “Success” message and the app will be available in the Start Menu automatically.
Step 5: In a few seconds the Android App Apk will be installed on your Windows 11 system and get integrated into the App launcher.
The same process is to be repeated for each app that you can not find in the Amazon Appstore. In many cases, Google Apps do not work properly if sideloaded on Windows PC, as those apps require additional services and inputs, which are only available with a phone or tab. But for most of the apps, the above method is a foolproof and tested method for sideloading android apps on Windows PC.
Here’s how to install android apps on Windows 11 and run them with ease. Follow the step-by-step guide for precision.
Microsoft recently rolled out the latest Windows 11 for the users. You can now download Windows 11 or update to the latest version of the operating system. As you may already know, the brand decided to introduce an option to run Android apps on Windows 11, without the help of an emulator.
This feature will ease up your work to a great extent and provide feasibility. The present version of Windows 11 does not include this feature and is soon to be rolled out in the upcoming ones. However, if you are a Windows Insider, you can use the beta test to run android APK on Windows 11.
The number of apps you can install on Windows 11 Beta is limited to 50 for now. This number will gradually increase with every update. All this is possible with the help of the Windows Subsystem for Android (WSA) with Amazon Appstore and Android Debugging Bridge. These utilities will help you install android apps on PC and run them with ease.
So, to help you further, we are providing this step-by-step guide to answer how to install android apps in Windows 11. If you are a beta test subject, you can take the help of these methods to run the apps on your system for free.
But before we go over the methods, let’s have a look at the minimum system requirements to run the apps.
Minimum System Requirements to Run Apps on Windows 11
Here are the basic system requirements necessary to run Android apps on Windows 11.
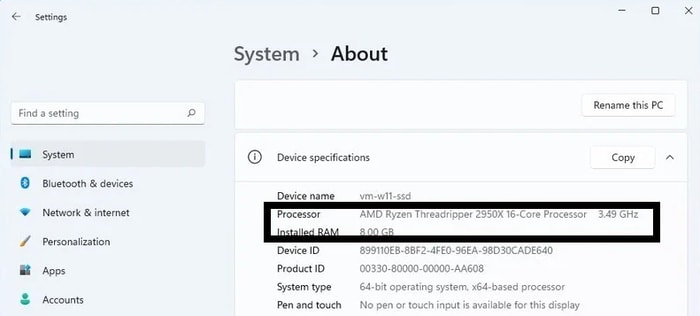
- Memory- 8GB or Higher
- Processor- Qualcomm Snapdragon 8c, AMD Ryzen 3000, Intel Core i3 8th Gen, or Higher.
Before you install android on PC you can check the Memory and Processor specifications on Windows 11 with the help of the following steps: Click on Start, Open Settings, then select the System subhead and click on About. - Storage- Solid State Drive (SSD)
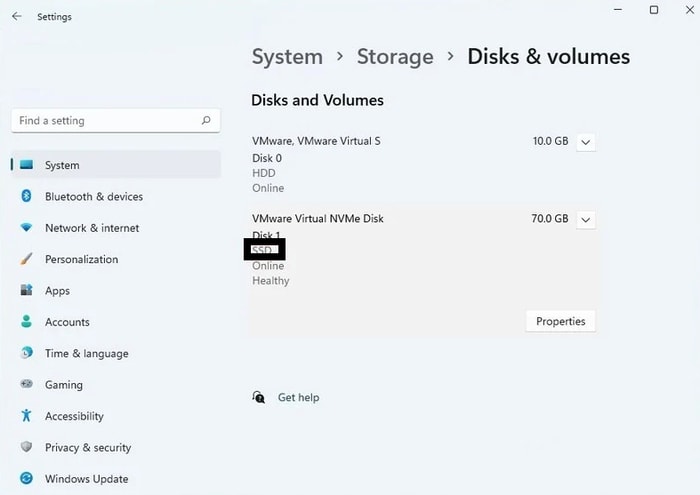
Follow these instructions to check whether you have an SSD or not: Click on Start, Open Settings, then select the System subhead, click on Storage, expand Advanced storage settings to find Disk and Volumes, and see the disk type. - MS Store- Version 22110.1402.6.0 or higher
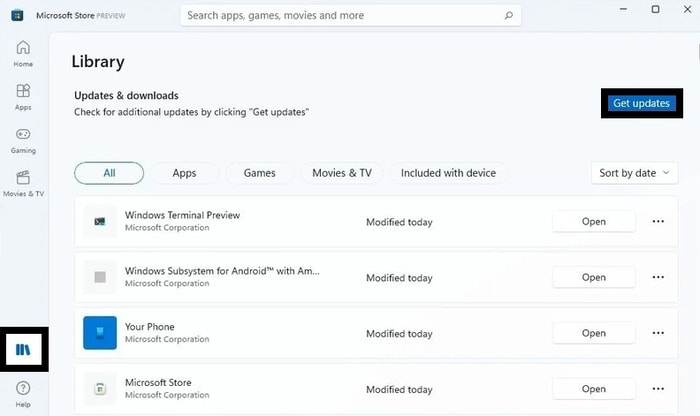
For the ease of running android apps on PC, follow these instructions to get the latest version of the Microsoft Store: Open MS Store, click on Library, and select Get Updates. - Windows 11 OS– Beta Required
Follow these steps to join the Windows 11 Beta program. Navigate to Windows 11 Settings, click on Windows Update, select Windows Insider, click on Get Started, Link an Account, and follow the instructions to join the program. After that turn on the Beta Channel (you can also try Dev Channel). - Minimum OS Build- 22000.282 or higher
If you are wondering how to install android apps, then you need an updated OS to proceed. Search for “winver” and check whether your system has at least Build 22000.282 or not. If not, go to the Windows Settings, click on Windows Update, and refresh the page for system updates. Click on the update button to update Windows 11 to its latest version. - Virtualization- Enabled
Press Ctrl+Shift+Esc keys, switch over to the Performance subtab and check if the Virtualization is Enabled. If disabled, click on Start, type Turn Windows features on or off, check the Virtual Machine Platform option, and press Ok. Restart the system to run Android APK on Windows 11.
If your system meets all these requirements, proceed further with the installation.
Also Read: How to Install Apple Music on Windows 11 PC – Step by Step Guide
Step By Step Procedure to Install Android Apps on Windows 11 PC
If you are wondering how to install android apps on Windows 11 then follow the easy steps provided below and get the job done perfectly.
1. Download and Install Android on PC with Amazon Appstore
As you may already know, Microsoft announced that Windows 11 will support Android apps on PC through the Amazon Appstore. Hence, you can use the same to install the apps on your system. Here’s how:
- Launch the Microsoft Store from the Start menu.
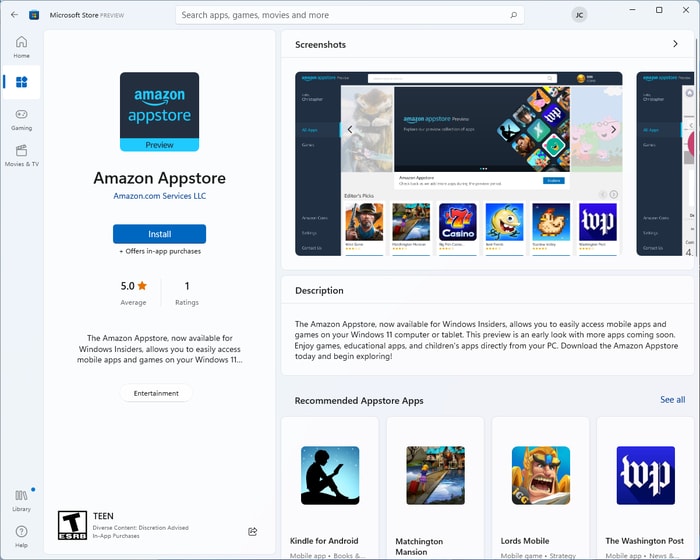
- Search for Amazon Appstore and click on install.
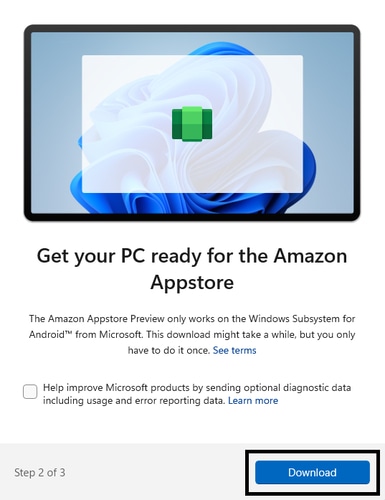
- Follow the on-screen instructions and Download WSA. (Check the boxes required after reading the Terms and Conditions)
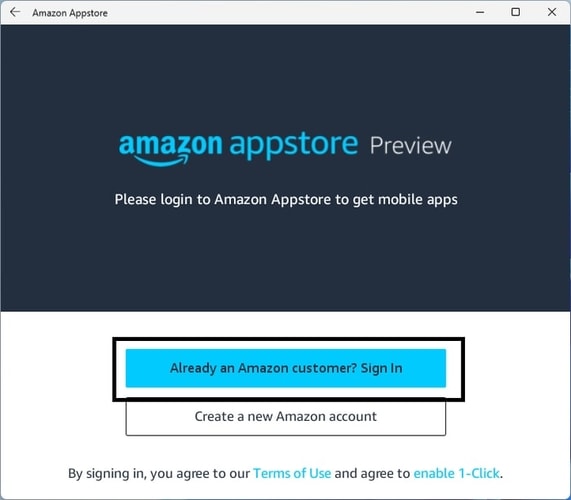
- Once downloaded, Set Up an account with Amazon Appstore. (Log in to your existing Appstore account if required.)
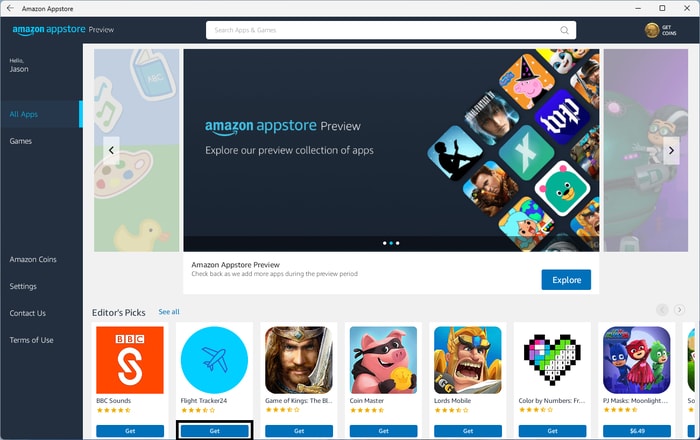
- Launch Amazon Appstore, select the app you like, click on Get and download the app. (Check the box of acceptance if any warning appears.)
- Once the app is installed, go to the Start menu or the Appstore to launch it.
With the help of these easy steps, you can get running Android apps on PC quite easily. If you want to install some Android APK on Windows 11, then take the help of the next solution.
Also Read: Windows 11 PC Health Check App is Now Available for Everyone
2. How to run APK on Windows 11 through Android Debugging Bridge?
If you want to run android APK on Windows 11, then you need to take the help of Android Debugging Bridge. Below are the easy steps to download the SDK platform tool for Windows and use it to install APKs on your PC:
- Visit the Android developer website.
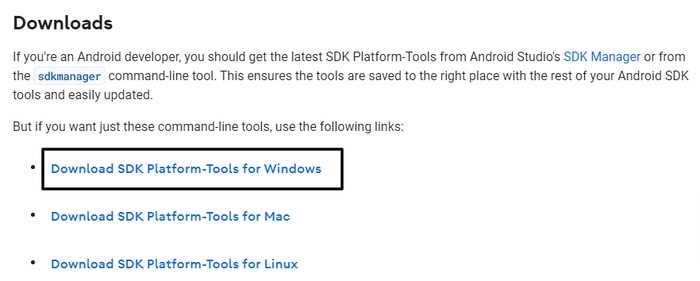
- Download the SDK Platform-Tools for Windows from the website.
- Scroll down Terms and Conditions, check the box named I have read and agree with the above terms and conditions, and select Download SDK Platform-Tools for Windows.
- Extract the downloaded file to any location.
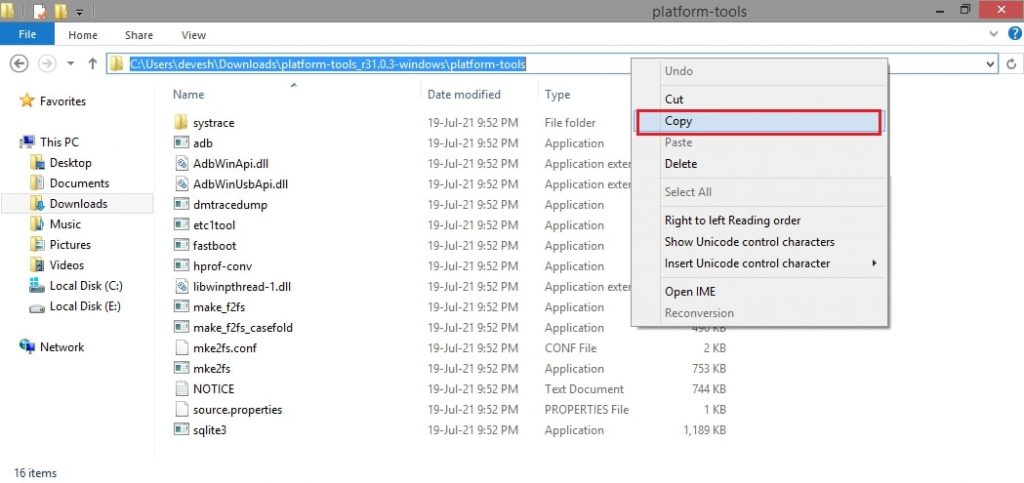
- Once the extraction is complete, open the folder, copy the path, and paste it elsewhere (Ex. Notes or MS Word).
- Now download the required APK for any app you want from trusted sources. (keep the APK in the SDK folder)
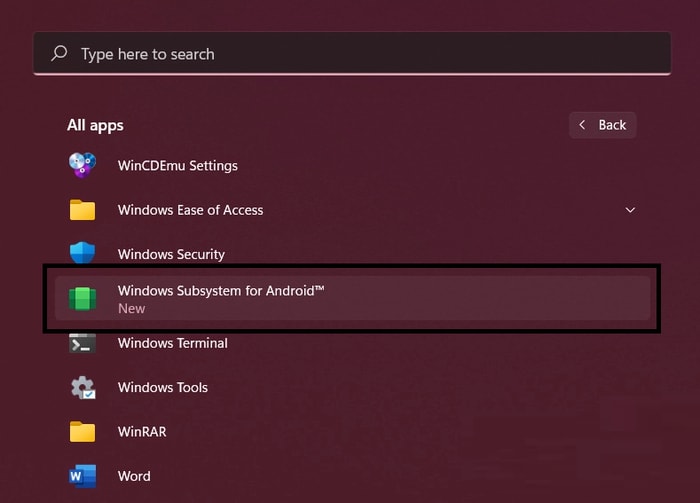
- Click on Start, search for Windows Subsystem for Android, and press Enter.
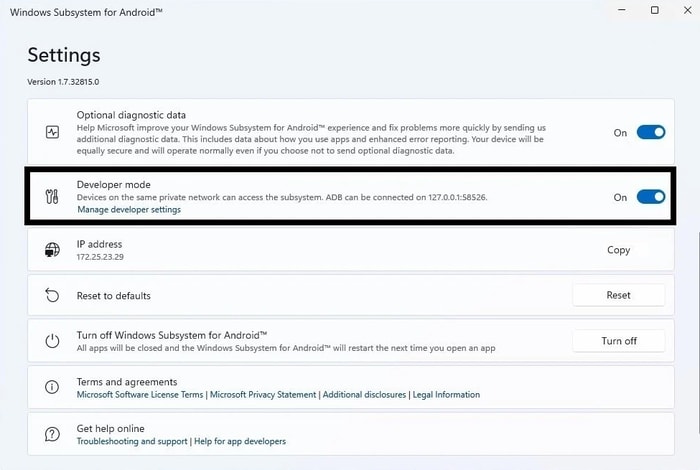
- Toggle on the Developer Mode.
- Now Copy the IP Address and paste it elsewhere (Ex. Notes or MS Word).
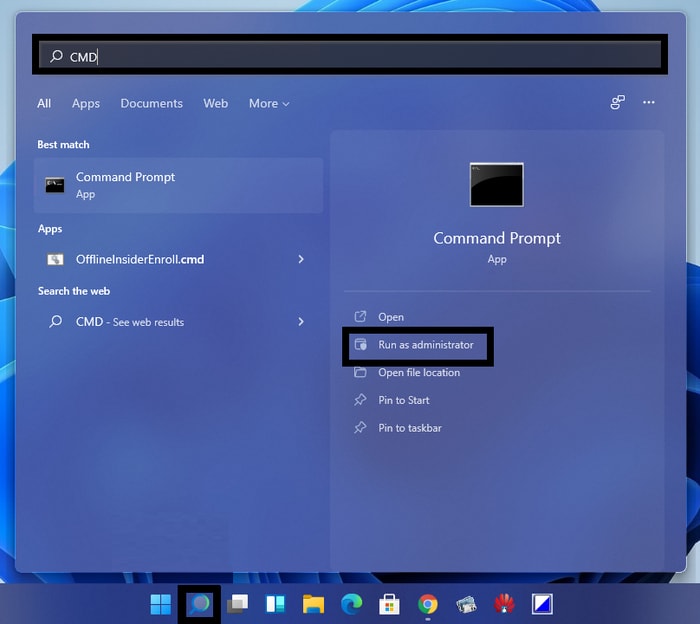
- Click on Start, search for cmd, and click on Run as administrator.
- In Command Prompt, type these commands followed by the Enter key.
Paste the path you copied, ex.C:UsersyourusernameDownloadsplatform-tools_r31.0.3-windowsplatform-toolsNow type the IP address followed by the command ex.adb connect 191.87.544.544Now type the apk file you want to install, ex.adb install <APK Path> - Once the app is installed, run it like any other app from the Start menu.
So this is how you can use the Android Debugging Bridge to install and open Android apps on PC very easily. You can follow this process to download and install all kinds of gaming and program APKs on the system.
Also Read: How To Fix Internal Microphone is Missing Error on Windows 11 & Older Versions
Successfully Answered How to Install Android Apps on Windows 11
These were some of the easy steps that can help you ascertain how to install Android apps on Windows 11. We have listed two methods to run Android apps on your PC with ease. These are through Amazon Appstore and Android Debugging Bridge. You can take the help of any method as suited.
We recommend that you use the Amazon Appstore to install Android apps on PC if you do not want to apply much effort. You will find all of the major apps on the Appstore to download.
However, if you wish to run android APK on Windows 11, then suggest you use the Android Debugging Bridge. Amazon Appstore is an effective method but does not provide an opportunity to install any PK you want on the system. With the help of SDK Platform-Tools for Windows, you can install the desired app or game on your Windows PC and use it as an Android Device.
If you have any questions related to how to use Google Play apps on Windows 11, then write to us in the comments. For more interesting tech blogs and solutions, subscribe to the newsletter from the Techpout Blog and stay updated.
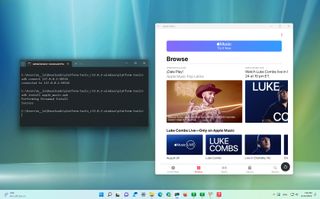
The Windows Subsystem for Android (WSA) continues to be available as a preview, finally bringing support for Android apps to Windows 11. Although the company has decided to collaborate with Amazon to download the apps using the Amazon Appstore, it’s possible to sideload Android apps you may have acquired from different sources.
The platform is currently available for devices in the United States and Japan, running the most up-to-date version of Windows 11 and meeting the memory, processor, and virtualization requirements, and using a United States-based Amazon account to access the Amazon Appstore.
Since the Amazon Appstore only offers a limited number of apps, and not everyone has an Amazon account or an account based in the U.S., you can use the Android Debugging Bridge (ADB) tools to install apps from any source using the «.apk» file.
This guide will walk you through the steps to sideload Android apps on Windows 11.
How to install WSA on Windows 11
To sideload Android apps, you first need to confirm that your computer meets the minimum requirements, and then you need to install the Windows Subsystem for Android, which you can do by installing the Amazon Appstore.
System requirements
These are the additional system requirements for running Android apps on Windows 11:
- Memory: 8GB or 16GB (recommended).
- Processor: Intel Core i3 8th Gen, AMD Ryzen 3000, Qualcomm Snapdragon 8c, or better.
- Storage: Solid-state drive (SSD).
- Microsoft Store app: Version 22110.1402.6.0 or higher.
- Windows 11: Build 22000.527 or higher.
Check system requirements
To check the system requirements, use these steps:
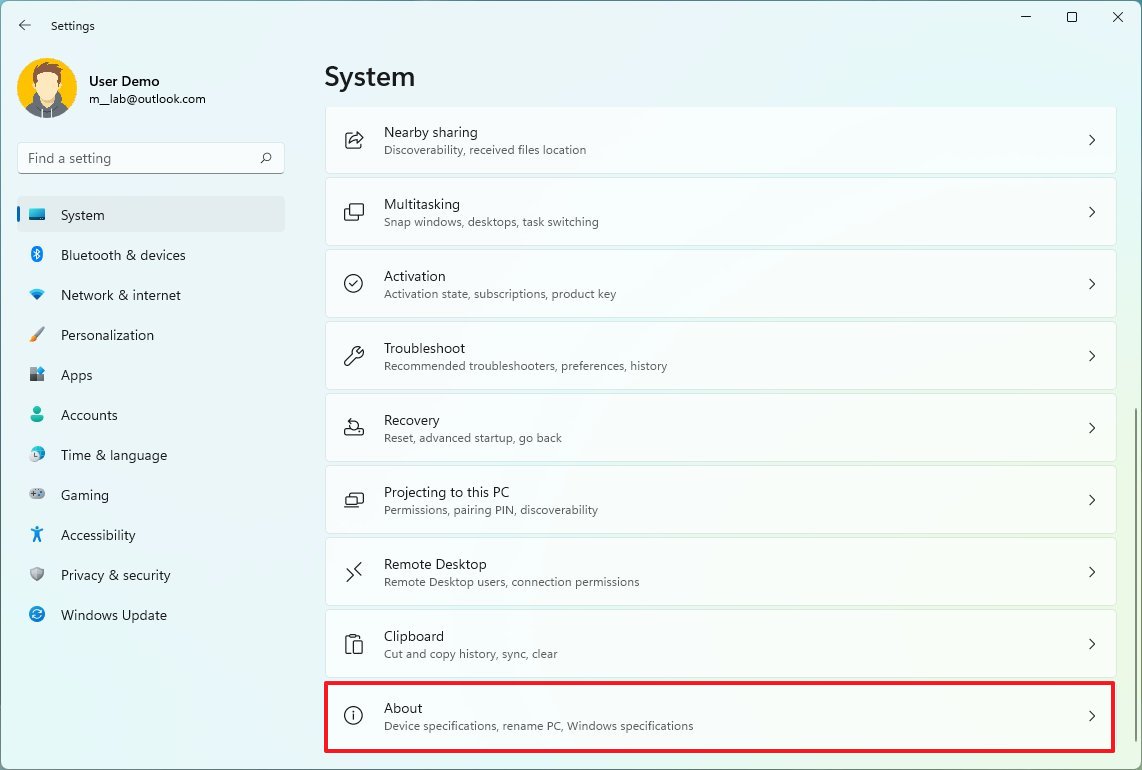
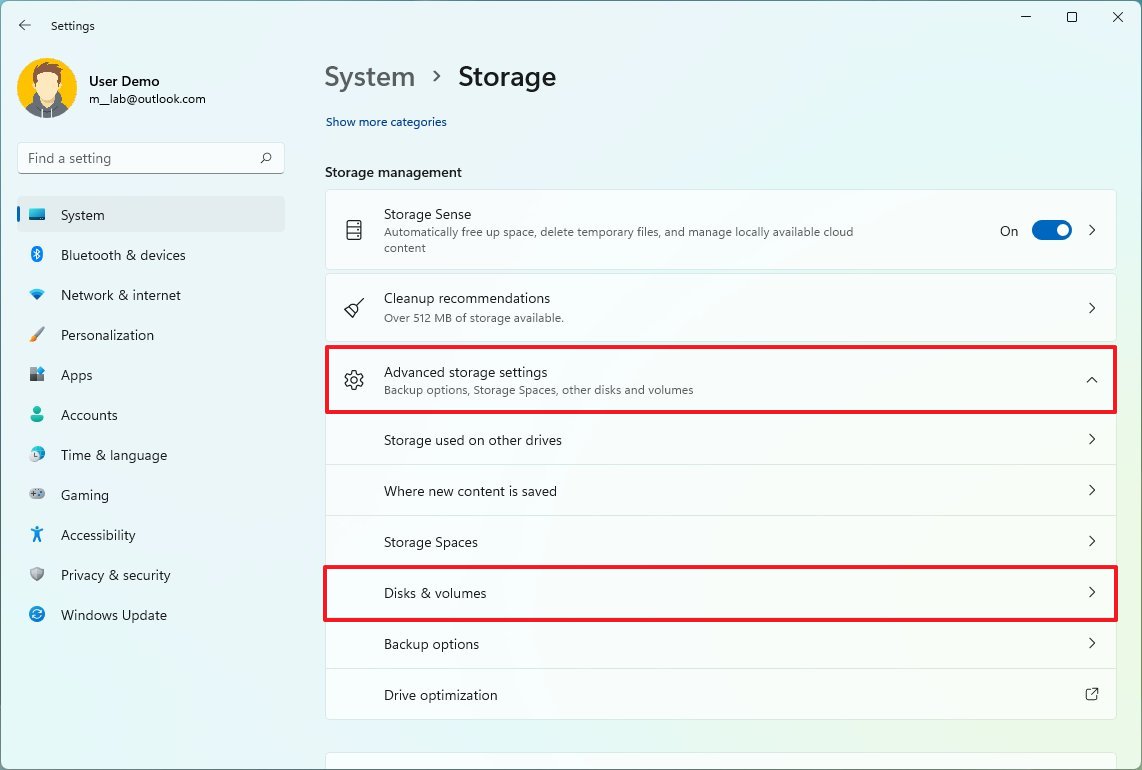
- Open Settings.
- Click on System.
- Click the About page on the right side.
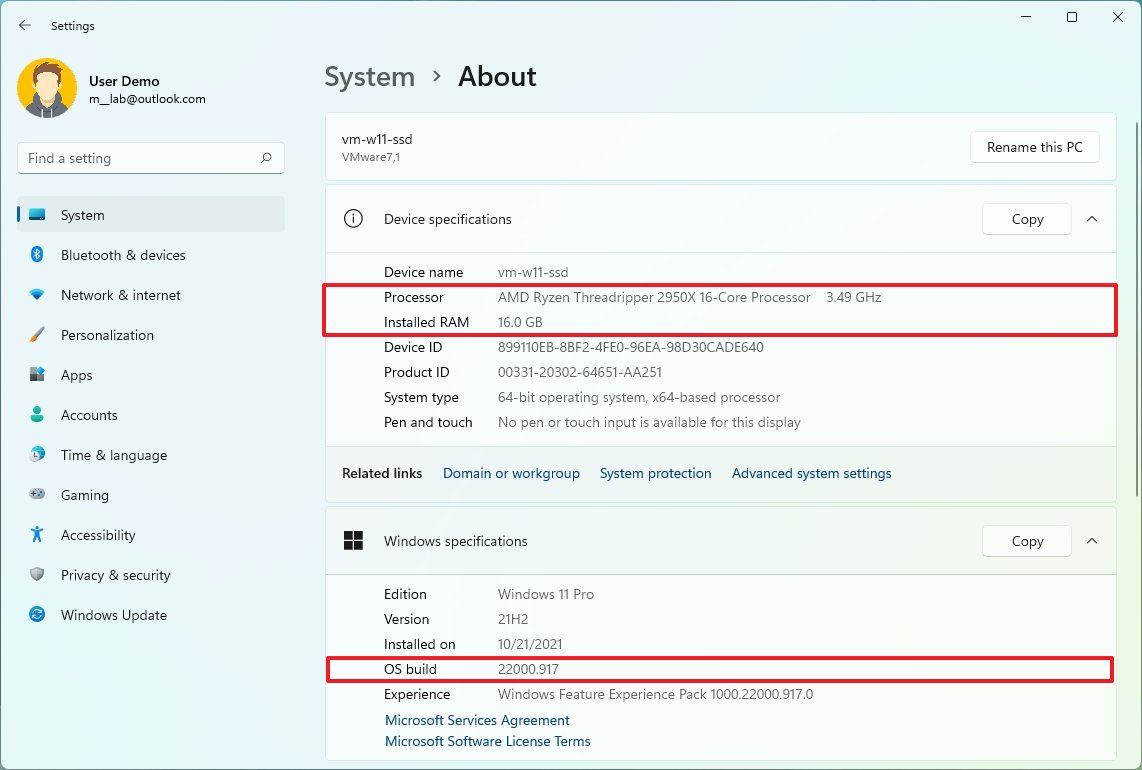
- Under the «Device specifications» section, confirm the RAM and CPU requirements.
- Under the «Windows specifications» section, confirm the build number is higher than 22000.257.
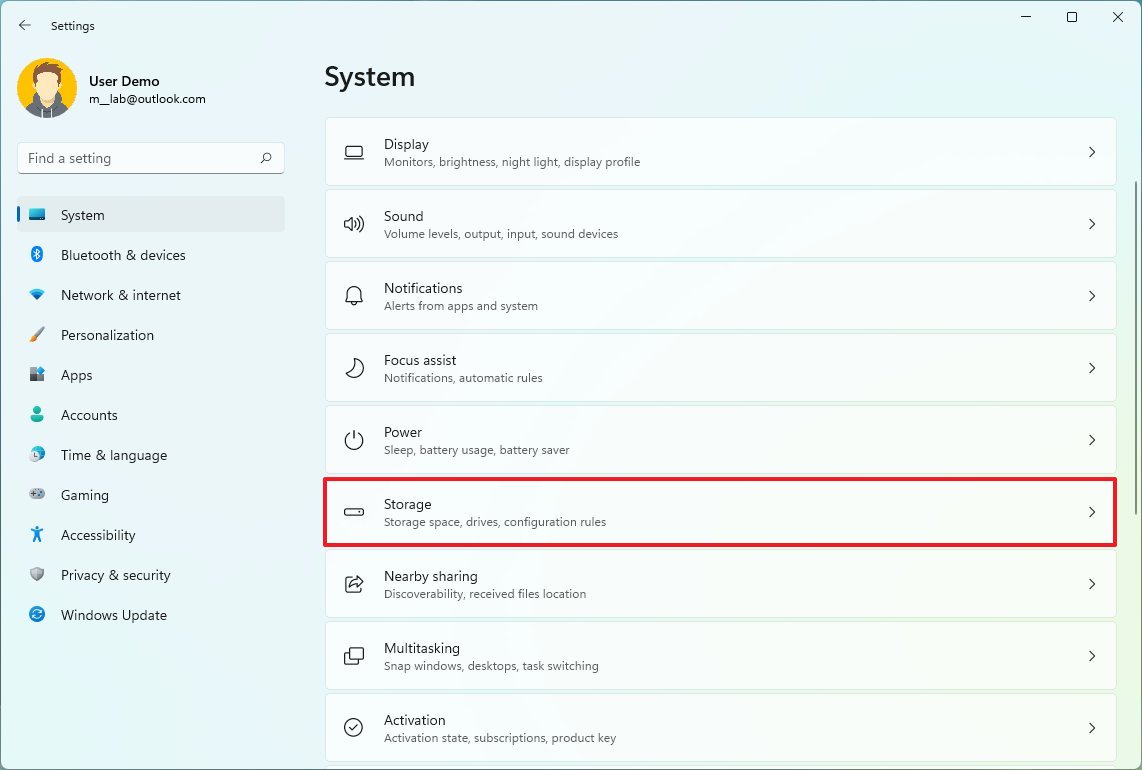
- Click on System.
- Click the Storage page on the right side.
- Under the «Storage management» section, click on Advanced storage settings.
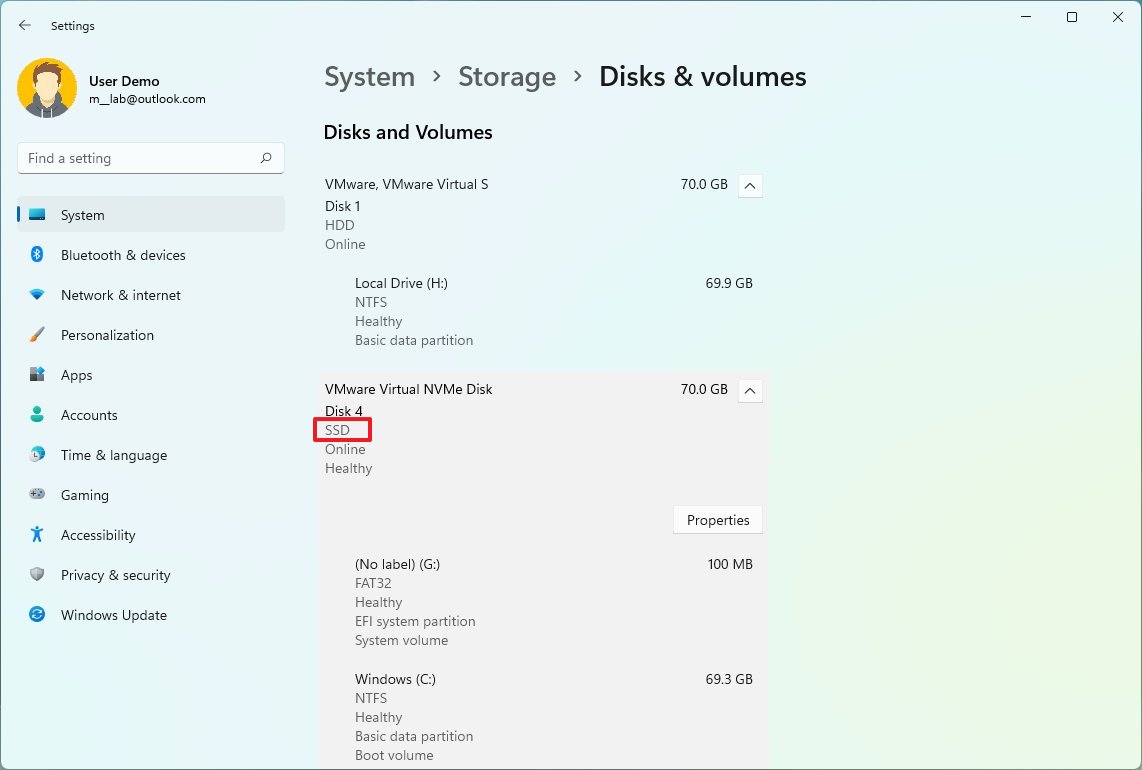
- Click the Disks & volumes setting.
- Select the main drive.
- Confirm that the media type is SSD. If it’s «HDD,» you won’t be able to install WSA.
Once you complete the steps, you want to make sure the device has the latest updates of Windows 11.
Check for Windows 11 updates
To download the latest updates of Windows 11, use these steps:
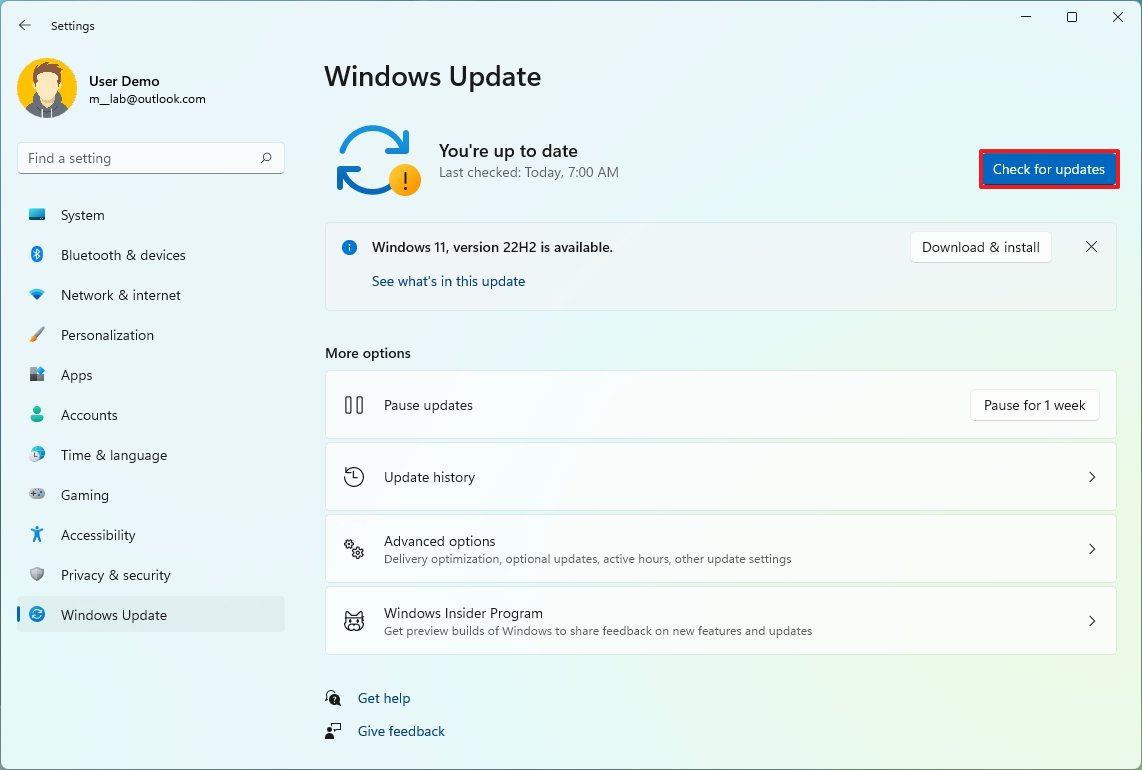
- Open Settings.
- Click on Windows Update.
- Click the Check for updates button.
After you complete the steps, restart the computer to apply any pending updates.
Check for Microsoft Store update
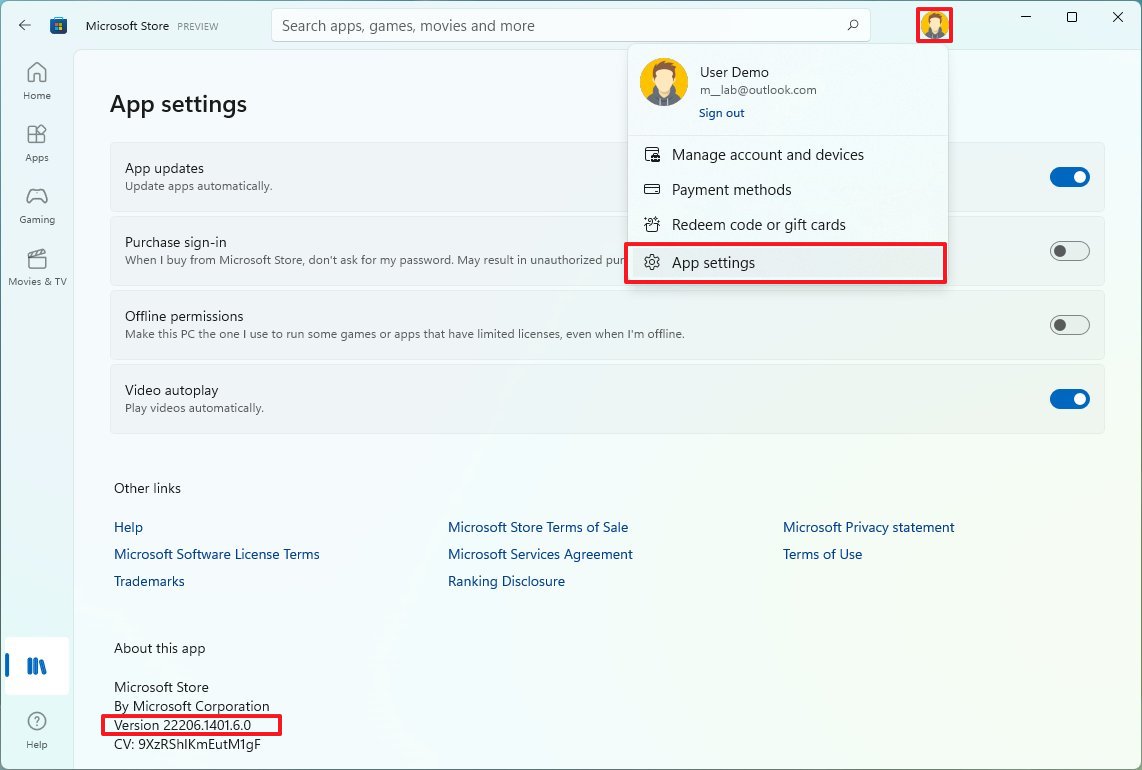
If you want to install the Amazon Appstore app, the device must be using the Microsoft Store app version 22110.1402.6.0 or higher.
You can use these steps to update the store and check the current version:
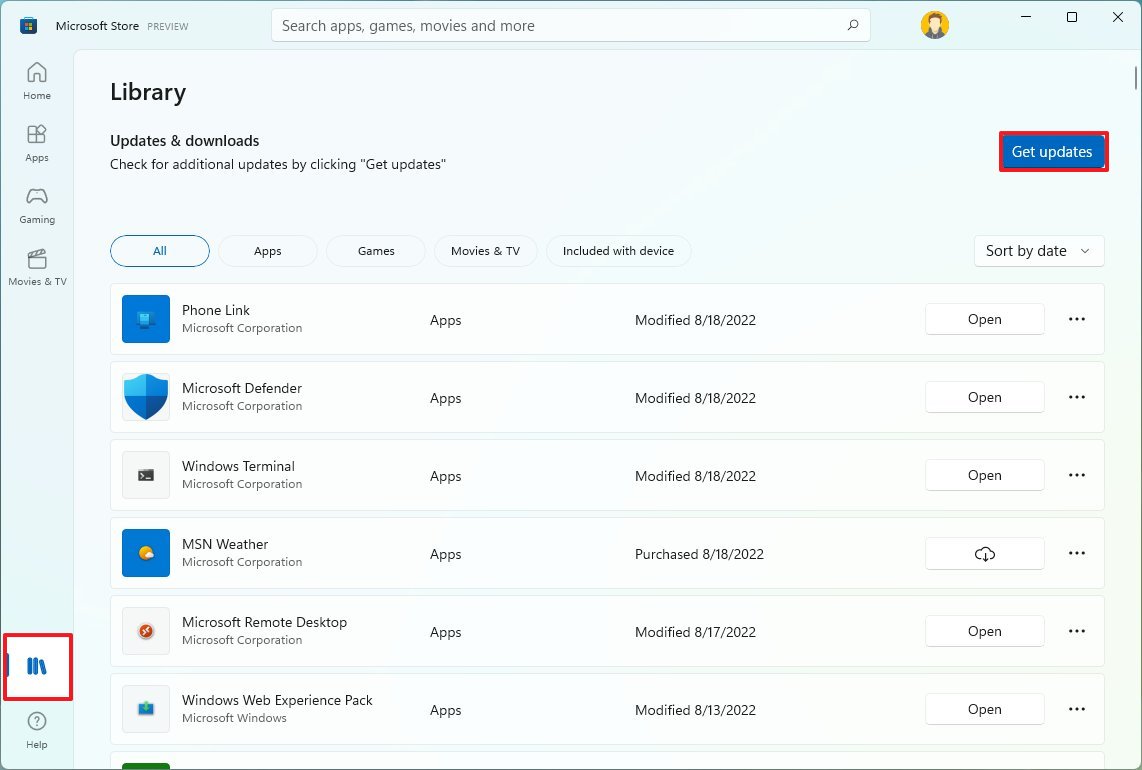
- Open Microsoft Store app.
- Click on Library.
- Click the Get updates button.
- Click the Profile menu and select the App settings option.
- Confirm that the version is higher than 22110.1402.6.0.
Once you complete the steps, you can now enable the virtualization features on the motherboard and Windows 11.
Enable virtualization
The platform requires a device with virtualization enabled at the hardware and software level. Since each computer is different, you may want to check your manufacturer support website for the specific steps to check and enable virtualization in the UEFI firmware of the motherboard. If you have a computer with modern hardware, this feature may already be enabled. Once you confirm that virtualization is enabled, you can turn on the Virtual Machine Platform on Windows 11.
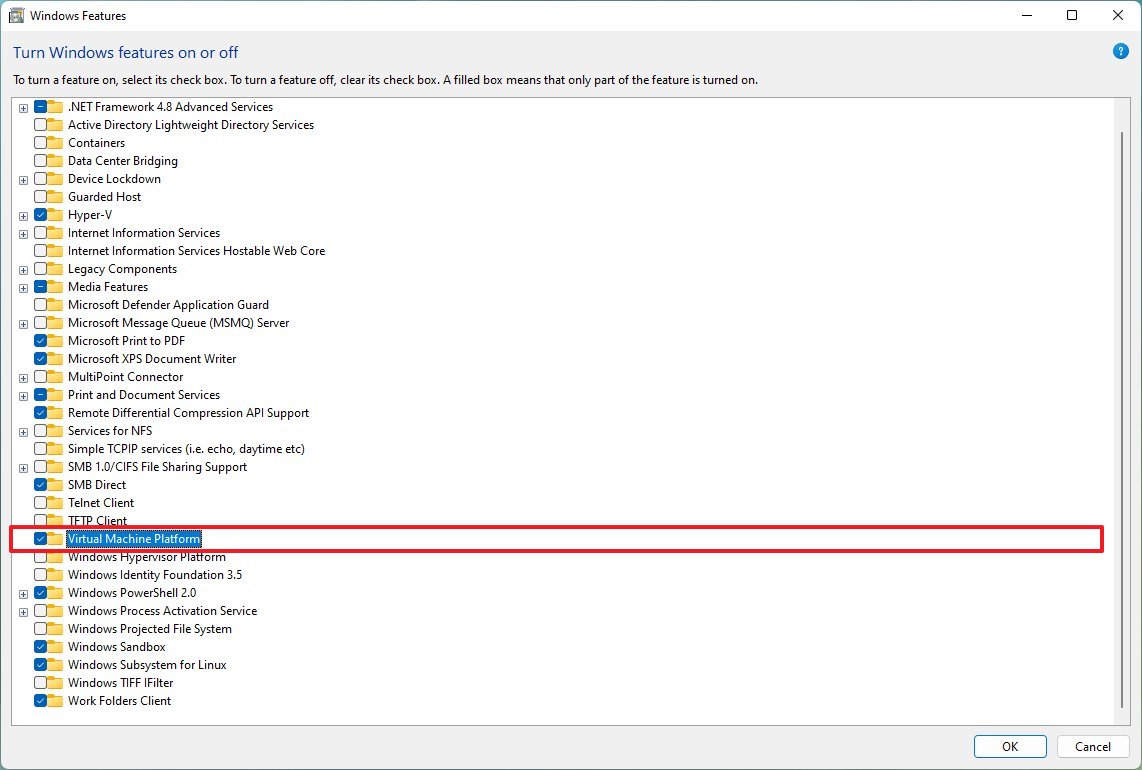
To enable the Virtual Machine Platform feature, use these steps:
- Open Start.
- Search for Turn Windows features on or off and click the top result to open the app.
- Check the «Virtual Machine Platform» option.
- Click the OK button.
- Click the Restart button.
After you complete the steps, you can proceed to install the Windows Subsystem for Android and the Amazon Appstore.
Install Amazon Appstore and WSA
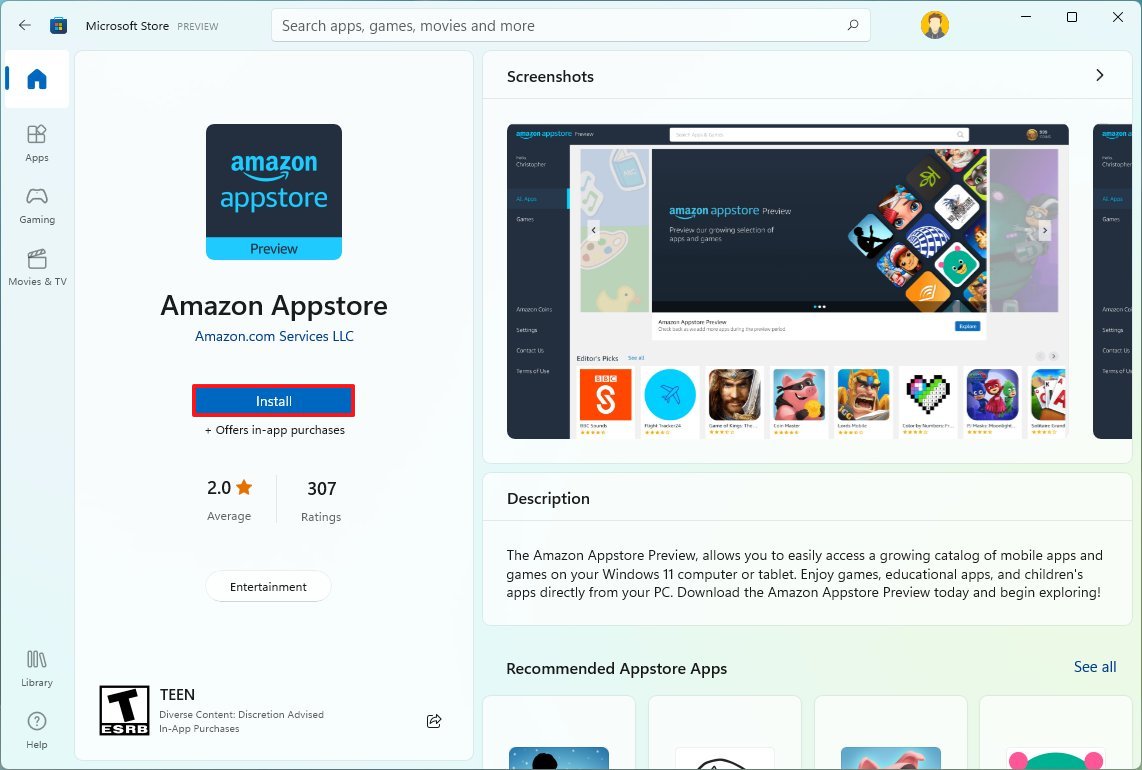
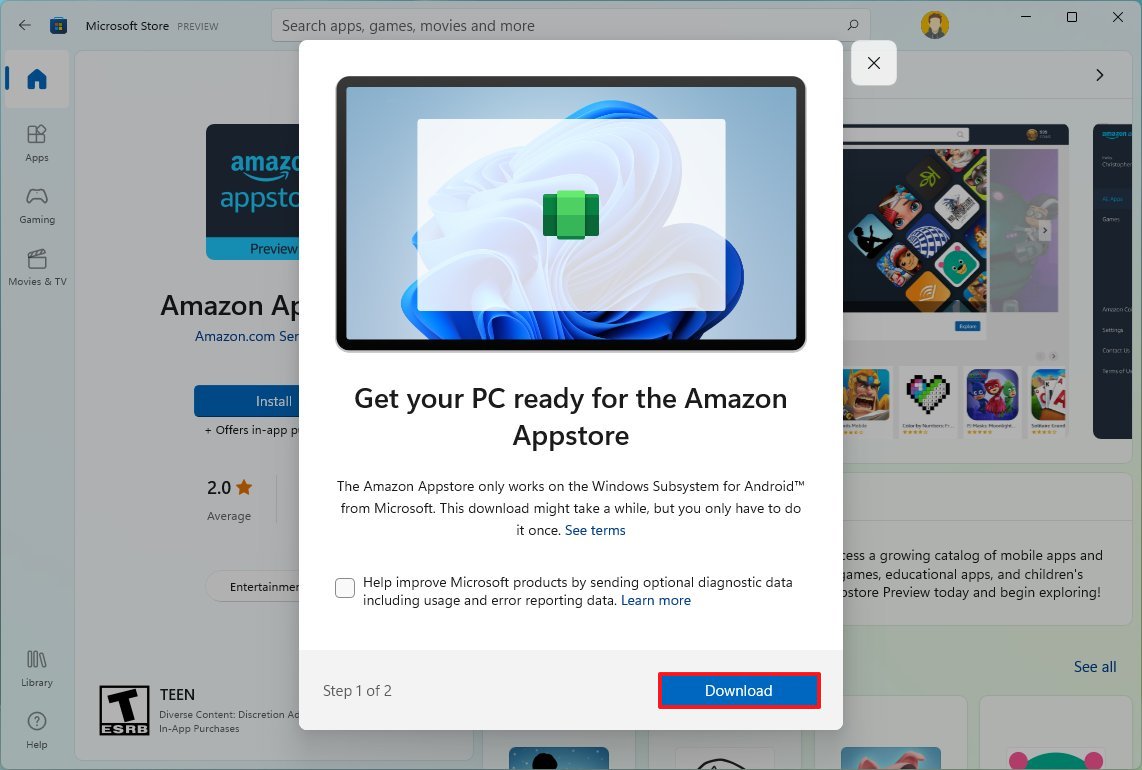
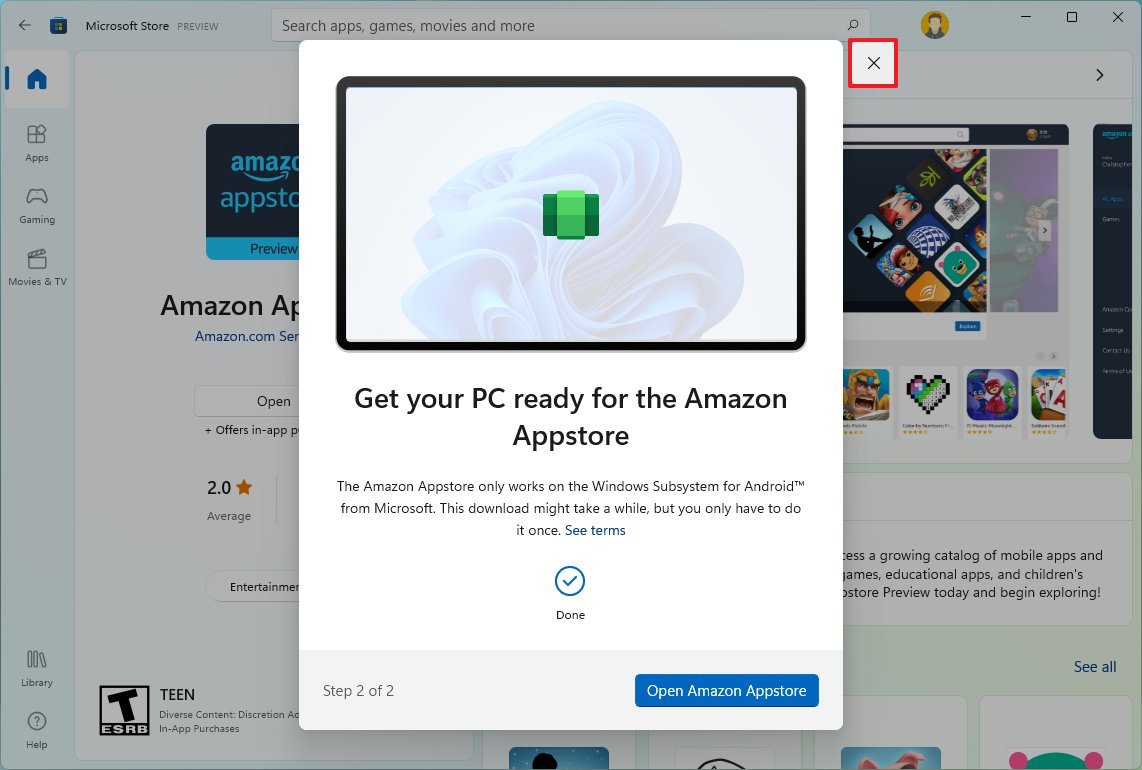
To install the Amazon Appstore with WSA, use these steps:
- Open the Amazon Appstore page (opens in new tab).
- Click the Install button.
- Click the Next button.
- Click the Restart button.
- Click the Close button.
- Close the Microsoft Store app.
After you complete the steps, you can finally proceed to sideload Android apps on Windows 11.
How to sideload Android apps on Windows 11
The process of installing and running Android apps has three steps. First, you need to set up the Android Debugging Bridge (ADB) tools to connect and install the apps. Then you need to provide the «.apk» file to install the application. Third, you need to use the ADB command to stream and install the package to the Windows Subsystem for the Android virtual machine.
Set up Android Debugging Bridge
To set up the ADB tools, use these steps:
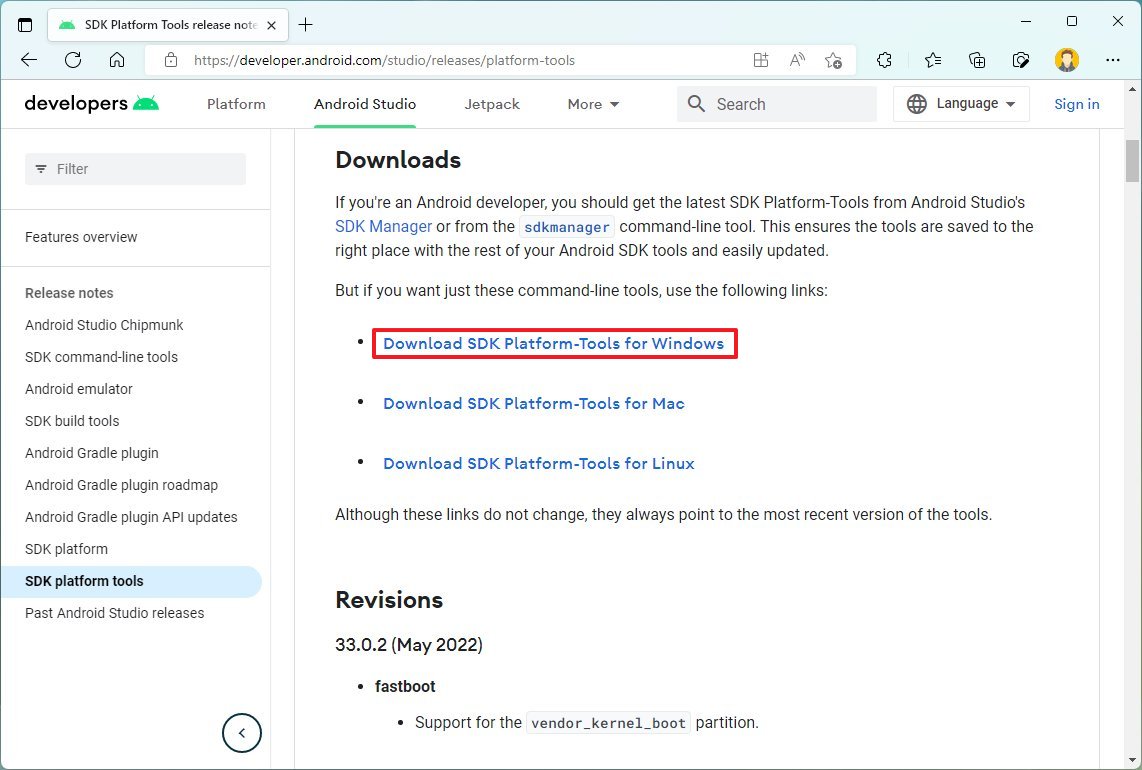
- Open the Android developer website.
- Under the «Downloads» section, click the «Download SDK Platform-Tools for Windows» link.
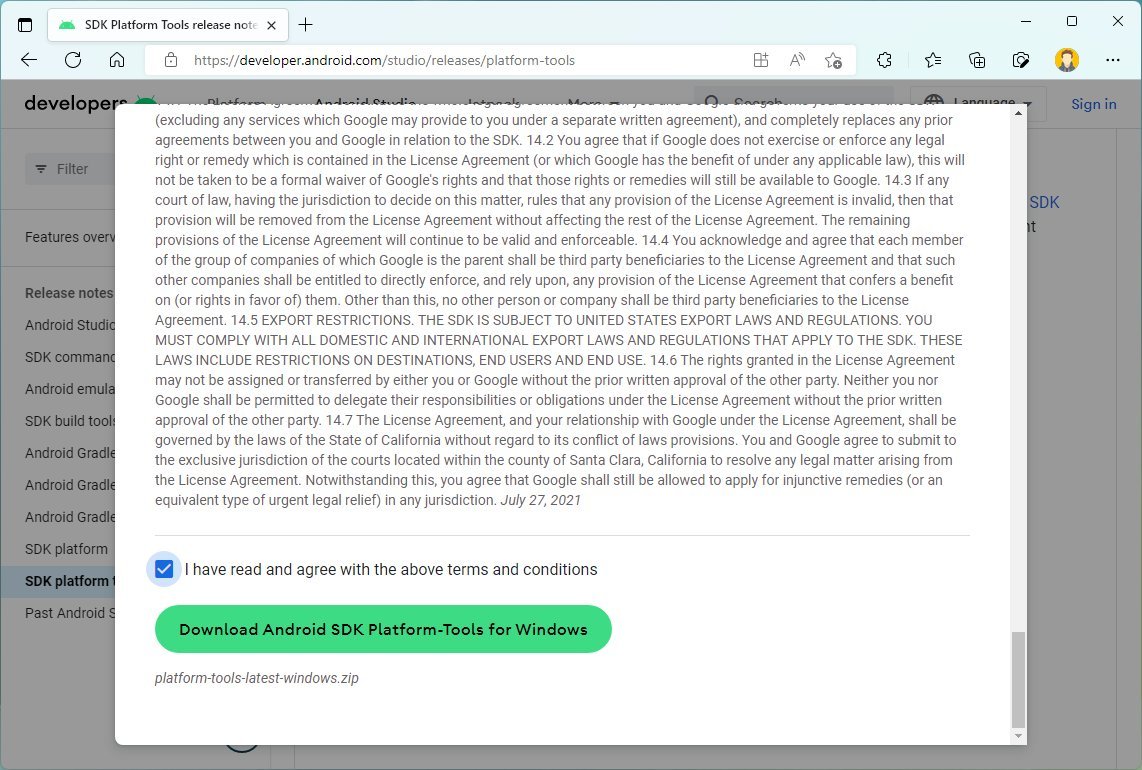
- Check the option to accept the terms.
- Click the «Downloads» section, and click the «Download Android SDK Platform-Tools for Windows» button.
- Save the platform-tools zip to the computer.
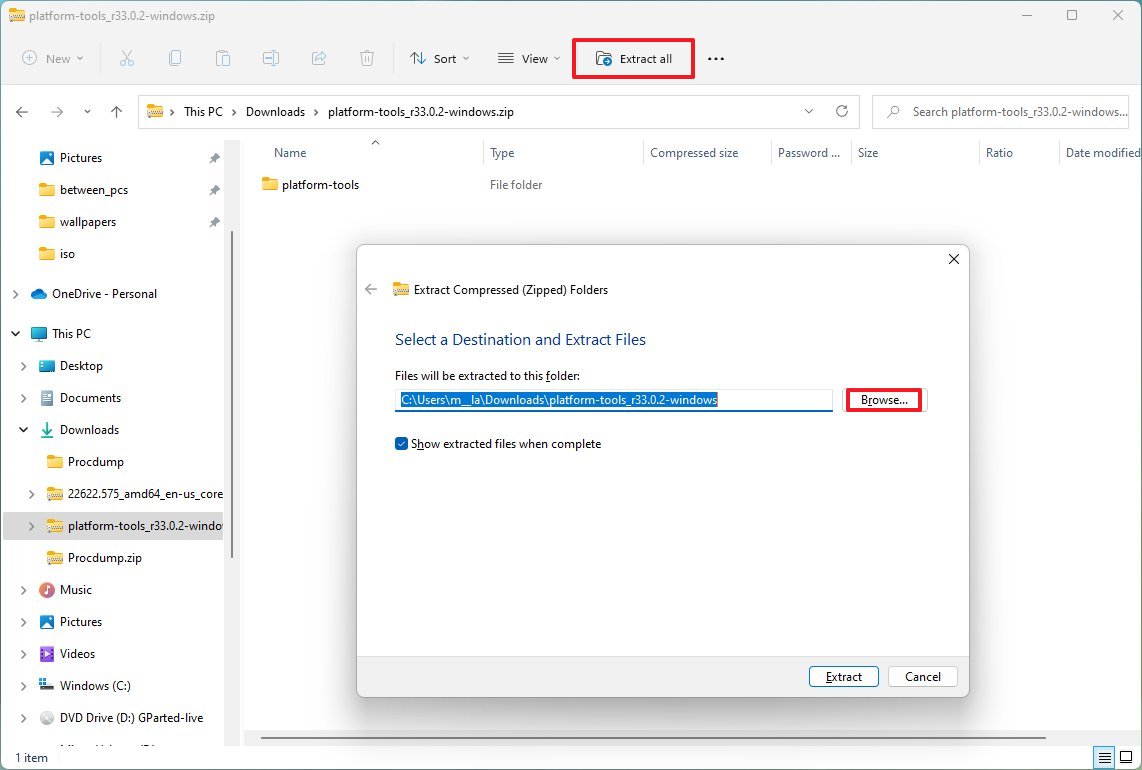
- Open the recently downloaded zip folder.
- Click the Extract all button.
- Click the Browse button.
- Select the extraction destination.
- Click the Extract button.
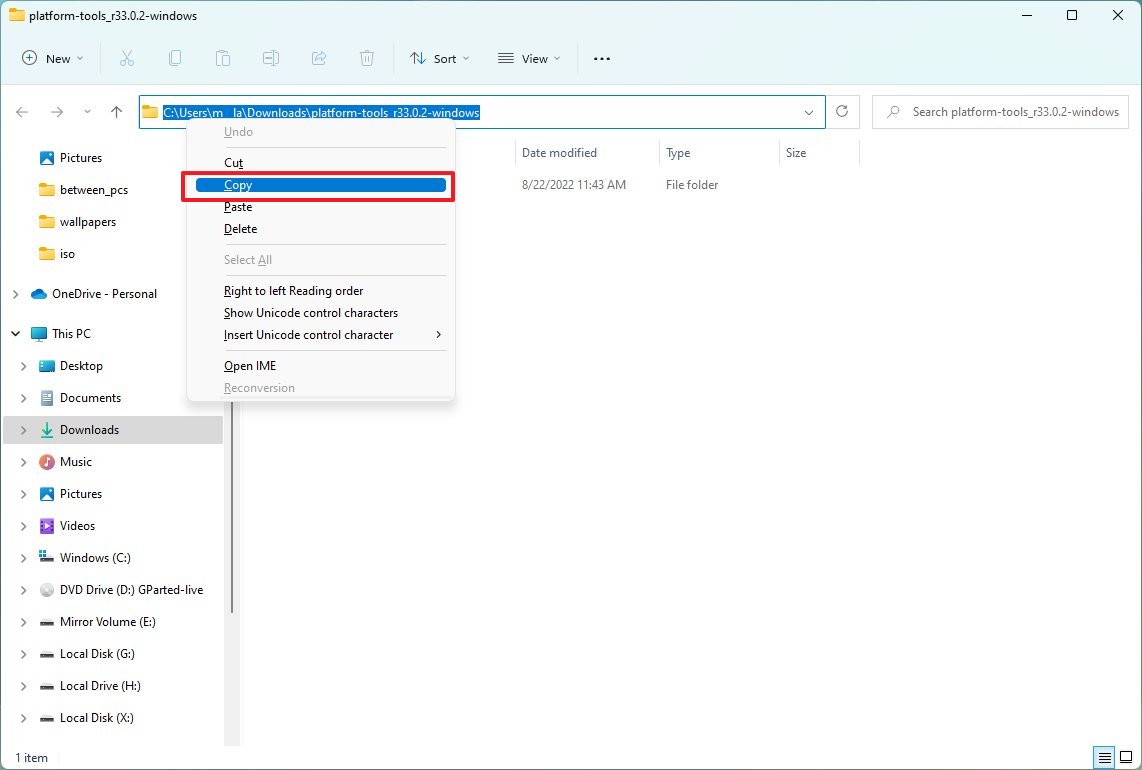
- Open the platform-tools folder.
- Select and copy the path from the address bar.
Once you complete the steps, you need to download the Android app file you want to install on Windows 11.
Download Android apps
You will need to provide the «.apk» file to install the app you want through the Windows Subsystem for Android outside the Amazon Appstore.
Once you get the Android APK file from your favorite trusted repository, make sure to save it inside the platform-tools folder.
Sideload Android apps on Windows 11
To install Android apps outside the Amazon Appstore on Windows 11, use these steps:
- Open Start.
- Search for Windows Subsystem for Android and click the top result to open the platform.
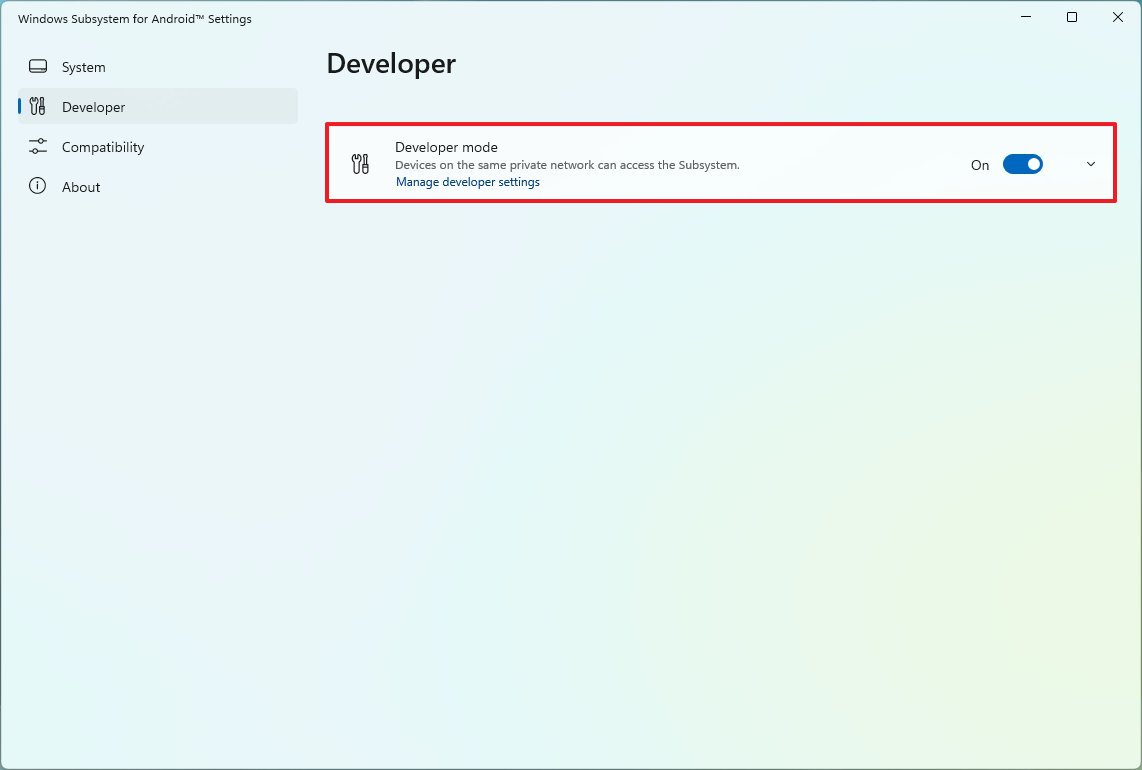
- Click on Developer.
- Turn on the Developer mode toggle switch.
- Click the Manage developer setting option to spin the Windows Subsystem for Android (if applicable).
- Check the IP address under the «Developer mode» section.
- Open Start.
- Search for Command Prompt, right-click the top result, and select the Run as administrator option.
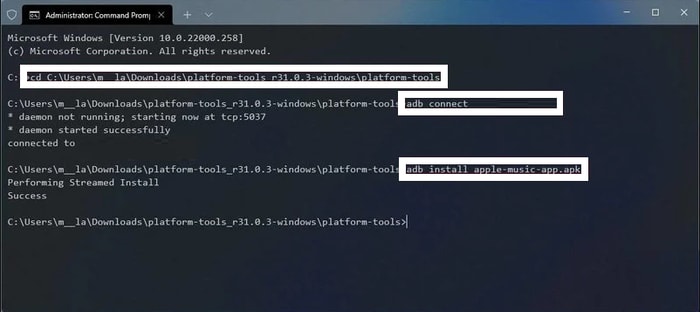
- Type the following command to navigate to the platform-tools folder and press Enter: cd C:PATHTOplatform-tools
In the command, change the path of the location where you extracted the files. For example, this command opens the tool’s location inside the «Downloads» folder: cd C:UsersyourusernameDownloadsplatform-tools_r33.0.2-windowsplatform-tools
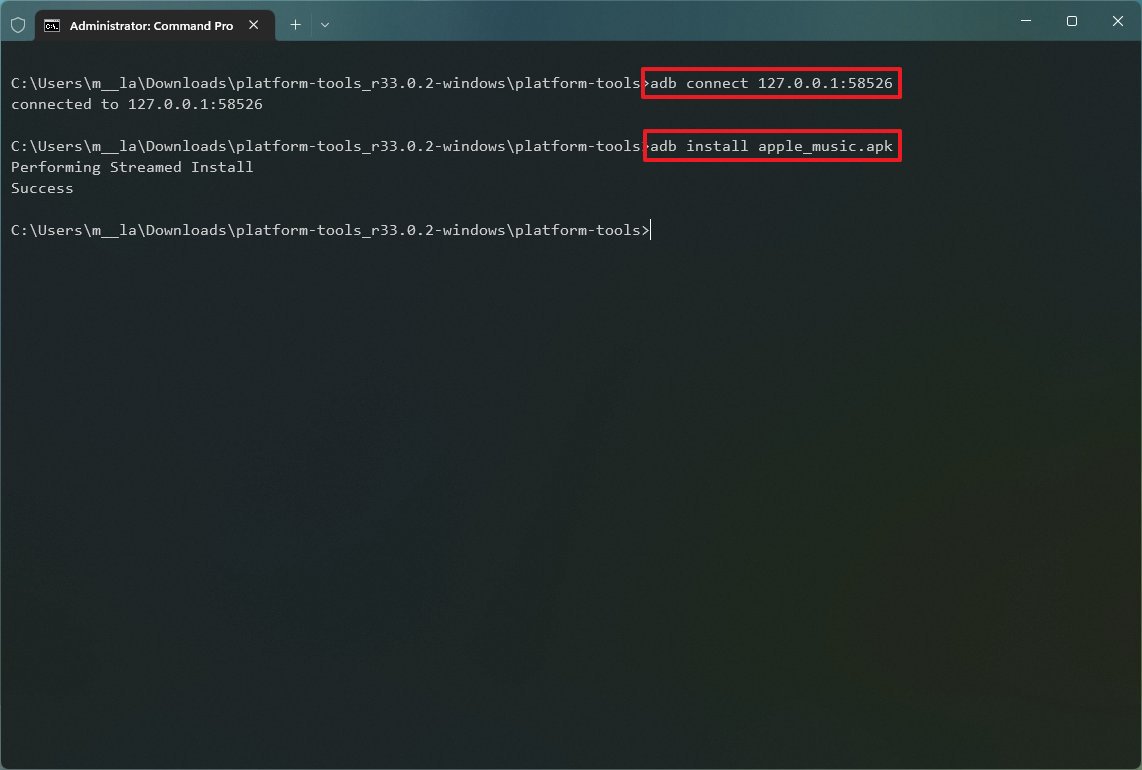
- Type the following command to connect to the WSA instance and press Enter: adb connect WSA-IP-ADDRESS-PORT
In the command, replace «WSA-IP-ADDRESS» with the actual IP address of the Windows Subsystem for Android. For example, this command connects using the 127.0.0.1:58526 address: adb connect 127.0.0.1.137:58526
- Type the following command to install the Android app and press Enter: adb install ANDROID-APK-APPNAME
In the command, replace «ANDROID-APK-APPNAME» with the actual .apk package name. For example, this command installs the package called apple-music-app.apk located in the platform-tools folder: adb install apple_music.apk
After you complete the steps, the app will install, and you can then find it and run it from the Start menu like any other native app on Windows.
More resources
For more helpful articles, coverage, and answers to common questions about Windows 10 and Windows 11, visit the following resources:
- Windows 11 on Windows Central — All you need to know
- Windows 10 on Windows Central — All you need to know
Get the best of Windows Central in your inbox, every day!
Mauro Huculak is technical writer for WindowsCentral.com. His primary focus is to write comprehensive how-tos to help users get the most out of Windows 10 and its many related technologies. He has an IT background with professional certifications from Microsoft, Cisco, and CompTIA, and he’s a recognized member of the Microsoft MVP community.
