Linux users have a wide range of commands under their belt, but not all of them work in Windows. Fortunately, the «ls» command is an exception to this

Linux has a very powerful and valuable command-line terminal that is used and loved by its users. As such, if you have previously used Linux’s Command Line Interface (CLI) and have only recently started using the Windows Command Prompt, you’re bound to feel underwhelmed by the latter’s lack of features.
There are many commands that are supported on the Linux terminal that does not exist on Windows 10 and 11. Luckily the “ls” command in Windows is supported on the Command Prompt. Read on as we explore how to use the «ls» command in Windows 10 and 11.
What Is the “ls” Command in Windows?
The “ls” command (that’s LS, not IS) is one of the first terminal commands that veterans teach Linux beginners. It allows users to list files and directories from the Command Line Interface. You can think of it as a File Explorer, but without the user-friendly icons and navigation buttons.
By using the “ls” command, users can list the contents of the current working directory, similarly, you can also switch directories using Command Prompt. On Windows, the usage of «ls» in Command Prompt is slightly different compared to Linux, but it can accomplish the same task.
How to Use the “ls” Command in Command Prompt on Windows 10 and 11
Windows is an entirely different ecosystem when compared to Linux. As a result, many Linux CLI commands are not supported by the Windows Command Prompt tool.
If you try using the “ls” command in Command Prompt, you will get the following error: «‘ls’ is not recognized as an internal or external command, operable program or batch file.»
However, you can use the “ls” command in Windows using the equivalent dir command in Command Prompt.
To list files and directories using the equivalent of «ls» in Command Prompt on Windows 10 and 11:
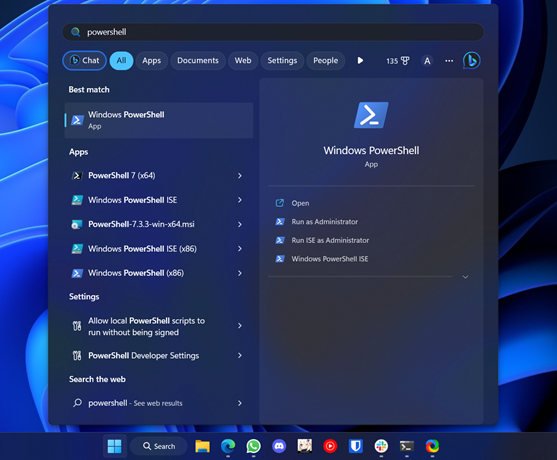
- Click on the Start menu icon, search for Command Prompt, right-click the Best Match, and select Run as administrator.
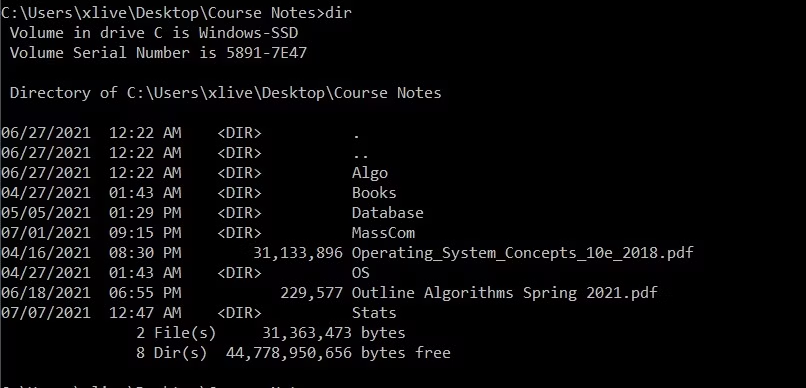
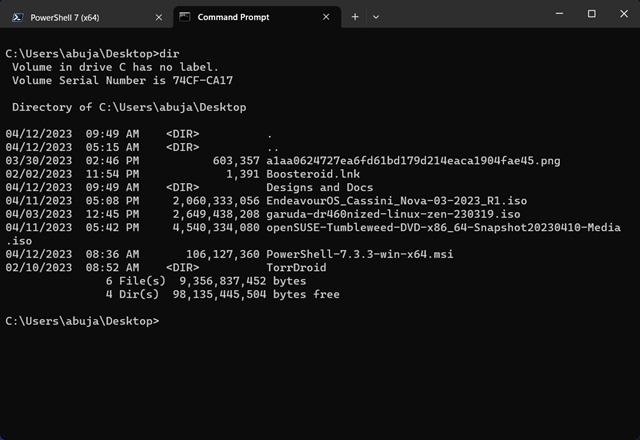
- Once the Command Prompt window is open, navigate to the directory you want to view and type dir.
- Command Prompt will now list all of the files in the current working directory, along with their sizes and last modified date.
How to Use «ls» Command in Windows PowerShell
While the «ls» command does not work on the Windows Command Prompt, it does work within Windows PowerShell. Windows PowerShell is a very powerful utility, and even allows you to carry out complex file management tasks such as creating, removing, and copying files and folders straight through the terminal.
The Get-ChildItem cmdlet script of PowerShell allows users to easily list file directories using any of the aliases such as ls, dir, and even gci.
Follow these steps to view a file directory using the «ls» command on Windows using Windows PowerShell:
- Launch Windows PowerShell using the Start menu and select the Best match.
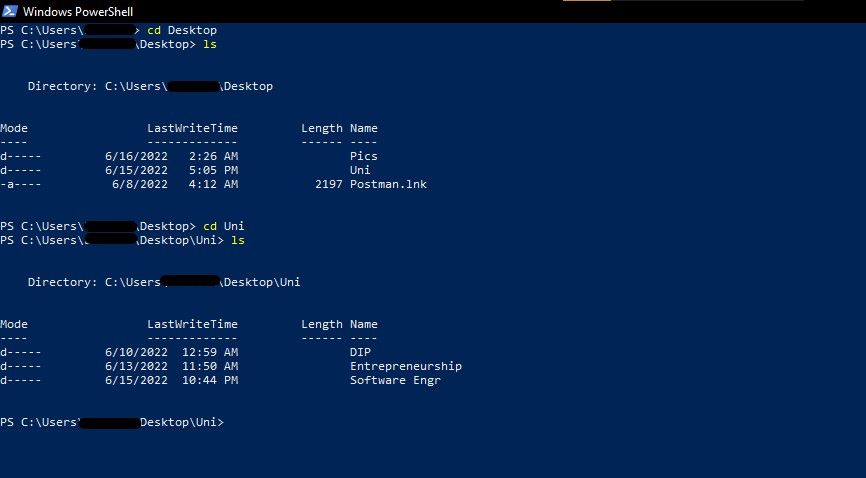
- Navigate to your target directory using the cd command.
- Type the ls command and press enter to view all of the listed files and folders within your target directory.
- Similarly, you can even use the dir or gci command to view the contents of a folder.
If you love using Linux, you’ll likely find that Microsoft’s own command prompt is a bit weaker in comparison. Fortunately, the «ls» command is also on Windows; it just uses a different name within Command Prompt. If you’re using PowerShell you can use any of the alias commands to get the required file directories.
If you haven’t explored them yet, the Windows Command Prompt and PowerShell utility are a handy gateway to using more advanced Windows tools. It is always a good idea to be familiar with Windows CMD commands so you can make full use of your copy of Windows.
on February 13, 2012
It’s very common scenario in IT field that people who are familiar with one OS have to learn/work with another OS. I do see many people, who are familiar with Linux commands, looking for their equivalent commands in Windows OS. Below I have attempted to list down the Windows commands for most widely used Linux commands. If I have missed any, please write in the comments section and let me know.
Ls : The Windows equivalent one is dir. ‘Dir‘ has many switches to list files based on different attributes, sort the list on size or date modified etc.
Grep : Findstr is the closet matching one for grep. find is also for searching strings in files, but it does not have many options.
Adduser: We can use net user to manage user accounts.
Useradd: net localgroup can be used to manage user groups. Net group can be used to manage active directory (domain) groups.
Uname : ver command shows Windows OS version. Systeminfo shows lot of hardware and software information.
Ps : The closest matching command is tasklist, though it’s not as feature rich as ps.
Echo : echo. Very much similar to Linux’s echo.
Md : mkdir
rm: Del deletes files whereas rmdir can be used to delete directories.
Du : du can be used to monitor the disk usage. However, this tool is not part of Windows OS. We need to install it separately. See the link for more information.
Df : Net use. We can list the network shares mapped on the computer.
Mount : Net use . Map network share to local drive
Cat : Type print the contents of a text file in the console/command prompt.
Head : there’s no equivalent command I am aware of.
Tail : Tail resource kit tool.
touch: Fsutil can be used to create files of require size.
I will add few more commands to the list soon…If you are searching for some specific command and do not find it here, please let me know.
The ls command, short for “list,” is a Linux command that’s used to display files and directories in the terminal. In most cases, it is used to get an idea about the files in the working directory and to ensure you are in the right directory. When you compare this to a rival operating system, the Command Prompt in Windows has a different approach when it comes to listing directories. In this guide, we will explain how to use the “ls” command on Windows 10 and 11.
Table of Contents
The ls command from Linux is not supported in Command Prompt on Windows, and you will get the following error when you try to run this command: ‘ls’ is not recognized as an internal or external command, operable program, or batch file.
However, we have an alternative that does work in the Command Prompt. The ls command equivalent on Windows is “dir,” which is short for directory. The dir command is supported in the command prompt on Windows 10 and 11, but Powershell lets you use the ls command to list directories and files. The method of getting into a directory remains the same, i.e., by using the command “cd <dir name>” (change directory) command.
How to Use the “ls” Command in Command Prompt
Here’s how to use the command that brings the “ls” functionality in the Command Prompt on Windows:
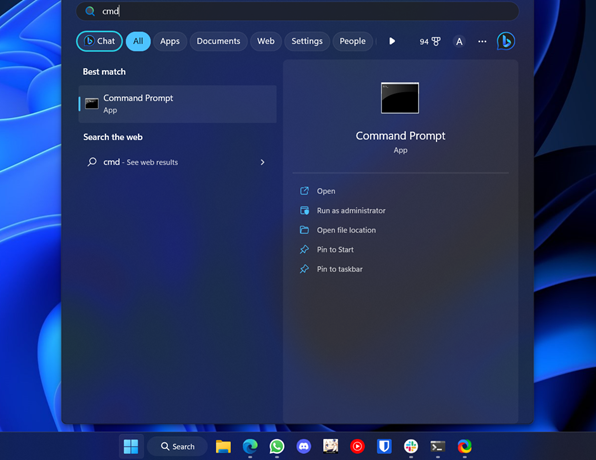
1. Go to the Start menu, search CMD, and launch Command Prompt.
2. Then, use the cd command to move to the directory you want to see the contents of. For example, we switched to the Desktop.
cd DesktopNotably, you can also move backward into directories using the command “cd ../”
3. Finally, type “dir” and hit Enter to see all files and folders in the current working directory.
How to Use the “ls” in Windows PowerShell
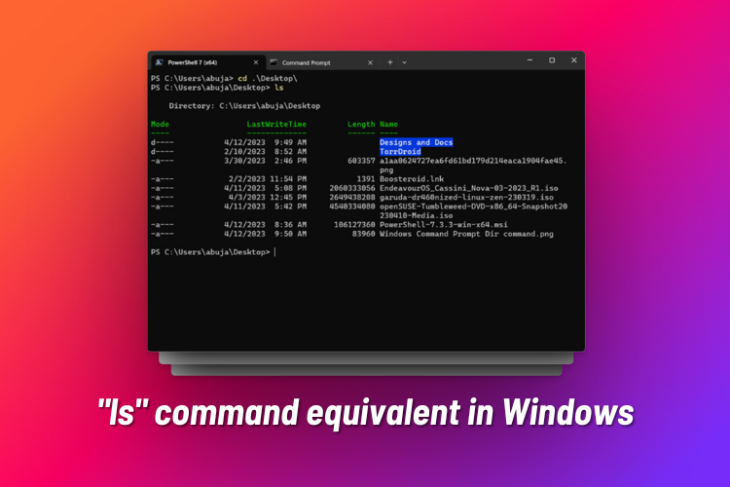
Unlike Command Prompt, Windows PowerShell recognizes the “ls” command, just like Linux, and lists all files and folders in the working directory. Here’s how to use the “ls” command in Windows PowerShell.
1. Go to Start and search for Windows PowerShell. Click to open the window.
2. Move into a directory using the cd command and use the command “ls” to see its contents.
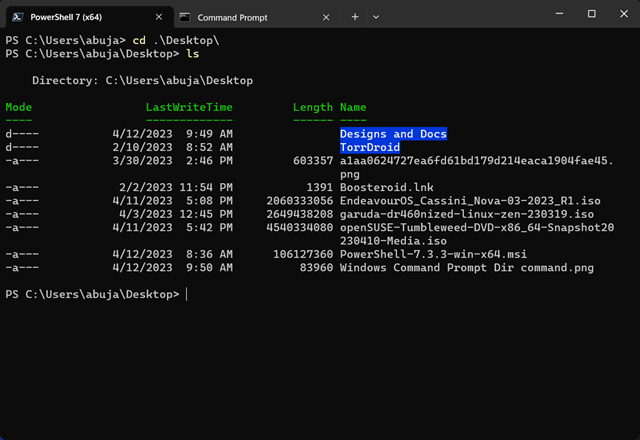
3. You can also use the “dir” command to list directories in Windows PowerShell.
Difference Between Command Prompt and PowerShell
Both Command Prompt and PowerShell are terminals used to execute batch files, but Windows PowerShell is more modern and powerful compared to Command Prompt. It’s used to automate tasks, execute files and programs, and more importantly, pipe information from one application to another, just like Bash on Linux. That said, which of these do you use most often — Command Prompt or PowerShell? Let us know in the comments section below.
Время на прочтение
8 мин
Количество просмотров 15K
Типичный вопрос разработчиков под Windows: «Почему здесь до сих пор нет <ВСТАВЬТЕ ТУТ ЛЮБИМУЮ КОМАНДУ LINUX>?». Будь то мощное пролистывание less или привычные инструменты grep или sed, разработчики под Windows хотят получить лёгкий доступ к этим командам в повседневной работе.
Подсистема Windows для Linux (WSL) сделала огромный шаг вперёд в этом отношении. Она позволяет вызывать команды Linux из Windows, проксируя их через wsl.exe (например, wsl ls). Хотя это значительное улучшение, но такой вариант страдает от ряда недостатков.
- Повсеместное добавление
wslутомительно и неестественно. - Пути Windows в аргументах не всегда срабатывают, потому что обратные слэши интерпретируются как escape-символы, а не разделители каталогов.
- Пути Windows в аргументах не переводятся в соответствующую точку монтирования в WSL.
- Не учитываются параметры по умолчанию в профилях WSL с алиасами и переменными окружения.
- Не поддерживается завершение путей Linux.
- Не поддерживается завершение команд.
- Не поддерживается завершение аргументов.
В результате команды Linux воспринимаются под Windows как граждане второго сорта — и их сложнее использовать, чем родные команды. Чтобы уравнять их в правах, нужно решить перечисленные проблемы.
Оболочки функций PowerShell
C помощью оболочек функций PowerShell мы можем добавить автозавершение команд и устранить необходимость в префиксах wsl, транслируя пути Windows в пути WSL. Основные требования к оболочкам:
- Для каждой команды Linux должна быть одна оболочка функции с тем же именем.
- Оболочка должна распознавать пути Windows, переданные в качестве аргументов, и преобразовывать их в пути WSL.
- Оболочка должна вызывать
wslс соответствующей командой Linux на любой вход конвейера и передавая любые аргументы командной строки, переданные функции.
Поскольку этот шаблон может быть применён к любой команде, мы можем абстрагировать определение этих оболочек и динамически генерировать их из списка команд для импорта.
# The commands to import.
$commands = "awk", "emacs", "grep", "head", "less", "ls", "man", "sed", "seq", "ssh", "tail", "vim"

# Register a function for each command.
$commands | ForEach-Object { Invoke-Expression @"
Remove-Alias $_ -Force -ErrorAction Ignore
function global:$_() {
    for (`$i = 0; `$i -lt `$args.Count; `$i++) {
        # If a path is absolute with a qualifier (e.g. C:), run it through wslpath to map it to the appropriate mount point.
        if (Split-Path `$args[`$i] -IsAbsolute -ErrorAction Ignore) {
            `$args[`$i] = Format-WslArgument (wsl.exe wslpath (`$args[`$i] -replace "\\", "/"))
        # If a path is relative, the current working directory will be translated to an appropriate mount point, so just format it.
        } elseif (Test-Path `$args[`$i] -ErrorAction Ignore) {
            `$args[`$i] = Format-WslArgument (`$args[`$i] -replace "\\", "/")
        }
    }

    if (`$input.MoveNext()) {
        `$input.Reset()
        `$input | wsl.exe $_ (`$args -split ' ')
    } else {
        wsl.exe $_ (`$args -split ' ')
    }
}
"@
}
Список $command определяет команды для импорта. Затем мы динамически генерируем обёртку функции для каждой из них, используя команду Invoke-Expression (сначала удалив любые алиасы, которые будут конфликтовать с функцией).
Функция перебирает аргументы командной строки, определяет пути Windows с помощью команд Split-Path и Test-Path, а затем преобразует эти пути в пути WSL. Мы запускаем пути через вспомогательную функцию Format-WslArgument, которую определим позже. Она экранирует специальные символы, такие как пробелы и скобки, которые в противном случае были бы неверно истолкованы.
Наконец, передаём wsl входные данные конвейера и любые аргументы командной строки.
С помощью таких обёрток можно вызывать любимые команды Linux более естественным способом, не добавляя префикс wsl и не беспокоясь о том, как преобразуются пути:
man bashless -i $profile.CurrentUserAllHostsls -Al C:\Windows\ | lessgrep -Ein error *.logtail -f *.log
Здесь показан базовый набор команд, но вы можете создать оболочку для любой команды Linux, просто добавив её в список. Если вы добавите этот код в свой профиль PowerShell, эти команды будут доступны вам в каждом сеансе PowerShell, как и нативные команды!
Параметры по умолчанию
В Linux принято определять алиасы и/или переменные окружения в профилях (login profile), задавая параметры по умолчанию для часто используемых команд (например, alias ls=ls -AFh или export LESS=-i). Один из недостатков проксирования через неинтерактивную оболочку wsl.exe — то, что профили не загружаются, поэтому эти параметры по умолчанию недоступны (т. е. ls в WSL и wsl ls будут вести себя по-разному с алиасом, определённым выше).
PowerShell предоставляет $PSDefaultParameterValues, стандартный механизм для определения параметров по умолчанию, но только для командлетов и расширенных функций. Конечно, можно из наших оболочек сделать расширенные функции, но это вносит лишние осложнения (так, PowerShell соотносит частичные имена параметров (например, -a соотносится с -ArgumentList), которые будут конфликтовать с командами Linux, принимающими частичные имена в качестве аргументов), а синтаксис для определения значений по умолчанию будет не самым подходящим (для определения аргументов по умолчанию требуется имя параметра в ключе, а не только имя команды).
Однако с небольшим изменением наших оболочек мы можем внедрить модель, аналогичную $PSDefaultParameterValues, и включить параметры по умолчанию для команд Linux!
function global:$_() {
    …

    `$defaultArgs = ((`$WslDefaultParameterValues.$_ -split ' '), "")[`$WslDefaultParameterValues.Disabled -eq `$true]
    if (`$input.MoveNext()) {
        `$input.Reset()
        `$input | wsl.exe $_ `$defaultArgs (`$args -split ' ')
    } else {
        wsl.exe $_ `$defaultArgs (`$args -split ' ')
    }
}
Передавая $WslDefaultParameterValues в командную строку, мы отправляем параметры через wsl.exe. Ниже показано, как добавить инструкции в профиль PowerShell для настройки параметров по умолчанию. Теперь мы можем это сделать!
$WslDefaultParameterValues["grep"] = "-E"
$WslDefaultParameterValues["less"] = "-i"
$WslDefaultParameterValues["ls"] = "-AFh --group-directories-first"
Поскольку параметры моделируются после $PSDefaultParameterValues, вы можете легко их отключить на время, установив ключ "Disabled" в значение $true. Дополнительное преимущество отдельной хэш-таблицы в возможности отключить $WslDefaultParameterValues отдельно от $PSDefaultParameterValues.
Автозавершение аргументов
PowerShell позволяет регистрировать завершители аргументов с помощью команды Register-ArgumentCompleter. В Bash есть мощные программируемые средства для автозавершения. WSL позволяет вызывать bash из PowerShell. Если мы можем зарегистрировать завершители аргументов для наших оболочек функций PowerShell и вызвать bash для создания завершений, то получим полное автозавершение аргументов с той же точностью, что и в самом bash!
# Register an ArgumentCompleter that shims bash's programmable completion.
Register-ArgumentCompleter -CommandName $commands -ScriptBlock {
    param($wordToComplete, $commandAst, $cursorPosition)

    # Map the command to the appropriate bash completion function.
    $F = switch ($commandAst.CommandElements[0].Value) {
        {$_ -in "awk", "grep", "head", "less", "ls", "sed", "seq", "tail"} {
            "_longopt"
            break
        }

        "man" {
            "_man"
            break
        }

        "ssh" {
            "_ssh"
            break
        }

        Default {
            "_minimal"
            break
        }
    }

    # Populate bash programmable completion variables.
    $COMP_LINE = "`"$commandAst`""
    $COMP_WORDS = "('$($commandAst.CommandElements.Extent.Text -join "' '")')" -replace "''", "'"
    for ($i = 1; $i -lt $commandAst.CommandElements.Count; $i++) {
        $extent = $commandAst.CommandElements[$i].Extent
        if ($cursorPosition -lt $extent.EndColumnNumber) {
            # The cursor is in the middle of a word to complete.
            $previousWord = $commandAst.CommandElements[$i - 1].Extent.Text
            $COMP_CWORD = $i
            break
        } elseif ($cursorPosition -eq $extent.EndColumnNumber) {
            # The cursor is immediately after the current word.
            $previousWord = $extent.Text
            $COMP_CWORD = $i + 1
            break
        } elseif ($cursorPosition -lt $extent.StartColumnNumber) {
            # The cursor is within whitespace between the previous and current words.
            $previousWord = $commandAst.CommandElements[$i - 1].Extent.Text
            $COMP_CWORD = $i
            break
        } elseif ($i -eq $commandAst.CommandElements.Count - 1 -and $cursorPosition -gt $extent.EndColumnNumber) {
            # The cursor is within whitespace at the end of the line.
            $previousWord = $extent.Text
            $COMP_CWORD = $i + 1
            break
        }
    }

    # Repopulate bash programmable completion variables for scenarios like '/mnt/c/Program Files'/<TAB> where <TAB> should continue completing the quoted path.
    $currentExtent = $commandAst.CommandElements[$COMP_CWORD].Extent
    $previousExtent = $commandAst.CommandElements[$COMP_CWORD - 1].Extent
    if ($currentExtent.Text -like "/*" -and $currentExtent.StartColumnNumber -eq $previousExtent.EndColumnNumber) {
        $COMP_LINE = $COMP_LINE -replace "$($previousExtent.Text)$($currentExtent.Text)", $wordToComplete
        $COMP_WORDS = $COMP_WORDS -replace "$($previousExtent.Text) '$($currentExtent.Text)'", $wordToComplete
        $previousWord = $commandAst.CommandElements[$COMP_CWORD - 2].Extent.Text
        $COMP_CWORD -= 1
    }

    # Build the command to pass to WSL.
    $command = $commandAst.CommandElements[0].Value
    $bashCompletion = ". /usr/share/bash-completion/bash_completion 2> /dev/null"
    $commandCompletion = ". /usr/share/bash-completion/completions/$command 2> /dev/null"
    $COMPINPUT = "COMP_LINE=$COMP_LINE; COMP_WORDS=$COMP_WORDS; COMP_CWORD=$COMP_CWORD; COMP_POINT=$cursorPosition"
    $COMPGEN = "bind `"set completion-ignore-case on`" 2> /dev/null; $F `"$command`" `"$wordToComplete`" `"$previousWord`" 2> /dev/null"
    $COMPREPLY = "IFS=`$'\n'; echo `"`${COMPREPLY[*]}`""
    $commandLine = "$bashCompletion; $commandCompletion; $COMPINPUT; $COMPGEN; $COMPREPLY" -split ' '

    # Invoke bash completion and return CompletionResults.
    $previousCompletionText = ""
    (wsl.exe $commandLine) -split '\n' |
    Sort-Object -Unique -CaseSensitive |
    ForEach-Object {
        if ($wordToComplete -match "(.*=).*") {
            $completionText = Format-WslArgument ($Matches[1] + $_) $true
            $listItemText = $_
        } else {
            $completionText = Format-WslArgument $_ $true
            $listItemText = $completionText
        }

        if ($completionText -eq $previousCompletionText) {
            # Differentiate completions that differ only by case otherwise PowerShell will view them as duplicate.
            $listItemText += ' '
        }

        $previousCompletionText = $completionText
        [System.Management.Automation.CompletionResult]::new($completionText, $listItemText, 'ParameterName', $completionText)
    }
}

# Helper function to escape characters in arguments passed to WSL that would otherwise be misinterpreted.
function global:Format-WslArgument([string]$arg, [bool]$interactive) {
    if ($interactive -and $arg.Contains(" ")) {
        return "'$arg'"
    } else {
        return ($arg -replace " ", "\ ") -replace "([()|])", ('\$1', '`$1')[$interactive]
    }
}
Код немного плотный без понимания некоторых внутренних функций bash, но в основном мы делаем следующее:
- Регистрируем завершатель аргументов для всех наших обёрток функций, передавая список
$commandsв параметр-CommandNameдляRegister-ArgumentCompleter. - Сопоставляем каждую команду с функцией оболочки, которую использует bash для автозавершения (для определения спецификаций автозавершения в bash используется
$F, сокращение отcomplete -F <FUNCTION>). - Преобразуем аргументы PowerShell
$wordToComplete,$commandAstи$cursorPositionв формат, ожидаемый функциями автозавершения bash в соответствии со спецификациями программируемого автозавершения bash. - Составляем командную строку для передачи в
wsl.exe, который обеспечивает правильную настройку среды, вызывает соответствующую функцию автозавершения и выводит результаты с разбиением по строкам. - Затем вызываем
wslс командной строкой, разделяем выдачу разделителями строк и генерируем для каждойCompletionResults, сортируя их и экранируя символы, такие как пробелы и скобки, которые в противном случае были бы неверно истолкованы.
В итоге наши оболочки команд Linux будут использовать точно такое же автозавершение, как в bash! Например:
ssh -c <TAB> -J <TAB> -m <TAB> -O <TAB> -o <TAB> -Q <TAB> -w <TAB> -b <TAB>
Каждое автозавершение подоставляет значения, специфичные для предыдущего аргумента, считывая данные конфигурации, такие как известные хосты, из WSL!
<TAB> будет циклически перебирать параметры. <Ctrl + пробел> покажет все доступные опции.
Кроме того, поскольку теперь у нас работает автозавершение bash, вы можете автозавершать пути Linux непосредственно в PowerShell!
less /etc/<TAB>ls /usr/share/<TAB>vim ~/.bash<TAB>
В тех случаях, когда автозавершение bash не даёт никаких результатов, PowerShell возвращается к системе по умолчанию с путями Windows. Таким образом, вы на практике можете одновременно использовать и те, и другие пути на своё усмотрение.
Заключение
С помощью PowerShell и WSL мы можем интегрировать команды Linux в Windows как нативные приложения. Нет необходимости искать билды Win32 или утилиты Linux или прерывать рабочий процесс, переходя в Linux-шелл. Просто установите WSL, настройте профиль PowerShell и перечислите команды, которые хотите импортировать! Богатое автозавершение для параметров команд и путей к файлам Linux и Windows — это функциональность, которой сегодня нет даже в нативных командах Windows.
Полный исходный код, описанный выше, а также дополнительные рекомендации по его включению в рабочий процесс доступны здесь.
Какие команды Linux вы считаете наиболее полезными? Каких ещё привычных вещей не хватает при работе в Windows? Пишите в комментариях или на GitHub!
NEW AND IMPROVED ANSWER
I recently stumbled upon a built-in command that is rather similar to find in Unix:
ForFiles
Basic syntax is:
forfiles [/p <Path>] [/m <SearchMask>] [/s] [/c <Command>] [/d [{+|-}][{<Date>|<Days>}]]
There are several variables to use when constructing the command to execute per each file (via the /c switch):
@FILEFile name.@FNAMEFile name without extension.@EXTFile name extension.@PATHFull path of the file.@RELPATHRelative path of the file.@ISDIREvaluates to TRUE if a file type is a directory. Otherwise, this variable evaluates to FALSE.@FSIZEFile size, in bytes.@FDATELast modified date stamp on the file.@FTIMELast modified time stamp on the file.
It looks like you would use the command like this:
FORFILES /m *.cs /c FINDSTR /I /N /C:"sqlcommand" @FILE
I’m not sure how long this command has been around, but the earliest reference I could find in the documentation is from 2008-09-02:
https://web.archive.org/web/20080902221744/http://technet.microsoft.com:80/en-us/library/cc753551.aspx
and that page states that it was last updated on «April 25, 2007». The documentation is filed under «Windows Server» so it likely started there and was added to the desktop OSes starting with Windows Vista, I believe. I did check Windows XP and didn’t see it there, though it is on Windows 10.
ORIGINAL ANSWER
This requires a combination of two DOS commands:
-
FOR /F ["options"] %variable IN ('command') DO command [command-parameters]and
-
DIR /B /O:N /W *.c(this is the'command'noted in theFORcommand above)
Create a CMD script as follows:
@ECHO OFF

FOR /F %%B IN ('DIR /B /O:N /W *.cs') DO (
    findstr /I /N /C:"sqlcommand" %%B
)
OR, just use the find command found in this set of Unix command ports:
http://unxutils.sourceforge.net/
or
http://sourceforge.net/projects/unxutils/
(both links should be the same project)