Telnet protocol is used to establish a remote connection to the remote computer. Telnet provides access to a command-line interface on the remote computer. However, due to security concerns, the Telnet client feature is disabled by default on all versions of the Windows operating system. If you don’t want to enable to Telnet Client feature, there are alternative methods to PowerShell Telnet to test remote computer connections.
If you try to run Telnet in PowerShell, it will throw an exception as ‘Telnet‘ is not recognized as the name of the cmdlet.
In this article, I will explain to you how to use PowerShell Telnet and PowerShell Telnet alternative to test remote host connection over the port.
In all versions of Windows Operating System, the Telnet client is disabled by default because of security reasons.
Let’s understand PowerShell Telnet alternatives to test remote computer connections.
Using Test-NetConnection to Test Connectivity
PowerShell Test-NetConnection cmdlet is used to test connectivity with remote computers and get diagnostics information about the connection.
Syntax
Test-NetConnection
    [[-ComputerName] <String>]
    [-TraceRoute]
    [-Hops <Int32>]
    [-InformationLevel <String>]
    [<CommonParameters>]
To test a ping connection to a remote host, use the PowerShell Test-NetConnection command:
Test-NetConnection -ComputerName 192.168.0.6 -InformationLevel "Detailed" -Port 3389
In the above command, the PowerShell Test-Connection command test ping connectivity with the remote computer name specified by ComputerName and Port 3389.
It returns detailed diagnostic information about remote computer connectivity as given below
ComputerName            : 192.168.0.6
RemoteAddress           : 192.168.0.6
RemotePort              : 3389
NameResolutionResults   : 192.168.0.6
MatchingIPsecRules      :
NetworkIsolationContext : Private Network
IsAdmin                 : False
InterfaceAlias          : Wi-Fi
SourceAddress           : 192.168.0.6
NetRoute (NextHop)      : 0.0.0.0
TcpTestSucceeded        : True
If PingSucceeded is true, it means the remote computer is reachable over Port 3389 else not reachable. PowerShell Test-Connection test port without telnet.
Using System.Net.Sockets.TcpClient to Test Connectivity
Microsoft .Net System.Net.Sockets.TcpClient provides telnet connectivity to the remote host on a specified port number.
To test connection with remote computer, use the System.Net.Sockets.TcpClient method:
New-Object System.Net.Sockets.TcpClient("192.168.0.6", 3389)
In the above command, the TcpClient method takes the remote computer IP address and port number to test the connection.
It returns detailed diagnostics information about the test connection with a remote computer over the port number below:
Client              : System.Net.Sockets.Socket
Available           : 0
Connected           : True
ExclusiveAddressUse : False
ReceiveBufferSize   : 65536
SendBufferSize      : 65536
ReceiveTimeout      : 0
SendTimeout         : 0
LingerState         : System.Net.Sockets.LingerOption
NoDelay             : False
In the above output,
Connected: True, if the connection to a remote computer over the port is successful
Connected: False, if the connection to a remote computer over the port is unsuccessful.
Cool Tip: How to use Get-AdDomainController to get domain controller in PowerShell!
Using PowerShell Telnet to Test Connection
The Telnet Client is disabled by default on Windows 10 or all Windows versions. To use Telnet in PowerShell, enable the Telnet client feature.
There are two different ways to enable Telnet client in Windows:
Install Telnet Client using Command Prompt (cmd)
To install the Telnet client using cmd, open the command prompt with run as administrator.
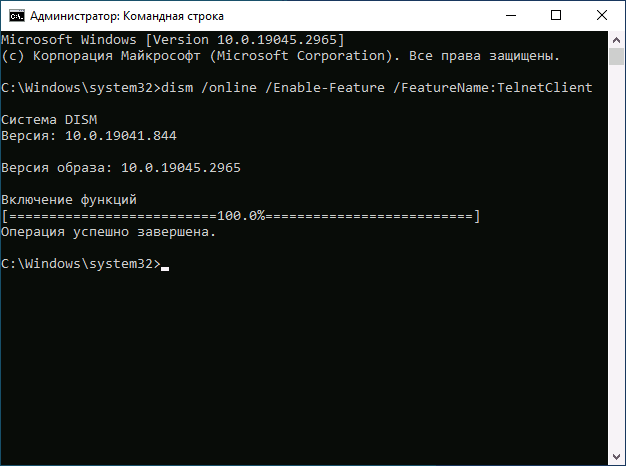
Use the command dism with its /Enable-Feature and /FeatureName:TelnetClient to enable the Telnet client feature:
dism /online /Enable-Feature /FeatureName:TelnetClient
In the above command, the dism command is used to repair or modify Windows installation media and its feature. The command uses the Enable-Feature parameter and TelnetClient as FeatureName and enables Telnet client on the Windows operating system to test the port.
Install Telnet Client using PowerShell
To install Telnet client using the PowerShell console, open the terminal with run as administrator.
Install-WindowsFeature cmdlet requires ServerManager to be installed. Install the module using the below command
Import-Module ServerManagerRun the below command in the PowerShell terminal to enable Telnet in PowerShell.
Install-WindowsFeature -name "Telnet-Client"
In the above command, using Install-WindowsFeature, it takes Telnet-Client as the feature name, and on script execution, it enables Telnet in PowerShell to test connection with a remote host over the port.
Conclusion
The Telnet command is very useful for system administrators to test connections over remote computers and test ports if it is used or block ports if they are not in use.
If the PowerShell Telnet client is not enabled, you can enable it using dism or Install-WindowsFeature command. If you don’t want to enable Telnet client feature, there are another telnet alternative to test connection to the remote host using PowerShell Test-Connection and System.Net.Sockets.TcpClient.
You can find more topics about PowerShell Active Directory commands and PowerShell basics on the ShellGeek home page.
 Несмотря на то, что Telnet протокол уже редко используется, что связано с отсутствием шифрования и проверки подлинности данных, у некоторых пользователей могут возникать задачи, требующие подключения с использованием клиента Telnet.
В Windows 11 и Windows 10 клиент для Telnet протокола присутствует, но отключен по умолчанию. При необходимости его можно включить одним из способов, описанных далее.
Компоненты Windows
Клиент Telnet — один из дополнительных компонентов Windows, который может быть включен, как и другие такие компоненты:
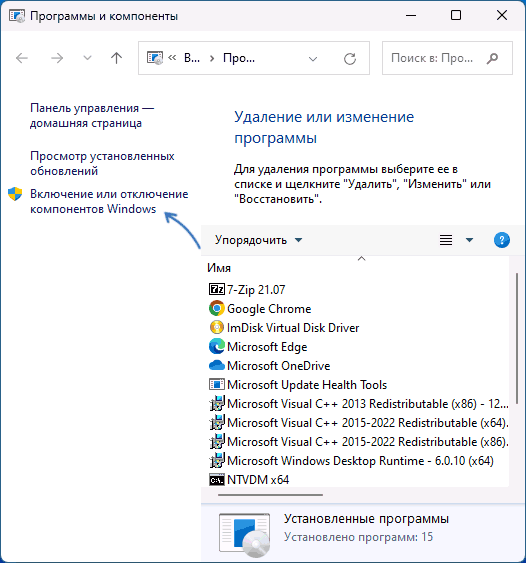
- Нажмите клавиши Win+R на клавиатуре (либо нажмите правой кнопкой мыши по кнопке «Пуск» и выберите пункт «Выполнить»), введите appwiz.cpl и нажмите Enter.
- В открывшемся окне в панели слева нажмите по пункту «Включение или отключение компонентов Windows».

- Отметьте «Клиент Telnet» в списке доступных компонентов и нажмите «Ок».

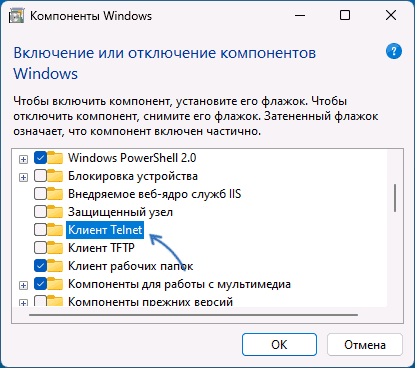
Останется дождаться, когда клиент Telnet будет установлен.
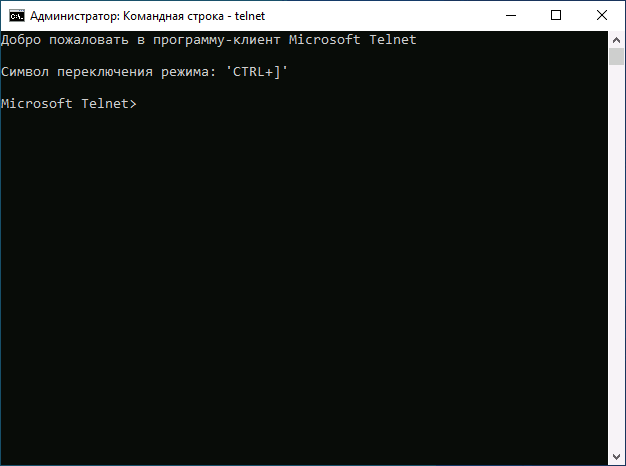
Для начала использования достаточно будет запустить командную строку, ввести команду telnet и нажать Enter.
Командная строка
Вы можете включить Telnet в командной строке, установив компонент с помощью DISM:
- Запустите командную строку от имени администратора.
- Введите команду
dism /online /Enable-Feature /FeatureName:TelnetClient
и нажмите Enter.

- Дождитесь завершения установки компонента.
Windows PowerShell
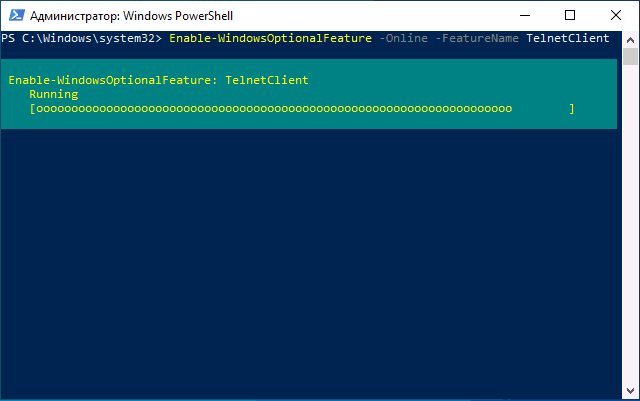
Включить компонент можно и в PowerShell: запустите Windows PowerShell или Терминал Windows от имени администратора, сделать это можно в контекстном меню кнопки «Пуск», после чего введите команду:
Enable-WindowsOptionalFeature -Online -FeatureName TelnetClient
и нажмите Enter. Через короткое время клиент Telnet будет установлен на вашем компьютере.
Завершая статью, поинтересуюсь: для какой цели вам потребовался именно Telnet клиент в наше время SSH, шифрования и защищенных протоколов? Будет отлично, если вы сможете поделиться этим в комментариях.
PowerShell alternative of Telnet command
Table of Contents
If you are a Windows system admin, you will surely know the importance of Telnet command in your day-to-day life. As you, know that all version of Windows (starting from Vista and above) comes with Telnet client feature disabled by default. If you want to test the connectivity or reachability to a remote computer, you need to enable the Telnet-Client optional windows feature or you will look for some alternative command to Telnet.
In this article, you will learn how to use Test-NetConnection cmdlet as an alternative of telnet in PowerShell.
Test a remote TCP port
Launch the PowerShell console and type the following command:
Test-NetConnection -ComputerName techtutsonline.com -Port 443
Where the -ComputerName parameter is used to specify the name (or IP address) of remote computer and -Port parameter is used to specify the TCP port that you want to test the connectivity for. See the following screenshot for reference:

The above command tests the connectivity of your local computer with techtutsonline.com domain name on TCP port 443. By default, it gives you the information about remote server (by doing the name resolution), the name of source interface and it’s IP address.
The TcpTestSucceeded : True in output means the remote server is listening on that port and your system can reach it on that TCP port. If you see TcpTestSucceeded : False, it means something is wrong. Maybe server isn’t listening on that port or your connection attempt is blocked.
If you’re interested in adjusting the information level this command produces, you could add -InformationLevel parameter with either “Quiet” or “Detailed” values.
For instance, to see the test result only, you could use the same command as:
Test-NetConnection -ComputerName techtutsonline.com -Port 443 -InformationLevel Quiet
This command will return only True or False in output. You just saw how to use the Test-NetConnection cmdlet as an alternative of Telnet command. You could even use it as an alternative of Ping command or as an alternative of the Tracert command. Let’s see how.
Test regular Ping connectivity
If you want to test the regular ping connectivity to a remote computer, just omit the -Port parameter and use the command as shown below:
Test-NetConnection -ComputerName techtutsonline.com

This command will return the PingSucceeded and Round Trip Time (RTT) in output. If you are wondering on how to run a continuous ping in PowerShell, checkout this article.
Tracing the Route
One more useful feature offered by Test-NetConnection cmdlet is its built-in ability to trace the route to a remote computer. Remember the tracert command we used for this purpose? Well not anymore, you can use the Test-NetConnection cmdlet for that too. To trace the route just use the following command:
Test-NetConnection techtutsonline.com -TraceRoute
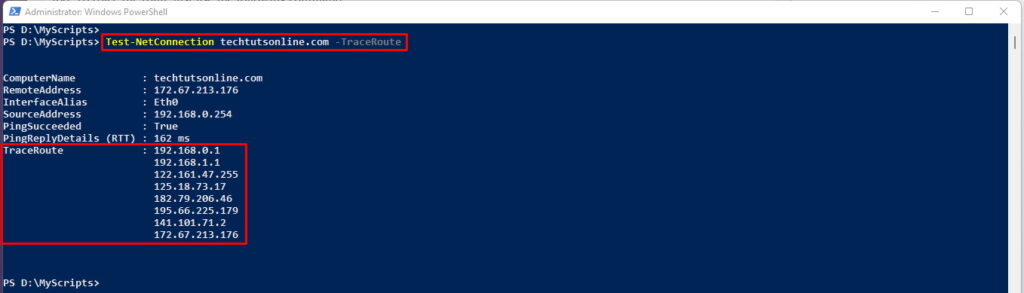
The output isn’t like the one you see in tracert but you get the information about various hops in between and that’s all you need most of the time.
Tip: If you want to be able to use Telnet command in PowerShell exactly as you do in cmd.exe (command prompt), keep on reading the remaining article.
Creating Telnet PowerShell Module
Now that Telnet feature is disabled in every version of Windows but the good news is that every version of Windows comes with PowerShell installed out of the box. So we can create a PowerShell module that will work exactly like traditional Telnet command.
To create the Telnet PowerShell module, follow these steps:
- Launch Windows PowerShell console and run the following command:
-
ise $(New-Item $HOME\Documents\WindowsPowerShell\Modules\Telnet\Telnet.psm1 -Force)
The above command will create a PS module file at predefined location and automatically open that file in PowerShell ISE.
- Now copy the following code, paste it in the PowerShell ISE and press “Ctrl+S” to save the module file.
<#
.Synopsis
Tests the connectivity between two computers on a TCP Port

.Description
The Telnet command tests the connectivity between two computers on a TCP Port. By running this command, you can determine if specific service is running on Server.

.Parameter <ComputerName>
This is a required parameter where you need to specify a computer name which can be localhost or a remote computer

.Parameter <Port>
This is a required parameter where you need to specify a TCP port you want to test connection on.

.Parameter <Timeout>
This is an optional parameter where you can specify the timeout in milli-seconds. Default timeout is 10000ms (10 seconds)

.Example
Telnet -ComputerName DC1 -Port 3389
This command reports if DC1 can be connected on port 3389 which is default port for Remote Desktop Protocol (RDP). By simply running this command, you can check if Remote Desktop is enabled on computer DC1.

.Example
Telnet WebServer 80
This command tells you if WebServer is reachable on Port 80 which is default port for HTTP.

.Example
Get-Content C:\Computers.txt | Telnet -Port 80
This command will take all the computernames from a text file and pipe each computername to Telnet Cmdlet to report if all the computers are accessible on Port 80.
#>
Function Telnet{

    [CmdletBinding()]
    param(
        [Parameter(Mandatory=$true,
                   ValueFromPipeline=$true,
                   ValueFromPipelineByPropertyName=$true)]
        [Alias ('HostName','cn','Host','Computer')]
        [String]$ComputerName='localhost',
        [Parameter(Mandatory=$true,
            ValueFromPipeline=$true,
            ValueFromPipelineByPropertyName=$true)]
        [int32]$Port,
         [int32] $Timeout = 10000
    )

    Begin {}

    Process {
    foreach($Computer in $ComputerName) {
    Try {
          $tcp = New-Object System.Net.Sockets.TcpClient
          $connection = $tcp.BeginConnect($Computer, $Port, $null, $null)
          $connection.AsyncWaitHandle.WaitOne($timeout,$false)  | Out-Null
          if($tcp.Connected -eq $true) {
          Write-Host  "Successfully connected to Host: `"$Computer`" on Port: `"$Port`"" -ForegroundColor Green
      }
      else {
        Write-Host "Could not connect to Host: `"$Computer `" on Port: `"$Port`"" -ForegroundColor Red
      }
    }

    Catch {
            Write-Host "Unknown Error" -ForegroundColor Red
          }

       }

    }
    End {}
}
- At the end of all the steps, your PowerShell module should be available at the location as shown in image below:
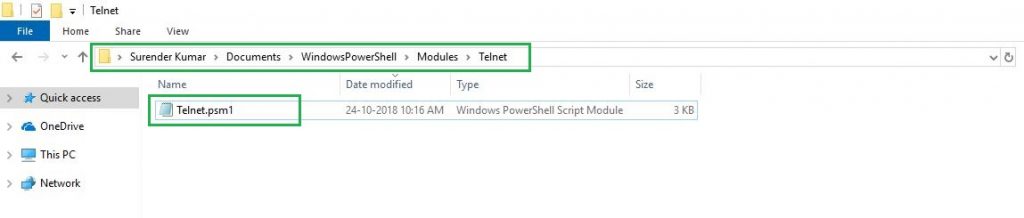
That’s it! Your Telnet PowerShell module is ready. Use can start using it like a traditional telnet command.
- Close the current PowerShell console and open a new one. Type the following command:
Get-Help Telnet -Full
Below is the snapshot of Get-Help Telnet -Full command:
NAME
    Telnet

SYNOPSIS
    Tests the connectivity between two computers on a TCP Port


SYNTAX
    Telnet [-ComputerName] <String> [-Port] <Int32> [[-Timeout] <Int32>] [<CommonParameters>]


DESCRIPTION
    The Telnet command tests the connectivity between two computers on a TCP Port. By running this command, you can determine if specific service is running on
    Server.


PARAMETERS
    -ComputerName <String>

        Required?                    true
        Position?                    1
        Default value                localhost
        Accept pipeline input?       true (ByValue, ByPropertyName)
        Accept wildcard characters?  false

    -Port <Int32>

        Required?                    true
        Position?                    2
        Default value                0
        Accept pipeline input?       true (ByValue, ByPropertyName)
        Accept wildcard characters?  false

    -Timeout <Int32>

        Required?                    false
        Position?                    3
        Default value                10000
        Accept pipeline input?       false
        Accept wildcard characters?  false

    <CommonParameters>
        This cmdlet supports the common parameters: Verbose, Debug,
        ErrorAction, ErrorVariable, WarningAction, WarningVariable,
        OutBuffer, PipelineVariable, and OutVariable. For more information, see
        about_CommonParameters (https:/go.microsoft.com/fwlink/?LinkID=113216).

INPUTS

OUTPUTS

    -------------------------- EXAMPLE 1 --------------------------

    PS C:\>Telnet -ComputerName DC1 -Port 3389

    This command reports if DC1 can be connected on port 3389 which is default port for Remote Desktop Protocol (RDP). By simply running this command, you can check
    if Remote Desktop is enabled on computer DC1.


    -------------------------- EXAMPLE 2 --------------------------

    PS C:\>Telnet WebServer 80

    This command tells you if WebServer is reachable on Port 80 which is default port for HTTP.


    -------------------------- EXAMPLE 3 --------------------------

    PS C:\>Get-Content C:\Computers.txt | Telnet -Port 80

    This command will take all the computernames from a text file and pipe each computername to Telnet Cmdlet to report if all the computers are accessible on Port
    80.

RELATED LINKS
Look! You just created a Windows PowerShell module that will feel and behave exactly like regular cmdlets. You can use parameters like -ComputerName, -Port, -Credential, -Verbose, -ErrorAction etc. which is awesome.
Using Telnet Cmdlet
Now, its time to use our newly created Telnet Module. As shown in examples of cmdlet, you can use the Telnet module in 3 different ways.
First Way:
Telnet -ComputerName techtutsonline.com -Port 80
Successfully connected to techtutsonline.com on Port: 80
Second Way:
Telnet techtutsonline.com 80
Successfully connected to techtutsonline.com on Port: 80
Third Way:
Get-Content D:\Servers.txt | Telnet -Port 80
Successfully connected to WebServer on Port: 80
Could not connect to DC1 on Port: 80
Successfully connected to Linux-Box on Port: 80
Congratulations! Your Telnet module is working as expected. The good thing about this module is that you can use same command that used to work with cmd.exe.
This cmdlet is an ideal way to work on client’s servers where you do not have authority (or you do not want) to enable Telnet-Client Windows feature for any reason.
Ранее я писал о том Где telnet в Windows 7 / 8 / 8.1, статья рассказывала как включить компонет telnet в Windows 7 и выше. Но как правило в большинстве случаев Telnet используется для диагностики сети, а именно проверить открыт ли порт. Собственно в последних версиях PowerShell для диагностики сети Telnet то и не нужен. Есть замечательный командлет Test-NetConnection, в результе выполнения которого в выводе будет информация о том доступен ли сервис по ICMP и в том числе по указанному порту.
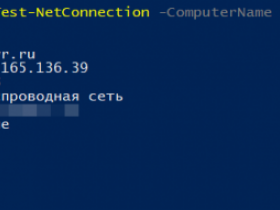
Все очень просто, запускаем PowerShell и выполняем команду Test-NetConnection
Если выполнять команду без параметров, то это будет просто проверка на наличие Интернет соединения.
Но в моем примере будет все просто, я проверю доступность своего сайта по 443 порту (HTTPS)

Вот она простая и детальная информация о доступности соединения.
Да, вам не нужно использовать Telnet в powershell, чтобы проверить доступность порта. Его клиент даже не надо устанавливать на машину.
Первым параметром передаём ip адрес или хост, а вторым порт.
New-Object System.Net.Sockets.TcpClient("213.180.204.89", 25)
или
New-Object System.Net.Sockets.TcpClient("mx.yandex.ru", 25)
Если подключение есть, нам вернётся Connected = True:
Client              : System.Net.Sockets.Socket
Available           : 101
Connected           : True
ExclusiveAddressUse : False
ReceiveBufferSize   : 65536
SendBufferSize      : 64512
ReceiveTimeout      : 0
SendTimeout         : 0
LingerState         : System.Net.Sockets.LingerOption
NoDelay             : False

На основе этого, можно реализовать скрипт, который будет отправлять уведомление, если возникают проблемы с подключением.
function Get-Telnet () {
    Param (
    [string]$computer,
    [string]$port
    )

    $tcpobject = new-Object system.Net.Sockets.TcpClient
    #Подключаемся к удалённой машине
    $connect = $tcpobject.BeginConnect($computer,$port,$null,$null)
    #Настраиваем таймаут, перед закрытием соединения (в мс)
    $wait = $connect.AsyncWaitHandle.WaitOne(2000,$false)
    If (-Not $Wait) {
        '0'
    } Else {
        $error.clear()
        $tcpobject.EndConnect($connect) | out-Null
        If ($Error[0]) {
            #Write-warning ("{0}" -f $error[0].Exception.Message)
            '0'
        } Else {
            '1'
        }
    }

}

function AlertMe ($subject) {
    Send-MailMessage -SmtpServer mx.bgelov.ru -Subject "Problem with $subject aaaaaaa!!!!" -From "no-reply@bgelov.ru" -To "oleg@bgelov.ru"
}

if ($(Get-Telnet -computer 213.180.204.89 -port 993) -eq 0) { AlertMe "213.180.204.89" }
if ($(Get-Telnet -computer 93.158.134.89 -port 993) -eq 0) { AlertMe "93.158.134.89" }
if ($(Get-Telnet -computer 87.250.250.89 -port 995) -eq 0) { AlertMe "87.250.250.89" }
Были кейсы, когда надо было прикрутить скрипт к системе мониторинга и вызывать его через bat файл. Всё так же просто. Делаем батник:
@echo off
C:\windows\system32\WindowsPowerShell\v1.0\powershell.exe -NonInteractive -OutputFormat Text -ExecutionPolicy Bypass -File "H:\telnet.ps1" -computer 213.180.204.89 -port 993 < NUL
И скрипт telnet.ps1 для вызова:
Param (
[string]$computer,
[string]$port
)

$tcpobject = new-Object system.Net.Sockets.TcpClient
#Подключаемся к удалённой машине
$connect = $tcpobject.BeginConnect($computer,$port,$null,$null)
#Настраиваем таймаут, перед закрытием соединения (в мс)
$wait = $connect.AsyncWaitHandle.WaitOne(2000,$false)
If (-Not $Wait) {
    '0'
} Else {
    $error.clear()
    $tcpobject.EndConnect($connect) | out-Null
    If ($Error[0]) {
        #Write-warning ("{0}" -f $error[0].Exception.Message)
        '0'
    } Else {
        '1'
    }
}
[ratings]