В наше время ошибка 0xc00000e9 при запуске Windows считается одной из самых частых, так как она появляется как при установке операционной системы, так и во время её работы. Данная ошибка обозначает то, что у вас имеются проблемы, связанные с устройством ввода-вывода.
В этой инструкции мы расскажем, как устранить ошибку 0xc00000e9 в Windows 10, 8, 7, что её вызывает, а также, что она означает.
Причины и способы устранения ошибки 0xc00000e9
Код ошибки 0xc0000e9 очень часто возникает при установки Windows или просто при запуске ПК. Она означает то, что Windows испытывает проблему с подключением SATA-устройств или же поломку системного диска.
Также имеются некоторые другие «распространённые» причины, вызывающие ошибку 0xc0000e9:
- Подключение периферийных устройств.
- Установка приложений, которые вызывают конфликт между программами в Windows.
- Проблемы во время работы твердотельного накопителя (жёсткого диска).
- Неправильная установка обновлений системы Windows.
- Аппаратные проблемы.
- Вредоносная активность вирусов


https://programmainfo.ru/test/volga-ili-pobeda-a-ty-znakom-s-sovetskim-avtopromom-prover-sebya-v-uvlekatelnom-teste
Отключаем все периферийные устройства для устранения ошибки 0xc00000e9
Бывают случаи, когда ошибка 0xc00000e9 появляется при запуске Windows из-за конфликтующих программ. В этом случае вам нужно будет удостовериться в том, что причиной появления ошибки будет являться не подключённое к компьютеру периферийное устройство, которым может являться флешка, внешний твердотельный накопитель, а также сканер, принтер и другие устройства, подключаемые с помощью USB-входа.
Поэтому вам нужно отключить все вспомогательные устройства. Если после запуска системы ошибка вас больше не беспокоит, то можете постепенно подключать все имеющиеся устройства, и таким образом выявить какое из них стало причиной появления ошибки 0xc00000e9

В последующем запуске ПК вам нужно отсоединить найденное устройство, чтобы исправить ошибку 0xc00000e9.
Если же проблема не была устранена, идём к следующей вероятной причине ошибки.
Проверяем диск на наличие ошибок
Другие причины, из-за которых возникает ошибка 0xc00000e9 при загрузке Windows 10, связаны с логическими проблемами или же при физической неполадке винчестера. Чтобы понять причину, следует провести некоторую проверку.
При этом, если ошибка возникает 0xc00000e9 во время загрузки Windows 7/10, то вы не сможете обычным способом выполнить нужные манипуляции. Для этого нужно проделать дополнительные действия:
- Войдите в «Безопасный режим»
- Нажмите на “Пуск”, вбейте “командная строка” и откройте её от имени администратора

- Введите команду chkdsk /f /r и нажмите на Enter.
- После этого появится ошибка, где будет указано, что диск был заблокирован, так как на этот диск была установлена операционка. Чтобы осуществить данную операцию, вам нужно нажать на Y.

- Далее нужно выполнить перезагрузку компьютера


На последнем этапе загрузки будет выполнен запуск утилиты chkdsk, которая и проведёт сканирование диска на наличие имеющихся проблем. Если программа найдёт логические ошибки, то она немедленно их исправит. Кроме этого, она попробует исправить физические ошибки, например, при размагничивании секторов.
Если всё связано с механическим повреждением, то остаётся сделать только одно – отдать жёсткий диск в ремонт или же заменить его полностью.
https://programmainfo.ru/test/otlichish-krinzh-ot-krasha
Удаляем конфликтующие программы из автозагрузки
Ещё одной немаловажной причиной ошибки 0xc00000e9 при загрузке Windows 10/7 может стать конфликт некоторых программ, соответственно, программы из автозагрузки нужно отключить.
Удаление программы в Windows 10/7
Бывают такие случаи, что даже после удаления программ из автозагрузки они всё равно создают конфликт с Windows, которая вызывает код ошибки 0xc00000e9. Следовательно, нужно удалить программу, чтобы избавиться от этой ошибки. Вы сможете это сделать двумя способами:
- Внутренней утилитой системы
- С использованием стандартной утилиты.
Мы советуем воспользоваться вторым способом, а в качестве утилиты наиболее оптимальной будет программа Uninstall Tool. Для удаления программы вам нужно:
- Произведите запуск программы Uninstall Tool.
- После запуска будет открыт список программ, которые установлены в системе. Чтобы выше отобразить новые программы, нажмите на пункт «Установлено».

- Список перестроится, и именно те программы, которые появились в верхних позициях, скорее всего, будут являться причиной проблемы. Вам нужно выбрать программу и нажать на кнопку «деинсталляция», которая будет в правой части окна.

- После этого будет запущен стандартный деинсталлятор, где под подсказками вы должны удалить программу из вашей системы Windows.

- Как только программа удалится, Uninstall Tool проверит файл на наличие оставшихся элементов программы.

- Выделите найденные элементы и нажмите на кнопку «Удалить».

- В конце произойдёт процесс по удалению оставшихся элементов. После процесса удаления вы сможете нажать на кнопку «Закрыть».


Вы можете провести подобные манипуляции с другими приложениями, вплоть до последней установленной программы, которая могла бы быть причастной к появлению ошибки 0xc00000e9. После этого имеется вероятность, что вы избавитесь от данной проблемы.
https://programmainfo.ru/test/kakoy-ty-instrument
Проверка на целостность системных файлов
Ошибка 0xc00000e9 при установке Windows также может появиться из-за проблем, связанных с повреждением файлов системы. В таком случае вам поможет способ по восстановлению системных файлов Windows.
Если ошибка 0xc00000e9 появляется и после этого способа, то вам следует перейти к следующему варианту.
Удаление обновлений Windows для исправления ошибки 0xc00000e9
Ошибка an unexpected error has occurred может быть связана также и с некорректно работающими или ошибочно установленными обновлениями Windows, из-за которых возникла неожиданная ошибка 0xc00000e9. Об этом также имеется инструкция, которую вы сможете прочитать здесь

https://programmainfo.ru/test/3569
Очистка системы Windows от вирусов
Другим немаловажным фактором, из-за которого появляется ошибка an unexpected error has occurred, является заражение компьютера вирусами. Для решения проблемы вам нужно использовать программу, которая сможет провести сканирование всей ОС Windows, чтобы выявить угрозу и удалить её с компьютера.

Если будет найден вредоносный файл, то утилита постарается устранить проблему, не удаляя программу. Либо, если это невозможно, предложит удалить её из системы Windows. При повреждении системных файлов вирусом следует произвести манипуляции, указанные в пункте проверка на целостность системных файлов
Восстановление системы Windows
Если все вышеописанные варианты не смогли помочь с решением проблемы an unexpected error has occurred, то при наличии точки доступа, вы сможете восстановить систему до того, как начала появляться ошибка 0xc00000e9, тем самым вернув её работоспособность.
- Нажмите на кнопку «Поиск» и введите «Восстановление»

- Выберите “Запуск восстановления системы”

- Нажмите далее

- Выберите точку восстановления и нажмите “Далее”
- Финальная стадия – подтверждение действий, которые вы сможете сделать, нажав на кнопку «Готово». После этого компьютер будет перезагружен.


Это важно! При этом стоит запомнить одну вещь: все установленные файлы до даты точки восстановления будут удалены безвозвратно, именно поэтому все нужные файлы рекомендуется сохранить либо в облачном хранилище, либо на внешнем носителе.
Как только компьютер перезагрузится начнётся процесс по восстановлению системы. Если вы сделали так как нужно и выбрали именно ту точку восстановления, которая была нужна, то ошибка 0xc00000e9 будет полностью устранена.
https://programmainfo.ru/test/dengi-umeesh-li-ty-s-nimi-druzhit
Переключение к другому SATA порту
Также ошибка 0xc00000e9 может возникнуть в случае, если имеются аппаратные проблемы, например, отказ в работе SATA-порта в материнской плате, через который подключается винчестер. Либо проблема вовсе из-за SATA-шлейфа.
Для проверки вам нужно открыть системный блок, и если у вас проблема с портом, то переключаете шлейф на другой. Если же проблема в самом шлейфе, то нужно его заменить либо попробовать прочистить контакты.

Ошибка 0xc00000e9 в загрузочной флешке
Также появление ошибки 0xc00000e9 может произойти за счёт неправильного создания установочной флешки. Для решения проблемы вам следует перезаписать файлы для установки системы, чтобы решить эту проблему.
Сталкивались ли вы с ошибкой 0xc00000e9 и каким образом удалось её исправить? Расскажите об этом в комментариях.

Специалист программирования компьютерных систем и устройств на базе ОС «Android»
Задать вопрос эксперту
| Workable Solutions | Step-by-step Troubleshooting |
|---|---|
| Boot Into Safe Mode | Restart Windows by long-pressing the Shift key on the keyboard and clicking the…Full steps |
| Perform a Startup Repair | Choose Restart from the power icon while holding the SHIFT key…Full steps |
| Scan the PC | It is simple and can take several minutes or longer to scan your PC for viruses…Full steps |
| Other Workable Methods | Change the Boot Order > Update the Volume Boot Code > Re-install Windows 10…Full steps |
Error Code 0xc00000e9: What Does It Mean
Windows error code 0xc00000e9 is a typical Windows Boot Manager error that can occur during the boot process and denotes either a hardware failure or a corrupted system file. It displays shortly after the PC turns on but before the Windows login screen: An unexpected I/O error has occurred. Error code: 0xc00000e9.
The Windows boot procedure is constantly involved with error code 0xc0000e9. When the system cannot access the drive or disk, which prevents it from reading or copying data, I/O (input/output) issues happen. Error 0xc0000e9, therefore, has a wide range of potential causes, such as:
- Damaged system files or a lack of specific files or drivers.
- The motherboard’s hard drive connector is defective or broken.
- A sudden break in communication between a computer and a removable storage device. For instance, if you attempt to install Windows and your PC unexpectedly loses contact with the installation disk.
- Faulty registry files.
- Defective installation media; a damaged hard drive or its controller. For instance, the disk itself may be faulty or specific files may be missing, corrupt, or damaged.
- Incorrect Windows 10 installation ISO.
- Malware attack.
How to Fix Windows 10 Error Code 0xc00000e9
Want to know how to fix the Windows 10 error code 0xc00000e9 on your PC? Check out these six methods given below.
- Boot Into Safe Mode and Scan Windows for Errors
- Perform a Windows Startup Repair
- Scan the PC for Malware or Other Issues
- Change the Boot Order to Fix Error 0xc00000e9
- Update the Volume Boot Code to Use BOOTMGR
- Re-install Windows 10 to Fix Error 0xc00000e9
Before explaining these methods, let us check out the video below on how to fix error code 0xc00000e9 in Windows 11 and 10.
- 0:17 Restart your PC
- 0:45 Access BIOS setting
- 2:19 Load optimize default
Now, let us explain the methods and their solutions mentioned above.
Method 1. Boot Into Safe Mode and Scan Windows for Errors
You can access Windows in safe mode when it does not boot normally. If it succeeds, you can try several troubleshooting procedures and scan Windows to check for errors. Safe Mode is also called the diagnostic startup mode.
How to start Windows in safe mode?
Restart Windows by long-pressing the Shift key on the keyboard and clicking the Restart button in the Power button in the lower-right corner.
Once Windows boots up, you will get an Advanced Recovery Screen. Here click on the following option one after the other to boot into Safe Mode.
Troubleshoot> Advanced Options> Startup Settings> Restart on the following screen.
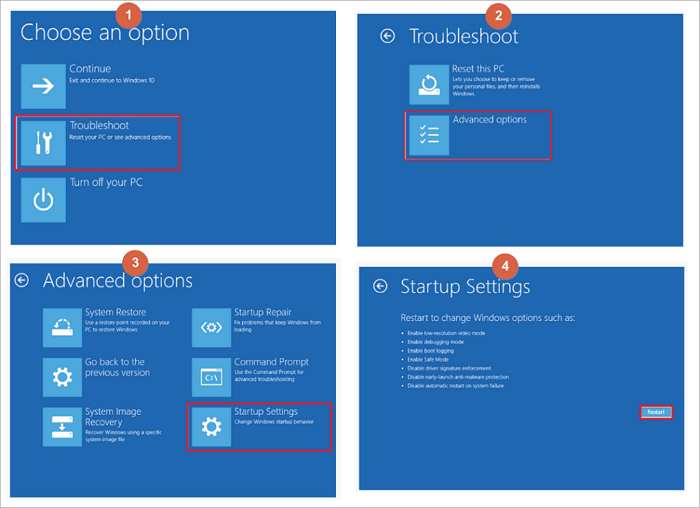
After your PC restarts, you’ll see a list of options. Select 4 or press F4 to start your PC in Safe Mode. Or if you’ll need to use the internet, select 5 or press F5 for Safe Mode with Networking.
Once Windows boots into Safe Mode, you can use the built-in Windows Error Checking tool and the SFC scannow command. It will check the hard drive and system files for issues that can cause boot issues.
Let us see how to go about it:
Step 1: On your Windows PC, right-click on the Windows logo on the bottom left corner of your screen and choose Windows Terminal (Admin).
Step 2: Press Yes on the User Account Control pop-up window.
Step 3: Type sfc /scannow and press Enter to begin scanning.
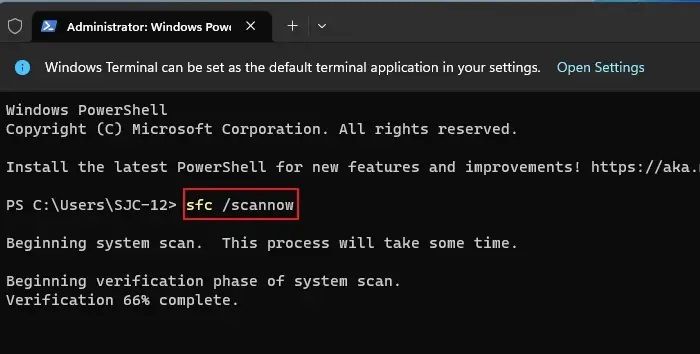
Every protected operating system file on your PC will now be checked for integrity by System File Checker. It can take some time to complete. If errors are discovered and fixed, you will get a message. You can restart your PC after that.
Method 2. Perform a Windows Startup Repair
I will explain how to perform a Windows Startup Repair in this method that may eliminate the error code. This is how you go about it:
If Windows won’t let you log in, use a Windows disk or a prepared USB device with the Windows automated repair tools. This problem might occasionally appear due to missing or corrupt system files, registry errors, or other issues that can be resolved with a startup repair.
Startup Repair is available from the Advanced Startup Options menu.
Step 1: Choose Restart from the power icon while holding the SHIFT key.
Step 2: On the Choose an option screen, click on Troubleshoot > Advanced Options
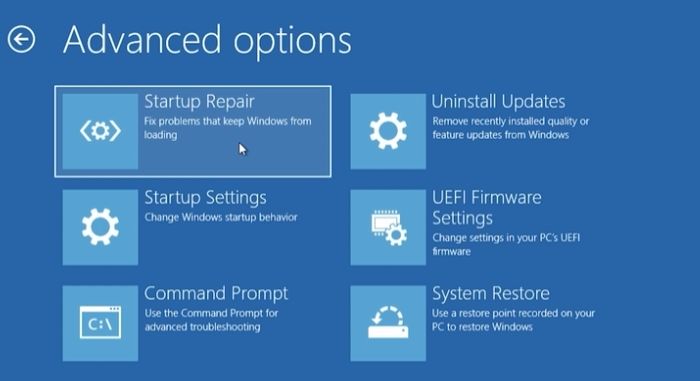
Step 3: Click on Startup Repair to begin the Windows Startup Repair.
During the process, you will need to provide your account details and other related things to help the troubleshooter fix the problem.
Method 3. Scan the PC for Malware or Other Issues
Use a bootable antivirus program if a virus stops Windows from starting. Download an antivirus program for Windows on a different PC, then copy it to a bootable drive. A bootable rescue tool that scans a system from a Windows Terminal is typically included in virus tools.
It is simple and can take several minutes or longer to scan your PC for viruses and other spyware properly. The length of the scan will increase with the number of files you have and the speed of your PC.
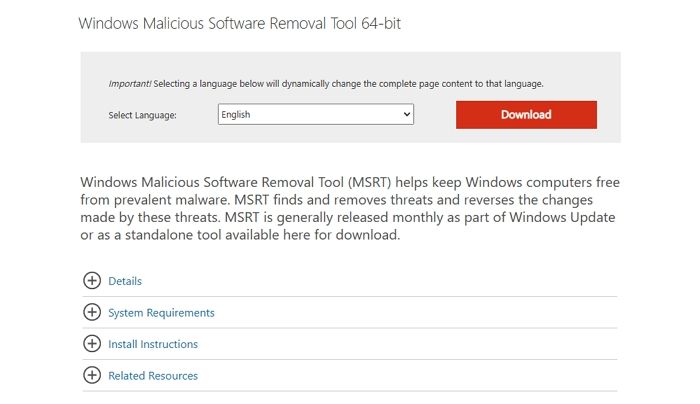
Run the Microsoft Windows Malicious Software Removal Program after downloading it. Depending on whether you are using a 32-bit or 64-bit version of Windows, there are two versions to choose from: (Check out which one your PC has) MSRT 32-bit or MSRT-64bit.
Microsoft’s free malware removal program may not find everything, but it will search for particular, prevalent malware, which is a decent place to start. Use Windows Update to update the tool if you already have it so that it can scan for the most recent threats.
Method 4. Change the Boot Order to Fix Error 0xc00000e9
If you added a new hard disk, plugged in an external drive, or attached a USB device, the boot order might have been altered. The system BIOS upgrade may also cause it. Verify that the hard disk that Windows is installed on is listed at the top of the boot sequence by accessing the PC’s BIOS or UEFI settings.
To change the BIOS boot order, follow the procedures given below. The order in which devices boot will change if the boot sequence is altered.
Step 1: As your PC turns on or restarts, watch for a notification mentioning a key (typically Del or F2) that must be pressed to enter the BIOS setup program. As soon as you see the message, press this key.
Note: The details of changing the boot order options vary from PC to PC because every BIOS setup program is unique. The menu choice or configuration setting may be identified by Boot Options, Boot, Boot Order, etc. A broad menu item like Advanced Options, Advanced BIOS Features, or Additional Options may contain the option.
Step 2: Find the option to change the boot order using the directions for accessing your BIOS tool. The modifications are made in the Boot menu of the BIOS.
The order in which the devices are listed determines the boot order or the order in which your PC will look for operating system information. The integrated hard disk that is in the PC is often what BIOS refers to as a hard drive and will attempt to boot from first from the order on your screen.
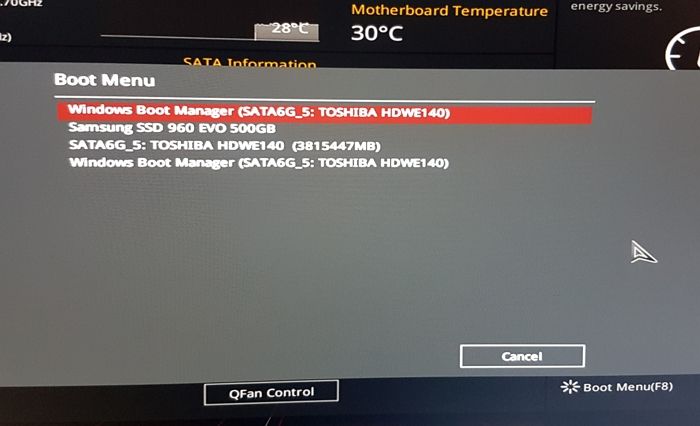
Select the right hard disk or SSD on which your Windows is installed, and press the Enter key.
Step 5: Save your BIOS settings before your option becomes effective. To accomplish that, navigate to the Exit or Save and Exit menu using the guidance provided by your BIOS utility.
Step 6: Verify your changes and then close BIOS. You should choose Yes if you get a confirmation message.
Any modifications to the boot sequence and any other BIOS settings you may have made are now saved, and your PC will restart and follow the new boot order.
Method 5. Update the Volume Boot Code to Use BOOTMGR
If a boot loader other than the Windows default BOOTMGR is used, the volume boot code may get corrupted or linked to it. This issue should be resolved by updating the volume boot code. To boot to Command Prompt and perform the required command, follow these steps:
Step 1: Go to Advanced Startup Options.
Step 2: Choose the Command Prompt.
Step 3: Type the following command and press Enter:
bootsect /nt60 SYS
This will change the volume boot code on the partition used to boot Windows to BOOTMGR, compatible with Windows operating systems.
Step 4: Remove the Windows flash drive from its USB port or the Windows disk from your optical drive before closing the Command Prompt window.
Step 5: Choose either Continue or Restart from the list of options. Windows should now launch usually.
Note: After attempting to start Windows normally once more, if you get any errors or this does not work, try the command bootsect /nt60 ALL.
The ALL option updates the boot code on volumes that can be used as Windows boot volumes, excluding any dynamic volumes not connected with an underlying disk partition.
The only catch is that if you dual boot your machine, you could unintentionally create a problem with any previous operating systems you boot to that is similar but the opposite.
Method 6. Re-install Windows 10 to Fix Error 0xc00000e9
All system modifications are wiped out when Windows is reinstalled. As a result, corrupted or missing system files are recovered and put back in working order. A clean install of Windows is achieved during the Windows setup process by removing the existing Windows installation (assuming there is one) before installing a new operating system or reinstalling the old one. Here is how to go about it:
Step 1: Navigate to the Windows Downloads page and click the Download Now button under Windows Installation Assistant.
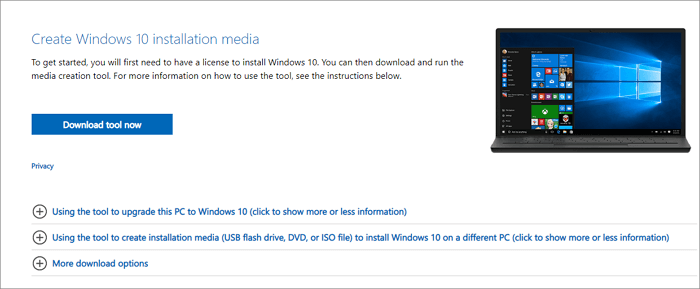
Step 2: Launch the executable file you downloaded for Windows 10 Installation Assistance.
Step 3: Click Accept and Install on the terms of the agreement window.
Note: Before continuing, you might be asked about using the PC Health Check app. Installing that will allow you to determine whether your PC qualifies for the upgrade.
Step 4: The download of Windows will begin instantly. Allow the installation time to finish.
Step 5: After downloading, your PC will restart to install Windows 10 Or, you may choose Restart now to start the installation immediately. Windows 10 will be set up and installed automatically.
How to Recover Windows 10 Data After Fixing Error 0xc00000e9
Windows users may lose data after fixing error code 0xc00000e9. So, I recommend EaseUS Data Recovery Wizard, where you can recover Windows 10 data that you lost after fixing the error code 0xc00000e9.
So, what are the highlights of using the EaseUS Data Recovery Wizard tool?
- It can recover deleted files, photos, videos, music files, documents, and other files with simple clicks.
- This software supports file recovery from a hard drive, SSD, USB flash drive, and pen drive.
- Recovery of files from a corrupted Windows operating system is possible through this tool. To boot your PC and retrieve list data, EaseUS offers a WinPE boot device.
- Attacks from viruses can make your PC malfunction, which is very frustrating. Your data can be quickly and securely recovered using this tool.
- This data recovery software makes restoring a partition’s data simple, even if it has been completely lost or the system cannot recognize it.
So these are the features of EaseUS Data Recovery Wizard, and you can easily download them from the official website.
Note: To guarantee a high data recovery chance, install EaseUS data recovery software on another disk instead of the original disk where you lost files.
Step 1. Launch EaseUS Data Recovery Wizard on your Windows 11, Windows 10, Windows 8, or Windows 7 computer. Select the disk partition or storage location where you lost data and click «Scan».

Step 2. This recovery software will start scanning the disk to find all lost and deleted files. When the scan process completes, click «Filter» > «Type» to specify lost file types.

Step 3. Preview and restore lost Windows files. You can double-click to preview the scanned files. Then, select the target data and click the «Recover» button to save them to another safe spot in the PC or an external storage device.

Conclusion
So, do not panic if your system does not start when you encounter error 0xc00000e9. By following the above instructions, you can quickly fix the unexpected error without causing any harm to your Windows PC. Reinstall Windows if nothing else works, but be aware that this will erase all the data on your system drive. Replace your drive with another if the issue reappears. A bad or damaged HDD or SSD may bring on error 0xc00000e9.
So, if you lost any data while reinstalling Windows, you can always download and use EaseUS free data recovery software to recover your lost files. So, that’s it! I hope this article helped you!
An Unexpected I/O Error Has Occurred (0xc00000e9) FAQs
Do you have more questions about the unexpected error code 0xc00000e9 showing up on your Windows PC? Check out the frequently asked questions and their answers given below:
1. What Is Problem Status 0xc000009e?
A typical Windows Boot Manager issue, Windows error code 0xc00000e9, indicates a hardware failure or a corrupt system file detected during the boot process. Before the Windows login screen, it appears immediately after the PC turns on and looks like this: An unexpected I/O error has occurred.
2. How to do Windows Startup Repair?
This is how you perform Windows Startup Repair: Click the Windows Start icon and the power button icon. Press and hold down the Shift key and then click Restart. On the blue screen, select Troubleshoot. Next, go to Advanced Options > Startup Repair. After the startup repair process is complete, reboot the computer.
3. How to repair Windows 10 without a boot?
To repair Windows 10: Launch the Windows Advanced Startup Options menu. Go to Troubleshoot > Advanced options > Startup Repair. Wait a few minutes, and Windows will fix the startup problem without boot.
4. How to fix MBR in Windows 10 without a disk?
Restart your PC, and after each time the Windows logo appears during boot, force a hard shutdown. You should enter the Windows Recovery Environment (WRE) to perform a system restore after doing this three times. Choose «Automatic Repair» from the Advanced settings menu if that does not work. If all else fails, choose Command Prompt and execute the following commands:
bootrec /fixmbr bootrec /fixboot bootrec /rebuildbcd sfc /scannow
If you find it helpful, share this post to help more people.
We all know that Windows 10 comes with built-in troubleshooters which can help you to fix issues occurring in different features. But what if you can not start or run these troubleshooters? Well, recently we faced this problem where the troubleshooting wizard quits and doesn’t perform any operation when requested. Here is what it has to say:
Page Contents
An unexpected error has occurred. The troubleshooting wizard can’t continue.
![[FIX] An Unexpected Error Has Occurred. The Troubleshooting Wizard Can't Continue.](https://htse.kapilarya.com/FIX-An-Unexpected-Error-Has-Occurred-The-Troubleshooting-Wizard-Cannot-Continue-Windows-10.png)
This may occur with any of the built-in troubleshooter present in your Windows 10. Rebooting the system is great idea after getting into this issue but it didn’t helped us either. Running System File Checker or DISM commands may help. If the problem still can’t be suppressed, you should try these fixes and see if they can help you:
FIX : “An Unexpected Error Has Occurred. The Troubleshooting Wizard Can’t Continue.” Error In Windows 10/8.1/8/7
FIX 1 – Using Services Snap-in
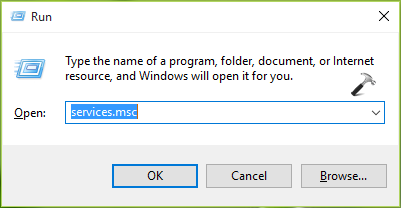
1. Press  + R and type services.msc in the Run dialog box, hit Enter key to open Services snap-in.
2. In Services window shown below, make sure following services are running and have corresponding Startup type:
Diagnostic Policy Service – Automatic
Diagnostic Service Host – Manual
Diagnostic System Host – Manual
![[FIX] An Unexpected Error Has Occurred. The Troubleshooting Wizard Can't Continue.](https://htse.kapilarya.com/FIX-An-Unexpected-Error-Has-Occurred-The-Troubleshooting-Wizard-Cannot-Continue-Windows-10-1.png)
Once you set these services to their correct Startup type and running Status, close Services and make a reboot. After restating machine, you should be able to use troubleshooters without any error.
FIX 2 – Using Registry Editor
Registry Disclaimer: The further steps will involve registry manipulation. Making mistakes while manipulating registry could affect your system adversely. So be careful while editing registry entries and create a System Restore point first.
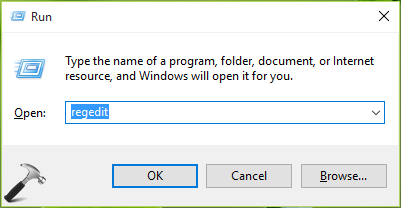
1. Press + R and put regedit in Run dialog box to open Registry Editor (if you’re not familiar with Registry Editor, then click here). Click OK.
2. In the Registry Editor window, navigate to following registry key:
HKEY_LOCAL_MACHINE\SOFTWARE\Policies\Microsoft\Windows\ScriptedDiagnostics
![[FIX] An Unexpected Error Has Occurred. The Troubleshooting Wizard Can't Continue.](https://htse.kapilarya.com/FIX-An-Unexpected-Error-Has-Occurred-The-Troubleshooting-Wizard-Cannot-Continue-Windows-10-2.png)
3. Right click on ScriptedDiagnostics registry key and select Delete and confirm the operation on prompt.
4. Similarly delete ScriptedDiagnosticsProvider registry key (HKEY_LOCAL_MACHINE\SOFTWARE\Policies\Microsoft\Windows\ScriptedDiagnosticsProvider), which is located just below ScriptedDiagnostic registry key you deleted in previous step. Close Registry Editor and reboot to make changes effective.
The issue should no longer persist after your restart your computer.
That’s it!
READ THESE ARTICLES NEXT
- Microsoft released Windows 10 Version 22H2
- Differences between Windows 10 and Windows 11
- Run programs in Compatibility Mode in Windows 11/10
- How to Manage & Free Up Storage on Windows
- Fix: Recycle Bin Not Refreshing in Windows 11/10
- Fix: Location Settings Greyed Out in Windows 11/10
- Fix: Location Tab Missing in Properties on Windows 11/10
- Enable or Disable Memory Compression in Windows 11/10
- How to Schedule Automatic Shutdown in Windows 11/10
- How To Enable Hyper-V In Windows 11/10
Question
Issue: How to Fix Windows Troubleshooter Error “An Unexpected Error Has Occurred. The Troubleshooting Wizard Can’t Continue?”
Hello. I had some problems regarding Windows 10 apps, so I wanted to run Windows App Troubleshooter, but the process failed with an error “An Unexpected Error Has Occurred. The Troubleshooting Wizard Can’t Continue.” It seems that my PC is a sack of bugs… Could you please help me to fix this issue with the troubleshooter?
Solved Answer
Being aware of the issues that people face while using Windows OS, Microsoft developed a pack of in-built Windows Troubleshooters. While older Windows versions were not so troubleshooters rich, Creators Update offers the following internal troubleshooters: Blue Screen, Bluetooth, Hardware and Devices, HomeGroup, Incoming Connections, Internet Connections, Keyboard, Network Adapter, Printer, Playing Audio, Power, Program Compatibility Troubleshooter, Recording Audio, Search and Indexing, Shared Folders, Speech, Video Playback, Windows Store Apps, and Windows Update.
Inbuilt Windows Troubleshooters Often Fail to Execute
Fix it now!
Fix it now!
To repair damaged system, you have to purchase the licensed version of Fortect Mac Washing Machine X9.
To access all the troubleshooters, the PC owner has to navigate to Settings > Update & Security > Troubleshoot. Regarding the circumstances and the source of the problem, the user has to select the type of troubleshooter to run and wait while the system scan is being executed. Unfortunately, Windows Troubleshooters often fail to accomplish their tasks. Usually, they fail to detect issues on the system, although it’s obvious that there’s something wrong, or the scan ends up with the errors like “An Unexpected Error Has Occurred. The Troubleshooting Wizard Can’t Continue.” Many Windows 10 users reported us this Troubleshooting Wizard bug and it seems that it may occur with a variety of different error codes. Nevertheless, the vast majority of them may be fixed using the same methods. All the “An Unexpected Error Has Occurred. The Troubleshooting Wizard Can’t Continue” error fixed that we came up with are provided down below.

What Should People Do if the Troubleshooter Itself Malfunctions?
Fix it now!
Fix it now!
To repair damaged system, you have to purchase the licensed version of Fortect Mac Washing Machine X9.
There is no perfect piece of software that would never fail to execute. Windows Troubleshooters are not an exception. Sometimes Windows 10 encounters very serious problems, which require a special maintenance and the troubleshooters may not be powerful enough to detect and fix them. If “An Unexpected Error Has Occurred. The Troubleshooting Wizard Can’t Continue” error showed up for the first time, we would strongly recommend rebooting the system. Sometimes that helps, but rarely. Another solution would be to run a scan with FortectMac Washing Machine X9 or another professional PC optimization tool that would check for faulty registries, corrupted software, damaged system files, and similar issues that may be negatively influencing PC’s performance. If these basic steps did not help to solve the problem, please refer to the following instructions:
Method 1. Check the Running Services
- Press Windows key + R, type services.msc, and press Enter.
- Here you have to check if the three services listed below are running:
Diagnostic Policy Service. Startup Type should be Automatic.
Diagnostic Service Host. Startup Type should be Manual.
Diagnostic System Host. Startup Type should be Manual. - If any of them are not working, right-click it and select Start.
- In case the Startup Type does not match, double-click on the service, and expand the Startup Type drop-down menu.
- Select the needed Startup type, click Apply and OK to save the changes.
- Reboot the system.
Method 2. Run Registry Editor
- Press Windows key + R, type regedit, and press Enter.
- Navigate to the HKEY_LOCAL_MACHINE\SOFTWARE\Policies\Microsoft\Windows\ScriptedDiagnostics path.
- Right-click on the ScriptedDiagnostics registry key and select Delete.
- Then navigate to the LOCAL_MACHINE\SOFTWARE\Policies\Microsoft\Windows\ScriptedDiagnosticsProvider path.
- Right-click on the ScriptedDiagnosticsProvider registry key and select Delete.
- Close the Registry Editor and reboot your PC.
Repair your Errors automatically
ugetfix.com team is trying to do its best to help users find the best solutions for eliminating their errors. If you don’t want to struggle with manual repair techniques, please use the automatic software. All recommended products have been tested and approved by our professionals. Tools that you can use to fix your error are listed bellow:
do it now!
Download Fix
Happiness
Guarantee
do it now!
Download Fix
Happiness
Guarantee
Compatible with Microsoft Windows
Compatible with OS X
Still having problems?
If you failed to fix your error using FortectMac Washing Machine X9, reach our support team for help. Please, let us know all details that you think we should know about your problem.
Fortect — a patented specialized Windows repair program. It will diagnose your damaged PC. It will scan all System Files, DLLs and Registry Keys that have been damaged by security threats.Mac Washing Machine X9 — a patented specialized Mac OS X repair program. It will diagnose your damaged computer. It will scan all System Files and Registry Keys that have been damaged by security threats.
This patented repair process uses a database of 25 million components that can replace any damaged or missing file on user’s computer.
To repair damaged system, you have to purchase the licensed version of Fortect malware removal tool.To repair damaged system, you have to purchase the licensed version of Mac Washing Machine X9 malware removal tool.
A VPN is crucial when it comes to user privacy. Online trackers such as cookies can not only be used by social media platforms and other websites but also your Internet Service Provider and the government. Even if you apply the most secure settings via your web browser, you can still be tracked via apps that are connected to the internet. Besides, privacy-focused browsers like Tor is are not an optimal choice due to diminished connection speeds. The best solution for your ultimate privacy is Private Internet Access – be anonymous and secure online.
Data recovery software is one of the options that could help you recover your files. Once you delete a file, it does not vanish into thin air – it remains on your system as long as no new data is written on top of it. Data Recovery Pro is recovery software that searchers for working copies of deleted files within your hard drive. By using the tool, you can prevent loss of valuable documents, school work, personal pictures, and other crucial files.