If you see “AMD High Definition Audio Device Not Plugged In” in your Windows computer or laptop, don’t panic. This is a common error and you can solve the “AMD High Definition Audio Device Not Plugged In” error quickly and easily with the solutions below.
Try these fixes
Here are the solutions that have helped people resolve the same problem. You don’t need to try them all; just work your way down the list until you find the one that works for you.
- Run DISM command
- Reinstall AMD audio device and driver
- Update available drivers
Note: The screenshots below come from Windows 10, and the fixes also work on Windows 8 and Windows 7.
Fix 1: Run DISM command
DISM stands for Deployment Image Servicing and Management, which is a useful command utility to fix the buggy problem on your computer. Follow the steps below to do:
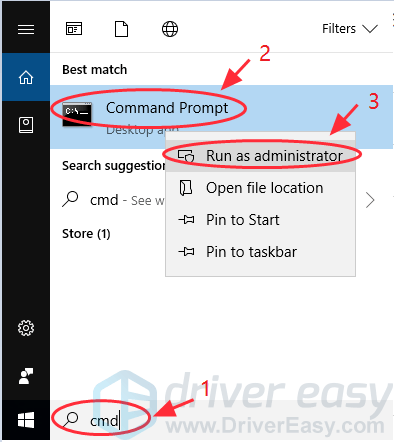
1) Type cmd in the search box from the Start button, right-click on Command Prompt (or cmd if you’re using Windows 7), and select Run as administrator.

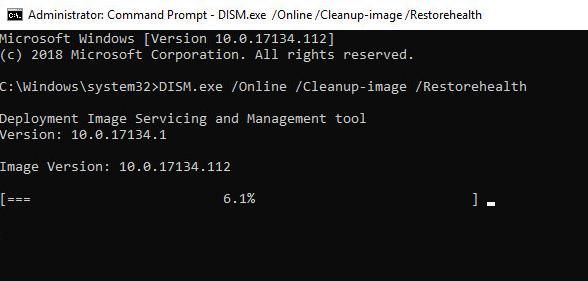
2) Copy and paste the command below in your Command Prompt, and press Enter on your keyboard.
DISM.exe /Online /Cleanup-image /Restorehealth
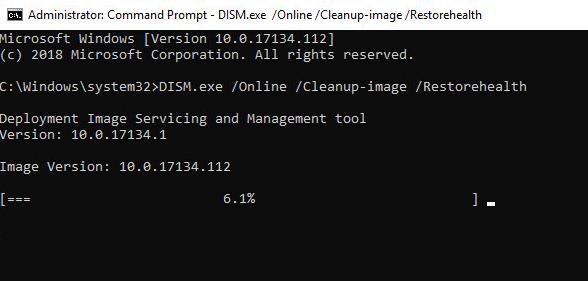
3) It may take a while for the process to complete.
4) Once complete, copy and paste the command below in Command Prompt, and press Enter on your keyboard.
sfc /scannow
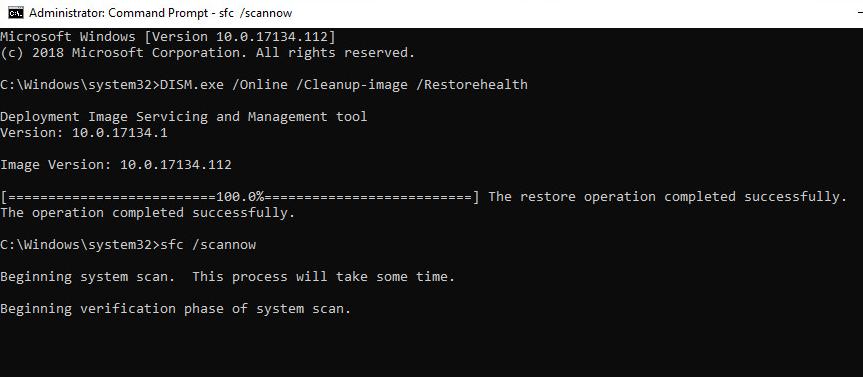
5) Once complete, exit Command Prompt.
6) Restart your computer and see if it fixes the problem.
Fix 2: Reinstall DISAMD audio device and driver
You can also fix the “AMD High Definition Audio Device Not Plugged In” issue by reinstalling your AMD audio device and the driver. Here’s how to do it:
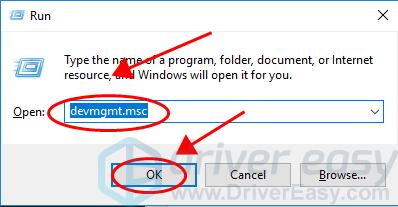
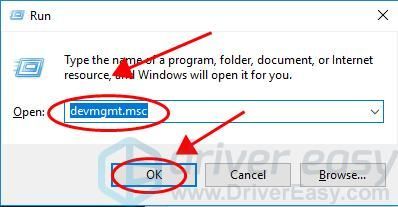
1) On your keyboard, press the Windows logo key and R at the same time to invoke the Run box.
2) Type devmgmt.msc and click OK.
3) Double click Sound, video and game controllers to expand it.
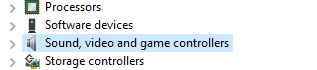
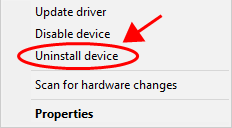
4) Right-click on your AMD High Definition Audio Device and select Uninstall device.
4) Ensure to check the box next to Delete the driver software for this device, and click Uninstall.
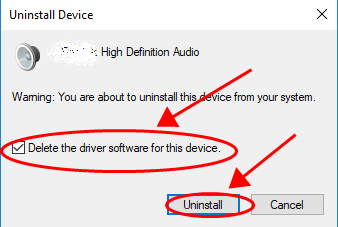
5) After uninstalling, restart your computer, and Windows will reinstall the device and driver for you.
Try it again to see if your problem has been resolved.
Still no luck? Okay, there’s one more thing to try.
Fix 3: Update available drivers
If your AMD audio driver or your PCI driver is missing or outdated, you should probably run into the AMD High Definition Audio Device not plugged in issue in your computer. So you should verify the drivers in your computer are up to date, and update those that aren’t.
There are two ways to update drivers: manually and automatically.
Manually: you can manually update your drivers by searching the correct driver from the manufacturer, and download and install it on your computer. Ensure to download the driver that is compatible with your Windows operating system. This requires time and computer skills.
Automatically: if you don’t have time or patience, you can do it automatically with Driver Easy.
Driver Easy will automatically recognize your system and find the correct drivers for it. You don’t need to know exactly what system your computer is running, you don’t need to risk downloading and installing the wrong driver, and you don’t need to worry about making mistake when installing.
You can update your drivers automatically with either the FREE or the Pro version of Driver Easy. But with the Pro version, it takes just 2 clicks (and you will get full support and a 30-day money back guarantee).
1) Download and install Driver Easy.
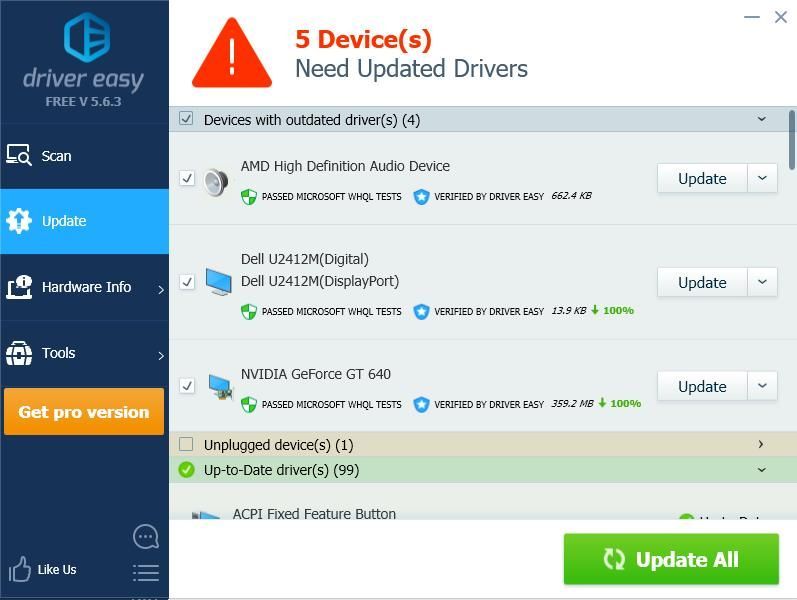
2) Run Driver Easy and click the Scan Now button. Driver Easy will then scan your computer and detect any problem drivers.
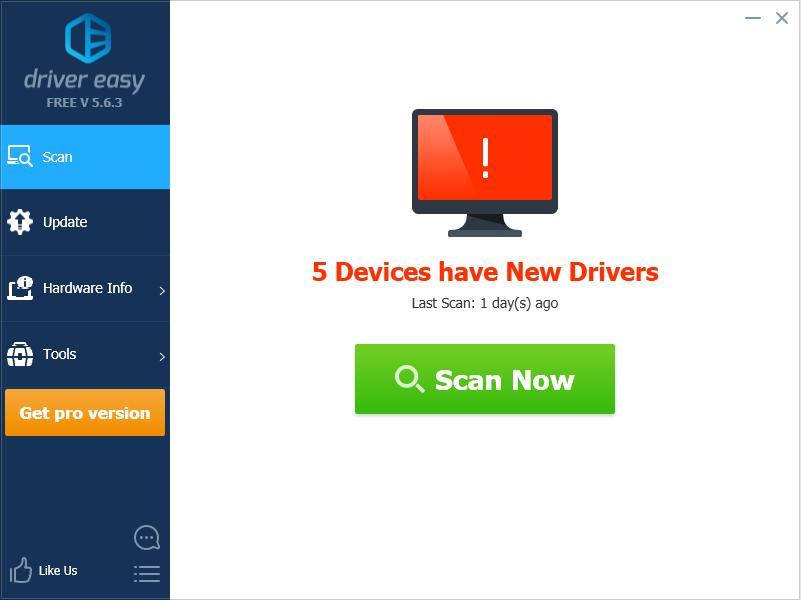
3) Click the Update button next to the flagged driver to automatically download the correct version of the driver (you can do this with the FREE version), then install it in your computer.
Or click Update All to automatically download and install the correct version of all the drivers that are missing or out of date on your system (this requires the Pro version – you’ll be prompted to upgrade when you click Update All).

4) Restart your computer to take effect.
That’s it. Hope this post comes in handy and helps resolve your AMD High Definition Audio Device Not Plugged In issue.
75
75 people found this helpful
Struggling with the AMD High-Definition Audio Device not plugged in error?
Don’t fret; this common error can be solved by updating outdated, corrupt, and missing AMD audio drivers. The easiest way to update the AMD High Definition Audio Drivers is to use Advanced Driver Updater, a tool that helps update outdated corrupt, and missing drivers.
But before moving into details, let’s know about AMD High Definition Audio.
Like Intel High Definition Audio Devices, AMD High Definition Audio is an inbuilt audio mechanism found in different AMD modules. However, when the AMD High Definition Driver is outdated, you face AMD High Definition Audio Device Not Plugged In error.
Reasons for AMD High Definition Audio Device not Plugged in Rrror
- Incompatible or outdated AMD HD audio drivers.
- Incorrect system settings.
- Virus or malware-related issues.
- Corrupt graphics card.
Easiest Way to Solve – AMD HD Audio Device Driver not Plugged In Error:
The simplest solution to fix AMD HD audio device not plugged error is to use Advanced Driver Updater. This advanced tool helps update outdated drivers in a few clicks. To download it, click the download button given below:

We know the easiest way to fix the AMD High Definition Audio Device error. Here are some other fixes.
Read Also- How To Download AMD Ryzen 3 2200G Drivers
Best Ways to Fix AMD High Definition Audio Error
Here are the alternate ways to resolve the High Definition Audio device error. There’s no need to follow all the solutions. You can just work your way down the list. Once you find the right solution, you can stop.
1. Run DISM command
2. Reinstall AMD audio driver
3. Update driver
Note : The methods explained below will work on all versions of Windows. From Windows 11 to Windows 7.
Solution 1: Run the DISM command
Deployment Image Servicing and Management (DISM) is a command that helps fix system bugs. To run it and fix the AMD High Definition audio issue, follow these steps:
1. In the Windows search bar, type Command Prompt > right-click Run as administrator.

2. In the Command Prompt window, enter the following command DISM.exe /Online /Cleanup-image /Restorehealth and press Enter key.

3. Wait for the command to run. Once the process is completed, copy-paste the following command – sfc /scannow and press Enter key.

4. When done, close Command Prompt.
5. Reboot the PC.
This should fix the problem. If the solution doesn’t work, move to the second solution.
Must Read- Fix – No AMD Radeon Graphics Driver is Installed on Windows 10
Solution 2: Reinstall the Audio Driver
The “AMD High Definition Audio Device Not Plugged In” issue can also be fixed by reinstalling the AMD audio device and the driver. Follow these steps to uninstall the driver.
1. Press Windows + X > Device Manager.

2. Double-click Sound, video, and game controllers.

3. Select and right-click AMD High Definition Audio Device > Uninstall device.

4. Check the box next to Delete the driver software for this device > Uninstall.

5. Wait for the process to finish.
6. Reboot the system so that Windows can reinstall the generic device driver for you.
Now try to use the audio device; this should solve the problem.
If things didn’t work this time either, no issues, move to the next step.
Must Read- How To Download AMD x570 Chipset Driver
Solution 3: Update Available Drivers
When the PCI driver or the AMD audio driver is outdated or missing, you encounter the AMD High Definition Audio Device not plugged in the issue. This means you need to update the outdated and missing drivers. There are two ways to update drivers.
Method 1 – Manually Updating AMD High Definition Audio Device Driver
To manually update AMD audio driver, follow these steps:
1. Press Windows + X > Device Manager.
2. Double click the “Sound, Video, and Game Controllers.”
3. Right-click the AMD High Definition audio device > “Update driver.”

4. You will now get two options

5. Search automatically for drivers.
6. Browse my computer for drivers.
7. Click Search for drivers and wait for Windows to find the AMD High Definition Audio device driver update. Wait for the process to complete; this might take a few minutes.
Method 2 – Automatically Update AMD High Definition Audio Device Driver
If the above steps aren’t something you like to go with, you can update the driver automatically using Advanced Driver Updater.
Advanced Driver Updater automatically recognizes system details and helps find the compatible and correct driver update. To use this tool, you don’t need to know the exact system details. The tool detects all these details and helps update outdated drivers. To use Advanced Driver Updater, follow these steps.
You can update your drivers automatically with either the FREE or the registered version of Advanced Driver Updater. You can update all outdated drivers using the registered version in just 2 clicks. Also, you get technical support and a 60-day money-back guarantee).
1. Download and install Advanced Driver Updater.
2. Run Advanced Driver Updater > Start Scan Now button. Wait for Advanced Driver Updater to scan the system for outdated drivers.

3. If you are using the Advanced Driver Updater trial version, click the Update Driver next to the AMD audio driver. However, if you are using the registered version by clicking Update All, you can update all outdated drivers.

4. Restart your computer to apply changes.
See This- How to Update AMD CPU Driver For Windows 11,10,8,7
FAQ-AMD High Definition Audio Device Not Plugged In
Update AMD high Definition Audio Device Driver Windows 10
Using these simple steps, you can fix the AMD High Definition Audio Device Not Plugged In issue. Scanning your system regularly using a driver updating tool like Advanced Driver Updater helps minimize the risk of manual errors, BSOD, and other driver-related problems. Undoubtedly, Advanced Driver Updater is the best option to update AMD High Definition Audio Device Driver on Windows 11/10/8.1/8/7.
If you are facing “AMD High Definition Audio Device not Plugged in” error on Windows 10, then you are in right place.
Here, we are discussing about problems with AMD High Definition Audio in details and providing some recommended & easy methods to fix it on Windows device. Let’s starts the discussion.
What is AMD High Definition Audio?
It is audio mechanism inbuilt in several AMD modules. AMD HD Audio can be compared with other popular audio devices like Intel HD Audio devices. Some graphics cards including Radeon HD, Radeon R5 and Radeon R7 has inbuilt audio device. On other hand, these sound devices is used by huge number of peoples among the world.
Now comes to matter, numerous AMD users report about AMD High Definition Audio Device not plugged-in problem on AMD Support official site and other popular platforms, and asked for the solution.
Users explained that this issue occurs usually when AMD HD Audio device driver not working properly and driver is not installed. Some users reported that this problem occurs when some sound configuration is not set or corrupted drivers.
Reasons behind AMD Audio Driver Windows 10 problem
- Missing, outdated or incompatible AMD HD Audio driver
- Misconfiguration in System settings can cause driver related issues
- Viruses or malware related issue causes AMD HD Audio driver not working problem
- Corrupted graphics cards can cause this type of error
[Tips & Tricks] How to Fix AMD High Definition Audio Device not plugged-in on Windows 10?
Procedure 1: Run DISM Command
Step 1: Press “Windows +X” key from keyboard and select “Command Prompt as Administrator”
Step 2: Type the follow command one-by-one and hit “Enter” key after each
“DISM /Online /Cleanup-Image /CheckHealth”
“DISM /Online /Cleanup-Image /ScanHealth”
“DISM /Online /Cleanup-Image /RestoreHealth”
Step 3: Wait to complete the process. Once done, please restart your computer and please check if the problem is resolved.
Procedure 2: Run SFC Scan
Step 1: Press “Windows + X” key from keyboard and select “Command Prompt as Administrator”
Step 2: In the opened Command Prompt window, type “sfc/scannow” command and hit “Enter” key to execute
Step 3: Wait for completion. Once done, reboot your computer and please check if the problem is resolved.
Procedure 3: Reinstall AMD High Definition Audio Device Driver
Step 1: Press “Windows + X” key together from keyboard and select “Device Manager”
Step 2: In the opened “Device Manager” window, locate “Sound, video and game controllers” and expand it
Step 3: Right-click on “AMD High Definition Audio Device” and select “Uninstall”
Step 4: Ensure to check the box “Delete the driver software for this device” and click on “Uninstall”
Step 5: Once done, restart your computer
Step 6: After restart, open “Device Manager” again and click on “Action > Scan for hardware changes”
Step 7: Once done, please check if the problem is resolved.
Procedure 4: Restoring default settings
Step 1: Right-click on “Sound icon” in Taskbar and select “Playback devices”
Step 2: Right-click on “Speaker/headphones” and select “Properties”
Step 3: Now, click on “Advanced” tab and click on “Restore defaults”
Step 4: After that, close the window and restart your computer to save the changes
Step 5: Once done, please check if the problem is resolved.
Procedure 5: Adding the Network Service
Step 1: Press “Windows + X” key together from keyboard and select “Command Prompt as Administrator”
Step 2: Type the following command in Command Prompt and hit “Enter” key after each
“net localgroup Administrators /add networkservice”
“net localgroup Administrators /add localservice”
Step 3: Wait to complete the process. Once done, restart your computer and please check if AMD High Definition Audio Device not Plugged-in Windows 10 problem is resolved.
Procedure 6: Updating PCI BUS Driver
Step 1: Press “Windows + X” key from keyboard and select “Device Manager”
Step 2: Locate “System Devices” and expand it
Step 3: Right-click on your PCI and select “Update Driver”
Step 4: Select “Browse my computer for driver software”
Step 5: Select “let me pick from a list of available drivers on my computer”
Step 6: Now, select the entry “PCI BUS” and click on “Next”
Step 7: After updating the driver, reboot your computer and please check if the trouble is resolved.
Procedure 7: Using IDT Audio Installer
Step 1: Download IDT Audio Installer
Step 2: Once downloaded, press “Windows + X” key from keyboard and select “Device Manager”
Step 3: Locate “Sound, video and game controllers” and expand it
Step 4: Right-click on IDT Device and select “Uninstall Device”
Step 5: Restart your computer and right-click on “Sound icon” and then click on “Playback Devices”
Step 6: Select the Speakers/headphones and select “Set as Default”
Step 7: Finally, click on “Apply” and “OK” to save the changes.
Conclusion
I am sure this article helped you to “Fix AMD High Definition Audio Device not Plugged-in Windows 10” with several easy methods/procedures. You can choose/follow either one or all procedures to fix this issue.
If you are unable to fix AMD High Definition Audio Device not Plugged-in problem with the solutions mentioned above, then it might possible that your System has infected with malware or viruses. According to security researchers, malware or viruses cause several damages in your computer.
In this case, you can scan your computer with powerful antivirus software that has the ability to delete all types of malware or viruses from System.
You can also try another possible solution to fix this issue. We recommended you to Repair your PCs/laptops with powerful PC Repair Tools/Software that has the ability to remove all the faculty software, clean System registry, remove all types of malware or viruses, fix all types of bugs or errors and improves System performance as well. You can download powerful PC Repair Tool/Software via “Download” link below.
Is Your PC Behaving Abnormal & Needs Instant Optimzation?
We recommend you to choose Advanced System Repair Suite which is dedicated to offer complete options to optimize a PC, fix any Windows error, and remove malware threats in easy. The software is award winning and suggested as the best malware fix application supporting all Windows versions including XP/Vista/7/8/8.1/10. Just 3 steps to avail error free PC.
- Download Advanced System Repair and install on your PC. (Follow all on screen instructions when installer is executed)
- Click “Scan Your PC” button to scan all present issues, errors, junk files, and malware threats.
- Finally, click “Start Repair” to fix all detected problems in next few minutes.
На чтение 4 мин. Просмотров 3.2k. Опубликовано
Команда AMD постоянно работает над тем, чтобы предоставлять нам обновления, которые повысят производительность графических карт AMD. Эти обновления, как правило, исправляют ошибки, проблемы с играми. Однако обновление драйверов AMD может иногда приводить к нежелательным изменениям на вашем ПК. Например, иногда нет звука после обновления драйвера AMD .
Это почему? К сожалению, есть несколько различных факторов, которые могут вызвать эту ошибку. Таким образом, не существует только одного решения этой проблемы. Итак, мы составили список исправлений, которые, мы надеемся, позволят вам решить проблему как можно быстрее. Этот список сделает поиск удобных решений более удобным для вас! На самом деле, вы можете найти множество других решений для других проблем, связанных с компьютером на нашем сайте.
Теперь есть два типа решений, перечисленных в этой статье. Первый тип – это общие исправления. Средний пользователь компьютера уже должен знать, как выполнить эти исправления. Поэтому я не буду вдаваться в подробности о том, как выполнить исправления. Исправления второго типа более специфичны. Я более подробно расскажу об этих исправлениях «нет звука после обновления драйвера amd».
Без лишних слов, давайте начнем.
Содержание
- Устранить проблемы со звуком после обновления драйвера AMD
- 1. Общие исправления
- 2. Конкретные исправления
- Неправильные настройки
- Переустановите драйверы
Устранить проблемы со звуком после обновления драйвера AMD
1. Общие исправления
- Обновление Windows: Хорошо, так что это почти не проблема, но большинство людей об этом забывают. Существует также тот факт, что Windows, как правило, обновляется автоматически. Тем не менее, я лично использовал это исправление, и оно решило многие из моих проблем. Проверка наличия обновлений также займет всего несколько секунд. Просто откройте Меню Windows и выполните поиск: проверить наличие обновлений . Остальное в значительной степени само собой объясняется.
- SFC Scan . Так что это исправление не так хорошо известно, но оно все еще довольно распространено. В основном сканирование SFC будет сканировать (удивительно верно?) Ваши системные файлы на предмет чего-либо поврежденного. Windows также заменит поврежденные файлы, если они найдут. Вам не нужно загружать какие-либо сторонние программы, но, как известно, они помогают. Чтобы выполнить это исправление в встроенной Системной проверке Windows, откройте Командную строку . Вы можете найти это, выполнив поиск в меню Windows. Кроме того, не забудьте запустить его от имени администратора . Когда вы окажетесь в окне командной строки, введите sfc/scannow .
- Проверка на вирусы . Вредоносное ПО может повредить системные файлы, связанные с этой проблемой. Решение? Найти и уничтожить. Используйте антивирусную программу для достижения наилучших результатов.
Выезд: исправление: ошибка драйвера Lenovo N700 в Windows 10
2. Конкретные исправления
Вы должны попробовать эти конкретные исправления после того, как вы попробовали общие исправления выше.
-
Неправильные настройки
Иногда, когда вы обновляете драйвер, настройки могут быть сброшены или изменены. Возможная причина этой проблемы на самом деле очень проста. Возможно, ваше аудиоустройство не выбрано. Причиной этого является то, что у большинства видеокарт AMD есть собственный звук. Если вы обновите драйвер, возможно, Windows автоматически выберет его. Как вы меняете это обратно?
- Это очень просто, сначала откройте панель управления.
- Затем нажмите на раздел Оборудование и звук , затем нажмите на раздел звук .
- В этом окне найдите устройство, которое вы используете для прослушивания аудио, и включите его.
-
Проверьте изображение ниже для справки. Обратите внимание, что вам может потребоваться отключить аудиоустройство AMD.


- ТАКЖЕ ЧИТАЙТЕ: исправлено: я не могу открыть приложения после Windows 8.1/Windows 10 Update
-
Переустановите драйверы
Скорее всего, ваши драйверы были неправильно обновлены. Следовательно, удаление, а затем переустановка драйверов может помочь.
-
Для этого вам необходимо сначала загрузить правильный драйвер для вашего конкретного AMD GPU (рекомендуется вручную выбрать драйвер.
- Следующая загрузка Display Driver Uninstaller или DDU.
- Отключите все свои антивирусные программы.
- Удалите все файлы в папке AMD. Эта папка обычно находится на C:/AMD
- Пользователям Windows 10 следует отключить «Автоматическое обновление Windows».
- Далее удалите драйвер AMD. Вам нужно будет снова посетить панель управления . Самый простой способ сделать это – ввести элемент управления панель в поисковом меню Windows ( ключ Windows + S) . ,
- Когда вы окажетесь в окне панели управления, перейдите в раздел Программы . После этого нажмите удалить программы.
- Затем вам нужно будет найти программное обеспечение AMD и щелкнуть по нему правой кнопкой мыши, чтобы удалить.
- Перезагрузите компьютер. Убедитесь, что загружается в Безопасном режиме .
- После перезагрузки компьютера в безопасном режиме запустите DDU , который вы ранее загрузили. Это позволит вам легко переустановить драйверы AMD.

Заключение
Отсутствие звука после обновления драйвера AMD может серьезно расстраивать. Тем более, что не существует единственно возможного решения проблемы. Мы знаем, что подобные вещи раздражают, поэтому мы стараемся упростить вам задачу, объединив все общие решения в одной статье. Если у вас есть какие-либо вопросы, исправления и т. Д., Не стесняйтесь комментировать!
Попробуйте наш инструмент устранения неполадок
Выберите операционную систему
Выберите язык програмирования (опционально)
‘>
Если ты видишь ‘ Аудиоустройство высокой четкости AMD не подключено »На компьютере или ноутбуке с Windows, не паникуйте. Это распространенная ошибка, и вы можете решить ее. Аудиоустройство высокой четкости AMD не подключено »Быстро и легко устранить ошибку с помощью приведенных ниже решений.
Попробуйте эти исправления
Вот решения, которые помогли людям решить ту же проблему. Нет необходимости пробовать их все;просто продвигайтесь вниз по списку, пока не найдете тот, который вам подходит.
- Запустить команду DISM
- Переустановите аудиоустройство AMD и драйвер
- Обновите доступные драйверы
Запись : Скриншоты ниже взяты из Windows 10, и исправления также работают в Windows 8 и Windows 7 .
Исправление 1: запустите команду DISM
DISM — это сокращение от Deployment Image Servicing and Management, которое представляет собой полезную командную утилиту для устранения неполадок на вашем компьютере. Следуйте инструкциям ниже, чтобы сделать:
1) Тип cmd в поле поиска от кнопки Пуск щелкните правой кнопкой мыши Командная строка (или же cmd если вы используете Windows 7) и выберите Запустить от имени администратора .
2) Скопируйте и вставьте приведенную ниже команду в командную строку и нажмите Войти на клавиатуре.
DISM.exe / Online / Cleanup-image / Restorehealth
3) Для завершения процесса может потребоваться некоторое время.
4) После завершения скопируйте и вставьте команду ниже в командной строке и нажмите Войти на клавиатуре.
sfc / scannow

5) По завершении выйдите из командной строки.
6) Перезагрузите компьютер и посмотрите, решит ли это проблему.
Исправление 2: переустановите аудиоустройство и драйвер DISAMD.
Вы также можете исправить ‘ Аудиоустройство высокой четкости AMD не подключено ”, Переустановив аудиоустройство AMD и драйвер. Вот как это сделать:
1) На клавиатуре нажмите кнопку Windows logo key и р в то же время, чтобы вызвать окно ‘Выполнить’.
2) Тип devmgmt.msc и нажмите Хорошо .
3) Дважды щелкните Звуковые, видео и игровые контроллеры чтобы расширить его.

4) Щелкните правой кнопкой мыши на своем Аудиоустройство высокой четкости AMD и выберите Удалить устройство .

4) Обязательно установите флажок рядом с Удалите программное обеспечение драйвера для этого устройства и щелкните Удалить .

5) После удаления перезагрузите компьютер, и Windows переустановит устройство и драйвер.
Попробуйте еще раз, чтобы увидеть, решена ли ваша проблема.
Все еще не повезло? Хорошо, можно попробовать еще кое-что.
Исправление 3: Обновите доступные драйверы
Если ваш аудиодрайвер AMD или драйвер PCI отсутствует или устарел, вам, вероятно, следует столкнуться с проблемой не подключенного аудиоустройства AMD High Definition к вашему компьютеру. Поэтому вам следует убедиться, что на вашем компьютере установлены последние версии драйверов, и обновить те, которые не обновлены.
Обновить драйверы можно двумя способами: вручную и автоматически .
Вручную : вы можете вручную обновить драйверы, выполнив поиск подходящего драйвера у производителя, а затем загрузив и установив его на свой компьютер. Убедитесь, что вы скачали драйвер, совместимый с вашей операционной системой Windows. Это требует времени и навыков работы с компьютером.
Автоматически : если у вас нет времени или терпения, вы можете сделать это автоматически с помощью Водитель Easy .
Driver Easy автоматически распознает вашу систему и найдет для нее подходящие драйверы. Вам не нужно точно знать, в какой системе работает ваш компьютер, вам не нужно рисковать загрузкой и установкой неправильного драйвера, и вам не нужно беспокоиться о том, что при установке вы ошибетесь.
Вы можете автоматически обновлять драйверы с помощью СВОБОДНЫЙ или За версия Driver Easy. Но с версией Pro это займет всего 2 клика (и вы получите полную поддержку и 30-дневная гарантия возврата денег ).
1) Скачать и установите Driver Easy.
2) Запустите Driver Easy и нажмите Сканировать сейчас кнопка. Driver Easy просканирует ваш компьютер и обнаружит проблемы с драйверами.

3) Щелкните значок Обновить рядом с отмеченным драйвером, чтобы автоматически загрузить правильную версию драйвера (вы можете сделать это с помощью СВОБОДНЫЙ версия), затем установите его на свой компьютер.
Или нажмите Обновить Все для автоматической загрузки и установки правильной версии всех драйверов, которые отсутствуют или устарели в вашей системе (для этого требуется Pro версия — вам будет предложено выполнить обновление, когда вы нажмете Обновить все ).
4) Перезагрузите компьютер, чтобы изменения вступили в силу.
Это оно. Надеюсь, этот пост пригодится и поможет решить вашу Аудиоустройство высокой четкости AMD не подключено вопрос.