AirPods Pro has become one of the most popular choices for wireless earbuds. Its seamless connection with iPhone and iPad made it the optimal choice for Apple users. However, not all Apple users solely use iOS devices. The good news is, you can also use AirPods Pro with your Windows computer. In this blog post, we will talk about how to connect AirPods Pro to PC Windows 11. We will also discuss some common issues you may encounter and additional tips that will optimize your experience.
Video Tutorial:
The Challenge of Connecting AirPods Pro to PC Windows 11
Connecting AirPods Pro to Windows 11 can be challenging, especially if you are not familiar with it. Windows uses Bluetooth to connect devices like AirPods. AirPods Pro connection in Windows needs to be set up manually, unlike the seamless connection for iOS devices. It is essential to know what to prepare for to ensure a successful connection.
Things You Should Prepare for
1. A PC with Windows 11 operating system.
2. Bluetooth 4.0 or later.
3. AirPods Pro with fully charged batteries.
Method 1: Via Bluetooth Settings
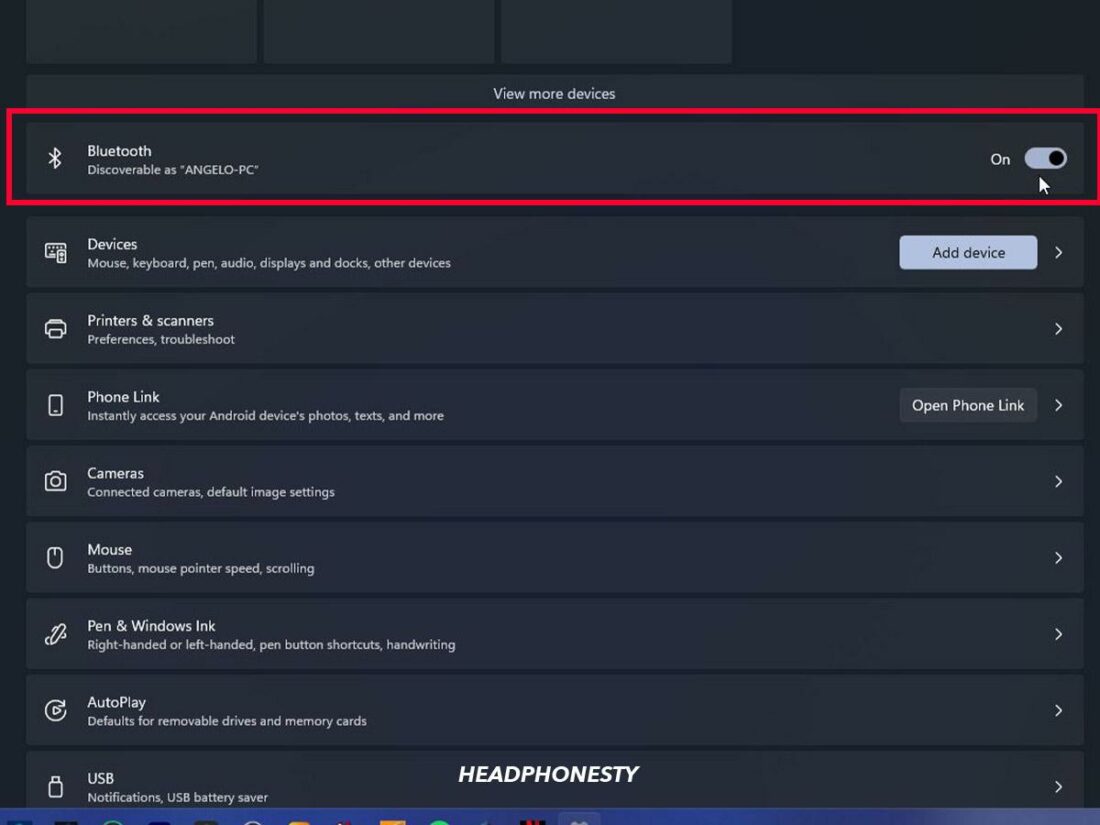
Step 1: Turn on the Bluetooth feature on your Windows 11 PC.
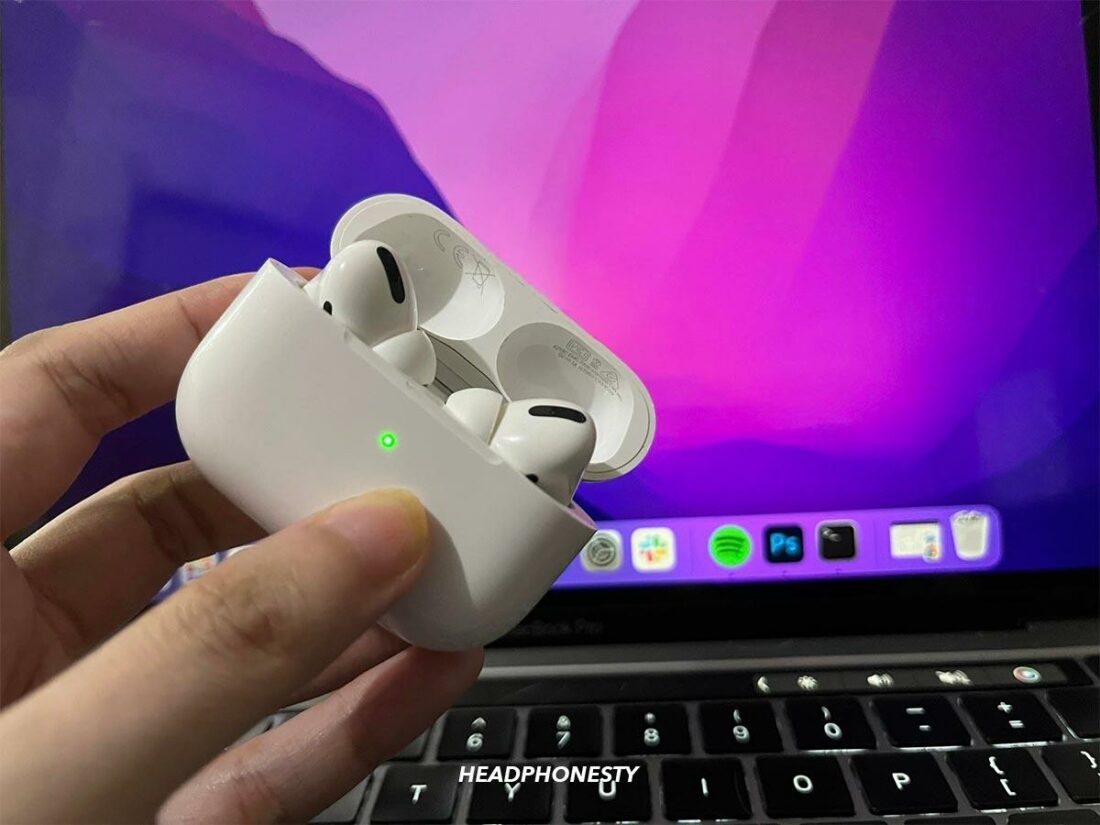
Step 2: Place your AirPods Pro inside the charging case and open the lid.
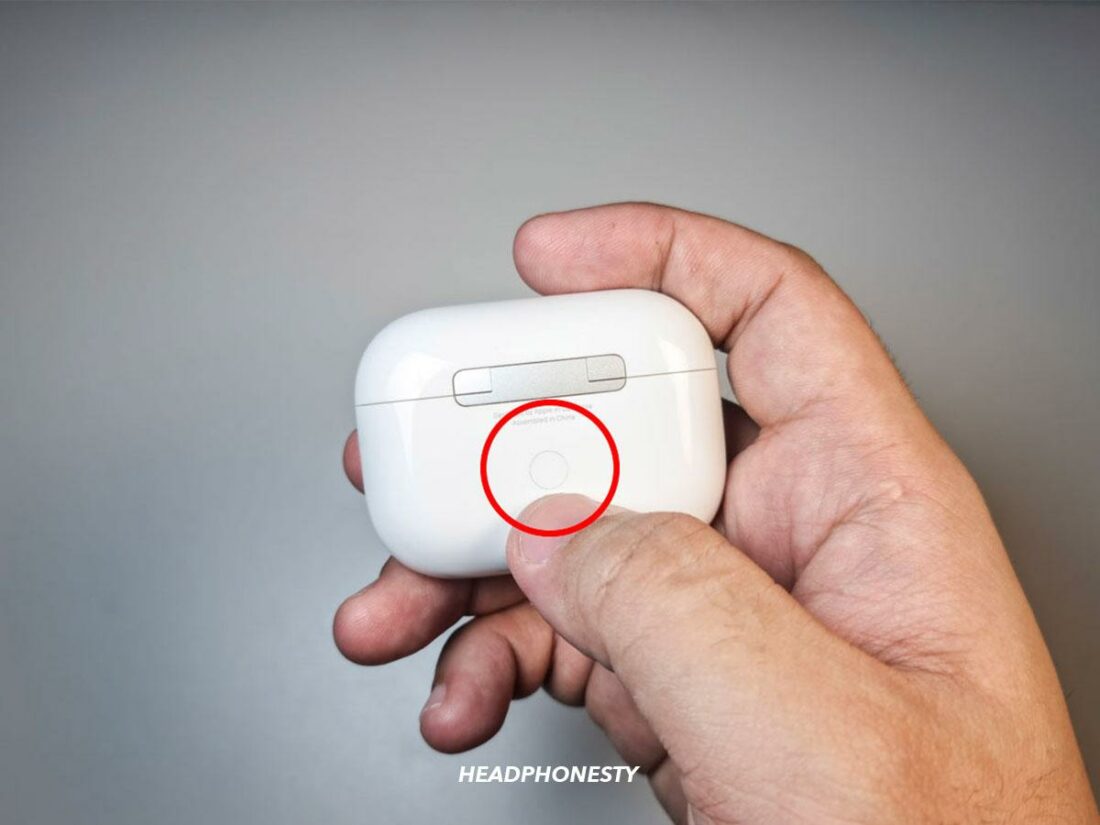
Step 3: Press and hold the button on the back of the charging case until the LED light inside the case turns white.
Step 4: On your PC, go to settings > Bluetooth and other device.
Step 5: Click on «Add Bluetooth or other device» button.
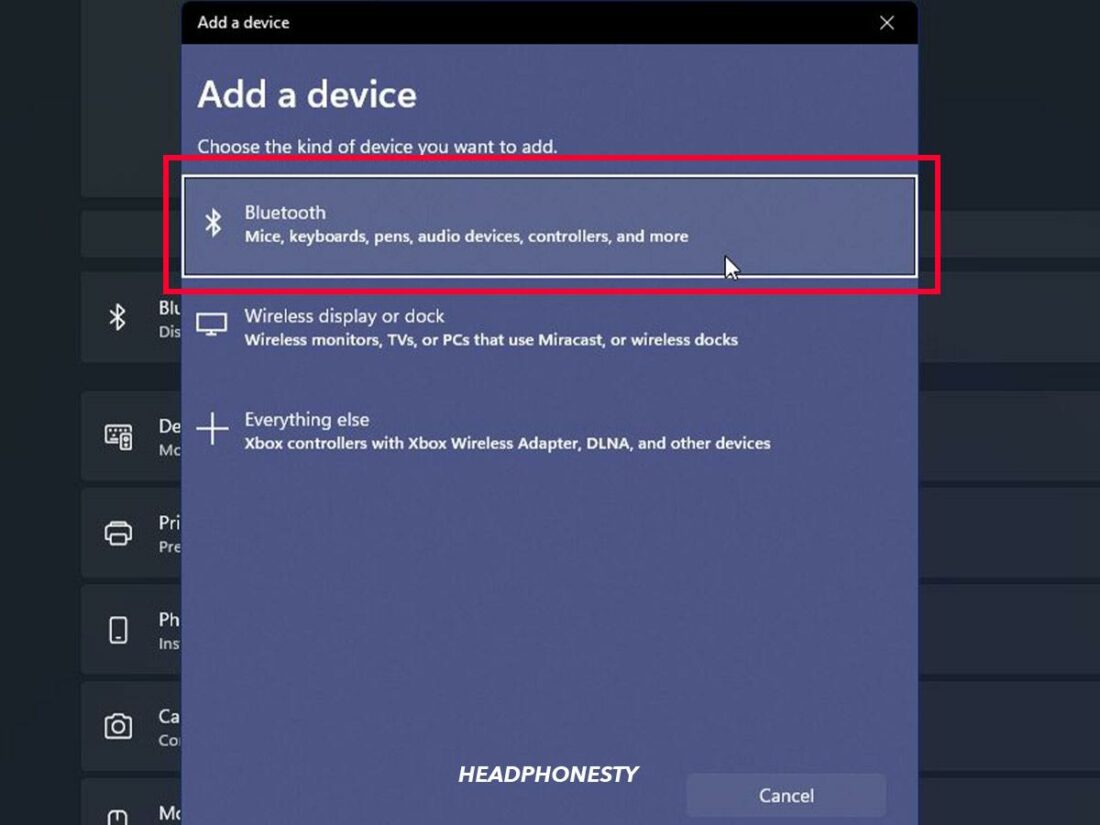
Step 6: Select «Bluetooth» as the device type.
Step 7: A window will appear, and your PC will start searching for nearby Bluetooth devices. Select your AirPods Pro from the list.
Step 8: Once selected, click on «Pair» and follow the on-screen instructions to complete the process.
Pros:
– Easy to follow steps
– Built-in settings in Windows 11
– Does not require any third-party software
Cons:
– May take a while to connect
– May encounter issues with compatibility
Method 2: Via Taskbar
Step 1: Turn on the Bluetooth feature on your Windows 11 PC.
Step 2: Place your AirPods Pro inside the charging case and open the lid.
Step 3: Press and hold the button on the back of the charging case until the LED light inside the case turns white.
Step 4: On the taskbar, click on the Bluetooth icon.
Step 5: From the drop-down list, select «Add Bluetooth or other devices.»
Step 6: Select «Bluetooth» as the device type.
Step 7: A window will appear, and your PC will start searching for nearby Bluetooth devices. Select your AirPods Pro from the list.
Step 8: Once selected, click on «Pair» and follow the on-screen instructions to complete the process.
Pros:
– Easy to access via taskbar
– Built-in settings in Windows 11
– Does not require any third-party software
Cons:
– May take a while to connect
– May encounter issues with compatibility
Method 3: Via Third-Party Apps
Step 1: Download and install a third-party app, such as «AirPods Pro-Bluetooth Explorer» or «AirPods ProPair» on your Windows 11 PC.
Step 2: Place your AirPods Pro inside the charging case and open the lid.
Step 3: Press and hold the button on the back of the charging case until the LED light inside the case turns white.
Step 4: Open the third-party app you installed earlier.
Step 5: Your AirPods Pro should be recognized automatically by the app.
Step 6: Click on «Pair» and wait for the app to finish the process.
Pros:
– Some third-party apps offer additional features like battery percentage and firmware update.
Cons:
– Requires downloading and installing third-party apps
– Some apps may come with potentially harmful malware
Why Can’t I Connect My AirPods Pro?
1. Bluetooth driver is outdated or not installed.
Fix: Update the Bluetooth driver or install it if it is not present.
2. AirPods Pro batteries are not charged.
Fix: Charge the AirPods Pro battery before attempting to connect to Windows 11 PC.
3. The AirPods are already paired with another device.
Fix: Disconnect AirPods Pro from the previously paired device and follow the connection process for Windows 11 PC.
Additional Tips
1. Make sure the AirPods Pro and Windows 11 PC are within the range of each other.
2. Disconnect other Bluetooth devices to avoid interference.
3. Restart the Bluetooth service on Windows 11 if it is not connecting.
5 FAQs about Connecting AirPods Pro to PC Windows 11
Q1: Can I connect AirPods Pro to Windows 11 without Bluetooth?
A: No, Bluetooth is the only way to connect AirPods Pro to Windows 11.
Q2: Why is my AirPods Pro connection unstable?
A: The connection may be unstable if there are too many active Bluetooth connections, the distance is too far, or there are other signal interferences.
Q3: Can I listen to music on my AirPods Pro while connected to Windows 11 PC?
A: Yes, once connected, you can stream audio or listen to music on your AirPods Pro while connected to your Windows 11 PC.
Q4: Will my AirPods Pro microphone work on Windows 11 PC?
A: Yes, once connected, you can use the microphone on your AirPods Pro as a device for audio input in Windows 11 PC.
Q5: Is there any dedicated app to control AirPods Pro on Windows 11 PC?
A: No, there is currently no dedicated app to control AirPods Pro on Windows 11 PC.
In Conclusion
Connecting AirPods Pro to Windows 11 PC requires following specific steps, but it is straightforward to achieve. The methods we discussed in this blog post will help you connect your AirPods Pro to your Windows 11 PC and enjoy high-quality audio. If you encounter any issues, follow the fixes suggested in the blog post. Remember, to get the best out of your AirPods Pro on Windows 11 PC, follow the additional tips shared here.
AirPods Connect
An app that helps you switch your AirPods between your Windows PC and other Apple Family Devices. Written with MAUI and .NET 7.0

Disclaimer
- This is an highly experimental app which I do not guarantee that it will work on each computer nor claim that it will serve its intended functionality
- To use you have to lower UAC restrictions 0 or else it’ll ask you an UAC Prompt after pressing Connect/Disconnect
Usage
To use you first have to clone the repo. Change the AirPodsName in MainPage.xaml.cs#L19. Then you have to run
dotnet publish -f net7.0-windows10.0.19041.0 -c Release
After that you should have your installer at AirPodsConnect.MAUIApp\bin\Release\net7.0-windows10.0.19041.0\win10-x64\AppPackages\AirPodsConnect.MAUIApp_X.X.X.X_Test.
Credits
All the visual resources were fetched from apple.com
The PnP Disconnect and Connect scripts were derived from this answer on Stackoverflow

Image: Leif Johnson / IDG
Pairing AirPods or AirPods Pro with a PC may not be as utterly simple as with an iOS device, but it’s only marginally harder. You just connect the earbuds via Bluetooth—a straightforward, fast process in both Windows 10 and Windows 11 (though Windows 11 added steps to connect Bluetooth devices). Just follow our steps below and you’ll be off and running.
Do note, however, that as an Apple product, AirPods and AirPod Pros lose some functionality in Windows. They work well for listening to audio, but fall quite short of microphone quality you’d get on iOS or macOS. So while Apple’s earbuds can handle Zoom calls in a pinch, we’d steer clear of them as your main Windows headset. Hopefully the hotly anticipated AirPods Pro 2 don’t suffer from the same limitations when they (presumably) come out later this year.
First, make sure your AirPods are fully charged with both earbuds in the case, and the lid is shut. Also confirm your Windows 10 PC is capable of running Bluetooth devices. (The overwhelming majority of modern laptops have Bluetooth built in, as do prebuilt desktop PCs from vendors like Dell and HP.) If your system lacks support, you can buy an inexpensive dongle like this TP-Link oneRemove non-product link to add that feature.
- Open the Settings app in Windows 10. You can find it by typing settings in the Windows 10 search bar and selecting the app once it appears. Its icon looks like a cog. Alternatively, you can press the Windows key + I at the same time.
- In the Settings menu, choose Devices.
- The Bluetooth & other devices page will pop up. First, make sure that Bluetooth is turned on by checking the toggle near the top of the page. If it isn’t, flip it on.
- Select Add Bluetooth or other device.
- The Add a device menu will pop up, asking you which kind of device you’d like to pair with. Select Bluetooth.
- Grab your AirPods or AirPods Pro and open the lid.
- Hold down the circular button on the back of your AirPods for around three to eight seconds. The charging light on your AirPods will eventually start pulsing white. When this happens, lift your finger and look back at the Add a device menu.
- Be patient. It might take a couple of seconds for the AirPods to appear. When they do, they’ll likely appear as “Headphones” at first and then Windows 10 will load them as “AirPods Pro” (or whatever name you gave them on iOS, if you have an iPhone or iPad you previously used them with). Select them.
- You’ll get a notification saying, “Your device is ready to go!”
Your AirPods should immediately become your default listening device. When you put them back into your case, Windows 10 will automatically revert to the last audio device you used.
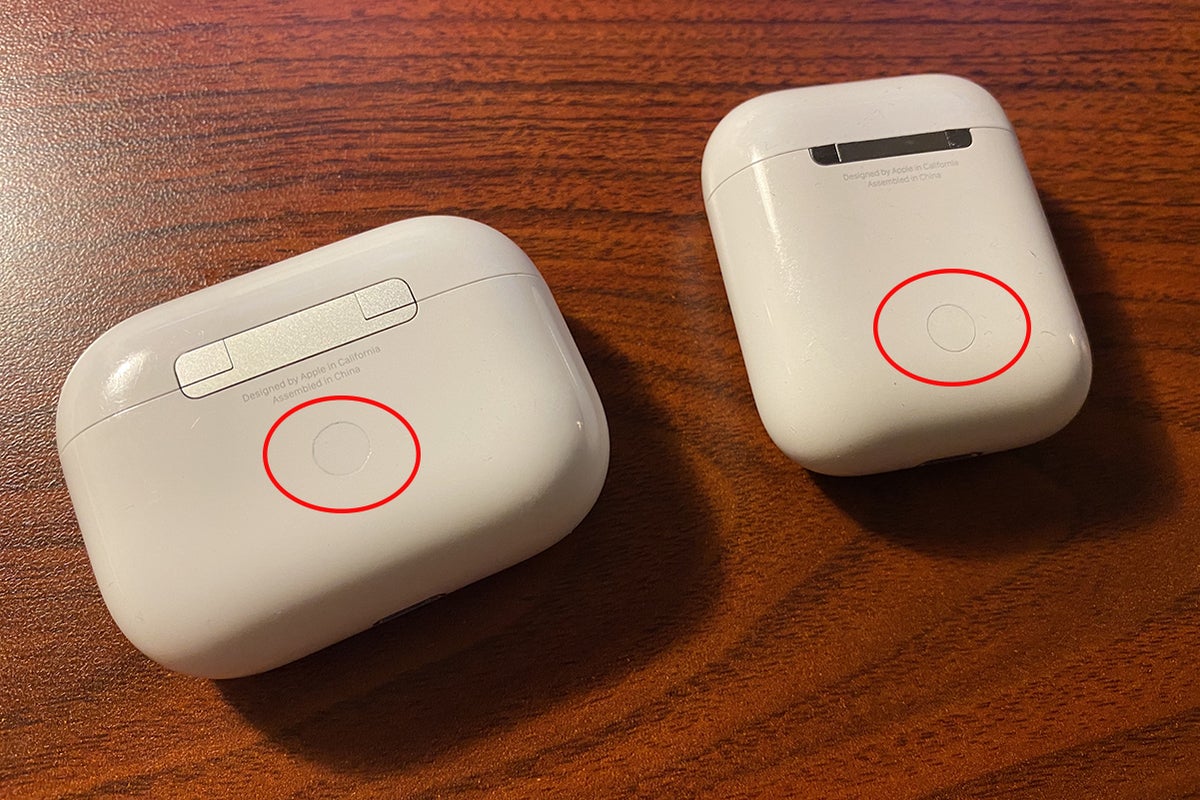
Hold the button on the back of your AirPods or AirPods Pro to put them into pairing mode.
How to pair AirPods or AirPods Pro with Windows 11
Before pairing, your AirPods should be fully charged, with both earbuds in the case and the lid shut. Also verify that your Windows 11 computer supports Bluetooth connections. Most laptops have Bluetooth built in, as do desktop PCs purchased through companies like Dell or HP. If your PC can’t run Bluetooth devices, you can buy an inexpensive dongle (like this TP-Link model) to add the feature.
- Open the Settings app in Windows 11. You access it by clicking on the Start menu, then clicking on the grey cog icon labled Settings. You can also bring it up by typing settings into the search bar, or pressing Windows + I on your keyboard.
- In the Settings menu, choose Bluetooth & devices.
- Confirm that the toggle for Bluetooth is turned on. If it’s not, click on it.
- At the top of the screen, click on the big button that says Add device.
- When the Add a device menu appears, choose Bluetooth from among the options.
- Now open the lid on your AirPods or AirPods Pro. If this is your first time ever pairing the device, you can skip to Step 8.
- Otherwise, hold down the circular button on the back of your AirPods. The charging light on your AirPods will eventually start pulsing white after several seconds. (It can take as long as 10 seconds, though.) When this happens, lift your finger and look at the Add a device menu.
- Be patient, as it can take a few seconds for the AirPods to appear. They’ll likely appear as “Headphones” at first and then Windows 11 will load them as “AirPods” or “AirPods Pro” (or whatever you’ve renamed them to, if you’ve previously used them with an iPhone or iPad). Select them.
- A new window will appear that says “Your device is ready to go!”
Your AirPods should now be your active listening device. You’ll see it as a new button at the top of the Bluetooth & devices screen; its status should be marked with a green dot and listed as Connected voice, music. You can put them back into the case to automatically disconnect them. Windows 11 will then automatically switch to the last audio device you used.
How to reconnect or disconnect AirPods with your PC (Windows 10)
Your AirPods should automatically start working with your PC once you put them back in your ears. If they don’t, you can connect them manually.
- Open the Settings app in Windows 10.
- Select Devices.
- Scroll down to the Audio section and select your AirPods.
- In the prompt that pops up, press Connect. Your AirPods should now work.
You can also use these same steps to disconnect your AirPods from your PC if you want to use them with an iPhone, iPad, or Mac you’ve previously paired them with. Just keep in mind that you’ll now need to manually connect your AirPods through the Bluetooth menus on those devices while your AirPods are still paired with your Windows PC.
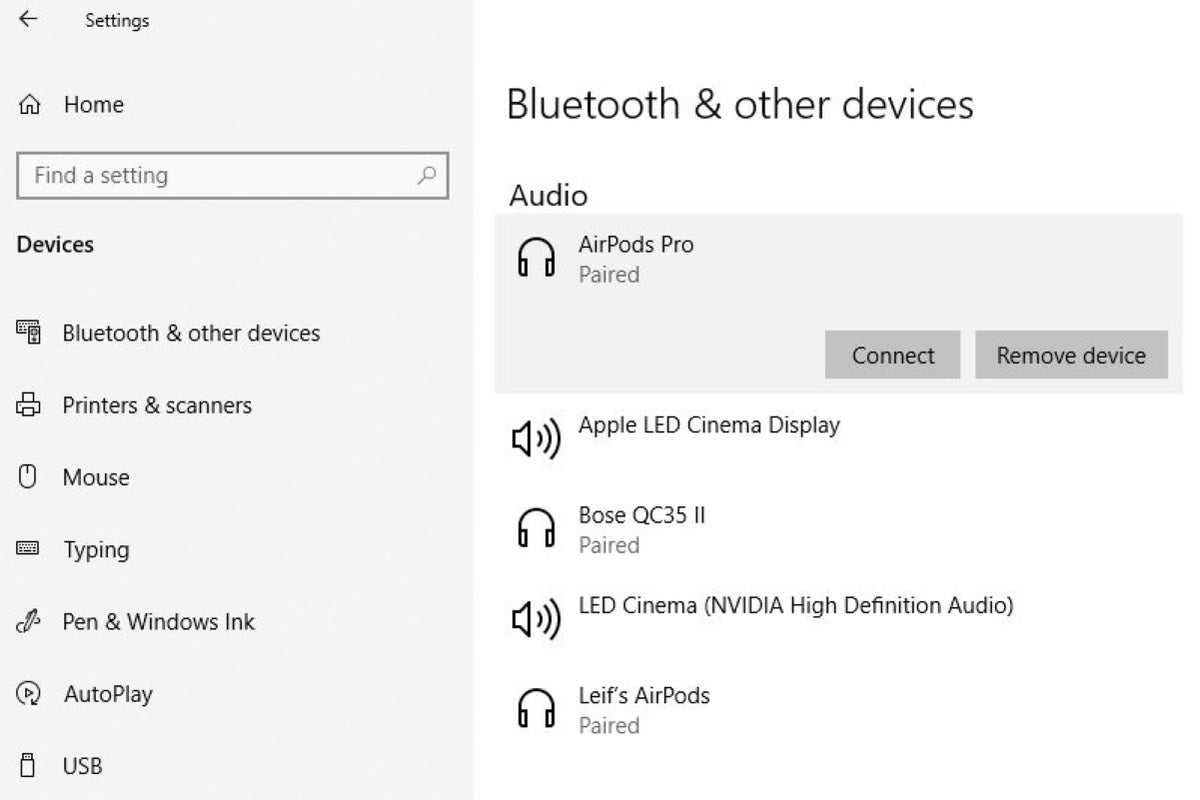
Keep in mind that you might have to scroll down a bit in order to see the Audio section.
How to reconnect or disconnect AirPods with your PC (Windows 11)
Your AirPods should automatically reconnect to your Windows 11 PC after you pull them from your case. If they don’t, you can connect them manually.
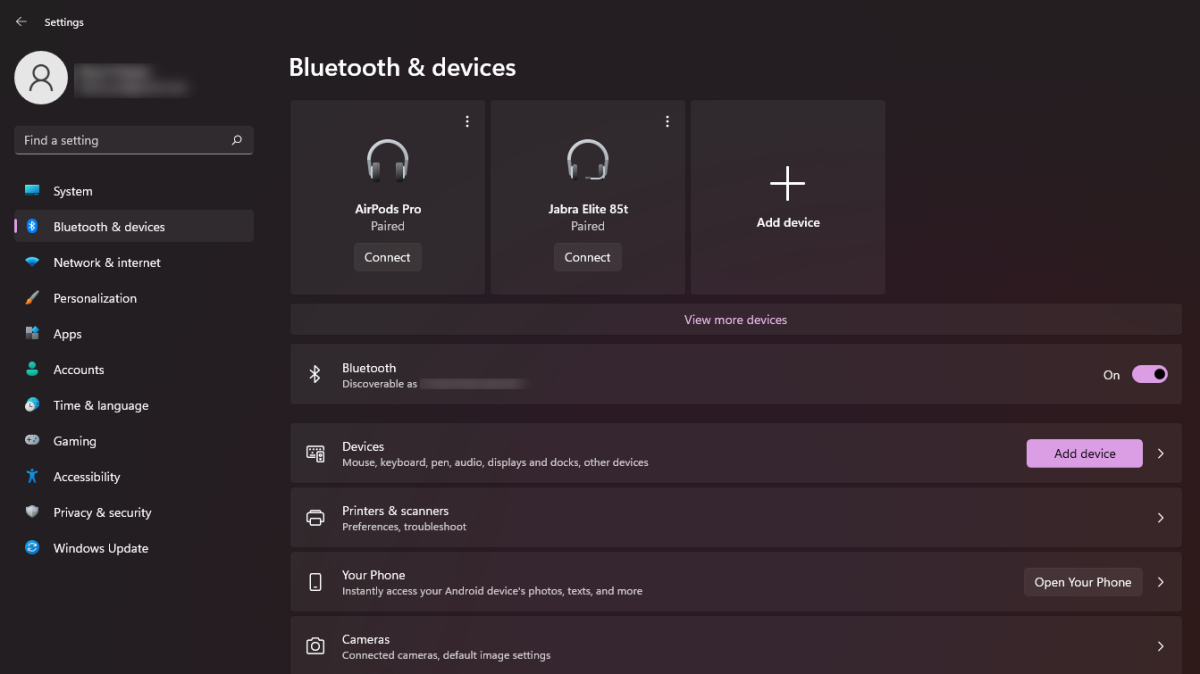
- Open the Settings app in Windows 11.
- Choose Bluetooth & devices.
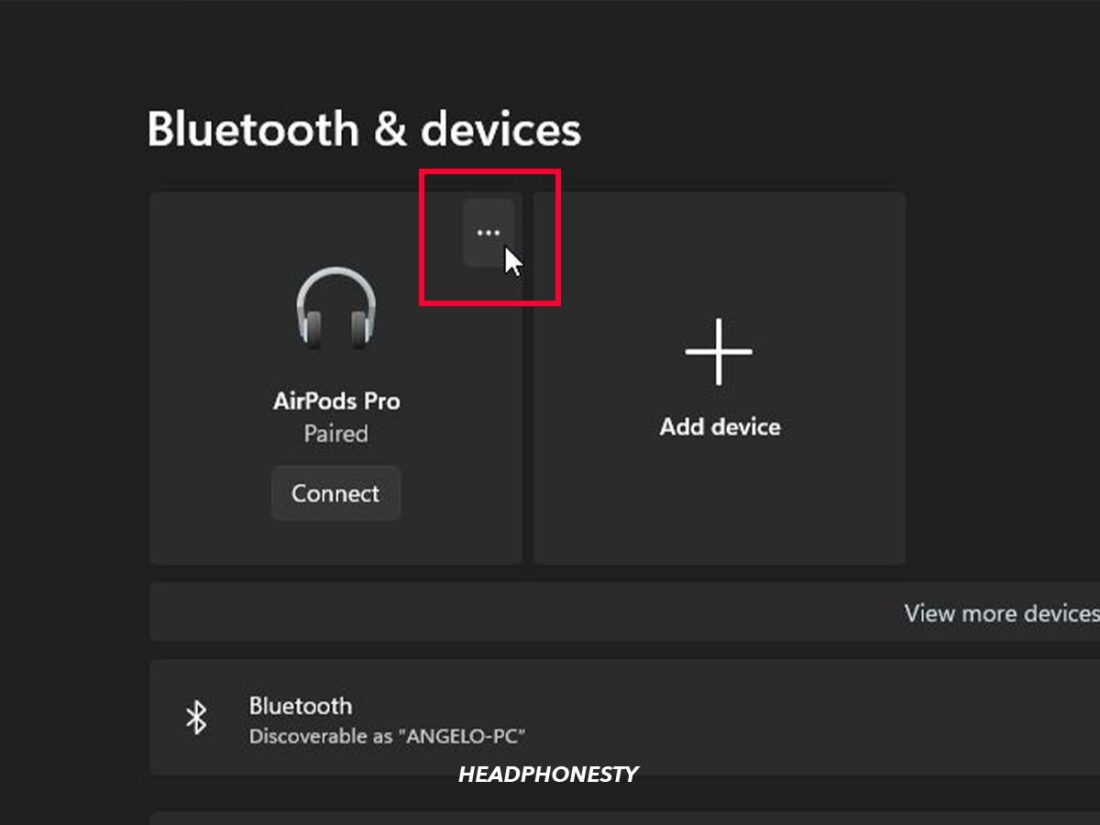
- At the top of the screen, you should see a large button for your AirPods (e.g., “AirPods Pro”).
- Click the Connect button.
- If you don’t see your AirPods among the buttons on this screen, click on View more devices just underneath them. Then scroll down to Audio.
- On the AirPods entry, click on the vertical set of three dots.
- In the pop-up window that appears, choose Connect.
Your AirPods should now work. To disconnect them from your PC, use these same steps. If you want to use your AirPods with a previously paired device, you may need to connect to it manually through its Bluetooth menu if automatic connection fails.
PCWorld
How to unpair your AirPods from your Windows 10 PC
Permanently unpairing your AirPods involves a similar series of steps as reconnecting them, but with a single difference.
- Open the Settings app.
- Press Devices.
- Scroll down to the Audio section and select your AirPods.
- In the prompt that pops up, press Remove device.
How to unpair your AirPods from your Windows 11 PC
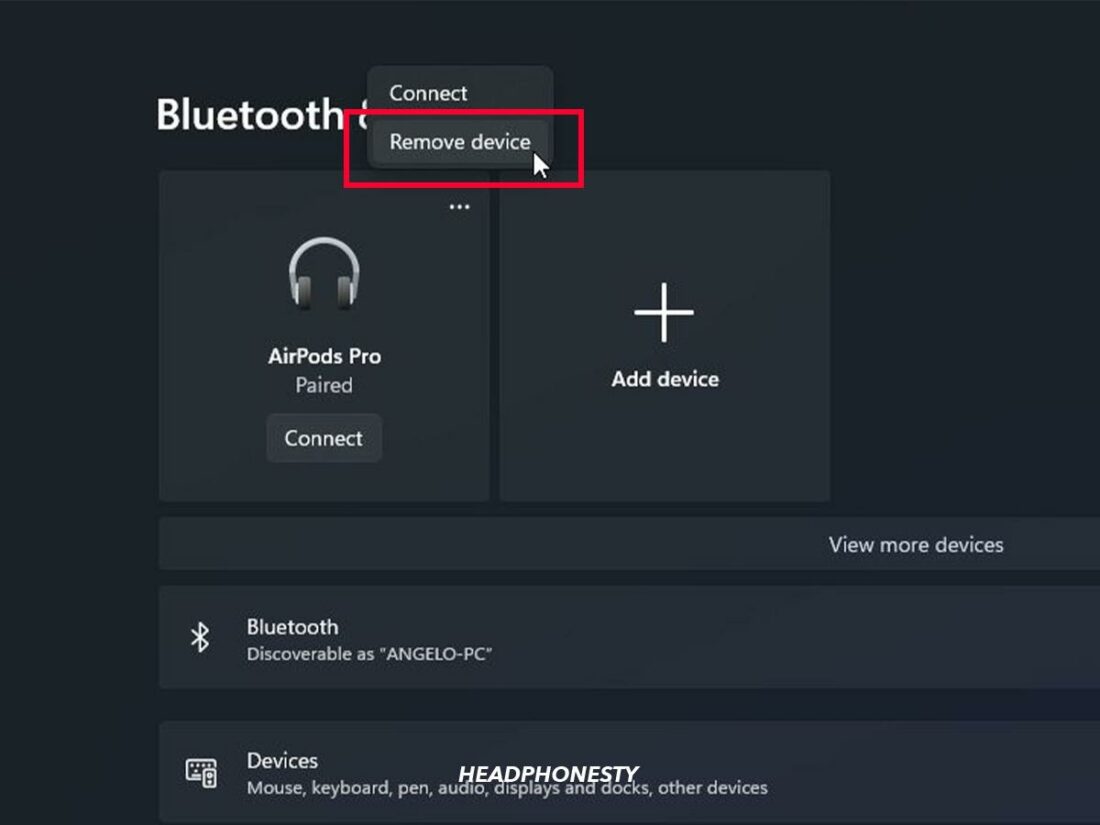
To remove your AirPods as a device, you’ll take similar steps as when reconnecting them.
- Open the Settings app.
- Select Bluetooth & devices.
- Locate the big button for your AirPods (e.g., “AirPods Pro”).
- Click on the vertical line of three dots at the upper-right corner of the button.
- In the small pop-up window that appears, choose Remove device.
- If you can’t find your AirPods among the buttons on this screen, click View more devices just underneath them. Then scroll down to Audio.
- On the AirPods entry, click on the vertical set of three dots.
- Choose Remove device.
В компании Apple сделали действительно классные и простые наушники AirPods, которые вообще без проблем, за несколько секунд можно подключить к другим устройствам от Apple. Если у вас есть эти наушники, то вы уже наверное убедились, как просто они подключаться к тому же iPhone. Самые новые на рынке – AirPods 2 и AirPods Pro. Но сегодня я хочу рассказать вам не о самих наушниках, а о том, как подключить их к компьютеру, или ноутбуку, который работает на Windows 10, Windows 8, или Windows 7. Так же разберемся, можно ли использовать эти наушники как гарнитуру. Обновление: инструкция по подключению AirPods к Windows 11.
Процесс подключения AirPods к Windows не сложный, но все же не такой простой как к устройствам на iOS и Mac OS. Я иногда использую свои AirPods с ноутбуком на Windows 10. Соединяются они конечно же по Bluetooth. Поэтому, если у вас не ноутбук (где Bluetooth обычно уже есть встроенный), а стационарный компьютер, то для подключения беспроводных наушников от Apple вам понадобится Bluetooth-адаптер.
Если на вашем ноутбуке, или компьютере нет Bluetooth, или он не работает, то подключить AirPods не получится. Поэтому:
- В случае с ноутбуком, где Bluetooth-модуль обычно встроенный, нужно просто установить драйвера. В Windows 10 проблем с этим быть не должно, так как драйвера устанавливаются обычно автоматически. Не важно, какая у вас Windows. Посмотрите, есть ли иконка Bluetooth в трее. Если есть, то все хорошо, можно подключать Аирподсы. Так же можно глянуть, есть ли соответствующий модуль в диспетчере устройств. Если же Bluetooth нигде нет, то попробуйте установить драйвера. Скачайте их с сайта производителя ноутбука для своей модели. Больше информации в статье как включить и настроить Bluetooth на ноутбуке с Windows 10 и как включить Bluetooth на ноутбуке (здесь так же есть информация по Windows 8, 8.1 и Windows 7).
- В случае с ПК, скорее всего понадобится выбрать и купить Bluetooth-адаптер. Затем, его нужно установить и настроить: настройка Bluetooth на компьютере.
Если на компьютере есть Блютуз (иконка в трее, раздел в настройках и т. д.), то можно переходить к подключению наушников.
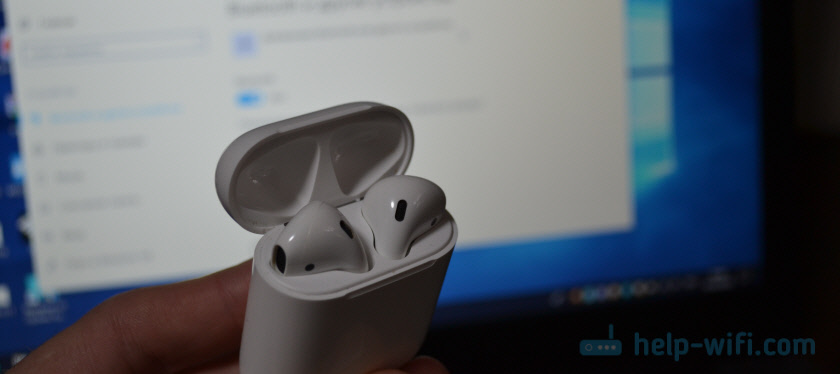
Подключаем AirPods к Windows 10
Можно нажать на соответствующую иконку в трее и выбрать «Добавление устройства Bluetooth», либо зайти в «Параметры» – «Устройства» – вкладка «Bluetooth и другие устройства».

Окно с параметрами оставляем открытым, берем наши наушники AirPods, открываем кейс и на задней стороне кейса на секунды три зажимаем круглую кнопку. Держим ее нажатой, пока индикатор внутри кейса не начнет мигать белым цветом.

В параметрах Windows нажмите на «Добавление Bluetooth или другого устройства» и в новом окне выберите «Bluetooth».
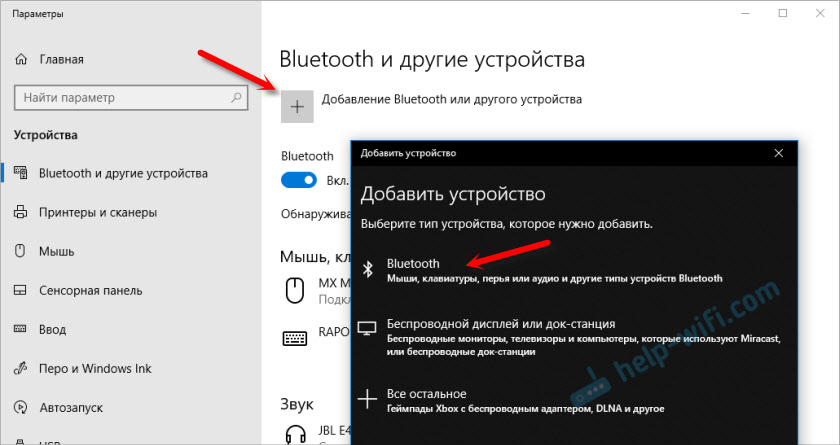
Компьютер должен увидеть наши Аирподсы. Нажимаем на них и сразу пойдет процесс подключения. По завершению нужно просто нажать на кнопку «Готово».

Все готово! Windows уже транслирует звук на наши беспроводные наушники. Их статус в настройка: AirPods – «Подключенный голос, музыка». Там же их можно вручную либо отключить, либо удалить. После удаления нужно будет повторить процесс подключения заново.

Достаем их из зарядного кейса, вставляем в уши и наслаждаемся музыкой. Можно использовать только один наушники.
Когда мы прячем оба наушника в кейс и закрываем его, то наушники автоматически отключаются (статус соединения – «Сопряжено») и звук начинает воспроизводится через динамики ноутбука, или акустическую систему. Как только открываем кейс с Аирподсами, то они автоматически подключится к компьютеру и звук идет на наушники.
Настройка микрофона, работа в качестве гарнитуры
В этом плане все так же, как и с другими Bluetooth наушниками. У меня в Windows 10 не получилось настроить AirPods таким образом, чтобы можно было слушать музыку в хорошем качестве (Stereo) и при этом работал микрофон.
В параметрах звука можно выбирать устройство ввода и вывода. Если выбрать «Головной телефон AirPods», то наушники будут работать в режиме гарнитуры.
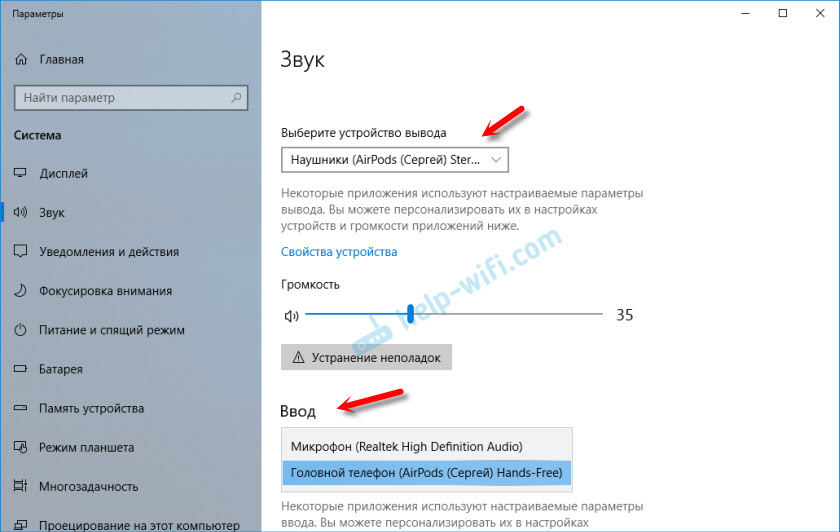
Если вы подключили Аирподс для общения через Скайп, то прямо в настройках программы можно задать настройки. Выбрать эти наушники в качестве микрофона и динамиков.

Но тогда система не будет воспроизводить звуки через наушники. Нужно вернуть все настройки обратно. Возможно, у вас получится иначе это все настроить. Можете поделится с нами в комментариях.
Вообще, в этом плане все далеко не идеально. Если просто слушать музыку, смотреть фильмы и т. д., то да, все работает хорошо. Но чтобы настроить микрофон – придется повозится. Да и то не факт, что все получится.
Подключение и настройка Аирподс на компьютере с Windows 7
Так как у меня на ноутбуке рядом с десяткой установлена еще и Windows 7, то я и к ней решил попробовать приконектить AirPods. Так как там с подключением таких новых устройств бывают проблемы.
Все сделал как и в Windows 10. Просто подключаем новое устройство. Не забудьте активировать режим подключения на наушниках. С помощью отдельной кнопки на кейсе.

Но как я и ожидал, Windows 7 не смогла найти драйвера.
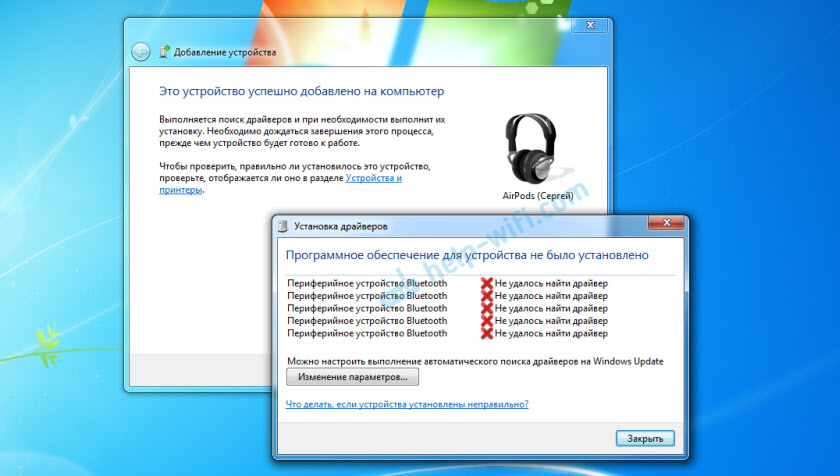
Аирподсы подключились, но с ошибкой (возле них был желтый восклицательный знак) и они просто не работали.
Как я решил эту проблему?
Обновил драйвер Bluetooth модуля. Зашел в диспетчер устройств, открыл свойства Generic Bluetooth Adapter и увидел, что драйвер еще от 2006 года. Который Windows 7 сама установила.

Так как я знаю модель Wi-Fi/Bluetooth модуля, который установлен в моем ноутбуке (я его уже менял), то очень быстро скачал и установил новый драйвер с сайта производителя. Если вы не знаете модель самого модуля, то можете попробовать скачать драйвер с сайта производителя ноутбука. Но строго для своей модели ноутбука. А если у вас USB Bluetooth-адаптер, то качайте драйвер для него.
После обновления драйвера:

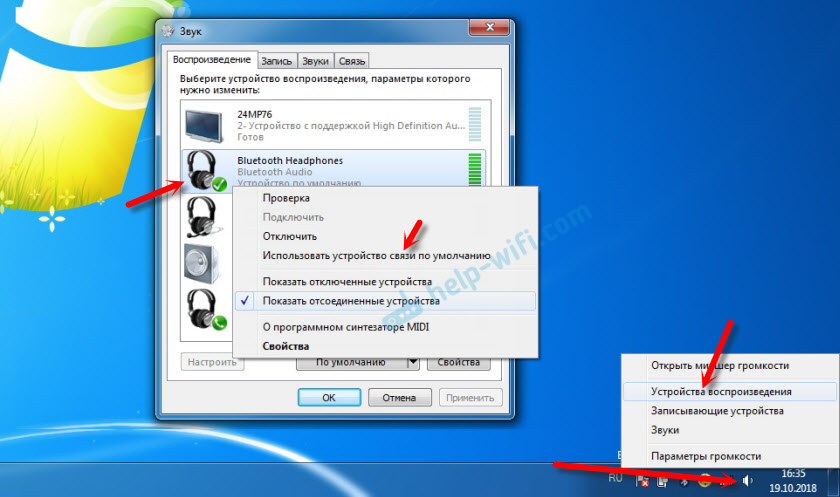
Дальше я просто удалил AirPods из списка уже подключенных устройств (так как я уже пробовал их подключить) и установил соединение заново. И уже в этот раз Windows 7 установила практически все драйвера. Кроме «Периферийное устройство Bluetooth». Но наушники без проблем начали работать, несмотря на то, что возле них остался желтый восклицательный знак.

В устройствах воспроизведения нужно присвоить им статус «по умолчанию».
Вот так я подружил новые наушники от Apple с не очень новой операционной системой от Microsoft. В Windows 10 это все подключается и настраивается намного проще. Не так как на iOS и Mac OS устройствах, но все же без таких танцев с бубном.
Разные проблемы, настройки, решения и т. д. по этой теме мы можем обсуждать в комментариях. Оставляйте там свои сообщения.
We show you the most effective ways to connect your AirPods to a Windows PC or laptop.
Connecting AirPods to an Apple computer is typically an effortless experience, leading users to expect a similar level of ease when pairing with a Windows PC or a laptop like Microsoft Surface.
However, while AirPods can work with Windows laptops and PCs, connecting the devices involves additional know-how. Compatibility differences and unclear instructions often make the process more challenging for Windows users.
Thankfully, things get easier once you familiarize yourself with the steps you need to take. We have a full guide on how to connect AirPods to a PC, troubleshooting tips included. Let’s dive in!
In This Article
- How to Connect Your AirPods to a Windows PC
- What to Do When Your AirPods Won’t Connect to PC
- How to Disconnect Your AirPods From Your Windows PC
- How to Use AirPods as Headsets on PC
- Conclusion
How to Connect Your AirPods to a Windows PC
Like any true wireless earbuds, AirPods use Bluetooth. As a result, they work with non-Apple devices that have a Bluetooth module.
Once that’s done, here’s how you can connect AirPods, AirPods Max, or AirPods Pro to your Windows 10 or Windows 11 PC:
- Check your AirPods battery life by placing them in the case. If the status light is orange or green, they have juice left and you’re good to go.
The status light is either at the front of the case (AirPods 3rd gen. and Pro) or inside the case in the space between the two earbuds (AirPods 1st & 2nd gen).

Check your AirPods battery life. - Put the AirPods in pairing mode by long-pressing the setup button at the back of the case until the status light flashes orange, then white.
Long press the setup button on the AirPod charger case. - On your PC, open the Windows Start menu at the bottom left corner of the screen and go to Settings.
Select Settings. - Select Bluetooth & devices.
Select Bluetooth & devices. - Ensure that the Bluetooth toggle is switched to on.
Turn on Bluetooth toggle switch. - Click Add device.
Click Add Device. - This will take you to the Add a device tab. Once there, click on Bluetooth.
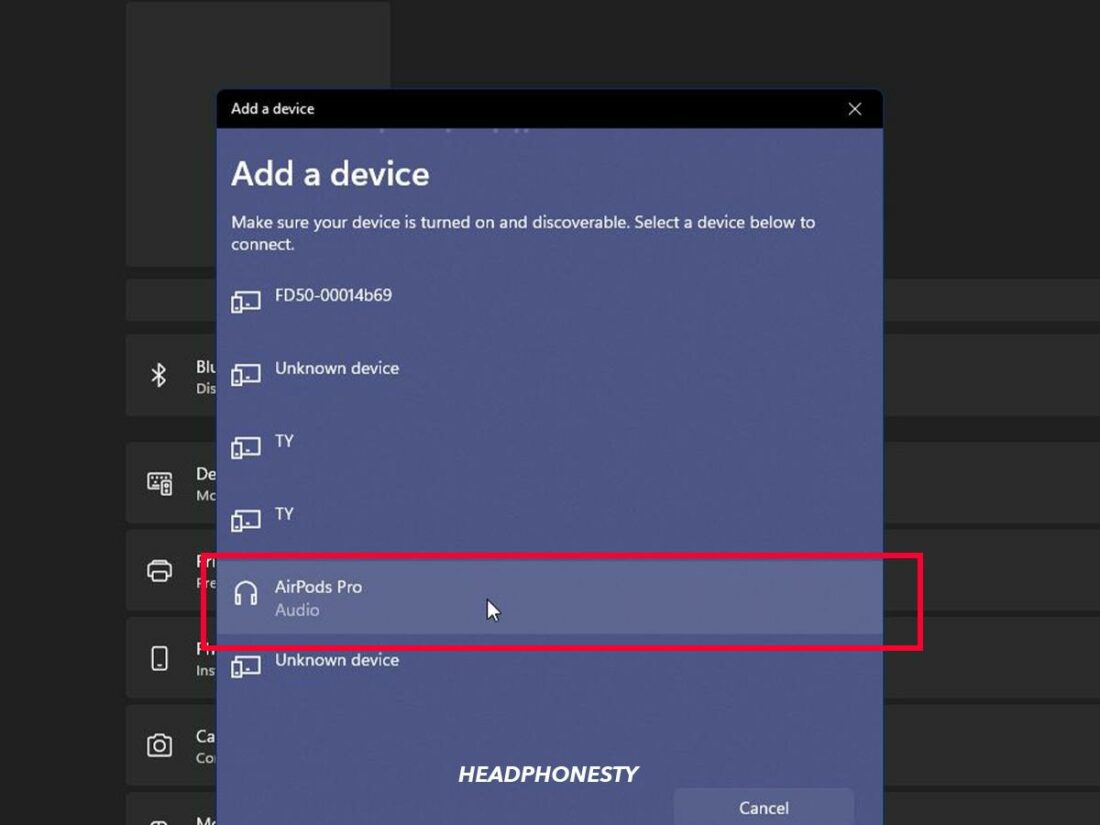
Select on Bluetooth. - You’ll see a list of Bluetooth devices within range. Select your AirPods from the list to pair them with your PC.
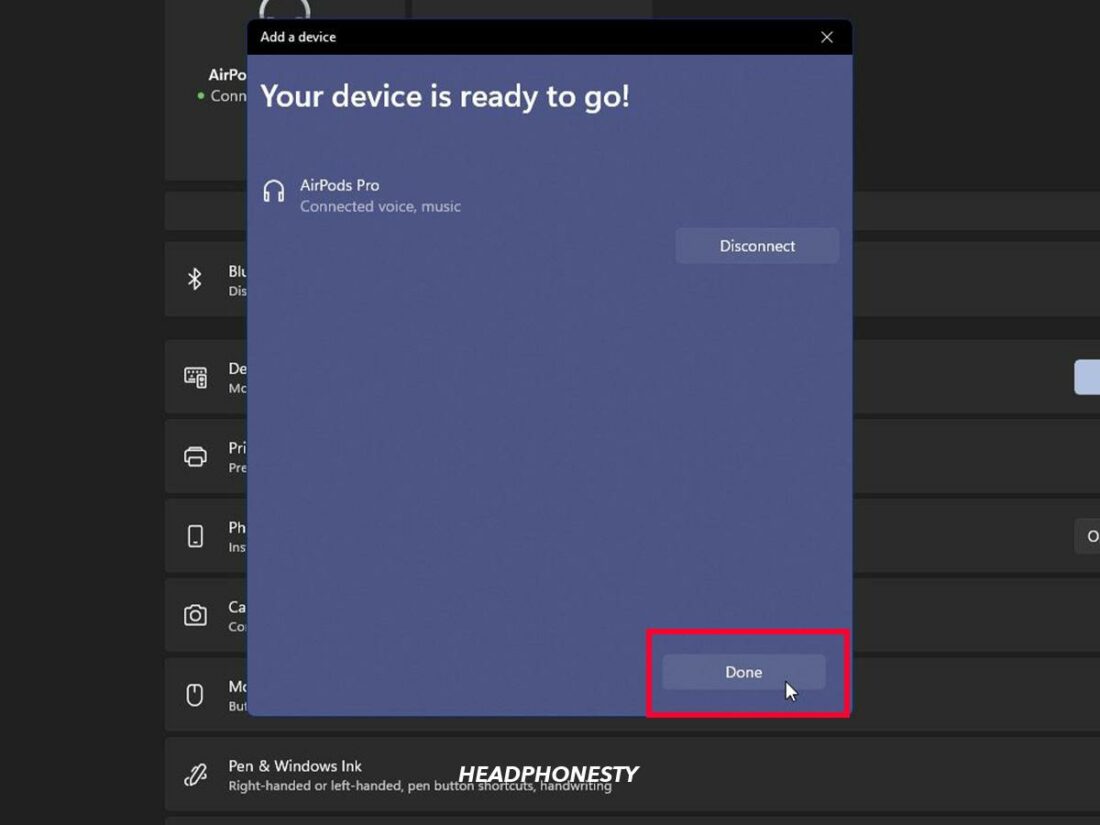
Select your Airpods from the list. - Click Done and you will receive a message indicating that your AirPods have been connected successfully.
Select the Done button after connecting the AirPods to your PC. - Now, you can remove your AirPods from their case and use them as you please.


Remember that some AirPods features might not work when you use them with a Windows laptop of PC. This includes features such as automatic in-ear detection, instant pairing, battery status display, gesture customization, and Siri.
Looking to get the most out of your AirPods? Check out our collection of AirPods tips and tricks to make your life easier.
What to Do When Your AirPods Won’t Connect to PC
AirPods can sometimes fail to connect to iPhones or other Apple devices. So it’s no surprise that there may sometimes be some issues when you try connecting them with a Windows PC.
Fret not, as we’ve rounded up the tried-and-true methods known to fix common connection issues between AirPods and Windows PCs below.
- Disconnect AirPods from Apple devices
- Run the Windows troubleshooter
- Manual troubleshooting
Disconnect AirPods from Apple devices
When you open the lid on an AirPods case, nearby Apple devices automatically pick up the signal and connect to them. This will prevent your Windows PC from initiating a pairing process since Bluetooth pairing works on a first-come-first-served basis.
That said, there’s no chance the manual pairing on Windows can beat Apple’s instant pairing speed.
If you have trouble pairing your AirPods to a Windows PC, try turning off the Bluetooth on all other nearby devices, especially Apple devices. If you need the Bluetooth on those devices to be ‘On’, try forgetting your AirPods from them or simply resetting your AirPods.
Run the Windows troubleshooter
Windows’ troubleshooter is a built-in feature that can help you detect potential causes of your Bluetooth connectivity issues. If you’re unsure what causes your AirPods to not connect to Windows, this is your best chance at identifying the problem.
Here’s how you can run the Windows troubleshooter:
- Open the Start menu.
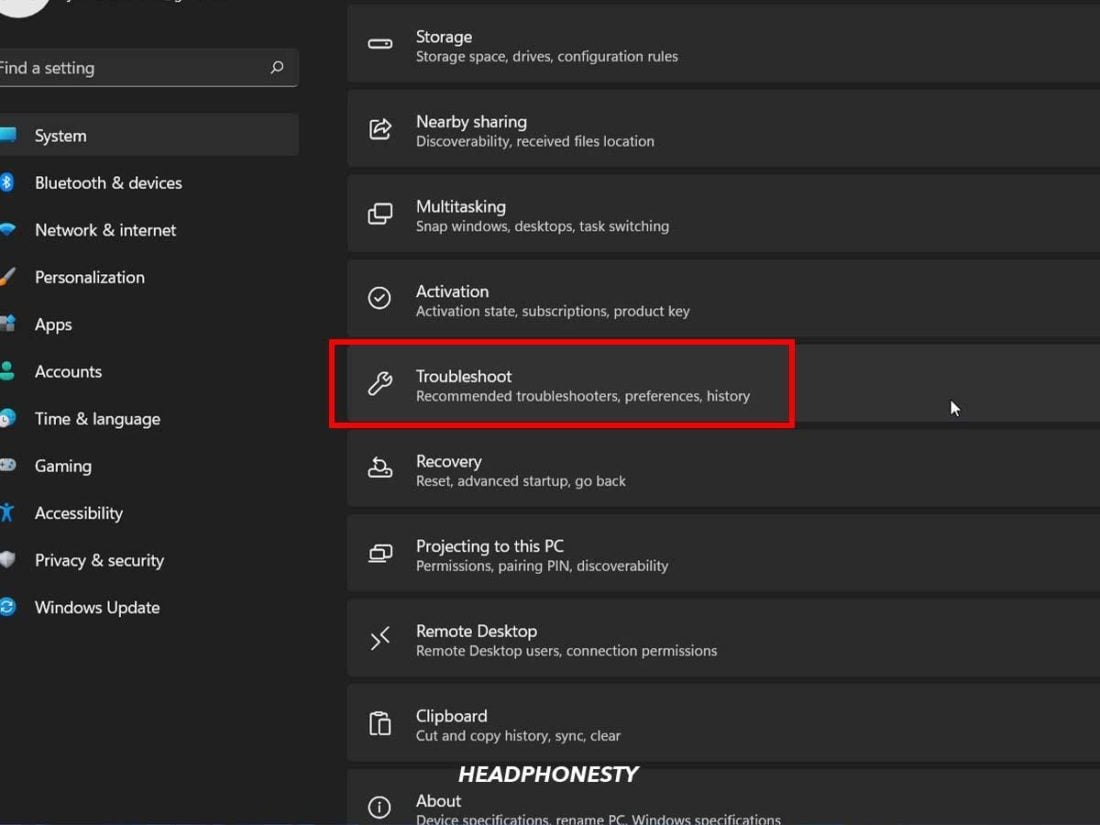
Opening Windows Start Menu - Go to Settings > Update & Security (Windows 10) or Settings > System (Windows 11) and click Troubleshoot.
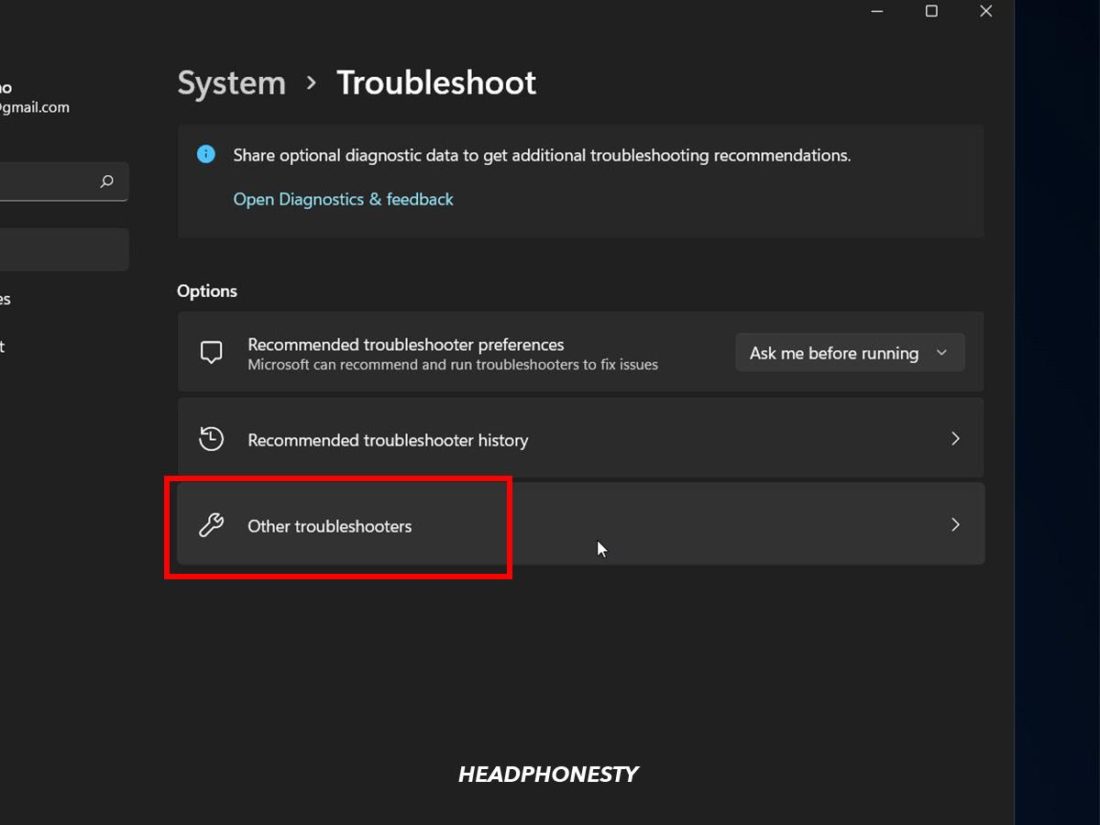
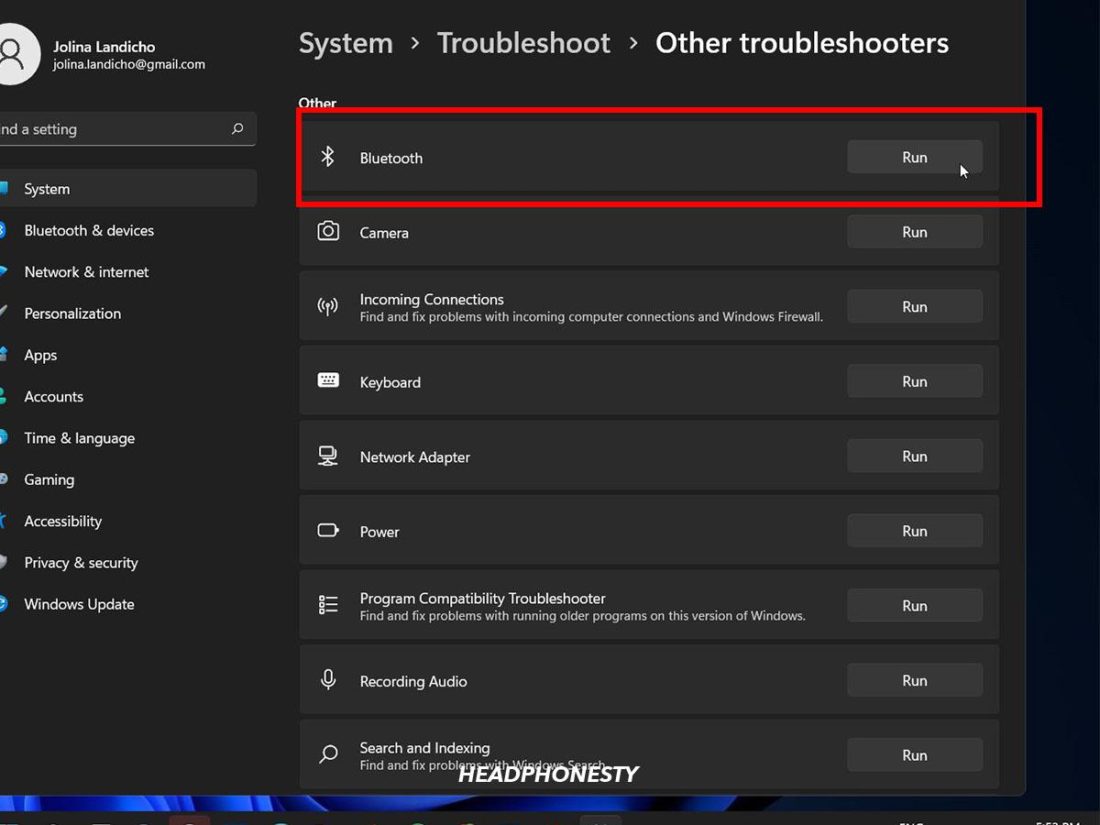
Going to Windows troubleshooter - Click on Other Troubleshooters.
Selecting Other toubleshooters - Select Bluetooth, and click Run the troubleshooter.
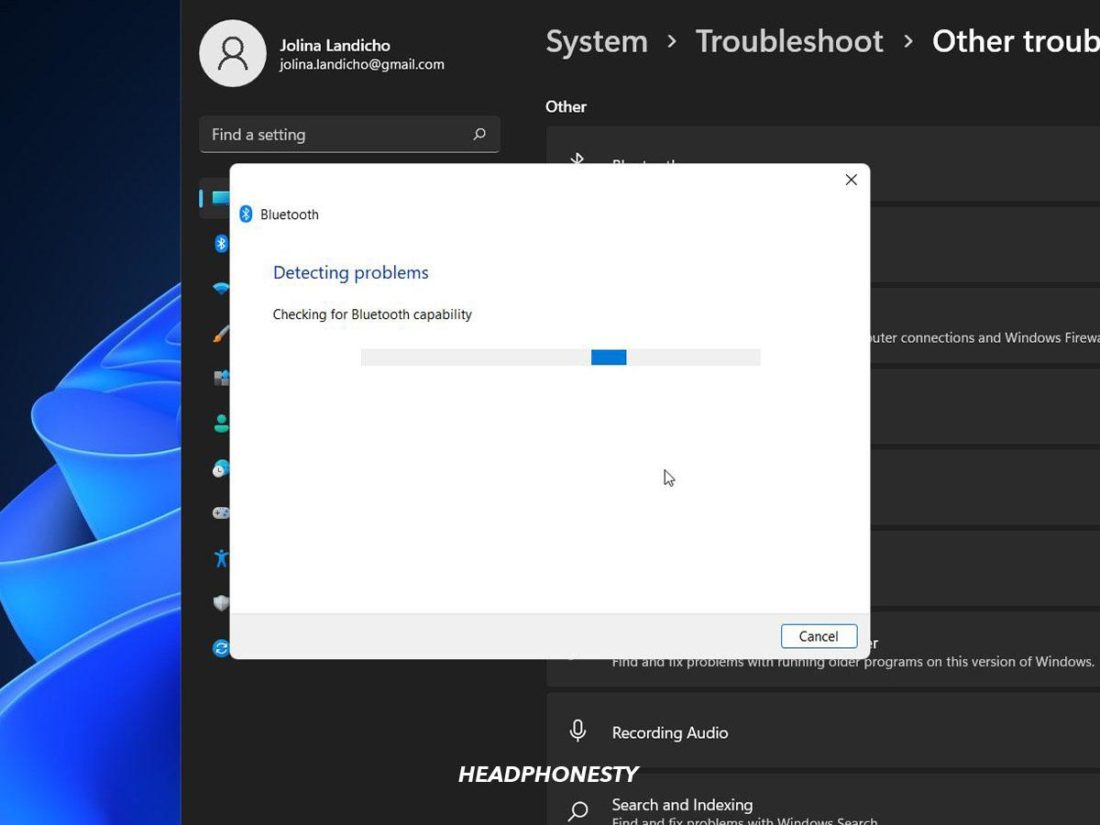
Running the troubleshooter for Windows Bluetooth - Wait for Windows to detect the potential problem.
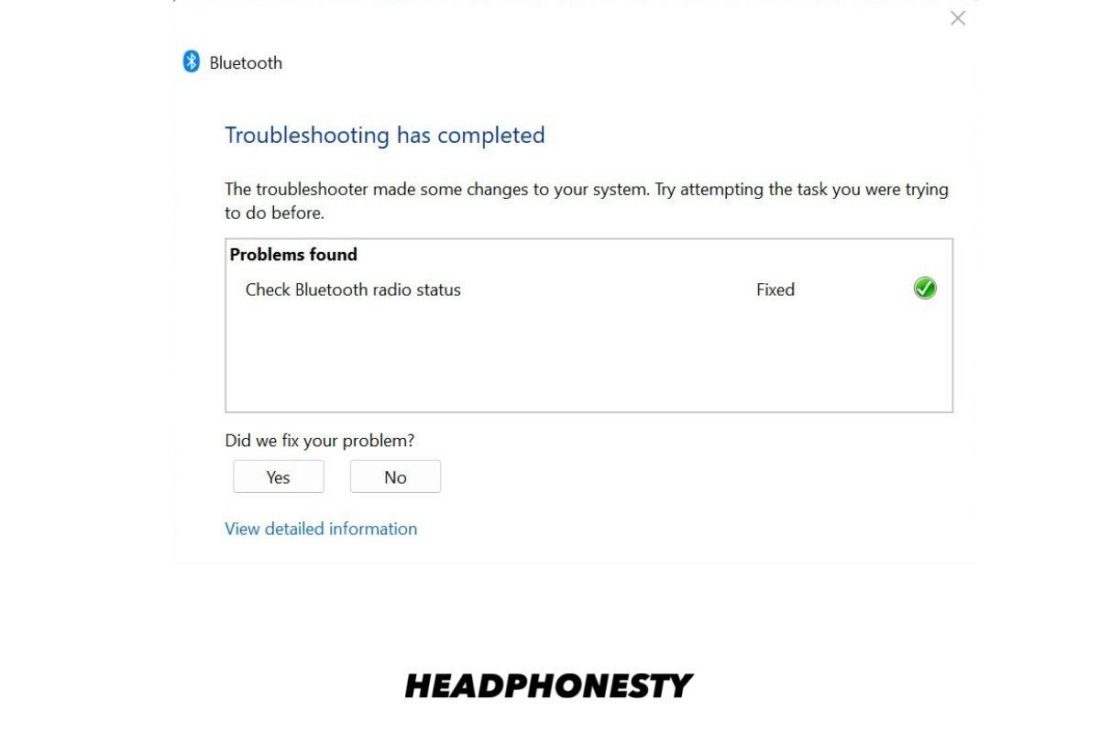
Windows Troubleshooter scanning for issues - Apply the recommended fix if necessary.

Here’s an example of a successful Bluetooth troubleshooting dialog. Yours may be different depending on the issue.
Manual troubleshooting
Windows will likely be able to find any hardware or software-related problems that cause your AirPods to not connect properly to your PC.
But in case it doesn’t, here are several manual troubleshooting measures you can try:
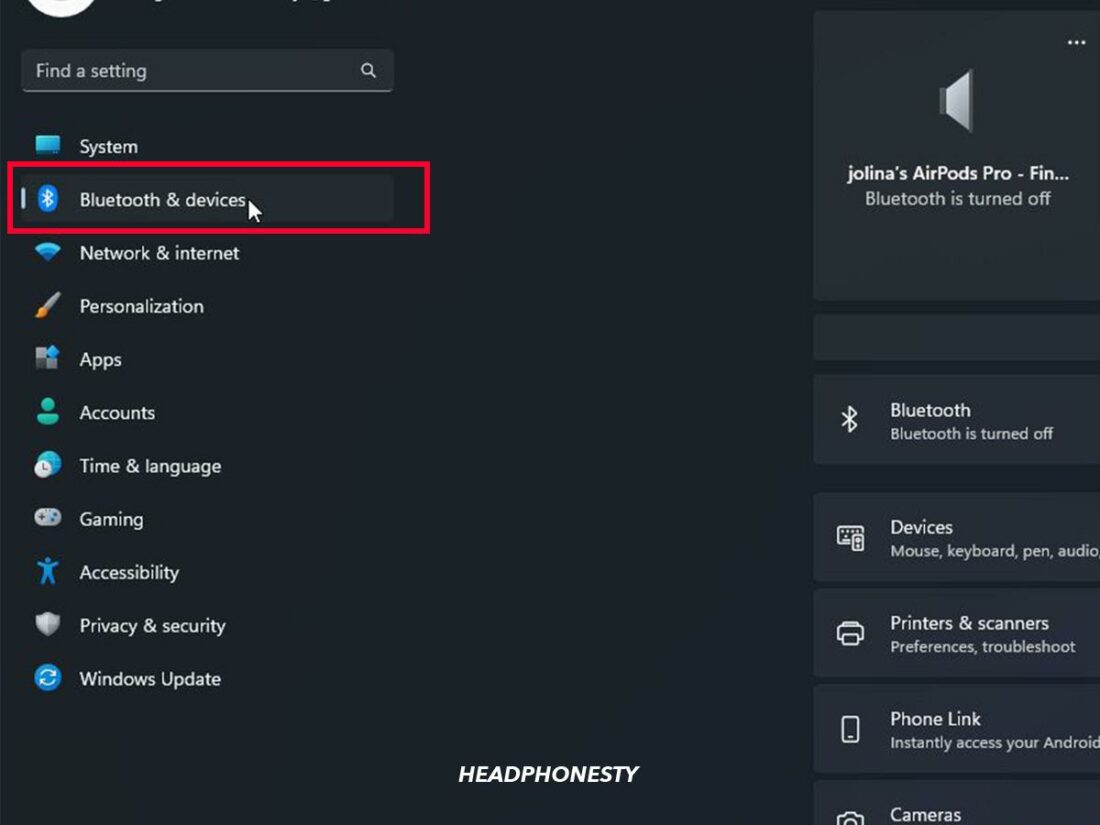
- Make sure your PC’s Bluetooth is on. You can check this in Settings > Bluetooth & Devices > Bluetooth.
- Ensure that your AirPods have enough charge and that they’ve been updated with the latest firmware.
- Check whether the Airplane mode is active. Go to Settings > Network & Internet > Airplane Mode to verify this.
- Turn Bluetooth off and on again. Go to Settings > Devices > Bluetooth & other devices > switch the slider off. Wait for a few seconds, then turn it back on.
- Update your PC’s Bluetooth driver by following this guide.
- While you’re exploring any of these troubleshooting measures, make sure your AirPods are clean and free of debris and earwax build-up, so they don’t throw up glitches when you try to connect them to your Windows computer.
When all else fails, you can always narrow down the issue by testing your AirPods with other devices.
If they work, then the problem lies with your PC or laptop. But if they don’t, there might be underlying issues with your AirPods. In that case, contact Apple support to see if you’re still under warranty and eligible for a replacement.
How to Disconnect Your AirPods From Your Windows PC
Like any other Bluetooth device, you can easily disconnect your AirPods from other devices once you’re done using them. Here’s how you can disconnect your AirPods from a Windows PC:
- Go back to Settings from the Windows start menu, then click the ‘Bluetooth & Devices’ option.
Select Bluetooth & devices. - Locate your AirPods on the top of Bluetooth & Devices the click the button with three dots.
Click on the “…” icon on the upper right corner of your device. - Click on the Remove device button.
Click on the Remove device button. - Confirm your selection by clicking Yes to remove the device.
Select Yes to remove the device.

How to Use AirPods as Headsets on PC
Once you pair your AirPods to your Windows PC, they should automatically work well as a headset, so you should be able to both talk and listen.
However, some users have noticed that they can’t use the mic when connected to a PC. This can be frustrating, especially if you rely on your AirPods for virtual work meetings.
Luckily, this only tends to happen if the computer isn’t particularly intuitive, and you can fix the problem by tweaking the Sound settings. To do so, follow these steps:
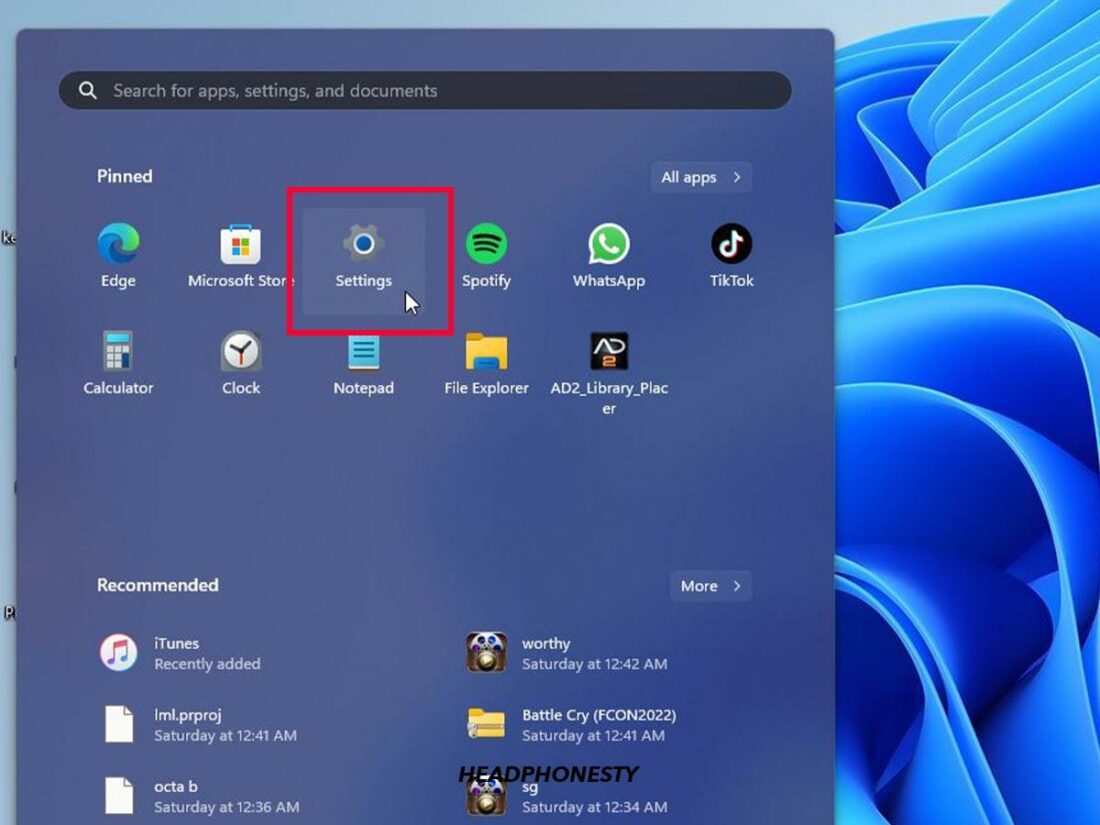
- On your Windows PC, go to the Start menu and open Settings.
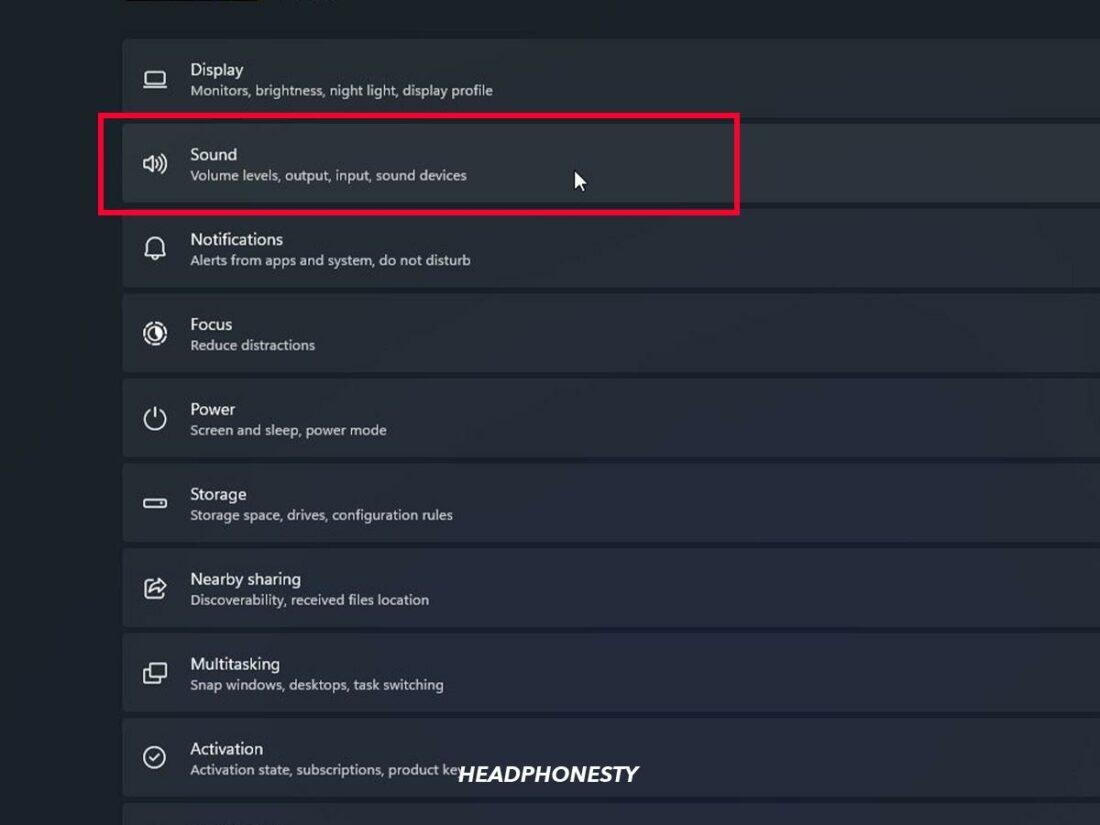
Select Settings. - Go to Sound.
Select Sound. - In the Input section, choose the AirPods as the Input device.
Choose the AirPods as the Input device
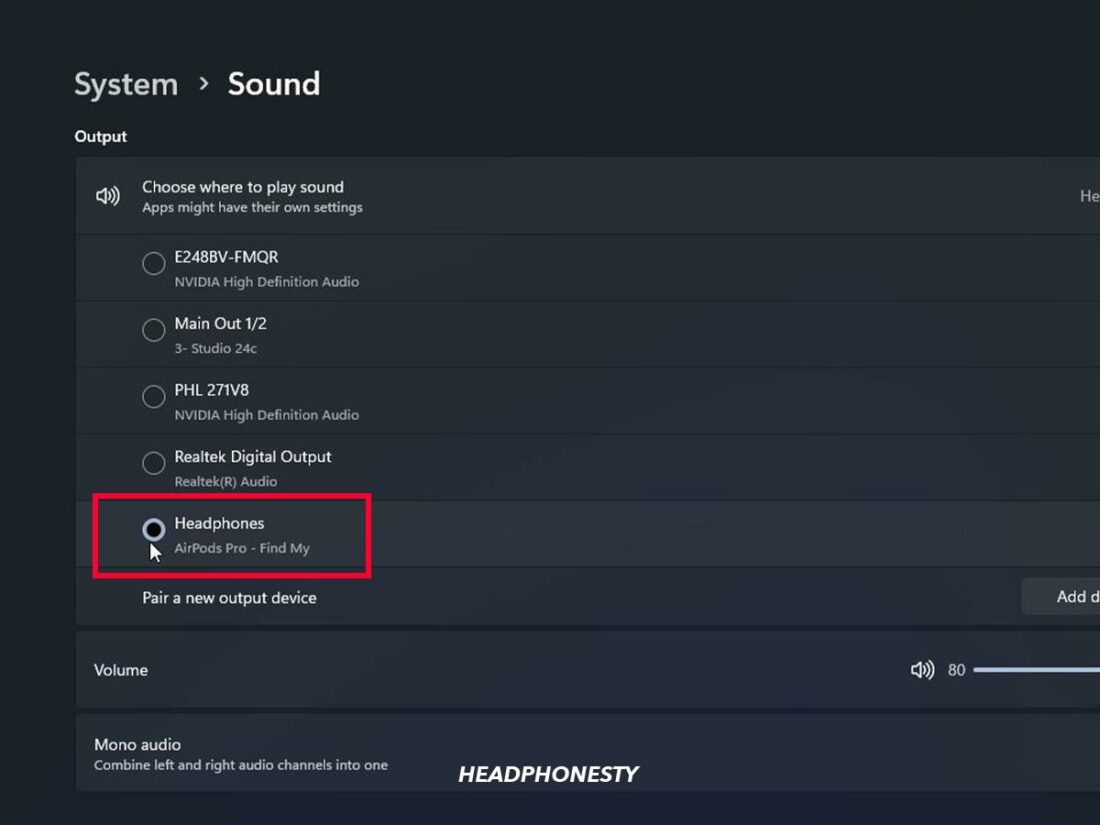
You should also make sure that the AirPods are set as the Output device if you’re using them to listen to audio.
Conclusion
By now, you should be listening to your jam or having an online meeting using AirPods with your Windows PC.
Although they work best with Apple devices, AirPods can connect to most Bluetooth-enabled devices – albeit with some features disabled.
Did you find significant issues when connecting your AirPods to a Windows PC? Or is there any step you think we missed? Let us know in the comments!