
Подскажите кто сталкивался, подключаю airpods 2 по синезубу к виндовс 10. До самого блютус передатчика в системнике максимум 40см расстояние. Звук бывает пропадает или заикается и лечится не на долго переключением с одного устройства вывода на другое в микшере windows. Пробовал обновлять драйвера, другие наушники работают без проблем. Может какие то опредленные настройки нужны или установка другого драйвера?
Intel(R) Wireless Bluetooth(R)
20.100.5.1
-
Вопрос задан
-
9537 просмотров
Пригласить эксперта
Это происходит из-за точек WIFI, как именно, пока не понятно. Если рядом лежит модем раздающий WIFI, звук начинает плавать… Должно быть фикс на аппаратном уровне, либо более новая версия блютуса.
Добрый день, была такая же проблема, мне помогло включение в настройках устройства (свойства наушников) пространственного звука (Windows Sonic) и Bass Boost в Enchancements (не знаю что конкретно помогло), но после этого наушники перестали «отклеиваться» и звук пропадать.
Добрый вечер пробуйте поменять адаптер на более высокую версию bluetooth.
Та же проблема на Win 10. В основном при просмотре видео на Youtube. Звук пропадает, но сразу возобновляется, если, например, поставить видео на паузу и снова запустить. Кто-то сталкивался? Есть решение?
-
Показать ещё
Загружается…
08 окт. 2023, в 23:50
5000 руб./за проект
08 окт. 2023, в 21:59
1000 руб./в час
08 окт. 2023, в 20:00
10000 руб./за проект
Минуточку внимания
Если подключить Bluetooth-наушники к компьютеру на macOS или ПК, звук из них может быть ужасным как у затычек из перехода за 100 рублей. От проблемы никто не застрахован, но она решается в несколько кликов.
Когда столкнулся сам, пришлось копаться по англоязычным сайтам: на русском нашёл помощь только для macOS.
Вот инструкция, что делать в обоих случаях. Поможет всем, у кого гарнитура с Bluetooth.
Наушники записывают и воспроизводят звук одновременно
В AirPods есть два режима: прослушивания и разговора. Во втором случае качество звука падает, потому что наушники работают на вход и на выход сразу.
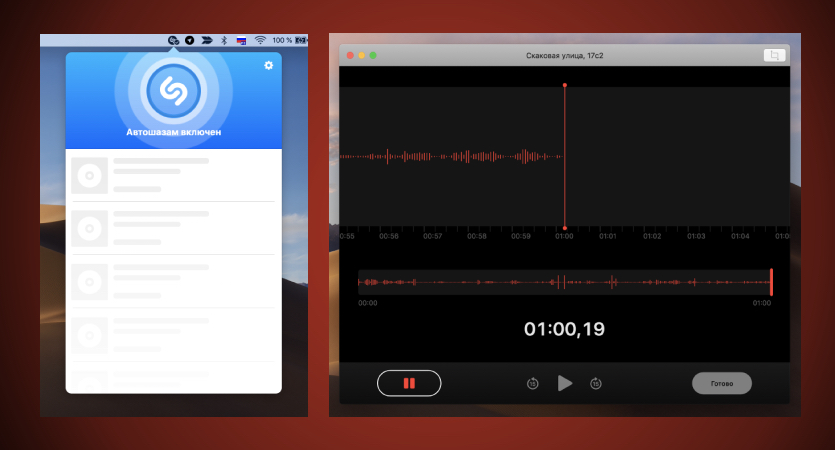
Это происходит, когда что-то прямо сейчас пытается записать звук. Например, открытый в фоне Shazam или зафиксированная запись аудиосообщения в мессенджере.
Windows 10 может прикрутить к гарнитуре дополнительный функционал вроде «телефонной связи», как отключить который опишу ниже.
Как улучшить звук AirPods (Pro) на macOS
Сверьте и закройте программы, у которых есть доступ к микрофону:
1. Выберите меню Apple () -> Системные настройки
2. Нажмите Защита и безопасноть -> Конфиденциальность
3. Щелкните в списке слева на пункт Микрофон. Справа будут программы, которые могут записывать звук. Тут ничего не меняйте
4. Выберите меню Apple () -> Завершить принудительно…
5. Закройте все открытые программы, которые есть в списке из пункта 4.
Важно. В окне Завершить пиринудительно… не отображаются все открытые приложения. Если звук всё ещё плохой, закройте программы из пункта 4 в Строке состояния macOS (где часы и заряд).
Переподключите источник вывода аудио, если закрыть программы не помогло:
1. Выберите меню Apple () -> Системные настройки
2. Нажмите Звук -> Выход
3. В списке выберите Встроенные динамики, затем снова свои AirPods.
Меню Вход в этих же настройках включает микрофон выбранного устройства. Поэтому нажатие на этот пункт сразу понижает качество воспроизводимого звука. Убедитесь, что меню закрыто.
Как улучшить звук AirPods (Pro) на Windows 10
Отключите «телефонную связь» устройства:
1. Зайдите в Панель управления. Для этого на рабочем столе нажмите Win + R -> введите «control panel» и нажмите Ок
2. Выберите Оборудование и звук -> Устройства и принтеры
3. Найдите в списке устройств ваши наушники и зайдите в их Свойства через ПКМ
4. Щелкните на Службы
5. Убедитесь, что на Беспроводная телефонная связь галочки нет
Сверьте и закройте программы, которые используют микрофон, если отключить телефонную связь не помогло:
1. Выберите Пуск -> Параметры
2. Нажмите Конфиденциальность -> Микрофон
3. Пролистайте до начала списка приложений с доступом к микрофону. Тут ничего не меняйте
4. Откройте Диспетчер задач сочетанием клавиш Ctrl + Shift + Escape
5. Закройте все открытые программы, которые есть в списке из пункта 4.
По итогу мы просто выключили микрофон
Пока это заметный недостаток технологии Bluetooth: наушники звучат отлично только до тех пор, пока есть правильные условия.
Исходящий звук будет ухудшаться во время записи, потому что меняются режимы передачи данных. Из-за этого для ПК-гарнитуры всё ещё советуют использовать проводные варианты.
После выключения программ, которые используют микрофон, ваши наушники замолчат на несколько секунд, а затем к ним вернётся качественный звук.
Если этого не случилось, не бойтесь обращаться в поддержку. Она помогает.

 (51 голосов, общий рейтинг: 4.78 из 5)
🤓 Хочешь больше? Подпишись на наш Telegram.
![]()
iPhones.ru
Ситуация с macOS описана даже у Apple, но проблемы могут быть и на обычном ПК.
- AirPods,
- AirPods 2,
- AirPods Pro,
- Apple,
- macOS,
- Windows 10
![]()
Павел
@Tinelray
У меня 4 новых года: обычный, свой, WWDC и сентябрьская презентация Apple. Последний — самый ожидаемый, и ни капли за это не стыдно.
Airpods Pro — это Bluetooth-наушники, разработанные и произведённые технологическим гигантом Apple. В первую очередь, они предназначены для всех устройств производителя, включая настольные компьютеры / ноутбуки MacOS, iPhone, iPad и т. д. Однако? многие их используют вместе с компьютерами с Windows 10.
Несмотря на то, что гарнитура отлично работает на компьютерах Mac, а также с любой системой, в которой включена функция Bluetooth (Android, Linux и т. п.), многие пользователи жалуются на плохое качество звука на ПК с Windows. Таким образом можно сделать вывод, что проблема заключается именно в конфигурации и совместимости этой системы.
Одна из основных причин, по которой возникают эти несовместимости и аналогичные проблемы с наушниками Bluetooth, связана с тем, как Windows обрабатывает эту технологию. Система настраивает два отдельных устройства — одно для наушников, а другое для гарнитуры. После подключения качество звука устанавливается на 1 канал, 16 бит, 8000 Гц, это является качеством, сравнимым с телефонной связью.
Как исправить плохое качество звука Airpods Pro в Windows
Чтобы исправить плохое качество звука Airpods Pro, необходимо зайти в настройки конфигурации Windows и сделать соответствующие изменения. Также важно отметить, что плохое качество звука может быть связано с другими проблемами на самом ПК, включая несовместимые или повреждённые звуковые драйверы, нарушенные системные файлы и другие проблемы.
Прежде чем начинать вносить правки в систему, рекомендуется выполнить диагностику специализированными программами, чтобы выявить возможные проблемы с ОС и автоматически исправить их всего за несколько минут. Ну, а далее можно приступать к ручным методам.
Способ 1. Обновите драйверы
Качество звука может сильно пострадать, если на устройстве установлены устаревшие драйверы. Поэтому сначала следует попробовать обновить звуковые и аудиодрайверы:
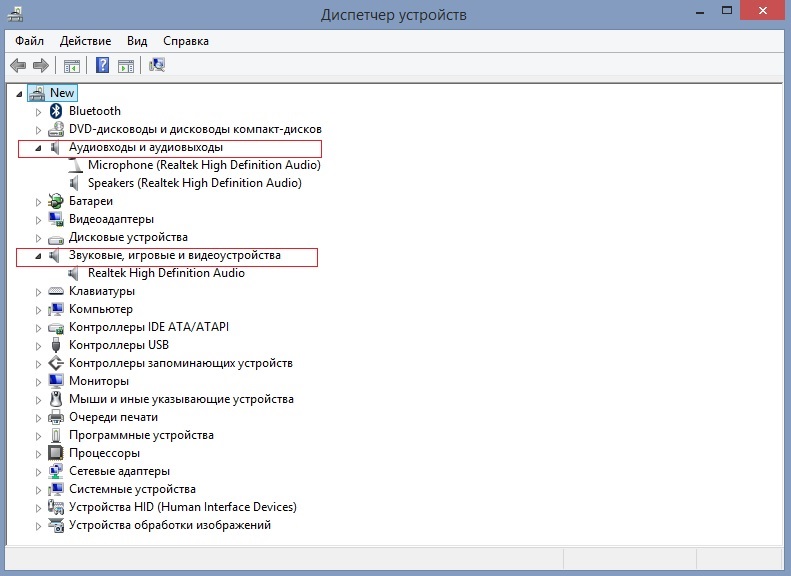
- Щелкните ПКМ по значку Пуск и выберите «Диспетчер устройств».
- В новом окне разверните раздел «Аудиовходы и аудиовыходы».
- Нажмите правой кнопкой по доступной гарнитуре и выберите «Обновить драйвер».
- Далее нажмите на пункт «Автоматический поиск драйверов» и обновите их.
- После этого разверните раздел «Звуковые, игровые и видеоустройства» и обновите драйверы тем же способом.
- Дождитесь загрузки и установки драйверов, а затем перезагрузите компьютер.
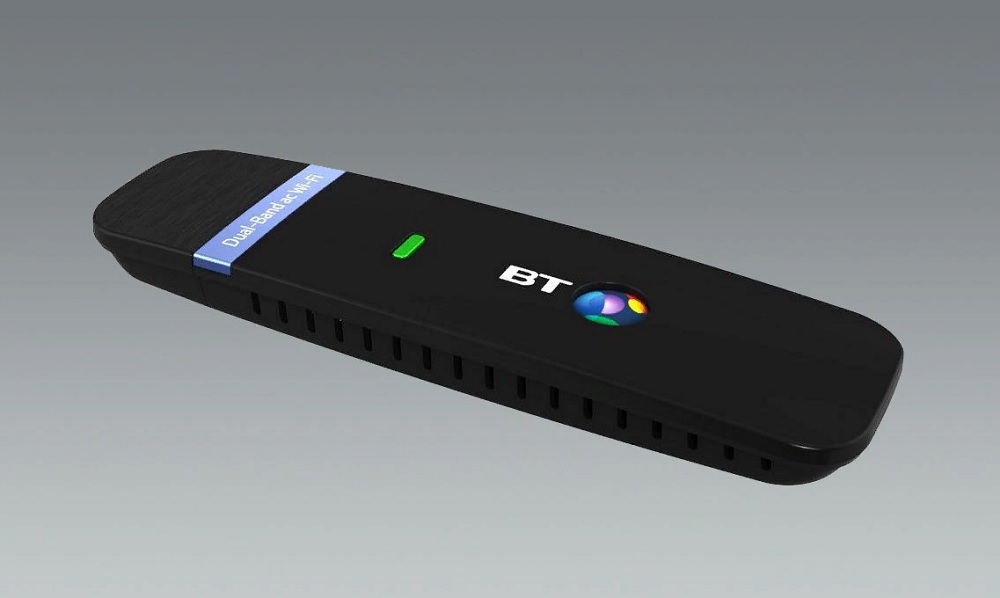
Способ 2. Используйте двухдиапазонный адаптер
Одна из основных причин плохого качества звука Airpods Pro в Windows заключается в том, как работает технология Bluetooth — она просто не обеспечивает достаточной пропускной способности для эффективной работы наушников. В этом случае может помочь двухдиапазонный адаптер — он хорошо работает с диапазонами 2,4 и 5 ГГц, обеспечивая гораздо лучшее качество передачи для вашей гарнитуры.
Проблема в том, что адаптер — это дополнительное оборудование, которое придётся покупать отдельно. Однако те, кто готов потратить немного лишних денег на удобство, будут довольны лучшим качеством звука.
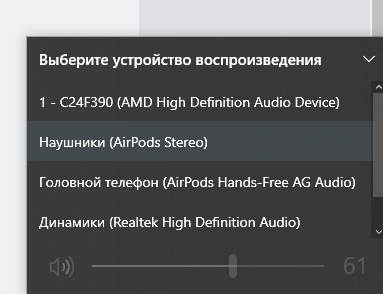
Способ 3. Установите Airpods Pro в режим наушников
Этот метод самый эффективный, хотя он не позволит вам использовать микрофон. Однако, если это не требуется, то проблема решается всего в несколько кликов. На панели задач, внизу экрана, рядом со временем и датой есть значок динамика. Щёлкнув по нему при подключённых Airpods отобразится список устройств воспроизведения:
- Гарнитура (Airpods Pro Hands-Free AG Audio)
- Наушники (AirPods Pro Stereo)
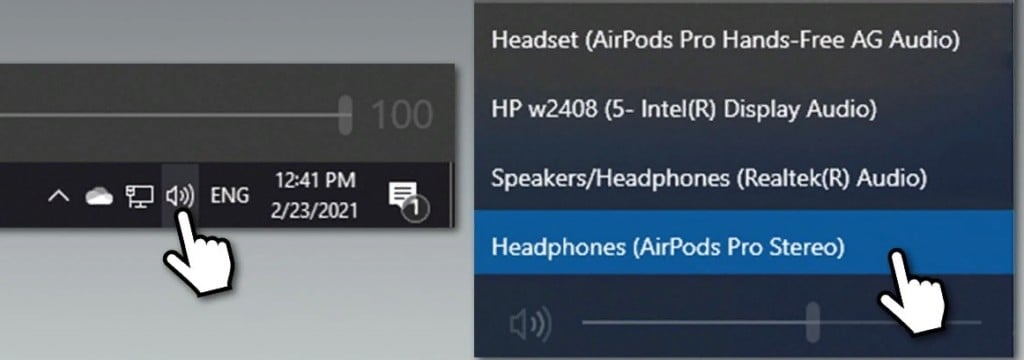
Всё, что нужно сделать, это выбрать наушники (AirPods Pro Stereo), нажав на них один раз. На случай, если понадобится микрофон, придётся подключать отдельное устройство. Также на ноутбуках есть встроенный микрофон.
Airpods are the go-to pair of earbuds if you are looking to get into the ecosystem. However, the experience is completely different when it comes to Windows. Windows 10 was notorious for the way it managed Airpods as a Bluetooth device. So have things changed? Are you still having Audio issues with Airpods on Windows 11? Then here’s all you need to know about them!
Why do I have audio issues when using Airpods on Windows 11?
Windows 11 has improved quite well when it comes to managing Airpods as a Bluetooth headset. You no longer have to switch between the headset profile and the stereo audio profile to get the best audio quality. It shows up as a single device however, things are still quite finicky when compared to the macOS or iOS experience. The OS seems to usually use multiple drivers while getting confused between each reconnect with the Airpods. Additionally, having to reconnect the Airpods from the Control Panel is still a thing however as a workaround now, you can enter the pairing mode and hit ‘Reconnect’ within the Settings app or Action Center as well. These and other reasons affecting your PC could be the reason you are facing Audio issues with Airpods on Windows 11. We recommend you use the fixes below to fix this issue on your system.
Use the first fix to ensure that everything is covered properly. As you may know, Airpods require smart switching between A2dp and hands-free which is something Windows 11 doesn’t do very well like its predecessor. Hence having everything set up according to your needs is vital and we recommend you perform the following checks before you proceed. Let’s get started.
Fix 1: Disable Telephony service (if you don’t need Mic)
We recommend you verify the audio quality currently set for Airpods. If you are happy using Airpods without the mic, then we recommend you disable the Telephony service as well (guide here).
Guide: How to disable telephony service on Airpods for better music quality
Fix 2: Restart the Bluetooth service
However, if you wish for maximum audio quality with the mic active then we recommend you restart the Bluetooth service on your PC and reconnect Airpods to get everything working by default.
The quality won’t be as good, but it’s the best you can get on Windows currently. Unlike Windows 10, you now don’t need to manually switch over your Audio device depending on what you wish to do, Windows 11 now helps do it for you. But now and then it needs a nudge, and a restart of the BT service should help do the trick.
Press Windows + R on your keyboard, type in the following, and press Enter.
services.msc
Now look for the following services, right-click on them, and hit ‘Restart’ one by one. The user Bluetooth User Support Service_NNNNN will usually show up when you have an ongoing session and probably have Airpods connected to your PC. If it does not show up, don’t worry, simply restart the other two services.
- Bluetooth Audio Gateway Service
- Bluetooth Support Service
- Bluetooth User Support Service_NNNNN
Once restarted, try reconnecting your Airpods to your PC again. Everything should now work as intended.
Fix 3: Turn off Enhanced Audio
Airpods use a single channel profile when using the headset profile and this means that you do not get good audio quality and it seems in Windows 11, it lets only a single bud be active at any given point in time.
While you might get stereo audio when watching content for the first time, connecting to a video or audio call will soon reveal things to be far more different. Airpods will default to single-channel audio and use the right one by default. You will get the option to choose which earbud you wish to use but this option doesn’t work very well depending on the app. You can find more information regarding the same, in the Video Conferencing apps section below.
Press Windows + i and click on ‘Sound’ on your right.

Now click on ‘Headphones’.

Turn on the toggle for ‘Enhance audio’ at the bottom. Try playing an audio file now and you should be able to get high res audio within Windows 11.

If not, then turn off the toggle and try again. Toggling this switch restarts background services dealing with Airpods audio enhancements which should help fix Audio issues for you.

If however, you’re still facing issues, you can try the last troubleshooting method below before re-pairing your Airpods.
We recommend you play something in the background and go back to the previous page within the Settings app. Now turn on the toggle for Mono audio.
The sound quality should now decrease on your end, we now recommend you disable this toggle again. This should re-establish a Stereo connection with your Airpods allowing you to enjoy high res audio on your device.
Fix 4: Reset Airpods
This can be inconvenient as you will have to re-pair your Airpods with every device you own however, this is a known fix for most issues that you might be having with Audio or Connection on Windows. Resetting your Airpods will allow you to start afresh and pairing them first with Windows should help get everything working as intended. Use the guide below to reset your pair and then connect it to Windows using the guide above.
Note: Make sure you remove Airpods from your PC as a device. We recommend you use the guides in this post to remove it from the Control Panel first and then subsequently from the Device Manager (if it shows up).

Resetting Airpods is a fairly simple process, place your Airpods in the case and leave it alone for a few minutes. Now come back, open the lid and hold down the Setup button at the back of your Airpods for around 15 seconds. You should then see the light flash Amber and then white. Now close the lid, enter pairing mode and try connecting them to your Windows 11 PC as a fresh device. If everything goes correctly, you should have audio and connection working on your device. You can now use the guide above to configure your Airpods as intended.
If L and R audio isn’t properly balanced:
This is a new issue that is specific to Windows 11. Unlike Windows 10, the balance shows up as correctly in Windows 11 even if it is messed up. This issue arises when Windows tries to manage your Airpods when it only detects a single bud or one of the buds runs out of battery while being connected to your PC. Unfortunately, the balance changes made to accommodate a single bud aren’t reverted in Windows 11 or maybe get reverted but aren’t reflected the next time you connect your Airpods. The best way to fix this is to simply adjust the balance according to your needs, disconnect, and reconnect the Airpods. If however, this does not work, then you will need to re-pair your Airpods to get everything working as intended. You can apply the following fixes from this guide to get this issue sorted on your system.
Fix 5: Adjust your Balance & Reconnect
Connect your Airpods to your PC and press Windows + i to open the Settings app. Now click on ‘Sound’ on your right.
Click on ‘Headphones’, they should read ‘Airpods’ beneath them.
Now play something in the background and adjust your Balance as needed for both the buds by using the sliders.

Once done, click on ‘Bluetooth and devices’ on your left.

Click on the ‘3-dot’ menu above Airpods and select ‘Disconnect’. Restart your PC for good measure at this point.

Place your AirPods in the case, close the case and leave it alone for a few minutes. Once a few minutes pass, open the case and hold down the setup button until you enter the pairing mode on your Airpods. Now go back to the ‘Bluetooth and devices’ settings on your PC and click on ‘Connect’ underneath Airpods at the top.

If everything goes well, your Airpods should now be balanced and connected to your PC. If you are still facing balance issues, then we recommend you Reset your pair of Airpods using the section in this guide. A reset is a known fix to help solve audio balance issues with Airpods on your PC.
Fix 6: Airpods and Video Conferencing services on Windows
This is quite finicky and depends on your BT driver version and whether you are using Windows 11 or Windows 10. If you are using Windows 10 then Airpods will show up as two different devices, one called ‘Airpods hands-free’ and the other called ‘Airpods stereo’. If you have the latest PC compatible with Windows 11 running the same, then in most cases Airpods will now show up as one device with smart switching already enabled. However, if you have an older BT adapter or older BT drivers then it will indeed show up as two devices on your system as well.
The trick here is to select ‘Airpods hands-free calling‘ when trying to use Airpods in video conferencing apps if you have two devices. If you have one, then you re-enable the Telephony service if you had disabled it earlier. Subsequently, you will have to increase your Mic levels to get manageable audio quality on your system. We tested the following video conferencing apps with Airpods (Gen 1) and here’s how the experience went.
We tested Google Meet first where Airpods showed up as three different devices, for both audio and video. Selecting either did absolutely nothing. The audio output and input defaulted to the right earbud and no amount of tinkering got either the input or output to switch over.
We then tested Microsoft Teams and things were similarly disappointing. Teams does a great job of automatically switching between stereo and mono audio on its own when you speak or listen, that is until it doesn’t happen too often. The mic then simply stops working and toggling the Mute button does seem to fix this after the first or second try. In the worst cases, you will have to put the buds back in the case, wait a few seconds, and wear them again to get everything working. This doesn’t sound bad, but if you’re having to do this every 10 minutes then the Airpods aren’t simply worth using. It would be better to have a single bud that works flawlessly than having two buds that rarely work. We’re sure that this is fairly new and Microsoft is looking to improve this over time.
If you are getting low volume:
If you’re getting low volume on Airpods then this is a known issue with them and there’s not much you can do about it. Airpods get dirty and clogged up with dirt quite too often. This is one of the reasons why Apple switched to the new in-ear style with the newer generations of Airpods but this issue is still prevalent. We recommend you clean your Airpods thoroughly first to try and fix this issue. Use this comprehensive guide from Apple to clean your Airpods thoroughly. Additionally, if you have compressed Air at hand, we recommend you use the same to clear out vents without pushing the dirt into the Airpods indefinitely. If you still end up facing issues after cleaning your Airpods then you can use a third-party EQ on your PC to get the audio exactly right according to your preferences. Use the section below to get you started.
Fix 6: Use 3rd party EQ
Third-party EQs will allow you to increase the Gain on your Airpods, apply filters, noise compressors, and more to get the Audio sounding exactly right. This takes some effort and tinkering on your part depending on your needs but the result is definitely worth it. We recommend you try Equalizer APO as it is completely free with tons of different tools and filters at your disposal. Use the link below to download and use Equalizer APO on your PC.
Fix 7: Use your OEM app
This isn’t a fix but more of a workaround if you are facing low audio quality, low volume, or similar issues. If you use any third-party audio enhancements app then we recommend you use the same to fine-tune your Audio output for Airpods on Windows. As discussed bandwidth and software limitations on Windows prevent you from enjoying the best possible audio quality when using AirPods.

This can be circumvented by fine-tuning your EQ, using compressors, and increasing the gain in rare cases. All of this should be possible through the OEM audio app offered by your manufacturer especially if you are using a pre-built system or a laptop. For example, Asus laptops come bundled with Sonic Studio in some cases which offers various enhancements to fine-tune your audio experience. If however, your PC does not have a dedicated app then you can use Equalizer APO instead from the link given below.
- EqualizerAPO | Download Link
Fix 8: Install Broadcomm BT drivers (if you have their hardware)
Broadcomm Bluetooth adapters were quite popular a few years ago and if you have an older system then it is probably the reason why you are facing audio issues with Airpods on your system. You will need to use a specific driver that helps solve this issue which was released by Lenovo for their devices a few years ago. This package contains .inf files for most Broadcomm adapters which is why you can use this driver on any PC. We recommend you use the link below to update your Broadcomm Bluetooth Adapter drivers.
- Broadcom Bluetooth Drivers | Download Link
If however, these drivers do not work for you then we recommend you use the oldest available Bluetooth drivers on your OEM support site. This usually ends up fixing the issue for users that have problems with the Broadcomm drivers linked above.
Fix 9: Test audio via Control panel (Troubleshoot)
We will now test the audio on your device and then troubleshoot it accordingly. Use the guides below to get you started.
This is another test that can help you identify connection issues with Airpods that might be causing issues with the audio. We recommend you use the guide below to test your Airpods and then re-pair them if you can’t hear the Test audio properly. We will also perform some basic troubleshooting to restart Windows services in the background that might be causing issues with Audio on Airpods as well. Use the guide below to get you started.
Note: Connect your Airpods and have them in your ears beforehand before proceeding with the guide below.
Launch the Start menu, search for Control Panel and launch the same from your search results.

Now click on the drop-down menu in the top right corner of your screen and select ‘Large icons’.

Click and launch the ‘Sound’ option.
Select ‘Headphones’ from the list and click on ‘Properties’ at the bottom.

Switch to the ‘Advanced’ tab by clicking on the same at the top.

Now click on ‘Test’.

Note: The Settings app seems to bug out whenever testing audio for Airpods hence we are using the Control Panel instead.
If you’re able to hear a chime in both the earbuds then everything is working as intended for your Airpods. You might be facing audio issues due to the current audio drivers on your PC or due to a third-party app. We recommend you troubleshoot your PC at this point if that is the case for you. \
We also recommend you try resetting your Bluetooth adapter if you are facing Bluetooth issues with other devices as well. If however, you are facing audio issues during the Test, then we recommend you try the following troubleshooting methods below and if nothing works, then proceed to re-pair your Airpods with Windows 11 to fix this issue.
Fix 10: Check for BT driver updates
Bluetooth exploits are quite common nowadays and apple releases multiple firmware updates for all their devices regularly as well. This means that you might be facing a driver and firmware conflict where the current firmware of your Airpods is incompatible with your older Bluetooth driver version.
We recommend you check for any driver updates or use your OEM support website to get the latest drivers for your Bluetooth Adapter. You can also check for optional driver updates within Windows 11 by going to Settings > Windows Update > Advanced options > Optional updates > Driver updates.
Fix 11: Check for Audio driver updates
We now recommend you check for Audio driver updates especially if you have a third-party sound card or integration into your system. Regular audio updates allow your adapters to be compatible with all the latest possible equipment and if you haven’t updated your drivers for some time then this is likely the reason why you are facing audio issues on your system. We recommend you check your OEM support site for updates as well as Windows updates for updates that might be related to your Audio drivers. If any are found, we recommend you install them at the earliest and restart your PC.
Fix 12: Re-connect Airpods
As you might have noticed, Airpods now efficiently reconnect to Windows 11 whenever the case is opened, however, this is only until you connect Airpods to another device. Once connected, Airpods will no longer connect with your Windows 11 device even if you have the case open and try to connect manually.
The trick here is that you need to enter pairing mode on your Airpods and then hit ‘Connect’ in the Settings app. Hold down the Setup button at the back of your Airpods with the lid open until you see a flashing white light. This means you have entered the pairing mode and you can now hit ‘Connect’ on your PC.
You won’t have to remove and re-pair Airpods every time on your PC when reconnecting, but you will have to enter pairing mode on Airpods to reconnect. In addition to this, if you do not connect Airpods to another device, then you can simply enjoy an automatic connection when you open the Airpods lid with Bluetooth turned on, on your PC.
Fix 13: Remove & Re-pair
If you are still facing Audio issues then we recommend you re-pair your Airpods to Windows 11. Use the guide below to get you started.
Launch the Start menu, search for ‘Control Panel’ and launch the same from your search results.
Click on the drop-down menu in the top right corner and select ‘Large icons’.
Now click on ‘Devices and Printers’.

Right-click on ‘Airpods’ and select ‘Remove device’.

Confirm your choice by clicking on ‘Yes’.

Wait for the device to be removed. Once removed, hit Windows + X on your keyboard and select ‘Device Manager’.

Now click on ‘View’ and the top and select ‘Show hidden devices’.

Double click on Bluetooth in the list and look for any entries related to Airpods. If you find any, right-click on it and select ‘Uninstall device’.

Click on ‘Uninstall’ again to confirm your choice.

Repeat the steps if you have any other entries related to Airpods in the Device manager, specifically under Bluetooth.
Airpods will now be removed from your device. You can now re-connect them with Windows as you normally would and disable the Telephony service to get high res audio on your device. Everything should work as intended after a re-pair.
Fix 14: Test Airpods with another device
Performing these checks will help us ensure that every device we are using is working as intended and is not facing a hardware or driver issue. If it is, then you will need to troubleshoot it first to get Airpods working with your PC. If however, everything is working as intended, then you can use the two methods below to appropriately fix your issue.
- Connect another audio output device to your PC via BT: This will verify your audio and BT drivers. If another speaker or headset can connect and deliver audio as intended then you are good to go.
- Connect Airpods to another Android or Windows PC: This is to test if audio issues are isolated only to your PC or affecting all BT non-Apple connections with the Airpods.
- Connect Airpods to an Apple device: This will help us verify the default capabilities of Airpods in its native environment. If you are getting great audio and everything is working as intended then your Airpods are probably fine.
If you fail either of these checks then you could be facing a hardware issue on the appropriate device. If Airpods have poor audio quality when connected to a macOS or iOS device as well then they are likely damaged and you will need to take them to a repair center to get everything back up and running again. If however, you pass all these checks then we recommend you use the fixes below to fix your issue.
Fix 15: Reconfirue Airpods on a Mac, iPhone or iPad, then re-pair to Windows
This is a known fix and changing the Airpods configuration and how each gesture and tap is translated seems to fix Audio and connection issues with Windows. You first need to pair your Airpods with an iOS or macOS device and then subsequently edit its conversation. We recommend changing gestures especially for unsupported features like volume control and Hey Siri. These can be finicky and Windows might not know how to address these commands which could be the reason for your Audio issues.
Once you have reconfigured Airpods we highly recommend you re-pair them to Windows 11 instead of reconnecting them. A fresh connection will not only carry over the existing configuration and customizations but also help establish a fresh connection with your PC.
We recommend you use the guide at the top to remove every instance of Airpods being paired to your PC. Once you are done, restart your PC for good measure and set up your Airpods as new. You can then use our comprehensive guide at this link to customize your experience as desired.
Fix 16: Reset PC (known fix, but the last resort!)
If by this point you haven’t fixed your Audio issues then you need to Reset your PC. This might sound a bit redundant but a Reset has been known to work for tons of Airpods users in the past. Most likely this issue stems from newer BT driver updates where older adapters are unable to keep up with the current requirements and newer devices. Another issue seems to be OEM bugs caused when issuing driver updates for Bluetooth over time. Either way, a Reset or Refresh of your PC will help reinstall all previously compatible drivers released by your OEM to solve any issues. A reset will also help remove driver conflicts and conflicting drivers which should help fix the issue on your PC. Use this comprehensive guide by us to reset your Windows 11 PC.
We hope you were able to get audio working with Airpods on Windows 11 using the guide above. If you’re still facing issues, feel free to drop more information for us in the comments section below.
If you’re encountering the AirPods connected but no sound issue, you’re alone. Many Windows 10 & 11 users complained that when they connected the AirPods to a computer, the sound comes from the speakers or there’s no sound at all. Don’t worry. We’ve put together several fixes for you to bring your earbuds back to normal.
Before getting started:
Before trying anything more complicated, you can go through the steps below to rule out some common causes.
- First, make sure your AirPods are not physically damaged and fully charged. You can simply test the hardware with a mobile phone or another Windows computer.
- Remove AirPods and pair them again.
- Restart your computer to resolve the temporary glitch of the system.
- Disconnect other audio devices from your PC to avoid potential interference.
Try these fixes:
If the basic troubleshooting doesn’t help, you may need to work on more advanced methods. You don’t have to try them all. Just work your way down the list until you find the one that does the trick.
- Check for Windows updates
- Set your AirPods as the default device
- Restart the Bluetooth Support service
- Update your Bluetooth driver
The screenshots are from Windows 10, but the fixes also apply to Windows 7, 8 and 11.
Fix 1 – Check for Windows updates
When your devices start to malfunction on PC all of a sudden, there may be something wrong with your operating system. Windows regularly push patches for new features and bug fixes, so you can install the latest updates to keep your computer in tip-top condition.
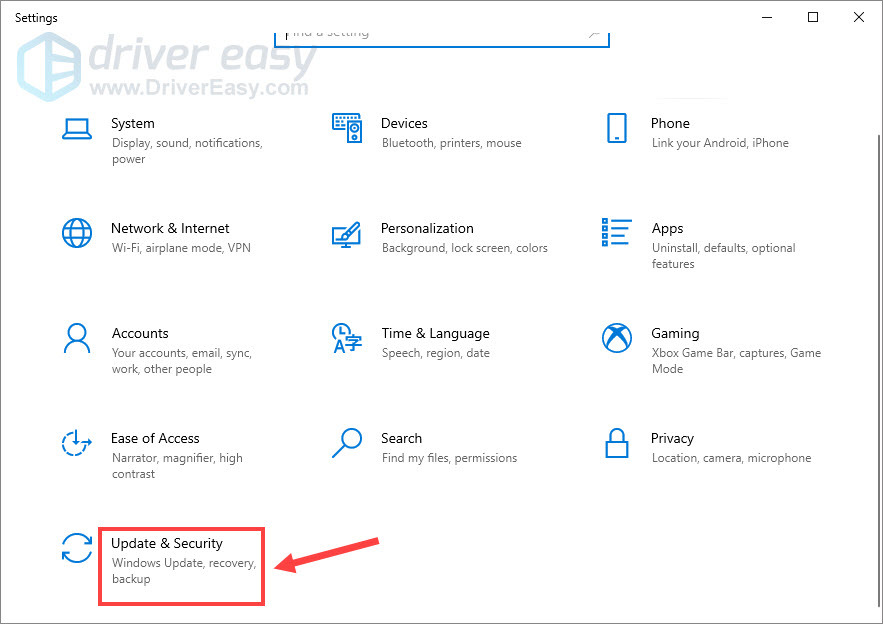
- On your keyboard, press the Windows logo key and I at the same time to open the Settings menu. Then click Update & Security.

- Click Check for updates.
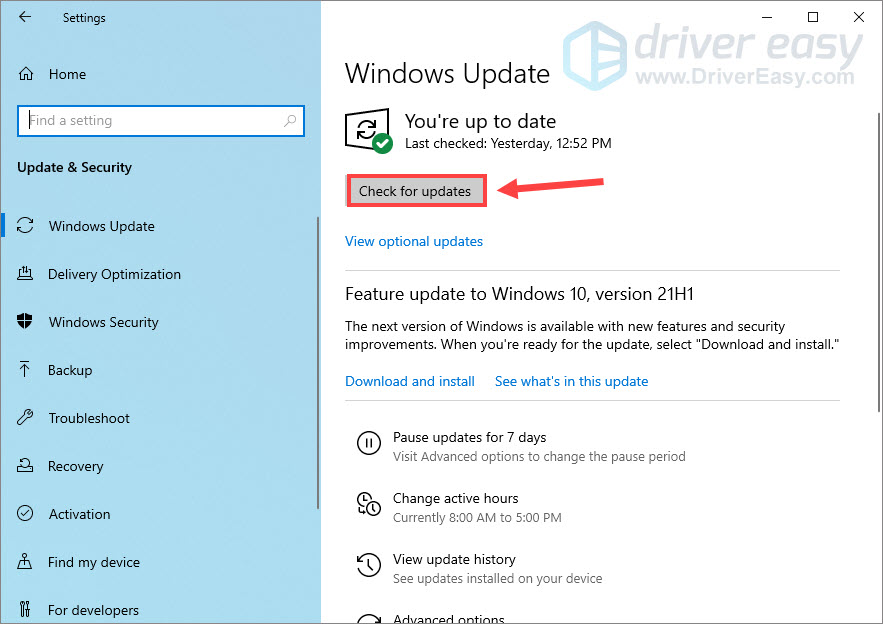
If there are any updates available, the download and installation will automatically initiate. After the process completes, restart your computer to test the issue. If it persists, move on to the second solution.
Fix 2 – Set your AirPods as the default device
To make sure your AirPods work properly at all times on Windows, you should set them as the default device. Follow the instruction to configure the settings correctly.
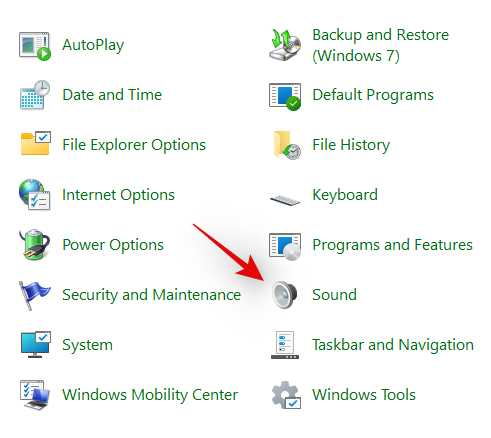
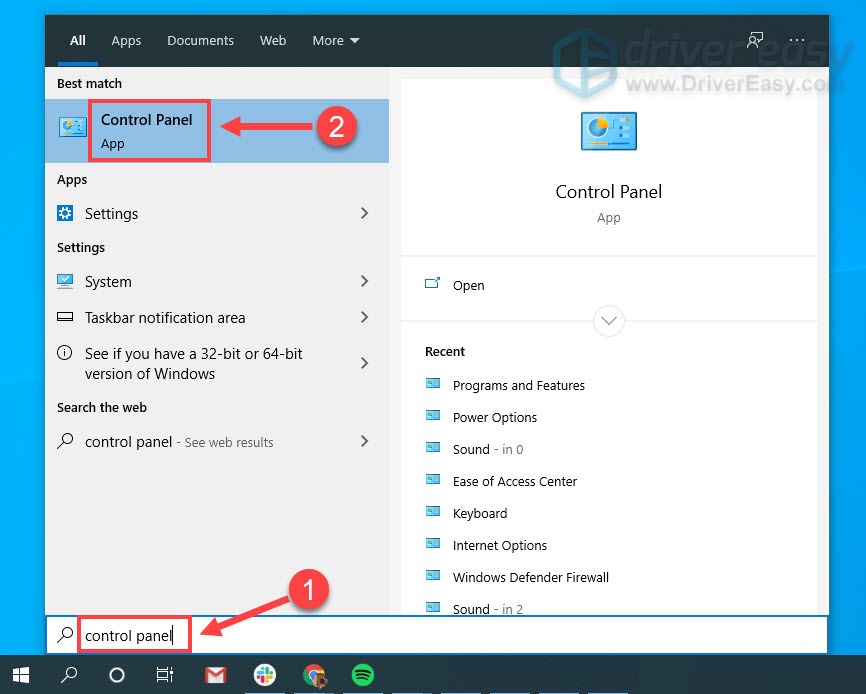
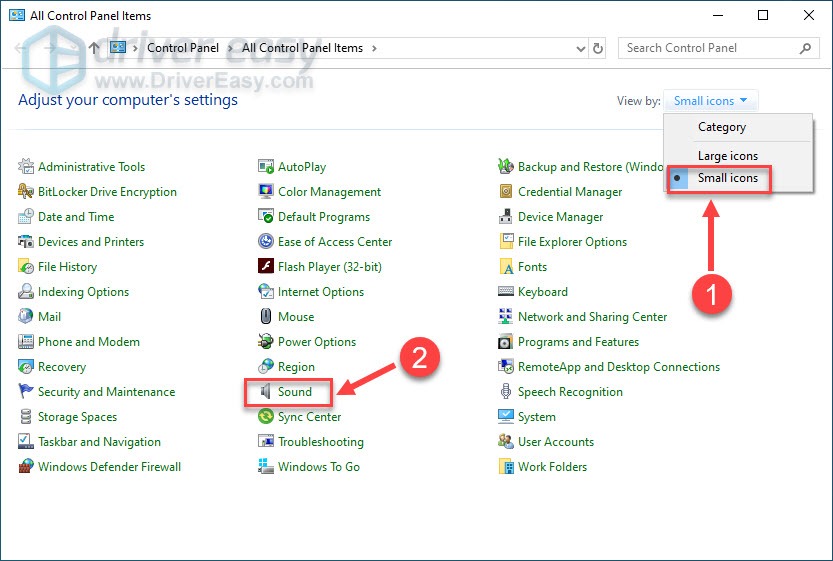
- Type control panel in the Windows search box and select Control Panel.

- Select Small icons next to View by, and click Sound.

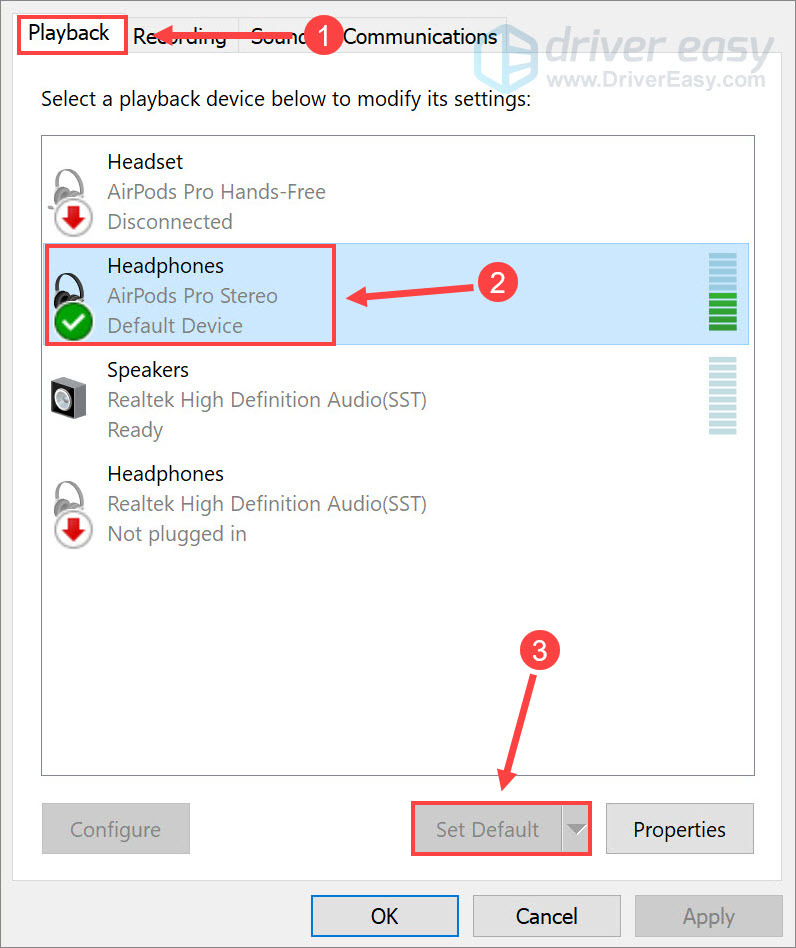
- Under the Playback tab, make sure your AirPods are enabled (there should be a green checkmark). Then click the AirPods and click Set as default.

- Navigate to the Recording tab, and also set your AirPods headset as the default device.
- Click OK to save the changes.
If the AirPods no sound issue only occurs in specific programs, you should check the in-app settings and ensure your earbuds are chosen as the primary device for both audio input and output.
Fix 3 – Restart the Bluetooth Support service
A Bluetooth headphone like AirPods will require certain services to work on your Windows PC. If the service isn’t started or running properly, there will be various problems when you’re using it.
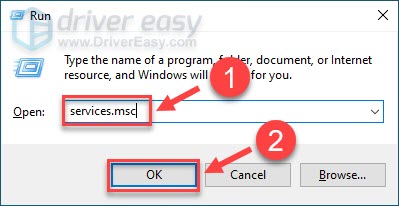
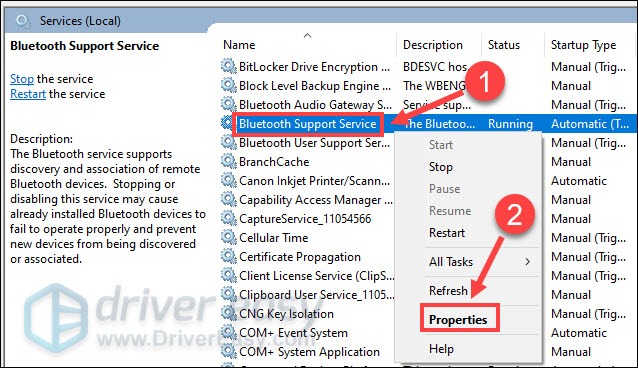
- On your keyboard, press the Windows logo key and R at the same time to invoke the Run box. Then, type services.msc, and click OK.

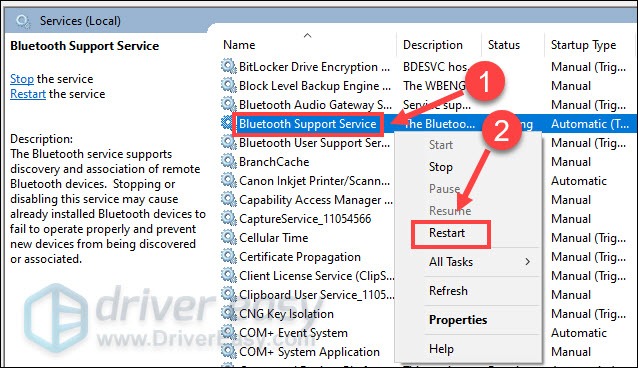
- Right-click Bluetooth Support Service. If it isn’t running, click Start; if it’s already running, click Restart.

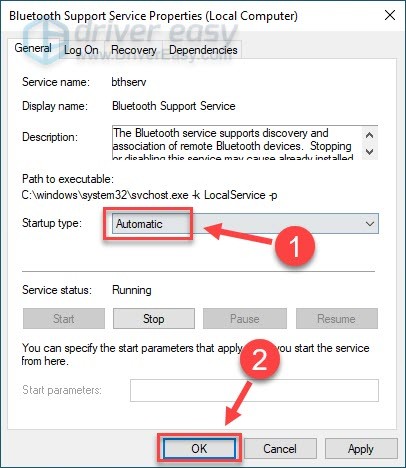
- After the service restarts, right-click it again and click Properties.
- Set the Startup type to Automatic, and click OK.

See if your AirPods play sound as normal now. If not, you should check whether the problem is related to the device drivers.
Fix 4 – Update your Bluetooth driver
Most device glitches indicate the driver issue. If you’re using an outdated or faulty Bluetooth driver, the AirPods may not produce sound and act up randomly. So you can install the latest Bluetooth driver to see if that helps your case.
There are two ways you can update the Bluetooth driver: manually or automatically.
If you’re familiar with computer hardware, first identify the manufacturer of the Bluetooth adapter, such as Intel, Qualcomm or Realtek, and visit their official websites. Then you need to download the correct driver corresponding with your specific flavor of Windows version and install it manually.
If you don’t have the time, patience or computer skills to update your Bluetooth driver manually, you can, instead, do it automatically with Driver Easy. Driver Easy will automatically recognize your system and find the correct driver for your exact Bluetooth adapter, and your Windows version, and it will download and install it correctly:
- Download and install Driver Easy.
- Run Driver Easy and click the Scan Now button. Driver Easy will then scan your computer and detect any problem drivers.

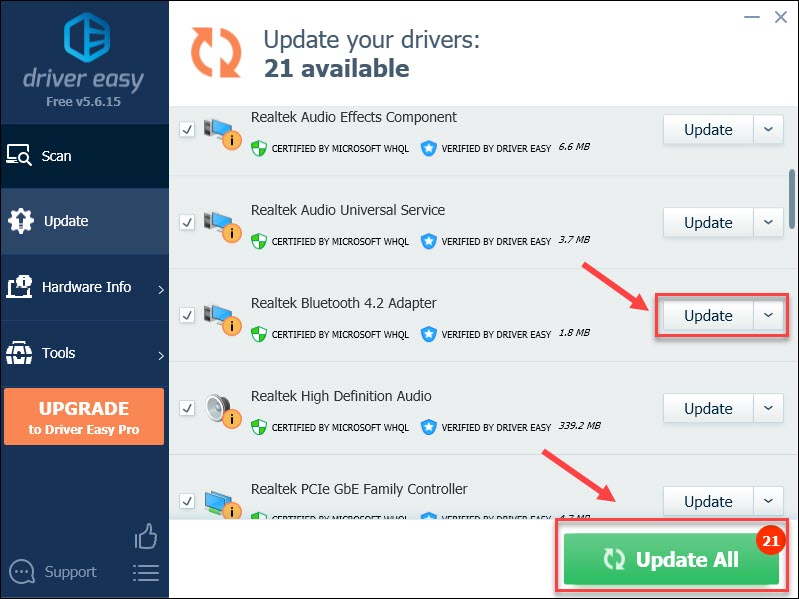
- Click the Update button next to the flagged Bluetooth driver to automatically download the correct version of that driver, then you can manually install it (you can do this with the FREE version).
Or click Update All to automatically download and install the correct version of all the drivers that are missing or out of date on your system. (This requires the Pro version which comes with full support and a 30-day money back guarantee. You’ll be prompted to upgrade when you click Update All.)


The Pro version of Driver Easy comes with full technical support.
If you need assistance, please contact Driver Easy’s support team at support@drivereasy.com.
Test your AirPods again. A driver update should recover the sound for your headphones and make the device stay in the best state.
So these are all the simple fixes for AirPods connected but no sound issue. Hopefully you’ll find them useful. If you have further questions or suggestions, please feel free to leave a comment below.
19
19 people found this helpful