На экране Дополнительные варианты загрузки вы можете запустить Windows в расширенном режиме устранения неполадок. Вы можете открыть меню, включив компьютер и нажав клавишу F8 перед запуском Windows.
Некоторые параметры, такие как безопасный режим, запускают Windows в ограниченном состоянии, когда запускаются только основные компоненты. Если при запуске в безопасном режиме проблема не возникает, то из списка возможных причин неполадки можно исключить параметры, используемые по умолчанию, основные драйверы устройств и службы. Другие варианты позволяют запустить Windows с дополнительными функциями, предназначенными для системных администраторов и ИТ-специалистов. Дополнительные сведения можно найти на веб-сайте Майкрософт для специалистов по ИТ.
Восстановление системы
Отображает список средств восстановления системы, которые можно использовать для устранения проблем, возникающих при запуске Windows, а также для запуска средств диагностики или восстановления системы. Этот вариант доступен, только если эти средства установлены на жесткий диск компьютера. Если у вас есть установочный диск Windows, то средства восстановления системы находятся на нем.
Безопасный режим
Запуск Windows с минимальным набором драйверов и служб.
Чтобы запустить Windows в безопасном режиме, выполните указанные ниже действия.
-
Удалите все гибкие диски, компакт-диски и DVD-диски с компьютера, а затем перезагрузите компьютер. Нажмите кнопку «Пуск» , щелкните стрелку рядом с кнопкой Завершение работы (или стрелку рядом с кнопкой Блокировать), а затем выберите Перезагрузка.
-
Выполните одно из следующих действий:
-
Если на компьютере установлена одна операционная система, во время перезапуска компьютера нажмите и удерживайте клавишу F8. Необходимо нажать клавишу F8 до появления логотипа Windows. Если отобразился логотип Windows, необходимо повторить попытку; для этого дождитесь появления экрана входа в систему Windows, а затем завершите работу компьютера и перезапустите его.
-
Если на компьютере установлено несколько операционных систем, с помощью клавиш со стрелками выберите операционную систему, которую вы хотите запустить в безопасном режиме, а затем нажмите клавишу F8.
-
-
На экране Дополнительные варианты загрузки с помощью клавиш со стрелками выберите необходимый вариант безопасного режима, а затем нажмите клавишу ВВОД.
-
Войдите в систему, используя учетную запись пользователя с правами администратора.
-
Безопасный режим с загрузкой сетевых драйверов. Запуск Windows в безопасном режиме, а также загрузка сетевых драйверов и служб, необходимых для доступа к Интернету или другим компьютерам в локальной сети.
-
Безопасный режим с поддержкой командной строки. Запуск Windows в безопасном режиме с окном командной строки вместо обычного интерфейса Windows. Этот вариант предназначен для ИТ-специалистов и администраторов.
-
Вести журнал загрузки. Создает файл ntbtlog.txt, в который заносятся все драйверы, установленные во время запуска. Эта информация может оказаться полезной для расширенной диагностики.
-
Включение видеорежима с низким разрешением (640 × 480). Запуск Windows с использованием текущего видеодрайвера и низкими значениями разрешения и частоты обновления изображения. Этот режим можно использовать для сброса параметров дисплея. Дополнительные сведения см. в статье «Изменение разрешения экрана».
-
Последняя удачная конфигурация (дополнительно). Запуск Windows с использованием последней успешно работавшей конфигурации реестра и драйверов.
-
Режим восстановления служб каталогов. Запуск контроллера домена Windows, на котором выполняется Active Directory, для восстановления службы каталогов. Этот вариант предназначен для ИТ-специалистов и администраторов.
-
Режим отладки. Запуск Windows в режиме расширенной диагностики, предназначенном для ИТ-специалистов и системных администраторов.
-
Отключить автоматическую перезагрузку при отказе системы. Запрет автоматического перезапуска Windows в случае сбоя в работе системы. Этот вариант следует выбирать только в том случае, если Windows вошла в цикл, когда сбой в работе системы вызывает перезапуск, и система продолжает перезапускаться снова и снова.
-
Отключить обязательную проверку подписи драйверов. Позволяет устанавливать драйверы, содержащие неправильные подписи.
-
Обычная загрузка Windows. Запуск Windows в обычном режиме.
Нужна дополнительная помощь?
Нужны дополнительные параметры?
Изучите преимущества подписки, просмотрите учебные курсы, узнайте, как защитить свое устройство и т. д.
В сообществах можно задавать вопросы и отвечать на них, отправлять отзывы и консультироваться с экспертами разных профилей.
Найдите решения распространенных проблем или получите помощь от агента поддержки.
To access the Advanced Boot Options menu, you should start by restarting your computer. Next, press the F8 key. This will allow you to choose which operating system you want to boot in safe mode. You should be logged in as an administrator before you can proceed. Sometimes, you may accidentally delete these options after a system reset or an upgrade. If this happens to you, the following steps will help you restore them.
To access the Advanced Boot Options menu, you should hold the Ctrl key down while Windows starts. Once in the Advanced Boot Options menu, you will see a series of options. Click the one you wish to start and press Enter. If you choose the Repair Your Computer option, the system will boot into a recovery-bound version of Windows. If you choose a different option, you can choose to boot your computer directly into a Command Prompt.
If you still cannot access the Advanced Boot Options menu, you must restart your computer. You may need to time your key presses to ensure that they land in the right place. Alternatively, you can press the “Continue” button to exit Advanced Boot Options. Once in the Advanced Boot Options menu, click on “Use a device” to select a boot source. The two options available are USB storage device and network boot.
If you want to start your PC in an advanced boot mode, you must have administrator rights. To do so, you must press the F8 key while restarting your computer. Once you’ve tapped the F8 key, you’ll see a menu that consists of several options. Select one of them, then click OK. The computer will reboot into that operating system. If the problem persists, try logging in as administrator.
The Advanced Boot Options dialog allows you to pick a boot device. These are designed for repair and troubleshooting purposes. The boot options list includes a minimalist Safe Mode, a recovery-bound Repair Your Computer option, and diagnostic Debugging Mode. Pressing the F8 key repeatedly may mistime the hotkey, so be cautious when you use it. But if you are determined to use Advanced Boot Options, this step will save you time and troubleshooting.
When a PC fails to start, the Advanced Boot Options menu displays and lets you choose from a variety of recovery options. While certain options may not be available, the menu should be present in the bootloader. The bootloader is the part of Windows that loads before Windows starts. This menu will allow you to launch Windows using specified parameters. Depending on which version of Windows you have installed, it will be different from one version to the next.
How Do I Get to Advanced Options While Booting?
To access the Advanced Boot Options, you need to first select your operating system. To do this, press the F8 key on your keyboard and choose your Operating System. If you’re using Windows 7, press F8 while it’s booting. This hot key may not work on every system. If you’re unsure of which key to press, tap F5 first. This will bring up the Advanced Boot Options menu.
The Advanced Boot Options menu is located in the bootloader. It will appear during the startup process of your computer. It depends on your bootloader. When you access the menu, you can choose the features you want to run. For instance, you can choose to run Windows in Safe Mode or change your BIOS settings. But in some cases, you might need to enter your BitLocker decryption key. The key is saved to your Microsoft account. So you need to get this key before accessing the Advanced Boot Options menu.
To get to Advanced Boot Options while booting Windows 7, you must access the bootloader. In some PCs, pressing F8 will open the Advanced Boot Options menu. If your PC does not have this option, you can go back to the boot selection screen by pressing F5.
How Do I Press F8 on Windows 7?
If you have a problem with your PC and are not able to access the Advanced Boot Options menu, you can bypass this step by pressing the F8 key. This will bring up the Advanced Boot Options menu, which you can use to choose which operating system to boot into when your PC does not boot normally. It is important to note that this menu may look different depending on your version of Windows. After pressing the F8 key, your PC should restart and you will be prompted to log in as the administrator.
Pressing the F8 key during a reboot will bypass the windows loading screen and bring up the Advanced Boot Options window. You may also need to select the appropriate boot partition if your PC is dual-booting, although most users won’t need to do this. You can also use the arrow keys to select options in the Advanced Boot Options window. Once you’ve highlighted an option, press “Enter” to select it.
How Do I Get to Repair Mode in Windows 7?
First, you must boot your computer into the System Recovery Environment (or “RE”) using a specific method. For Windows 7 systems, the easiest way to get to this mode is by pressing the F8 key while the computer is booting. Once you’ve reached this screen, use the arrow keys on your keyboard to choose the option “Repair Your Computer.” Once you’ve selected this option, press Enter to begin the repair process.
Once you’re in the repair menu, select Repair Mode. You’ll see a list of tools in the window, including Repair and System Image Recovery. Select the damaged operating system to begin the process of reinstalling it. Follow the instructions to start the process. If all else fails, contact the manufacturer of your computer or your network administrator. This step will allow you to troubleshoot various problems and repair them.
You must insert the Windows 7 installation disc into your computer’s DVD drive and make it the first device on the “Boot Device Order.” After inserting the disk, press the power button to boot the PC. The next screen will be a language selection screen. From here, click on “Repair Your Computer.” Once you’ve done this, the system will begin the repair process.
How Do I Boot into Automatic Repair?
If your PC is in a perpetual boot loop, you can use the fixboot command to force your computer to boot into the repair menu. This method will force your PC to boot into the repair menu, which will resolve any issues with your startup. To try fixboot, press F8 at the boot prompt. If you still encounter the same problem, try using the fixboot command to force the computer to boot again.
Firstly, make sure you have the appropriate system file repair utility installed on your PC. The System File Checker utility fixes system files using a local Windows image. Corrupted system files prevent Windows from self-repairing. You can also try the DISM tool for system file repair. You can launch DISM from the troubleshoot menu by pressing F8 during boot up. Next, choose Troubleshoot and then Startup Settings. In the Troubleshoot menu, choose Enable Safe Mode with Networking. Once this is done, you can boot into a safe mode with minimal services.
Startup repair (also known as “Automatic Repair”) is a program in Windows that can help fix common problems that prevent the computer from booting into Windows. It can repair many types of problems, including corrupted registry entries, missing system files, and corrupted boot sector files. It can even identify and fix hard disk hardware and memory errors. This is an ideal option if you’re experiencing frequent boot problems.
How Do I Boot into Safe Mode From BIOS?
If your PC is having trouble booting up, you may be wondering how to boot into Safe Mode from BIOS. The good news is that there are several ways to do it. In fact, it’s possible to fix a number of problems using Safe Mode, whether your computer’s operating system is faulty or not. The most efficient way to do this is by holding down the F8 key. By doing so, you’ll be able to access the Advanced Boot Options window and choose either Safe Mode with Networking. Depending on your situation, you may also want to try editing the registry and running a virus scan.
When you restart your PC, you’ll see a small text box with “Safe Mode” on it. If your computer has more than one operating system, click on the one you want to load in safe mode and press F8. Then, log on as an administrator, and select the safe boot option. Once the system has successfully loaded into safe mode, you can safely access Windows normally. After this, you can also choose to exit the recovery environment.
How Do I Get to Safe Mode From Command Prompt?
To boot into safe mode, you need to enter administrator credentials. You can do this by pressing F8 or by using the Ctrl+Shift+Enter shortcut keys. Once in safe mode, your PC will reboot automatically into a safe mode with networking. It will automatically check for system problems and launch a Start Scan to fix them. In case you are unfamiliar with the procedures, this article will help you out.
When in Safe Mode, Windows will load only a minimal set of services and drivers. For example, it will not load the drivers for networking devices. It will also run at the lowest graphics settings and the smallest resolution Windows can support. In this way, you may want to save time and try this method out on a PC before tackling serious problems. However, if you have no idea how to exit Safe Mode, here are three ways to get rid of it.
In Safe Mode, you can perform certain operations to repair your computer. Since your system will not load any third-party software, you can rollback drivers and do other repairs. It can also be used to fix computer crashes and the infamous blue screen of death. By following these steps, you can have your computer back up and running in no time. You don’t have to be a computer geek to learn how to get to Safe Mode from Command Prompt in Windows 7!
Learn More Here:
1.) Windows Help Center
2.) Windows – Wikipedia
3.) Windows Blog
4.) Windows Central
Если Windows 7 не может нормально загрузиться, она попробует провести восстановление системы и отобразит диалоговое окно Windows Error Recovery. В системе, на которой не установлены файлы Startup Repair, диалоговое окно Windows Error Recovery выглядит так, как показано на рисунке ниже. Для восстановления своего компьютера, вы можете использовать установочный диск Windows или диск восстановления Windows. В системе с установленными файлами Startup Repair, если ваша система не может загрузиться, в диалоговом окне «Windows Error Recovery» отображаются параметры, показанные на следующем рисунке.
Восстановление Windows 7
Если работа системы не была завершена должным образом (например, для выключения вы использовали кнопку питания), Windows Error Recovery предлагает параметры Safe Mode, Last Known Good Configuration (advanced) или Start Windows Normally.
Предложение, для восстановления ОС Windows, использовать установочный диск или диск восстановления.
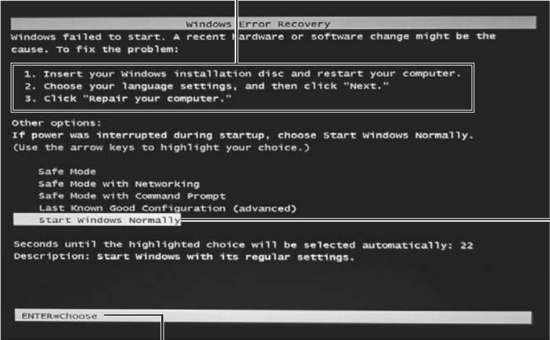
Если файлы восстановления при загрузке в системе недоступны и она не может загрузиться, Windows 7 отображает этот тип сообщения. Для выделения нужного параметра, используйте клавиши стрелка вверх и стрелка вниз.
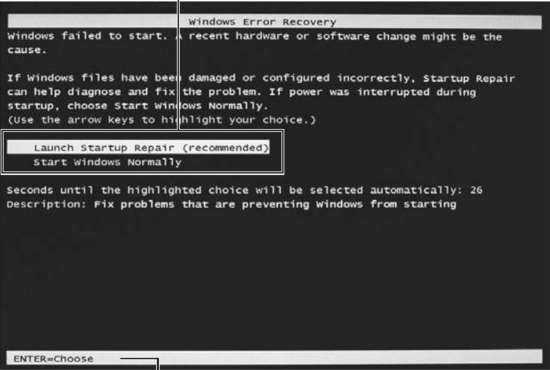
Если файлы Startup Repair доступны в не запускающейся системе, Windows 7 отображает этот тип сообщения. Предложение нажать клавишу Enter для использования выбранной опции запуска. Для выделения нужного параметра, используйте клавиши стрелка вверх и стрелка вниз.
Если вы подозреваете, что Windows работает не так хорошо, как это возможно, но Windows 7 не запускает Windows Error Recovery, вы все равно можете выбрать один из этих и других параметров, нажав при запуске, пока не появится меню расширенных параметров загрузки клавишу F8.
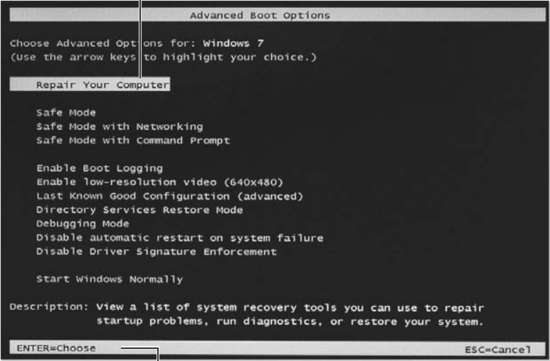
Меню дополнительных вариантов загрузки Windows 7. Предложение нажать клавишу Enter для использования выбранной опции запуска. Для выделения нужного параметра, используйте клавиши стрелка вверх и стрелка вниз.
Использование инструментов восстановления Windows 7
Доступ к инструментам восстановления Windows 7 возможен разными способами. В таблице ниже приведена краткая ссылка на эти инструменты и способы доступа к ним.
Средства восстановления системы для Windows 7
| Инструменты восстановления | Для чего использовать | Как пользоваться |
| Автоматическое восстановление системы (Startup Repair) | Восстановление системы и загрузочных файлов | Запускается по мере необходимости автоматически или может быть запущено из Recovery Environment (диск восстановления) |
| Восстановление системы (System Restore) | Сбрасывает настройки оборудования и программного обеспечения Windows на заданную дату | Recovery Environment |
| Командная строка (Command Prompt) | Использует команды для копирования или удаления файлов, изменения настроек Windows и других функций командной строки | Recovery Environment |
| Safe Mode (Безопасный режим) | Загружает основные драйверы Windows и только службы | Advanced Boot Options или Windows Error Recovery |
| Safe Mode with Networking (Безопасный режим с загрузкой сетевых драйверов) | Загружает базовые драйверы и службы Windows, а также основные сетевые службы | Advanced Boot Options (Расширенные параметры загрузки) |
| Safe Mode with Command Prompt (Безопасный режим с поддержкой командной строки) | Загружает основные драйверы и службы Windows, но загружается в командной строке | Advanced Boot Options (Расширенные параметры загрузки) |
| Last Known Good Configuration (Загрузка последней удачной конфигурации) | Загружает Windows в последней удачной конфигурации | Advanced Boot Options (Расширенные параметры загрузки) |
| Enable Boot Loggin (Включить протоколирование загрузки) | Создаёт текстовый журнал всех процессов запуска | Advanced Boot Options (Расширенные параметры загрузки) |
| Enable Low-Resolution Video (Включить видео с низким разрешением) | Загрузка Windows с использованием основного драйвера VGA | Advanced Boot Options (Расширенные параметры загрузки) |
| Disable Automatic Restart After Failure (Отключить автоматическую перезагрузку после сбоя) | Сохраняет на экране STOP ошибку (синий экран), до ручной перезагрузки системы | Advanced Boot Options (Расширенные параметры загрузки) |
| System Image Recovery (образ восстановления системы) | Восстанавливает резервную копию Windows из системного образа, на системный диск (или пустой жёсткий диск) | Recovery Environment |
| Windows Memory Diagnostic (Средства диагностики памяти Windows) | Тестирует RAM модули памяти на наличие ошибок | Recovery Environment |
/Guides /Accessing the Advanced Boot Options menu
“Advanced Boot Options” is a menu that can be displayed before Windows starts, providing access to various recovery options useful in attempting repair and recovery of damaged or incorrectly configured Windows PCs.
The “Advanced Boot Options” Menu
Depending on what version of Windows is installed, the Advanced Boot Options menu may or may not have certain options. This menu should be seen as a is part of (or an extension to) the bootloader. NTLDR or BOOTMGR present the user with the Advanced Boot Options menu and then start Windows with the correct parameters as selected. For details about all the various components of the Advanced Boot Options menu, please refer to the knowledgebase article on the Advanced Boot Options menu.
Accessing the “Advanced Boot Options” menu
It can be tricky to correctly access the Advanced Boot Options menu. Correct timing is crucial. The steps below should serve as a general guideline for gaining access to the Advanced Boot Options menu and its contents.
Instructions
Starting with a fully powered-down computer, follow the instructions below:
- Fully power down your PC and make sure it has come to a complete halt.
- Press the power button on your computer and wait for the screen with the manufacturer’s logo to finish. While the manufacturer’s logo (HP, Dell, Acer, Samsung, Toshiba, Lenovo, etc) is on the screen, your system is undergoing a self-test known as POST in which it identifies connected hardware and brings it to a functional state.
- As soon as the logo screen goes away, begin to repeatedly tap (not press and keep pressed) the F8 key on your keyboard. Important note: for some laptops you may need to also simultaneously hold down the Fn key as well.
- If the Windows loading screen shows up, then you did not tap the F8 key early enough, go back to step 1.
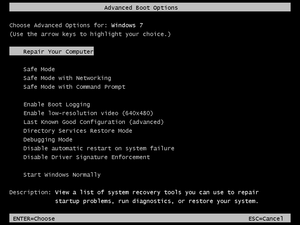
- Otherwise, you should be seeing a screen like the one pictured below, titled “Advanced Boot Options.” It may appear subtly different for older or newer versions of Windows:

Advanced Boot Options on Windows 7
Problems accessing the Advanced Boot Options menu
Some common problems when trying to access the Advanced Boot Options menu and their resolutions are mentioned below.
PC starts BIOS setup or shows a boot selection menu
You began tapping the F8 key too soon, and your BIOS interpreted it as a command to perform a certain action. Shut down your PC and try again, making sure the BIOS POST has fullycompleted before tapping the F8 key.
Windows boot screen shows up
- You did not press the F8 key in time, and Windows has begun to load normally. Restart your PC and try pressing F8 a little earlier.
- If Windows begins to load normally every time, you might need to press another key on the keyboard at the same time as F8. This commonly happens on laptop keyboards that override the F keys unless the Fn button is simultaneously pressed.
- Make sure you’re not using a wireless or Bluetooth keyboard, as many times it cannot be used to interact with the Windows boot loader (and/or the BIOS). Try again with a wired USB or PS/2 keyboard, following the instructions above.
The Advanced Boot Options menu is missing some entries
Refer to the in-depth write-up on the Advanced Boot Options menu to identify which features are available for your particular installation of Windows. Note that the “Repair My Computer” feature, in addition to only being available on Windows 7 and above, may not be available unless it was pre-installed by your PC maker.
Propose an edit
Related Articles
-
Disable Legacy Boot Mode and Enable UEFI
-
How To Reinstall Windows 10
-
Remove Dual Boot Menu – Fix for Windows
-
Windows won’t start – Guide for Windows XP, Vista, 7, 8, 10
-
Fix slow boot – Guide for Windows XP, Vista, 7, 8, 10
-
How to Reset PC BIOS/CMOS
You access the Advanced Boot Menu by pressing F8 after the BIOS power-on self-test (POST) finishes and makes a hand-off to the operating system boot loader. Follow these steps to use the Advanced Boot Options menu: Start (or restart) your computer. Press F8 to invoke the Advanced Boot Options menu.
Contents
- 1 How do I get to advanced options while booting?
- 2 How do you open Advanced BIOS Features in Windows 7?
- 3 How do I set boot options in Windows 7?
- 4 How do I get UEFI firmware settings?
- 5 How do I start Windows 7 in Safe Mode if F8 doesn’t work?
- 6 How do I boot to BIOS in Windows 7?
- 7 How do I enable UEFI in Windows 7?
- 8 Where is the BIOS settings in Windows 7?
- 9 What UEFI bootable?
- 10 Where is UEFI firmware settings in Windows 7?
- 11 How do I enable UEFI boot?
- 12 What can I use if I don’t have UEFI firmware settings?
- 13 What can I use instead of F8?
- 14 What advanced boot options?
- 15 How do I force my computer to start in Safe Mode?
- 16 How can I enter BIOS if F2 key is not working?
- 17 How do I boot into BIOS on startup?
- 18 How do I find my BIOS key?
- 19 Is Windows 7 Legacy or UEFI?
- 20 Does Windows 7 support a secure boot in UEFI?
How do I get to advanced options while booting?
If you are already at the Windows 10 desktop, getting to the Advanced Startup Options menu is easy.
- Navigate to settings. You can get there by hitting the gear icon on the Start menu.
- Click Update & security.
- Select Recovery from the menu.
- Click Restart Now.
- Click Troubleshoot.
- Click Advanced Options.
How do you open Advanced BIOS Features in Windows 7?
1) Press and hold Shift, then turn off the system. 2) Press and hold the function key on your computer that allows you to go into BIOS settings, F1, F2, F3, Esc, or Delete (please consult your PC manufacturer or go through your user manual). Then click the power button.
How do I set boot options in Windows 7?
Windows 7: Change the BIOS Boot Order
- Select Run from the start menu and type “msinfo32” into open field.
- Click OK.
- Locate the BIOS version/date entry in the items column.
- Match the BIOS version to the ones listed below to find which key to press to enter BIOS during CPU restart later.
How do I get UEFI firmware settings?
How to access UEFI (BIOS) using Settings
- Open Settings.
- Click on Update & Security.
- Click on Recovery.
- Under the “Advanced startup” section, click the Restart now button. Source: Windows Central.
- Click on Troubleshoot.
- Click on Advanced options.
- Click the UEFI Firmware settings option.
- Click the Restart button.
How do I start Windows 7 in Safe Mode if F8 doesn’t work?
Hit Win+R, type “msconfig” into the Run box, and then hit Enter to open the System Configuration tool again. Switch to the “Boot” tab, and disable the “Safe Boot” checkbox. Click “OK” and then restart your PC when you’re done.
How do I boot to BIOS in Windows 7?
Description. To enter BIOS in Windows 7, press F2 (some products are F1) rapidly and repeatedly at Lenovo logo during bootup.
How do I enable UEFI in Windows 7?
Follow these steps:
- Restart your computer.
- Press the necessary key to open UEFI/EFI. The key depends on your PC manufacturer and PC model.
- Once inside the UEFI/EFI setup menu, search for Secure Boot.
- Make sure Secure Boot is either Disabled or Off.
- Save these settings and exit the UEFI/EFI setup menu.
Where is the BIOS settings in Windows 7?
You can also find your BIOS’s version number in the System Information window. On Windows 7, 8, or 10, hit Windows+R, type “msinfo32” into the Run box, and then hit Enter. The BIOS version number is displayed on the System Summary pane. Look at the “BIOS Version/Date” field.
What UEFI bootable?
The Unified Extensible Firmware Interface (UEFI) is a publicly available specification that defines a software interface between an operating system and platform firmware.UEFI can support remote diagnostics and repair of computers, even with no operating system installed.
Where is UEFI firmware settings in Windows 7?
To access the UEFI Firmware Settings, which are the closest thing available to the typical BIOS setup screen, click the Troubleshoot tile, select Advanced Options, and select UEFI Firmware Settings. Click the Restart option afterwards and your computer will reboot into its UEFI firmware settings screen.
How do I enable UEFI boot?
Select UEFI Boot Mode or Legacy BIOS Boot Mode (BIOS)
- Access the BIOS Setup Utility.
- From the BIOS Main menu screen, select Boot.
- From the Boot screen, select UEFI/BIOS Boot Mode, and press Enter.
- Use the up and down arrows to select Legacy BIOS Boot Mode or UEFI Boot Mode, and then press Enter.
What can I use if I don’t have UEFI firmware settings?
Verify That Your PC Is Equipped With UEFI
Press the Windows Key + R to open the Run command dialog box. Type msinfo32 and press Enter to open the System Information screen.Its value should either be UEFI or Legacy. If it’s Legacy, then your PC can’t access the UEFI Firmware Settings.
What can I use instead of F8?
Press the F4 key or number 4 key on your keyboard to enter Safe Mode. You can also press the corresponding key to enter Safe Mode with Command Prompt or with Networking depending on what you want to do.
The Advanced Boot Options screen lets you start Windows in advanced troubleshooting modes. You can access the menu by turning on your computer and pressing the F8 key before Windows starts.Other options start Windows with advanced features intended for use by system administrators and IT professionals.
How do I force my computer to start in Safe Mode?
Press Windows key + R (force Windows to start into safe mode every time you reboot the PC)
- Press the Windows Key + R.
- Type msconfig in the dialog box.
- Select the Boot tab.
- Select the Safe Boot option and click Apply.
- Choose Restart to apply the changes when the System Configuration window pops up.
How can I enter BIOS if F2 key is not working?
If the F2 prompt doesn’t appear on the screen, you might not know when you should press the F2 key.
- Go to Advanced > Boot > Boot Configuration.
- In the Boot Display Config pane: Enable POST Function Hotkeys Displayed. Enable Display F2 to Enter Setup.
- Press F10 to save and exit BIOS.
How do I boot into BIOS on startup?
Method 2: Use Windows 10’s Advanced Start Menu
- Navigate to Settings.
- Click Update & Security.
- Select Recovery in the left pane.
- Click Restart now under the Advanced startup header. Your computer will reboot.
- Click Troubleshoot.
- Click Advanced options.
- Click UEFI Firmware Settings.
- Click Restart to confirm.
How do I find my BIOS key?
In order to access BIOS on a Windows PC, you must press your BIOS key set by your manufacturer which could be F10, F2, F12, F1, or DEL. If your PC goes through its power on self-test startup too quickly, you can also enter BIOS through Windows 10’s advanced start menu recovery settings.
Is Windows 7 Legacy or UEFI?
UEFI boot mode
Windows system supports UEFI from Windows 7 and Windows 8 starts to use UEFI by default. To upgrade to Windows 11, UEFI is required. UEFI supports GPT disk, which owns the following features: It supports up to 128 primary partitions.
Does Windows 7 support a secure boot in UEFI?
For secure boot to operate, UEFI boot must also be enabled. Secure boot is not supported by Windows 7. UEFI boot is supported but many IT departments prefer to leave UEFI boot disabled to preserve compatibility with operating system images. As secure boot is not supported by Windows 7, this will need to be disabled.