premiere on Windows server

New Here
,
/t5/premiere-pro-discussions/premiere-on-windows-server/td-p/10487866
May 18, 2019
May 18, 2019
Copy link to clipboard
Copied
Can the premiere be installed on windows sever system?
- Follow
- Report
Community guidelines
Be kind and respectful, give credit to the original source of content, and search for duplicates before posting.
Learn more


1
Reply
1

![]()
Community Expert
,
/t5/premiere-pro-discussions/premiere-on-windows-server/m-p/10487867#M214597
May 18, 2019
May 18, 2019
Copy link to clipboard
Copied
LATEST
You can install it on a computer which connected to a server. You could also create «Team Projects» where anyone on the server can access the projects.
- Follow
- Report
Community guidelines
Be kind and respectful, give credit to the original source of content, and search for duplicates before posting.
Learn more
![]()
![]()
![]() [Updated May 21, 2018, with more details about specifying hard drives.]
[Updated May 21, 2018, with more details about specifying hard drives.]
If you are a one-person shop, the best storage system to use for audio or video editing is a RAID that’s directly connected to your computer; this is called “Direct-Attached Storage.” The benefits of direct-attached storage are, generally, that it’s the fastest, cheapest and easiest to use.
If you are an editor in a large shop, their IT department has already configured both hardware and software to save and access both media and projects on the corporate server. The benefit to the corporate server is that all you need to do is edit, it’s someone else’s job to keep the system running.
However, if you are part of a small- to medium-sized workgroup who needs to share media between multiple editors, there has never been a better time to migrate to a server. The purpose of this article is to showcase some best practices for integrating shared storage with Premiere Pro.
NOTE: Here’s an article that covers how to integrate a server with Apple Final Cut Pro X.
SERVER BACKGROUND

Designed by Freepik
There are two types of servers: SAN and NAS. “Storage area networks (SANs) and network attached storage (NAS) both provide networked storage solutions. A NAS is a single storage device that operates on data files, while a SAN is a local network of multiple devices.” (LiveWire.com) SAN devices tend to be found in the enterprise, while NAS devices tend to be found in smaller workgroups. Also, in general, NAS devices are much less expensive than SAN systems and easier to set up.
NOTE: Servers today can include spinning hard disks, SSDs or a combination of both. For what we do, spinning hard disks (called “spinning media”) offer the best performance with the best capacity at a reasonable price. Network speeds are so slow, compared to the speed of an SSD, that we aren’t able to take advantage of the speed SSDs provide. They are best used in direct-attached storage.
When you start integrating a server into your editing workflow, you need to be concerned about four things:
- Storage capacity
- Bandwidth
- Latency
- How the NLE integrates with the server
Storage capacity is the number we are most familiar. It measures how much data the server can hold in terabytes (TB).
Bandwidth is the speed that data transfers between the computer and server. This is measured in megabytes per second.
Latency is the amount of delay between the time you press the spacebar inside your NLE and when the clip starts playing. Less latency is better, and, in general, we want it to be less than a quarter-second. (While I can’t measure the precise latency on my server, I have not found it objectionable during editing.)
The fourth point is one we’ll discuss more during this article.
NOTE: One other point, when you invest in a server, be sure to also get hard drives that are rated for NAS or server use. These tend to be 5400 rpm units, which is fine for a server. Slower speed drives still deliver great performance and they last longer than 7,200 or 10,000 rpm drives.
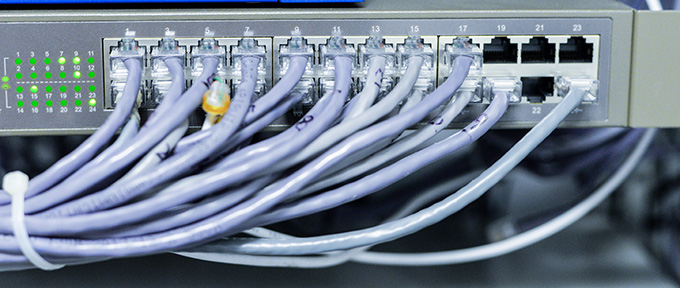
CONNECTIVITY AND BANDWIDTH

Designed by natanaelginting / Freepik
How you connect to the server has a significant impact on the bandwidth. Here are some examples:
- 100base-T Ethernet (also called Fast Ethernet) has a maximum bandwidth of about 12.5 MB/second. This is far too slow for any editing.
- 1-gigabit Ethernet has a maximum theoretical bandwidth of 125 MB/second. This is sufficient for smaller workgroups and most HD editing.
- 10-gigabit Ethernet has a maximum theoretical bandwidth of 1.25 GB/second. This is sufficient for larger workgroups and most 4K editing.
- FibreChannel, which uses fiber optic cable, can run at speeds of up to 16 GB/second, depending upon configuration. (More typically, Fibre Channel is closer to 1-4 GB/second.) This is sufficient for virtually all editing today.
To attain these speeds, three key pieces of hardware must all support the same bandwidth:
- The server
- The data switch that distributes the data between computers and servers
- The cabling between computers and switch. (1 Gigabit Ethernet requires Cat-5e cables, while 10 Gigabit Ethernet requires Cat 6a cables.)
As with all things, the faster the speed, the greater the cost. Most buildings are wired with Cat 5e cables, which makes 1 Gigabit Ethernet the default network speed for many of us.
DRIVES ARE IMPORTANT [Update]
 Designed by www.slon.pics / Freepik
It wasn’t until I published this report that I realized I left out a critical step in any server: hard drives. Most of the servers in the market ship without drives, which means we need to add them ourselves. And determining which drives to buy, I discovered, can be very confusing.
Here are some suggestions:
- When you are buying drives for a server, you need to buy “enterprise-class” or NAS drives. These are built to run continuously under heavy load, unlike consumer-grade drives.
- For direct attached storage, rotation speed is important to minimize latency. For servers, rotation speed is less important than reliability because the gating factor for speed is not the drive itself, but the Ethernet connection. For this reason, I have not seen a perceptual drop in latency using 5400 RPM drives.
- BackBlaze.com is an online storage company that, since 2013, has recorded, saved and published daily hard drive statistics from their data centers. As of the end of 2017, they have more than 91,000 drives in operation. I used this report to help me focus on which drives to buy for my server. Here’s the link to the latest report.
NOTE: Several readers took issue with my recommending 5400 RPM drives, feeling that these were too slow for media work. Instead, they recommend 7200 RPM drives, especially as the number of users on the server increases. The difference in price is minor. If I were to do this again, I’d probably get 7200 RPM drives.
These are the criteria I used to determine which drives to buy:
- The drives needed to be Enterprise class, with good ratings on BackBlaze.com
- The size of my network – five computers
- The media I’m editing – mostly HD for purposes of training
- The amount of storage I needed – about 40 TB
- My Ethernet bandwidth: 1 Gigabit
I ended up buying five Western Digital 8 TB RED NAS drives, which spin at 5400 RPM. The Western Digital 8 TB RED Pro NAS versions spin at 7200 RPM. In either case, I formatted these into a RAID 5 to provide 32 TB of online storage. They’ve been running continuously for seven months, so far, with no problems. And, I haven’t noticed any issues with latency.
NOTE: Servers should always be formatted as RAID 5 or 6, not RAID 0 or 1. Here’s an article that explains RAID levels.
A SPECIAL CONNECTION
Designed by Victor217 / Freepik
Bandwidth is fixed. For example, if I have a single Ethernet cable between the server and a 1 Gigabit switch, that means that the maximum data transfer rate is about 120 MB/second. If I have two users accessing the server at the same time, each user gets 60 MB/second (120 / 2 = 60). If three users access the server at the same time, each user gets 40 MB/second (120 / 3 = 40).
Suddenly, that single Ethernet cable become a serious bottleneck. To avoid this, many servers provide multiple Ethernet connections on the back of the server. Each connection on the back of the server acts as a separate “port,” each with its own IP address and providing the full bandwidth for that port. This allows different computers to access different ports on the server, thus avoiding the bottleneck of trying to squeeze all those data requests through a single Ethernet cable. Spreading the load decreases performance bottlenecks.
NOTE: While I could connect the server to the switch using a 10-Gigabit connection, that would require getting a new switch and additional ports on the server. When budgets are tight, that may not be a good option. Separate ports are cheaper and achieve similar results.
For example, here at the office, I’m using a NAS server from Synology. The back of the Synology has four Ethernet ports. I connect each of these to the switch then, using the switch control software, I assign a different port – with its own IP address to each connection. Now, when editor 1 needs to access the server, they use a different IP address than editor 2.
The internal bandwidth of the server is FAR faster than a single Ethernet connection, so this provides maximum performance to each member of the editorial team.
NOTE: Even though computers connect thru different ports, they all have access to the same data. This server provides file-level sharing, which is what you want for video editing, not separate volumes for each editor.
We can take this one step further using “port aggregation,” also called “port bonding” and “port doubling.” Rather than limit myself to the speed of a single Ethernet connection, I can “tie” or “bond” two of the ports together to improve the file transfer speed between the server and the switch. This means, under a heavy load, I’m using two connections to completely fill the Ethernet “pipe” between the server, the switch and my computer.
NOTE: The specific switch configuration settings vary by manufacturer and switch. Consult the user manual for guidance.
Even with this setup, I still can’t exceed the speed of 1 Gigabit Ethernet, but I can make sure it goes as fast as possible. Port aggregation combined with a server that provides multiple Ethernet ports is a very effective way to make sure your editors have the bandwidth they need.
NOTE: WiFi speeds are improving, but for video editing, I don’t recommend using a WiFi connection. Speeds fluctuate based upon the load through the wireless receiver and interference can also slow things down. If you need to edit, it is much faster and more reliable to connect a wire between the server and your computer.
HOW MUCH BANDWIDTH?
Different codecs require different amounts of bandwidth. For example:
- AVCHD 1080p/30 needs about 6 MB/second
- ProRes 422 1080p/30 needs about 36 MB/second
- ProRes 422 UHD/30 needs about 150 MB/second
NOTE: Here’s a table that goes into bandwidth requirements for a variety of codecs.
The best way to determine how much bandwidth you need is to measure it. And Activity Monitor (Utilities > Activity Monitor) is a great tool for doing exactly that.

Open Activity Monitor, then open Premiere and play a typical project. Click the Disk tab at the top of Activity Monitor and watch the graph at the bottom. Data received (in blue) shows the amount of data playing from the server to the computer. Data sent (in red) shows the amount of data being sent from the computer to the server.
In this screen shot, I’m measuring the bandwidth while playing a four image split screen in camera native format without first rendering the scene. While the bandwidth fluctuates, at its most intense, Premiere only needs 28 MB/second of data in this example. However, I’ve done other projects that need close to 80 MB/second. Every project is different and some video codecs require hundreds of megabytes per second!

These stats are from my current network, as measured using AJA System Test Lite. Given my setup of multiple server ports and port bonding, I can fully “saturate,” or fill, a 1 Gigabit Ethernet connection. While the theoretical maximum bandwidth is 125 MB/second, we can only expect about 108 – 110 MB/second in real life, due to overhead in the Ethernet protocol.
As you can see from the screen shot above, my network, switch and server support both reads and writes close to that practical maximum of 110 MB/second.

So, what video formats will this bandwidth support? A lot, actually, as you can see from this table from Blackmagic Disk Speed test. A properly configured 1-Gigabit Ethernet network can support virtually all camera native formats, frame sizes and frame rates – including all ProRes variations – up to 2K frame sizes.
NOTE: The “How Fast?” column describes the maximum frame rate supported for different frame sizes and codecs at this network bandwidth.
For frame sizes larger than HD, you will need to configure your computers and network to support 10-Gigabit Ethernet. While there are excellent 10-gig converters that connect to the Thunderbolt port on both current and older MacBook Pros and iMacs, you’ll also need to change your network cabling, switch and connections on the back of the server to support this faster protocol.
Still, though more expensive, 10-bit Ethernet provides 10 times the bandwidth of 1-Gigabit Ethernet. This allows you to support more editors from that single server or work with more complex video formats.
SHARED PROJECTS IN PREMIERE PRO CC
My workgroups tend to be small – two to three editors with a fourth computer system reserved solely for video compression.
There are two ways multiple editors can collaborate on the same project: team projects and shared projects. The big difference, editorially, between them is that with a team project, two or more editors can open the same project at the same time and both editors can make changes. With a shared project, two or more editors can open the same project at the same time, but only one editor can make changes, all other editors view the project as “read only.”
Shared projects can be created by anyone running a current version of Premiere Pro CC, while team projects require that your Creative Cloud subscription account be part of a team. Sharing occurs when another editor opens the same project at the same time. There is nothing you need to do to “share” a project, other than create it.
NOTE: Since the network requirements for both are essentially the same, here’s a video training I did that explains how Team Projects work.
When it comes to shared projects, any Premiere project can be shared between other editors on the same local network. Any project that you want to share requires that all media and projects be stored on a server, not on storage attached to local systems.

While you can use File > New > Shared Project to create a shared project, my recommendation is to create a normal Premiere project because there is no ability to specify where a Shared Project will be stored.
Shared projects are stored, as far as I can tell, in the last folder that you used to create a private project. Most often, this was a local folder. If you create a Shared Project, be sure to resave it immediately into a location that is accessible to other members of the workgroup. Specifically, you MUST save shared projects to the server.
NOTE: It is easier to create and share a standard Premiere Project than go thru the hassle of creating, then re-saving a Shared Project to move it into shared storage.
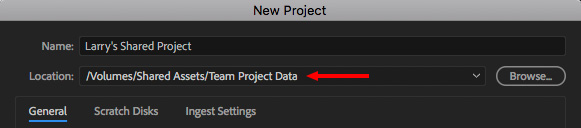
Instead, you are always better off creating stand-alone projects which can be shared anytime after they are created. Notice, this is the standard New Project dialog, except that I’m storing the project in a folder on a server, not a local hard disk.
Because shared projects assume all editors who need to view the project have access to the location where both the project and media are stored. In other words, this is designed for a workgroup of editors where all projects and media are stored on a server which everyone in the workgroup can access.
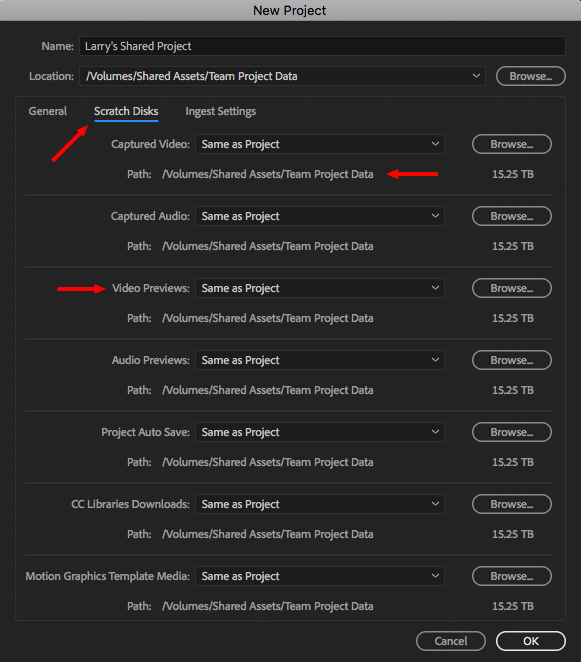
This means going to the Scratch Disks tab and making sure that key files – such as Video and Audio Previews – are stored on the server as well. While it isn’t necessary they be stored in the same folder as the project, doing so means that you can find them easily.
Also, it is a good idea to store Project Auto Saves on a different drive than the project itself simply as a protection against accidental lose or drive failure.
Once the project is created, you edit with it the same as any other Premiere project.
COLLABORATION PREFERENCES
Another BIG note is that you need to set Collaboration preferences before sharing your first project. Otherwise, chaos ensues.

There’s a new Preference pane in this version: Collaboration. While most of these options specifically refer to Team Projects, the bottom checkbox applies specifically to Shared Projects. It is unchecked by default – which is a serious mistake.
If this is NOT checked, everyone will have the ability to open any project at the same time, make whatever changes they want, then save the project. This will result in the most recent save by any editor replacing all changes from previous editors, without version control and without the ability to resolve conflicts. Oh, and it does this without warning.
This is very, very bad.
NOTE: Project locking only applies when two, or more, editors open the same project at the same time. When a single editor opens a project – regardless of whether they created it or not – they can safely make whatever changes they want.
To prevent chaos, it is important that the Project Locking preference be enabled for ALL systems that expect to create or share projects. Otherwise there is the very real risk of one editor erasing the edits of another editor.
Once Project Locking is enabled, the ability to safely review projects is very nicely implemented and a big speed boost to smaller workgroups. The first editor opening a project controls file locking.
Shared Projects should always be created with Project Locking turned on. Always. If you need more flexibility, create a Team Project.
REVIEW A SHARED PROJECT

Reviewing any project is easy. Open the Media Browser, and double-click the project you want to review.

The Dynamic Link database starts, then opens the project into the Media Browser.

You can now review both sequences and media.

Double-click a sequence to display it in the Source monitor. This also shows the sequence in the Timeline. Here you can review what’s there, as well as copy and paste clips, but not display them in the Program monitor or make changes to the Sequence in the timeline.
We’ve been able to do this for the last version or two. We aren’t really “opening” the project, we are simply reviewing it.
PROJECT LOCKING

When Project Locking is NOT turned on, or when you actually open a project when no other editor is using it, the padlock icon in the lower left corner of the Project panel lights up and turns green.
This means that you have the ability to make changes and save them. If you are the only one working on the file, this is not a problem. If you are part of a group, it can be a big problem.
BIG, BIG WARNING!! If project locking is not turned on and two editors open the same project, then EVERYONE has the ability to make changes and save them using the same file name – thus erasing all changes that were made by anyone earlier.
Again, this is generally considered bad.

When Project Locking IS turned on – remember, this needs to be done in Preferences for ALL systems, not just yours – when you open a project that someone else has open, the padlock icon turns red.
This means that you can open a project, play a project, copy media and sequences out of the project, even export the project, but NOT make any changes. If you try to make a change, whatever you attempted to do is ignored.

When you open a project that another editor has open, this message appears. However, it goes by REALLY fast. A better indicator that the project is open by someone else is the red padlock.
NOTE: If no other editor has the file open, you are able to open the file without restrictions and make changes. This system does not prevent changes, it simply prevents two editors from changing the same file at the same time.
In my tests, even when the first editor closes the file, it remains locked on the second editor’s system; the padlock is not dynamic. The way to unlock it is to click the red padlock. However, this requires that the two editors talk to each other to clarify the hand-off.
ANOTHER COOL THING

The latest version of Premiere allows multiple projects to be open at once. Here you can see at the top of the Project Panel that I have four projects open at once, with the first project locked, which allows me to review it, but not make changes.
SUMMARY
The first time you setup a server is VERY intimidating. I know, it took me a long while to figure this out. But the benefits of sharing media between multiple editors make the work worthwhile. However, once a server is setup and mounts to the desktop, using it is as easy as using any “normal hard disk.” Even better, once you understand how this system works, creating a new library takes just a few seconds.
As with all things in tech, experiment with this new workflow to see how it works before jumping into a deadline-driven paying project. And let me know what you discover or if I left anything out. There’s still a lot here for all of us to learn.
LARRY’S SERVER SYSTEM
Server: Synology 1517+ (32 TB)
Drives: Western Digital 8 TB RED (a set of 5)
Switch: Cisco SG200-18 18-port Gigabit Smart Switch
Cabling: Cat-5e
Bookmark the permalink.

- Форум
- ОБСУЖДЕНИЕ ПРОГРАММ
- ADOBE
- ADOBE PREMIERE
- Adobe Premiere Pro CC на Win Server 2008, 2012

-
28.12.2014 18:11
#1
Зарегистрированные пользователи
Статус :
- Доп. информация
Adobe Premiere Pro CC на Win Server 2008, 2012
Форумчане, кто нибудь запускал Adobe Premiere Pro CC на Win Server 2008, 2012 ?
- Доп. информация


Информация о теме
Пользователи, просматривающие эту тему
Эту тему просматривают: 1 (пользователей: 0 , гостей: 1)
Ваши права
- Вы не можете создавать новые темы
- Вы не можете отвечать в темах
- Вы не можете прикреплять вложения
- Вы не можете редактировать свои сообщения
- BB коды Вкл.
- Смайлы Вкл.
- [IMG] код Вкл.
- [VIDEO] код Вкл.
- HTML код Выкл.
Правила форума
Текущее время: 08:36. Часовой пояс GMT +5.
Powered by vBulletin® Version 4.2.3
Copyright © 2023 vBulletin Solutions, Inc. All rights reserved.
Перевод: zCarot
Forum Modifications By Marco Mamdouh
#1
![]()
OAG
-
- Участник
- 5 Сообщений:

Отправлено 31 мар 2006 — 01:03
При попытке установить Adobe Premiere Pro 2.0 на Windows Server 2003 установщик говорит что, мол, программа предназначена для Windows XP SP2 or higher… и вылетает. Это лечится? (только не надо говорить про то, что Серевер для другого предназначен — сам знаю. Но есть обстоятельства…)
-
0
- Наверх
#2
![]()
mic2001
Отправлено 31 мар 2006 — 11:41
Нет, просто программа предназначен для другой ОС, о чем прямо и заявляет.
Вопрос установки другой ОС вторым номером, похоже, не рассматривается?
P.S.: А насчет «переделки» Premiere под WinServer 2003 — оно Вам надо? Глюки, вылеты и так, думаю, могут быть, а после «переделки» — там вообще песня будет.
Не мучайте себя…
-
0
- Наверх
#3
![]()
OAG
OAG
-
- Участник
- 5 Сообщений:
Отправлено 31 мар 2006 — 19:12
Спасибо, понял.
Работа на «сервере» имеет определенные преимущества — просто есть под рукой более сильный агрегат, можно было бы удаленно заходить, работать, затем по сети забирать результаты. А так придется на десктопе — заметно более хилом.
Интересно, другие «серьезные» монтажки могут жить на Windows Server 2003, кто-нибудь пробовал?
-
0
- Наверх
#4
![]()
OAG
OAG
-
- Участник
- 5 Сообщений:
Отправлено 05 апр 2006 — 14:03
Все же, был ли у кого реальный опыт работы с Премьером под Сервером?
Способ установки описан здесь: http://aeclub.net/index.php?go=News&in=view&id=13
-
0
- Наверх
#5
![]()
mic2001
Отправлено 05 апр 2006 — 18:57
Интересно, что отзывов благодарных и восторженных пользователей, перешедших на столько удивительный способ интеграции указанной программы и WinServer 2003, по прежнему не видно.
Видимо, все-таки желание получить стабильно работающую монтажку пересиливает желание работать на глючном эксперименте…
-
0
- Наверх
![Adobe Premiere Pro 2023 23.6.0.65 [Rus + Crack]](https://iceprogs.ru/uploads/posts/2023-01/1675122794_adobe-premiere-pro-2023.jpg)
Профессиональный софт для видеомонтажа
Adobe Premiere – профессиональное программное обеспечение для монтажа видео. Приложение обеспечивает высококачественное редактирование видео разрешения 4K и выше с 32-битовым цветом, как в RGB, так и YUV цветовом пространстве.
Особенности и достоинства программы:
– Поддержка видео 4K;
– Несколько дорожек видео и аудио;
– Широкий выбор эффектов и переходов;
– Устранение шумов и работа со звуком;
– Современный импорт файлов;
– Предпросмотр видео перед рендерингом;
– Поддержка форматов видео для YouTube и смартфонов;
– Поддержка дополнительных плагинов;
– Поддержка русского языка и удобный интерфейс.
Активация Adobe Premiere:
Лечение автоматическое, установка в формате Repack.