![]() В данной статье будет подробно, в деталях, рассказано как создать нового пользователя в Microsoft SQL Server 2012 (в более старых редакциях, например в Microsoft SQL Server 2008 R2, набор действий аналогичен).
В данной статье будет подробно, в деталях, рассказано как создать нового пользователя в Microsoft SQL Server 2012 (в более старых редакциях, например в Microsoft SQL Server 2008 R2, набор действий аналогичен).
0. Оглавление
- Добавление нового пользователя
- Проверка подлинности SQL Server
- Проверка подлинности Windows
1. Добавление нового пользователя
Запускаем утилиту «SQL Server Management Studio». В Microsoft Windows server 2012 R2 ее можно найти в списке всех программ.

В Microsoft Windows Server 2008 R2 в меню «Пуск» (Start) — «Microsoft SQL Server 2012» — «Среда SQL Server Management Studio».

Вводим имя сервера, данные для авторизации и нажимаем «Соединить» (Connect).

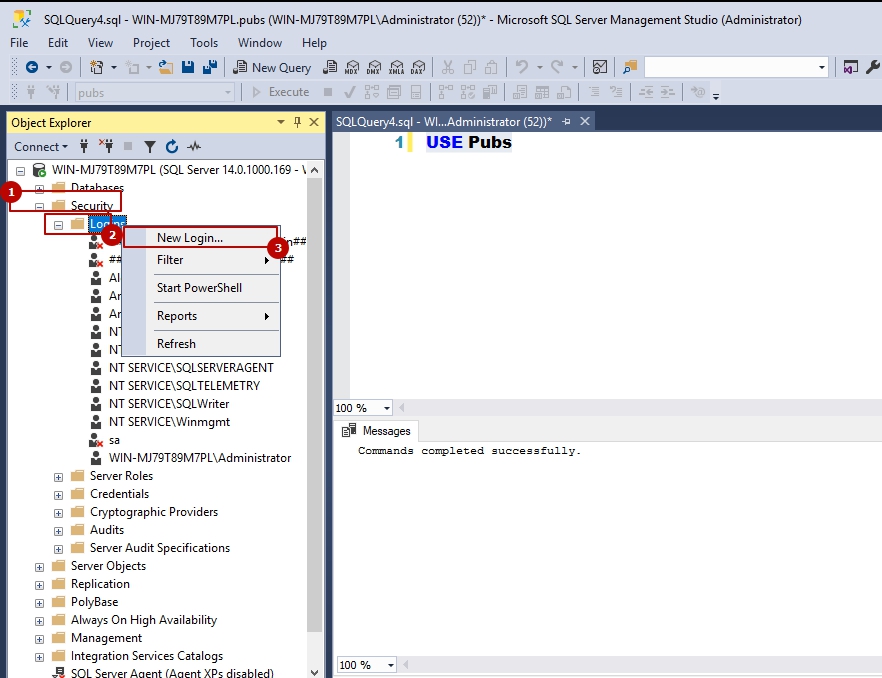
В обозревателе объектов раскрываем вкладку «Безопасность» (Security), кликаем правой кнопкой мыши по вкладке «Имена входа» (Logins) и в контекстном меню выбираем «Создать имя входа…» (New Login…)

Откроется окно создания имени входа (Login — New). Теперь необходимо определиться с вариантом аутентификации нового пользователя. Возможны 2 варианта:
- Аутентификация с помощью пароля — Проверка подлинности SQL Server (SQL Server Authentication).
- Доступ для конкретного пользователя Windows — Проверка подлинности Windows (Windows authentication).
2. Проверка подлинности SQL Server
Для начала рассмотрим первый способ аутентификации. Например, создадим пользователя для работы сервера 1С:Предприятие. Укажем имя входа (Login name), выберем «Проверка подлинности SQL Server» (SQL Server Authentication) и введем пароль (Password) пользователя. Далее снимаем / отмечаем галочки у следующих параметров:
- Требовать использование политики паролей (Enforce password policy)
- Задать срок окончания действия пароля (Enforce password expiration)
- Пользователь должен сменить пароль при следующем входе (User must change password at next login)
Для данной задачи оставляем включенным только первый параметр.
Также сразу рекомендую выбрать язык по умолчанию. Если вы используете английскую версию SQL Server, то и служебные сообщения, которые SQL Server будет передавать приложению, подключенному под данным пользователем (в данном случае программе 1С:Предприятие, следовательно и конечному пользователю, работающему в программе) будут передаваться на английском языке. Если язык по умолчанию для пользователя выбрать, например, русский, то и служебные сообщения будут передаваться на русском языке.
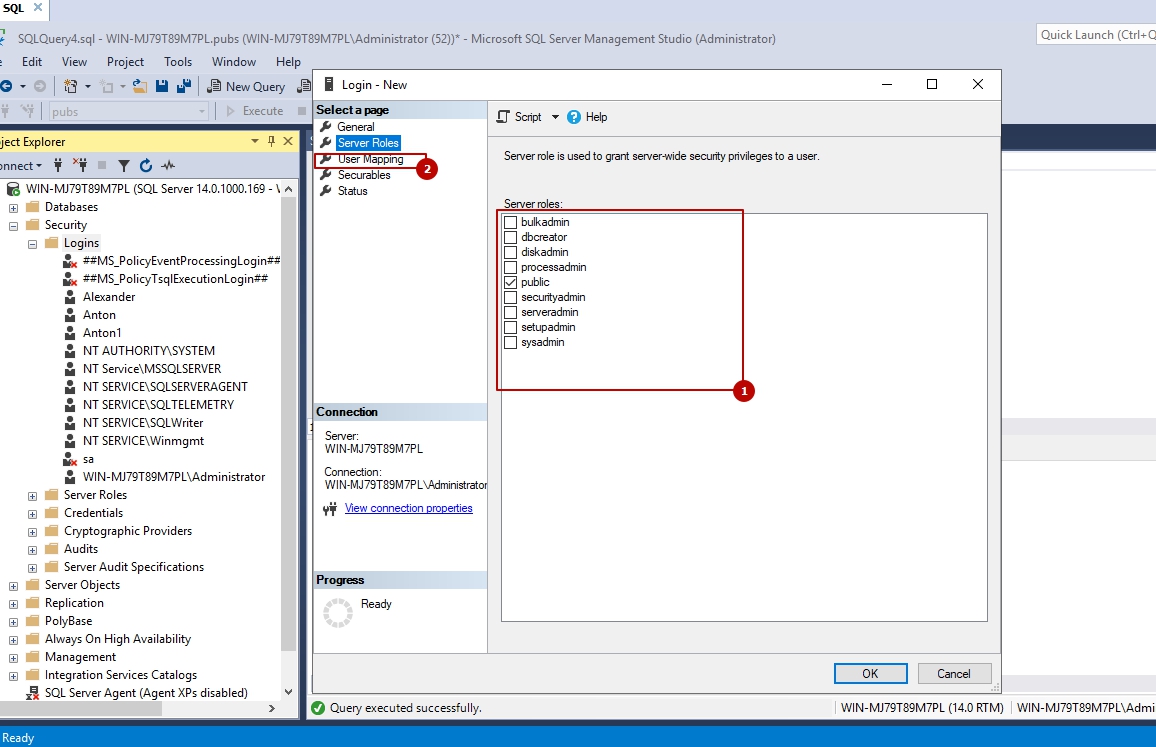
Устанавливаем необходимые параметры и переходим на вкладку «Роли сервера» (Server Roles).

Здесь выбираем набор прав добавляемого пользователя. Для этого отмечаем необходимые роли сервера. С полным описанием предопределенных ролей сервера и их возможностями можно ознакомиться здесь. Для текущей задачи выбираем:
- dbcreator
- processadmin
- public

После чего нажимаем «ОК» для сохранения выполненных действий.
3. Проверка подлинности Windows
Теперь добавим администратора SQL Server, выбрав его из текущих пользователей Windows. Для этого создадим нового пользователя и способ аутентификации укажем «Проверка подлинности Windows» (Windows authentication). Далее, чтобы ввести имя входа, нажмем «Найти» (Search…), затем «Дополнительно» (Advanced…), в следующем окне «Поиск» (Find Now) и выбрав необходимого пользователя из списка, закроем все окна нажав на «ОК».

Перейдем на вкладку «Роли сервера» (Server Roles) и в соответствии с поставленной задачей укажем роли:
- public
- sysadmin
Нажмем «ОК» для сохранения нового пользователя.

Теперь в списке имен входа среди прочих мы можем увидеть только что созданных пользователей.

-
Posted on July 25, 2009 by
There are two methods to add a user in SQL Server. One way is to do so using code (programmatically), the second way is to use the interface. First we will explore the programmatic way, then we will walk through the interface.
First of all, there are two different ways users can login to SQL Server. One is automatically using their windows accounts or (Windows Authentication), the other is by using SQL Server Authentication. When a user is created in SQL using SQL Authentication, the user will have to type in the username and password manually in order to connect.
- Windows Authentication – The user will connect to SQL Server automatically using their existing credentials without having to type in their username or password. (More Secure)
- SQL Authentication – The user will be prompted to type in the username and password manually in order to connect. (Less Secure)
Add User Using Windows Authentication
[cc lang=”sql”]
— Create user windows Authentication
CREATE LOGIN [YourDomainNameJohnJacobs] FROM WINDOWS
WITH DEFAULT_DATABASE = [YourDatabaseHere];
GO
— Now add user to database
USE YourDatabaseHere;
CREATE USER JohnJacobs FOR LOGIN [YourDomainNameJohnJacobs];
— If adding to a second database, do so below:
USE YourSecondDatabaseHere;
CREATE USER JohnJacobs FOR LOGIN [YourDomainNameJohnJacobs];
[/cc]
Add User Using SQL Authentication
[cc lang=”sql”]
— Create user for SQL Authentication
CREATE LOGIN JohnJacobs WITH PASSWORD = ‘JinGleHeimerSchmidt’
,DEFAULT_DATABASE = [YourDatabaseHere]
GO
— Now add user to database
USE YourDatabaseHere;
CREATE USER JohnJacobs FOR LOGIN JohnJacobs;
GO
— If adding to a second database, do so below:
USE YourSecondDatabaseHere;
CREATE USER JohnJacobs FOR LOGIN JohnJacobs;
[/cc]
In order to use SQL Authentication, your SQL Server Instance must be set to Mixed Mode Authentication
The first step of creating a login only gets the user into the front gate of the community of databases. In order to get them into the databases themselves, you must create a user (tied to that login) for each of the databases they will access.
The next step is to add the user to a role.
Or you can view the entire Add User Script.
На первый взгляд, в MS SQL нестандартная система учетных записей. В ней существуют логины и пользователи.
Логины — это понятие всего сервера SQL. У них могут быть права на какие-то административные задачи (например бэкап). Им можно дать права на какие-то действия с базой или таблицой. Для того что бы у логина были права на базу на основе него создается пользователь. Они могут быть как SQL логином, так и созданные на основе существующих пользователя Windows или AD. Например тот пользователь, который устанавливал MS SQL так же добавился в список логинов. Рекомендуется использовать логины на основе Windows или AD, а не SQL логины.
Пользователи — это понятие в рамках одной базы. Им нельзя дать права по административной части, но можно дать права на работу с базой.
Оба типа учетных записи можно создать как в графике, так и с помощью запроса T-SQL
T-SQL CREATE USER, CREATE LOGIN
Перейдем в базу данных, в которой мы работаем:
USE pubsДля создания логина SQL выполним:
CREATE LOGIN Anton WITH PASSWORD='Password1910'Anton — имя логина. Password1910 — пароль. У этого логина уже будут права на вход.
Посмотреть что этот логин создался можно так:
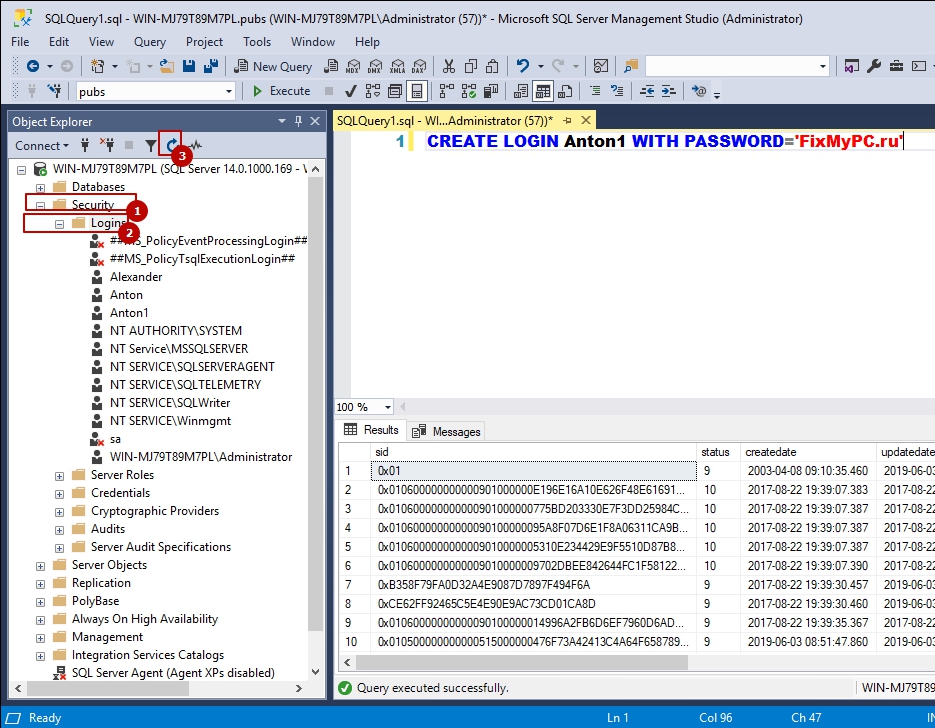
Под номером 3 — это кнопка обновления. Может понадобится т.к. в графике изменения происходят не моментально.
Для создания пользователя привязанного к логину нужно выполнить:
CREATE USER AntonUser FOR LOGIN AntonОтмечу, что пользователь создасться в той базе, откуда мы выполняем запрос.
Что бы просто создать пользователя нужно:
CREATE USER JustUser WITHOUT LOGINГде JustUser — просто пользователь
Созданных пользователей можно увидеть так:
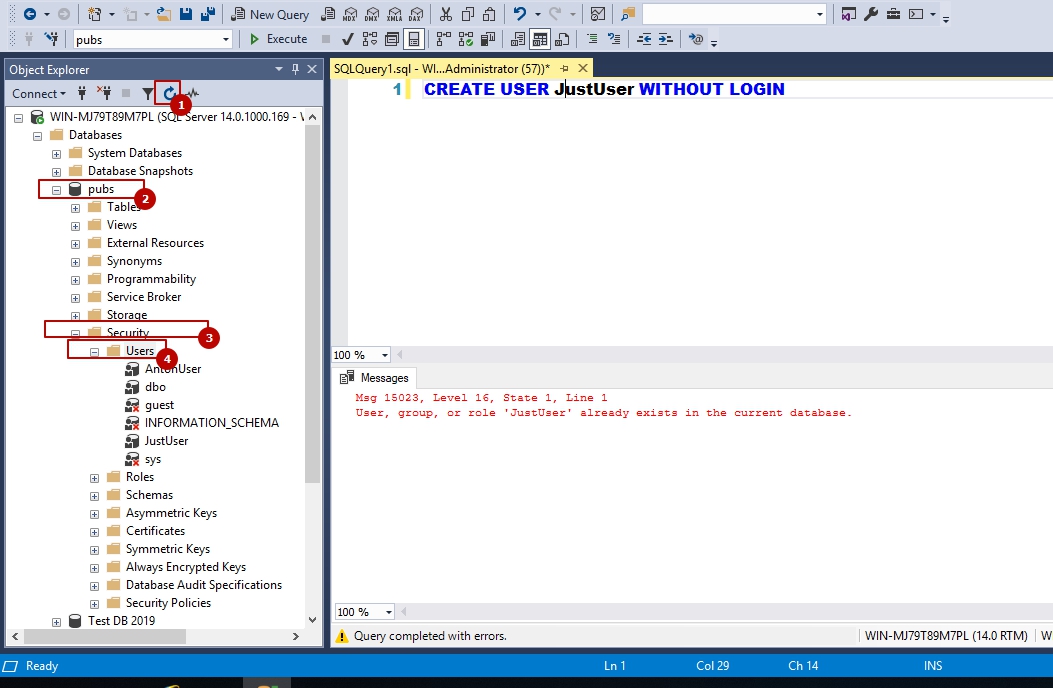
Пользователи создаются без каких либо прав на базу.
T-SQL GRANT
GRANT в пер. «Разрешение» дает права на какое-то действие.
Что бы дать пользователю право получать данные из какой-то таблицы нужно выполнить:
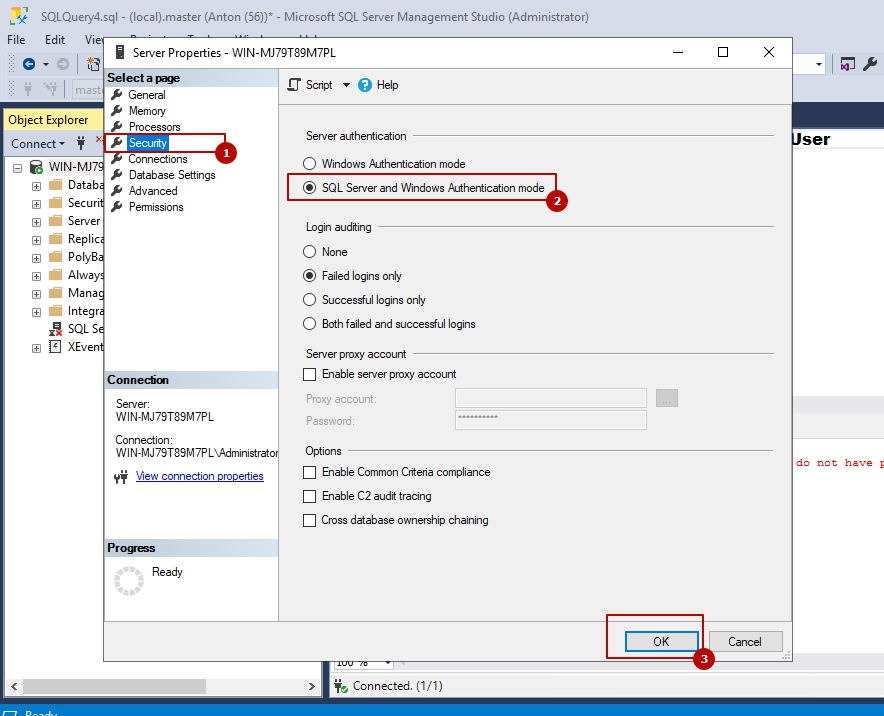
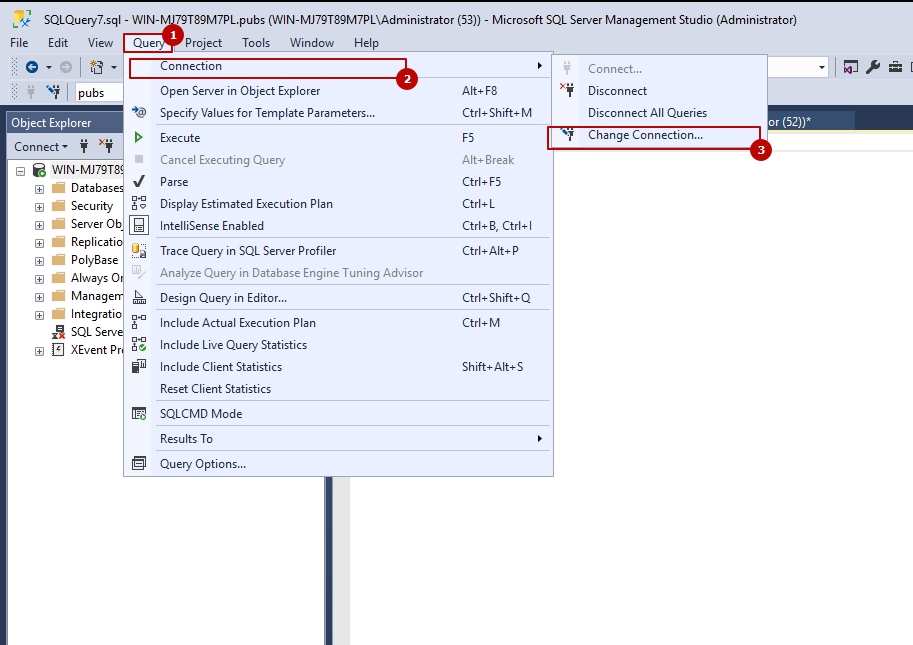
GRANT SELECT ON dbo.authors TO AntonUserЕсли мы хотим зайти под созданным пользователем нам нужно выполнить ряд действий. Дело в том, что по умолчанию аутентификация по логинам SQL отключена (разрешена только Windows). Для этого зайдем в свойства сервера:
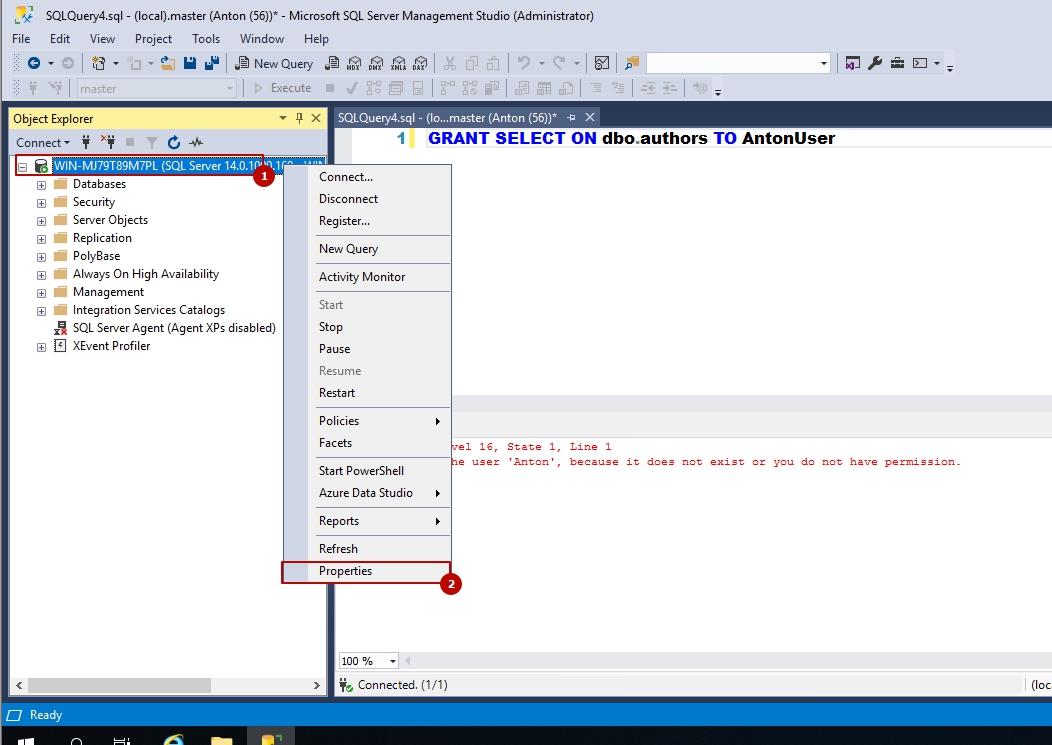
Затем в «Безопасность» и включи аутентификация SQL
Теперь мы сможем зайти под логином SQL. Для этого сделаем следующее — откроем новое окно запросов Ctr + N или нажмем кнопку:
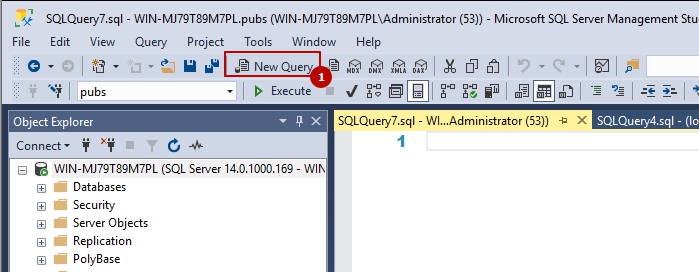
Важно сделать так, что бы у нас было 2 окошка для запросов до того как мы сменем пользователя. Благодаря этому у нас каждое окно будет работать под разными пользователями
Затем окно подключения пользователя:
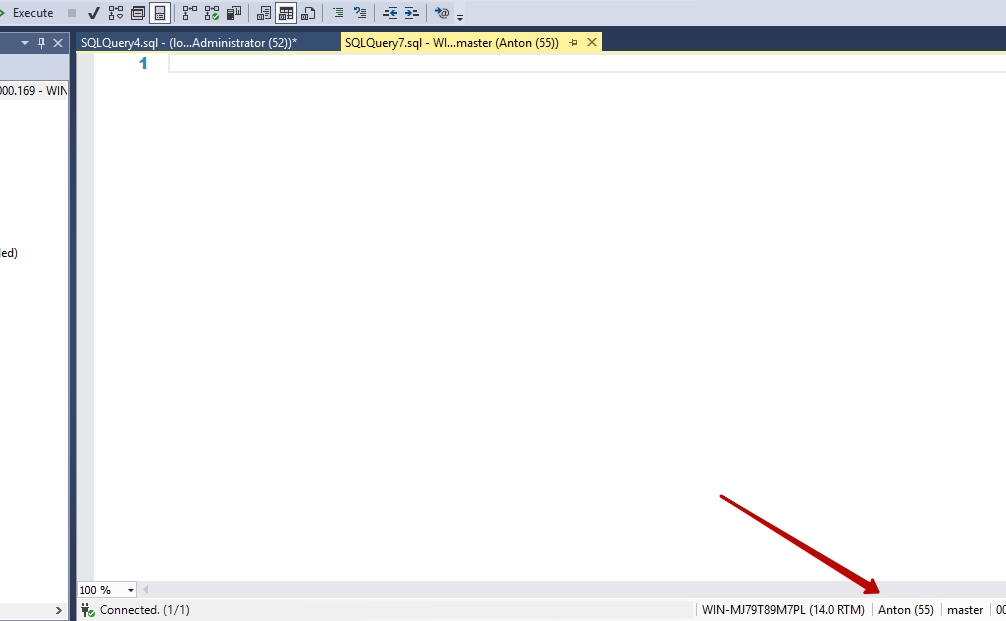
Меняем тип подключени на SQL и вводим логин/пароль. Я создавал логин Anton, с паролем Password1910.
После подключения можем увидеть, что одно окно работает под логином Anton, а другое под учетной записью с помощью которой мы проводили операции выше. Так же обратите внимания, что новые пользователь подключен к другой базе (master).
Перейдем к базе, на которую мы давали права. В моем случае это база pubs
USE pubsЯ давал права на SELECT для таблицы dbo.authors. Проверем работу:
SELECT *
FROM dbo.authors
Запрос дожен пройти успешно.
Для другой таблицы, на которую мы не давали прав:
SELECT *
FROM dbo.titles
Получим ошибку
The SELECT permission was denied on the object ‘titles’, database ‘pubs’, schema ‘dbo’.
Что бы отозвать разрешение на SELECT нужно заменить GRANT на REVOKE (не забудьте переключится на окно у которого есть разрешение или переключится на предыдущего пользователя):
REVOKE SELECT ON dbo.authors TO AntonUserРазрешений, которые мы можем выдать пользователю достаточно много. Это основные:

Мы можем так же явно запретить пользователю выполнять определенные запросы. Для этого есть DENY:
DENY SELECT ON dbo.authors TO AntonUserЧто ба дать разрешение на создание таблиц:
USE Pubs;
GRANT CREATE TABLE TO Anton;
Теперь создадим логин через графический интерфейс. Нажмем следующие кнопки:
В новом окне мы должны заполнить логин (1) и пароль (3). Под цифрой 2 мы можем увидеть выбор способа аутентификации. В случае Windows мы должны будем выбрать локального пользователя или пользователя AD. Перейдем на закладку Server Roles (4).

Перед нами находятся роли уровня сервера. Все эти роли это просто набор прав. В Microsoft SQL мы так же можем создать и свои группы. Public — роль по умолчанию для всех, кому разрешено вход. Из всех созданных ролей только public можно изменять.
Приведу описание самых популярных ролей:

Перейдем на следующую вкладку (2)
На этой закладке можно сразу создать пользователя и привязать его к базе данных. На этой закладке отображаются 4 базы, которые вы скорее всего раньше не видели. Это системные базы данных, которые хранят в себе транзакции, структуру подключенных баз, скрипты агента и т.д. В области 2 можно дать права на выделенную базу данных.
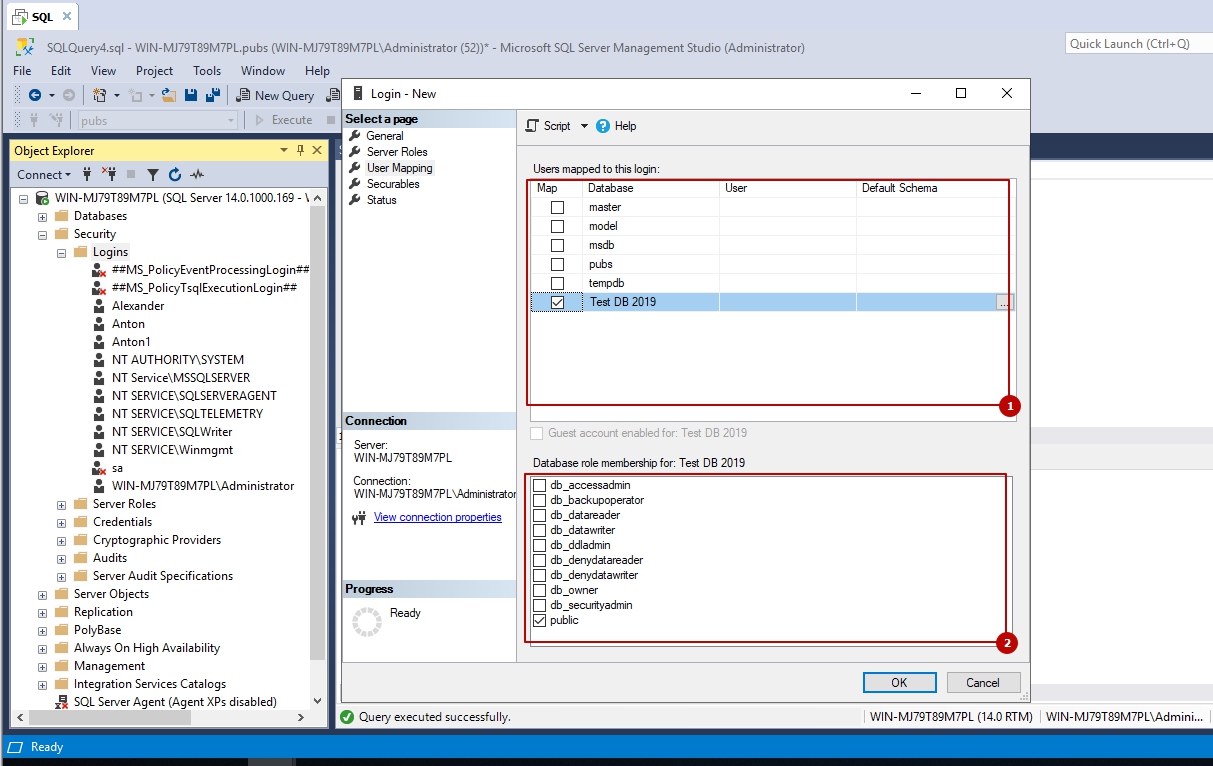
Коротко о нескольких ролях баз данных:

Роль public, в отличии от всех остальных, можно изменять. Т.е. можно дать роли public разрешение на SELECT и тогда все пользователи с логином смогут это делать. По умолчанию эта ролько может делать запросы типа:
SELECT 1+1…
Теги:
#ms-sql
Abstract
Logins and Users are basic security concepts in SQL Server. They are often, and incorrectly, considered to be pretty much one in the same so it is sometimes confusing to some SQL Server users. Another important security concept tied to a login and user in SQL Server is Security Identifiers (SID). This article will explain these concepts through a step-by-step demonstration. This article will focus on the Windows login and provide some specific usage scenarios.
Login vs User
A login is a security principal at the scope of the SQL Server instance, and a SQL Server instance can contain numerous databases. There are two main types of logins; Windows authenticated login and SQL Server authenticated login. Simply stated, a login allows you to connect to a SQL Server instance.
Once you are connected to SQL Server instance, you will typically need access to a particular database. To allow access to a database, this login must be mapped to a database user. Internally within SQL Server, a login is mapped and identified to a user using security identifier (SID).
With this brief definition of login and user, we will now proceed to our demonstration to learn how these security concepts are connected to each other.
Windows Authenticated Login
In the scenario when a Windows user is created in the Active Directory, it is assigned a security identifier (SID) which is used to access domain resources. SIDs are unique within their scope (domain or local) and are never reused. This domain level SID is then used by SQL Server as source principal for SID. So, we are now talking about two SIDs, one is the domain level SID and the other is the SQL Server SID. The domain level SID representation is in string which looks like GUID (i.e. S-1-5-21-124525095-708259637-1543119021), and SQL Server SID representation is in binary (i.e. 0x010600000000000901000000E286A25BE10CFF1FDF83DB82A0179E302B98EB23).
From the high level, they might seem to be different, but the SID stored in SQL Server is actually a translation from the domain SID. If this statement seems confusing, then the demonstration below would walk you through how they are connected to each other.
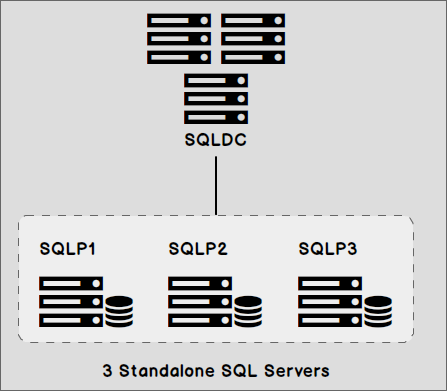
The configuration of our demonstration is three SQL Servers 2016 Developer Edition running Windows Server 2012 R2 Data Center. All the servers are joined to the domain controller SQLDC.
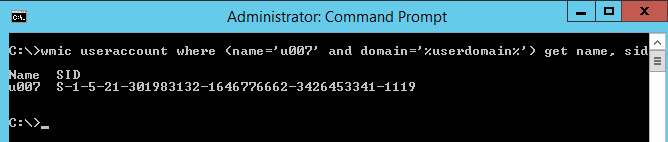
Step 1 – Create a Windows user
In Active Directory, we will create a Windows user account u007. We can execute a Windows Management Instrumentation Command-line (WMIC) from a command prompt as below to get the domain level SID for Windows user account u007.

Step 2 – Create User Defined Function
Before proceeding any further, we will execute the script below to create a user defined function ufn_StringToSID on the 3 SQL Server instances – SQLP1, SQLP2 and SQLP3
|
1 2 3 4 5 6 7 8 9 10 11 12 13 14 15 16 17 18 19 20 21 22 23 24 25 26 27 28 29 30 31 32 33 34 |
USE tempdb GO CREATE FUNCTION dbo.ufn_StringToSID ( @strSID VARCHAR(100) ) RETURNS VARBINARY(100) AS BEGIN DECLARE @binSID varbinary(100), @i bigint SET @binSID = CONVERT(varbinary, CONVERT(tinyint, SUBSTRING(@strSID , 3,1))) + 0x05 SET @binSID = @binSID + CONVERT(binary(6), CONVERT(tinyint, SUBSTRING(@strSID , 5,1))) SET @strSID = SUBSTRING(@strSID,7,LEN(@strSID)—6) WHILE CHARINDEX(‘-‘,@strSID) > 0 BEGIN SET @i = CONVERT(bigint, SUBSTRING(@strSID,1,CHARINDEX(‘-‘,@strSID)—1)) SET @binSID = @binSID + CONVERT(varbinary(4), REVERSE(CONVERT(varbinary, @i))) SET @strSID = SUBSTRING(@strSID,CHARINDEX(‘-‘,@strSID)+1,LEN(@strSID)) END SET @i = CONVERT(bigint, @strSID) SET @binSID = @binSID + CONVERT(varbinary(4), REVERSE(CONVERT(varbinary, @i))) RETURN (@binSID) END |
Step 3 – Add Windows user account to SQL Server
We will now add Windows user u007 into SQLP1.
|
USE [master] GO CREATE LOGIN [SQLDC\u007] FROM WINDOWS WITH DEFAULT_DATABASE=[master], DEFAULT_LANGUAGE=[us_english] GO |
SQL Server provides an undocumented system function SID_BINARY() which can translate domain level SID into binary SID representation stored in SQL Server.
In this article, we will also use our, previously described, userdefined function ufn_StringToSID to convert the domain level SID into binary SID representation stored in SQL Server. Both functions accept the domain level SID as a parameter and return a binary value output.
One reason to use ufn_StringToSID is to allow an insight into the translation between domain level SID into SQL Server SID representation. SID_BINARY() output would serve as a control output to make sure the user defined function is working as it should.
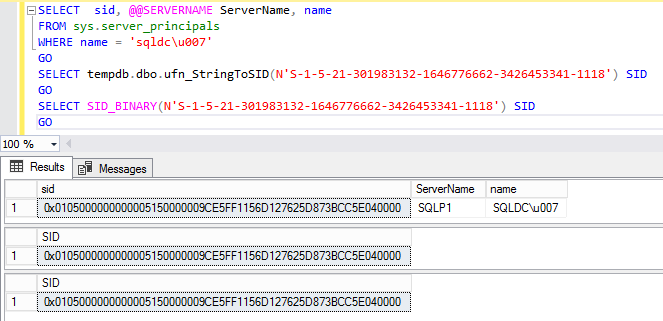
The binary login SID stored in SQL Server can be retrieved from dynamic view management sys.server_principals. Both function output should match the SID retrieved from sys.server_principals.
Here, you can see that the SID stored in SQL Server is just a binary representation of the domain level SID.
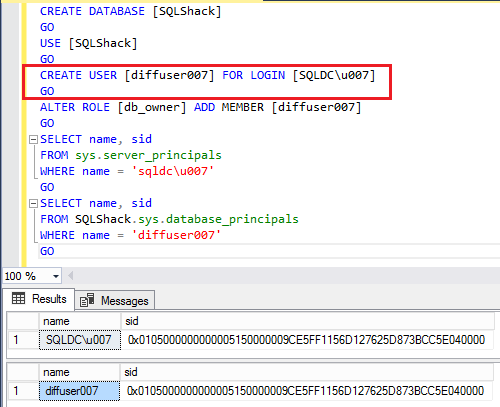
Step 4 – Grant Windows user u007 privilege to a user database
When the login u007 is granted access to a database in SQL Server, it creates a database user which maps back to the instance level login. Internally in SQL Server, the Windows login maps back to the database user using the same SID value.
So, the database user name can pretty much be any name and the permission would still work fine. This is possible because the binary SID value will be the same for both the login at the SQL Server instance level and the user at the database level.
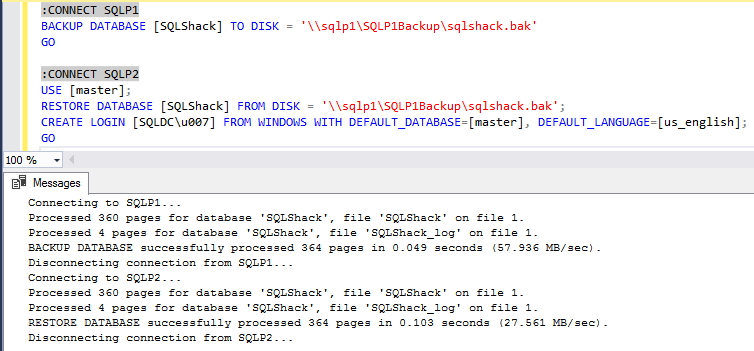
Step 5 – Windows login automatically maps SID
We can now backup and restore the [SQLShack] database to SQLP2. We will add Windows user u007 to SQL Server instance SQLP2. We do not need to grant any additional privilege on the [SQLShack] database. The Windows login will automatically map to the database the user SID in [SQLShack] database and all privileges will be maintained the same as [SQLShack] database on SQLP1.
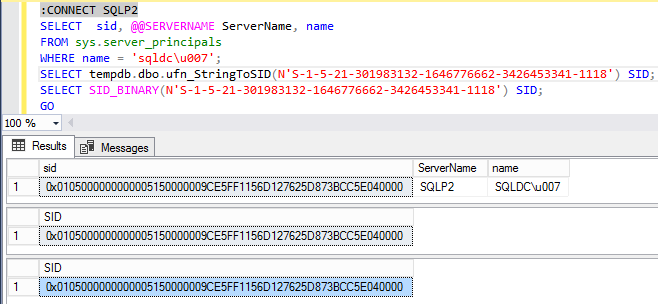
Step 6 – Domain level SID do not change
Since the domain level SID did not change, the binary SID value in SQL Server sys.server_principals will remain the same. If we check the domain level SID and the SID stored in SQL Server on SQLP2, they would produce the same output as on SQLP1 for both the login and the database user.
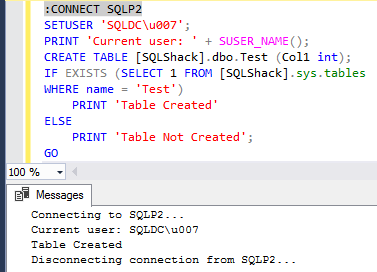
If we execute a create table DDL on SQLP2, db_owner permission would allow the table to be created successfully.
Step 7 – New Windows user with same name
In some organizations, Windows user accounts are created in an incrementalnumbering fashion. A user account is dropped when an employee leaves the organization, and the same number sometimes gets re-used over time.
What happens when the user account is dropped from Active Directory and the same Windows user name is created?
Well, the Windows user will be assigned a new SID by the Active Directory. The new SID gets the next numbering and incremented by 1.
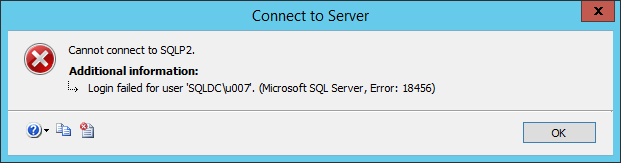
The repercussion is that the new Windows user u007 SID will not be able to connect to SQL Server SQLP1 and SQLP2 because the binary SID value stored in SQL Server would not match.
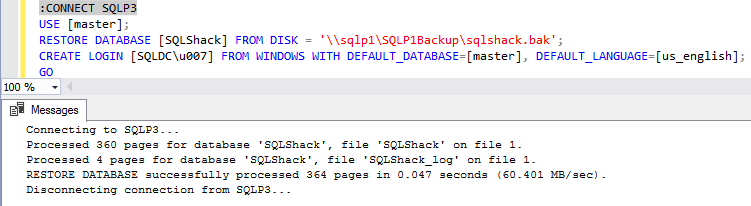
Step 8 – Restore user database and add new login on SQLP3
Now we restore SQLShack database to SQLP3 and add the new Windows user u007 here.
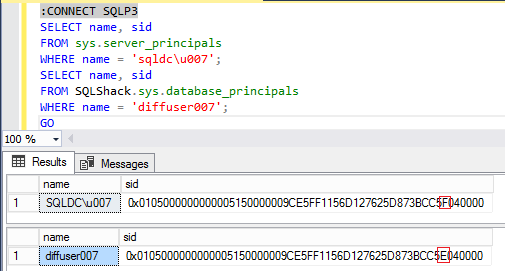
In this scenario, we have a mismat in SID value stored in SQL server SQLP3 between the login and the database user. A SID mismatch can happen for Windows login similarly to SQL Server login. The SID for the Windows login u007 has incremented by 1, and the database user SID value reflects the point in time when the database backup was taken on SQLP1 as indicated in the red box below.
Because the SQLP3 Windows authenticated login SID reflects the new Windows user u007, we can connect to SQL Server SQLP3. But the Windows login would not allow access to the user database. This situation sometimes provides problems when the database user name is the same as the login because SQL Server would then prompt, with an error, that the user name already exists when you try to grant privilege to the database.
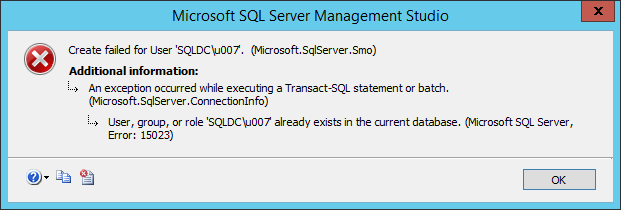
The solution to fix this issue is to drop the database user from the database. Then grant the Windows login again access to the database either using T-SQL or SSMS.
Conclusion
SQL Server logins can be assigned server level permissions, and database users can be assigned database level permissions. Logins and users are mapped to each other when the SID values are identical.
A significant benefit of using a Windows user in SQL Server is the automatic mapping of SID to allow access to resources, since the SID is always the same on the scope of domain or local.
Beware of dropping and recreating a domain user account with the same account name. This could cause the unexpected issues such as mismatched SIDs in SQL Server. The best practice is not to reuse the domain user account with the same name.
- Author
- Recent Posts

Simon Liew an independent SQL Server Consultant with deep understanding of Microsoft SQL Server technology with focus on delivering business solutions. He loves exploring data and passionate about sharing his knowledge.
Simon has over 15+ years of database design, implementation, administration and development in SQL Server. He is a Microsoft Certified Master for SQL Server 2008 and holds a Master’s Degree in Distributed Computing. Achieving Microsoft masters-level certifications validate the deepest level of product expertise, as well as the ability to design and build the most innovative solutions for complex on-premises, off-premises, and hybrid enterprise environments using Microsoft technologies.
View all posts by Simon Liew
Managing SQL Server security is a critical part of maintaining your SQL Server environment. In this article, let us take a step-by-step approach to create a new database User and grant permissions to the User.
In SQL Server, a Login is created for the server instance whereas a User is created for a database. A Login has to be mapped to a User to connect to a database. A login can be mapped to only one user for any database. The scope of a User is the database
There are two ways to create a new User or to grant user permissions:
- Using Microsoft SQL Server Management Studio
- Using T-SQL
Create New User using SSMS
Open SQL Server management studio. In the Object Explorer, expand the Databases node.
Here, we are going to create a new user for the HR database. So, expand the HR database.
Expand the Security folder of the database and right click on User and select New User, as shown below.

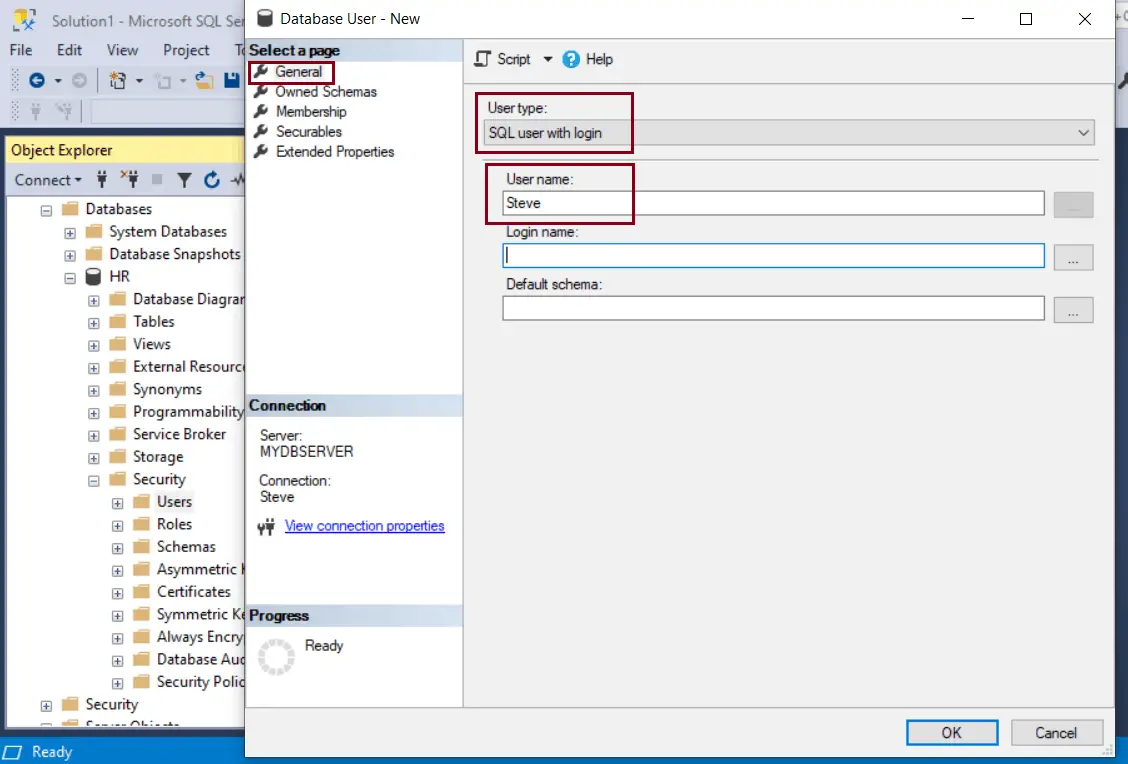
In the Database User — New dialog box, on the General tab page, User type drop down lists the following types:
- SQL user with login
- SQL user with password
- SQL user without login
- User mapped to a certificate
- User mapped to an asymmetric key
- Windows user
Select the User type as «SQL User with login» from the drop-down.
Under User name, enter a new user name. Here, we will enter ‘Steve’ as a user name.
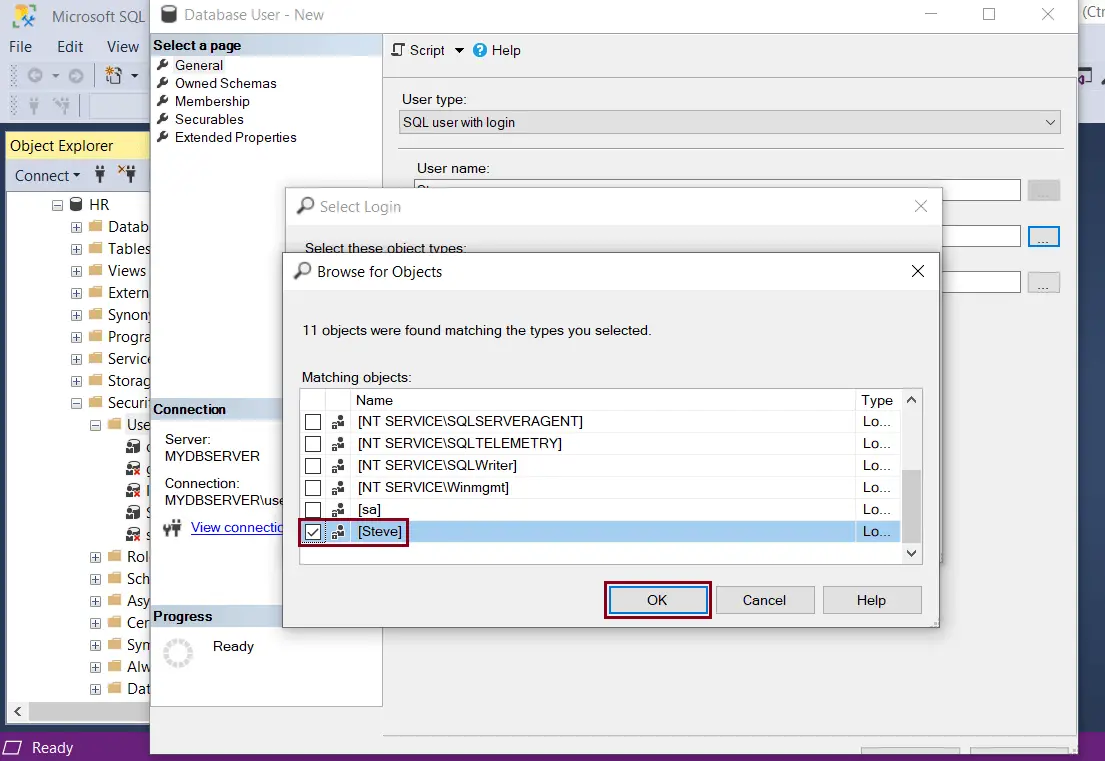
Under Login name, type the previously created login i.e., Steve. Alternately click on the ellipsis ... button to open the Select – Login dialog box.

Click on Browse button and select an existing login name to map with this user, as shown below. Select login ‘Steve’. Click the OK button to proceed.
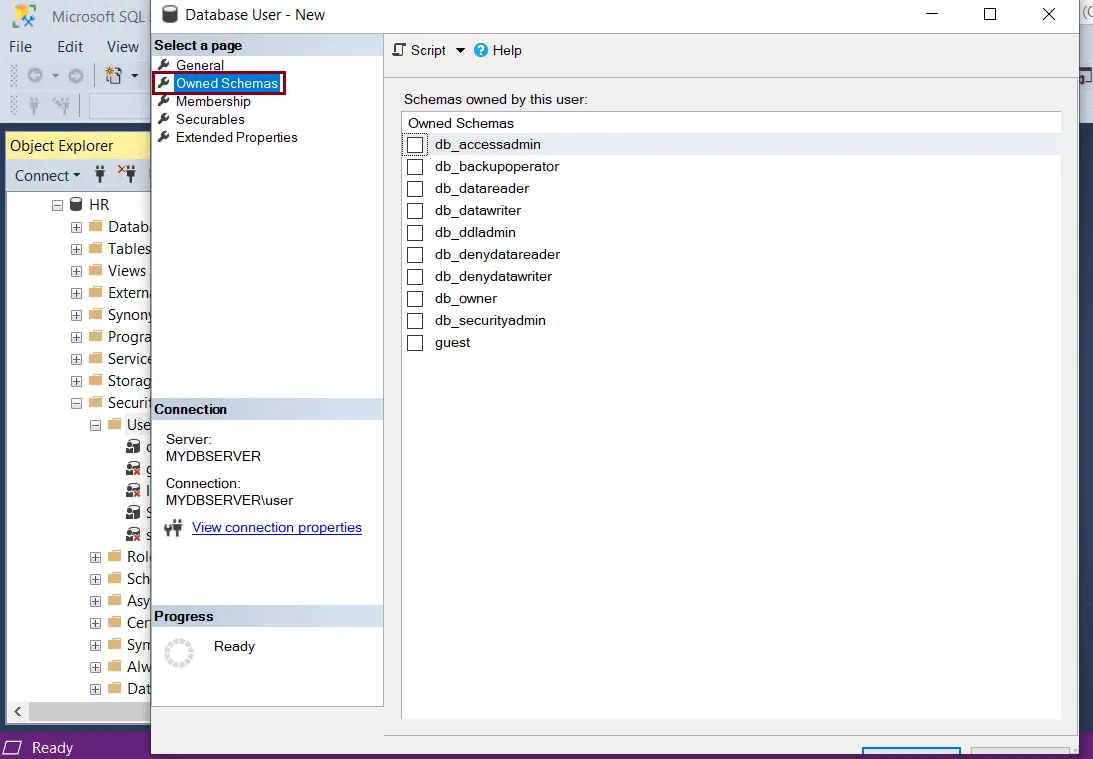
The Owned Schema page lists all the available schemas in the database. To add schemas to the user, select the check box next to the schema name.
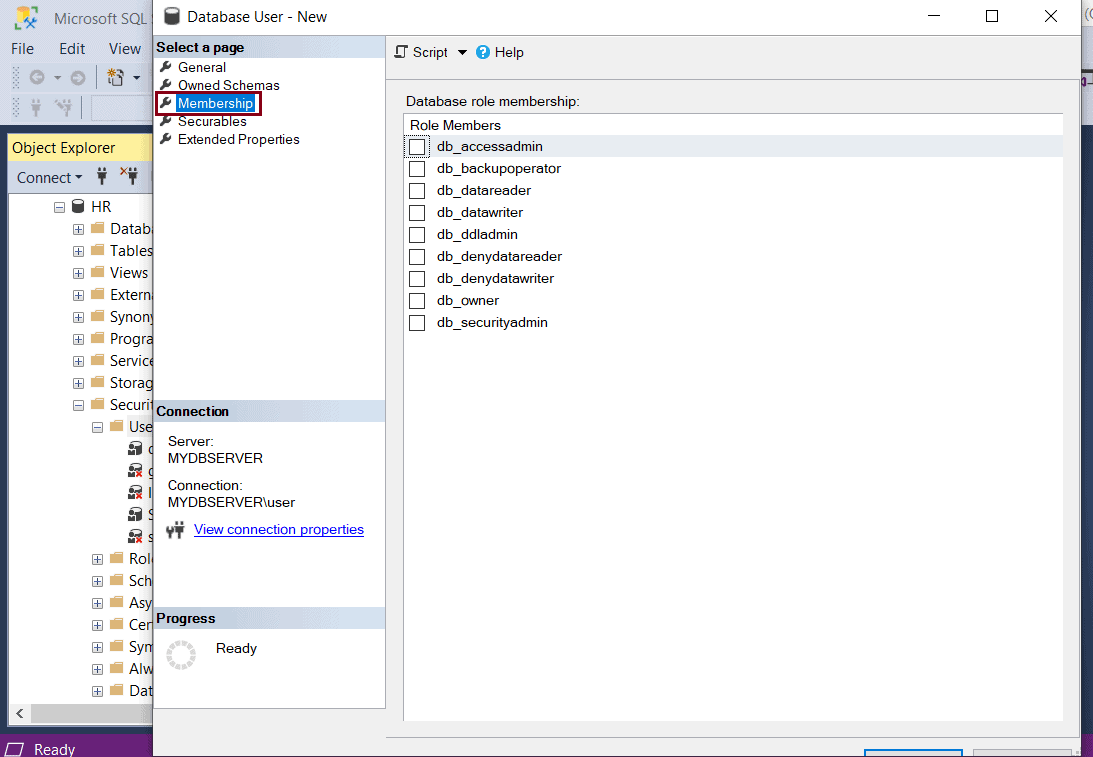
The Membership page lists all the possible membership roles that can be owned by the database user being created. To add membership roles, select the check-box next to the roles.
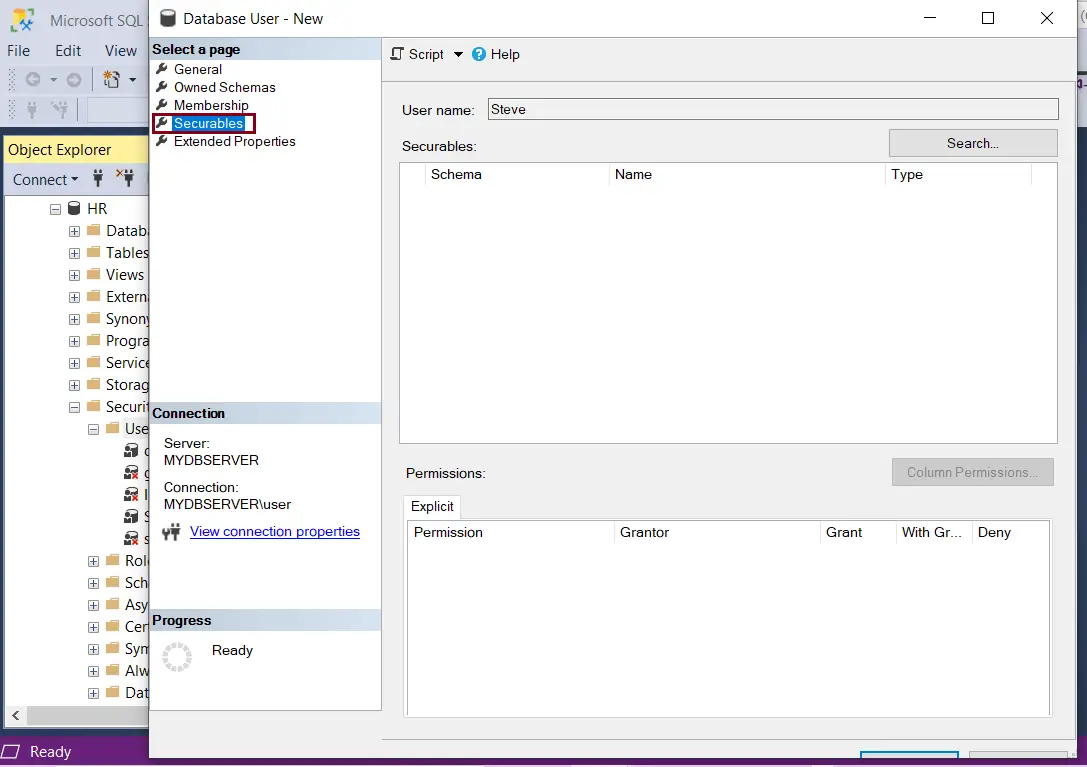
The Securables page lists all the securables and permissions that can be granted to the user. We will look at how to grant permissions to the User later in the article under User Permissions.
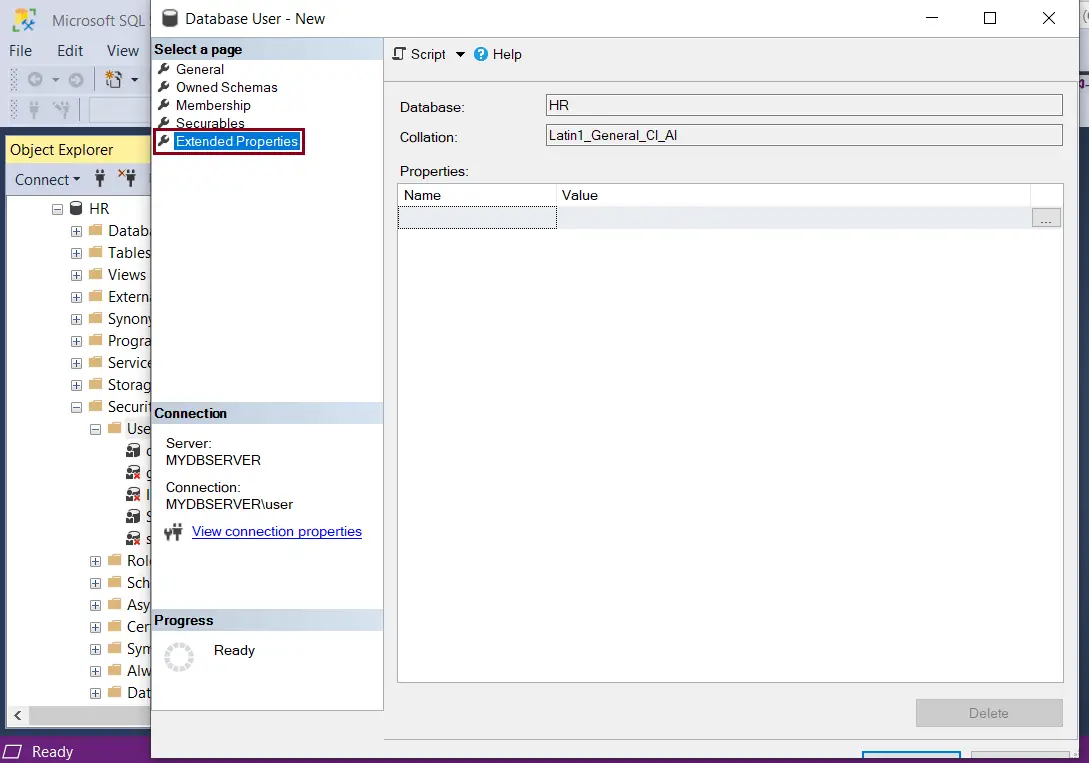
The Extended Properties page allows custom properties to be added to database users.
This page displays the name of the selected database and the collation used which are read-only fields. The page also has an option to view or specify the extended properties for the object.
Click OK to create this user.
Create a New User using T-SQL
USE <database-name>
CREATE USER <user-name> FOR LOGIN <login-name>
The following creates a new user Steve in the HR database:
USE HR
GO
    CREATE USER 'Steve' FOR LOGIN 'Steve'
GO
Want to check how much you know SQL Server?