Windows provides command line utilities to manager user groups. In this post, learn how to use the command net localgroup to add user to a group from command prompt’
Add user to a group
Run the steps below –
- Open elevated command prompt
- Run the below command
net localgroup group_name UserLoginName /add
For example to add a user ‘John’ to administrators group, we can run the below command.
net localgroup administrators John /add
Few more examples:
To add a domain user to local users group:
net localgroup users domainname\username /add
This command should be run when the computer is connected to the network. Otherwise you will get the below error.
H:\>net localgroup users domain\user /add
System error 1789 has occurred.
The trust relationship between this workstation and the primary domain failed.
To add a domain user to local administrator group:
net localgroup administrators domainname\username /add
To add a user to remote desktop users group:
net localgroup "Remote Desktop Users" UserLoginName /add
To add a user to debugger users group:
net localgroup "Debugger users" UserLoginName /add
To add a user to Power users group:
net localgroup "Power users" UserLoginName /add
This command works on all editions of Windows OS i.e Windows 2000, Windows XP, Windows Server 2003, Windows Vista and Windows 7. In Vista and Windows 7, even if you run the above command from administrator login you may still get access denied error like below.
C:\> net localgroup administrators techblogger /add
System error 5 has occurred.
Access is denied.
The solution for this is to run the command from elevated administrator account. See How to open elevated administrator command prompt
When you run the ‘net localgroup’ command from elevated command prompt:
C:\>net localgroup administrators techblogger /add
The command completed successfully.
To list the users belonging to a particular group we can run the below command.
net localgroup group_name
For example to list all the users belonging to administrators group we need to run the below command.
net localgroup administrators
Related posts:
Add new user account
Delete user account
In Windows 10, you can add or remove a user account from a group to grant or revoke access to certain Windows features, file system folders, shared objects, and more. There are a number of ways to do it. Let’s review them.
Group accounts are used to manage privileges for multiple users. Global group accounts, for domain use, are created in Active Directory Users And Computers, while local group accounts, for local system use, are created in Local Users And Groups. Generally, group accounts are created to facilitate the management of similar types of users. The types of groups that can be created include the following:
- Groups for departments within the organization: Generally, users who work in the same department need access to similar resources. Because of this, groups can be created that are organized by department, such as Business Development, Sales, Marketing, or Engineering.
- Groups for users of specific applications: Often, users will need access to an application and resources related to the application. Application-specific groups can be created so that users get proper access to the necessary resources and application files.
- Groups for roles within the organization: Groups could also be organized by the user’s role within the organization. For example, executives probably need access to different resources than supervisors and general users. Thus, by creating groups based on roles within the organization, proper access is given to the users that need it.
A local user group is created locally. These are the groups you can use directly on a Windows 10 computer without adding the computer to an Active Directory domain. Here is the list of groups typically available in Windows 10 out-of-the box.
- Administrators
- Backup Operators
- Cryptographic Operators
- Distributed COM Users
- Event Log Readers
- Guests
- IIS_IUSRS
- Network Configuration Operators
- Performance Log Users
- Performance Monitor Users
- Power Users
- Remote Desktop Users
- Replicator
- Users
To add a user account to a local group in Windows 10, you can use either MMC, the console tool net.exe, or PowerShell. Let’s see how it can be done.
To add users to a group in Windows 10, do the following.
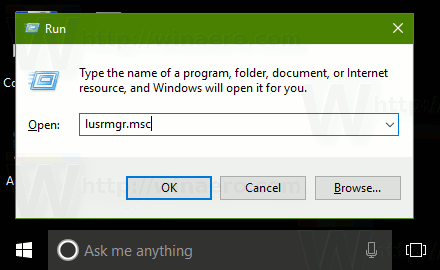
- Press Win + R shortcut keys on your keyboard and type the following in the run box:
lusrmgr.msc
 This will open the Local Users and Groups app.
 - Click on Groups on the left.

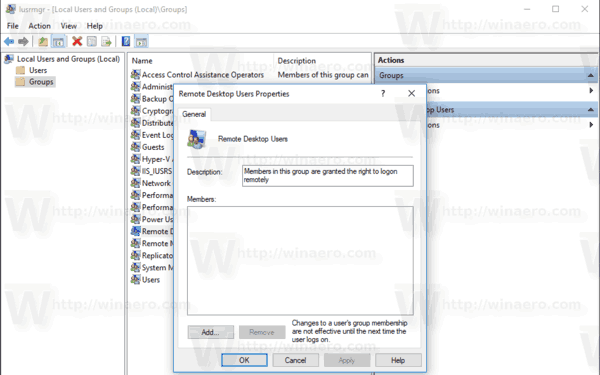
- Double-click the group you want to add users to in the list of groups.

- Click the Add button to add one or more users.
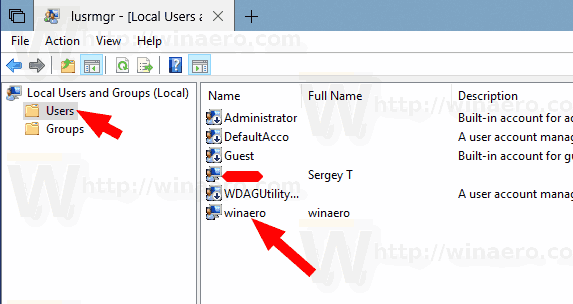
- Alternatively, you can click the Users folder on the left.
- Double-click on the user account on the right.

- Switch to the Member of tab and click on the Add button to select a group you want to add the user account to.

 This will open the Local Users and Groups app.
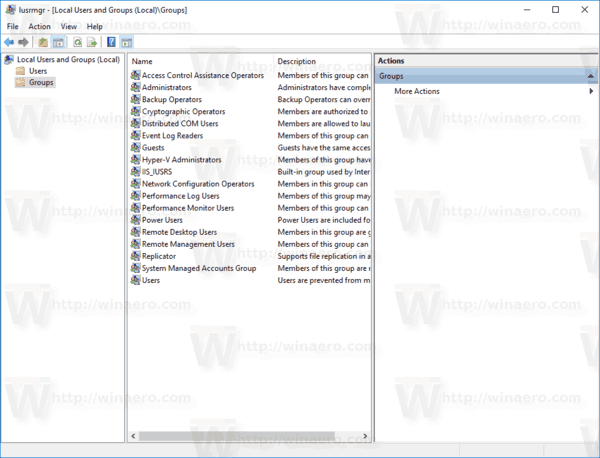
Note: You can use Local Users and Groups snap-in if your Windows edition comes with this app. Otherwise, you can use one of the methods described below.
Add users to a group using the NET tool
- Open an elevated command prompt.
- Type the following command:
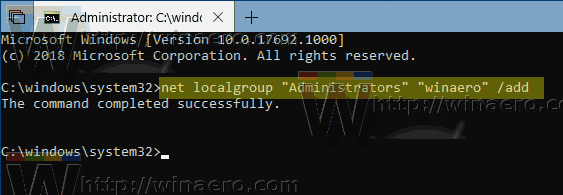
net localgroup "Group" "User" /add
Replace the Group portion with the actual group name. Provide the desired user account instead of the «User» portion. For example,

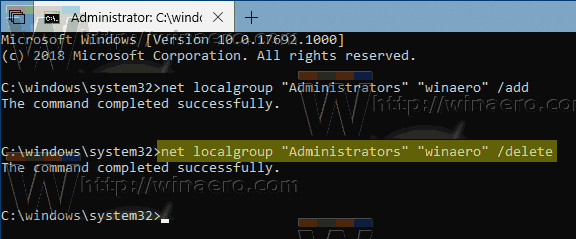
- To remove a user from a group, execute the next command:
net localgroup "Group" "User" /delete
See the following screenshot:

Add users to a group using PowerShell
- Open PowerShell as Administrator. Tip: You can add «Open PowerShell As Administrator» context menu.
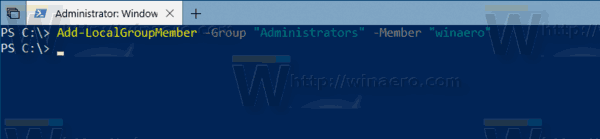
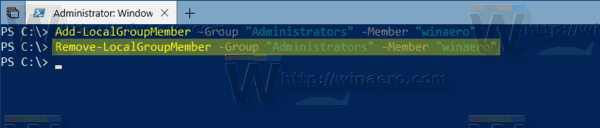
- Type or copy-paste the following command:
Add-LocalGroupMember -Group "Group" -Member "User"
Replace the Group portion with the actual group name. Provide the desired user account instead of the «User» portion.

- To remove a user account from a group, use the cmdlet Remove-LocalGroupMember as follows.
Remove-LocalGroupMember -Group "Group" -Member "User"

The Add-LocalGroupMember cmdlet adds users or groups to a local security group. All the rights and permissions that are assigned to a group are assigned to all members of that group.
The cmdlet Remove-LocalGroupMember removes members from a local group.
That’s it.
Support us
Winaero greatly relies on your support. You can help the site keep bringing you interesting and useful content and software by using these options:
If you like this article, please share it using the buttons below. It won’t take a lot from you, but it will help us grow. Thanks for your support!
When you create a new account, that account is part of a group. If this is the first account after a clean OS installation, then that user account will be part of the Administrators group by default. If this is not the first account, it will be assigned to the Users group.
Regardless of which default groups, you can change which users are part of which groups. There are multiple methods to add them to a group, as well as remove them. Moreover, an account can be part of more than one user group.
This article discusses several methods to add a user account to any user group, and how to remove it as well.
Table of contents
- Local vs Global Users and Groups
- Purpose of User Groups
- How to Add a User Account to a Group
- From the Local Users and Groups/Computer Management Console
- From the Users Folder
- From the Groups Folder
- From Command Prompt
- From Windows PowerShell
- From the Local Users and Groups/Computer Management Console
- Closing Words
Local vs Global Users and Groups
Local Users and Groups are the user accounts and then groups on a local PC whose privileges are only limited to that computer. Whereas Global Users and Groups are user accounts and groups whose rights and privileges are valid through a domain.
Global Users and Groups are created in the Active Directory Users and Computers on a Windows Server, which are defined for the entire domain. A global user account is usually part of a global user group that can be used to sign into any PC as long as it is part of the domain. However, a local user account can only be used to log into the same PC.
But what is the purpose of these groups?
Purpose of User Groups
Groups are used to define and manage the rights and privileges of the user accounts within them. You can add or remove a user account from a group to grant or revoke certain access, implement certain policies, define their roles, etc.
The following categories briefly describe the different types of groups usually created:
- Groups to segregate different departments within an organization.
- Groups to grant limited access to applications and tools.
- Groups to assign certain roles to individual user accounts.
These types of groups are usually global groups that cover the entire organization’s work domain.
However, in the case of local groups, the following groups can be found by default on a Windows 10/11 PC right out of the box:
- Access Control Assistance Operators
- Administrators
- Backup Operators
- Cryptographic Operators
- Device Owners
- Distributed COM Users
- Event Log Readers
- Guests
- Hyper-V Administrators
- IIS_IUSRS
- Network Configuration Operators
- Performance Log Users
- Performance Monitor Users
- Power Users
- Remote Desktop Users
- Remote Management Users
- Replicator
- System Managed Accounts Group
- Users
Each of the local user groups assigned different privileges to the user accounts inside of them.
Let us now discuss how to add a user account to a group.
How to Add a User Account to a Group
From the Local Users and Groups/Computer Management Console
Microsoft Management Consoles come preinstalled in Windows to control and manage the different OS components. 2 of these are the Local Users and Groups Console and the Computer Management Console. Both of these can be used to add a user to a group.
Before we proceed, let us inform you that these consoles have a folder where all users are listed, and another folder where the groups are listed. You can add a user account to a group from the users folder as well as through the groups folder.
-
To begin, open either the Local Users and Groups Console or the Computer Management Console by typing either of the following in the Run Command box:
For Local Users and Groups Console:
lusrmgr.msc

Open Local Users and Groups Console For Computer Management Console:
compmgmt.msc

Open Computer Management Console -
Now you must choose whether you want to add a user account to a group from the Users folder or the Groups folder.
-
From the Users Folder
-
Navigate to the following:
From Local Users and Groups:
Users
From Computer Management:
Local Users and Groups >> Users
-
Here, double-click on the user account that you want to add to a group from the middle pane.

Open user from Users folder -
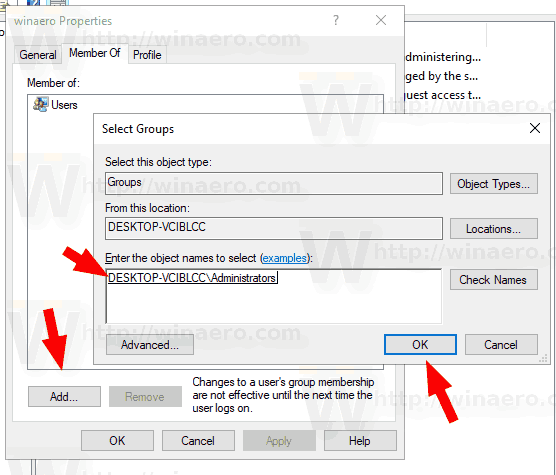
From the Popup Properties window, switch to the Member of tab, then click Add.
Add to group -
In the popup, type in the name of the user group and then click Check names.
Check names -
You will now see the Fully Qualified Domain Name (FQDN) of the user account. Once confirmed, click OK.
Confirm complete group name -
Back in the Properties window, you will see that the user account is now a member of the new group. Click Apply and OK.
Apply changes
The account has been added to a group successfully.
If you wish to remove this account from the group, simply click on the group in the Member of tab in the Properties window, then click Remove, and apply the changes.
Remove account from group -
-
From the Groups Folder
-
Navigate to the following:
From Local Users and Groups:
Groups
From Computer Management:
Local Users and Groups >> Groups
-
Here, double-click on the group you want to add the user to from the middle pane.
Open group from Groups folder -
From the Popup Properties window, click Add.
Add new user -
Now enter the name of the user account you want to add and click Check names.
Check name of account -
You will now see the FQDN of the account. Click Ok.
Confirm account name -
Now back in the Properties window, you will see that the user account has been added to the group. Click Apply and Ok to save the changes
Apply changes
The account will now be added to the group.
If you wish to remove an account, simply select the account and click Remove, then apply the changes.
Remove account from group -
-


From Command Prompt
If you prefer the Command Line Interface (CLI), here are the steps to add a user account to a group in Windows:
-
Open Command Prompt with elevated privileges.
-
Now use the following cmdlet to add a user account to a group while replacing Group and User with the name of the group you want to add the user to, and the user account name you want to add, respectively.
net localgroup "Group" "User" /add
User added successfully

The user will now be added to the stated group.
You can also remove a user account from the group using the Command Prompt. Simply use the following cmdlet to do so while replacing Group and User as when adding the account to the group:
net localgroup "Group" "User" /delete
From Windows PowerShell
Perform these steps to add a user account to a group using Windows PowerShell:
-
Launch PowerShell with administrative rights.
-
Now use the following cmdlet to add a user account to a group while replacing “Group” and “User” with the name of the group you want to add the user to, and the user account name you want to add, respectively.
Add-LocalGroupMember -Group "Group" -Member "User"
User added successfully

The user will now be added to the stated group.
You can also remove a user account from the group using PowerShell. Simply use the following cmdlet to do so while replacing “Group” and “User” as when adding the account to the group:
Remove-LocalGroupMember -Group "Group" -Member "User"
Closing Words
As we already mentioned, the groups define what roles and privileges each user within has. Groups can control whether a user is allowed access to any specific apps or tools, whether they are allowed to initiate Remote Desktop protocols, which shared folders they have access to and which are blocked, etc.
Therefore, regardless if a user account is local or global, we suggest that you add them to groups very carefully, and do not give them permissions more than they desire.
![]()
Download Article
An easy-to-follow guide to adding a user to a group on Windows computers
![]()
Download Article
This wikiHow teaches you how to add a new user to a user group on a Windows computer. Adding a user to a group will apply all the group settings and permissions to the added user account.
Things You Should Know
- Click «Manage» on «This PC» in File Explorer and expand the menu next to «System Tools.»
- Click «Local Users and Groups» then click the «Groups» folder.
- Right-click a user listed and select «Add to Group» then select the group.
-

1
Open your computer’s Start menu. The Start menu button looks like a Windows icon on your desktop taskbar.
-
2
Open the File Explorer from the Start menu. This will open a new window.
- Alternatively, you can open any folder on your computer. This will open a File Explorer window.
Advertisement
-
3
Right-click This PC on the left sidebar. Find your This PC directory on the left-hand side of the File Explorer window, and open the right-click menu.
-
4
Click Manage on the right-click menu. This will open the Computer Management application in a new window.
-
5
Click the
icon next to System Tools. Find System Tools on the left sidebar of the Computer Management window, and expand the tabs under it.
- If you see
next to System Tools, you can skip this step. This means your tabs are already expanded.
- If you see
-
6
Click the
icon next to Local Users and Groups. This will expand a list of folders under it.
-
7
Click the Groups folder under Local Users and Groups. This will display all your groups in the Computer Management window.
-
8
Right-click a group in the Groups folder. A drop-down menu will list your options.
-
9
Click Add to Group on the right-click menu. This will open the group properties in a new window.
-
10
Click the Add button in the Properties window. This will allow you to add new users to this group in a new window.
-
11
Enter a username in the «Enter the object names to select» box. Find the username of the user you want to add to this group, and enter it here.
-
12
Click the Check Names button next to the text box. This will find the specified username on your computer, and confirm the user’s folder directory.
-
13
Click the OK button. This will close the Select Users window. You will now see the newly added user’s username in the group properties window.
-
14
Click the Apply button. This will save and apply your group changes to your computer.
-
15
Restart your computer. Restarting will apply and activate your new user and group settings.


Advertisement
Ask a Question
200 characters left
Include your email address to get a message when this question is answered.
Submit
Advertisement
Thanks for submitting a tip for review!
-
You have to be logged in to an administrator account in order to change user and group settings.
Advertisement
About This Article
Thanks to all authors for creating a page that has been read 25,157 times.
Is this article up to date?
In the Groups folder, located in the Local Users and Groups snap-in in the Microsoft Management Console (MMC), both the default local groups and the user-created local groups are displayed. Local default groups are automatically created when you install the operating system. Belonging to a local group gives the user rights and capabilities to perform various tasks on the local computer.
Local user accounts, domain user accounts, computer accounts, and group accounts can be added to local groups.
Learn how to add user to a group from windows command line. You need to run the below steps.
1. Open Command Line as Administrator
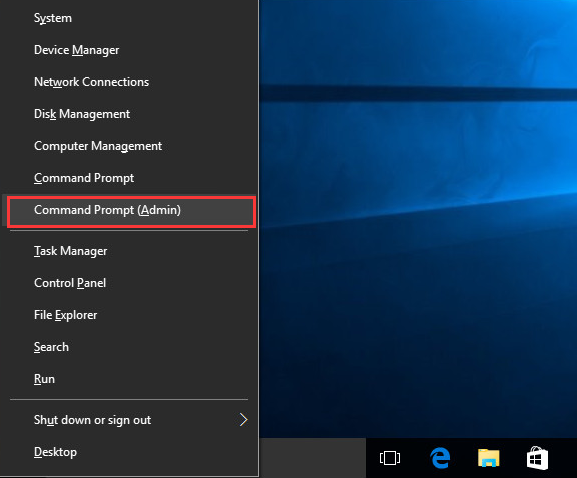
Right-click on the Start button (or the key combination WIN + X) and select Command Prompt (Administrator) in the menu that opens.
2. Run This Command to Add User to Local Group
In command line type following code:
net localgroup group_name UserLoginName /add
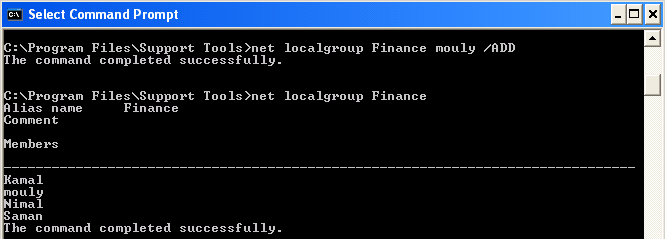
For example to add a user ‘mouly’ to Finance group, we can run the below command:
net localgroup Finance mouly /add
3. Command to Add a Domain User to Local Users Group
In command prompt input this:
net localgroup users domainname\username /add
This command should be run when the computer is connected to the network. Otherwise, you will get the below error.
H:\>net localgroup users domain\user /add
System error 1789 has occurred.
The trust relationship between this workstation and the primary domain failed.
4. Ways to Add User to Different Local Groups
To add a domain user to local administrator group:
net localgroup administrators domainname\username /add
To add a user to remote desktop users group:
net localgroup “Remote Desktop Users” UserLoginName /add
To add a user to debugger users group:
net localgroup “Debugger users” UserLoginName /add
To add a user to Power users group:
net localgroup “Power users” UserLoginName /add
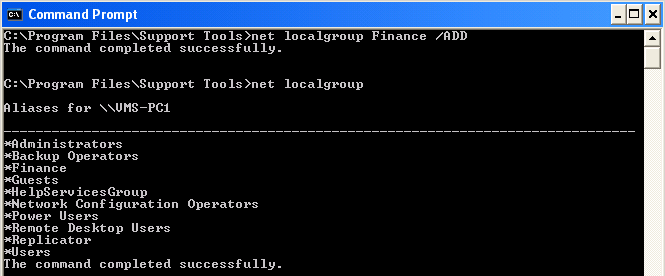
5. To List the Users Belonging to a Particular Group
If you need to get a list of users belonging to a group we can run this command:
net localgroup group_name
6. Manage Local Users and Groups Using Powershell
Recently, Microsoft has added a standard PowerShell module to Windows for managing local users and groups called Microsoft.PowerShell.LocalAccounts. Previously, this cmdlet had to be downloaded and imported separately into PowerShell. In Windows Server 2016 and Windows 10, the LocalAccounts module is now available by default, because It is included with PowerShell 5.1. In earlier versions of Windows, you must install the Windows Management Framework 5.1 to use the local account management module. The module includes 15 cmdlets. The full list of cmdlets in the LocalAccounts module can be displayed as follows:
Get-Command -Module Microsoft.PowerShell.LocalAccounts
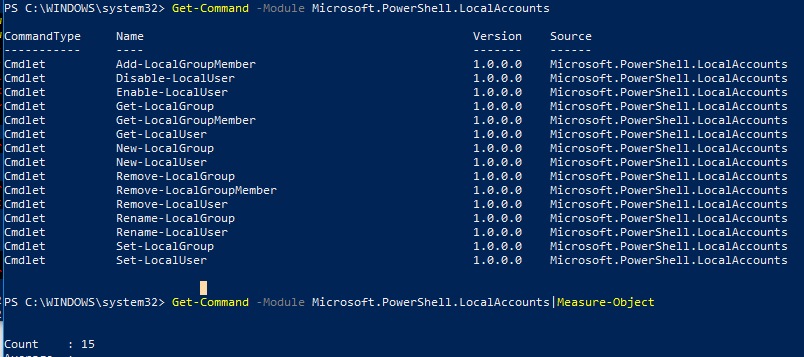
Add-LocalGroupMember— add user to local groupDisable-LocalUser— disable local accountEnable-LocalUser— enable account (unlock)Get-LocalGroup— get information about a local groupGet-LocalGroupMember— get a list of users in a local groupGet-LocalUser— get local user informationNew-LocalGroup— create a new local groupNew-LocalUser— create userRemove-LocalGroup— remove groupRemove-LocalGroupMember— remove member from groupRemove-LocalUser— remove local userRename-LocalGroup— Rename GroupRename-LocalUser— rename userSet-LocalGroup— change groupSet-LocalUser— change user
Next, we consider several typical tasks for managing local users and groups on a computer with Windows 10 using PowerShell cmdlets that are part of the LocalAccounts module.
7. Managing Local Windows Users with Powershell
List the local Windows users on the computer:
Get-LocalUser
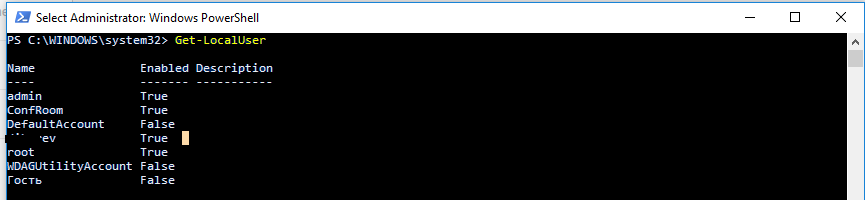
As you can see, there are 7 local accounts on the computer, 3 of which are disabled (Enabled = False).
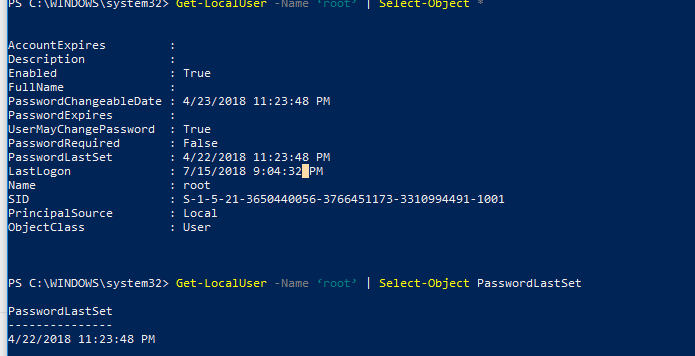
To display all the properties of a specific local account run:
Get-LocalUser -Name ‘root’ | Select-Object *
- AccountExpires :
- Description :
- Enabled : True
- FullName :
- PasswordChangeableDate : 4/23/2018 11:23:48 PM
- PasswordExpires :
- UserMayChangePassword : True
- PasswordRequired : False
- PasswordLastSet : 4/22/2018 11:23:48 PM
- LastLogon : 7/15/2018 9:04:32 PM
- Name : root
- SID : S-1-5-21-3650440056-3766451173-3310994491-1001
- PrincipalSource : Local
- ObjectClass : User
To get a specific user attribute, for example, the last time the password was changed, run:
Get-LocalUser -Name ‘root’ | Select-Object PasswordLastSet
Create a new local user using the New-LocalUser cmdlet. This cmdlet allows you to create the following types of accounts:
- Local Windows Accounts
- Microsoft accounts
- Azure AD accounts
When creating a user account using New-LocalUser, you cannot specify its password as an Open Password argument. Preliminarily, the password must be converted to a safe string by requesting a password online:
$UserPassword = Read-Host –AsSecureString
Or by entering the password directly in the PoSh console:
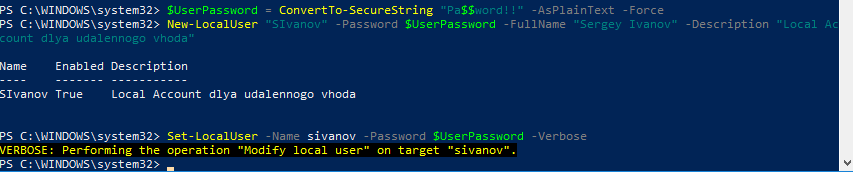
$UserPassword = ConvertTo-SecureString “Pa$$word!!” -AsPlainText -Force
New-LocalUser “SIvanov” -Password $UserPassword -FullName “Sergey Ivanov” -Description “Local Account remote local account”
To create a user in the AD domain, use the New-ADUser cmdlet.
To change the user’s password, use the Set-LocalUser command (we assume that you have already converted the new password to SecureString):
Set-LocalUser -Name sivanov -Password $UserPassword –Verbose
To set the flag “Password never expires” (“Password never expired”), run:
Set-LocalUser -Name sivanov –PasswordNeverExpires $False
As you can see, you do not need to convert the UserAccountControl value, as when managing account properties in AD.
As you remember, you can log in to Windows 10 as Microsoft accounts. If you need to create a new user associated with a Microsoft account, run the following command (note that you do not need to specify an account password, because it is stored in Microsoft).
New-LocalUser -Name “MicrosoftAccount\S[email protected]” -Description “This is Microsoft account”
To create a local account that is associated with your account in Azure AD (for example, you are using Office 365), run the command:
New-LocalUser -Name “AzureAD\[email protected]” -Description “This is AzureAD account”
To remove this local user, run:
Remove-LocalUser -Name sivanov -Verbose
8. Manage Windows Local Groups with Powershell
Now we will display a list of local groups on the computer:
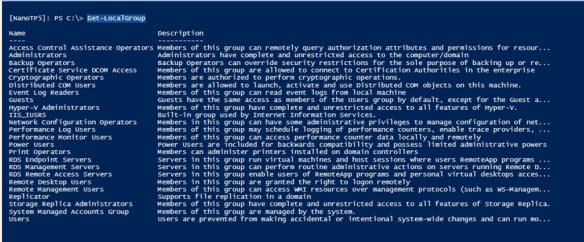
Get-LocalGroup
Create a new group:
New-LocalGroup -Name 'RemoteSupport' -Description 'Remote Support Group'
Now we will add several local accounts and a group of local administrators to the new group:
Add-LocalGroupMember -Group 'RemoteSupport' -Member ('SIvanov','root', 'Administrators') –Verbose
If your computer is in a domain, you can add groups and domain accounts or groups to the local group. To do this, they must be specified in the format DomainName \ user2 or DomainName \ ’domain admins’.
You can also add a user to groups using the following pipeline (we will add a user to local administrators):
Get-Localuser -Name 'sivanov' | Add-LocalGroupMember -Group 'Administrators'
Let’s list the users in the local group:
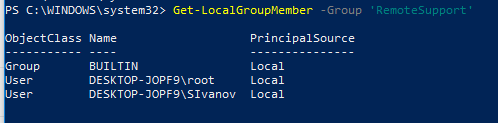
Get-LocalGroupMember -Group 'RemoteSupport'
As you can see, we use only local accounts (PrincipalSource – Local). However, there may be domain accounts (domain), Microsoft accounts (MicrosoftAccount) and accounts from Azure (AzureAD)
To display the list of groups in which a particular user is a member, you will have to go through all the local groups on the computer:
foreach ($LocalGroup in Get-LocalGroup){if (Get-LocalGroupMember $LocalGroup -Member 'sivanov' –ErrorAction SilentlyContinue){$LocalGroup.Name}}
To remove a user from a group, run:
Remove-LocalGroupMember -Group 'RemoteSupport' –Member 'sivanov'
To manage local users on a remote computer, you must first connect to it via WinRM with Invoke-Command or Enter-PSSession cmdlets.
For example, we need to collect a list of accounts in a local group on remote computers:
$s = new-pssession -computer pc01,pc02,pc03invoke-command -scriptblock {Get-LocalGroupMember -Group 'RemoteSupport'} -session $s -hidecomputername | select * -exclude RunspaceID | out-gridview -title “LocalAdmins”
Consider Using Action1 to Add Local Group Member if:
- You need to perform an action on multiple computers simultaneously.
- You have remote employees with computers not connected to your corporate network.
Action1 is a cloud-based platform for remote IT management and encompasses tools such as patch management, software deployment, remote desktop, software/hardware inventory, endpoint management and endpoint configuration reporting.