If a language is listed under Preferred languages but doesn’t appear on the Windows display language list, you’ll first need to install its language pack (if it’s available).
-
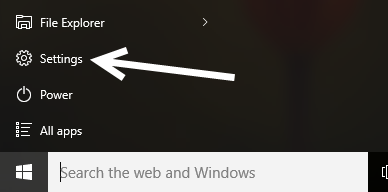
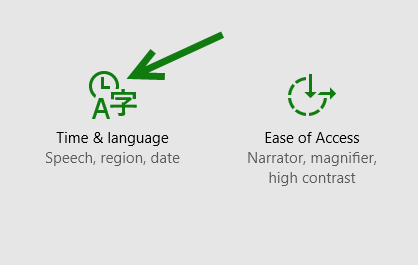
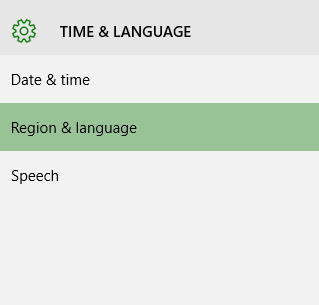
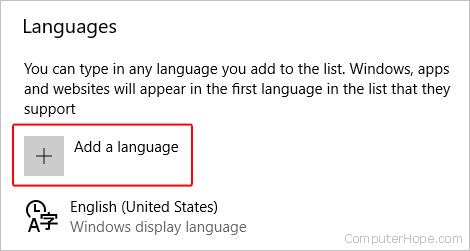
Select Start > Settings > Time & language > Language & region.
-
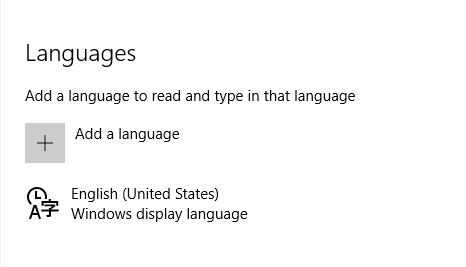
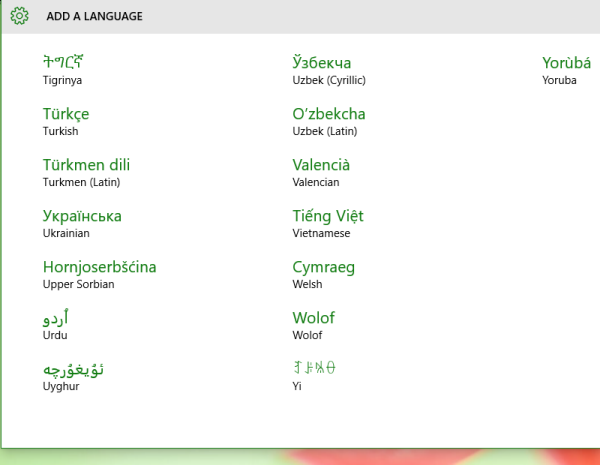
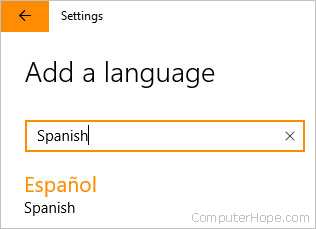
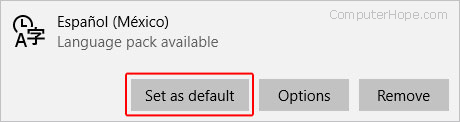
Choose a language from the Add a language list under Preferred languages, and then select Options.
-
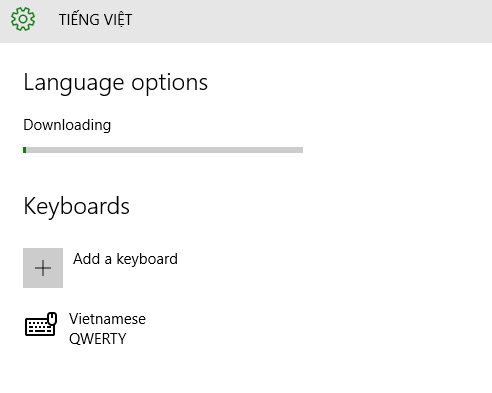
Select Download from the Download language pack option.
-
After the language pack is installed, select Back.
-
Choose a language from the Windows display language menu.
Learn more about managing language settings
If a language is listed under Preferred languages but doesn’t appear on the Windows display language list, you’ll first need to install its language pack (if it’s available).
-
Select Start > Settings > Time & Language > Language.
-
Choose a language from the Add a language list under Preferred languages, and then select Options.
-
Select Download from the Download language pack option.
-
After the language pack is installed, select Back .
-
Choose a language from the Windows display language menu.
Learn more about managing language settings
To manage all aspects of the input and display language settings on your Windows 11 PC, use the following methods.
To switch the keyboard layout you’re using, press and hold the Windows key and then repeatedly press the Spacebar to cycle through all your installed keyboards. (If this doesn’t do anything, it means you have only one installed.)
You can also select the language abbreviation in your taskbar then choose the language or input method you want to use.
Note: In the input field, press the Windows logo key + period (.) to access the Emoji & more keyboard, if your language supports it.
If you can’t find the keyboard layout you want, you may have to add a new keyboard.
Adding an input language lets you set a language-preference order for websites and apps, as well as change your keyboard language.
-
Select the Start > Settings > Time & language > Language & region.
-
Select the language that has the keyboard you want, then select Options.
-
Select Add a keyboard and choose the keyboard you want to add. If you don’t see the keyboard you want, you may have to add a new language to get additional options. If this is the case, go on to step 4.
-
Return to the Language settings page, go to Preferred languages, then select Add a language.
-
Choose the language you want to use from the list, then select Next.
-
Review any language features you want to set up or install, and select Install.
«Add a keyboard» shortcut
The display language you select changes the default language used by Windows features like Settings and File Explorer.
-
Select Start > Settings > Time & language > Language & region.
-
Choose a language from the Windows display language menu.
«Change your display language» shortcut
If a language is listed under Preferred languages but doesn’t appear on the Windows display language list, you’ll first need to install its language pack (if it’s available).
-
Select Start > Settings > Time & language > Language & region.
-
In Preferred languages, select Add a language, enter the language you want, then select Next.
-
Select Download from the Download language pack option.
-
After the language pack is installed, select Back.
-
Choose a language from the Windows display language menu.
«Install a language pack» shortcut
If you receive an «Only one language pack allowed» or «Your Windows license supports only one display language» message, you have a single language edition of Windows 10. Here’s how to check your Windows 10 language edition:
-
Select Start > Settings > About, and then go to the Windows specification section.
-
If you see Windows 11 Home Single Language next to Edition, you have a single language edition of Window 11, and you can’t add a new language unless you purchase an upgrade to either Windows 11 Home or Windows 11 Pro.
Upgrade to Windows 11 Home or Windows 11 Pro
-
Select Start > Settings > Time & language > Language & region.
-
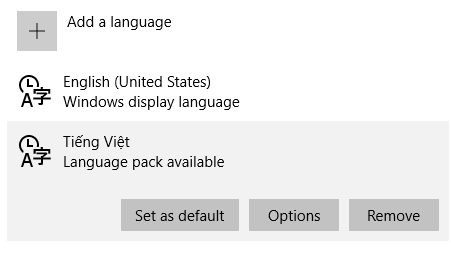
Under Preferred languages, select the language you want to remove, and then select Remove.
-
To remove an individual keyboard, select the language (see step 2), select Options, scroll down to the Keyboards section, select the keyboard you want to remove, and select Remove.
To manage all aspects of the input and display language settings on your Windows 10 device, use the following methods.
To switch the keyboard layout you’re using in Windows 10, press and hold the Windows key and then repeatedly press the Spacebar to cycle through all your installed keyboards. (If this doesn’t do anything, it means you have only one installed.)
You can also select the language abbreviation on the far right of the taskbar and then choose the language or input method you want to use.
Note: In the input field, press Windows +period (.) to access the emoji keyboard, if your language supports this.
If you can’t find the keyboard layout you want, you may have to add a new keyboard.
Adding an input language lets you set a language-preference order for websites and apps, as well as change your keyboard language.
-
Select the Start button, then select Settings > Time & Language > Language.
-
Under Preferred languages, select the language that contains the keyboard you want, and then select Options.
-
Select Add a keyboard and choose the keyboard you want to add. If you don’t see the keyboard you want, you may have to add a new language to get additional options. If this is the case, go on to step 4.
-
Return to the Language settings page, and select Add a language.
-
Choose the language you want to use from the list, and then select Next.
-
Review any language features you want to set up or install, and select Install.
«Add a keyboard» shortcut
Some languages require additional language features
For some languages to work properly, you need an admin on your PC to install the language features. Here’s a list of the languages that are affected:
-
Microsoft IME – Primary keyboard of Japanese
-
Microsoft Pinyin – Primary keyboard of Chinese (Simplified, China), Primary keyboard of Chinese (Simplified, Singapore)
-
Microsoft Wubi – Secondary keyboard of Chinese (Simplified, China), Secondary keyboard of Chinese (Simplified, Singapore)
-
Microsoft Bopomofo – Primary keyboard of Chinese (Traditional, Taiwan), Secondary keyboard of Chinese (Traditional, Hong Kong SAR), Secondary keyboard of Chinese (Traditional, Macao SAR)
-
Microsoft ChangJie – Secondary keyboard of Chinese (Traditional, Taiwan), Secondary keyboard of Chinese (Traditional, Hong Kong SAR), Secondary keyboard of Chinese (Traditional, Macao SAR)
-
Microsoft Quick – Secondary keyboard of Chinese (Traditional, Taiwan), Primary keyboard of Chinese (Traditional, Hong Kong SAR), Primary keyboard of Chinese (Traditional, Macao SAR)
-
Bangla Phonetic – Secondary keyboard of Bengali (India)
-
Gujarati Phonetic – Secondary keyboard of Gujarati
-
Hindi Phonetic – Secondary keyboard of Hindi
-
Kannada Phonetic – Secondary keyboard of Kannada
-
Malayalam Phonetic – Secondary keyboard of Malayalam
-
Marathi Phonetic – Secondary keyboard of Marathi
-
Odia Phonetic – Secondary keyboard of Odia
-
Punjabi Phonetic – Secondary keyboard of Punjabi (Gurmukhi)
-
Tamil Phonetic – Secondary keyboard of Tamil (India)
-
Telugu Phonetic – Secondary keyboard of Telugu
The display language you select changes the default language used by Windows features like Settings and File Explorer.
-
Select the Start button, then select Settings > Time & Language > Language.
-
Choose a language from the Windows display language menu.
«Change your display language» shortcut
If a language is listed under Preferred languages but doesn’t appear on the Windows display language list, you’ll first need to install its language pack (if it’s available).
-
Select the Start button, then select Settings > Time & Language > Language.
-
Choose a language from the Add a language list under Preferred languages, and then select Options.
-
Select Download from the Download language pack option.
-
After the language pack is installed, select Back .
-
Choose a language from the Windows display language menu.
«Install a language pack» shortcut
If you receive an «Only one language pack allowed» or «Your Windows license supports only one display language» message, you have a single language edition of Windows 10. Here’s how to check your Windows 10 language edition:
-
Select the Start button, select Settings > About, and then scroll down to the Windows specification section.
-
If you see Windows 10 Home Single Language next to Edition, you have a single language edition of Window 10, and you can’t add a new language unless you purchase an upgrade to either Windows 10 Home or Windows 10 Pro.
Upgrade to Windows 10 Home or Windows 10 Pro
-
Select the Start button, then select Settings > Time & Language > Language.
-
Under Preferred languages, select the language you want to remove, and then click Remove.
-
To remove an individual keyboard, select the language in question (see step 2), select Options, scroll down to the Keyboards section, select the keyboard you want to remove, and click Remove.
Need more help?
Want more options?
Explore subscription benefits, browse training courses, learn how to secure your device, and more.
Communities help you ask and answer questions, give feedback, and hear from experts with rich knowledge.
Find solutions to common problems or get help from a support agent.

If you ever want to change the display language of Windows 10 or want to add additional languages to use in documents, the steps in this tutorial will help you.
First Method: Using the Settings app
1. Click the Windows logo to open the Start menu, and select Settings from the there.
2. In the pop-up Settings window, select the Time & language option.
3. Select the Region & language option on the left side.
4. On the right side, you will see several options. Find Languages, and click Add a language.
5. Scroll through the list of available languages, and select the one you need. Once selected, the language will be added to the system automatically.
6. When you come back to the language list, select the newly added language, and set it as the system’s default language if you want. For languages that come with a “Language pack available” option, you will need to download the pack first. To do so, click the Options button.
7. At the top of the Language options page, click Download to proceed. In this section, you also have an option to add a special keyboard designed for that language (if available). The QWERTY keyboard is added by default for you.
Second Method: Using the Control Panel
If you prefer the traditional way to add a language as in Windows 7 and Windows 8, here are the steps for you.
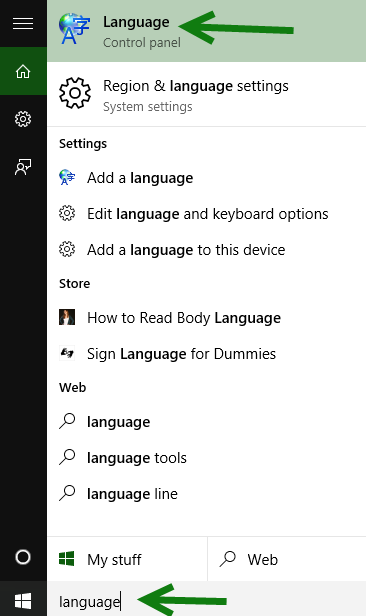
1. In Windows 10, the quickest way to visit the Language settings of the Control Panel is to type Language in the search box on the taskbar.
2. Similar to the steps above, click Add a language.
3. Use the search box at the top right to find the language you want, select it, and click Add.
4. If you want to display all system text in the new language, you will need to download the language pack in Options. If you only want to use the keyboard input, this step is not necessary.
5. Finally, click Download and install language pack. The system will display all text in the new language when you boot the system.
Looking to change the language on a Windows 10? This article will show you how to do it the easy way. Windows 10 allows users to customize many aspects of the system to suit their needs, including the system language. The system language and input method are essential when you are using multiple languages in the computer system and want a multilingual user interface. If you’d like to change or add a New Language to Windows 10, then you’ve come to the right place.
Steps
-

1
Open Settings. Click on the Start button
, and then click on the settings gear
.
-
2
Select the «Time & Language» menu.
-
3
Select «Language» in the left pane.
-
4
Click on «+ Add a language». This will bring up the «Choose a language to install» menu.
-
5
Select the language that you want to install. There is a search bar at the top of the page that you can use to search for one. Once you select a language, click Next.
-
6
Select the items that you want to install, and then click Install. This will install the language onto your computer.
- If you want to make that language the new default language, then make sure to check the «Set as my Windows display language».


Ask a Question
200 characters left
Include your email address to get a message when this question is answered.
Submit
-
You can add as many languages as you like.
References
About this article
Thanks to all authors for creating a page that has been read 1,459 times.
Is this article up to date?
wikiHow Tech Help:
Tech troubles got you down? We’ve got the tips you need
Subscribe
You’re all set!
—
—
Updated: 09/12/2023 by

The Microsoft Windows operating system allows users to change the display language from one language to another, including Spanish, French, German, and Arabic. Some restrictions may apply, depending on the version of Windows. Follow the steps below for your version of Windows to change the display language settings.
Windows 11
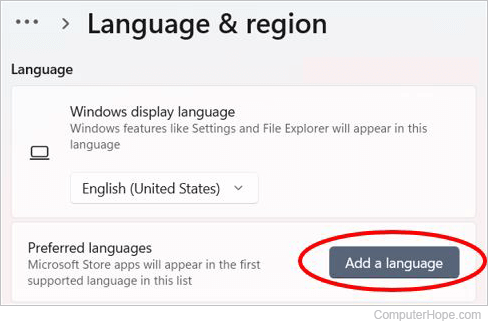
- Press the Windows key, type Language settings, and press Enter.
- In the window that appears, click the Add a language button under the Language section.
- Type a language to add or select from the list.
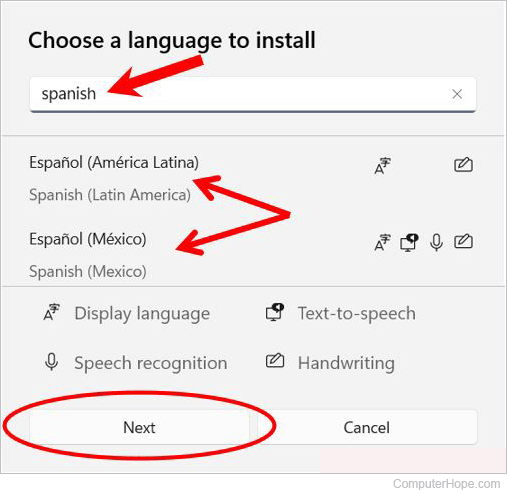
- After you select a language, click the Next button.
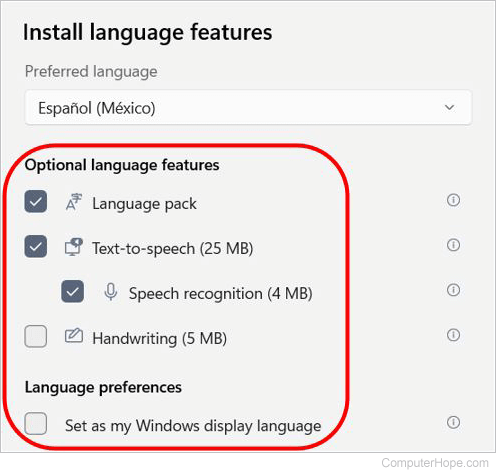
- In the Install language features window, select or deselect any optional language features you want to install.
- You should now see the new language under the Languages section.
- Click the Install button to install the new language. The installation process may take several minutes to complete.
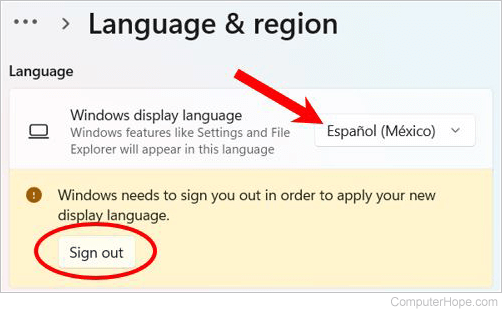
- After the new language is installed, select it from the Windows display language drop-down menu.
- Use the Sign Out button to sign out and then sign back into Windows, with the new language now set as the default language.
Windows 10
- Press the Windows key, type Language settings, and press Enter.
- In the window that appears, click the
 icon.
icon.
- Type a language to add or select from the list.
- After you select a language, you are asked to pick a region.
- You should now see the new language under the Languages section.
- Click the new language again and click the
 button.
 - In the screen that appears, under Language options, click the
 button.
 - Once the new language is downloaded, return to the previous screen.
- Click the new language again, and click the Set as default button.
- Restart your computer to display the new language.
Windows 8
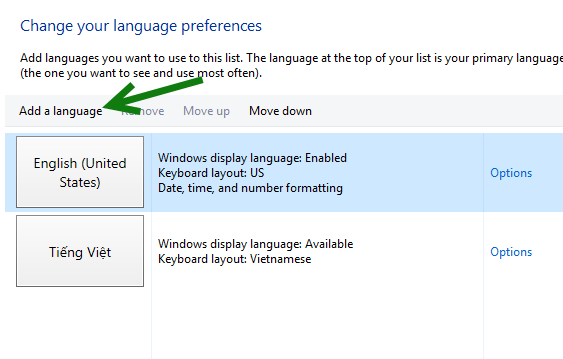
- Open the Control Panel.
- Under the Clock, Language, and Region section, click the Add a language link.
- Under Change your language preferences, click the Add a language option.
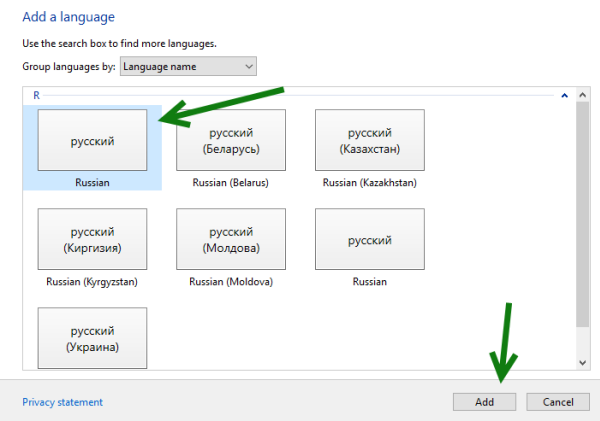
- Select the language you want to add and click the Add button.
Note
Some languages have sub-options or different dialects you need to choose. If the Add button changes to «Open,» you must select a sub-option for that language.
- The selected language is added to the language list. To make the added language the primary language, click the language in the list and click Move up until it’s at the top.
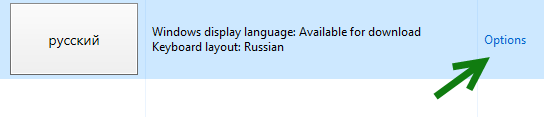
The language pack you added may need to be downloaded and installed in Windows 8 before you can use it. Next to the language name, if it says «Windows display language: Available for download,» follow the steps below.
- Click the Options link to the right of the language name.
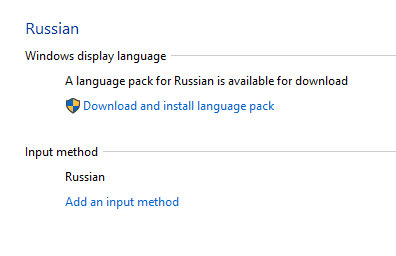
- Click the Download and install language pack link under the Windows display language section.
- After the download and install process is completed, restart the computer for the new display language to take effect.
Windows 7 and Vista
Note
Changing the language in Windows 7 requires you to have the Ultimate edition or Enterprise edition. Home and Professional editions do not have the language option.
In Windows 7, you first need to download and install the language pack you want to use. Then you can select and change the display language.
Download and install the language pack
- Open the Start menu and navigate to All Programs > Windows Update.
- Click the Optional Updates option.
- Check the box for the language pack you want to download and install, then click OK.
- Run the Install Updates process to download and install the language pack.
Change display language
- Open the Control Panel.
- Click the Clock, Language, and Region option.
- Click the Change the display language link.
- In the Choose a display language drop-down list, select the language you want to use as the display language and click OK.
- Restart the computer for the new display language to take effect.