User Manual — Table of Contents
- Introduction and Setup
- System Requirements
- Setup Windows Driver (Primary Machine)
- Run the spacedesk Driver Installer
- Verify if Setup was Successful
- Verify if latest version is installed
- Setup Viewer (Secondary Device)
- Install on Android and iOS Smartphones and Tablets via App Store
- Install on Windows PCs, Laptops and Surface Tablets
- Run on any Machine in HTML5 Web browser
- Viewer Platforms and Features
- Connecting a new display monitor over the network
- Network Discovery
- Establishing The Network Connection
- Verify Network Connection and additional Display Monitor
- Connecting a new display monitor over the USB cable
- Direct USB Cable Connection (Android only)
- USB Tethering (iOS and Android)
- Configuration and Settings
- Windows Driver (Primary Machine)
- Desktop Extension or Desktop Duplication (mirror) Settings in Display Control Panel
- Desktop Extension or Desktop Duplication (mirror) Settings in Display Switch
- Set as Primary Display
- spacedesk Server Automatic Start
- Disable spacedesk
- spacedesk Disconnect Delay
- Viewer (Secondary Device)
- Audio Speaker
- Mouse, Keyboard, Touchscreen And Pen Input
- Screen Resolution
- Automatic Connect
- Full Screen Upon Connect
- Auto Rotation
- Keep Monitor Active
- Auto-Start Windows Viewer
- Windows Driver (Primary Machine)
- Performance Tuning
- Use Direct Cable Connection
- USB Cable
- Network Cable
- Avoid and Bypass Network Routers
- Use Wifi Direct / Wifi Hotspot / Wifi Access Point
- Reduce Screen Resolution
- Color Depth and Image Compression
- Framerate per second
- Use Direct Cable Connection
- TROUBLESHOOTING
- Critical Errors
- Windows 10 Crash with BSOD (Blue Screen of Death)
- Black Screen on Main Monitor
- Known Issues, Problems and Limitations
- Incompatible Third Party Products
- Windows 11/10 spacedesk only worked once (not working after reboot)
- Windows 11/10 Desktop Duplication (mirror) option not available
- Windows 11/10 Known Issues and Unsupported Features
- Windows 10 old version not supported
- Windows 8.1 Limitations and Unsupported Features
- Windows 8.1 Crash upon client connect
- Network Connection
- Cannot discover Primary Machine
- Connection Error
- Firewall Settings on Primary Machine
- VPN (Virtual Private Network)
- Windows Driver (Primary Machine)
- spacedesk Server Status
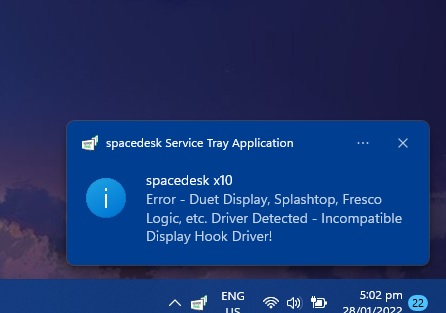
- Incompatible Display Hook Driver Detected
- Repair spacedesk Driver Setup
- Various
- Viewer (Secondary Device)
- Check Viewer App version
- HTML5 VIEWER
- Connection Error
- Limitations
- List of Incompatible Windows Application
- Critical Errors
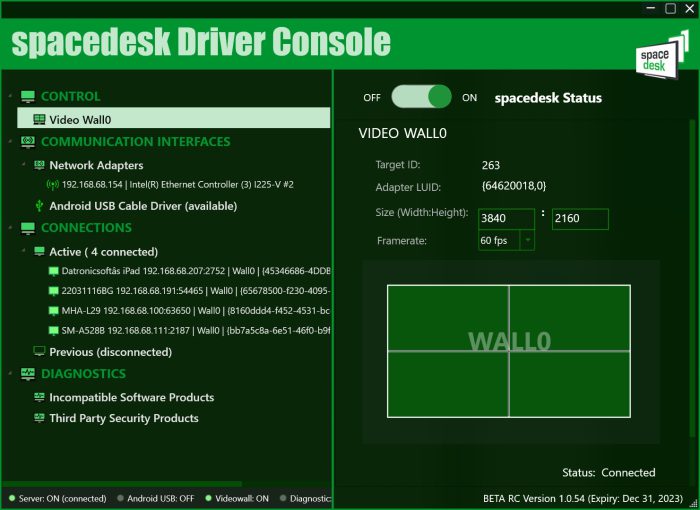
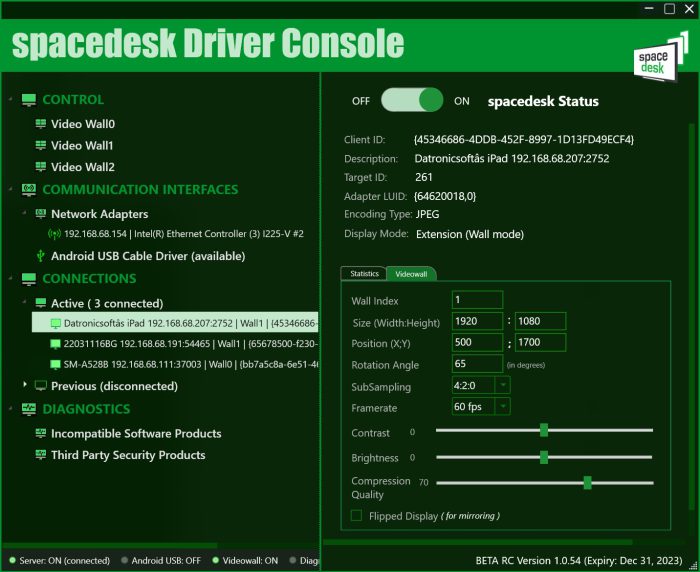
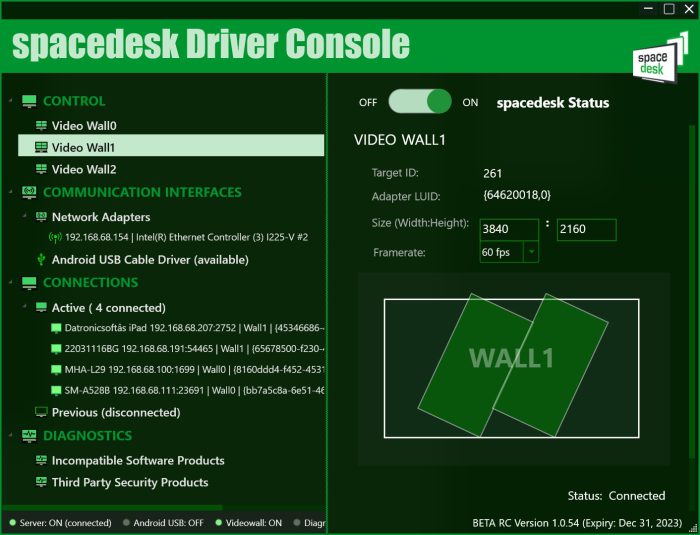
- Video Wall Configuration
- Videowall
- Settings
- Videowall Disconnect Delay
- Wall Display Settings
- Client Display Settings
- Video Wall Operation
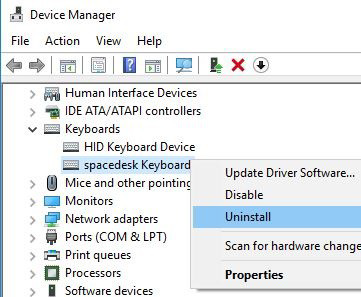
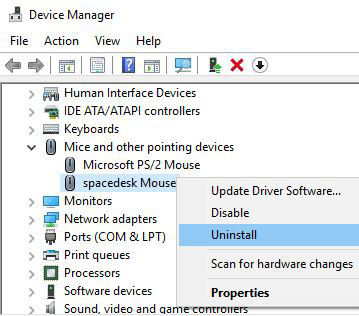
- Uninstall on Windows Primary Machine
- Uninstall Using Windows Control Panel
- Uninstall Using .Msi File
- Troubleshooting Uninstall
- Manual Uninstall (Troubleshooting Only)
- Windows Secondary Machine Uninstall
- Appendix
- Release Notes
- File List
Introduction and Setup
At least 2 machines are needed to operate spacedesk. These machines must be connected via a Local Area Network (e.g. Ethernet or Wireless) supporting TCP/IP network protocol. Each one of the two machines is running its own kind of spacedesk software:
1. The Primary Machine runs the spacedesk DRIVER software. It includes network display server software and display device drivers. This allows to extend or duplicate the Windows Desktop to the screen of another machine over the network.
• Windows PC
• Laptop
• Surface Pro tablet (Windows Desktop application)
2. The Secondary Machine runs spacedesk VIEWER software which acts as the secondary display. It can be one (or multiple) of the following:
• Android tablet or phone (Android VIEWER)
• Windows PC, laptop or Surface Pro tablet (Windows Desktop application)
• Apple Mac, iPad or iPhone (iOS VIEWER)
• Linux PC and a variety of other machines (HTML5 VIEWER)
3. The Network Connection in between can be direct or through router/switch/access point connected by cable or wireless. It can be one or multiple of the following:
• Ethernet crossover cable direct connection (best performance)
• Ethernet cable through router/switch/hub (good performance)
• WiFi direct connection to Access Point (intermediate performance)
• USB Tethering or USB to Ethernet (intermediate performance)
• WiFi through router/switch/hub (worst performance)
System Requirements
Primary Windows Machine (network display server)
The spacedesk server runs a Windows service and the WDDM Display Driver which is visible to Windows just as an own separate virtual graphics adapter (Windows 10) or as additional virtual display monitors on the primary graphics adapter (Windows 8.1). These additional virtual displays can mirror the main screen or extend the Windows Desktop. spacedesk DRIVER software is capturing their screen content, compressing it and transmitting it over the LAN (Local Area Network) to the spacedesk VIEWERs.
• Windows 11 / 10 (version 1607 – later only) / 8.1
• Graphics adapter Nvidia / AMD / Intel / Basic Display
• WDDM 3.0 / 2.7 / 2.6 / 2.5 / 2.4 / 2.3 / 2.2 / 2.1 / 2.0 / 1.3 / 1.2 / 1.1
• DirectX 12/11/10/9
Secondary Machine or Device (network display client)
Android VIEWER on tablets and phones.
• Android (> version 4.1)
iOS VIEWER on iPhones, iPads and iPod touch
• iOS (> version 9.3)
Windows VIEWER on Windows PCs, laptops and Surface.
• Windows 11 / 10 / 8.1 / 7
• DirectX 10
• DirectX WARP (Min. 800 MHz CPU / Min. 512MB RAM)
HTML5 VIEWER on any device running operating system with HTML5 Web browsers
Chrome (> 16), Safari (> 5.1) Internet Explorer (> 10), Opera (> 27) e.g.:
• Windows Phones (Windows Phone 10 / 8.1)
• Windows Surface, tablet, laptop and PC (Windows 10, 8.1, 8, 7, Vista, XP)
• Mac (OSX)
• Linux PC and laptop
Network Connection
Network needs to run TCP-IP protocol.
Setup Windows Driver (Primary Machine)
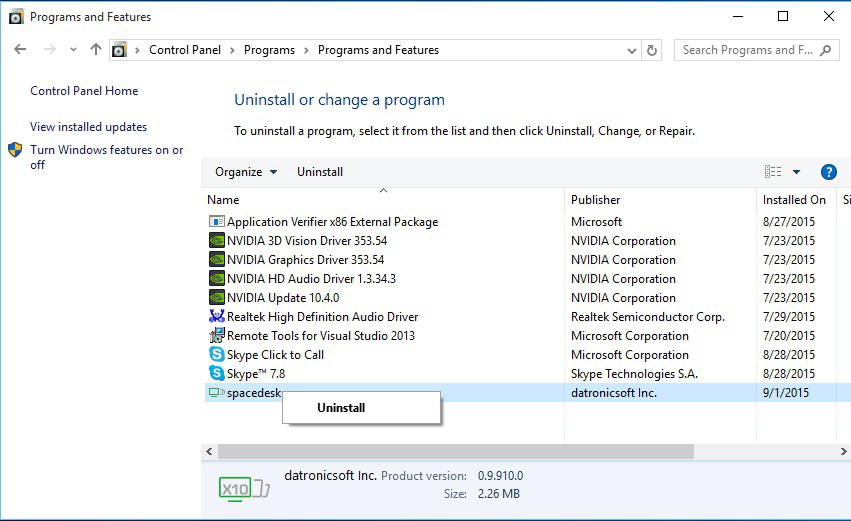
Before installing a new spacedesk version, uninstall any previous version. This can be done on Windows Control Panel → Programs and Features.
Run the spacedesk Driver Installer
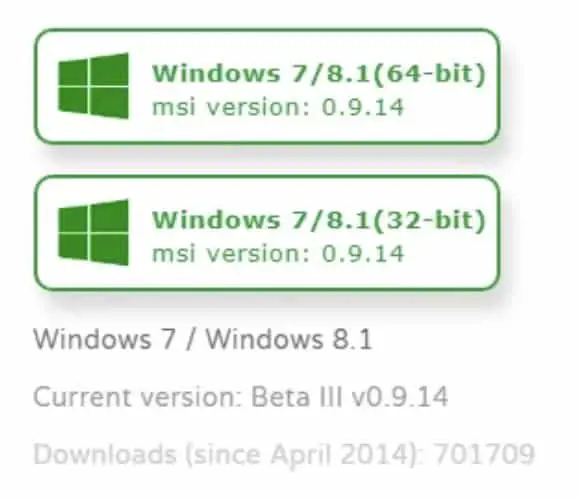
For Windows 10/11:
spacedesk_driver_Win_10_32_v1067_BETA.msi for 32-bit platform
spacedesk_driver_Win_10_64_v1067_BETA.msi for 64-bit platform
For Windows 8.1:
spacedesk_driver_Win_8.1_32_v1067_BETA.msi for 32-bit platform
spacedesk_driver_Win_8.1_64_v1067_BETA.msi for 64-bit platform
Make sure to check the Firewall configuration before proceeding otherwise no client will be able to discover this Primary Machine nor connect to it.
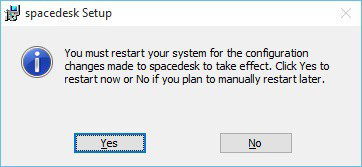
Only on Windows 8.1 the dialogs below will be shown and need to be confirmed. These operating systems, also require a reboot after the setup has completed.
Verify if Setup was Successful
First, make sure that the spacedesk Driver is properly installed and can be seen underneath Programs and Features.
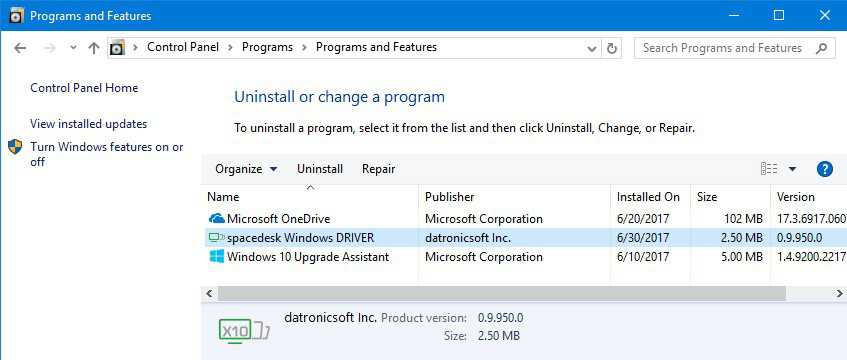
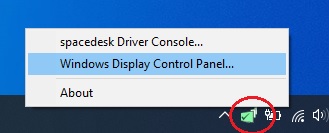
Check if the spacedesk System Tray icon (at the bottom right of the screen) is visible in the notification area and click it to show spacedesk status ON in spacedesk Driver Console app.
![]()

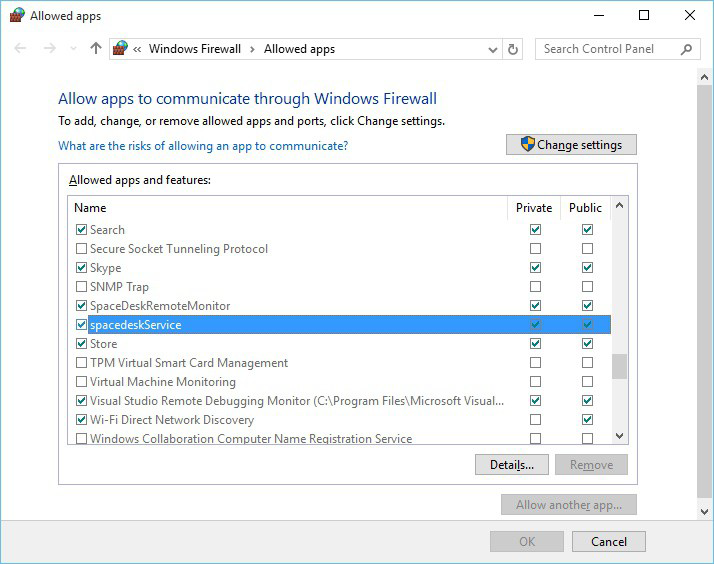
Check the Windows Firewall settings if spacedeskService.exe is allowed on private or public network. Open Control Panel → Windows Firewall → Allow an app through Windows Firewall, allow an another app then browse for spacedeskService.exe located at “C:\Windows\System32” folder.
Verify if latest version is installed
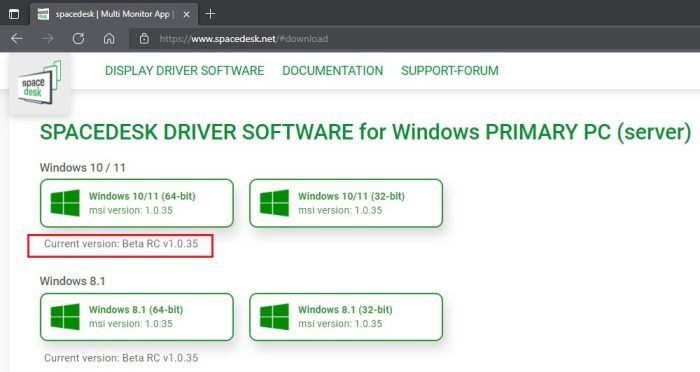
Check spacedesk version by right-clicking the spacedesk System Tray icon (at the bottom right of the screen) then click About to show the spacedesk SERVER About window displaying the current version.
![]()
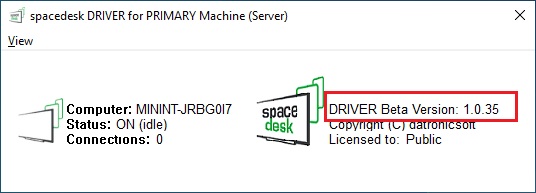
Then compare this version with the website’s current spacedesk version.
Setup Viewer (Secondary Device)
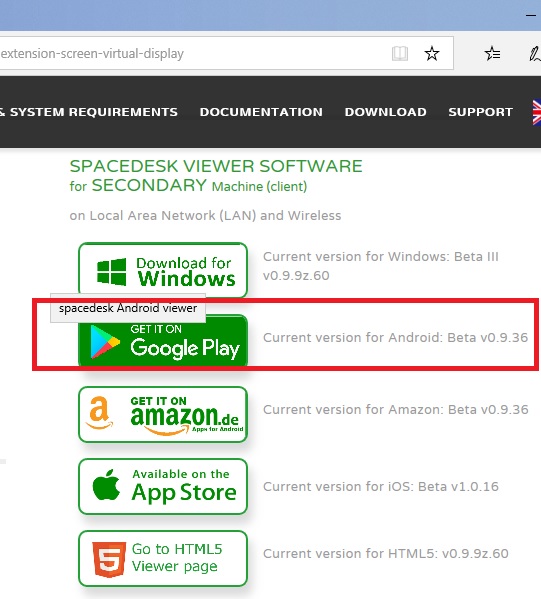
Install on Android and iOS Smartphones and Tablets via App Store
Android VIEWER is installed from the Google Play Store and iOS VIEWER is installed from the iTunes App Store.
Install on Windows PCs, Laptops and Surface Tablets
A Windows PC, laptop or Surface tablet can be used as Secondary Machine. spacedesk Windows VIEWER needs to be downloaded from the
spacedesk website. It needs setup and installation as shown below.
Run the spacedeskWindowsVIEWER setup installer, spacedeskWindowsVIEWER_v0930_BETA.msi. After a successful installation of Windows VIEWER application a shortcut is created on the desktop.
Run on any Machine in HTML5 Web browser
For spacedesk HTML5 VIEWER, no setup installation is needed on the Secondary Machine. HTML5 VIEWER operates with a standard web browser without any setup needed upfront. It can be opened directly from the website http://viewer.spacedesk.net/. Make sure that the web browser (e.g. Safari, Google Chrome, Opera, Internet Explorer, etc.) is updated to the latest version.
It is important to understand, that spacedesk HTML5 VIEWER does not operate over the internet. It does not need an internet connection. It does not even need to be opened over the internet as described above. The HTML5 page can be saved locally.
Local install (optional):The web page can be saved to be used off-line even without internet connection. Follow the instructions below:
• Refresh using Ctrl-F5 keys after opening HTML5 page (this ensures that everything is updated).
• For Google Chrome browser, use the the menu “More tools ” and select “Create shortcut… “.
• For Microsoft Internet Explorer browser, use the the menu “Tools ” and select “Add site to apps “
Viewer Platforms and Features
| Feature | Windows 7 Client | Windows Store Client | Android Client | iOS Client | HTML5 Client |
|---|---|---|---|---|---|
| On-Screen-Keyboard | |||||
| Keyboard | |||||
| Mouse | |||||
| Touch | |||||
| USB Cable Connection | |||||
| Audio Speaker |
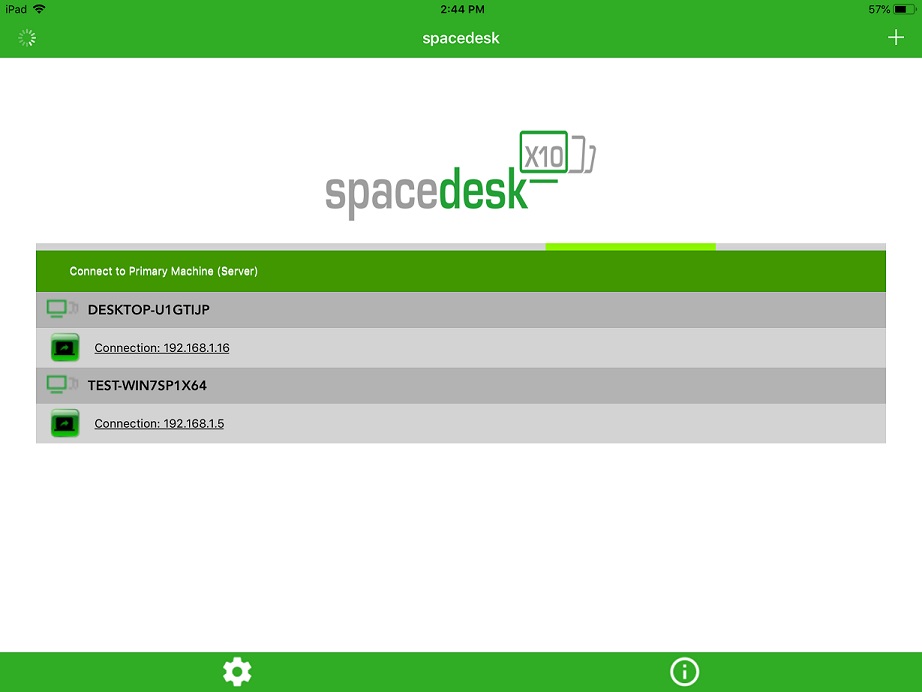
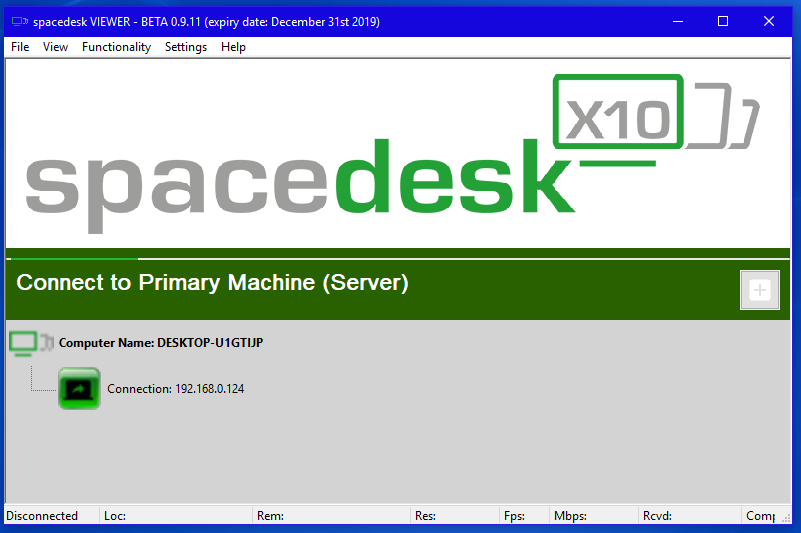
Connecting a new display monitor over the network
Network Discovery
spacedesk secondary machines (except HTML5 VIEWER) can do automatic network discovery of Primary Machines.
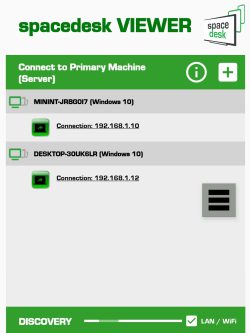
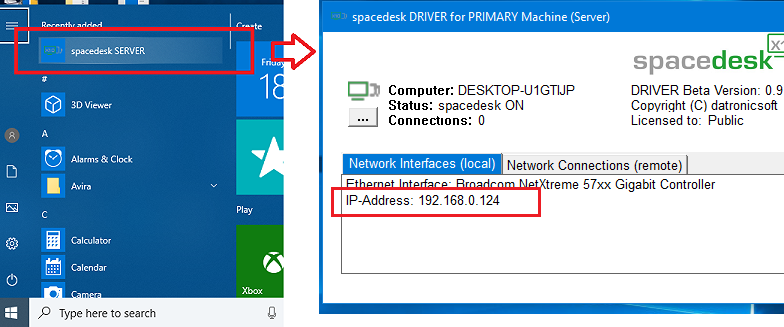
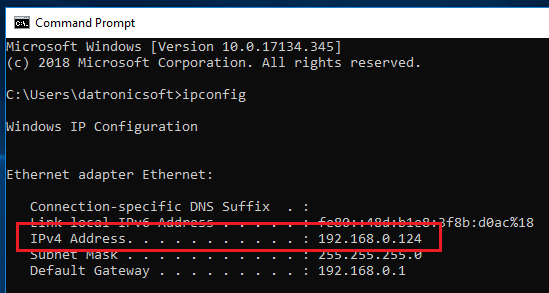
Only when using HTML5 VIEWER or in case the Primary Machine cannot be discovered, the IP address of the Primary Machine needs to be entered manually. It can be determined in various ways:
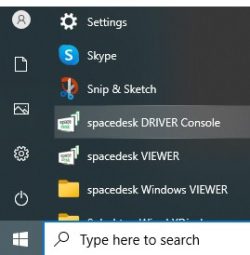
• Click the spacedesk System Tray icon (at the bottom right of the screen) OR the spacedesk DRIVER Console icon on the Windows Start menu to display the spacedesk DRIVER Console user interface.
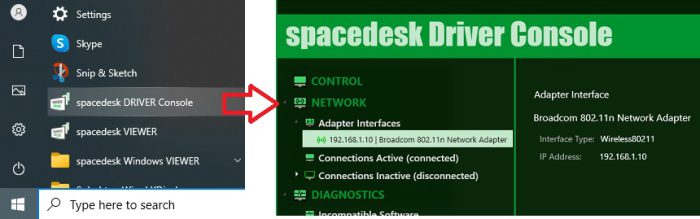
(for Windows 10-11 primary machine)
(for Windows 8.1 primary machine)
• Typing ipconfig in a Windows command prompt.
Establishing The Network Connection
Android / iOS / Windows Viewer
On the client side, initiate connection to server by opening the spacedesk VIEWER app and select the desired server on the list of detected primary machines to automatically connect. If Primary Machine cannot discover, please check the chapter Troubleshooting Network Connection – Cannot Detect Primary Machine below.
HTML5 Viewer
Using the updated web browser, go to HTML5 viewer page then type the IP address of primary machine where the spacedesk DRIVER is installed. The “Need Help?” button below the Connect button provides an instructions on how to get the IP address of server machine and then click the “Connect” button to start the connection.
Verify Network Connection and additional Display Monitor
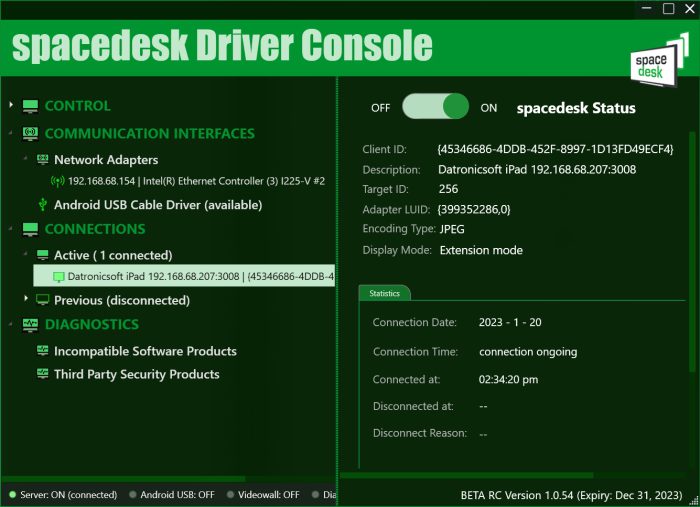
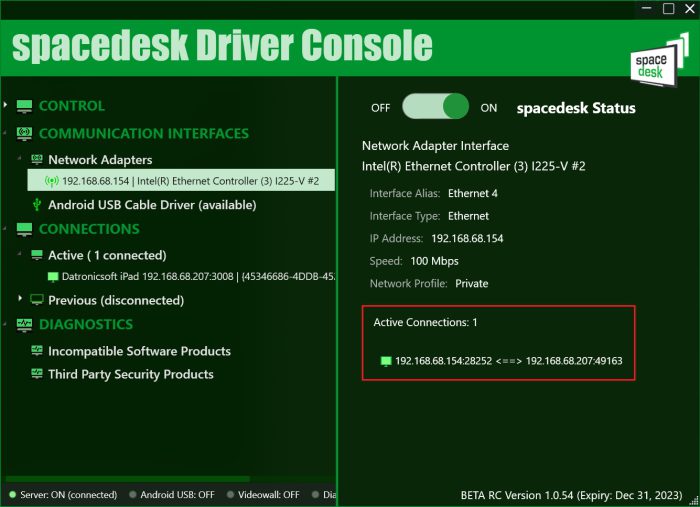
On the Primary Machine side, check if the connection is established. Just click the spacedesk System Tray icon (at the bottom right of the screen) on the primary machine to display the spacedesk Driver Console window -> Connections Active (connected) page and on Adapter Interface -> current Network Adapter -> Active Connections.
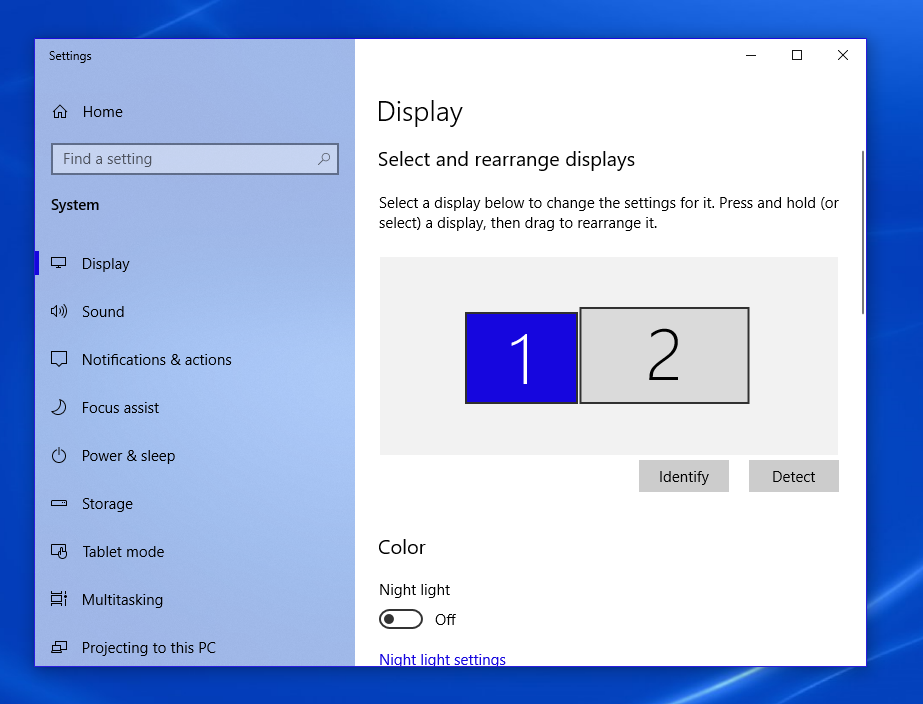
Open Display Control Panel via spacedesk Tray icon, right-click -> Windows Display Control Panel menu then check if there’s a secondary display attached.
Connecting a new display monitor over the USB cable
Direct USB Cable Connection (Android only)
USB cable connection is now supported in Android client devices.
To enable this feature, just open the spacedesk Driver Console → Communication Interfaces, then switch ON the Android USB Cable toggle switch. Plug the Android client device via direct USB cable to primary machine then spacedesk Viewer app will automatically connect as spacedesk display.

FYI:
Android USB ON disables other USB cable applications (e.g. File Transfer).
Android USB OFF enables other applications again.
In case of USB cable issues:
– Slowly unplug and plug USB cable a few times.
– Restart Android mobile device.
– Restart Windows PC.
USB Tethering (iOS and Android)
If the secondary machine is a smartphone or tablet that supports USB tethering, use the USB cable to establish a network connection between primary and secondary machine. USB tethering typically supported on devices with Cellular Network.
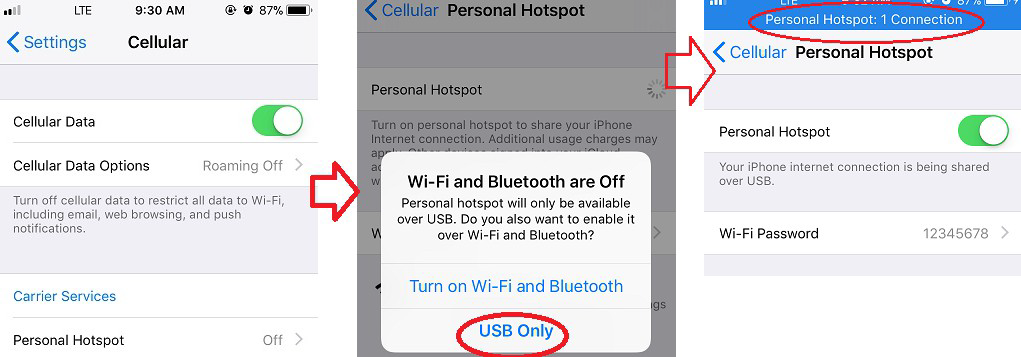
For iOS device, make sure to turn OFF first the Wifi. Connect the iOS device to Windows primary machine via USB lightning cable. Then switch ON the Cellular Data and Personal Hotspot and an option will pop-up and select USB Only.
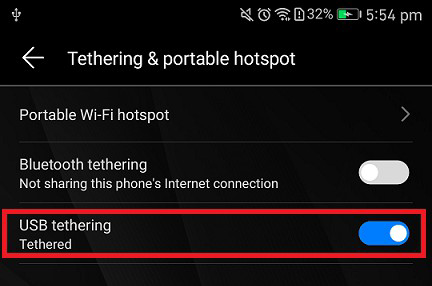
For Android device just go to settings and find the Tethering & portable hotspot, then connect the USB cable of Android device to Windows primary machine, then enable the USB tethering in Android settings.

Configuration and Settings
Windows Driver (Primary Machine)
Desktop Extension or Desktop Duplication (mirror) Settings in Display Control Panel
Right Mouse Click on Desktop → context menu “Display settings” leads to Display Control Panel. Display Control Panel can be used to change display resolutions and to verify proper operation. During Desktop Extension the following status should be shown:
During Desktop Duplication (Mirror) the following status should be shown:
During Single Output (Second Screen Only) the following status should be shown:
Desktop Extension or Desktop Duplication (mirror) Settings in Display Switch
Display Switch (Windows logo + P) can also be used to change modes
Set as Primary Display
Setting the spacedesk display as primary/main display can be done by selecting the display then underneath Multiple displays dropdown list, there’s a check box “Make this my main display”.

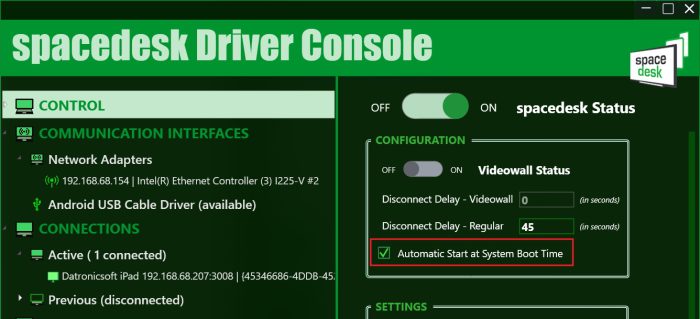
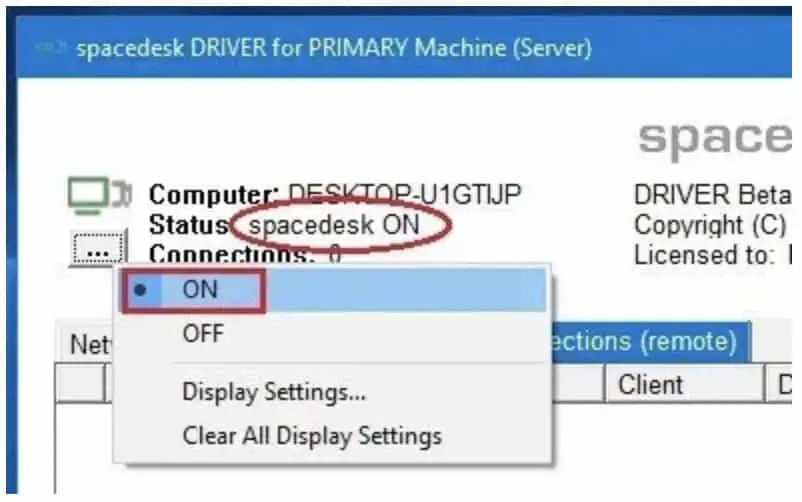
spacedesk Server Automatic Start
spacedesk is set to auto start at system boot time by default.
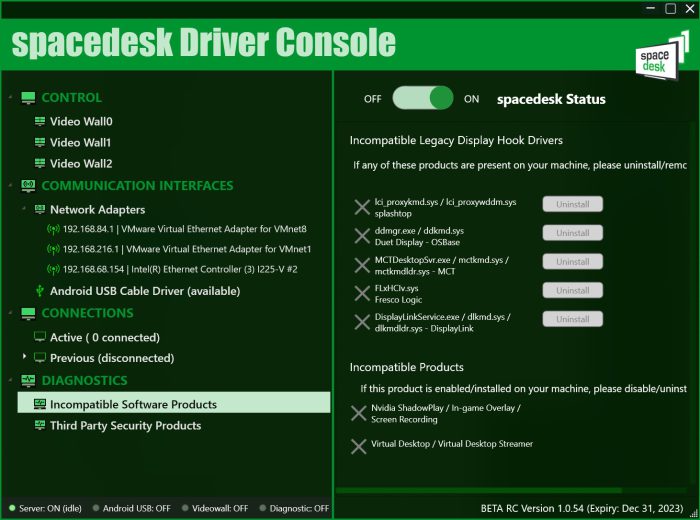
This setting is configurable via spacedesk Driver Console app -> Control -> Automatic Start at System Boot Time check box.
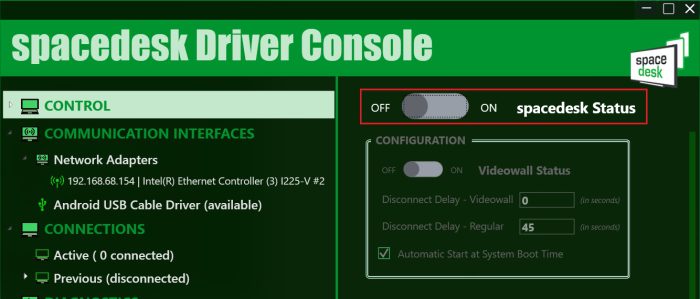
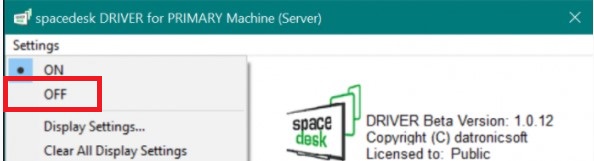
Disable spacedesk
Disabling the spacedesk server temporarily to prevent other spacedesk client connection can be done via spacedesk Driver Console user interface → CONTROL → spacedesk Status, toggle OFF for Windows 10-11 primary machine.
Via spacedesk SERVER window User Interface → Settings → OFF for Windows 8.1 primary machine.
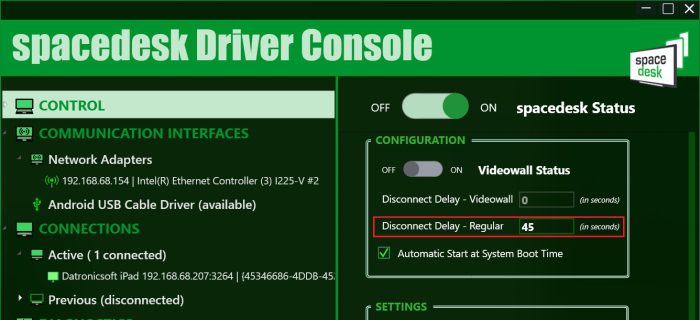
spacedesk Disconnect Delay
In case of disconnection event due to temporary network connection lost, spacedesk display will remain connected until the specified Disconnect Delay times out.
This setting is configurable only if spacedesk Server is switched OFF.
A -1 value is equivalent to infinite (spacedesk client display will not disconnect until the primary machine reboots).
By default this settings is set to 45 seconds.
Viewer (Secondary Device)
Below a few configuration settings to adjust spacedesk operation to individual needs.
Audio Speaker
Current spacedesk Android and Windows 7 Viewer apps already supports remote Audio.
To enable in spacedesk Android Viewer app, make sure to enable first the on-screen menu.
Upon spacedesk connect, Audio can be enabled/disabled via On-Screen menu.
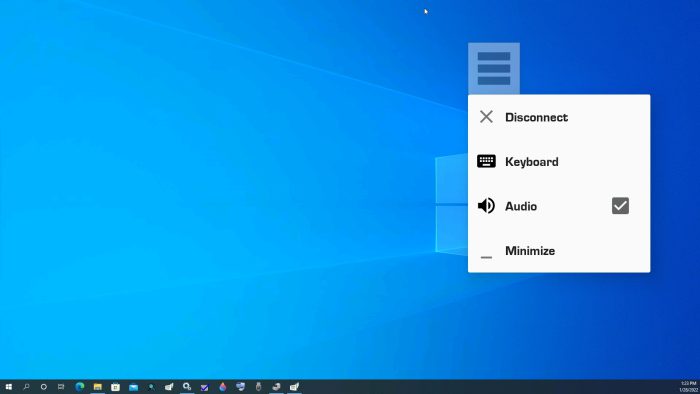
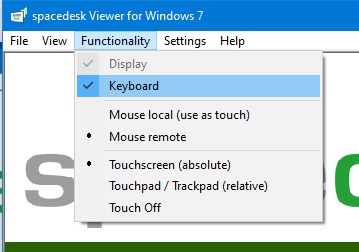
To enable in spacedesk Windows 7 Viewer app, click the Functionality -> Audio Speaker (experimental) before spacedesk connection.
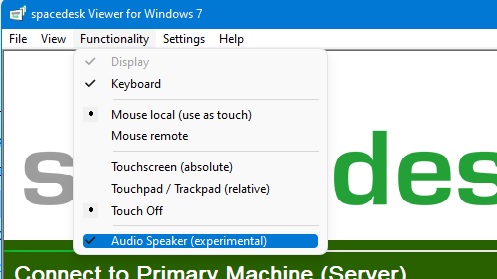
Mouse, Keyboard, Touchscreen And Pen Input
To enable the “Mouse, Keyboard and Touchscreen ” option:
Windows 7 VIEWER → Functionality menu.
For touchscreen, two options are available absolute and relative mode.
Touchscreen (absolute) mode provides an absolute input position of the mouse pointer within your viewer screen.
Touchpad/Trackpad (relative) mode is using relative desktop coordinates.
To exit from remote control mode just press “Alt+Shift” key combination.
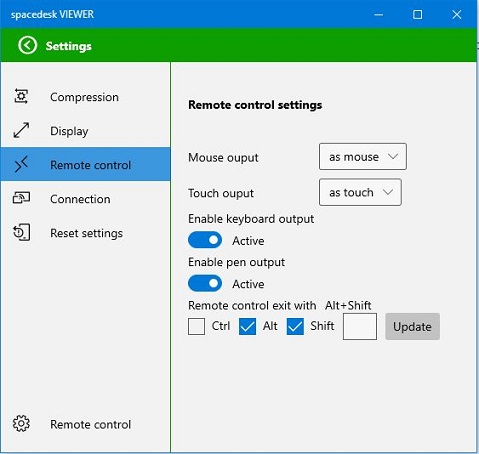
Windows 10 VIEWER App → Settings → Remote Control menu.
Mouse output can be set as the actual mouse or as emulated touch.
Touch output can be set as actual Touch or as emulated Mouse.
Keyboard and Pen can be activated or deactivated.
To exit from remote control, you can set a custom key combination. The default key combination is “Alt+Shift”.
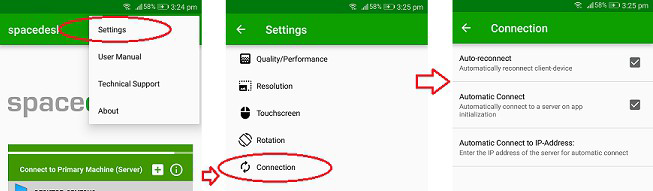
On Android and iOS VIEWER app, touch screen, Keyboard and Pen remote input feature is also supported.
It can be enabled on Settings → Input devices.
(Android)

(iOS)
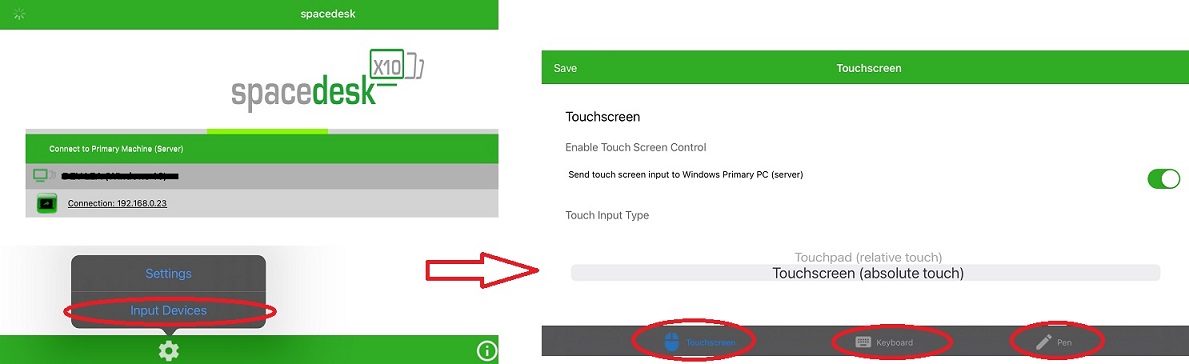
There are two different options on how touch feature can work on Android and iOS device.
• Absolute touch provides an absolute input position of the mouse pointer.
• Relative touch which works like a touch pad.
Keyboard remote control can be activated/deactivated.
For software keyboard on Android VIEWER app, just do the two finger touch on the viewer screen to activate the onscreen keyboard.
Hardware keyboard is also supported (USB or wireless).
Pen remote control can be activated/deactivated too.
On HTML5 VIEWER, just go to Advanced Performance Settings → Remote Control to enable remote control feature. However, no keyboard control only mouse and touchscreen support.
Below are the touch gestures for Android and HTML5 Viewer:
Move pointer: Tap with one finger and drag anywhere on the screen.
Left-click: Tap the screen with one finger
Right-click: Tap and hold the screen, then release.
Drag Windows/Object: Tap two times for relative OR tap once for absolute, hold then drag.
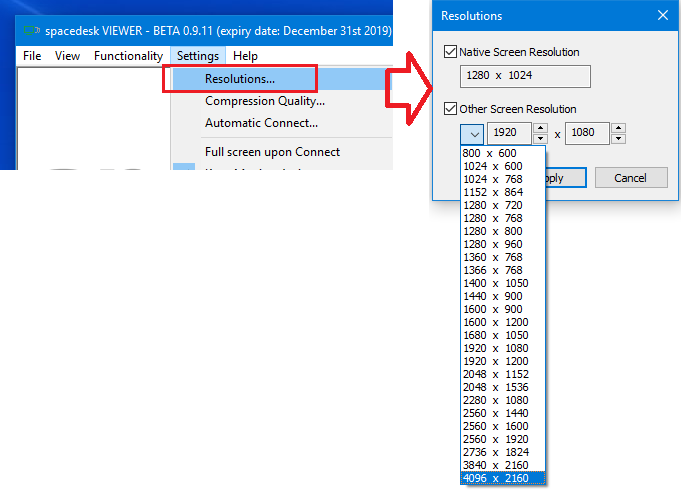
Screen Resolution
The “Resolutions” dialog box of the Windows VIEWER Settings allows the users to use up to two resolutions. The client’s native resolution can be enable and use by checking the box of “Native Screen Resolutions”.Then the user can also add another resolution by selecting one of the typical screen resolutions on the combo box.
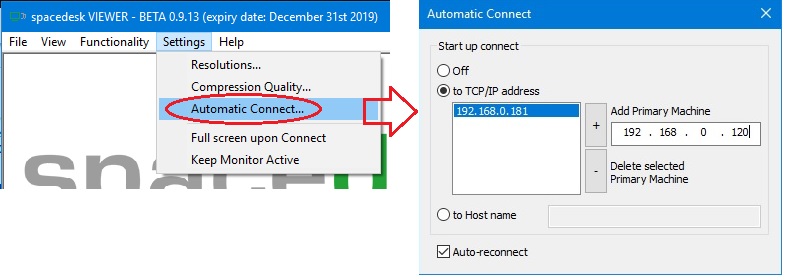
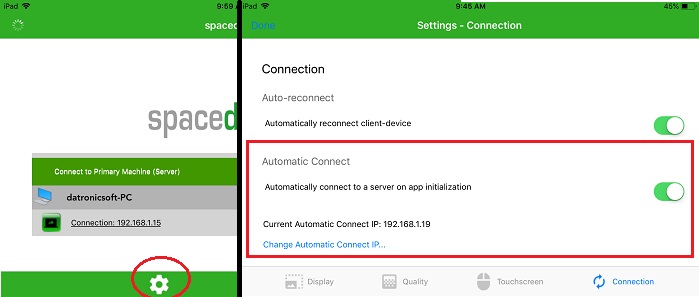
Automatic Connect
The “Automatic Connect” option of the Windows and Android viewer’s Settings allows the user to enable the automatic connect to IP address (of multiple primary machines) or hostname upon launching the viewer app and also an option to “Auto-reconnect” to the last server machine connected in case of sudden disconnection from system sleep or hibernate or from any kind of unwanted disconnection.
 (windows viewer)
 (android viewer)
 (iOS viewer)
Full Screen Upon Connect
The “Full screen upon Connect” option on Windows VIEWER Settings will enable the automatic switching to full screen mode upon connecting to the server.
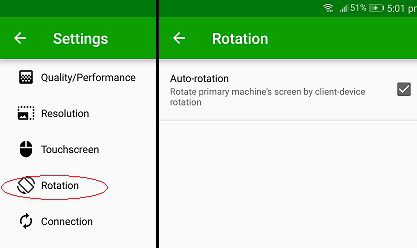
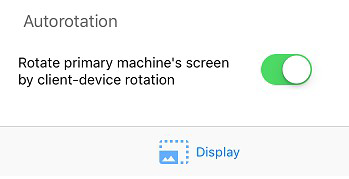
Auto Rotation
The “Auto rotation” option on iOS and Android viewer settings allows users to enable an automatic rotation of viewer screen according to current display orientation (eg Portrait or Landscape mode) of iOS / Android device.
 (android)
 (iOS)
(iOS)
Keep Monitor Active
The “Keep Monitor Active” option on Windows VIEWER Settings will prevent the secondary machine’s monitor from going to Display Off or System Sleep only when Windows VIEWER is connected to the server.
Auto-Start Windows Viewer
To set the spacedesk Windows VIEWER app to auto start during Windows start up:
• open the run command (Window + R key combination),
• paste “% appdata% \ Microsoft \ Windows \ Start Menu \ Programs \ Startup” then enter,
• on the Startup folder just copy the spacedesk Windows VIEWER shortcut file found on your desktop.
Performance Tuning
Use Direct Cable Connection
Cable connections perform better than wireless networks. USB and network cable is faster than WiFi.
USB Cable
spacedesk supports direct USB connection for Android.
On Apple iOS, spacedesk performance can be improved by USB Tethering.
Go to chapter “CONNECTING A NEW DISPLAY MONITOR OVER THE USB CABLE” for more details.
Network Cable
The faster the network, the faster the display performance. The fastest option is always a direct connection via network cable, e.g. a Gigabit Ethernet.
Currently minimum reasonable network bandwidth needed by spacedesk BETA ranges around 50 Mbit/sec. Substantial improvements including support of slower networks are planned for the first release version.
Avoid and Bypass Network Routers
The network router is the heaviest performance restraint. Cirumventing routers substantially improves performance. This can be done in various ways:
– On wired networks, just use crossover cables.
– On wireless networks use WiFi Direct (see paragraph below).
– WiFi Direct has almost the same performance as cable.
Use Wifi Direct / Wifi Hotspot / Wifi Access Point
Performance on wireless networks can be improved by configuring the Windows 10 PC/laptop or the mobile device as Wifi Hotspot / Wifi Access Point. Connection to this Access Point needs to be established before connecting spacedesk.
To configure the Mobile Hotspot option on Windows 10 PC/laptop. Just go to Start → Settings → Network & Internet → Mobile Hotspot, then turn it ON. Try to connect the client device(phone/tablet/laptop) to the wireless network name generated by the Mobile Hotspot. Then run the spacedesk VIEWER and connect to the IP address of server machine, in this case it should be the IP address of the Mobile Hotspot network generated (Microsoft Wi-Fi Direct Virtual Adapter).
Reduce Screen Resolution
The lower the resolution of the networked display screen, the faster the display performance.
Color Depth and Image Compression
spacedesk uses image compression to improve display performance. This mechanism reduces image size before transferring images over the network. The spacedesk image compression algorithm is lossy. It reduces quality and color depth of the image.
On fast networks, color depth and image quality can be kept very high while still achieving good performance.
On slow networks, color depth and image quality need to be reduced to achieve good performance.
The “Compression Quality” dialog box of the Windows VIEWER Settings allows the user to enable or disable the compression of screen updates. To choose OFF means to use RGBA 32-bit color format of screen image and no image quality reduction will be done. To choose On means that the user allows to reduce color depth by Chroma Downsampling and adjusts the compression quality to find the ideal image quality and performance speed.
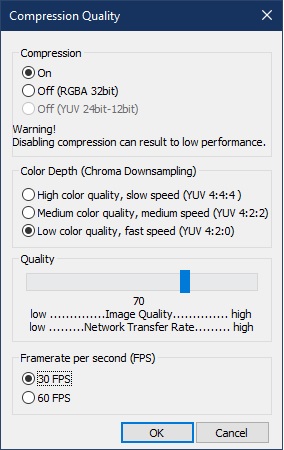
YUV 4:4:4 – No reduction of color information. High quality of screen image but, performance intensive. Can only be used on very fast networks
YUV 4:2:2 – Reducing the color information by 1/3 (from 24 bit to 16bit) reducing color quality of screen image and improving performance.
YUV 4:2:0 – Reducing the color information by 50% (from 24 bit to 12bit) to achieve best possible performance.
The color loss caused by the above mechanism typically not very much noticeable for the human eye, especially when there is a lot of motion on the screen (e.g. playing a video). Thus YUV: 4:2:0 is the default setting which can apply to many user Applications.
The Image Quality can be varied between 100 (no compression) and 0 (maximum possible compression). The default value is 70 which still tends to show a clear enough and detailed enough image for many user applications.
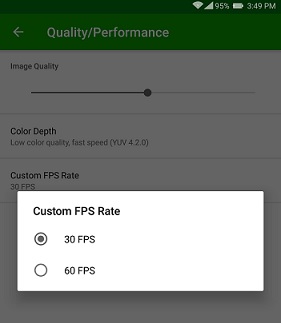
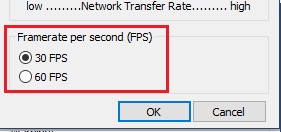
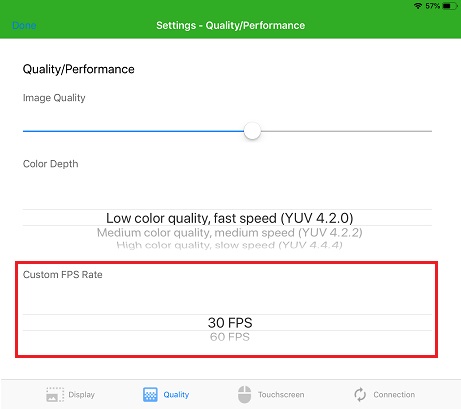
Framerate per second
The framerate option allows user to choose the FPS (framerate per second) on the viewer screen.
On Windows viewer just go to Settings → Compression Quality … → Frame rate per second (FPS).
On Android viewer, just go to Settings → Quality / Performance → Custom FPS rate.
On iOS viewer, just go to Settings → Quality → Custom FPS rate
TROUBLESHOOTING
Critical Errors
Windows 10 Crash with BSOD (Blue Screen of Death)
In some cases, when spacedesk is connected over USB tethering connection, the USB driver used by USB tethering network causes a BSOD crash.
Please try to update the Windows USB driver via Windows Update.
Black Screen on Main Monitor
When changing Windows to multimonitor configuration, then sometimes the main display monitor remains detached from the Windows Desktop. Such “Black screen Problems” sometimes happen on all Windows displays. E.g. this also happens sometimes when working with projectors. This situation can usually be solved easily by changing Windows projector settings using “Windows Key + P” (where P stands for projector). Just repeat this key sequence: “Windows Key + P” “Arrow Down” “Enter”.
Known Issues, Problems and Limitations
Incompatible Third Party Products
Incompatible products:
Nvidia ShadowPlay
Wired XDisplay (splashtop)
Windows 11/10 spacedesk only worked once (not working after reboot)
Virtual Desktop App Streamer – spacedesk will not work anymore after reboot if this software is installed in the primary machine. Uninstalling this software will fix the spacedesk Display – Off issue.
Windows 11/10 Desktop Duplication (mirror) option not available
Desktop duplication of primary monitor to other displays is disabled in Windows display settings of Windows 10 with old version of graphics adapter (< WDDM 2.0).
Just download the latest driver version from its website OR if it did not work try to downgrade the graphics driver to Microsoft Basic Display driver via device manager.
Windows 11/10 Known Issues and Unsupported Features
Nvidia ShadowPlay – Current spacedesk version has a known issue with Nvidia ShadowPlay. While Nvidia ShadowPlay (screen record) is active, spacedesk will give an error code 1-2-0 on the viewer side. Just disable it in order to use spacedesk.
Night Light – Windows Night Light settings is currently not supported on spacedesk displays.
HDR – Windows HDR (High Dynamic Range) settings is currently not supported on spacedesk displays.
10-Bit Pixel Format – With 10-bit pixel format enabled in Nvidia or AMD control panel spacedesk display will show a desktop image with discoloration.
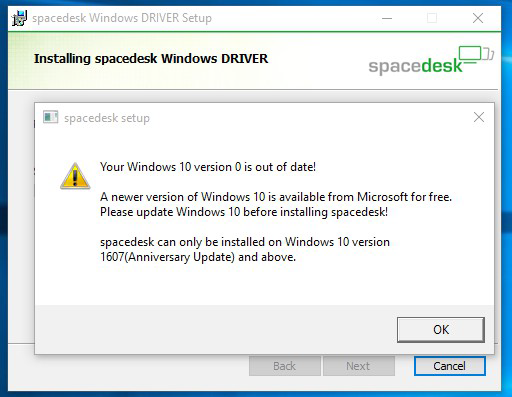
Windows 10 old version not supported
Latest spacedesk Windows 10 Driver version now only supports Windows 10 version 1607 and above. Just run “winver ” to check Windows 10 version. If the version is older than version 1607 (Build 14393) just upgrade to Windows 10 version 1607 or above, in order to use the latest spacedesk driver. Use Windows 10 Update Assistant to upgrade Windows 10 to latest version for free, just click here…
Windows 8.1 Limitations and Unsupported Features
Multi-GPU Technology such as Nvidia SLI Technology or AMD Crossfire is currently not supported by spacedesk. In case SLI is enabled, spacedesk will not work properly.
Virtual machines are officially not supported by spacedesk driver for Windows 8.1 Primary Machine. It may work on some cases but some problems may occur such as strange mouse pointer behavior, black screen on client, etc.
Nvidia Control Panel crash may also observed while spacedesk is active on Windows 8.1 Primary Machine.
qWave (Quality Windows Audio/Video Experience) Windows Feature unavailablemessage box during installation may observed on Windows Server 2008/2012 primary machine. To install this feature, Open Server Manager -> Add Roles and Features, just click Next until you are on the Features, then check if the box for Quality Windows Audio Video Experience (qWave) features is checked, and if not please check it and install.Then restart your server machine (if required).
Windows 8.1 Crash upon client connect
In very rare Windows 8.1 environments a BSOD crash (Blue Screen of Death) can happen upon connect. Such a system crash is always recoverable because the driver is not yet active during Windows 8.1 system boot time.
Just reboot the primary machine in safemode then uninstall the spacedesk driver. To boot in safemode, press and hold f8 key upon computer reboot and before the windows logo appeared. Then in advanced boot option screen use the arrow keys to select the safe mode option then press Enter key.
Note: Before uninstalling using the spacedesk msi installer on safemode, run a Command Prompt then type the following commands:
Step 1:
for Safemode: REG ADD “HKLM\SYSTEM\CurrentControlSet\Control\SafeBoot\Minimal\MSIServer” /VE /T REG_SZ /F /D “Service”
for Safemode with Network: REG ADD “HKLM\SYSTEM\CurrentControlSet\Control\SafeBoot\Network\MSIServer” /VE /T REG_SZ /F /D “Service”
Step 2: net start msiserver
Network Connection
Cannot discover Primary Machine
Step 1: Different Network Segments
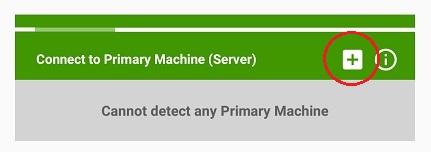
If Primary Machine and Secondary Machine are in different network segments, then they cannot discover each other. However, they may still be able to connect. In that case try to add the IP address to detect the primary machine by clicking the ” + ” button.
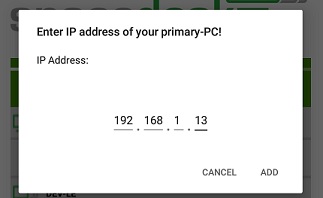
To get the IP address of the Primary machine please check the above chapter Establishing the network connection .
Step 2: third party firewall software
In case the above steps did not help, then a third party firewall software (other than Windows Firewall) could still prevent detection. Please check this chapter’s paragraph ” Firewall Settings ” below.
Step 3: WiFi router’s network isolation active
Ihttps://spacedesk.net/user-manual/#item_492n case all above steps still did not help, and if this is happening on a wireless network, then there might be one other remaining problem: WiFi router’s network isolation feature might be activated. The only solution for this is re-configuring the router.
Step 4: VPN (Virtual Private Network) enabled
Just refer to the VPN topic below.
Step 5: Network profile
In some cases, setting the network profile from “Public” to “Private” solves the spacedesk network discovery issue.
To set, open the Windows Settings -> Network & Internet -> properties of the current network, then select Private underneath Network Profile.
Step 6: Alternative ways to connect
If all above connection attempts failed. Try USB Tethering or Wifi Direct / Hotspot setup to establish a network connection between Primary and Secondary machines.
Connection Error
This shows that the primary machine can be reached over the network but connection fails after the indicated connection time. Possible reasons are the following:
– Unstable network connection
– Error on spacedesk Primary Machine
– Nvidia ShadowPlay (screen record) is running which is a known issue at the moment.
– Virtual Private Network (VPN) enabled
Firewall Settings on Primary Machine
Third party firewall
If there is a third-party firewall software or anti virus (eg Avast, AVG, etc.) with own firewall settings running on Primary Machine, then this can prevent spacedesk discovery and connection.
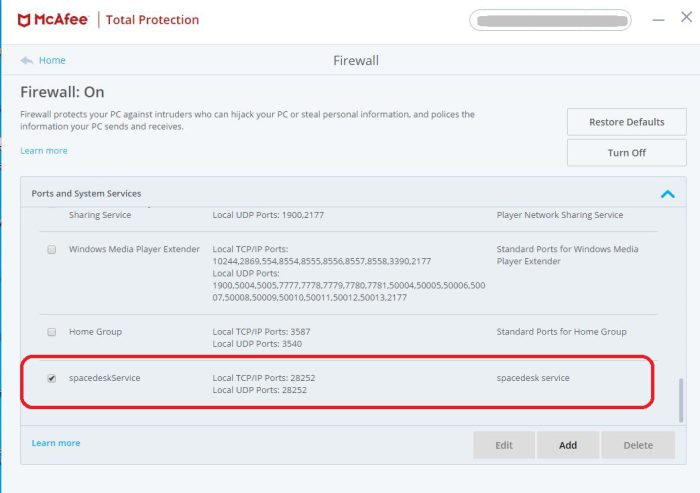
Please ensure that C: \ Windows \ System32 \ spacedeskService.exe is allowed through the firewall software or the spacedesk TCP / IP network protocol port is opened. spacedesk is using TCP port 28252.
In case there is a McAfee antivirus or firewall software installed, try the settings below or just disable it to check if spacedesk Viewer app can discover the Primary Machine. There is a known connection issue on spacedesk with McAfee software where after a few minutes of connectivity, McAfee on Windows is known to randomly kill and prevent network connections without informing the user.
Try to add spacedeskService in McAfee Firewall settings, click Ports and System Services then click the Add button.
System Service Name: spacedeskService
Local TCP/IP Ports: 28252
Local UDP Ports: 28252
Windows firewall
Please ensure that the Windows Firewall settings is correct. For details please check chapter Setup Primary Machine – Verify if setup was successful .
VPN (Virtual Private Network)
On some situations, having a VPN connection present on either primary or secondary machine prevents the network discovery process between spacedesk server and client, which results to “Cannot Detect Primary Machine” or “Error code 1-0” in spacedesk viewer apps.
There are various workaround that can fix this problem without completely disabling the VPN connection.
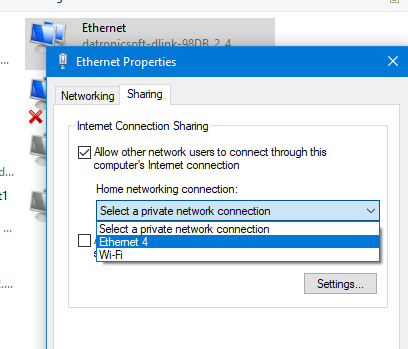
1. If VPN app has user interface with configuration settings that will let users select a specific apps to not use VPN, just add the C:\Windows\System32\spacedeskService.exe on this exception list.
2. Run “ncpa.cpl”, right-click the Ethernet or WiFi network icon then open the Properties window. Click on the Sharing tab and check the “Allow other network users to connect through this computer’s internet connection” box.
Windows Driver (Primary Machine)
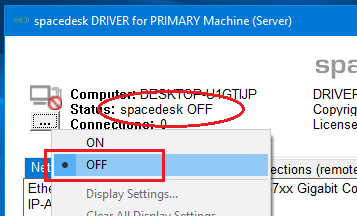
spacedesk Server Status
Check if spacedeskService is operating. Make sure that spacedesk service has started and spacedesk System Tray icon (at the bottom right of the screen) is visible in taskbar’s notification area and turned ON. For details, please check chapter above Setup Primary Machine – Verify if Setup was Successful .
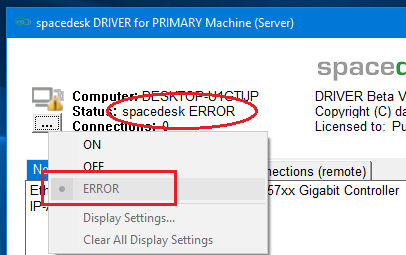
Server OFF or ERROR
spacedesk server can be enabled and disabled via spacedesk server user interface menu. In case viewer app cannot discover / connect to the server, make sure that this menu is ON.
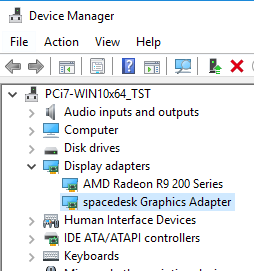
spacedesk server can be in ERROR state if spacedesk Graphics Adapter in device manager has yellow exclamation mark which indicates an error in driver. Check in C: \ Windows \ system32 \ drivers \ UMDF directory if “spacedeskDisplayUmode1_x.dll” is present then try to disable-enable the driver in device manager and try to switch ON in spacedesk server user interface menu.
For Windows 8.1 primary machine, check for “spacedeskHookKmode.sys” in C: \ Windows \ system32 \ drivers directory, then reboot.
For Windows 10 (version 1607 – later) primary machine, open Device manager and check below Display Adapters if spacedesk Graphics Adapter is installed correctly and enabled.
Incompatible Display Hook Driver Detected
Step 1: Check if system tray bubble reports incompatible display hook driver
This error message indicates that another WDDM filter hook display driver is present on the system.
The specific display hook driver can be determine via spacedesk Driver Console app -> DIAGNOSTICS -> Incompatible Software.
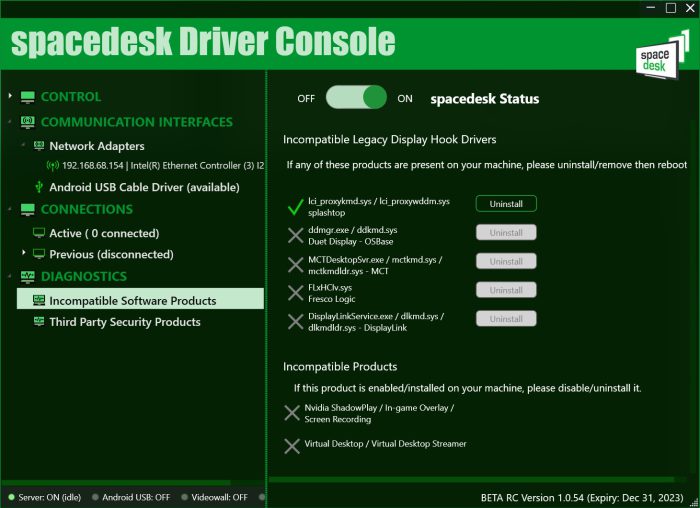
Step 2:Uninstall known products using incompatible display hook drivers
This is usually installed by a USB-Display or Zero-Client of the following brands:
Display Link, Duet Display, Fresco Logic, MCT, Microchip/SMSC, OSBase, Splashtop XDisplay and Extended Display HD, etc.
Display hook drivers are not standard Windows drivers. All products relying on such drivers are incompatible with each other. They cannot coexist on the same system. This includes spacedesk.
Use the Uninstall button on the spacedesk Driver Console app to uninstall the other product / hook driver detected, then reboot the spacedesk server machine and try to connect spacedesk client again.
Step 3:Uninstall splashtop wired XDisplay’s virtual display driver
splashtop wired XDisplay’s virtual display driver needs to be uninstalled (it’s an incompatible old legacy WDDM Filter Hook driver which cannot coexist with other similar products like spacedesk even though it doesn’t even seem to use this old driver any more).
On Splashtop Wired XDisplay Agent window -> Advanced, just uninstall the Virtual Display driver.
Step 4:Check if incompatible products did not uninstall OSBase driver
Various products using the OSBase driver do not properly remove it upon uninstall (e.g Duet Display, Fresco Logic, etc.). After uninstalling their product, the leftovers of the OSBase driver still need to be removed manually following the instructions below:
- Go to Control Panel -> “Add Remove Programs “. If you can find OSBase display driver software, uninstall it.
- Check if OSBASE drivers are installed by running the following commands:
- “sc query ddkmd “
- “sc query ddkmdldr “
- “sc query ddmgr”
- If installed, uninstall OSBASE drivers by running the following commands:
- “sc stop ddmgr”
- “sc delete ddmgr”
- “sc delete ddkmdldr”
- “sc delete ddkmd”
- Reboot your PC.
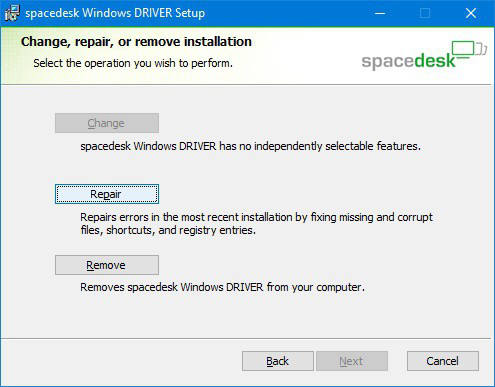
Repair spacedesk Driver Setup
Installation repair can be done by running the same msi installer version then select Repair button. Or just go to Windows Control panel → Programs and Features then search for spacedesk Driver, right-click then repair. This procedure only applies for Windows 10 primary machine only.
Various
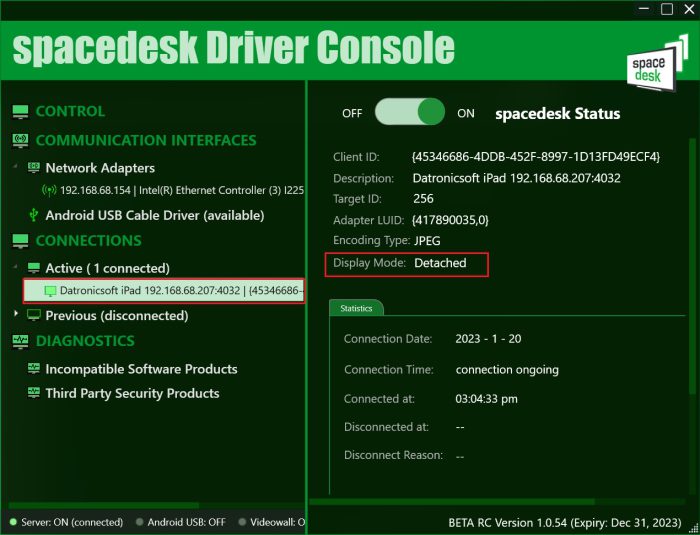
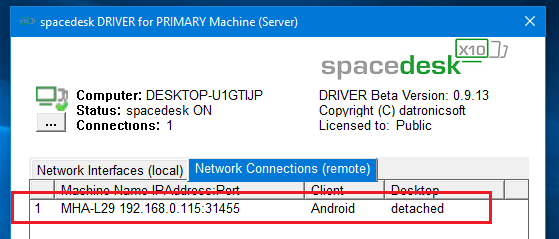
Detached Second Display.
In case of black screen in Windows desktop application or always connecting status on HTML5 VIEWER or “Connected – Display OFF” message showing in Android/iOS VIEWER:
For Windows 11/10 primary machine, open the spacedesk Driver Console and click the connected client to check the Display Mode if it’s detached.
For Windows 8.1 primary machine, click the spacedesk Server window on the task bar and check if status of the device on Network Connections (remote) tab is “detached”.
To attach, open the Windows Display settings of the primary machine, click the detached secondary display and try to attach it by selecting extend or duplicate.
Mirror mode failed.
For Windows 8.1 primary machine, if desktop extension is working but duplication is always failing, make sure that the “Settings → Resolutions → Other Screen Resolution” of Windows VIEWER OR the “Advanced Performance Options → Custom Resolution” of HTML5 VIEWER OR the “Settings → Resolution” of Android VIEWER, OR Settings → Display → Custom Resolutions of iOS VIEWER should matched the native resolution of the primary machine’s monitor.
For Windows 10, if duplicate option is not available in Display settings try to update the graphics adapter by Windows Update or manual download of driver from official website.
If duplication is still not available after driver update, then it’s probably because the driver does not support mirror mode anymore. Please refer to Known issues chapter below for Mirror mode not supported.
Clear All Display Settings.
In case display is in wrong settings (orientation, screen resolution, display detached) upon client connect, try the “Clear All display Settings” option in spacedesk System Tray menu.
![]()
Viewer (Secondary Device)
Check Viewer App version
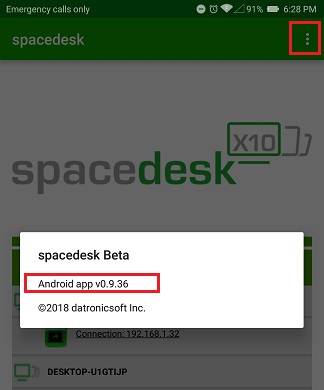
Make sure that the VIEWER version is updated. To check just open the Settings → About of Android / iOS / Windows viewer app. While in HTML5 Viewer page, current version is displayed on the page below. Then compare the version on the viewer to the current version on the spacedesk website.
HTML5 VIEWER
Step 1: Delete cached files, images and cookies of web browser.
If spacedesk HTML5 VIEWER web page doesn’t load the latest version 0.9.10, just delete the cached files, images and cookies on browsers settings.
Step 2: check if the web browser supports websockets.
If the spacedesk HTML5 VIEWER is unable to connect, check the version of the web browser and make sure that it is updated. If the secondary machine is a smartphone or tablet device the browser and OS needs to be most recent versions supporting websockets. Just go to https://websocketstest.com/ to verify.
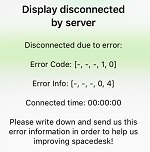
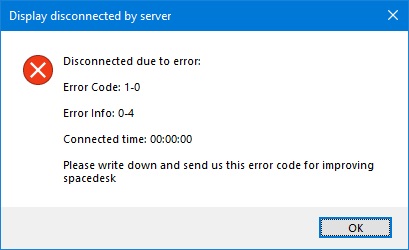
Connection Error
Error Code: 1 & Error Info: 0
This error code and info indicates that the viewer cannot find the Windows server on the network. Mostly, this is caused by Virtual Private Network (VPN) enabled on the primary machine. For more details, kindly refer to the Troubleshooting Network connection – Connection Error chapter above.
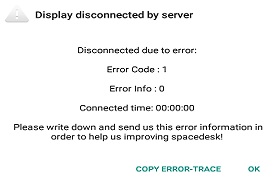
Error Code: 1-2-3 & Error Info: 0-3-5
This error indicates that the primary machine can be reached over the network but connection fails after the indicated connection time. Check the Connection Error chapter discussed above.
(android) (iOS)
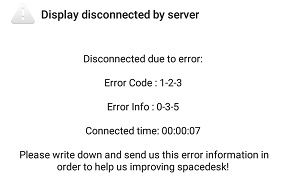
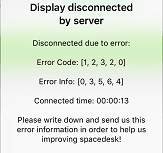
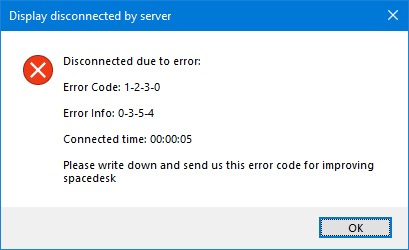
These error message box also shows the connected time, it indicates how long the viewer is connected before it disconnects. And in case procedures did not help, just report this error code sequence to spacedesk support.
Limitations
Custom Screen Resolutions
On iOS and Android viewer, custom screen resolutions available on settings are only those not bigger than the device’s native screen resolution. This is due to the black screen problem observed when switching to higher resolution. On Windows and HTML5 viewer’s Settings → Resolutions… → Other/Custom Screen Resolutions, supported resolutions is up to 4096×2160.
Performance in HTML5 VIEWER
HTML5 VIEWER is much slower than native viewer apps on Android, iOS and Windows. This is due to technical limitation of HTML5/Javascript.
Slow screen update on Windows VIEWER.
There are some cases that the rendering of screen update in Windows VIEWER is very slow. One of the possible reason is that Windows client machine only has a DirectX 9 graphics driver. It is recommended to upgrade to DirectX 10 – above graphics driver to achieve better performance.
Multiple Display
As of now, spacedesk supports simultaneous connection of up to sixteen additional displays.
– Up to sixteen Android, or iOS, or Windows VIEWERs
– One HTML5 VIEWER web browser application for any device and operating system e.g. Mac OS X and Linux
HTML5 VIEWER on Mozilla Firefox and Microsoft Edge not supported.
spacedesk’s HTML5 VIEWER is currently not supported in Mozilla Firefox web browsers due to performance limitations. Please use other web browsers recommended in system requirements chapter.
List of Incompatible Windows Application
This only applies on Windows 8.1 Primary Machine.
Applications conflicting and causing system instability while spacedesk is active
Skype for business
Fortinet security software
Flight Simulator
Applications not working in full screen mode on spacedesk display monitor
Various DirectX games (e.g. Witcher 2, Project Cars, Asseto Corsa, Battlefield, etc.)
Video Wall Configuration
Videowall
Step 1: Open spacedesk DRIVER Console window by clicking the spacedesk Tray icon or search “spacedesk DRIVER Console” in Windows Start Menu.
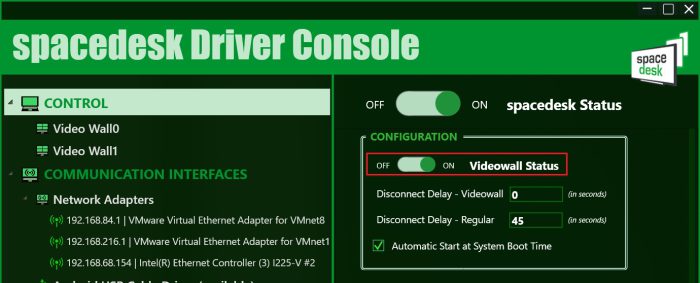
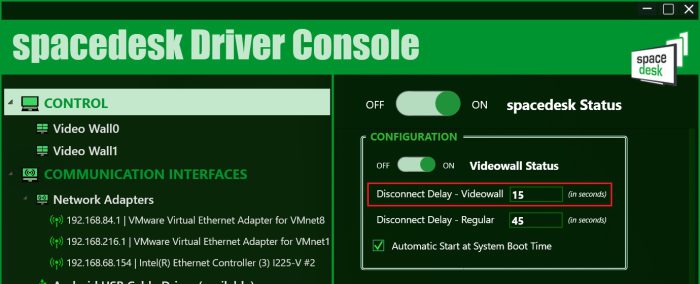
Step 2: Enable/Disable Videowall functionality using the toggle switch in the spacedesk DRIVER Console – CONTROL – Videowall Configuration box.
Settings
Videowall Disconnect Delay
If this settings is set to non zero value, video wall client displays will only disconnect after the specified value in seconds times out.
A -1 value is equivalent to infinite (video wall client displays will not disconnect until the primary machine reboots).
By default this settings is set to 0.
Wall Display Settings
Updating the wall display’s settings will take effect immediately upon pressing the enter on each text box.
Size (Width:Height) – The (Width x Height) screen resolution of the video wall. By default, Video wall display is set to 4K screen resolution (3840 x 2160).
Client Display Settings
Updating the client display’s settings will take effect immediately upon pressing the enter on each text box.
Wall Index – use to create new Video Wall or assign to an existing Video Wall.
Size (Width:Height) – The Width x Height / screen resolution of the client display.
Position (X;Y) – The (X : Y) position/coordinates of the client display. By default, both are set to 0.
This settings is only applied on the client displays assigned in a Wall.
Rotation Angle – Angle in degrees of the client display. By default, it is set to 0.
This settings is only applied on the client displays assigned in a Wall.
SubSampling type – The color depth type of the client display image. By default, it is set to 4:2:0.
For more info please check Color Depth and Image Compression chapter.
Framerate – The frame rate per second (FPS) of the client display. By default, it is set to 30 fps.
Contrast – slider settings to adjust the client display image’s contrast. By default, it is set to 0.
Brightness – slider settings to adjust the client display image’s brightness. By default, it is set to 0.
Compression Quality – slider settings to adjust the client display image’s quality. By default, it is set to 70.
Flipped Display – check box will enabled the inverted/flipped display which usually used for mirroring.
Video Wall Operation
Step 1: Create a Video Wall Display
For first time client connection, the display is set as Extension mode.
To create a Video Wall, just assign a value (e.g. 0) in the Wall Index text box of each client display.
Just press the enter key to update the settings and it will automatically plugged a video wall display (e.g. Wall0).
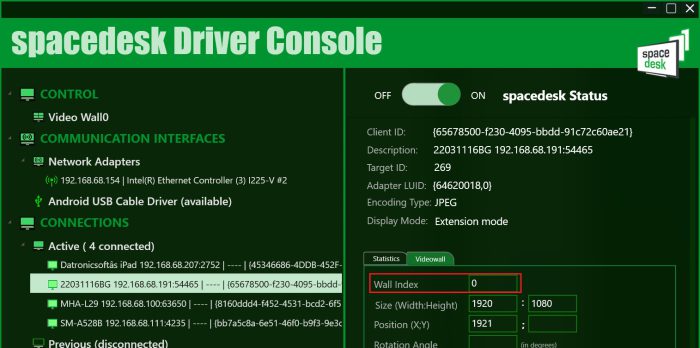
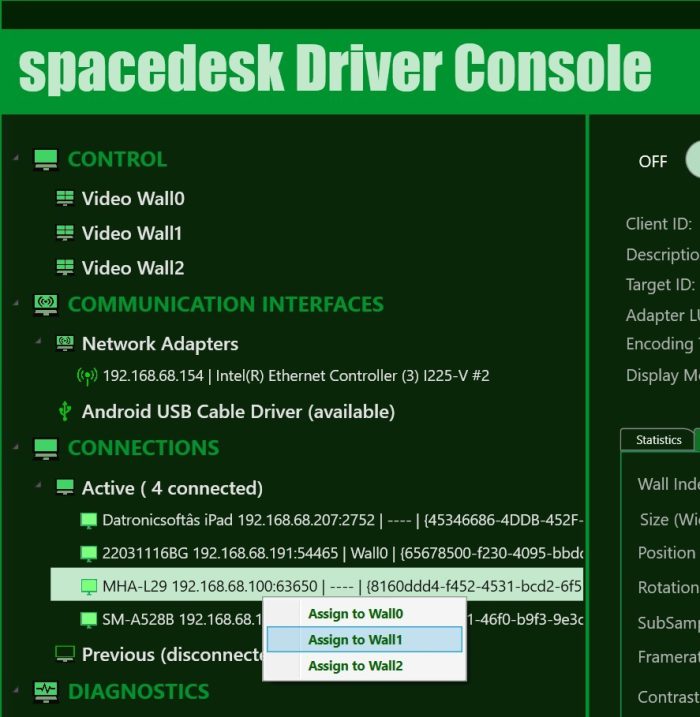
Step 2: Assign multiple clients to Video Wall
Multiple client display can be assigned to the video wall by assigning it on the Wall Index text box or via right click context menu “Assign to WallX”.
User can also create multiple video walls simultaneously as long as the primary machine’s resources can handle it.
Step 3: Creative Video Wall
Creative video wall involves rotated client displays and/or positioned in a non zero X and Y coordinates.
Below are the sample creative video wall settings.
Sample #1: Video Wall0

Sample #2: Video Wall1
Step 4: Mirroring to multiple client displays
This video wall configuration can also be used to mirror/duplicate a desktop screen into multiple client displays, by assigning multiple clients in one video wall with the same X and Y coordinates and just change the video wall’s dimension to the same dimension of the client displays.
Uninstall on Windows Primary Machine
Uninstall Using Windows Control Panel
Uninstall of spacedesk can be done on Control Panel → Programs and Features.
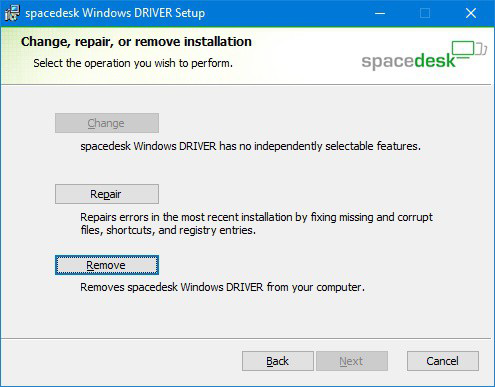
Uninstall Using .Msi File
An alternative way to uninstall spacedesk is using the spacedesk msi installer file.
Step 1: Run the setup installer
Run the spacedesk setup installer.
spacedesk_driver_Win_10_32_v1067_BETA.msi for x86 platform
spacedesk_driver_Win_10_64_v1067_BETA.msi for x64 platform
Step 2: Click the remove button
After selecting the Remove button, just click Next until it uninstallation completed.
Starting on version 0.9.9.z.25, reboot is not needed anymore in Windows 10 machine.
Step 3: Reboot (Windows 8.1 only)
After the uninstallation has completed, reboot the computer before proceeding with any other task.
Note: Please do not manually delete or remove the C:\Program Files\datronicsoft\ spacedesk folder and its files, to prevent uninstallation problem.
Troubleshooting Uninstall
Step 1: Missing spacedesk program files.
Manually deleting spacedesk program files located in chosen directory folder (e.g. C:\Program Files\datronicsoft\spacedesk) is extremely not advisable, doing so may result to uninstallation failure of spacedesk with an error message below.

To fix the problem, just restore the program files (please check your Recycle bin)to its original location and try to uninstall again using the same msi installer version or by Windows Control Panel → Programs and features.
Step 2:Try Microsoft Fix.
If uninstall problem still persist after restoring spacedesk program files, try the Install/Uninstall troubleshooter program from the Microsoft Fix article. If spacedesk is not on the program list, just select “Not Listed” then paste the product code of current spacedesk version below.
spacedesk_driver_Win_10_32_v1067_BETA.msi:{C77CE9D7-F209-45B9-9DCE-E9A5190D89C5}
spacedesk_driver_Win_10_64_v1067_BETA.msi:{DC71F7EA-DD81-4E02-A1F8-47A4406B7FC0}
spacedesk_driver_Win_8.1_32_v1067_BETA.msi:{B8891AF1-EB52-4952-8B83-C19C6235EF26}
spacedesk_driver_Win_8.1_64_v1067_BETA.msi:{96E770CD-E3DC-43CE-905A-7C627E9AAF7D}
spacedeskWindowsVIEWER_v0941_BETA.msi:{1598F649-B998-45AE-8D83-FC14D3E9D56C}
for previous spacedesk version:
spacedesk_driver_Win_10_32_v1066_BETA.msi:{9A0AFD98-0102-4B7E-BCB7-8F6EDC486A35}
spacedesk_driver_Win_10_64_v1066_BETA.msi:{26EB1A9A-6F23-4AE4-8BD9-B43C3FA07550}
spacedesk_driver_Win_10_32_v1065_BETA.msi:{34F14846-0BB1-48B6-AECC-8095AE1A4A56}
spacedesk_driver_Win_10_64_v1065_BETA.msi:{93A3BAEF-BDE3-44C1-A2C6-4798020092DB}
spacedesk_driver_Win_10_32_v1064_BETA.msi:{C0BBD1B8-BA38-46B5-B72B-920E2E2D8C04}
spacedesk_driver_Win_10_64_v1064_BETA.msi:{8401623F-2D8C-4D78-A063-15425D9136D7}
spacedesk_driver_Win_10_32_v1062_BETA.msi:{AB04A2A6-574A-45DA-941B-7CCAA5D854E7}
spacedesk_driver_Win_10_64_v1062_BETA.msi:{799E173C-91BA-49B3-A7B5-3F3DE8C0B5D9}
spacedesk_driver_Win_10_32_v1060_BETA.msi:{C5721F86-A2E2-4EF8-9AFB-358C248E5951}
spacedesk_driver_Win_10_64_v1060_BETA.msi:{727AC596-D91C-49CD-A1DE-1DE32242764A}
spacedesk_driver_Win_10_32_v1057_BETA.msi:{1DC4315B-572F-4F6C-82C7-054C50587695}
spacedesk_driver_Win_10_64_v1057_BETA.msi:{6D9F8C23-E2D2-4D17-9B21-A076CCEED01D}
spacedesk_driver_Win_10_32_v1056_BETA.msi:{1C3A6671-5A19-4ED1-AFAB-20CF55547204}
spacedesk_driver_Win_10_64_v1056_BETA.msi:{F084E34E-CD12-4039-8449-84A2AA3C2E2E}
spacedesk_driver_Win_10_32_v1055_BETA.msi:{6D941A34-9F1B-4163-BD0C-C9C14E09CDFA}
spacedesk_driver_Win_10_64_v1055_BETA.msi:{675DEFD4-02A3-495A-96B5-E93BFA5CB617}
spacedesk_driver_Win_10_32_v1054_BETA.msi:{C162807D-9ADA-4C1C-95D7-E8D2F8459A36}
spacedesk_driver_Win_10_64_v1054_BETA.msi:{509A65B7-41DC-4B32-A54E-0D035F26F4D4}
spacedesk_driver_Win_10_32_v1050_BETA.msi:{97CE234A-3DAB-4DAF-BA5A-E68952445820}
spacedesk_driver_Win_10_64_v1050_BETA.msi:{F2F9F523-C420-4596-BBA7-987BF40E5583}
spacedesk_driver_Win_10_32_v1049_BETA.msi:{C0C13613-D3A7-41BC-82CA-B788BDF5305A}
spacedesk_driver_Win_10_64_v1049_BETA.msi:{0BD5C03D-5508-4DD4-BC32-FE13A1106A26}
spacedesk_driver_Win_10_32_v1048_BETA.msi:{2EADEA2C-9C46-4B68-AD59-19C1A141CFB6}
spacedesk_driver_Win_10_64_v1048_BETA.msi:{3B105125-FFD5-47A0-BA1A-7A1F69A52680}
spacedesk_driver_Win_10_32_v1047_BETA.msi:{C0B54B07-1A26-4111-B66E-0B3457173395}
spacedesk_driver_Win_10_64_v1047_BETA.msi:{B05A2ED2-AB9E-4A6A-B08E-A2CD04416750}
spacedesk_driver_Win_10_32_v1046_BETA.msi:{EE3377FA-DB1E-4236-8631-89BA26081F9F}
spacedesk_driver_Win_10_64_v1046_BETA.msi:{F75B0686-976F-40B8-B417-8E1D8479353F}
spacedesk_driver_Win_10_32_v1044_BETA.msi:{E85A97FF-95E2-4A29-93D3-7970810B142F}
spacedesk_driver_Win_10_64_v1044_BETA.msi:{D7903B45-1502-4A94-876E-8DF19B97487F}
spacedesk_driver_Win_10_32_v1043_BETA.msi:{A96638B0-AF24-4826-9808-2C9440507B31}
spacedesk_driver_Win_10_64_v1043_BETA.msi:{72C34756-6F21-4637-9A75-98EAE3EAC1DC}
spacedesk_driver_Win_10_32_v1042_BETA.msi:{811FE54D-E0A4-4BA4-9F0E-B7F632B85A2B}
spacedesk_driver_Win_10_64_v1042_BETA.msi:{153DFBF9-8C57-4A35-9CCA-9D01FE0689DA}
spacedesk_driver_Win_10_32_v1041_BETA.msi:{BC808207-9FF0-436F-AA5C-E3BD48105018}
spacedesk_driver_Win_10_64_v1041_BETA.msi:{A26AE12E-F3BA-435A-A600-D0D05597C32C}
spacedesk_driver_Win_10_32_v1040_BETA.msi:{6863B8F6-1229-4AAF-85D7-7278AB1A5D00}
spacedesk_driver_Win_10_64_v1040_BETA.msi:{A7749853-C2A7-4313-B46F-11AECF983D62}
spacedesk_driver_Win_10_32_v1039_BETA.msi:{36A88680-F72C-420D-A7CF-2B6E3BB8C13A}
spacedesk_driver_Win_10_64_v1039_BETA.msi:{D06EA7A6-EBC0-421F-A8B4-4CC648E9219E}
spacedesk_driver_Win_10_32_v1038_BETA.msi:{60556EC1-A62B-42AE-B50D-0B3080B6827D}
spacedesk_driver_Win_10_64_v1038_BETA.msi:{A7D9E65C-8236-4D7A-9AE0-F28DDEF0D583}
spacedesk_driver_Win_10_32_v1037_BETA.msi:{C2DE53FC-DA90-4A04-AE25-880F99D712A0}
spacedesk_driver_Win_10_64_v1037_BETA.msi:{599DEADB-A437-4A08-9187-BB2D3E6A76AC}
spacedesk_driver_Win_10_32_v1036_BETA.msi:{4BF61DED-156D-47A4-91B8-95F7CD26F902}
spacedesk_driver_Win_10_64_v1036_BETA.msi:{F9B74421-732C-417E-AFFF-C840D373D287}
spacedesk_driver_Win_10_32_v1035_BETA.msi:{3A1901EC-6398-4E19-AD56-58390CEE99CB}
spacedesk_driver_Win_10_64_v1035_BETA.msi:{8674C274-85BB-418B-84BC-71AE4D7E5EFE}
spacedesk_driver_Win_8.1_32_v1057_BETA.msi:{5150CB30-709F-45D4-9EF3-0DBD337BE6C8}
spacedesk_driver_Win_8.1_64_v1057_BETA.msi:{9702DF94-CE7E-460F-AB60-7F9931208C9F}
spacedesk_driver_Win_8.1_32_v1050_BETA.msi:{07E2F61E-7012-4BC9-873B-9E36BFA94A1B}
spacedesk_driver_Win_8.1_64_v1050_BETA.msi:{1E026DB0-7343-46F8-8078-ED38FE69C40E}
spacedesk_driver_Win_8.1_32_v1048_BETA.msi:{1F518912-9A06-4CE2-BC39-B2AE371AA34F}
spacedesk_driver_Win_8.1_64_v1048_BETA.msi:{DF5510B8-B313-413D-9F58-D0C92879B8F5}
spacedesk_driver_Win_8.1_32_v1043_BETA.msi:{F281537F-4B81-46A1-A262-1EB6A6CF363C}
spacedesk_driver_Win_8.1_64_v1043_BETA.msi:{8FB18F8A-B7AD-4C26-BDAB-4D7699A1A2C5}
spacedesk_driver_Win_8.1_32_v1036_BETA.msi:{A3FD378F-3846-4E99-A7F0-54FF212E4B34}
spacedesk_driver_Win_8.1_64_v1036_BETA.msi:{D944408D-DD6D-447A-B707-92EB8141EA0F}
spacedesk_driver_Win_8.1_32_v1035_BETA.msi:{C8F03123-AD56-4203-8744-4C9F281128A9}
spacedesk_driver_Win_8.1_64_v1035_BETA.msi:{769FA542-B6E2-41B1-B310-51F74D775CA5}
spacedesk_driver_Win_8.1_32_v1034_BETA.msi:{1FF2B33F-DE6B-4F5A-A7AF-C88AE5A218B9}
spacedesk_driver_Win_8.1_64_v1034_BETA.msi:{284A27A0-97C2-423D-9167-A7FCEAEEE5B3}
spacedesk_driver_Win_8.1_32_v1033_BETA.msi:{B4B0A476-1878-4E6A-A0E8-ECF240E23FDD}
spacedesk_driver_Win_8.1_64_v1033_BETA.msi:{4DC994AB-529A-4899-BAF7-37DB3B911481}
spacedesk_driver_Win_8.1_32_v1032_BETA.msi:{6DD0D79F-5B05-4C8B-AE26-DEBBE50D7CDF}
spacedesk_driver_Win_8.1_64_v1032_BETA.msi:{44417365-2F3A-4B97-8C47-322003A44292}
spacedesk_driver_Win_8.1_32_v1027_BETA.msi:{87A725A9-F83F-48D9-AEAE-08C86569EFF8}
spacedesk_driver_Win_8.1_64_v1027_BETA.msi:{F2ED3BFB-279B-439F-91C0-A316872AB928}
spacedesk_driver_Win_8.1_32_v1020_BETA.msi:{D36AC41F-8329-4899-8CDF-C132FC26FED0}
spacedesk_driver_Win_8.1_64_v1020_BETA.msi:{D51DBA31-4227-45D7-AB1F-BAD397C38F43}
spacedesk_driver_Win_8.1_32_v1018_BETA.msi:{20ACD8D5-FF4D-43CB-A7E8-641E0AE88254}
spacedesk_driver_Win_8.1_64_v1018_BETA.msi:{91103F10-6432-4D27-979C-9CF3D73862E0}
spacedeskWindowsVIEWER_v0940_BETA.msi:{854D64D6-685D-4A59-B5C4-33F106100223}
spacedeskWindowsVIEWER_v0939_BETA.msi:{AB3159A5-5E8D-4B2F-9A56-8034C8B3D272}
spacedeskWindowsVIEWER_v0938_BETA.msi:{ABC715E1-F1D3-4B9E-A693-2208825DC669}
spacedeskWindowsVIEWER_v0937_BETA.msi:{44C237FF-E3B0-42EC-B6BD-E21A4D5A10D0}
Step 3: Manual uninstall of drivers and services
After successfully troubleshooting uninstall, spacedesk should be removed from “Programs and Features”. To make sure that drivers and services are comprehensively removed, all the steps in the next section “Manual uninstall” need to be executed.
Manual Uninstall (Troubleshooting Only)
The steps in this chapter should only be done in exceptional cases if needed and if previously discussed with spacedesk support. The regular way to uninstall spacedesk is using Windows Control Panel or the spacedesk msi installer file as described above.
Step 1: Uninstall services
Run a Command Prompt (cmd.exe) “as administrator” and enter the following commands below:
- sc delete spacedeskHookKmode (for Windows 8.1 only)
- sc stop spacedeskService
- sc delete spacedeskService
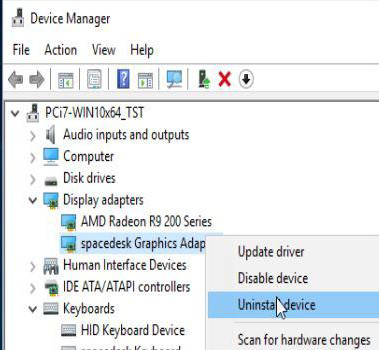
Step 2: Uninstall spacedesk Graphics Adapter (for Windows 10 only)
For Windows 10 operating systems, manually uninstall spacedesk Graphics Adapter in Device Manager. This only applies on spacedesk driver version 0.9.9.z.25 – later.
Step 3: Uninstall spacedesk Mouse and Keyboard drivers (for Windows 8.1 only)
Manually uninstall the spacedesk Mouse and Keyboard driver on Device Manager.
Step 4: Uninstall spacedesk virtual HID Device (for Windows 10 only)
On device manager click View -> Devices by Connection, then find the spacedesk virtual HID Device.
Before uninstalling the spacedesk virtual HID Device, the children below should be uninstall first.
Just right-click each child devices underneath the spacedesk virtual HID Device, then click “Uninstall device”.
Step 5: Uninstall spacedesk virtual Bus Device (for Windows 10 only)
On device manager click View -> Devices by Connection, then find the spacedesk virtual Bus Device.
Just right-click, then “Uninstall device”.
Step 6:Reboot
Reboot the system and ensure that the following registry keys below have been removed:
HKEY_LOCAL_MACHINE\SYSTEM\CurrentControlSet\Services\spacedeskService
HKEY_LOCAL_MACHINE\SYSTEM\CurrentControlSet\Services\spacedeskKtmInputKeybd (for Windows 8.1 only)
HKEY_LOCAL_MACHINE\SYSTEM\CurrentControlSet\Services\spacedeskKtmInputMouse
For Windows 8.1
HKEY_LOCAL_MACHINE\SYSTEM\CurrentControlSet\Services\spacedeskHookKmode
For Windows 10
HKEY_LOCAL_MACHINE\SOFTWARE\Microsoft\WindowsNT\CurrentVersion\WUDF\Services\spacedeskDisplayUmode
Step 7:Delete files
Delete all files listed in the appendix of this document underneath “File list” in the Appendix of this document.
Windows Secondary Machine Uninstall
Uninstallation of Windows VIEWER on Secondary Machine can be done on Control Panel → Programs and Features. Another way to uninstall is by using the msi installer.
Note: If these troubleshooting procedures does not solve your problem please contact our spacedesk support, just click here.
Appendix
Release Notes
spacedesk Windows 8.1/10/11 Driver version 1.0.67
– Bug fix for the random disconnect with Windows 10 Viewer and iOS Viewer app.
spacedesk Windows 7 Viewer version 0.9.41
– Refined Audio feature – toggling of Audio option during runtime.
File List
File list (Windows 11/10)
C:\Windows\System32\drivers\UMDF\spacedeskDriverHid.dll
C:\Windows\System32\drivers\UMDF\spacedeskDisplayUmode1_0.dll (for Windows 10 version 1607 – 1703)
C:\Windows\System32\drivers\UMDF\spacedeskDisplayUmode1_2.dll (for Windows 10 version 1709 – above)
C:\Windows\System32\drivers\spacedeskDriverAudio.sys
C:\Windows\System32\drivers\spacedeskKtmInputMouse.sys
C:\Windows\System32\drivers\spacedeskDriverAndroidControl.sys
C:\Windows\System32\drivers\spacedeskDriverAndroidUsb.sys
C:\Windows\System32\drivers\spacedeskDriverBus.sys
C:\Windows\System32\spacedeskService.exe
C:\Windows\System32\spacedeskServiceTray.exe
C:\Windows\System32\spacedeskConsole.exe
File list (Windows 8.1)
C:\Windows\System32\drivers\spacedeskHookKmode.sys
C:\Windows\System32\drivers\spacedeskKtmInputMouse.sys
C:\Windows\System32\drivers\spacedeskDriverBus.sys
C:\Windows\System32\spacedeskHookUmode.dll
C:\Windows\System32\spacedeskService.exe
C:\Windows\System32\spacedeskKtm.dll
C:\Windows\System32\spacedeskSrvLibConnectorUsb.dll
C:\Windows\System32\spacedeskServiceTray.exe
Files on 64 bit systems only (Windows 8.1)
C:\Windows\SysWOW64\spacedeskHookUmode.dll
Occasionally, I will hear someone ask what they should do with their old laptop. Usually I get this question on their way to the store to buy a new one, and I’ll ask them, “Did you know that you can use that laptop as a monitor?”
Though the laptop was never designed to be used as a standalone monitor, it is possible to use your laptop as a second monitor if both the primary computer and the laptop are both running the Windows operating system.
Before you decide to throw that old laptop away, I encourage you to read on, because I’ll show you that your old laptop still may be able to serve you for years to come, just in a different capacity.
What Options Do We Have?
There are numerous YouTube videos that show how people have taken a laptop apart and literally removed the screen completely creating a stand alone monitor out of it. One such video can be found here. Although he clearly knows what is doing I found it extremely geeky and even comical because he defines the stereotype of a computer geek.
We are not going to do that. Not because it won’t work, but because it is way too involved for the average user who just simply wants to use a laptop as an external monitor. There is a better solution and we will get to that in a minute, however, I want to explain why it’s not just as simple as taking a VGA, DVI, or HDMI cable and connecting it from one computer to the laptop.
Most laptops only offer VGA, DVI, or HDMI outputs, meaning the connection will only work from the laptop to an external monitor. It only goes one direction, out from the laptop, not to the laptop. We are looking use a desktop (or laptop), as the primary computer and use a separate laptop as an additional monitor.
If we do not want to purchase a standalone monitor, the only other option outside of completely disassembling a laptop and purchasing hardware to build a standalone monitor out of it, is to use your local network.
Instead of ripping a laptop apart, trying to follow an instructional video on YouTube that would take the better half of other day to accomplish, why don’t we just try using a free piece of software that will utilize your network. This software will allow you to use your laptop as an external monitor to your desktop. Moreover, this can be set up in less than 15 minutes, and within just a minute every time thereafter.
Not to blow your mind, but the software that I am referring to will not only allow you to use your laptop as an external monitor, but your tablet and even cell phone as an external monitor! To top things off, it works on both iOS and Android! The name of this software?
SpaceDesk
SpaceDesk is a product offered by a team of engineers from Datronicsoft. They are engineers who develop high quality Windows device drivers. As a result of over a decade of work, they have developed this FREE piece of software (free for personal use), that will extend or mirror your desktop to a laptop, tablet or cell phone.
Features and System Requirements
Before we move on, let’s talk about the system requirements and how this works. To begin, this will only work on a Windows-based machine. The primary machine must be running either Windows 10, Windows 8.1, or Windows 7.
The secondary machine can run any one of the following operating systems and devices:
- Windows 10
- Windows 8.1
- Windows 7
- Android (version 4.1 or later)
- IOS (version 9.3 or later)
- An HTML 5 web browser (Chrome (>16), Safari (>5.1), Internet Explorer (>10), Opera (>27))
- Windows Phones (Windows Phone 10 / 8.1)
- Windows Surface, tablet, laptop and PC (Windows 10, 8.1, 8, 7, Vista, XP)
- Mac (OSX)
- Linux PC and laptop
You also must be running a Local Area Network (LAN) running TCP/IP v4. The way this works is that the SpaceDesk software on the primary machine is capturing the screen content, and then compresses it, transmitting it over the LAN to the SpaceDesk software on the secondary device.
One really nice feature about this setup is that this software will allow you to either mirror your desktop or extend that desktop to other devices. When in Extend mode, you can drag windows from one screen to another.
How Do I Setup SpaceDesk?
There are two parts to installing SpaceDesk software. We first need to install SpaceDesk on the primary machine. For clarification purposes let’s refer to the primary machine as “The Desktop”. The second part involves installing space desk to the secondary device, and in our case, that would be your Laptop.
SpaceDesk.com has done a thorough job in providing great documentation. They offer written instructions complete with screenshots, on how to install their software on a PC, laptop, tablet, and cell phone (Both iOS and Android). But again, here, I am only going to show you how to install SpaceDesk on your primary machine and on your laptop which is your secondary machine.
For the record, although I am putting the instructions in my own words, (I don’t think English is their native language), for clarification purposes, I am using their screenshots to walk you through the process of creating a primary Desktop and a secondary machine, (the Laptop). Their documentation is much more thorough, showing you how to set up SpaceDesk with every known configuration for all devices supported.
The first thing you will want to do is download the software from SpaceDesk.com and you can do that by CLICKING HERE. You will want to download and install the “SPACEDESK DRIVER SOFTWARE” for the Windows PRIMARY PC (which will serve as the server).
Windows 10 users will need to choose between the 64-bit version and the 32-bit version, (if you don’t know, and are running a fairly new computer, you are almost certainly going to want to use the 64-bit version.

If you are running Windows 7 or Windows 8.1 on your Desktop (Primary machine), you will select the appropriate option on their website, (these screenshots are from their website and are not clickable. You will have to visit their website to download the needed drivers).
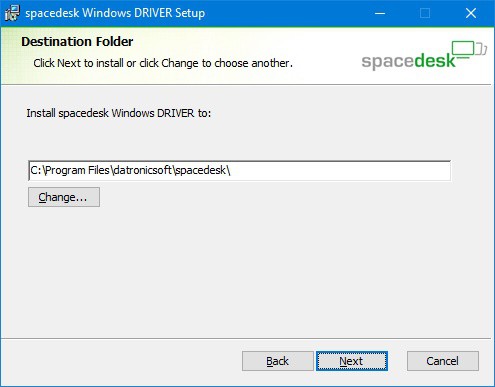
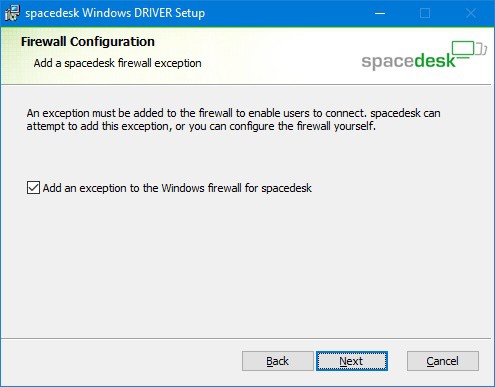
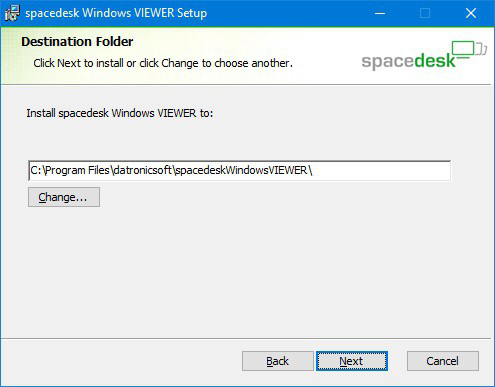
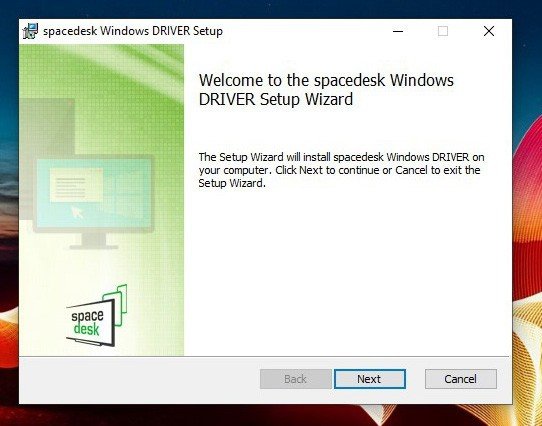
When you install the software, install it here:

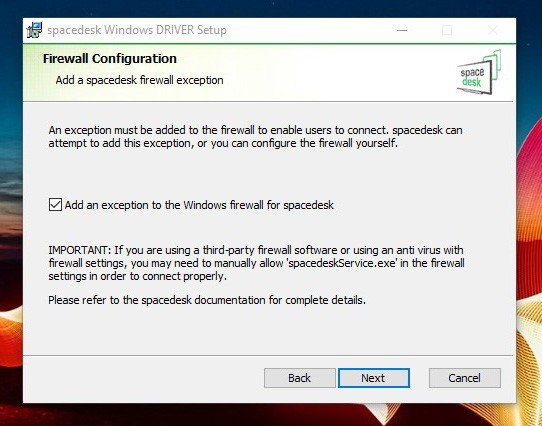
Be CERTAIN to place a checkbox in the Fire Configuration dialog box to add an exception to the Windows Firewall for SpaceDesk, otherwise it not work.

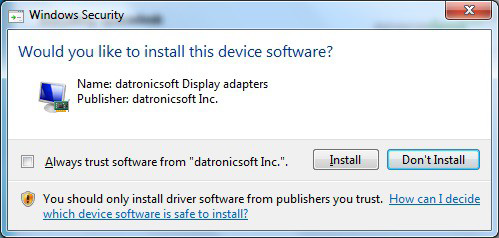
If installing on a Windows 7 or Windows 8.1 PC, you will be confronted by a dialog box requiring confirmation. Additionally, you will need to reboot the computer at this point, (only if using Windows 7 or Windows 8.1)
Now to verify that it was setup correctly, go to the CONTROL PANEL and click PROGRAMS AND FEATURES to ensure that the software is listed there.
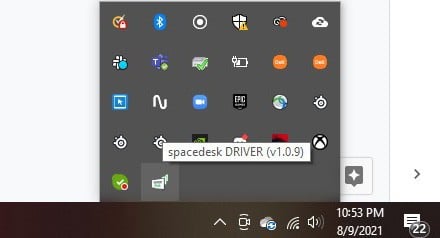
Check to ensure that the SpaceDesk System Tray icon (at the bottom right of the screen) is visible in the notification area.

If you see this icon, click it to ensure that the SpaceDesk status is ON and that the spacedesk Service is running (see below).
To ensure that the spacedeskService is running, click START > [type] COMPUTER MANAGEMENT [hit the ENTER key] > [on the left hand side of this dialog box, click the SERVICES AND APPLICATIONS drop-down menu] > SERVICES, and now on the right hand panel, scroll down until you see spacedeskService to ensure that it is running.

Now we are going to check the Windows Firewall settings to make sure that spacedeskService.exe is allowed on the private or public network. To do this, Open Control Panel > Windows Firewall > Allow an App or Feature through Windows Defender Firewall.
Now you *may* need to click the CHANGE SETTINGS button for the Allow Another App button to display. Once you can click on it, do so and browse to the C:\Windows\System32” folder. Select spacedeskService.exe and click OK. What we have just done is add the spacedeskService.exe as an exception in the Windows Defender Firewall.
It is here that you want to make sure that you have a check in the checkbox next to spacedeskSerivce, and ensure that both check boxes to the right are selected.

The good news is that the hard part is over. Now we are going to set up the secondary machine, and in our case, we are doing to install the SPACEDESK VIEWER SOFTWARE on the Secondary machine, (the laptop). Again, you can download the software from SpaceDesk.com by CLICKING HERE.
As a side note, this very same SPACEDESK VIEWER SOFTWARE not only works for Windows PCs and Laptops, but also for Microsoft Surface Tablets as well.
Once you have downloaded the Viewer software, install it. The installation should look like this on the secondary machine, (the laptop).

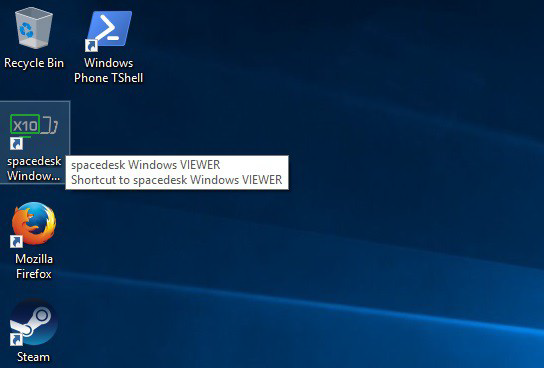
Once installation is complete, the Desktop Viewer icon will appear on the desktop of the laptop as shown below.

When you launch the SpaceDesk Viewer icon form the secondary machine, (in this case, from the laptop), it will automatically discover the Primary machine, (in this case, our Desktop).
On the Desktop (Primary Machine), check to see if the connection has been established. On the Desktop (again, Primary Machine), you can do this by clicking the spacedesk System Tray icon (at the bottom right of the screen) to display the spacedesk SERVER user interface.
Now I want you to open Display Control Panel by clicking the little spacedesk system tray icon, and click Display Settings.

This will tell us if there is a secondary display attached (see below).

Finally, we can now determine if we want to Mirror our Primary Desktop, or EXTEND our Primary Desktop. To do this, from the Desktop (Primary Desktop), simply right click on the desktop and click DISPLAY SETTINGS, which will of course, take you to the Display Control Panel.
This is what it will look like if you select the EXTEND DISPLAY SETTINGS option.

If you you decide to MIRROR your Desktop (Primary Machine), select the DUPLICATE THESE DISPLAYS (as shown below).

Conclusion
SpaceDesk is not the only software out there that allows one to extend or mirror your desktop to your laptop, but it sure is a good one. It’s reliable and FREE. I highly encourage you to try it out. If you don’t have a laptop to extend your desktop to, perhaps you may want to extend it to your tablet. Simply go to the App Store, (IOS), or Google Play, (Android), and download the SpaceDesk app to your tablet. All of the documentation on how to do that can be found here.
What Other Applications Are Similar To SpaceDesk?
- Air Display (Avatron)
- AirParrot 2 (Squirrels)
- Duet Display (Kairos)
- iDisplay (Shape GmbH)
- MaxiVista (Bartels Media)
- Twomon USB, TwomonAir (easynlight/DevGuru)
- XDisplay / Wired XDisplay (splashtop)
- ZoneScreen (ZoneOS)
What Can I Do With An Old Laptop?
If you don’t want to recycle it, sell it, or give it away, you may want to consider using it as a media center to play movies or store your music, if not for you, then perhaps for your little kids.
Tim Chesonis
Tim has been helping people with computers needs for several years, and he loves to help people succeed. He brings a wealth of wisdom and insight from an entrepreneur’s perspective and enjoys freelance writing. In fact, when he’s not writing an article, you might find him binge-watching Suits or formatting his computer . . . again, just for fun. To learn more about Tim, click here.
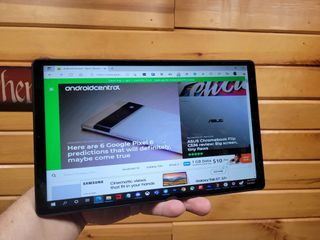
(Image credit: Adam Doud/Android Central)
If you have a workflow that requires a second monitor, getting things done on a laptop can be challenging. Lenovo seeks to address that with tablets like the Lenovo Yoga Tab 13 which doubles as a second monitor when not in use. But if you have any old Android tablet handy, it’s pretty easy to turn that tablet into a functional second monitor. We’ll show you how.
For this article, we took a look at a few software solutions to make this work before settling on an app called Spacedesk. Spacedesk is a pair of free apps that runs on your PC, and the other runs on your tablet. They connect via Wi-Fi, making it super simple to use (as long as you have Wi-Fi). We’ll discuss this more at the end of the article, but let’s get into installing it for now. There are two sets of instructions here, first for your PC, followed by your phone or tablet. Let’s get into it.
Download Spacedesk for Windows
- Download Spacedesk from the spacedesk website. Choose the appropriate version for your PC (32-bit vs. 64-bit, etc.).

- Once downloaded, run the file.
- Click Next.
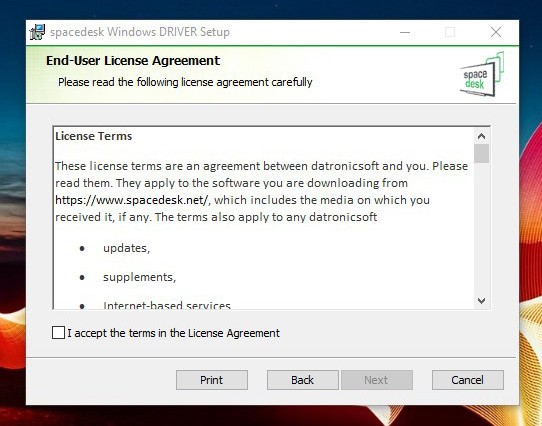
- Place a checkmark in I accept the terms in the License Agreement and Click Next.
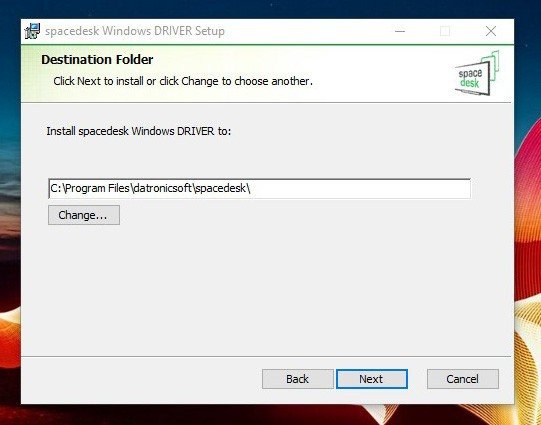
- Set your destination folder (if not the default) and click Next.
- Place a checkmark in Add an exception to the Windows firewall for Spacedesk and click Next. Note: This only adds an exception for the built-in firewall for Windows. If you’re using a third-party firewall, you will likely need to add an exception manually.
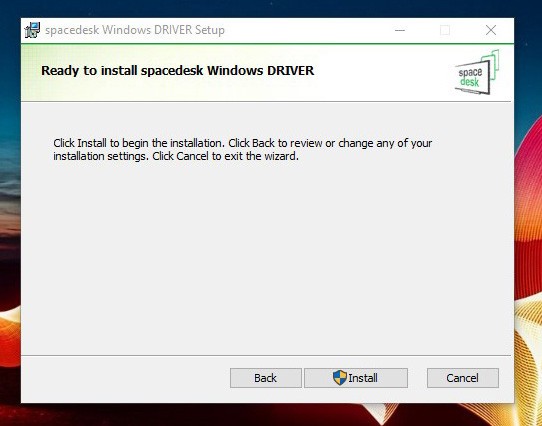
- Click Install.
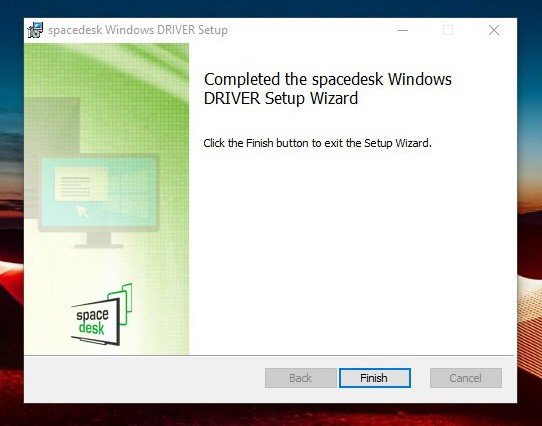
- Click Finish.
- When you’re done, the Spacedesk driver icon will appear in your system tray, and you’re ready to download the app.
Download Spacedesk onto your tablet
Once you’ve installed the Desktop client, it’s time to download and run the app.
- Download the spacedesk app from the Google Play Store.
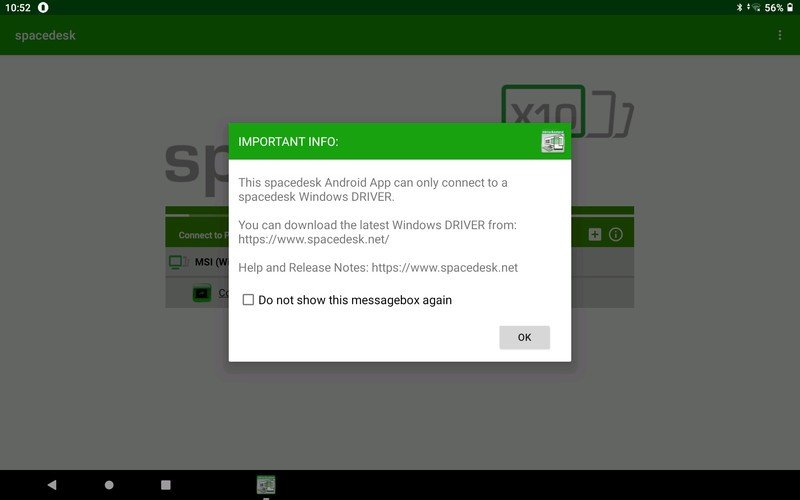
- Once installed, run the app. Place a checkmark in Do not show this message box again and tap Ok.
- Tap Connection: (IP address here).
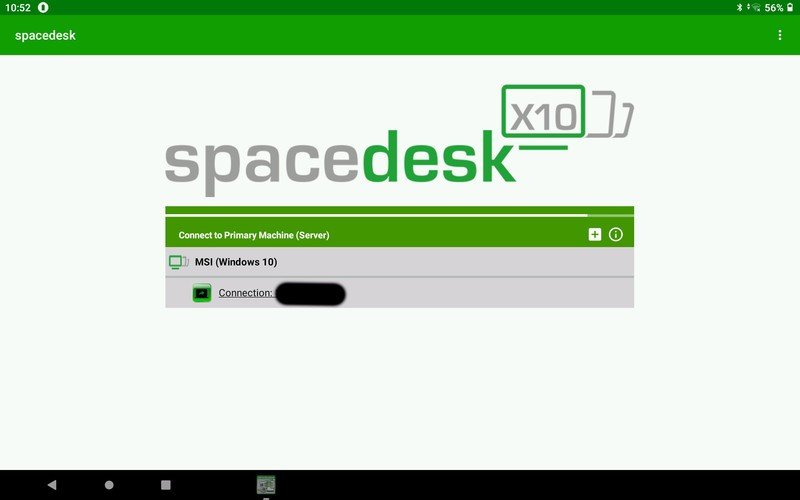
That’s it! Once you connect, you’ll see your computer’s desktop on your tablet. You can choose to mirror your display or extend your desktop, depending on what you want to do. You may need to go to your compter’s Settings > System > Display to configure how to arrange your displays, etc.
Some additional test notes
We tested this app with a Lenovo Smart Tab M10 HD. The Wi-Fi connection works beautifully with virtually no lag. You can use your tablet just like a second monitor. What’s more, touch input works! If you open the Netflix website, you can use touch to use the play controls, drag windows around, etc.
Spacedesk will not work if you currently have other screen-sharing apps installed on your computer, such as Splashtop wired Xdisplay. Spacedesk’s website gives you instructions for uninstalling that driver.
Once again, this app only works if you’re working in the same Wi-Fi network. If you’re a road warrior who likes to work in coffee shops, you might want to consider a wired solution, such as Splashtop or the Lenovo Yoga Tab 13 referenced above.
 A tablet and a smart screen
Pulling triple duty
One of the problems with Android tablets is what to do with them when not in use. They often end up on a shelf, but Lenovo built a dock for this tablet that turns it into a Google Assistant-powered smart screen. Plus, you can use it as a second monitor when needed with Spacedesk for a triple-duty tablet.
Instant access to breaking news, the hottest reviews, great deals and helpful tips.
Adam has been writing and podcasting the mobile tech space for almost a decade. When he’s not writing, he hosts the Benefit of the Doud podcast, spends way too much time on Twitter, and redesigns his office space over and over.
Most Popular
Having two displays definitely helps in increasing productivity. Yes, there are many advantages of having dual monitors set up. Especially, If you’re an online streamer then a dual monitor setup will gonna really helpful for you. On one monitor you can play your game and on another, you can check your viewer’s comments. From graphics designers to music composers everyone prefers having a dual monitor setup. Though, If you own an iPad, then you don’t need to buy a second monitor. Because you can use your iPad as a second monitor. Mac user can easily use their iPad as a second monitor by using Apple Sidecar. As you know how good the Apple ecosystem is.
Like Mac, For Windows users, there isn’t any built-in way to connect your iPad to Windows as a second screen. You have to download a third-party application. Yes, there are several premium apps available, that can turn your iPad or iPhone into an extra display. Like, Duet Display and iDisplay. Undoubtedly, Duet Display is one of the best-selling iOS apps. But, In this article, we’re only gonna talk about free options, such as SpaceDesk. The best thing is, with SpaceDesk App, your iPad will get converted into a touchscreen monitor. Now, you can also check iPad Battery Health.
Use the iPad as a second monitor
Splashtop Wired XDisplay – use iPad as a second monitor for Windows
Well, If you’re using an Ethernet connection on your PC, and you don’t have a WiFi connection. Then, Splashtop is here to save your day. Splashtop establishes the connection between PC and iPad using iTunes. And to use iTunes, you have to connect via a lightning cable.
The best part about Splashtop Wired XDisplay is you can Extend or Mirror your Display at 1080p and 60fps. And, yes it is free. Though, if you want a wireless second display, then scroll down to check the Spacedesk Application. Using the Splashtop Wired XDisplay application is quite simple.
- First, Do Install iTunes App on your Windows PC from Microsoft Store. If App is already installed, then it’s great.
- Now, download Splashtop Wired XDisplay Agent for PC.
- Once it gets downloaded, Run the “Splashtop_Wired_XDisplay_Agent” setup file as administrator.
- The installation process will take a few seconds. And, automatically Splashtop Wired XDisplay Agent window will get open.
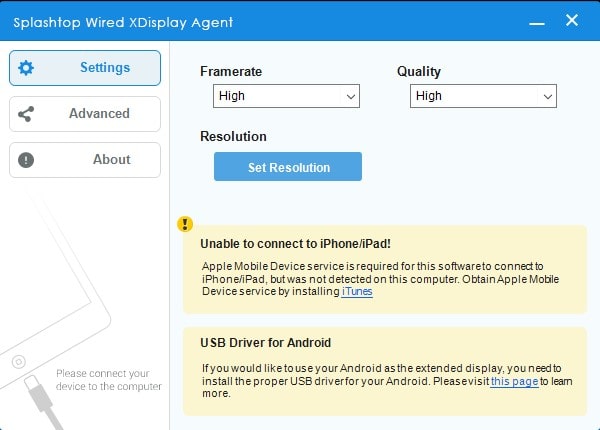
- Do set framerate and quality to high.
- Now, do install the Splashtop app on your iPad.
- Open Splashtop App on iPad.
- The app will ask you to connect your iPad to your PC via lightning cable. So do connect it.
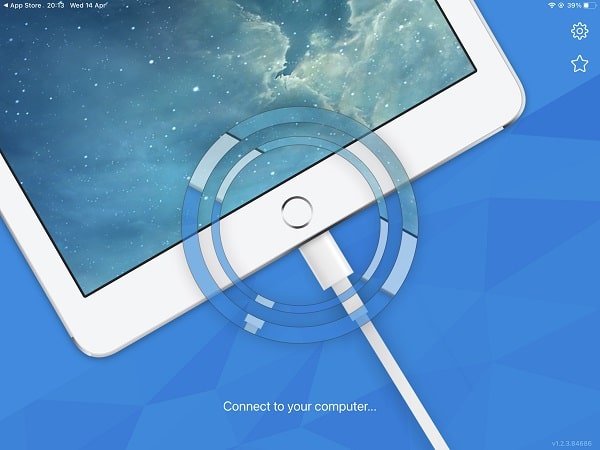
- Tap on Allow in iPad. Now, do open iTunes App on your Windows PC.
- That’s it, Wired XDisplay will get connected.
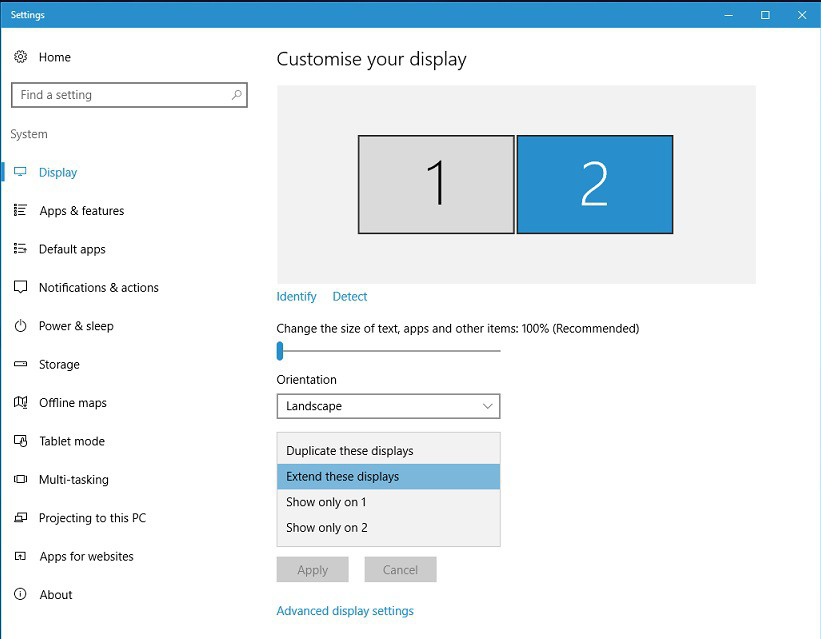
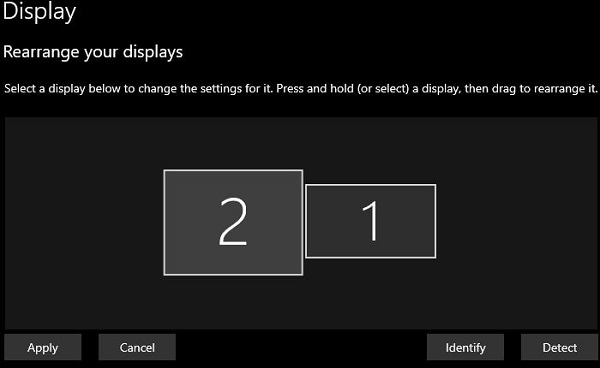
Manage Display
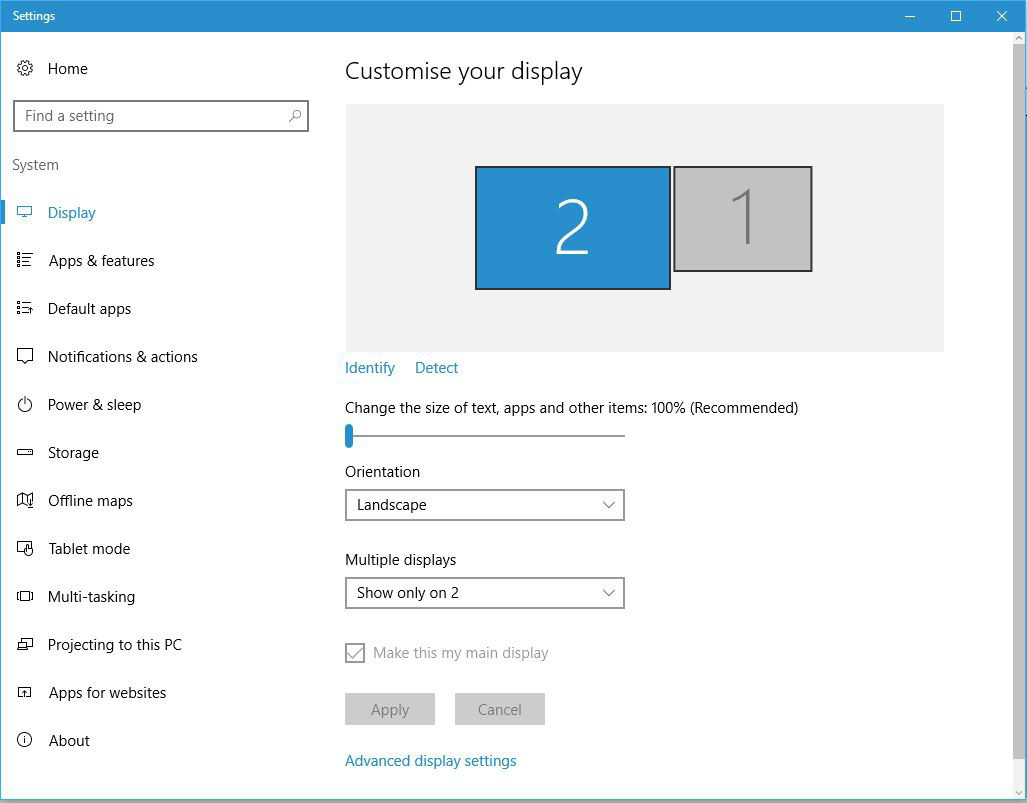
Use iPad as Primary Display.
By default, your iPad will be a second monitor. If you want to use your iPad as your primary monitor, you can do that do. Windows provide such an option by default.
- Press Windows + I key to open the Settings App.
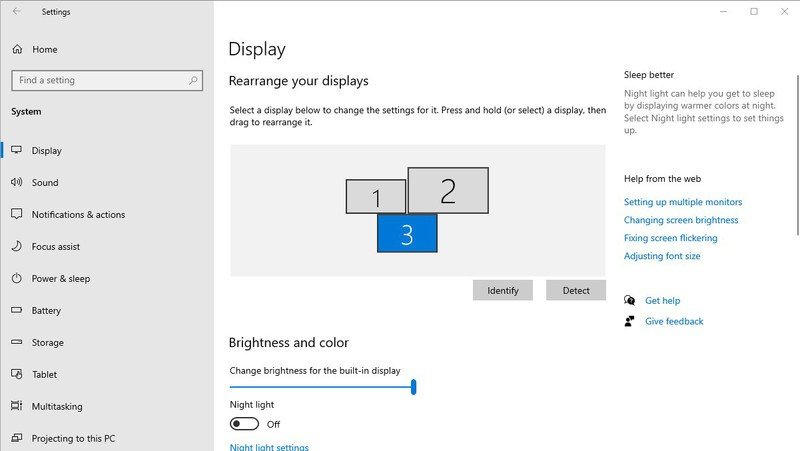
- Click on System.
- You will now see Rearrange your display screen will appear.
- All you need to do is, drag 2 to the place of 1. And, click on Apply.
- Done. You can revert it back if you like to use your monitor as your primary display.
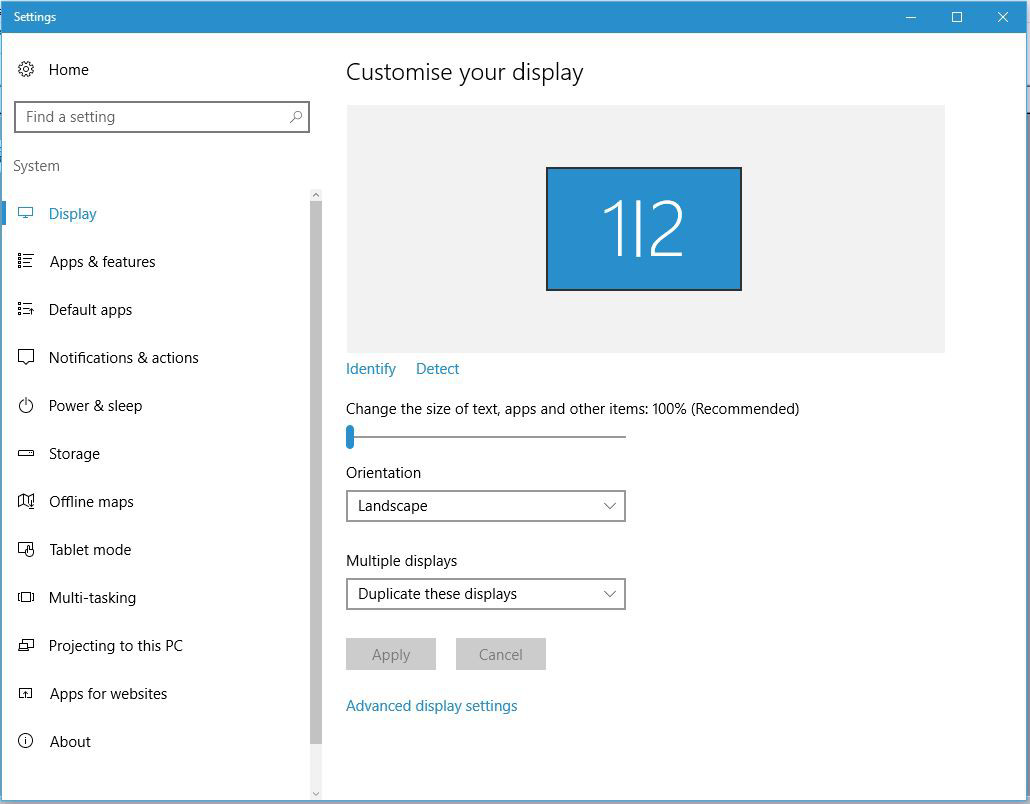
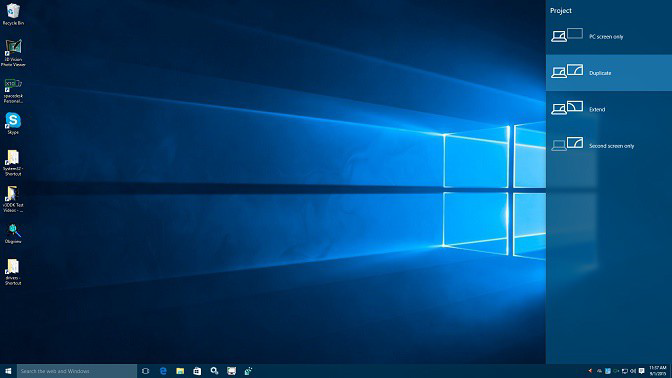
Mirror/Project Primary Display to iPad.
If you don’t want to extend the display, just want a duplicate display on the iPad. Then, you can use the project options of Windows 11/10.
- Do press the Windows + P key to open Project Screen.
- Click on Duplicate.

You can click on extend if you don’t want to duplicate the display. So Splashtop really makes using the iPad as a second monitor for windows easy.
Spacedesk – Use iPad as a second monitor on Windows 10/11.
Spacedesk is one of the most widely used multi-monitor Apps for Windows. It helps to enable the convenient and inexpensive setup of multiple displays using a single PC. I own an iPad Air 3, and I ran Spacedesk app in it. Surprisingly it works flawlessly. Spacedesk offers seamless connectivity options. Your iPad and Windows should be on the same WiFi network. Spacedesk also does enables touch controls on iPad to use Windows. Though, it only does supports HD resolution. Spacedesk is also available for Android smartphones and tablets.
Note: If you have installed Splashtop Wired XDisplay, uninstall it first. Else you will face errors while using Spacedesk.
Download and Install Spacedesk App in Windows and iPad.
First, download Spacedesk SERVER App on your Windows PC. Spacedesk driver software is available for Windows 11, 10, and 8.1. On the official site of spacedesk, you will find two versions 64-bit and 32-bit.
If you don’t know which version to download, do check your system type.
- To check system type, press the Windows + I key to open the Settings App.
- Click on System.
- And, from the bottom of the side pane, click on About.
- Here you can see your system type. As you can see I am using the 64-bit operating system. So, I can download the 64-bit spacedesk driver (Server) setup file.
- (Alternatively, you can right-click on my computer > properties to check system type.)

- Once, spacedesk setup file gets downloaded, run it as administrator by right-clicking on it.
- Spacedesk Windows Driver Setup wizard will get open. Keep clicking on next to install Spacedesk in your system.

Note: Keep the “Add an exception to the Windows firewall for spacedesk” option marked during the installation process.
- Once the spacedesk server gets installed. You can run it by searching for the “spacedesk server” in Windows search. ( Usually, App gets open automatically after installation.)

- Now, Install Spacedesk App on your iPad from App Store. (It’s free.)
Connect iPad as Second Monitor.
- To use the iPad as a second monitor for windows, your PC and iPad should be on the same Wireless network.

- Open Spacedesk App on your iPad. Spacedesk will ask permission to find and connect devices on your WiFi (local) network. Tap on Ok.
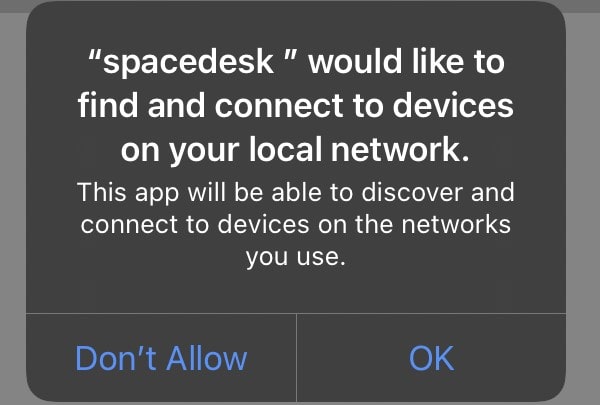
- Next, and Important Info will appear, tap on “Don’t show again”. (Because you already downloaded the server app on PC.)
- If all things are ok. Then, your Desktop Device Name will appear on your iPad. You will also see an IP address.
- Tap on that IP address.
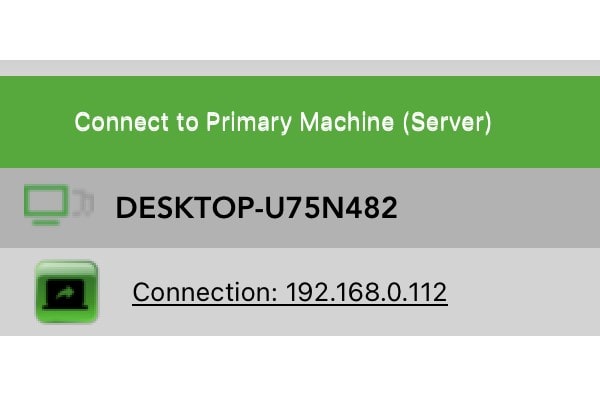
- And, within a few seconds your iPad will turn into a second monitor. (Wait for a few seconds if you see a black screen. The app takes time when performing the first-time setup.)
- You can click on the Network Connection (remote) tab in spacedesk SERVER app of Windows. And, here you will see your iPad information.
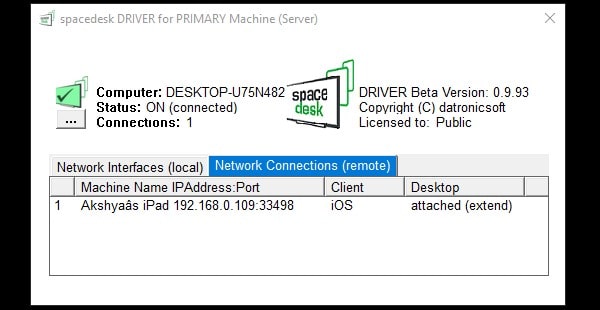
Spacedesk not working, what to do?

The first thing you need to check is whether spacedeskService is running or not.
- Press Windows + R key to open Run Window.
- Type services.msc in it and press enter key.
- In the Services window, look for the spacedeskService. And, check the status of it, make sure it is running.

- If the service is stopped then right-click on it and then click on start.
Next, do check Windows Firewall settings. Make sure spacedesk is allowed on the private or public networks.
- Go to Control Panel → System and Security → Windows Defender Firewall → Allow an app or feature through Windows Firewall.
- Now find spacedeskService, and make sure spacedesk is allowed on the private and public networks.
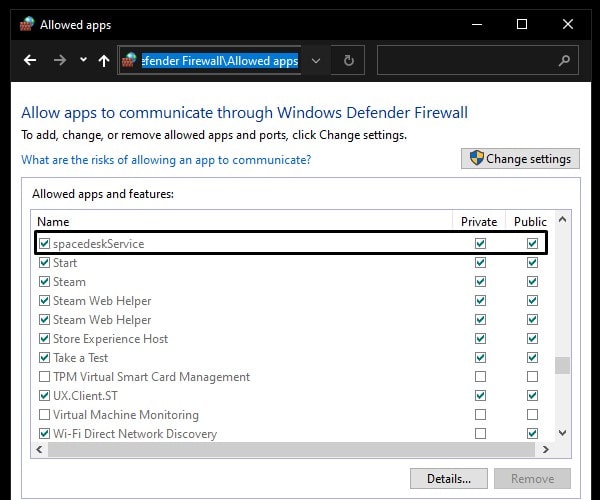
- If space desk service is running properly and spacedesk is allowed in Windows firewall. Then, it will work flawlessly.
Summing-up
Ok, So these were the two free Apps to turn your iPad or iPhone into a second display. Personally, I think Splashtop is the best and easy to use. And, it offers FHD resolution with a higher refresh rate. Because of a wired connection, you will get more stability. But if you don’t have a lightning cable, or have an issue with the cable connecting to the PC.
Then, you can use the spacedesk App for the wireless second display. Which is also quite good and offers an easy connection process. Or, if you want to go for a paid option, then Duet display App that you can purchase. If you find this article helpful, let me know in the comment section. If you’re a Mac user, then you can use Universal Control. With Universal Control, you can use the iPad as Second Monitor for Mac.
Привет, друзья. О преимуществах работы с двумя мониторами компьютера точно не надо говорить тем, кто использует таковые, скажем, в своей профессиональной деятельности. Но что делать, если вам для каких-то целей вдруг понадобится второй экран, а у вас к ПК подключён только один монитор, но при этом есть ноутбук, планшет или даже смартфон с большой диагональю экрана? Ребята, экраны этих устройств можно подключить к ПК по локальной сети так, как если бы эти экраны были мониторами, обычно подключёнными к ПК. Знакомьтесь, бесплатное программное обеспечение Spacedesk – программы для Windows, приложения для iPhone, iPad и Android-устройств, веб-приложение, реализующие подключение экранов других устройств к компьютеру в качестве сетевых мониторов. Давайте разбираться, что это за программное обеспечение, и как оно работает.
О проекте Spacedesk
Итак, друзья, Spacedesk – это, как я уже отметил, программное обеспечение для операционных систем Windows, iOS и Android и веб-приложение, реализующее по локальной сети подключение экранов различных устройств в качестве второго монитора Windows-компьютера.
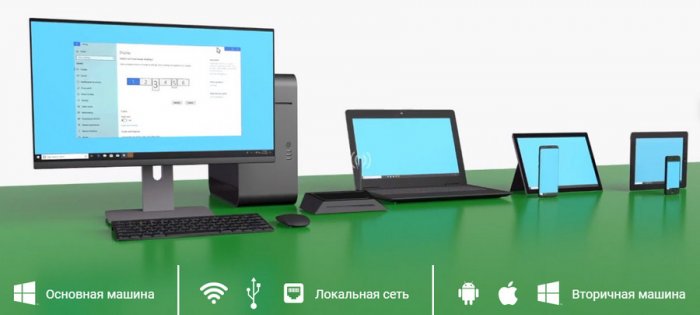
Подключение реализуется по типу «сервер-клиент». Серверным устройством, изображение которого должно выводиться на второй экран, может быть только Windows-компьютер, причём компьютер только на базе Windows 8.1 или 10. Клиентским устройством, экран которого будет использоваться в качестве второго монитора, может быть, по сути, любое устройство. На iOS- и Android-устройства можно установить специальные приложения-просмотрщики, которые будут отображать экран компьютера-сервера. В других операционных системах и на любых других устройствах, где есть браузер с поддержкой HTML5, для просмотра экрана компьютера-сервера можно использовать веб-приложение Spacedesk. На момент написания статьи поддерживаются актуальные версии браузеров Chrome и прочих на базе Chromium, Safari, Internet Explorer.
Ну и поскольку подключение реализуется по локальной сети, то компьютер-сервер и клиентское устройство должны быть объединены в одну локальную сеть, неважно проводную или беспроводную.
Конечно, нужно понимать, что это не должный вывод видеосигнала, но как вариант, к примеру, временно поработать и чётко для себя определить, нужен ли второй монитор на постоянной основе, согласитесь, Spacedesk предлагает отличное решение. При этом программное обеспечение проекта совершенно бесплатно. Давайте же посмотрим, как работает Spacedesk. Но прежде мы отправимся на страничку проекта:
https://spacedesk.net/
Здесь нам надо скачать программу-драйвер для компьютера-сервера и приложения-просмотрщики для клиентских устройств.
Настройка компьютера-сервера
Первым делом настроим компьютер-сервер, изображение которого будет передаваться на сетевой экран. По указанному выше адресу на сайте Spacedesk раскрываем вкладку «Download». Здесь нам нужен драйвер для сервера: выбираем версию Windows 8.1 или 10, выбираем разрядность и качаем. 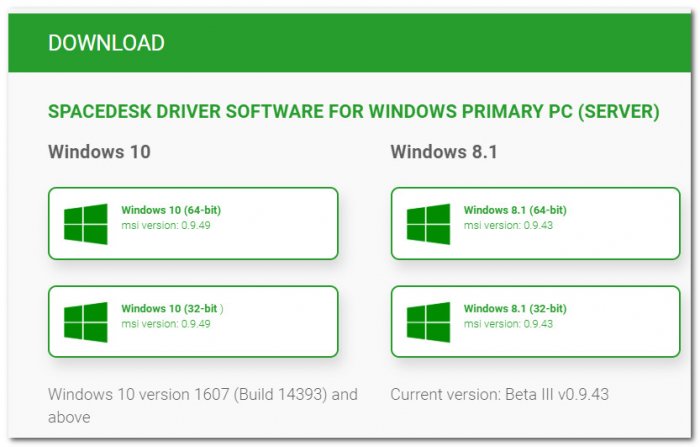
После установки драйвер Spacedesk будет работать в фоне, обеспечивая возможность подключения сетевого монитора. Этот драйвер являет собой небольшую утилиту, в его основной вкладке отображается, в частности, наш сетевой IP, он нам понадобится в отдельных случаях при подключении просмотрщиков на клиентских устройствах. И также в основной вкладке мы видим, что пока что у нас нет никаких подключений. 
Когда они будут, мы сможем отслеживать их во второй вкладке окошка.
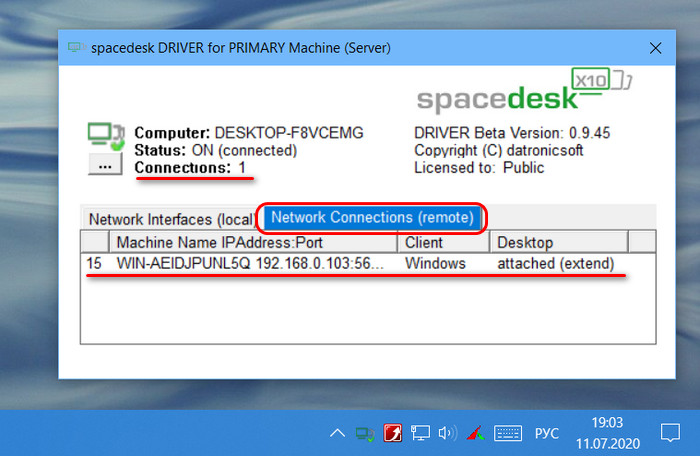
Настройка клиентских устройств
А чтобы подключение было, на сайте Spacedesk мы качаем программу-просмотрщик для клиентских Windows-устройств. Либо идём по ссылкам в магазины мобильных приложений, либо же кликаем ссылку веб-приложения «Go to HTML5». Для Windows 10, кстати, просмотрщик можно как скачать в формате классической программы Win32, так и установить в формате UWP-приложения из магазина Microsoft Store.
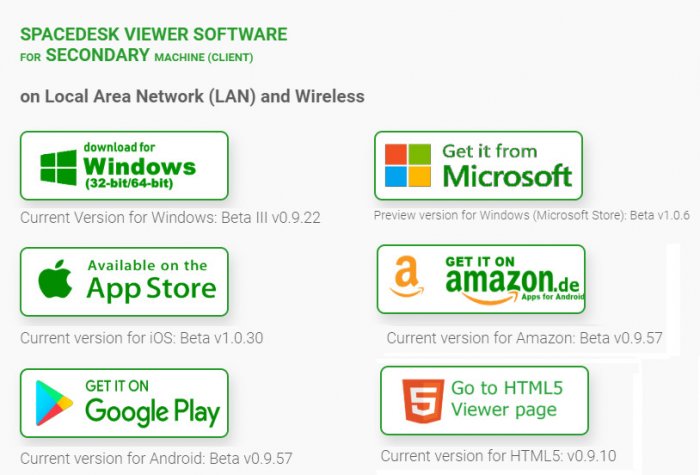
Подключение сетевого экрана
Ну а теперь, друзья, установим соединение. Открываем приложение-просмотрщик на клиентском устройстве, например, Windows-программу на ноутбуке. Видим, что программа автоматически определила адрес сервера, и нам для подключения нужно всего лишь сделать двойной клик по отображению IP сервера.

Если с определением адреса сервера есть какие-то проблемы, подключение можно выполнить вручную.
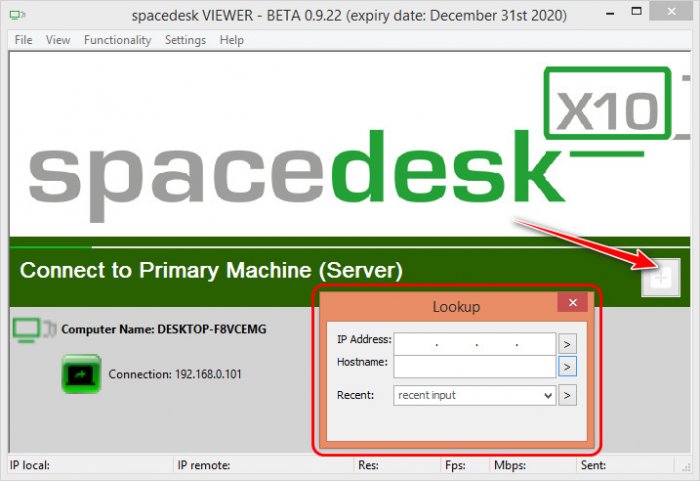
Ну и вот в окне просмотрщика видим расширенный на второй экран рабочий стол компьютера-сервера. Изображение второго экрана немного перекошено, но нам просто надо запустить полноэкранный режим и настроить разрешение на сервере. Перейти в полноэкранный режим можем клавишами Alt+Enter, либо же с помощью опций меню просмотрщика.
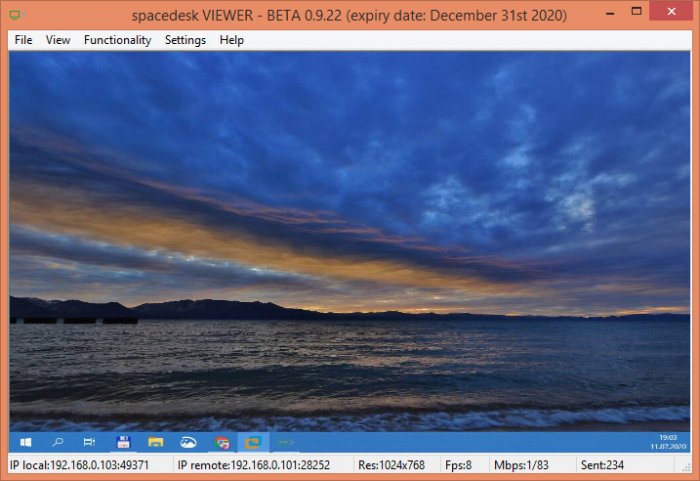
Для отключения второго экрана можем просто закрыть программу-просмотрщик.
В веб-приложении Spacedesk в окне браузера нам надо вручную ввести IP сервера и подключиться.
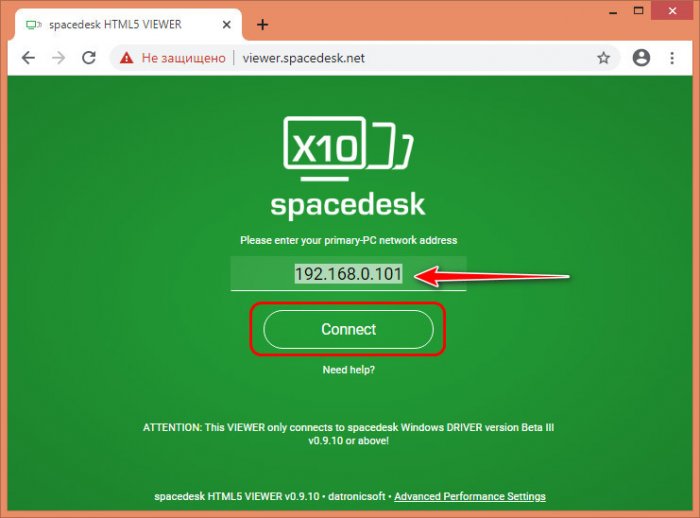
После подключения окно браузера с изображением рабочего стола компьютера-сервера само запустится в полноэкранном режиме. Для выхода из него можно использовать стандартную горячую клавишу браузера F11, либо же пункт в меню просмотрщика, где, кстати, мы можем применить к сетевому монитору кое-какие настройки.
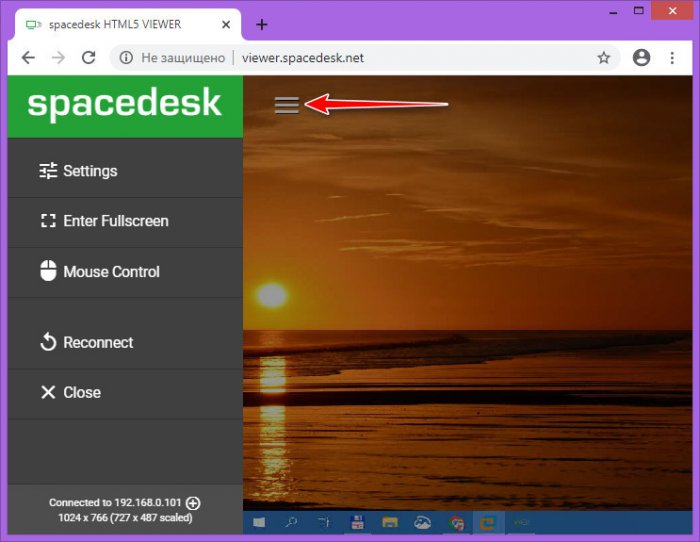
Для отключения второго экрана можем просто закрыть вкладку браузера с приложением просмотрщика.
В Android-приложении просмотрщика Spacedesk кликаем IP сервера.
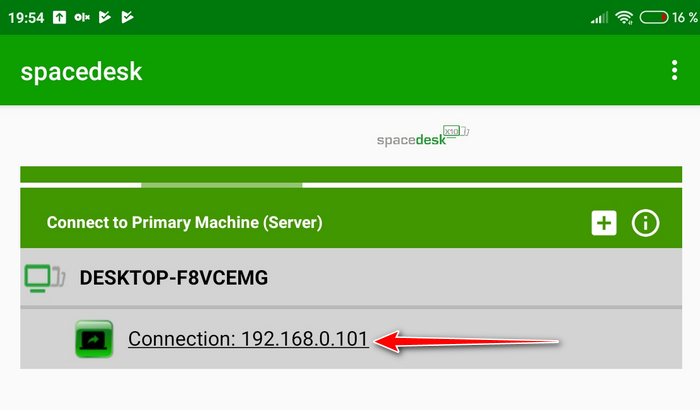
И видим его расширенный экран в полноэкранном режиме.
Автоповорот экрана выбирается автоматически в зависимости от положения Android-устройства. Для отключения экрана можем выйти из приложения кнопкой «Назад».
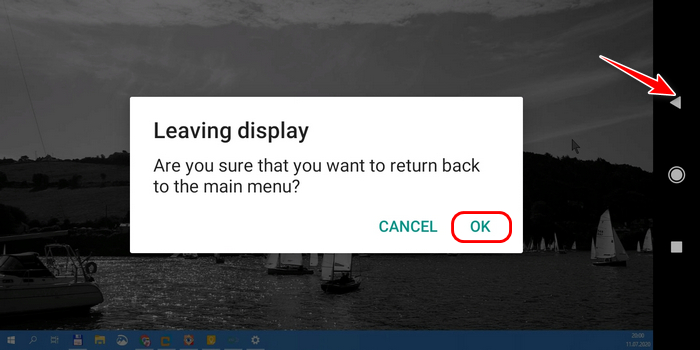
И также отключить второй сетевой экран мы можем в окне драйвера на компьютере-сервере. Нам нужно отключить соединение в меню утилиты пунктом «Off».
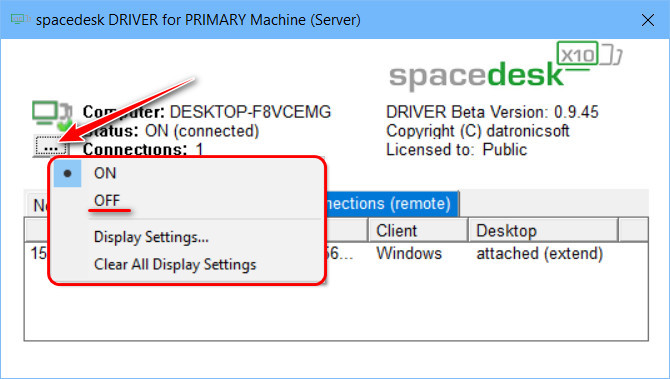
Настройки сетевого экрана
В меню драйвера также можем выбрать пункт «Display Settings», это быстрый путь к настройкам экрана Windows. Впрочем, мы также быстро попадём в них, вызвав на рабочем столе контекстное меню и выбрав в Windows 8.1 пункт «Разрешение экрана», а в Windows 10 – «Параметры экрана». И в системных настройках можем настроить сетевой экран так, как если бы это был обычно подключённый к компьютеру экран.

Единственное, что нам будет недоступно для сетевого экрана – это только масштабирование. Все же остальные настроечные возможности можем использовать — выбрать тип отображения второго экрана (расширение или дублирование), ориентацию экрана, разрешение.

***
Также, друзья, в настройках просмотрщиков на клиентских устройствах мы можем настроить работу сетевого экрана по типу удалённого подключения с использованием их средств управления – тачпадов, клавиатур, сенсорных экранов, пультов ДУ (для телевизоров) и т.п.
Такой вот примечательный проект Spacedesk. Кого заинтересовало, юзайте, делитесь впечатлениями в комментариях.
User Manual — Table of Contents
- Introduction and Setup
- System Requirements
- Setup Windows Driver (Primary Machine)
- Run the spacedesk Driver Installer
- Verify if Setup was Successful
- Verify if latest version is installed
- Setup Viewer (Secondary Device)
- Install on Android and iOS Smartphones and Tablets via App Store
- Install on Windows PCs, Laptops and Surface Tablets
- Run on any Machine in HTML5 Web browser
- Viewer Platforms and Features
- Connecting a new display monitor over the network
- Network Discovery
- Establishing The Network Connection
- Verify Network Connection and additional Display Monitor
- Connecting a new display monitor over the USB cable
- Direct USB Cable Connection (Android only)
- USB Tethering (iOS and Android)
- Configuration and Settings
- Windows Driver (Primary Machine)
- Desktop Extension or Desktop Duplication (mirror) Settings in Display Control Panel
- Desktop Extension or Desktop Duplication (mirror) Settings in Display Switch
- Set as Primary Display
- spacedesk Server Automatic Start
- Disable spacedesk
- spacedesk Disconnect Delay
- Viewer (Secondary Device)
- Audio Speaker
- Mouse, Keyboard, Touchscreen And Pen Input
- Screen Resolution
- Automatic Connect
- Full Screen Upon Connect
- Auto Rotation
- Keep Monitor Active
- Auto-Start Windows Viewer
- Windows Driver (Primary Machine)
- Performance Tuning
- Use Direct Cable Connection
- USB Cable
- Network Cable
- Avoid and Bypass Network Routers
- Use Wifi Direct / Wifi Hotspot / Wifi Access Point
- Reduce Screen Resolution
- Color Depth and Image Compression
- Framerate per second
- Use Direct Cable Connection
- TROUBLESHOOTING
- Critical Errors
- Windows 10 Crash with BSOD (Blue Screen of Death)
- Black Screen on Main Monitor
- Known Issues, Problems and Limitations
- Incompatible Third Party Products
- Windows 11/10 spacedesk only worked once (not working after reboot)
- Windows 11/10 Desktop Duplication (mirror) option not available
- Windows 11/10 Known Issues and Unsupported Features
- Windows 10 old version not supported
- Windows 8.1 Limitations and Unsupported Features
- Windows 8.1 Crash upon client connect
- Network Connection
- Cannot discover Primary Machine
- Connection Error
- Firewall Settings on Primary Machine
- VPN (Virtual Private Network)
- Windows Driver (Primary Machine)
- spacedesk Server Status
- Incompatible Display Hook Driver Detected
- Repair spacedesk Driver Setup
- Various
- Viewer (Secondary Device)
- Check Viewer App version
- HTML5 VIEWER
- Connection Error
- Limitations
- Critical Errors
- Video Wall Configuration
- Videowall
- Settings
- Videowall Disconnect Delay
- Wall Display Settings
- Client Display Settings
- Video Wall Operation
- Uninstall on Windows Primary Machine
- Uninstall Using Windows Control Panel
- Uninstall Using .Msi File
- Troubleshooting Uninstall
- Manual Uninstall (Troubleshooting Only)
- Windows Secondary Machine Uninstall
- Appendix
- Release Notes
- List of Incompatible Windows Application
- File List
Introduction and Setup
At least 2 machines are needed to operate spacedesk. These machines must be connected via a Local Area Network (e.g. Ethernet or Wireless) supporting TCP/IP network protocol. Each one of the two machines is running its own kind of spacedesk software:
1. The Primary Machine runs the spacedesk DRIVER software. It includes network display server software and display device drivers. This allows to extend or duplicate the Windows Desktop to the screen of another machine over the network.
• Windows PC
• Laptop
• Surface Pro tablet (Windows Desktop application)
2. The Secondary Machine runs spacedesk VIEWER software which acts as the secondary display. It can be one (or multiple) of the following:
• Android tablet or phone (Android VIEWER)
• Windows PC, laptop or Surface Pro tablet (Windows Desktop application)
• Apple Mac, iPad or iPhone (iOS VIEWER)
• Linux PC and a variety of other machines (HTML5 VIEWER)
3. The Network Connection in between can be direct or through router/switch/access point connected by cable or wireless. It can be one or multiple of the following:
• Ethernet crossover cable direct connection (best performance)
• Ethernet cable through router/switch/hub (good performance)
• WiFi direct connection to Access Point (intermediate performance)
• USB Tethering or USB to Ethernet (intermediate performance)
• WiFi through router/switch/hub (worst performance)
System Requirements
Primary Windows Machine (network display server)
The spacedesk server runs a Windows service and the WDDM Display Driver which is visible to Windows just as an own separate virtual graphics adapter (Windows 10) or as additional virtual display monitors on the primary graphics adapter (Windows 8.1). These additional virtual displays can mirror the main screen or extend the Windows Desktop. spacedesk DRIVER software is capturing their screen content, compressing it and transmitting it over the LAN (Local Area Network) to the spacedesk VIEWERs.
• Windows 11 / 10 (version 1607 – later only) / 8.1
• Graphics adapter Nvidia / AMD / Intel / Basic Display
• WDDM 3.0 / 2.7 / 2.6 / 2.5 / 2.4 / 2.3 / 2.2 / 2.1 / 2.0 / 1.3 / 1.2 / 1.1
• DirectX 12/11/10/9
Secondary Machine or Device (network display client)
Android VIEWER on tablets and phones.
• Android (> version 4.1)
iOS VIEWER on iPhones, iPads and iPod touch
• iOS (> version 9.3)
Windows VIEWER on Windows PCs, laptops and Surface.
• Windows 11 / 10 / 8.1 / 7
• DirectX 10
• DirectX WARP (Min. 800 MHz CPU / Min. 512MB RAM)
HTML5 VIEWER on any device running operating system with HTML5 Web browsers
Chrome (> 16), Safari (> 5.1) Internet Explorer (> 10), Opera (> 27) e.g.:
• Windows Phones (Windows Phone 10 / 8.1)
• Windows Surface, tablet, laptop and PC (Windows 10, 8.1, 8, 7, Vista, XP)
• Mac (OSX)
• Linux PC and laptop
Network Connection
Network needs to run TCP-IP protocol.
Setup Windows Driver (Primary Machine)
Before installing a new spacedesk version, uninstall any previous version. This can be done on Windows Control Panel → Programs and Features.
Run the spacedesk Driver Installer
For Windows 10/11:
spacedesk_driver_Win_10_32_v1065_BETA.msi for 32-bit platform
spacedesk_driver_Win_10_64_v1065_BETA.msi for 64-bit platform
For Windows 8.1:
spacedesk_driver_Win_8.1_32_v1057_BETA.msi for 32-bit platform
spacedesk_driver_Win_8.1_64_v1057_BETA.msi for 64-bit platform
Make sure to check the Firewall configuration before proceeding otherwise no client will be able to discover this Primary Machine nor connect to it.
Only on Windows 8.1 the dialogs below will be shown and need to be confirmed. These operating systems, also require a reboot after the setup has completed.
Verify if Setup was Successful
First, make sure that the spacedesk Driver is properly installed and can be seen underneath Programs and Features.
Check if the spacedesk System Tray icon (at the bottom right of the screen) is visible in the notification area and click it to show spacedesk status ON in spacedesk Driver Console app.
![]()
Check the Windows Firewall settings if spacedeskService.exe is allowed on private or public network. Open Control Panel → Windows Firewall → Allow an app through Windows Firewall, allow an another app then browse for spacedeskService.exe located at “C:WindowsSystem32” folder.
Verify if latest version is installed
Check spacedesk version by right-clicking the spacedesk System Tray icon (at the bottom right of the screen) then click About to show the spacedesk SERVER About window displaying the current version.
![]()
Then compare this version with the website’s current spacedesk version.
Setup Viewer (Secondary Device)
Install on Android and iOS Smartphones and Tablets via App Store
Android VIEWER is installed from the Google Play Store and iOS VIEWER is installed from the iTunes App Store.
Install on Windows PCs, Laptops and Surface Tablets
A Windows PC, laptop or Surface tablet can be used as Secondary Machine. spacedesk Windows VIEWER needs to be downloaded from the
spacedesk website. It needs setup and installation as shown below.
Run the spacedeskWindowsVIEWER setup installer, spacedeskWindowsVIEWER_v0930_BETA.msi. After a successful installation of Windows VIEWER application a shortcut is created on the desktop.
Run on any Machine in HTML5 Web browser
For spacedesk HTML5 VIEWER, no setup installation is needed on the Secondary Machine. HTML5 VIEWER operates with a standard web browser without any setup needed upfront. It can be opened directly from the website http://viewer.spacedesk.net/. Make sure that the web browser (e.g. Safari, Google Chrome, Opera, Internet Explorer, etc.) is updated to the latest version.
It is important to understand, that spacedesk HTML5 VIEWER does not operate over the internet. It does not need an internet connection. It does not even need to be opened over the internet as described above. The HTML5 page can be saved locally.
Local install (optional):The web page can be saved to be used off-line even without internet connection. Follow the instructions below:
• Refresh using Ctrl-F5 keys after opening HTML5 page (this ensures that everything is updated).
• For Google Chrome browser, use the the menu “More tools ” and select “Create shortcut… “.
• For Microsoft Internet Explorer browser, use the the menu “Tools ” and select “Add site to apps “
Viewer Platforms and Features
| Feature | Windows 7 Client | Windows Store Client | Android Client | iOS Client | HTML5 Client |
|---|---|---|---|---|---|
| On-Screen-Keyboard | |||||
| Keyboard | |||||
| Mouse | |||||
| Touch | |||||
| USB Cable Connection | |||||
| Audio Speaker (LAN) | |||||
| Audio Speaker (USB) | very soon |
Connecting a new display monitor over the network
Network Discovery
spacedesk secondary machines (except HTML5 VIEWER) can do automatic network discovery of Primary Machines.
Only when using HTML5 VIEWER or in case the Primary Machine cannot be discovered, the IP address of the Primary Machine needs to be entered manually. It can be determined in various ways:
• Click the spacedesk System Tray icon (at the bottom right of the screen) OR the spacedesk DRIVER Console icon on the Windows Start menu to display the spacedesk DRIVER Console user interface.
(for Windows 10-11 primary machine)
(for Windows 8.1 primary machine)
• Typing ipconfig in a Windows command prompt.
Establishing The Network Connection
Android / iOS / Windows Viewer
On the client side, initiate connection to server by opening the spacedesk VIEWER app and select the desired server on the list of detected primary machines to automatically connect. If Primary Machine cannot discover, please check the chapter Troubleshooting Network Connection – Cannot Detect Primary Machine below.
HTML5 Viewer
Using the updated web browser, go to HTML5 viewer page then type the IP address of primary machine where the spacedesk DRIVER is installed. The “Need Help?” button below the Connect button provides an instructions on how to get the IP address of server machine and then click the “Connect” button to start the connection.
Verify Network Connection and additional Display Monitor
On the Primary Machine side, check if the connection is established. Just click the spacedesk System Tray icon (at the bottom right of the screen) on the primary machine to display the spacedesk Driver Console window -> Connections Active (connected) page and on Adapter Interface -> current Network Adapter -> Active Connections.
Open Display Control Panel via spacedesk Tray icon, right-click -> Windows Display Control Panel menu then check if there’s a secondary display attached.
Connecting a new display monitor over the USB cable
Direct USB Cable Connection (Android only)
USB cable connection is now supported in Android client devices.
To enable this feature, just open the spacedesk Driver Console → Communication Interfaces, then switch ON the Android USB Cable toggle switch. Plug the Android client device via direct USB cable to primary machine then spacedesk Viewer app will automatically connect as spacedesk display.
FYI:
Android USB ON disables other USB cable applications (e.g. File Transfer).
Android USB OFF enables other applications again.
In case of USB cable issues:
– Slowly unplug and plug USB cable a few times.
– Restart Android mobile device.
– Restart Windows PC.
USB Tethering (iOS and Android)
If the secondary machine is a smartphone or tablet that supports USB tethering, use the USB cable to establish a network connection between primary and secondary machine. USB tethering typically supported on devices with Cellular Network.
For iOS device, make sure to turn OFF first the Wifi. Connect the iOS device to Windows primary machine via USB lightning cable. Then switch ON the Cellular Data and Personal Hotspot and an option will pop-up and select USB Only.
For Android device just go to settings and find the Tethering & portable hotspot, then connect the USB cable of Android device to Windows primary machine, then enable the USB tethering in Android settings.
Configuration and Settings
Windows Driver (Primary Machine)
Desktop Extension or Desktop Duplication (mirror) Settings in Display Control Panel
Right Mouse Click on Desktop → context menu “Display settings” leads to Display Control Panel. Display Control Panel can be used to change display resolutions and to verify proper operation. During Desktop Extension the following status should be shown:
During Desktop Duplication (Mirror) the following status should be shown:
During Single Output (Second Screen Only) the following status should be shown:
Desktop Extension or Desktop Duplication (mirror) Settings in Display Switch
Display Switch (Windows logo + P) can also be used to change modes
Set as Primary Display
Setting the spacedesk display as primary/main display can be done by selecting the display then underneath Multiple displays dropdown list, there’s a check box “Make this my main display”.
spacedesk Server Automatic Start
spacedesk is set to auto start at system boot time by default.
This setting is configurable via spacedesk Driver Console app -> Control -> Automatic Start at System Boot Time check box.
Disable spacedesk
Disabling the spacedesk server temporarily to prevent other spacedesk client connection can be done via spacedesk Driver Console user interface → CONTROL → spacedesk Status, toggle OFF for Windows 10-11 primary machine.
Via spacedesk SERVER window User Interface → Settings → OFF for Windows 8.1 primary machine.
spacedesk Disconnect Delay
In case of disconnection event due to temporary network connection lost, spacedesk display will remain connected until the specified Disconnect Delay times out.
This setting is configurable only if spacedesk Server is switched OFF.
A -1 value is equivalent to infinite (spacedesk client display will not disconnect until the primary machine reboots).
By default this settings is set to 45 seconds.
Viewer (Secondary Device)
Below a few configuration settings to adjust spacedesk operation to individual needs.
Audio Speaker
Current spacedesk Android and Windows 7 Viewer apps already supports remote Audio.
To enable in spacedesk Android Viewer app, make sure to enable first the on-screen menu.
Upon spacedesk connect, Audio can be enabled/disabled via On-Screen menu.
To enable in spacedesk Windows 7 Viewer app, click the Functionality -> Audio Speaker (experimental) before spacedesk connection.
Mouse, Keyboard, Touchscreen And Pen Input
To enable the “Mouse, Keyboard and Touchscreen ” option:
Windows 7 VIEWER → Functionality menu.
For touchscreen, two options are available absolute and relative mode.
Touchscreen (absolute) mode provides an absolute input position of the mouse pointer within your viewer screen.
Touchpad/Trackpad (relative) mode is using relative desktop coordinates.
To exit from remote control mode just press “Alt+Shift” key combination.
Windows 10 VIEWER App → Settings → Remote Control menu.
Mouse output can be set as the actual mouse or as emulated touch.
Touch output can be set as actual Touch or as emulated Mouse.
Keyboard and Pen can be activated or deactivated.
To exit from remote control, you can set a custom key combination. The default key combination is “Alt+Shift”.
On Android and iOS VIEWER app, touch screen, Keyboard and Pen remote input feature is also supported.
It can be enabled on Settings → Input devices.
(Android)
(iOS)
There are two different options on how touch feature can work on Android and iOS device.
• Absolute touch provides an absolute input position of the mouse pointer.
• Relative touch which works like a touch pad.
Keyboard remote control can be activated/deactivated.
For software keyboard on Android VIEWER app, just do the two finger touch on the viewer screen to activate the onscreen keyboard.
Hardware keyboard is also supported (USB or wireless).
Pen remote control can be activated/deactivated too.
On HTML5 VIEWER, just go to Advanced Performance Settings → Remote Control to enable remote control feature. However, no keyboard control only mouse and touchscreen support.
Below are the touch gestures for Android and HTML5 Viewer:
Move pointer: Tap with one finger and drag anywhere on the screen.
Left-click: Tap the screen with one finger
Right-click: Tap and hold the screen, then release.
Drag Windows/Object: Tap two times for relative OR tap once for absolute, hold then drag.
Screen Resolution
The “Resolutions” dialog box of the Windows VIEWER Settings allows the users to use up to two resolutions. The client’s native resolution can be enable and use by checking the box of “Native Screen Resolutions”.Then the user can also add another resolution by selecting one of the typical screen resolutions on the combo box.
Automatic Connect
The “Automatic Connect” option of the Windows and Android viewer’s Settings allows the user to enable the automatic connect to IP address (of multiple primary machines) or hostname upon launching the viewer app and also an option to “Auto-reconnect” to the last server machine connected in case of sudden disconnection from system sleep or hibernate or from any kind of unwanted disconnection.
(windows viewer)
(android viewer)
(iOS viewer)
Full Screen Upon Connect
The “Full screen upon Connect” option on Windows VIEWER Settings will enable the automatic switching to full screen mode upon connecting to the server.
Auto Rotation
The “Auto rotation” option on iOS and Android viewer settings allows users to enable an automatic rotation of viewer screen according to current display orientation (eg Portrait or Landscape mode) of iOS / Android device.
(android)
(iOS)
Keep Monitor Active
The “Keep Monitor Active” option on Windows VIEWER Settings will prevent the secondary machine’s monitor from going to Display Off or System Sleep only when Windows VIEWER is connected to the server.
Auto-Start Windows Viewer
To set the spacedesk Windows VIEWER app to auto start during Windows start up:
• open the run command (Window + R key combination),
• paste “% appdata% Microsoft Windows Start Menu Programs Startup” then enter,
• on the Startup folder just copy the spacedesk Windows VIEWER shortcut file found on your desktop.
Performance Tuning
Use Direct Cable Connection
Cable connections perform better than wireless networks. USB and network cable is faster than WiFi.
USB Cable
spacedesk supports direct USB connection for Android.
On Apple iOS, spacedesk performance can be improved by USB Tethering.
Go to chapter “CONNECTING A NEW DISPLAY MONITOR OVER THE USB CABLE” for more details.
Network Cable
The faster the network, the faster the display performance. The fastest option is always a direct connection via network cable, e.g. a Gigabit Ethernet.
Currently minimum reasonable network bandwidth needed by spacedesk BETA ranges around 50 Mbit/sec. Substantial improvements including support of slower networks are planned for the first release version.
Avoid and Bypass Network Routers
The network router is the heaviest performance restraint. Cirumventing routers substantially improves performance. This can be done in various ways:
– On wired networks, just use crossover cables.
– On wireless networks use WiFi Direct (see paragraph below).
– WiFi Direct has almost the same performance as cable.
Use Wifi Direct / Wifi Hotspot / Wifi Access Point
Performance on wireless networks can be improved by configuring the Windows 10 PC/laptop or the mobile device as Wifi Hotspot / Wifi Access Point. Connection to this Access Point needs to be established before connecting spacedesk.
To configure the Mobile Hotspot option on Windows 10 PC/laptop. Just go to Start → Settings → Network & Internet → Mobile Hotspot, then turn it ON. Try to connect the client device(phone/tablet/laptop) to the wireless network name generated by the Mobile Hotspot. Then run the spacedesk VIEWER and connect to the IP address of server machine, in this case it should be the IP address of the Mobile Hotspot network generated (Microsoft Wi-Fi Direct Virtual Adapter).
Reduce Screen Resolution
The lower the resolution of the networked display screen, the faster the display performance.
Color Depth and Image Compression
spacedesk uses image compression to improve display performance. This mechanism reduces image size before transferring images over the network. The spacedesk image compression algorithm is lossy. It reduces quality and color depth of the image.
On fast networks, color depth and image quality can be kept very high while still achieving good performance.
On slow networks, color depth and image quality need to be reduced to achieve good performance.
The “Compression Quality” dialog box of the Windows VIEWER Settings allows the user to enable or disable the compression of screen updates. To choose OFF means to use RGBA 32-bit color format of screen image and no image quality reduction will be done. To choose On means that the user allows to reduce color depth by Chroma Downsampling and adjusts the compression quality to find the ideal image quality and performance speed.
YUV 4:4:4 – No reduction of color information. High quality of screen image but, performance intensive. Can only be used on very fast networks
YUV 4:2:2 – Reducing the color information by 1/3 (from 24 bit to 16bit) reducing color quality of screen image and improving performance.
YUV 4:2:0 – Reducing the color information by 50% (from 24 bit to 12bit) to achieve best possible performance.
The color loss caused by the above mechanism typically not very much noticeable for the human eye, especially when there is a lot of motion on the screen (e.g. playing a video). Thus YUV: 4:2:0 is the default setting which can apply to many user Applications.
The Image Quality can be varied between 100 (no compression) and 0 (maximum possible compression). The default value is 70 which still tends to show a clear enough and detailed enough image for many user applications.
Framerate per second
The framerate option allows user to choose the FPS (framerate per second) on the viewer screen.
On Windows viewer just go to Settings → Compression Quality … → Frame rate per second (FPS).
On Android viewer, just go to Settings → Quality / Performance → Custom FPS rate.
On iOS viewer, just go to Settings → Quality → Custom FPS rate
TROUBLESHOOTING
Critical Errors
Windows 10 Crash with BSOD (Blue Screen of Death)
In some cases, when spacedesk is connected over USB tethering connection, the USB driver used by USB tethering network causes a BSOD crash.
Please try to update the Windows USB driver via Windows Update.
Black Screen on Main Monitor
When changing Windows to multimonitor configuration, then sometimes the main display monitor remains detached from the Windows Desktop. Such “Black screen Problems” sometimes happen on all Windows displays. E.g. this also happens sometimes when working with projectors. This situation can usually be solved easily by changing Windows projector settings using “Windows Key + P” (where P stands for projector). Just repeat this key sequence: “Windows Key + P” “Arrow Down” “Enter”.
Known Issues, Problems and Limitations
Incompatible Third Party Products
Incompatible products:
Nvidia ShadowPlay
Wired XDisplay (splashtop)
Windows 11/10 spacedesk only worked once (not working after reboot)
Virtual Desktop App Streamer – spacedesk will not work anymore after reboot if this software is installed in the primary machine. Uninstalling this software will fix the spacedesk Display – Off issue.
Windows 11/10 Desktop Duplication (mirror) option not available
Desktop duplication of primary monitor to other displays is disabled in Windows display settings of Windows 10 with old version of graphics adapter (< WDDM 2.0).
Just download the latest driver version from its website OR if it did not work try to downgrade the graphics driver to Microsoft Basic Display driver via device manager.
Windows 11/10 Known Issues and Unsupported Features
Nvidia ShadowPlay – Current spacedesk version has a known issue with Nvidia ShadowPlay. While Nvidia ShadowPlay (screen record) is active, spacedesk will give an error code 1-2-0 on the viewer side. Just disable it in order to use spacedesk.
Night Light – Windows Night Light settings is currently not supported on spacedesk displays.
HDR – Windows HDR (High Dynamic Range) settings is currently not supported on spacedesk displays.
10-Bit Pixel Format – With 10-bit pixel format enabled in Nvidia or AMD control panel spacedesk display will show a desktop image with discoloration.
Windows 10 old version not supported
Latest spacedesk Windows 10 Driver version now only supports Windows 10 version 1607 and above. Just run “winver ” to check Windows 10 version. If the version is older than version 1607 (Build 14393) just upgrade to Windows 10 version 1607 or above, in order to use the latest spacedesk driver. Use Windows 10 Update Assistant to upgrade Windows 10 to latest version for free, just click here…
Windows 8.1 Limitations and Unsupported Features
Multi-GPU Technology such as Nvidia SLI Technology or AMD Crossfire is currently not supported by spacedesk. In case SLI is enabled, spacedesk will not work properly.
Virtual machines are officially not supported by spacedesk driver for Windows 8.1 Primary Machine. It may work on some cases but some problems may occur such as strange mouse pointer behavior, black screen on client, etc.
Nvidia Control Panel crash may also observed while spacedesk is active on Windows 8.1 Primary Machine.
qWave (Quality Windows Audio/Video Experience) Windows Feature unavailablemessage box during installation may observed on Windows Server 2008/2012 primary machine. To install this feature, Open Server Manager -> Add Roles and Features, just click Next until you are on the Features, then check if the box for Quality Windows Audio Video Experience (qWave) features is checked, and if not please check it and install.Then restart your server machine (if required).
Windows 8.1 Crash upon client connect
In very rare Windows 8.1 environments a BSOD crash (Blue Screen of Death) can happen upon connect. Such a system crash is always recoverable because the driver is not yet active during Windows 8.1 system boot time.
Just reboot the primary machine in safemode then uninstall the spacedesk driver. To boot in safemode, press and hold f8 key upon computer reboot and before the windows logo appeared. Then in advanced boot option screen use the arrow keys to select the safe mode option then press Enter key.
Note: Before uninstalling using the spacedesk msi installer on safemode, run a Command Prompt then type the following commands:
Step 1:
for Safemode: REG ADD “HKLMSYSTEMCurrentControlSetControlSafeBootMinimalMSIServer” /VE /T REG_SZ /F /D “Service”
for Safemode with Network: REG ADD “HKLMSYSTEMCurrentControlSetControlSafeBootNetworkMSIServer” /VE /T REG_SZ /F /D “Service”
Step 2: net start msiserver
Network Connection
Cannot discover Primary Machine
Step 1: Different Network Segments
If Primary Machine and Secondary Machine are in different network segments, then they cannot discover each other. However, they may still be able to connect. In that case try to add the IP address to detect the primary machine by clicking the ” + ” button.
To get the IP address of the Primary machine please check the above chapter Establishing the network connection .
Step 2: third party firewall software
In case the above steps did not help, then a third party firewall software (other than Windows Firewall) could still prevent detection. Please check this chapter’s paragraph ” Firewall Settings ” below.
Step 3: WiFi router’s network isolation active
In case all above steps still did not help, and if this is happening on a wireless network, then there might be one other remaining problem: WiFi router’s network isolation feature might be activated. The only solution for this is re-configuring the router.
Step 4: VPN (Virtual Private Network) enabled
Just refer to the VPN topic below.
Step 5: Network profile
In some cases, setting the network profile from “Public” to “Private” solves the spacedesk network discovery issue.
To set, open the Windows Settings -> Network & Internet -> properties of the current network, then select Private underneath Network Profile.
Step 6: Alternative ways to connect
If all above connection attempts failed. Try USB Tethering or Wifi Direct / Hotspot setup to establish a network connection between Primary and Secondary machines.
Connection Error
This shows that the primary machine can be reached over the network but connection fails after the indicated connection time. Possible reasons are the following:
– Unstable network connection
– Error on spacedesk Primary Machine
– Nvidia ShadowPlay (screen record) is running which is a known issue at the moment.
– Virtual Private Network (VPN) enabled
Firewall Settings on Primary Machine
Third party firewall
If there is a third-party firewall software or anti virus (eg Avast, AVG, etc.) with own firewall settings running on Primary Machine, then this can prevent spacedesk discovery and connection.
Please ensure that C: Windows System32 spacedeskService.exe is allowed through the firewall software or the spacedesk TCP / IP network protocol port is opened. spacedesk is using TCP port 28252.
Windows firewall
Please ensure that the Windows Firewall settings is correct. For details please check chapter Setup Primary Machine – Verify if setup was successful .
VPN (Virtual Private Network)
On some situations, having a VPN connection present on either primary or secondary machine prevents the network discovery process between spacedesk server and client, which results to “Cannot Detect Primary Machine” or “Error code 1-0” in spacedesk viewer apps.
There are various workaround that can fix this problem without completely disabling the VPN connection.
1. If VPN app has user interface with configuration settings that will let users select a specific apps to not use VPN, just add the C:WindowsSystem32spacedeskService.exe on this exception list.
2. Run “ncpa.cpl”, right-click the Ethernet or WiFi network icon then open the Properties window. Click on the Sharing tab and check the “Allow other network users to connect through this computer’s internet connection” box.
Windows Driver (Primary Machine)
spacedesk Server Status
Check if spacedeskService is operating. Make sure that spacedesk service has started and spacedesk System Tray icon (at the bottom right of the screen) is visible in taskbar’s notification area and turned ON. For details, please check chapter above Setup Primary Machine – Verify if Setup was Successful .
Server OFF or ERROR
spacedesk server can be enabled and disabled via spacedesk server user interface menu. In case viewer app cannot discover / connect to the server, make sure that this menu is ON.
spacedesk server can be in ERROR state if spacedesk Graphics Adapter in device manager has yellow exclamation mark which indicates an error in driver. Check in C: Windows system32 drivers UMDF directory if “spacedeskDisplayUmode1_x.dll” is present then try to disable-enable the driver in device manager and try to switch ON in spacedesk server user interface menu.
For Windows 8.1 primary machine, check for “spacedeskHookKmode.sys” in C: Windows system32 drivers directory, then reboot.
For Windows 10 (version 1607 – later) primary machine, open Device manager and check below Display Adapters if spacedesk Graphics Adapter is installed correctly and enabled.
Incompatible Display Hook Driver Detected
Step 1: Check if system tray bubble reports incompatible display hook driver
This error message indicates that another WDDM filter hook display driver is present on the system.
The specific display hook driver can be determine via spacedesk Driver Console app -> DIAGNOSTICS -> Incompatible Software.
Step 2:Uninstall known products using incompatible display hook drivers
This is usually installed by a USB-Display or Zero-Client of the following brands:
Display Link, Duet Display, Fresco Logic, MCT, Microchip/SMSC, OSBase, Splashtop XDisplay and Extended Display HD, etc.
Display hook drivers are not standard Windows drivers. All products relying on such drivers are incompatible with each other. They cannot coexist on the same system. This includes spacedesk.
Use the Uninstall button on the spacedesk Driver Console app to uninstall the other product / hook driver detected, then reboot the spacedesk server machine and try to connect spacedesk client again.
Step 3:Uninstall splashtop wired XDisplay’s virtual display driver
splashtop wired XDisplay’s virtual display driver needs to be uninstalled (it’s an incompatible old legacy WDDM Filter Hook driver which cannot coexist with other similar products like spacedesk even though it doesn’t even seem to use this old driver any more).
On Splashtop Wired XDisplay Agent window -> Advanced, just uninstall the Virtual Display driver.
Step 4:Check if incompatible products did not uninstall OSBase driver
Various products using the OSBase driver do not properly remove it upon uninstall (e.g Duet Display, Fresco Logic, etc.). After uninstalling their product, the leftovers of the OSBase driver still need to be removed manually following the instructions below:
- Go to Control Panel -> “Add Remove Programs “. If you can find OSBase display driver software, uninstall it.
- Check if OSBASE drivers are installed by running the following commands:
- “sc query ddkmd “
- “sc query ddkmdldr “
- “sc query ddmgr”
- If installed, uninstall OSBASE drivers by running the following commands:
- “sc stop ddmgr”
- “sc delete ddmgr”
- “sc delete ddkmdldr”
- “sc delete ddkmd”
- Reboot your PC.
Repair spacedesk Driver Setup
Installation repair can be done by running the same msi installer version then select Repair button. Or just go to Windows Control panel → Programs and Features then search for spacedesk Driver, right-click then repair. This procedure only applies for Windows 10 primary machine only.
Various
Detached Second Display.
In case of black screen in Windows desktop application or always connecting status on HTML5 VIEWER or “Connected – Display OFF” message showing in Android/iOS VIEWER:
For Windows 11/10 primary machine, open the spacedesk Driver Console and click the connected client to check the Display Mode if it’s detached.
For Windows 8.1 primary machine, click the spacedesk Server window on the task bar and check if status of the device on Network Connections (remote) tab is “detached”.
To attach, open the Windows Display settings of the primary machine, click the detached secondary display and try to attach it by selecting extend or duplicate.
Mirror mode failed.
For Windows 8.1 primary machine, if desktop extension is working but duplication is always failing, make sure that the “Settings → Resolutions → Other Screen Resolution” of Windows VIEWER OR the “Advanced Performance Options → Custom Resolution” of HTML5 VIEWER OR the “Settings → Resolution” of Android VIEWER, OR Settings → Display → Custom Resolutions of iOS VIEWER should matched the native resolution of the primary machine’s monitor.
For Windows 10, if duplicate option is not available in Display settings try to update the graphics adapter by Windows Update or manual download of driver from official website.
If duplication is still not available after driver update, then it’s probably because the driver does not support mirror mode anymore. Please refer to Known issues chapter below for Mirror mode not supported.
Clear All Display Settings.
In case display is in wrong settings (orientation, screen resolution, display detached) upon client connect, try the “Clear All display Settings” option in spacedesk System Tray menu.
![]()
Viewer (Secondary Device)
Check Viewer App version
Make sure that the VIEWER version is updated. To check just open the Settings → About of Android / iOS / Windows viewer app. While in HTML5 Viewer page, current version is displayed on the page below. Then compare the version on the viewer to the current version on the spacedesk website.
HTML5 VIEWER
Step 1: Delete cached files, images and cookies of web browser.
If spacedesk HTML5 VIEWER web page doesn’t load the latest version 0.9.10, just delete the cached files, images and cookies on browsers settings.
Step 2: check if the web browser supports websockets.
If the spacedesk HTML5 VIEWER is unable to connect, check the version of the web browser and make sure that it is updated. If the secondary machine is a smartphone or tablet device the browser and OS needs to be most recent versions supporting websockets. Just go to https://websocketstest.com/ to verify.
Connection Error
Error Code: 1 & Error Info: 0
This error code and info indicates that the viewer cannot find the Windows server on the network. Mostly, this is caused by Virtual Private Network (VPN) enabled on the primary machine. For more details, kindly refer to the Troubleshooting Network connection – Connection Error chapter above.
Error Code: 1-2-3 & Error Info: 0-3-5
This error indicates that the primary machine can be reached over the network but connection fails after the indicated connection time. Check the Connection Error chapter discussed above.
(android) (iOS)
These error message box also shows the connected time, it indicates how long the viewer is connected before it disconnects. And in case procedures did not help, just report this error code sequence to spacedesk support.
Limitations
Custom Screen Resolutions
On iOS and Android viewer, custom screen resolutions available on settings are only those not bigger than the device’s native screen resolution. This is due to the black screen problem observed when switching to higher resolution. On Windows and HTML5 viewer’s Settings → Resolutions… → Other/Custom Screen Resolutions, supported resolutions is up to 4096×2160.
Performance in HTML5 VIEWER
HTML5 VIEWER is much slower than native viewer apps on Android, iOS and Windows. This is due to technical limitation of HTML5/Javascript.
Slow screen update on Windows VIEWER.
There are some cases that the rendering of screen update in Windows VIEWER is very slow. One of the possible reason is that Windows client machine only has a DirectX 9 graphics driver. It is recommended to upgrade to DirectX 10 – above graphics driver to achieve better performance.
Multiple Display
As of now, spacedesk supports simultaneous connection of up to sixteen additional displays.
– Up to sixteen Android, or iOS, or Windows VIEWERs
– One HTML5 VIEWER web browser application for any device and operating system e.g. Mac OS X and Linux
HTML5 VIEWER on Mozilla Firefox and Microsoft Edge not supported.
spacedesk’s HTML5 VIEWER is currently not supported in Mozilla Firefox web browsers due to performance limitations. Please use other web browsers recommended in system requirements chapter.
Video Wall Configuration
Videowall
Step 1: Open spacedesk DRIVER Console window by clicking the spacedesk Tray icon or search “spacedesk DRIVER Console” in Windows Start Menu.
Step 2: Enable/Disable Videowall functionality using the toggle switch in the spacedesk DRIVER Console – CONTROL – Videowall Configuration box.
Settings
Videowall Disconnect Delay
If this settings is set to non zero value, video wall client displays will only disconnect after the specified value in seconds times out.
A -1 value is equivalent to infinite (video wall client displays will not disconnect until the primary machine reboots).
By default this settings is set to 0.
Wall Display Settings
Updating the wall display’s settings will take effect immediately upon pressing the enter on each text box.
Size (Width:Height) – The (Width x Height) screen resolution of the video wall. By default, Video wall display is set to 4K screen resolution (3840 x 2160).
Client Display Settings
Updating the client display’s settings will take effect immediately upon pressing the enter on each text box.
Wall Index – use to create new Video Wall or assign to an existing Video Wall.
Size (Width:Height) – The Width x Height / screen resolution of the client display.
Position (X;Y) – The (X : Y) position/coordinates of the client display. By default, both are set to 0.
This settings is only applied on the client displays assigned in a Wall.
Rotation Angle – Angle in degrees of the client display. By default, it is set to 0.
This settings is only applied on the client displays assigned in a Wall.
SubSampling type – The color depth type of the client display image. By default, it is set to 4:2:0.
For more info please check Color Depth and Image Compression chapter.
Framerate – The frame rate per second (FPS) of the client display. By default, it is set to 30 fps.
Contrast – slider settings to adjust the client display image’s contrast. By default, it is set to 0.
Brightness – slider settings to adjust the client display image’s brightness. By default, it is set to 0.
Compression Quality – slider settings to adjust the client display image’s quality. By default, it is set to 70.
Flipped Display – check box will enabled the inverted/flipped display which usually used for mirroring.
Video Wall Operation
Step 1: Create a Video Wall Display
For first time client connection, the display is set as Extension mode.
To create a Video Wall, just assign a value (e.g. 0) in the Wall Index text box of each client display.
Just press the enter key to update the settings and it will automatically plugged a video wall display (e.g. Wall0).
Step 2: Assign multiple clients to Video Wall
Multiple client display can be assigned to the video wall by assigning it on the Wall Index text box or via right click context menu “Assign to WallX”.
User can also create multiple video walls simultaneously as long as the primary machine’s resources can handle it.
Step 3: Creative Video Wall
Creative video wall involves rotated client displays and/or positioned in a non zero X and Y coordinates.
Below are the sample creative video wall settings.
Sample #1: Video Wall0
Sample #2: Video Wall1
Step 4: Mirroring to multiple client displays
This video wall configuration can also be used to mirror/duplicate a desktop screen into multiple client displays, by assigning multiple clients in one video wall with the same X and Y coordinates and just change the video wall’s dimension to the same dimension of the client displays.
Uninstall on Windows Primary Machine
Uninstall Using Windows Control Panel
Uninstall of spacedesk can be done on Control Panel → Programs and Features.
Uninstall Using .Msi File
An alternative way to uninstall spacedesk is using the spacedesk msi installer file.
Step 1: Run the setup installer
Run the spacedesk setup installer.
spacedesk_driver_Win_10_32_v1065_BETA.msi for x86 platform
spacedesk_driver_Win_10_64_v1065_BETA.msi for x64 platform
Step 2: Click the remove button
After selecting the Remove button, just click Next until it uninstallation completed.
Starting on version 0.9.9.z.25, reboot is not needed anymore in Windows 10 machine.
Step 3: Reboot (Windows 8.1 only)
After the uninstallation has completed, reboot the computer before proceeding with any other task.
Note: Please do not manually delete or remove the C:Program Filesdatronicsoft spacedesk folder and its files, to prevent uninstallation problem.
Troubleshooting Uninstall
Step 1: Missing spacedesk program files.
Manually deleting spacedesk program files located in chosen directory folder (e.g. C:Program Filesdatronicsoftspacedesk) is extremely not advisable, doing so may result to uninstallation failure of spacedesk with an error message below.
To fix the problem, just restore the program files (please check your Recycle bin)to its original location and try to uninstall again using the same msi installer version or by Windows Control Panel → Programs and features.
Step 2:Try Microsoft Fix.
If uninstall problem still persist after restoring spacedesk program files, try the Install/Uninstall troubleshooter program from the Microsoft Fix article. If spacedesk is not on the program list, just select “Not Listed” then paste the product code of current spacedesk version below.
spacedesk_driver_Win_10_32_v1065_BETA.msi:{34F14846-0BB1-48B6-AECC-8095AE1A4A56}
spacedesk_driver_Win_10_64_v1065_BETA.msi:{93A3BAEF-BDE3-44C1-A2C6-4798020092DB}
spacedesk_driver_Win_8.1_32_v1057_BETA.msi:{5150CB30-709F-45D4-9EF3-0DBD337BE6C8}
spacedesk_driver_Win_8.1_64_v1057_BETA.msi:{9702DF94-CE7E-460F-AB60-7F9931208C9F}
spacedeskWindowsVIEWER_v0940_BETA.msi:{854D64D6-685D-4A59-B5C4-33F106100223}
for previous spacedesk version:
spacedesk_driver_Win_10_32_v1064_BETA.msi:{C0BBD1B8-BA38-46B5-B72B-920E2E2D8C04}
spacedesk_driver_Win_10_64_v1064_BETA.msi:{8401623F-2D8C-4D78-A063-15425D9136D7}
spacedesk_driver_Win_10_32_v1062_BETA.msi:{AB04A2A6-574A-45DA-941B-7CCAA5D854E7}
spacedesk_driver_Win_10_64_v1062_BETA.msi:{799E173C-91BA-49B3-A7B5-3F3DE8C0B5D9}
spacedesk_driver_Win_10_32_v1060_BETA.msi:{C5721F86-A2E2-4EF8-9AFB-358C248E5951}
spacedesk_driver_Win_10_64_v1060_BETA.msi:{727AC596-D91C-49CD-A1DE-1DE32242764A}
spacedesk_driver_Win_10_32_v1057_BETA.msi:{1DC4315B-572F-4F6C-82C7-054C50587695}
spacedesk_driver_Win_10_64_v1057_BETA.msi:{6D9F8C23-E2D2-4D17-9B21-A076CCEED01D}
spacedesk_driver_Win_10_32_v1056_BETA.msi:{1C3A6671-5A19-4ED1-AFAB-20CF55547204}
spacedesk_driver_Win_10_64_v1056_BETA.msi:{F084E34E-CD12-4039-8449-84A2AA3C2E2E}
spacedesk_driver_Win_10_32_v1055_BETA.msi:{6D941A34-9F1B-4163-BD0C-C9C14E09CDFA}
spacedesk_driver_Win_10_64_v1055_BETA.msi:{675DEFD4-02A3-495A-96B5-E93BFA5CB617}
spacedesk_driver_Win_10_32_v1054_BETA.msi:{C162807D-9ADA-4C1C-95D7-E8D2F8459A36}
spacedesk_driver_Win_10_64_v1054_BETA.msi:{509A65B7-41DC-4B32-A54E-0D035F26F4D4}
spacedesk_driver_Win_10_32_v1050_BETA.msi:{97CE234A-3DAB-4DAF-BA5A-E68952445820}
spacedesk_driver_Win_10_64_v1050_BETA.msi:{F2F9F523-C420-4596-BBA7-987BF40E5583}
spacedesk_driver_Win_10_32_v1049_BETA.msi:{C0C13613-D3A7-41BC-82CA-B788BDF5305A}
spacedesk_driver_Win_10_64_v1049_BETA.msi:{0BD5C03D-5508-4DD4-BC32-FE13A1106A26}
spacedesk_driver_Win_10_32_v1048_BETA.msi:{2EADEA2C-9C46-4B68-AD59-19C1A141CFB6}
spacedesk_driver_Win_10_64_v1048_BETA.msi:{3B105125-FFD5-47A0-BA1A-7A1F69A52680}
spacedesk_driver_Win_10_32_v1047_BETA.msi:{C0B54B07-1A26-4111-B66E-0B3457173395}
spacedesk_driver_Win_10_64_v1047_BETA.msi:{B05A2ED2-AB9E-4A6A-B08E-A2CD04416750}
spacedesk_driver_Win_10_32_v1046_BETA.msi:{EE3377FA-DB1E-4236-8631-89BA26081F9F}
spacedesk_driver_Win_10_64_v1046_BETA.msi:{F75B0686-976F-40B8-B417-8E1D8479353F}
spacedesk_driver_Win_10_32_v1044_BETA.msi:{E85A97FF-95E2-4A29-93D3-7970810B142F}
spacedesk_driver_Win_10_64_v1044_BETA.msi:{D7903B45-1502-4A94-876E-8DF19B97487F}
spacedesk_driver_Win_10_32_v1043_BETA.msi:{A96638B0-AF24-4826-9808-2C9440507B31}
spacedesk_driver_Win_10_64_v1043_BETA.msi:{72C34756-6F21-4637-9A75-98EAE3EAC1DC}
spacedesk_driver_Win_10_32_v1042_BETA.msi:{811FE54D-E0A4-4BA4-9F0E-B7F632B85A2B}
spacedesk_driver_Win_10_64_v1042_BETA.msi:{153DFBF9-8C57-4A35-9CCA-9D01FE0689DA}
spacedesk_driver_Win_10_32_v1041_BETA.msi:{BC808207-9FF0-436F-AA5C-E3BD48105018}
spacedesk_driver_Win_10_64_v1041_BETA.msi:{A26AE12E-F3BA-435A-A600-D0D05597C32C}
spacedesk_driver_Win_10_32_v1040_BETA.msi:{6863B8F6-1229-4AAF-85D7-7278AB1A5D00}
spacedesk_driver_Win_10_64_v1040_BETA.msi:{A7749853-C2A7-4313-B46F-11AECF983D62}
spacedesk_driver_Win_10_32_v1039_BETA.msi:{36A88680-F72C-420D-A7CF-2B6E3BB8C13A}
spacedesk_driver_Win_10_64_v1039_BETA.msi:{D06EA7A6-EBC0-421F-A8B4-4CC648E9219E}
spacedesk_driver_Win_10_32_v1038_BETA.msi:{60556EC1-A62B-42AE-B50D-0B3080B6827D}
spacedesk_driver_Win_10_64_v1038_BETA.msi:{A7D9E65C-8236-4D7A-9AE0-F28DDEF0D583}
spacedesk_driver_Win_10_32_v1037_BETA.msi:{C2DE53FC-DA90-4A04-AE25-880F99D712A0}
spacedesk_driver_Win_10_64_v1037_BETA.msi:{599DEADB-A437-4A08-9187-BB2D3E6A76AC}
spacedesk_driver_Win_10_32_v1036_BETA.msi:{4BF61DED-156D-47A4-91B8-95F7CD26F902}
spacedesk_driver_Win_10_64_v1036_BETA.msi:{F9B74421-732C-417E-AFFF-C840D373D287}
spacedesk_driver_Win_10_32_v1035_BETA.msi:{3A1901EC-6398-4E19-AD56-58390CEE99CB}
spacedesk_driver_Win_10_64_v1035_BETA.msi:{8674C274-85BB-418B-84BC-71AE4D7E5EFE}
spacedesk_driver_Win_8.1_32_v1050_BETA.msi:{07E2F61E-7012-4BC9-873B-9E36BFA94A1B}
spacedesk_driver_Win_8.1_64_v1050_BETA.msi:{1E026DB0-7343-46F8-8078-ED38FE69C40E}
spacedesk_driver_Win_8.1_32_v1048_BETA.msi:{1F518912-9A06-4CE2-BC39-B2AE371AA34F}
spacedesk_driver_Win_8.1_64_v1048_BETA.msi:{DF5510B8-B313-413D-9F58-D0C92879B8F5}
spacedesk_driver_Win_8.1_32_v1043_BETA.msi:{F281537F-4B81-46A1-A262-1EB6A6CF363C}
spacedesk_driver_Win_8.1_64_v1043_BETA.msi:{8FB18F8A-B7AD-4C26-BDAB-4D7699A1A2C5}
spacedesk_driver_Win_8.1_32_v1036_BETA.msi:{A3FD378F-3846-4E99-A7F0-54FF212E4B34}
spacedesk_driver_Win_8.1_64_v1036_BETA.msi:{D944408D-DD6D-447A-B707-92EB8141EA0F}
spacedesk_driver_Win_8.1_32_v1035_BETA.msi:{C8F03123-AD56-4203-8744-4C9F281128A9}
spacedesk_driver_Win_8.1_64_v1035_BETA.msi:{769FA542-B6E2-41B1-B310-51F74D775CA5}
spacedesk_driver_Win_8.1_32_v1034_BETA.msi:{1FF2B33F-DE6B-4F5A-A7AF-C88AE5A218B9}
spacedesk_driver_Win_8.1_64_v1034_BETA.msi:{284A27A0-97C2-423D-9167-A7FCEAEEE5B3}
spacedesk_driver_Win_8.1_32_v1033_BETA.msi:{B4B0A476-1878-4E6A-A0E8-ECF240E23FDD}
spacedesk_driver_Win_8.1_64_v1033_BETA.msi:{4DC994AB-529A-4899-BAF7-37DB3B911481}
spacedesk_driver_Win_8.1_32_v1032_BETA.msi:{6DD0D79F-5B05-4C8B-AE26-DEBBE50D7CDF}
spacedesk_driver_Win_8.1_64_v1032_BETA.msi:{44417365-2F3A-4B97-8C47-322003A44292}
spacedesk_driver_Win_8.1_32_v1027_BETA.msi:{87A725A9-F83F-48D9-AEAE-08C86569EFF8}
spacedesk_driver_Win_8.1_64_v1027_BETA.msi:{F2ED3BFB-279B-439F-91C0-A316872AB928}
spacedesk_driver_Win_8.1_32_v1020_BETA.msi:{D36AC41F-8329-4899-8CDF-C132FC26FED0}
spacedesk_driver_Win_8.1_64_v1020_BETA.msi:{D51DBA31-4227-45D7-AB1F-BAD397C38F43}
spacedesk_driver_Win_8.1_32_v1018_BETA.msi:{20ACD8D5-FF4D-43CB-A7E8-641E0AE88254}
spacedesk_driver_Win_8.1_64_v1018_BETA.msi:{91103F10-6432-4D27-979C-9CF3D73862E0}
spacedeskWindowsVIEWER_v0939_BETA.msi:{AB3159A5-5E8D-4B2F-9A56-8034C8B3D272}
spacedeskWindowsVIEWER_v0938_BETA.msi:{ABC715E1-F1D3-4B9E-A693-2208825DC669}
spacedeskWindowsVIEWER_v0937_BETA.msi:{44C237FF-E3B0-42EC-B6BD-E21A4D5A10D0}
Step 3: Manual uninstall of drivers and services
After successfully troubleshooting uninstall, spacedesk should be removed from “Programs and Features”. To make sure that drivers and services are comprehensively removed, all the steps in the next section “Manual uninstall” need to be executed.
Manual Uninstall (Troubleshooting Only)
The steps in this chapter should only be done in exceptional cases if needed and if previously discussed with spacedesk support. The regular way to uninstall spacedesk is using Windows Control Panel or the spacedesk msi installer file as described above.
Step 1: Uninstall services
Run a Command Prompt (cmd.exe) “as administrator” and enter the following commands below:
- sc delete spacedeskHookKmode (for Windows 8.1 only)
- sc stop spacedeskService
- sc delete spacedeskService
Step 2: Uninstall spacedesk Graphics Adapter (for Windows 10 only)
For Windows 10 operating systems, manually uninstall spacedesk Graphics Adapter in Device Manager. This only applies on spacedesk driver version 0.9.9.z.25 – later.
Step 3: Uninstall spacedesk Mouse and Keyboard drivers (for Windows 8.1 only)
Manually uninstall the spacedesk Mouse and Keyboard driver on Device Manager.
Step 4: Uninstall spacedesk virtual HID Device (for Windows 10 only)
On device manager click View -> Devices by Connection, then find the spacedesk virtual HID Device.
Before uninstalling the spacedesk virtual HID Device, the children below should be uninstall first.
Just right-click each child devices underneath the spacedesk virtual HID Device, then click “Uninstall device”.
Step 5: Uninstall spacedesk virtual Bus Device (for Windows 10 only)
On device manager click View -> Devices by Connection, then find the spacedesk virtual Bus Device.
Just right-click, then “Uninstall device”.
Step 6:Reboot
Reboot the system and ensure that the following registry keys below have been removed:
HKEY_LOCAL_MACHINESYSTEMCurrentControlSetServicesspacedeskService
HKEY_LOCAL_MACHINESYSTEMCurrentControlSetServicesspacedeskKtmInputKeybd (for Windows 8.1 only)
HKEY_LOCAL_MACHINESYSTEMCurrentControlSetServicesspacedeskKtmInputMouse
For Windows 8.1
HKEY_LOCAL_MACHINESYSTEMCurrentControlSetServicesspacedeskHookKmode
For Windows 10
HKEY_LOCAL_MACHINESOFTWAREMicrosoftWindowsNTCurrentVersionWUDFServicesspacedeskDisplayUmode
Step 7:Delete files
Delete all files listed in the appendix of this document underneath “File list” in the Appendix of this document.
Windows Secondary Machine Uninstall
Uninstallation of Windows VIEWER on Secondary Machine can be done on Control Panel → Programs and Features. Another way to uninstall is by using the msi installer.
Note: If these troubleshooting procedures does not solve your problem please contact our spacedesk support, just click here.
Appendix
Release Notes
spacedesk Windows 10/11 Driver version 1.0.65
– Bug fix for “Error – Driver not available” on Audio device.
– Bug fix to non-working creative wall dimension change.
– Added uninstall of the driver service of spacedesk Android drivers.
– spacedesk Console UI improvements and bug fixes (e.g. videowall status not remembered after server restart, Wall dimension cannot be modified).
spacedesk Windows 8.1 Driver version 1.0.57
– Bug fix to ‘Unknown device’ node leftover after failed installation of the INF.
spacedesk Windows 7 Viewer version 0.9.40
– Updated spacedesk Logo
– Viewer screen position reset by left-clicking the black portion of the screen.
List of Incompatible Windows Application
This only applies on Windows 8.1 Primary Machine.
Applications conflicting and causing system instability while spacedesk is active
Skype for business
Fortinet security software
Flight Simulator
Applications not working in full screen mode on spacedesk display monitor
Various DirectX games (e.g. Witcher 2, Project Cars, Asseto Corsa, Battlefield, etc.)
File List
File list (Windows 11/10)
C:WindowsSystem32driversUMDFspacedeskDriverHid.dll
C:WindowsSystem32driversUMDFspacedeskDisplayUmode1_0.dll (for Windows 10 version 1607 – 1703)
C:WindowsSystem32driversUMDFspacedeskDisplayUmode1_2.dll (for Windows 10 version 1709 – above)
C:WindowsSystem32driversspacedeskDriverAudio.sys
C:WindowsSystem32driversspacedeskKtmInputMouse.sys
C:WindowsSystem32driversspacedeskDriverAndroidControl.sys
C:WindowsSystem32driversspacedeskDriverAndroidUsb.sys
C:WindowsSystem32driversspacedeskDriverBus.sys
C:WindowsSystem32spacedeskService.exe
C:WindowsSystem32spacedeskServiceTray.exe
C:WindowsSystem32spacedeskConsole.exe
File list (Windows 8.1)
C:WindowsSystem32driversspacedeskHookKmode.sys
C:WindowsSystem32driversspacedeskKtmInputMouse.sys
C:WindowsSystem32driversspacedeskDriverBus.sys
C:WindowsSystem32spacedeskHookUmode.dll
C:WindowsSystem32spacedeskService.exe
C:WindowsSystem32spacedeskKtm.dll
C:WindowsSystem32spacedeskSrvLibConnectorUsb.dll
C:WindowsSystem32spacedeskServiceTray.exe
Files on 64 bit systems only
C:WindowsSysWOW64spacedeskHookUmode.dll

Человека окружает множество девайсов, и порой в рабочем процессе приходится переключать свое внимание с экрана одного гаджета на дисплей другого. Когда работа завязана на взаимодействии смартфона и компьютера, пользователю приходится сосредотачивать внимание только на одном устройстве. В такой ситуации на помощь приходит программа Spacedesk для операционной системы Windows 10, стирающая границы между ПК, телефоном, планшетом и другими девайсами.
Особенности и требования Spacedesk
Spacedesk представляет собой простую утилиту, которая призвана объединить несколько устройств для совместной работы. При помощи этого приложения можно использовать смартфон, планшет или телевизор на базе Android TV в качестве второго экрана. Подобная фишка является крайне полезной при работе в сложных программах вроде профессиональных аудиоредакторов, где представлено большое количество графиков, не помещающихся в рамках стандартного монитора.

Spacedesk отличается от других подобных программ умеренным потреблением ресурсов. Соединение между устройствами осуществляется через Wi-Fi, локальную сеть или USB. Однако при настройке подключения по проводному интерфейсу USB требуется создание точки доступа. Софт непритязателен в плане характеристик компьютера, но перед настройкой важно проверить, чтобы ПК соответствовал следующим параметрам:
- операционная система: Windows 8.1/10;
- архитектура процессора: x64 или x86;
- оперативная память: 2 Гб;
- дополнительно: DirectX 11.
Обозначенные требования актуальны для основной машины. Дополнительное устройство должно лишь иметь на борту одну из следующих версий операционных систем:
- Windows 7 и выше;
- Android 4.1 и новее;
- iOS 9.3 и выше.
Если в качестве второго экрана требуется подключить устройство на базе другой операционной системы, то необходимо обзавестись актуальной версией интернет-браузера. Spacedesk поддерживает эти и более новые версии: Google Chrome 16, Safari 5.1, Internet Explorer 10, Opera 27.

Где скачать и как установить
Перед началом использования приложения необходимо задуматься о загрузке дистрибутива. ПО требуется для всех устройств, участвующих в подключении. Это и компьютер-сервер, и гаджеты, на экраны которых будет выводиться информация с ПК на базе Windows 10.
Сначала разберемся, как загрузить и установить программу на основной компьютер:
- Откройте в любом браузере официальный сайт разработчика.
- Нажмите на кнопку «DOWNLOAD» (в текущей версии ресурса отображается в левом нижнем углу главной страницы).
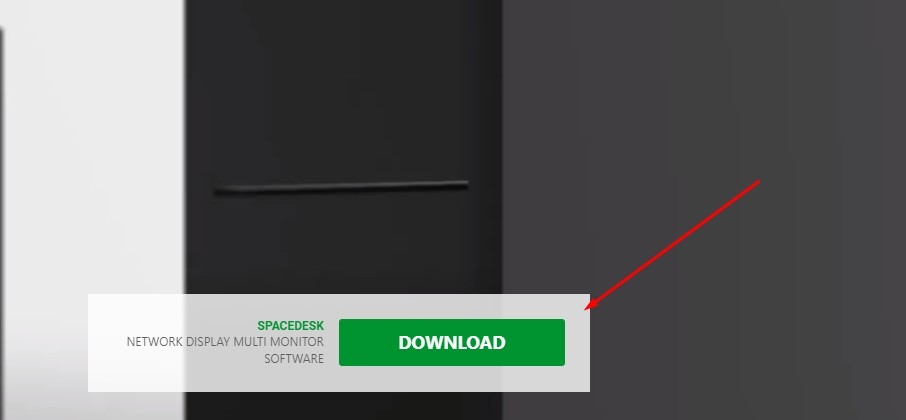
- Скачайте дистрибутив, соответствующий вашей версии ОС (32-bit или 64-bit).

- Запустите инсталлятор, представленный в виде exe-файла, и следуйте инструкциям, которые будут появляться в диалоговом окне.

На заметку. После установки Spacedesk автоматически начнет работу в фоновом режиме, а его значок появится в Панели задач.
Что касается дополнительных устройств, то загрузку ПО следует осуществлять через официальные магазины приложений. Например, для Android используется Play Market, а для iOS – App Store. В случае, если второй девайс базируется на другой ОС, нужно нажать на кнопку «Go to HTML5», расположенной в нижней части странице сайта Spacedesk.
Настройка программы
Подготовительный этап в работе приложения важен так же, как и настройка приложения. Во-первых, вам нужно скачать и установить соответствующее ПО (подробная инструкция была представлена ранее). Далее останется выполнить несколько простых действий для компьютера-сервера и клиентского устройства.
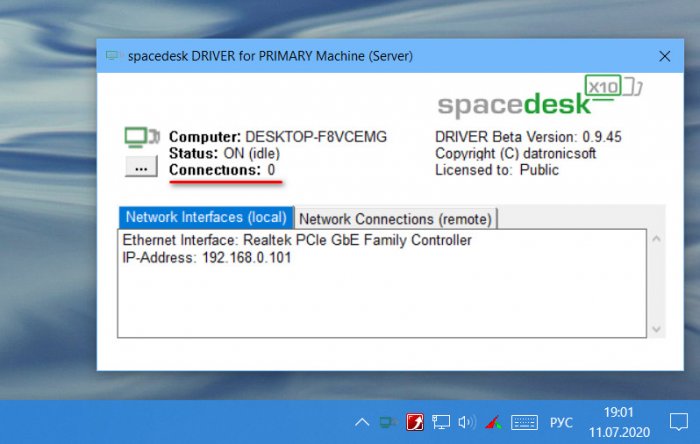
Компьютер-сервер
Первым делом подключите ПК к интернету. Если Spacedesk уже установлен, то запустите программу двойным кликом левой кнопки мыши по значку приложения в Панели задач. Утилита откроется в небольшом окне, где отобразится сетевой адрес (IP). Его нужно запомнить, поскольку в некоторых случаях потребуется его ручной ввод для подключения второго экрана.
В общей сложности программа имеет две вкладки:
- Network Interfaces (local);
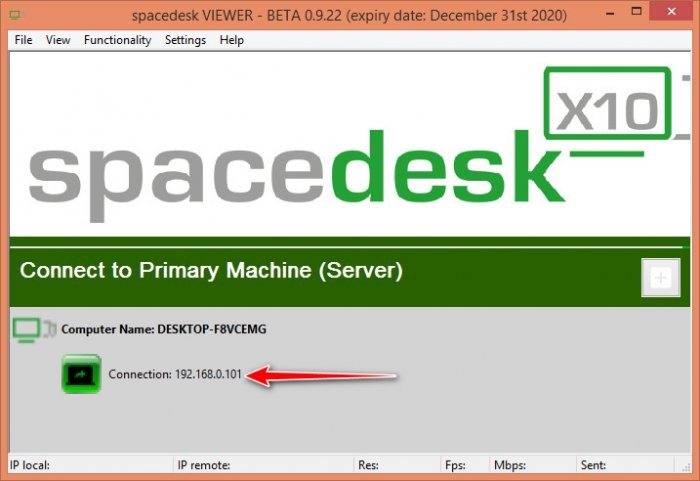
- Network Connection (remote).

В первой представлена информация о главном устройстве, включающая в себя IP-адрес, а во втором отображается список подключенных девайсов. Поскольку мы еще не приступили к настройке соединения, во вкладке «Network Connection» («remote») будет пусто.
Для клиентских устройств
Теперь перейдем к настройке второго и третьего девайса (при необходимости). На них также нужно загрузить ПО разработчика, представленное в виде приложения для Windows, iOS или Android. Главное, что следует сделать на первом этапе, – подключить клиентское устройство к той же сети Wi-Fi, что и компьютер-сервер. Большинство проблем, касающихся настройки соединения, заключается в пренебрежении данному совету. Если подключить второстепенный девайс к другой сети, компьютер не сможет его обнаружить.

Подключение и настройка сетевого экрана
Наконец, настало время перейти к самому интересному – настройке подключения. Рассмотрим общий пример соединения компьютера-сервера с клиентским устройством:
- Откройте приложение для клиентских устройств (обратите внимание, что оно отличается от той программы, которая устанавливалась на компьютер-сервер).
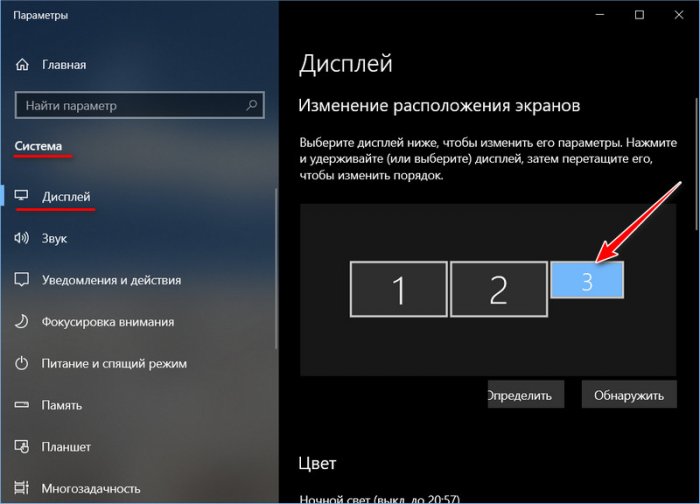
- Посмотрите, правильно ли утилита определила IP-адрес ПК-сервера. На всякий случай откройте Spacedesk на главном компьютере для сопоставления данных.
- Если адреса в утилитах двух устройств не совпадают, то нажмите на клиентском девайсе кнопку в виде плюсика. Далее заполните информацию, включающую в себя IP-адрес главного ПК.
- Если данные заполнены правильно, то в клиентском приложении вы увидите изображение с экрана компьютера-сервера. Для отключения достаточно закрыть утилиту.
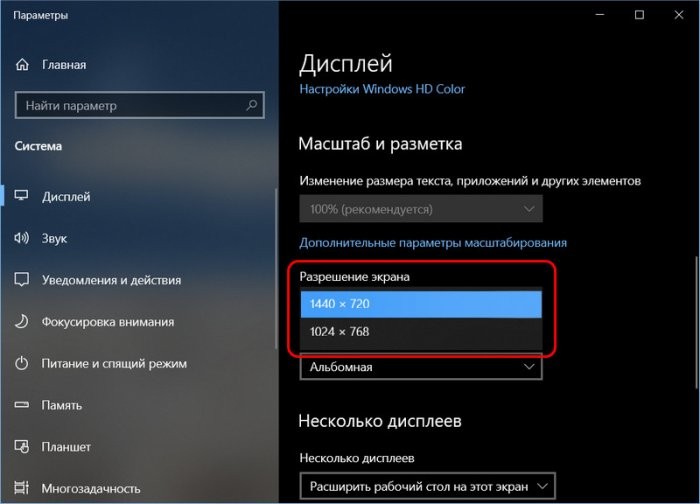
В случае с устройствами на базе операционных систем, для которых нет соответствующего приложения, подключение происходит через браузер. После перехода с официального сайта Spacedesk на страницу подключения будет предложено ввести IP-адрес основного компьютера. Далее нужно нажать на кнопку «Connect», и экран высветится в окне браузера.
Также на компьютере-сервере можно настроить работу дополнительных экранов. Для этого требуется перейти в раздел «Display Settings» утилиты или через «Параметры» Windows 10 по пути «Система/Дисплей». Здесь будет предложено выбрать расположение дисплеев, а также установить подходящее разрешение.
Содержание
- Spacedesk — подключаем к ПК с Windows 10 планшет в качестве сетевого монитора
- Space deck как настроить
- Space deck как настроить
- Особенности и требования Spacedesk, как скачать для Windows 10 и настройка
- Особенности и требования Spacedesk
- Где скачать и как установить
- Настройка программы
- Компьютер-сервер
- Для клиентских устройств
- Подключение и настройка сетевого экрана
- SpaceDesk: используйте ноутбук, мобильный телефон или планшет в качестве второго монитора
- Особенности и требования SpaceDesk
- Много улучшений (особенно безопасности) на пути
- Бесплатная, но с готовой версией
- Подключить второй монитор к Windows еще никогда не было так просто
- Скачать SpaceDesk
- Альтернативы SpaceDesk иметь второй монитор
Spacedesk — подключаем к ПК с Windows 10 планшет в качестве сетевого монитора

Традиционно в многомониторных системах используются обычные компьютерные мониторы, но с таким же успехом вместо них можно использовать ноутбуки, планшеты, смартфоны и десктопные компьютеры. При этом совсем необязательно соединять устройства кабелями, если вы работаете в локальной сети, достаточно установить на них по одному экземпляру программы Spacedesk.
Это небольшое бесплатное приложение позволяет превратить любое устройство под управлением Windows и Android в полноценный сетевой монитор. Spacedesk состоит из двух частей — устанавливаемой на базовый компьютер серверной и устанавливаемой на другой ПК или мобильное устройство клиентской частей. Будучи запущенным, клиент сам обнаруживает сервер в локальной сети так что пользователю достаточно просто к нему подключиться.
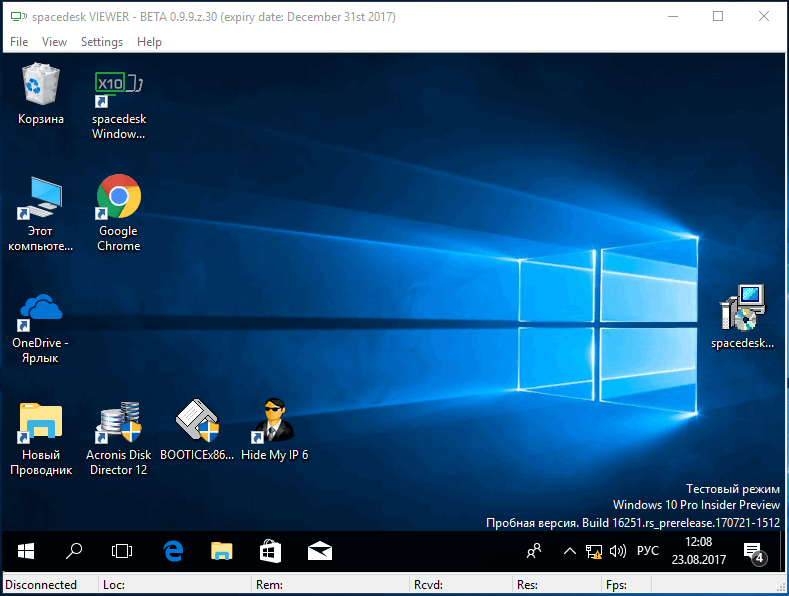
Вместо смартфона или планшета в качестве второго монитора можно использовать любой ПК под управлением Windows, — для трансляции картинки будет достаточно наличия популярного браузера с поддержкой HTML5 , например, Google Chrome , правда, при использовании браузера изображение может не отличаться высоким качеством.
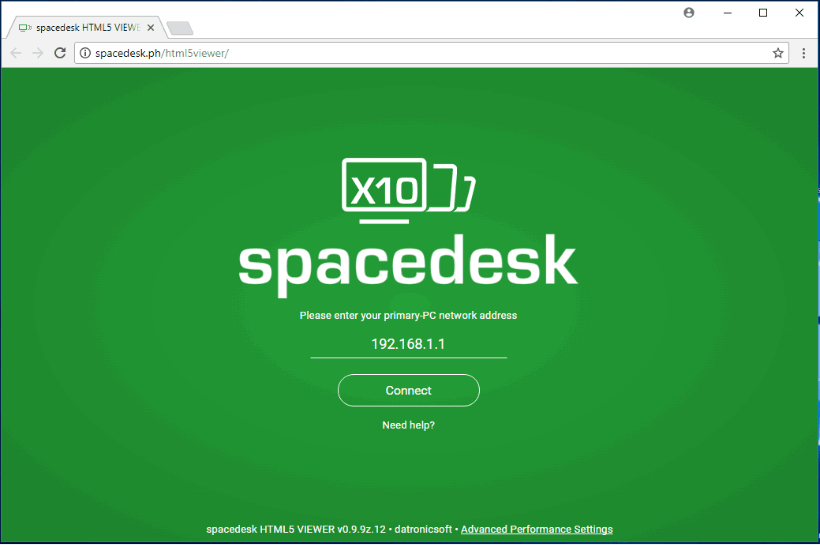
Больше возможностей предоставляет клиент. Как и при работе с отдельным дисплеем, пользователь может настроить разрешение, растянуть рабочий стол, продублировать изображение экрана основного компьютера на сетевой дисплей.
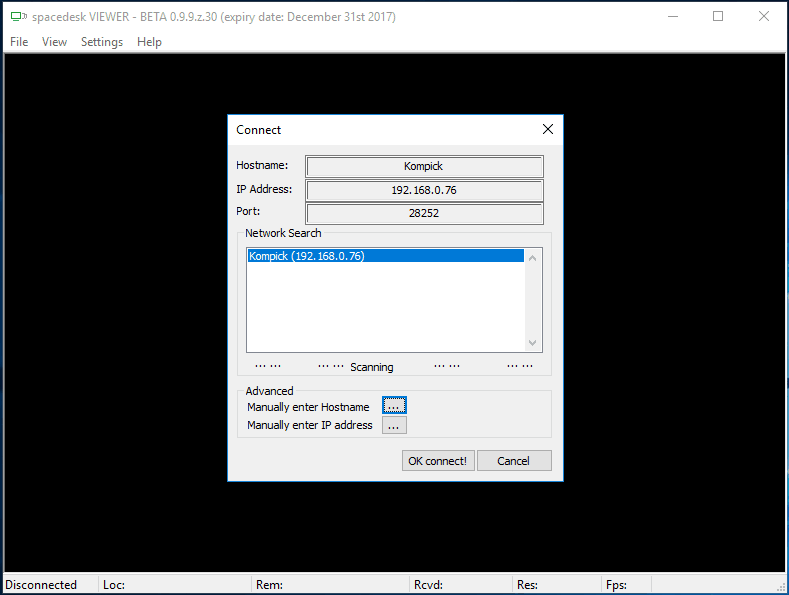
Скачать программу (клиентскую и серверную части) можно с сайта разработчика:
Распространяется Spacedesk на бесплатной основе, поддержка Windows 10 заявлена начиная с версии Anniversary Edition , язык интерфейса только английский. Компьютеры с Windows 7 и 8.1 не могут быть серверными, также программой не поддерживается работа с виртуальными машинами и браузерами Microsoft Edge и Mozilla Firefox .
Источник
Space deck как настроить
Драйвер для Windows 8.1 устанавивается на Windows 7, но корректная работа не гарантируется
Краткое описание:
Расширение и дублирование рабочего стола Windows
Описание:
Превращает телефон Android, планшет в дополнительный дисплей для ПК с Windows и планшетов под управлением Windows Surface.
Руководство пользователя, документация и подробная настройка: https://spacedesk.net/user-manual
Сетевое подключение: сервер и клиент должны находиться в одной и той же локальной сети и / или глобальной сети (LAN / WAN).
Альтернативные соединения:
-через мобильную точку доступа
-через USB-модем
Приложение НЕ требует подключения к Интернету
Требуется Android: 4.1 и выше
Русский интерфейс: Нет
Скачать:
0.9.81 (Драйвер для Windows 10):  spacedesk_driver_Win_10_64_v0981_BETA.msi ( 5,57 МБ )
Версия: 0.9.57 (APK) / 0.9.43 (Драйвер для Windows 8.1) spacedesk (Aer0naut)
Версия: 0.9.48 beta GP (Rekembus)
Dерсия: 0.9.45 beta spacedesk%20multi%20monitor%20display%20extension%20screen_v0.9.45_apkpure.com.apk ( 1,06 МБ )
Сообщение отредактировал greenbot — 04.02.21, 16:49
Тип: Новая версия
Версия: 0.9.48 beta
Краткое описание: GP
Список изменений:
— Несколько исправлений
Господа
как отменить автостарт приложения при запуске системы ?
в Автозагрузке его нет .
и закрыть его можно только через Диспетчер задач.
Сообщение отредактировал PofiguMoroz — 03.04.20, 22:58
Источник
Space deck как настроить
Драйвер для Windows 8.1 устанавивается на Windows 7, но корректная работа не гарантируется
Краткое описание:
Расширение и дублирование рабочего стола Windows
Описание:
Превращает телефон Android, планшет в дополнительный дисплей для ПК с Windows и планшетов под управлением Windows Surface.
Руководство пользователя, документация и подробная настройка: https://spacedesk.net/user-manual
Сетевое подключение: сервер и клиент должны находиться в одной и той же локальной сети и / или глобальной сети (LAN / WAN).
Альтернативные соединения:
-через мобильную точку доступа
-через USB-модем
Приложение НЕ требует подключения к Интернету
Требуется Android: 4.1 и выше
Русский интерфейс: Нет
Скачать:
0.9.81 (Драйвер для Windows 10): spacedesk_driver_Win_10_64_v0981_BETA.msi ( 5,57 МБ )
Версия: 0.9.57 (APK) / 0.9.43 (Драйвер для Windows 8.1) spacedesk (Aer0naut)
Версия: 0.9.48 beta GP (Rekembus)
Dерсия: 0.9.45 beta spacedesk%20multi%20monitor%20display%20extension%20screen_v0.9.45_apkpure.com.apk ( 1,06 МБ )
Сообщение отредактировал greenbot — 04.02.21, 16:49
Тип: Новая версия
Версия: 0.9.48 beta
Краткое описание: GP
Список изменений:
— Несколько исправлений
Господа
как отменить автостарт приложения при запуске системы ?
в Автозагрузке его нет .
и закрыть его можно только через Диспетчер задач.
Сообщение отредактировал PofiguMoroz — 03.04.20, 22:58
Источник
Особенности и требования Spacedesk, как скачать для Windows 10 и настройка
Человека окружает множество девайсов, и порой в рабочем процессе приходится переключать свое внимание с экрана одного гаджета на дисплей другого. Когда работа завязана на взаимодействии смартфона и компьютера, пользователю приходится сосредотачивать внимание только на одном устройстве. В такой ситуации на помощь приходит программа Spacedesk для операционной системы Windows 10, стирающая границы между ПК, телефоном, планшетом и другими девайсами.
Особенности и требования Spacedesk
Spacedesk представляет собой простую утилиту, которая призвана объединить несколько устройств для совместной работы. При помощи этого приложения можно использовать смартфон, планшет или телевизор на базе Android TV в качестве второго экрана. Подобная фишка является крайне полезной при работе в сложных программах вроде профессиональных аудиоредакторов, где представлено большое количество графиков, не помещающихся в рамках стандартного монитора.
Spacedesk отличается от других подобных программ умеренным потреблением ресурсов. Соединение между устройствами осуществляется через Wi-Fi, локальную сеть или USB. Однако при настройке подключения по проводному интерфейсу USB требуется создание точки доступа. Софт непритязателен в плане характеристик компьютера, но перед настройкой важно проверить, чтобы ПК соответствовал следующим параметрам:
- операционная система: Windows 8.1/10;
- архитектура процессора: x64 или x86;
- оперативная память: 2 Гб;
- дополнительно: DirectX 11.
Обозначенные требования актуальны для основной машины. Дополнительное устройство должно лишь иметь на борту одну из следующих версий операционных систем:
- Windows 7 и выше;
- Android 4.1 и новее;
- iOS 9.3 и выше.
Если в качестве второго экрана требуется подключить устройство на базе другой операционной системы, то необходимо обзавестись актуальной версией интернет-браузера. Spacedesk поддерживает эти и более новые версии: Google Chrome 16, Safari 5.1, Internet Explorer 10, Opera 27.
Где скачать и как установить
Перед началом использования приложения необходимо задуматься о загрузке дистрибутива. ПО требуется для всех устройств, участвующих в подключении. Это и компьютер-сервер, и гаджеты, на экраны которых будет выводиться информация с ПК на базе Windows 10.
Сначала разберемся, как загрузить и установить программу на основной компьютер:
- Откройте в любом браузере официальный сайт разработчика.
- Нажмите на кнопку «DOWNLOAD» (в текущей версии ресурса отображается в левом нижнем углу главной страницы).
- Скачайте дистрибутив, соответствующий вашей версии ОС (32-bit или 64-bit).
- Запустите инсталлятор, представленный в виде exe-файла, и следуйте инструкциям, которые будут появляться в диалоговом окне.
На заметку. После установки Spacedesk автоматически начнет работу в фоновом режиме, а его значок появится в Панели задач.
Что касается дополнительных устройств, то загрузку ПО следует осуществлять через официальные магазины приложений. Например, для Android используется Play Market, а для iOS – App Store. В случае, если второй девайс базируется на другой ОС, нужно нажать на кнопку «Go to HTML5», расположенной в нижней части странице сайта Spacedesk.
Настройка программы
Подготовительный этап в работе приложения важен так же, как и настройка приложения. Во-первых, вам нужно скачать и установить соответствующее ПО (подробная инструкция была представлена ранее). Далее останется выполнить несколько простых действий для компьютера-сервера и клиентского устройства.
Компьютер-сервер
Первым делом подключите ПК к интернету. Если Spacedesk уже установлен, то запустите программу двойным кликом левой кнопки мыши по значку приложения в Панели задач. Утилита откроется в небольшом окне, где отобразится сетевой адрес (IP). Его нужно запомнить, поскольку в некоторых случаях потребуется его ручной ввод для подключения второго экрана.
В общей сложности программа имеет две вкладки:
В первой представлена информация о главном устройстве, включающая в себя IP-адрес, а во втором отображается список подключенных девайсов. Поскольку мы еще не приступили к настройке соединения, во вкладке «Network Connection» («remote») будет пусто.
Для клиентских устройств
Теперь перейдем к настройке второго и третьего девайса (при необходимости). На них также нужно загрузить ПО разработчика, представленное в виде приложения для Windows, iOS или Android. Главное, что следует сделать на первом этапе, – подключить клиентское устройство к той же сети Wi-Fi, что и компьютер-сервер. Большинство проблем, касающихся настройки соединения, заключается в пренебрежении данному совету. Если подключить второстепенный девайс к другой сети, компьютер не сможет его обнаружить.
Подключение и настройка сетевого экрана
Наконец, настало время перейти к самому интересному – настройке подключения. Рассмотрим общий пример соединения компьютера-сервера с клиентским устройством:
- Откройте приложение для клиентских устройств (обратите внимание, что оно отличается от той программы, которая устанавливалась на компьютер-сервер).
- Посмотрите, правильно ли утилита определила IP-адрес ПК-сервера. На всякий случай откройте Spacedesk на главном компьютере для сопоставления данных.
- Если адреса в утилитах двух устройств не совпадают, то нажмите на клиентском девайсе кнопку в виде плюсика. Далее заполните информацию, включающую в себя IP-адрес главного ПК.
- Если данные заполнены правильно, то в клиентском приложении вы увидите изображение с экрана компьютера-сервера. Для отключения достаточно закрыть утилиту.
В случае с устройствами на базе операционных систем, для которых нет соответствующего приложения, подключение происходит через браузер. После перехода с официального сайта Spacedesk на страницу подключения будет предложено ввести IP-адрес основного компьютера. Далее нужно нажать на кнопку «Connect», и экран высветится в окне браузера.
Также на компьютере-сервере можно настроить работу дополнительных экранов. Для этого требуется перейти в раздел «Display Settings» утилиты или через «Параметры» Windows 10 по пути «Система/Дисплей». Здесь будет предложено выбрать расположение дисплеев, а также установить подходящее разрешение.
Источник
SpaceDesk: используйте ноутбук, мобильный телефон или планшет в качестве второго монитора
Второй монитор очень пригодится, особенно для работы. Однако мониторы стоят больших денег и занимают место, которого у многих из нас не будет на столе. Кроме того, они подразумевают наличие портов HDMI или DP на нашем ПК или ноутбуке для их подключения. А рядом вилка. К счастью, есть альтернативы, которые позволят нам использовать устройства, которые наверняка есть у всех дома, например, старый ноутбук, мобильный телефон или планшет, чтобы использовать их в качестве второго монитор. И одно из лучших приложений для этого — SpaceDesk.
SpaceDesk — это программа, разработанная, чтобы позволить нам преобразовать любой компьютер или устройство в дополнительный монитор для нашего компьютера. Эта программа требует только сервера (который мы устанавливаем на главном компьютере) и клиента (который мы установим на вторичном компьютере), чтобы иметь возможность использовать ноутбук, мобильный телефон или планшет в качестве второго монитора, подключенного к нашему компьютеру.
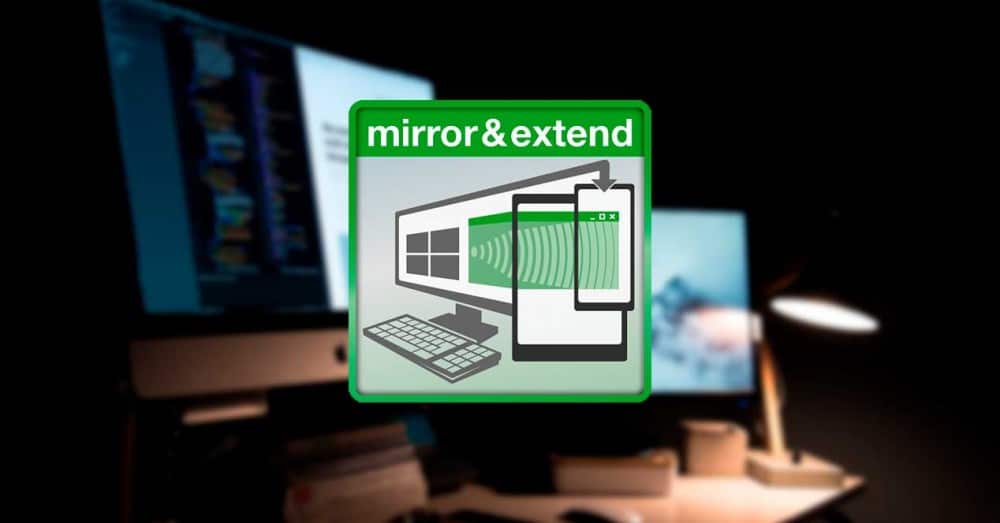
Это очень новая программа. Настолько, что по сей день он все еще находится в бета-фазе. Несмотря на это, это очень стабильный инструмент и предлагает отличную производительность на всех типах устройств. Мы вряд ли заметим разницу между вторым реальным монитором, подключенным к ПК и SpaceDesk.
Особенности и требования SpaceDesk
SpaceDesk работает через локальную сеть. Поэтому единственное требование, которое мы должны выполнить, — это то, что и основной ПК, и устройство, которое мы собираемся использовать в качестве дополнительного экрана, подключены к одному и тому же маршрутизатору. Неважно, по кабелю ли это или Wi-Fi, это работает так же. Мы даже можем подключить его через USB и использовать конфигурацию смартфонов Tethering.
Эта программа предлагает пользователям все функции дополнительного монитора. То есть мы сможем использовать его для расширить наш основной рабочий стол или дублировать это. Это также позволяет нам использовать клавиатуру и мышь для удаленного управления ПК, и даже делать это с сенсорного экрана.
Еще одно важное требование — главный компьютер (к которому мы хотим подключить второй монитор) должен использовать Windows 8.1 или Windows 10. Мы не сможем использовать SpaceDesk (на уровне сервера) в других версиях Windows или в других операционных системах (например, Linux или macOS).
Что касается клиента (компьютера или устройства, которое мы собираемся использовать в качестве второго монитора), здесь гораздо больше свободы. Мы можем использовать любой компьютер с Windows 7, 8.1 или Windows 10, любой Android смартфон и планшет или любой другой iPhone or IPad. Кроме того, в качестве второго монитора можно использовать любую операционную систему, которая может запускать браузер, совместимый с HTML5.
Много улучшений (особенно безопасности) на пути
Соединение между клиентом и сервером SpaceDesk осуществляется по протоколу TCP / IP v4 (и в будущем вы также можете использовать TCP / IP v6). Тем не менее, пока это не имеет точка-точка система шифрования , Это означает, что вся информация, передаваемая между обоими устройствами, может быть просмотрена и захвачена любым, кто подключен к сети.
Также важно отметить, что это не имеет мер безопасности , Мы можем подключиться к серверу без пароля или чего-либо еще. Будучи инструментом, предназначенным для работы только в локальной сети, проблем не должно быть, но это не означает, что это серьезный недостаток безопасности.
Эти две меры безопасности уже разработаны разработчиками, которые будут внедрять их в будущих версиях. Кроме того, будет улучшено кодирование изображений и добавлены такие функции, как звук через Wi-Fi.
Бесплатная, но с готовой версией
Поскольку SpaceDesk все еще находится на ранней стадии разработки, эта программа полностью бесплатна и без ограничений для всех пользователей.
С третьего квартала 2020 года мы найдем две разные формы этой программы. Первый из них будет бесплатно, и позволит нам подключать только одно устройство (то есть иметь один дополнительный экран) одновременно, и мы не сможем использовать сенсорное управление для управления им. Pro версия , предназначенный для коммерческого использования, будет поддерживать несколько экранов, полный сенсорный экран, автоматический поворот, дистанционное управление с помощью клавиатуры и мыши и многое другое.
Хотя на данный момент мы не знаем цену (и не будет ли у бесплатной версии другие ограничения), покупки будут производиться через покупки в приложениях с устройств. Мы также не знаем, будет ли это единовременный платеж, или нам придется оплатить одну из модных подписок.
Подключить второй монитор к Windows еще никогда не было так просто
Хотя некоторые приложения могут показаться сложными в настройке, SpaceDesk выбрал простота. Чтобы использовать эту программу, нам не нужно ничего настраивать на нашем маршрутизаторе (или открывать порты или что-то еще) или на нашем ПК (настраивать брандмауэр, и т.д.). Все, что нам нужно сделать, это убедиться, что мы используем правильную операционную систему и установить клиент и сервер на ПК и устройство.
Сервер, который мы устанавливаем в Windows (на главном компьютере), не имеет никакой конфигурации. Единственное, что мы увидим при его открытии, это данные ПК. Мы можем видеть версию сервера, лицензию и IP-адрес нашего компьютера. Ничего больше.
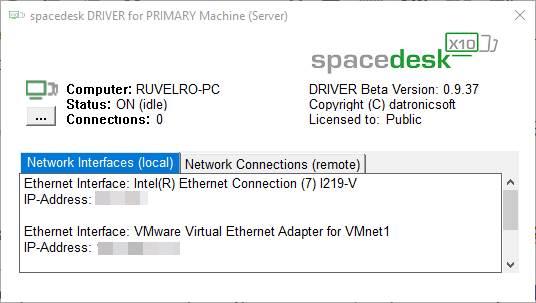
Клиенты, которые мы можем установить на Windows, Android или Ios есть еще несколько настроек. Например, они позволяют нам настраивать качество трансляции, разрешение, которое мы хотим, чтобы наш второй экран имел, и работу периферийных устройств.
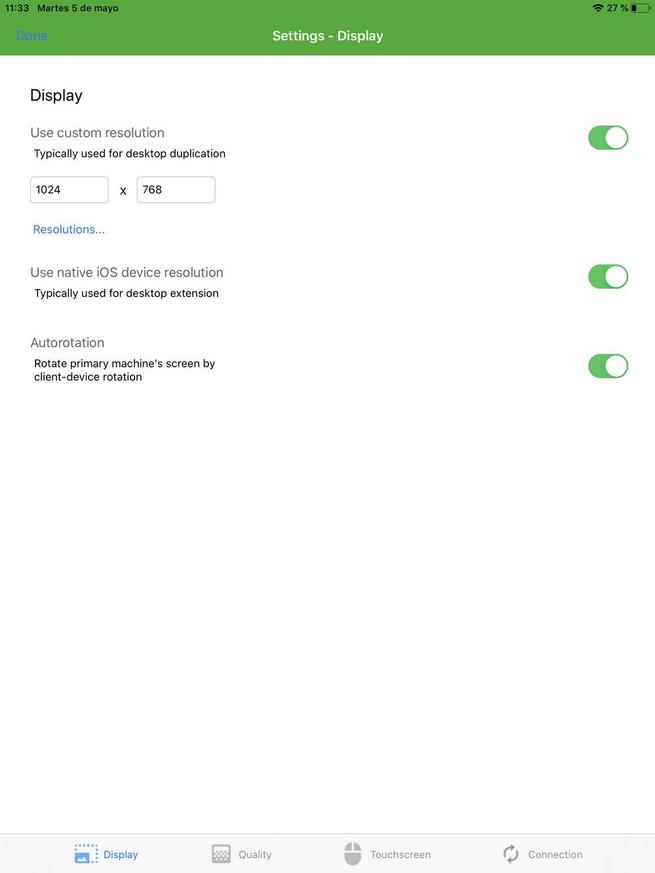

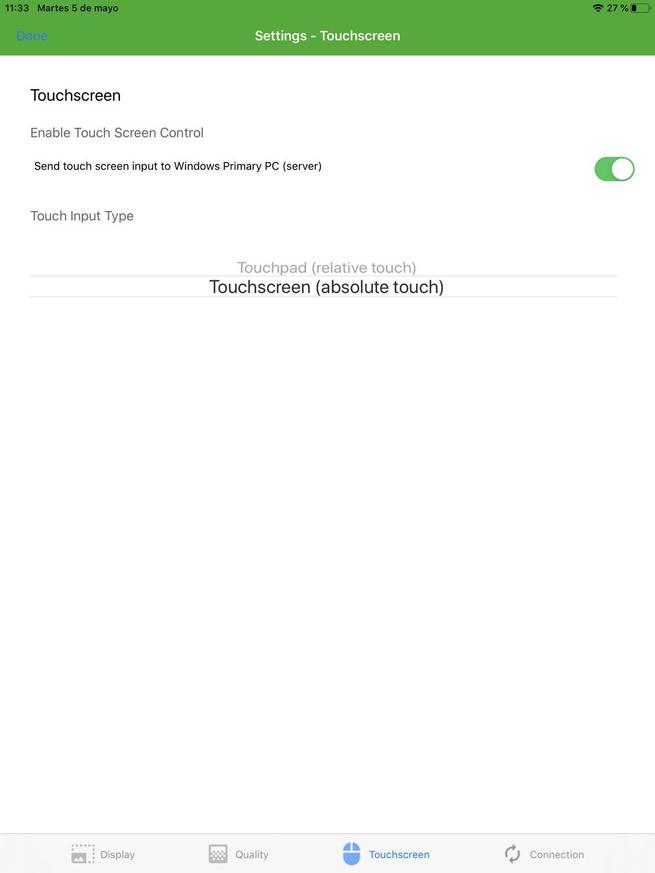
Что касается способа подключения к ПК, то здесь загадок нет. На главном экране клиента (в нашем случае iPad) сервер, который мы открыли на нашем главном ПК, автоматически появится.
Просто нажмите на ваш IP будет автоматически подключиться к компьютеру, и второй монитор автоматически начнет работать. Мы можем изменить его конфигурацию, местоположение и режим работы в Windows как из конфигурации, так и с помощью сочетания клавиш Windows + P.
Скачать SpaceDesk
На его главный сайт мы можем найти все ссылки для скачивания, как для сервера, который работает только в Windows, так и для клиентов, которые мы можем найти для браузеров Windows, Android, iOS и HTML5.
Мы помним, что сервер должен быть установлен на главном компьютере к которому мы собираемся подключить второй монитор , Клиенты установлены на устройствах что мы хотим использовать в качестве второго экрана .
Альтернативы SpaceDesk иметь второй монитор
Конечно, SpaceDesk не является революционной программой в этом секторе. В сети мы можем найти много других альтернатив, которые позволяют нам сделать то же самое, то есть преобразовать наши устройства в мониторы и дополнительные экраны:
- Воздушный Дисплей: самая полная альтернатива для macOS.
- AirParrot 2 : еще одна популярная альтернатива для размещения второго монитора на нашем ПК.
- Дуэт альтернатива без задержек для превращения любого планшета Android или iOS во второй экран для Windows и macOS.
- iDisplay: преобразует все виды оборудования и устройств во вторичные экраны.
- MaxiVista : несколько устарела, но сегодня все еще работает.
- Twomon USB, TwomonAir : быстрая и простая альтернатива для подключения второго монитора в Windows и macOS.
- XDisplay / Проводной XDisplay : очень мощно, если мы не против полагаться на кабель.
- ZoneScreen : один из самых старых, особенно полезный для компьютеров от Windows 98 до Windows XP.
Что правда, так это то, что по характеристикам и цене, SpaceDesk является одним из лучших , Мы не должны упустить возможность попробовать это, если мы хотим иметь возможность использовать второй экран на нашем ПК без ограничений.
Источник
Содержание
- Spacedesk — подключаем к ПК с Windows 10 планшет в качестве сетевого монитора
- Spacedesk для windows 10 как настроить
- PRIMARY MACHINE (Windows PC, laptop and tablet): spacedesk DRIVER
- SECONDARY MACHINE (PC, laptop, tablet, smartphone and devices)
- LOCAL AREA NETWORK (LAN)
- Overview
- FEATURES
- ABOUT
- Basic User Interface for Do-It-Yourselfers, Hobbyists and Enthusiasts
- SDK API FOR PROFESSIONAL BUSINESS CUSTOMERS
- CUSTOMER PRODUCTS
- SOFTWARE LICENSE TERMS
- INSTALLATION AND USER RIGHTS
- SCOPE OF LICENSE
- BUSINESS LICENSE
- ENTIRE AGREEMENT
- APPLICABLE LAW
- DISCLAIMER OF WARRANTY
- LIMITATION ON AND EXCLUSION OF REMEDIES AND DAMAGES
- PUBLIC SUPPORT FORUM!
Spacedesk — подключаем к ПК с Windows 10 планшет в качестве сетевого монитора
Традиционно в многомониторных системах используются обычные компьютерные мониторы, но с таким же успехом вместо них можно использовать ноутбуки, планшеты, смартфоны и десктопные компьютеры. При этом совсем необязательно соединять устройства кабелями, если вы работаете в локальной сети, достаточно установить на них по одному экземпляру программы Spacedesk.
Это небольшое бесплатное приложение позволяет превратить любое устройство под управлением Windows и Android в полноценный сетевой монитор. Spacedesk состоит из двух частей — устанавливаемой на базовый компьютер серверной и устанавливаемой на другой ПК или мобильное устройство клиентской частей. Будучи запущенным, клиент сам обнаруживает сервер в локальной сети так что пользователю достаточно просто к нему подключиться.
Вместо смартфона или планшета в качестве второго монитора можно использовать любой ПК под управлением Windows, — для трансляции картинки будет достаточно наличия популярного браузера с поддержкой HTML5 , например, Google Chrome , правда, при использовании браузера изображение может не отличаться высоким качеством.
Больше возможностей предоставляет клиент. Как и при работе с отдельным дисплеем, пользователь может настроить разрешение, растянуть рабочий стол, продублировать изображение экрана основного компьютера на сетевой дисплей.
Скачать программу (клиентскую и серверную части) можно с сайта разработчика:
Распространяется Spacedesk на бесплатной основе, поддержка Windows 10 заявлена начиная с версии Anniversary Edition , язык интерфейса только английский. Компьютеры с Windows 7 и 8.1 не могут быть серверными, также программой не поддерживается работа с виртуальными машинами и браузерами Microsoft Edge и Mozilla Firefox .
Spacedesk для windows 10 как настроить
At least two machines are required: PRIMARY machine and SECONDARY machine. All machines must be connected to a LAN (Local Area Network). Network protocol TCP/IP needs to be supported. The connection can be over USB (e.g. tethering), via LAN-cable or wireless.
PRIMARY MACHINE (Windows PC, laptop and tablet): spacedesk DRIVER
The primary machine runs a Windows service and the WDDM driver. This appears as an additional graphics adapter to Windows 10 and an additional monitor connection of the existing graphics adapter on Windows 7 and 8.1. This additional virtual graphics adapter or display connector can mirror any other Windows display screen or extend the Windows Desktop. spacedesk software on Primary Machine is capturing the screen content, compressing it and transmitting it over the LAN (Local Area Network) to the spacedesk secondary machines.
- Windows 10 (WDDM IddCx Indirect Display Driver)
- Windows 8.1 (WDDM Filter Hook Display Driver)
SECONDARY MACHINE (PC, laptop, tablet, smartphone and devices)
- Windows 7 / 8.1 / 10
- Android (> version 4.1)
- iOS (> version 9.3)
- Any other: HTML5 Web browsers ( Chrome (> 16), Safari (> 5.1) Internet Explorer (> 10), Opera (> 27) )
LOCAL AREA NETWORK (LAN)
- TCP/IP v4
- TCP/IP v6 (future versions only)
- No encryption transmitting data between client and server. Therefore all information transmitted is potentially available to everybody in the network.
Overview
The spacedesk SDK (Software Development Kit) for Windows 10 enables easy and convenient development of solutions for virtual and physical displays.
– Virtual WDDM IddCx Indirect Display Driver (UMDF)
– Virtual HID Keyboard and Touchscreen Driver (UMDF)
– Virtual Mouse Driver (KMDF)
– Image encoding software for Windows
– Network protocol software for Windows, iOS and Android
– Image decoding and rendering software for Windows, iOS and Android
FEATURES
Best in Class Code — spacedesk SDK provides all the infrastructure needed to demonstrate a fully functional WDDM Indirect Display. Starting with this code, developers can add their specific customization (such as count monitors supported, resolutions supported, image processing and encoding, etc.) which differentiates the specific product and provides unique added value.
Easy to understand samples that can be used as a starting point to develop a complete product.
One-time License Fee – NO Royalties. In addition to the broad terms of licensure, spacedesk SDK is licensed for a one-time fee. Products incorporating it my be shipped to end users anywhere in the world without royalties.
ABOUT
The spacedesk Video Wall Software Engine enables convenient and inexpensive setup of display walls using a single PC running on regular Windows 10. Our product supports multicast of Windows desktop screen to up to an unlimeted number of remote display devices.
Basic User Interface for Do-It-Yourselfers, Hobbyists and Enthusiasts
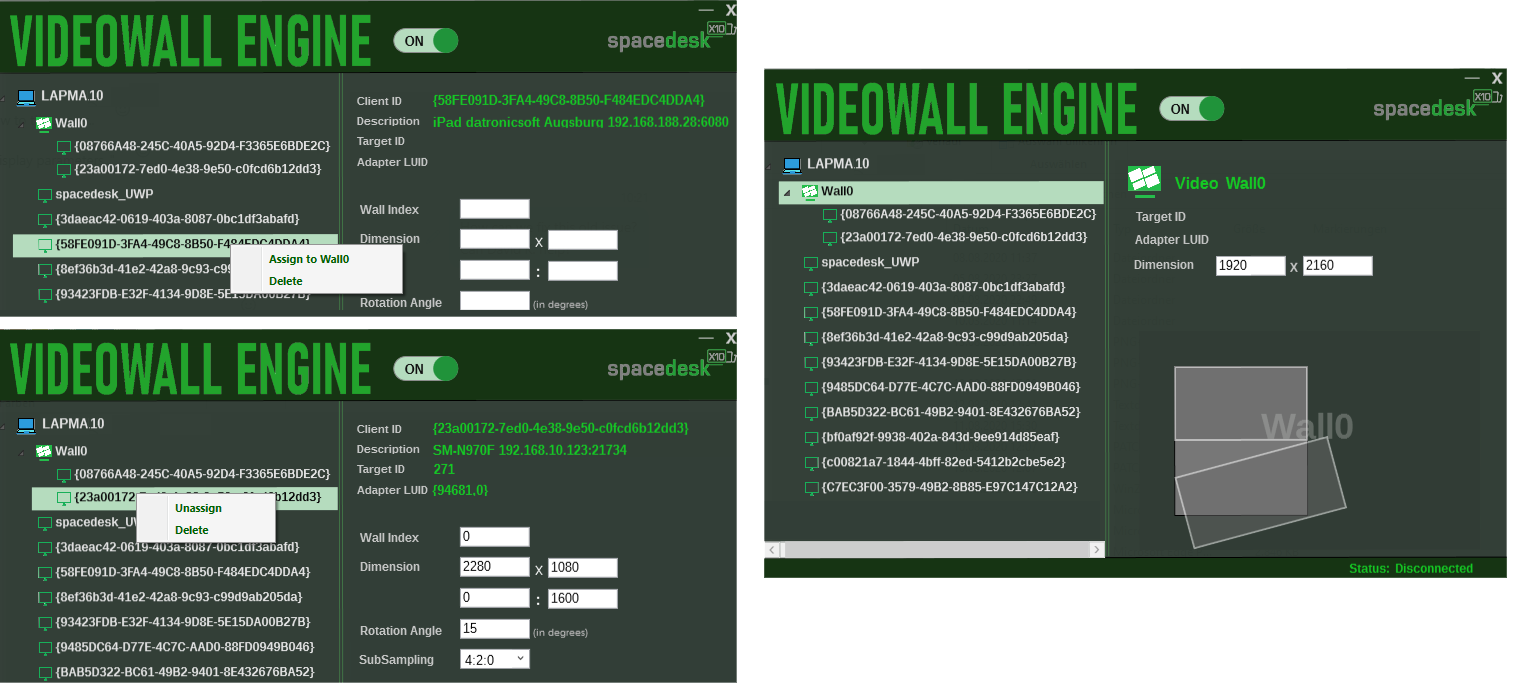
SDK API FOR PROFESSIONAL BUSINESS CUSTOMERS
spacedesk Video Wall Software Engine (VWSE) allows Clients to incorporate low level video wall functionality into their products. It serves as a solid fundament for professional video wall software. Using our proven and tested video wall engine functionality frees customers up from having to worry about the countless complexities of building the low level part of their product, and lets them focus on their part of their product that adds value and that they know best. In other words, we do what we do best (Display Driver and System Software), and customers do what they do best (create the best product for their market requirements).
CUSTOMER PRODUCTS
MAWi Spacewall utilizes spacedesk to turn any Android or Windows device into a powerful AV-over-IP gear for digital signage and video wall setups in a simple, cost-effective way.
The screens can be (i) set as individual displays for standard digital signage purposes, (ii) grouped to clone the same content, (iii) set up on a grid as standard video walls or (iv) set up as Creative video walls where screens of any size and scale are placed at any angle.
SOFTWARE LICENSE TERMS
These license terms are an agreement between datronicsoft and you. Please read them. They apply to the software you are downloading from spacedesk.net, which includes the media on which you received it, if any. The terms also apply to any datronicsoft
- updates,
- supplements,
- Internet-based services,
- and support services
for this software, unless other terms accompany those items. If so, those terms apply.
BY USING THE SOFTWARE, YOU ACCEPT THESE TERMS. IF YOU DO NOT ACCEPT THEM, DO NOT USE THE SOFTWARE!
If you comply with these license terms, you have the rights below.
INSTALLATION AND USER RIGHTS
You may install and use any number of copies of the software on your devices.
SCOPE OF LICENSE
The software is licensed (Beta only licensed until it will expire on Dec. 31st. 2021), not sold. This agreement only gives you some rights to use the software for own use. datronicsoft reserves all other rights. Unless applicable law gives you more rights despite this limitation, you may use the software only as expressly permitted in this agreement. In doing so, you must comply with any technical limitations in the software that only allow you to use it in certain ways. You may NOT
- work around any technical limitations in the software;
- reverse engineer, decompile or disassemble the software, except and only to the extent that applicable law expressly permits, despite this limitation;
- make more copies of the software than specified in this agreement or allowed by applicable law, despite this limitation;
- distribute the software or publish the software for others to copy;
- rent, lease or lend the software;
- transfer the software or this agreement to any third party; or
- use the software for commercial software hosting services.
BUSINESS LICENSE
A separate Business License is available for:
- Large volumes
- Distributing the software
- Branding the software
- Integrating the software into the own product
For obtaining a Business License, please contact us through our support web page.
ENTIRE AGREEMENT
This agreement, and the terms for supplements, updates, Internet-based services and support services that you use, are the entire agreement for the software and support services.
APPLICABLE LAW
Federal Republic of Germany.
DISCLAIMER OF WARRANTY
The software is licensed “as-is.” You bear the risk of using it. datronicsoft gives no express warranties, guarantees or conditions. You may have additional consumer rights under your local laws which this agreement cannot change. To the extent permitted under your local laws, datronicsoft excludes the implied warranties of merchantability, fitness for a particular purpose and non-infringement.
LIMITATION ON AND EXCLUSION OF REMEDIES AND DAMAGES
You can recover from datronicsoft and its suppliers only direct damages up to U.S. $5.00.
You cannot recover any other damages, including consequential, lost profits, special, indirect or incidental damages. This limitation applies to
- anything related to the software, services, content (including code) on third party Internet sites, or third party programs; and
- claims for breach of contract, breach of warranty, guarantee or condition, strict liability, negligence, or other tort to the extent permitted by applicable law.
It also applies even if datronicsoft knew or should have known about the possibility of the damages.
PUBLIC SUPPORT FORUM!
Help, troubleshooting and discussions with answers and insider information directly from the spacedesk development and support team.