Содержание:
- 1 Что позволяет делать ADB?
- 2 Установка ADB и Fastboot из пакета Android SDK
- 3 Minimal ADB and Fastboot
- 4 Проверка работы ADB и Fastboot
ADB, или Android Debug Bridge – это консольное приложение для ПК, с помощью которого можно управлять устройством на базе Android прямо с компьютера. Выглядит это так: сначала на компьютер устанавливаются инструментарий ADB и драйвера для Android, потом мобильное устройство подключается к ПК через USB-кабель в режиме отладки, и, наконец, после запуска ADB в консоли (командной строке) выполняются специальные команды, инициирующие те или действия с гаджетом. Подробная информация о принципе работы самого средства отладки представлена на официальном сайте разработчика, поэтому мы останавливаться на этом не будем, а сразу перейдем к возможностям ADB и способам его установки на компьютер.
Для начала укажем зачем вообще нужен ADB. С его помощью можно:
- Перезагружать устройство в различных режимах;
- Обмениваться файлами/папками с телефоном;
- Устанавливать/удалять приложения;
- Устанавливать кастомные прошивки (в том числе, TWRP Recovery);
- Производить разблокировку графического ключа Андроид;
- Выполнять разного рода скрипты.
Инструмент ADB обычно устанавливается в связке с консольным приложением Fastboot.
Установка ADB и Fastboot из пакета Android SDK
Этот способ предусматривает использование официального средства разработки и тестирования приложений Android Studio. Переходим на страницу https://developer.android.com/studio/index.html и находим заголовок «Get just the command line tools». Ниже скачиваем архив SDK tools для Windows (перед загрузкой соглашаемся с условиями использования).


Распаковываем архив на диск С. В нашем случае файлы были извлечены в папку sdk-tools-windows-3859397.

Заходим в директорию, а потом переходим в каталог tools/bin. Здесь нас интересует файл sdkmanager, который и поможет установить ADB и Fastboot на компьютер.

Далее все действия будут производиться в командной строке Windows. Запускаем ее от имени администратора.

Теперь необходимо открыть папку с sdkmanager, для чего в консоли следует выполнить команду cd C:\sdk-tools-windows-3859397\tools\bin, где C:\sdk-tools-windows-3859397\tools\bin – путь к файлу sdkmanager.

Если вы распаковали Android SDK не на диск С, а в какое-то иное место, то полный адрес можно будет узнать с помощью верхней строки Проводника (кликаем по конечной папке правой кнопкой мыши и жмем «Копировать адрес»).

Итак, мы перешли в tools\bin и теперь нам нужно выполнить команду sdkmanager “platform-tools”, которая установит пакет Platform-tools, содержащий файлы ADB и Fastboot.

В ходе установки ознакомьтесь с лицензионным соглашением и нажмите Y для завершения операции.

Если все прошло как надо, в корневой папке Android SDK появится каталог platform-tools с необходимыми файлами adb.exe и fastboot.exe.


Minimal ADB and Fastboot
Второй способ еще более простой. На форуме разработчиков Xda Developers можно скачать пакет Minimal ADB and Fastboot со всеми необходимыми файлами. Для этого заходим на страницу https://forum.xda-developers.com/showthread.php?t=2317790 и, кликнув по ссылке, загружаем установочный exe-файл.

Запускаем его и следуем инструкциям.

Мы установили Minimal ADB and Fastboot в корень того же диска С.

В принципе, на этом все. Осталось проверить наличие файлов.

Проверка работы ADB и Fastboot
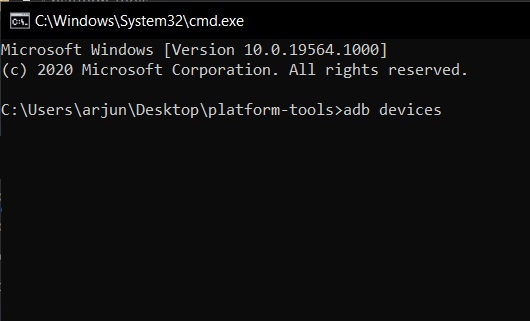
После установки приложений любым из приведенных способов необходимо удостовериться в корректности работы утилит. Для этого через командную строку заходим в папку с файлами adb и fastboot (команда cd C:\sdk-tools-windows-3859397\platform-tools или cd C:\Minimal ADB and Fastboot), а затем выполняем команду adb help. Она должна вывести версию установленного Android Debug Bridge и список команд ADB. Если вы видите примерно то же, что изображено на приведенном ниже скриншоте, значит все работает правильно.

Теперь следует подключить к ПК мобильное устройство и проверить, увидит ли его приложение ADB. Подсоединяем телефон (или планшет) к компьютеру с помощью USB-кабеля, выставляем в настройках режим подключения MTP (обмен файлами) и заходим в раздел Настройки – Для разработчиков.


Если такого пункта в настройках нет, то переходим на страницу «О телефоне» и семь раз кликаем по строке с номером сборки.

Режим разработчика будет активирован, и раздел «Для разработчиков» станет доступным. Заходим в него и включаем опцию «Отладка по USB».

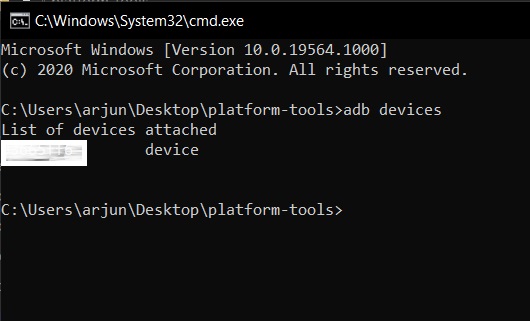
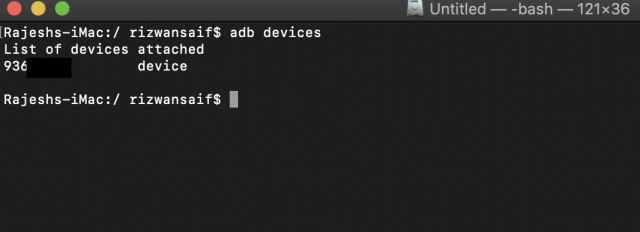
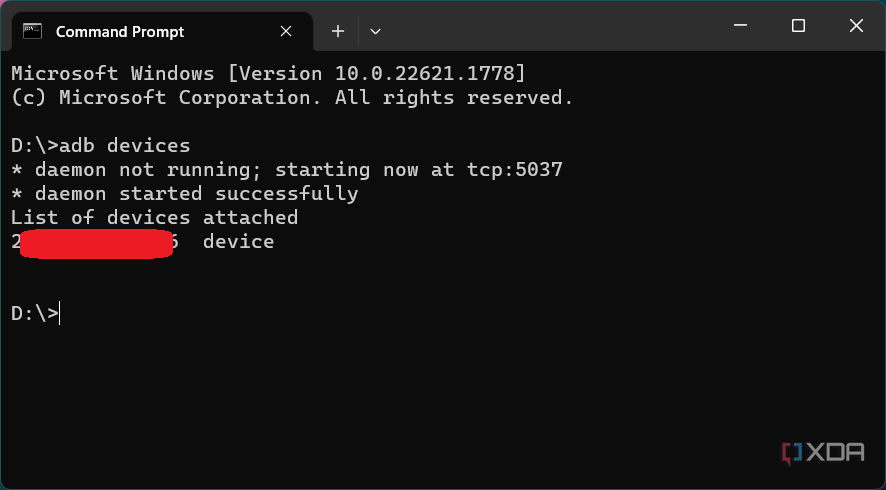
После всех этих манипуляций с гаджетом в командной строке Windows вводим команду adb devices. Она выведет информацию о подключенном устройстве примерно в таком формате, как на скриншоте.

Далее попробуем проверить, работает ли fastboot. Здесь же в консоли прописываем fastboot reboot и жмем Enter. Мобильное устройство должно перезагрузиться в обычном режиме.
Таким образом, мы протестировали ADB и Fastboot и убедились, что Android Debug Bridge нормально функционирует, а, значит, теперь можно управлять телефоном через компьютер.
Если связь с устройством наладить не получается, то необходимо проверить наличие и корректность установки драйверов Андроид. Для этого при включенном режиме отладки заходим в «Диспетчер устройств» и смотрим, нет ли восклицательных знаков в ветке «Устройства USB» пункт «ADB Interface» (может называться немного по-другому).

При обнаружении неполадок пробуем переустановить драйвера. Скачать их можно на сайте производителя телефона или по адресу https://adb.clockworkmod.com/.
Надеемся, что статья была для вас полезна.
Android Debugging Bridge (ADB), as the name suggests, is a command-line utility that allows developers to debug various parts of their applications. However, it is not restricted to just developers. If you want to access certain features of the Android platform that are not otherwise accessible, you too can use the ADB commands by installing ADB on your computer, be it Windows, macOS, Linux, or Chrome OS. Once you install it, there are numerous cool things that you can do with ADB on your Android device. Plus, there are various apps that require ADB permissions to work. So, if you have been confused about how to install and use ADB on Windows, macOS, Linux or Chrome OS, we have you covered.
Setup Your Android Device for ADB
Even if you install ADB on your computer, it is of no use unless you set up your Android device first to work with ADB. So in case you are not sure how to do that, follow the steps below to find out.
- Open Settings on your Android device, and go to “About Phone”. Here, tap on “Build number” 7 times consecutively. Keep in mind, as Android devices have different skin, the ‘Build Numer’ page may be kept under some other pages.
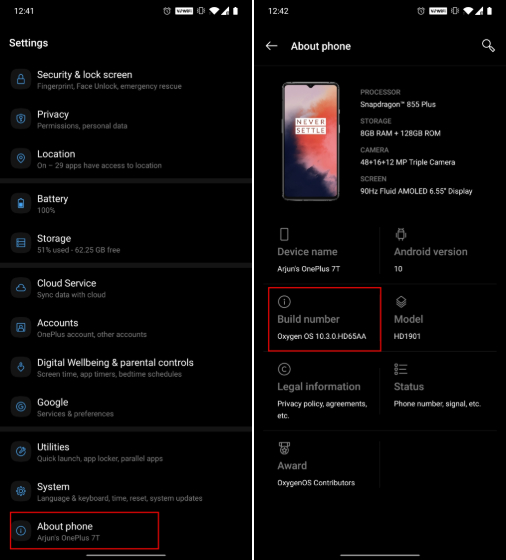
- This will enable “Developer options” on your Android device. Head over to “System” and then open Developer Options and enable “USB debugging”. Now, whenever you will connect your Android device to the computer, select the “File transfer (MTP)” mode. You are done on the device front. Now, the next step is to set up ADB on your computer.
- Firstly, download the ADB Platform Tools for Windows from Google’s official page. Once downloaded, extract the contents of this file on your Windows PC using a file archiver utility like WinRAR.

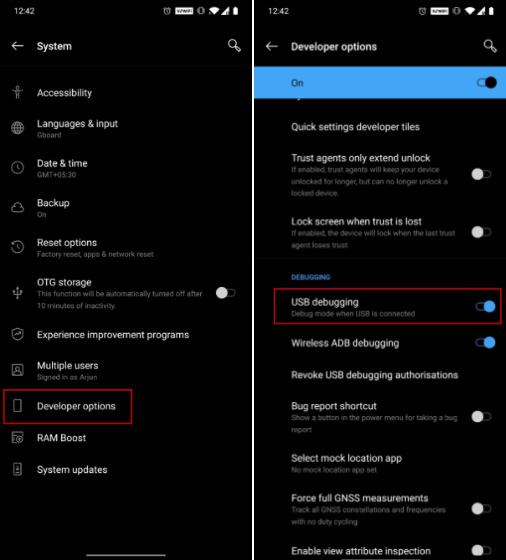
- Now head over to the extracted folder, and click on the address bar. Now, type “cmd” and hit enter. Instantly, a command prompt window will open up in the ADB directory.
- After that, connect your Android device to Windows PC and execute
adb devicescommand.
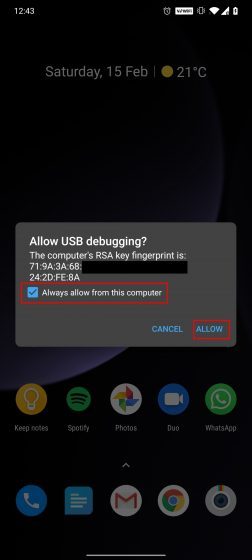
- It will prompt a “USB debugging” prompt on your smartphone. Enable the “Always allow” checkbox and then tap on “Allow”.

- Now, you should see your device’s serial number in the Command Prompt window. If it does not detect your device then run
adb devicesagain and this time, it will definitely detect your device. Congratulations! ADB is now successfully installed on your Windows PC.
Install ADB on macOS
Here, we will take a slightly different path to install ADB on macOS. We will have to install Homebrew first on macOS and then we can install the Android platform-tools easily. Homebrew is an open-source package manager that installs the missing packages. So with all that said, here we begin.
- First of all, open the Terminal on your Mac and execute the below command. It will install Homebrew on your Mac. During the installation, it might ask for your password. The whole installation will take about 10 mins.
ruby -e "$(curl -fsSL https://raw.githubusercontent.com/Homebrew/install/master/install)"

- After that, install the ADB platform-tools from the below command.
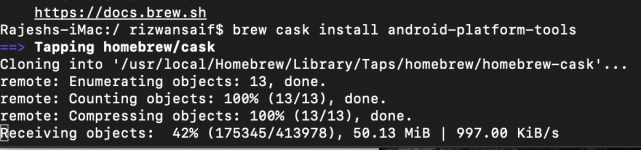
brew install android-platform-tools --cask
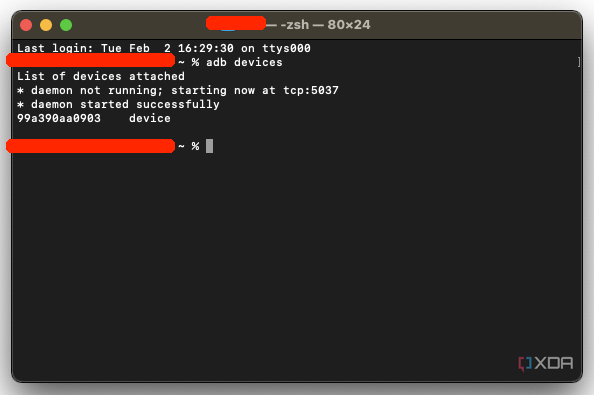
- Now connect the Android device to your Mac and execute the
adb devicescommand. You will receive a prompt on your Android device to allow USB debugging. So, just enable the checkbox and tap on “Allow”.
- You should now see the serial number of your device on Mac This signifies that ADB is successfully installed on your Mac.
Install ADB on Linux
- Download the ADB Platform Tools for Linux from Google’s official page and unzip the file to a suitable location like your home directory.
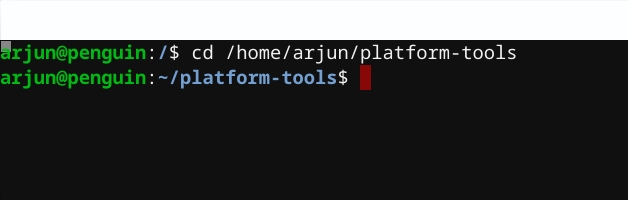
- After that, open the Linux terminal and move to the extracted folder location. Execute the below command to move to the particular folder. Make sure to change the username to your actual Linux username.
cd /home/arjun/platform-tools
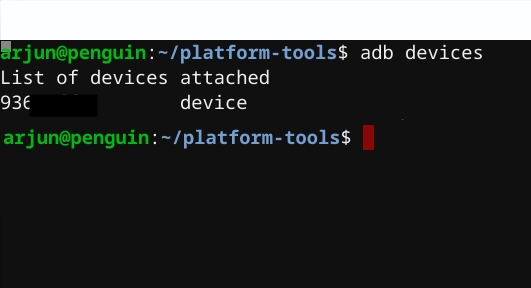
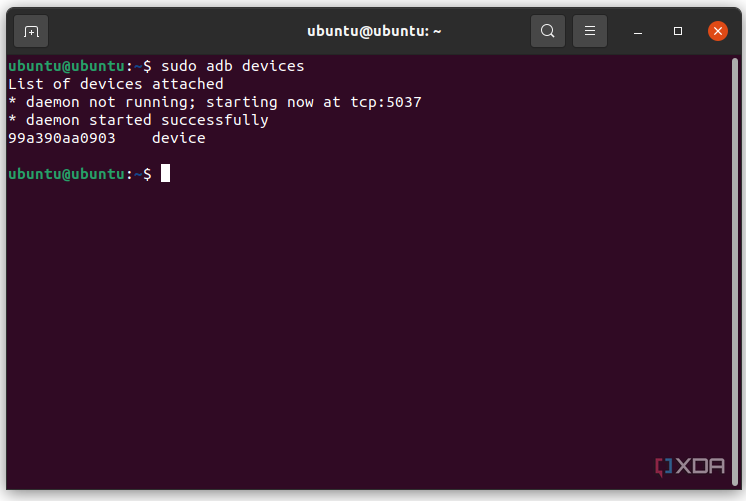
- Connect your Android device and run the
adb devicescommand on the Linux terminal. On your Android device, check the box for “Always allow” and then tap on the “Ok” button.
- Finally, your Android device will show up on the Linux Terminal with the serial number. This is how you can install and set up ADB on Linux systems.
Install ADB on Chrome OS
Before I move forward, let me clarify that your Chromebook should have Play Store support; Chrome OS should be on the Developer Channel and have Linux enabled on your machine. To move to Developer Channel, open Settings -> About Chrome OS -> Additional Details -> Change Channel to Dev. Now having said all of that, let’s learn how to install ADB on Chrome OS.
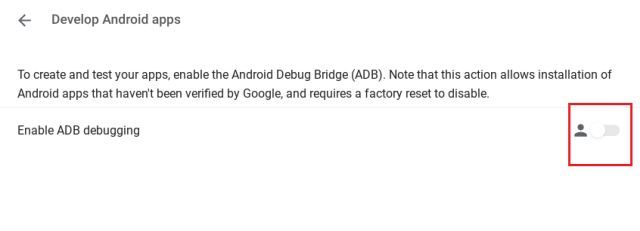
- First off, open Settings and navigate to Linux -> Develop Android Apps -> Enable the toggle for ADB Debugging. Now, restart your Chromebook and an ADB prompt will come up after the reboot. Click on “Allow” and move to the next step.

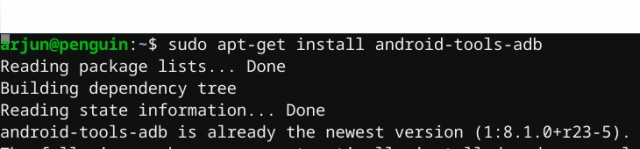
- Now, open the Linux Terminal from the app drawer and execute the below command to install the ADB platform tools. Further, press “Y” to allow the installation.
sudo apt-get install android-tools-adb
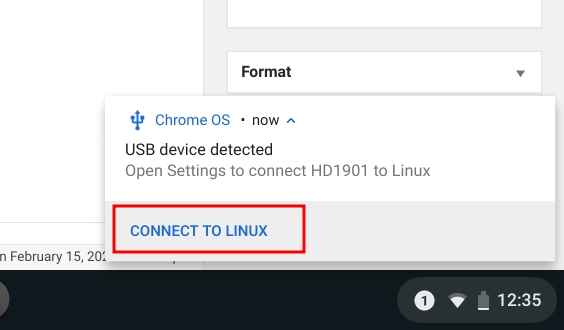
- After the installation, connect your Android device to Chromebook. You will get a prompt on your Chromebook about a USB device detection. Now, click on “Connect to Linux”.
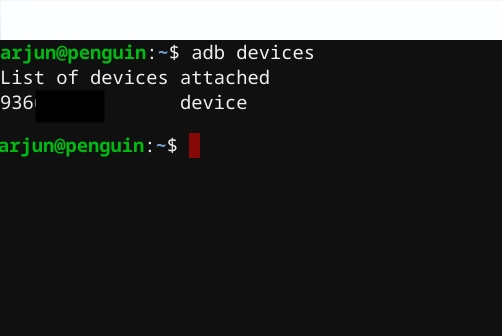
- Back to Linux Terminal, execute the
adb devicescommand and a prompt will appear on your Android device. Enable the checkbox for “Always allow” and then tap on the “Ok” button. Congratulations, you have successfully set up ADB on Chrome OS.
- If the Terminal shows “Permission Denied” or “Command Not Found” error then run the
adb start-servercommand first and then try again with theadb devicescommand.
How to Use ADB on Windows, macOS, Linux and Chrome OS
After you have successfully installed ADB on your Windows PC, Mac, Linux system or Chromebook, using it is just a matter of executing various ADB commands in the Terminal. Just make sure that you have connected your Android device to your computer while USB debugging is enabled. After this, you can try different commands and experience Android a whole lot differently. To help you get started, given below are a few of the most commonly used ADB commands.
Install ADB on Windows, macOS, Linux and Chrome OS With Ease
ADB is a very useful utility for all Android programmers. Even if you are not one yourself, you now know how to set up ADB on your PC or Mac and use it with your Android device. And if you’re new to this, I’ve already listed some of the common ADB commands above. This allows you to experience Android like never before. Talking about ADB commands, which ones are your favorites? I would love to hear from you in the comments section below.
What is ADB? ADB is short for Android Debug Bridge, a versatile command-line tool that lets you communicate with a device. It was mainly for developers to debug apps, but now basic users can also use it to perform many useful activities between computer and their Android smartphones. In this article, we are going to show you how to install ADB in Windows computer and how to use ADB to do something interesting to Android mobile phone.
It is quite easy to install and set up ADB in Windows computer. Actually, the size of the tool is merely 4.51MB, so it won’t take up much space on your computer. Here we Windows 10 as example.
- Step 1. Download Platform Tools for Windows. Confirm to download on the new window and save the zip file to a folder on your PC.
- Step 2. Extract the zip file after download.
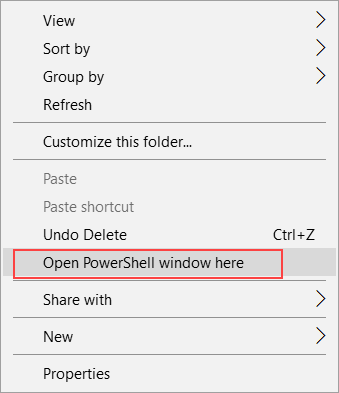
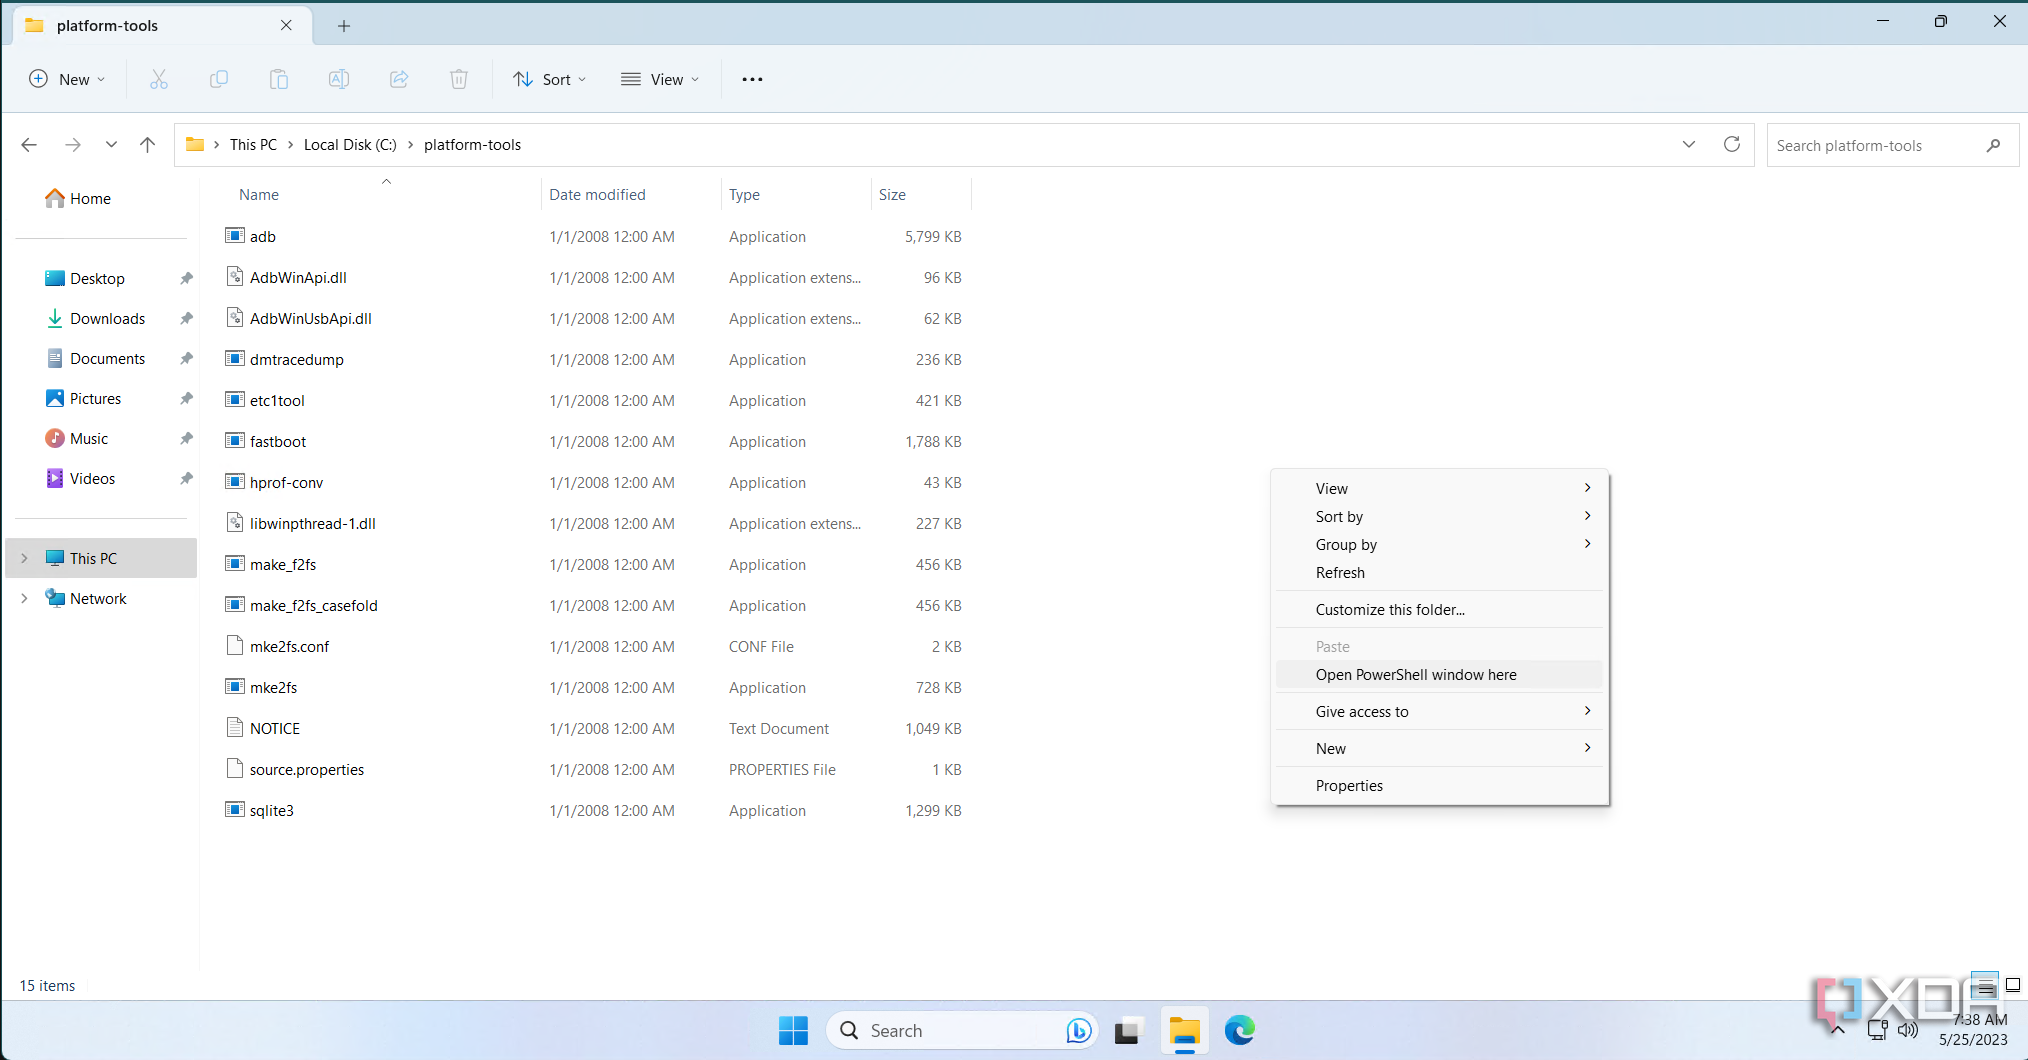
- Step 3. Press Shift key and right click within the extracted folder, then choose Open PowerShell window here (or Open command window here on some computers)

- Step 4. A command prompt should appear.
This means that ADB is set up on your Windows computer. In order to communicate with your Android phone, however, you also need to enable USB debugging on your handset.
Part 2. Enable USB Debugging on Your Mobile Phone
USB debugging must be turned on in order to use ADB. The steps to turn on USB debugging are varied on different versions of Android OS, but the instruction below should work for most Android smartphones used nowadays.
- Step 1. Go to Settings > About phone.
- Step 2. Scroll down to find and tap Build number for 7 times.
- Step 3. Back to Settings, then find and tap Developer options.
- Step 4. Within Developer options, enable USB debugging. Confirm your choice.
- Step 5. Connect your phone to PC.
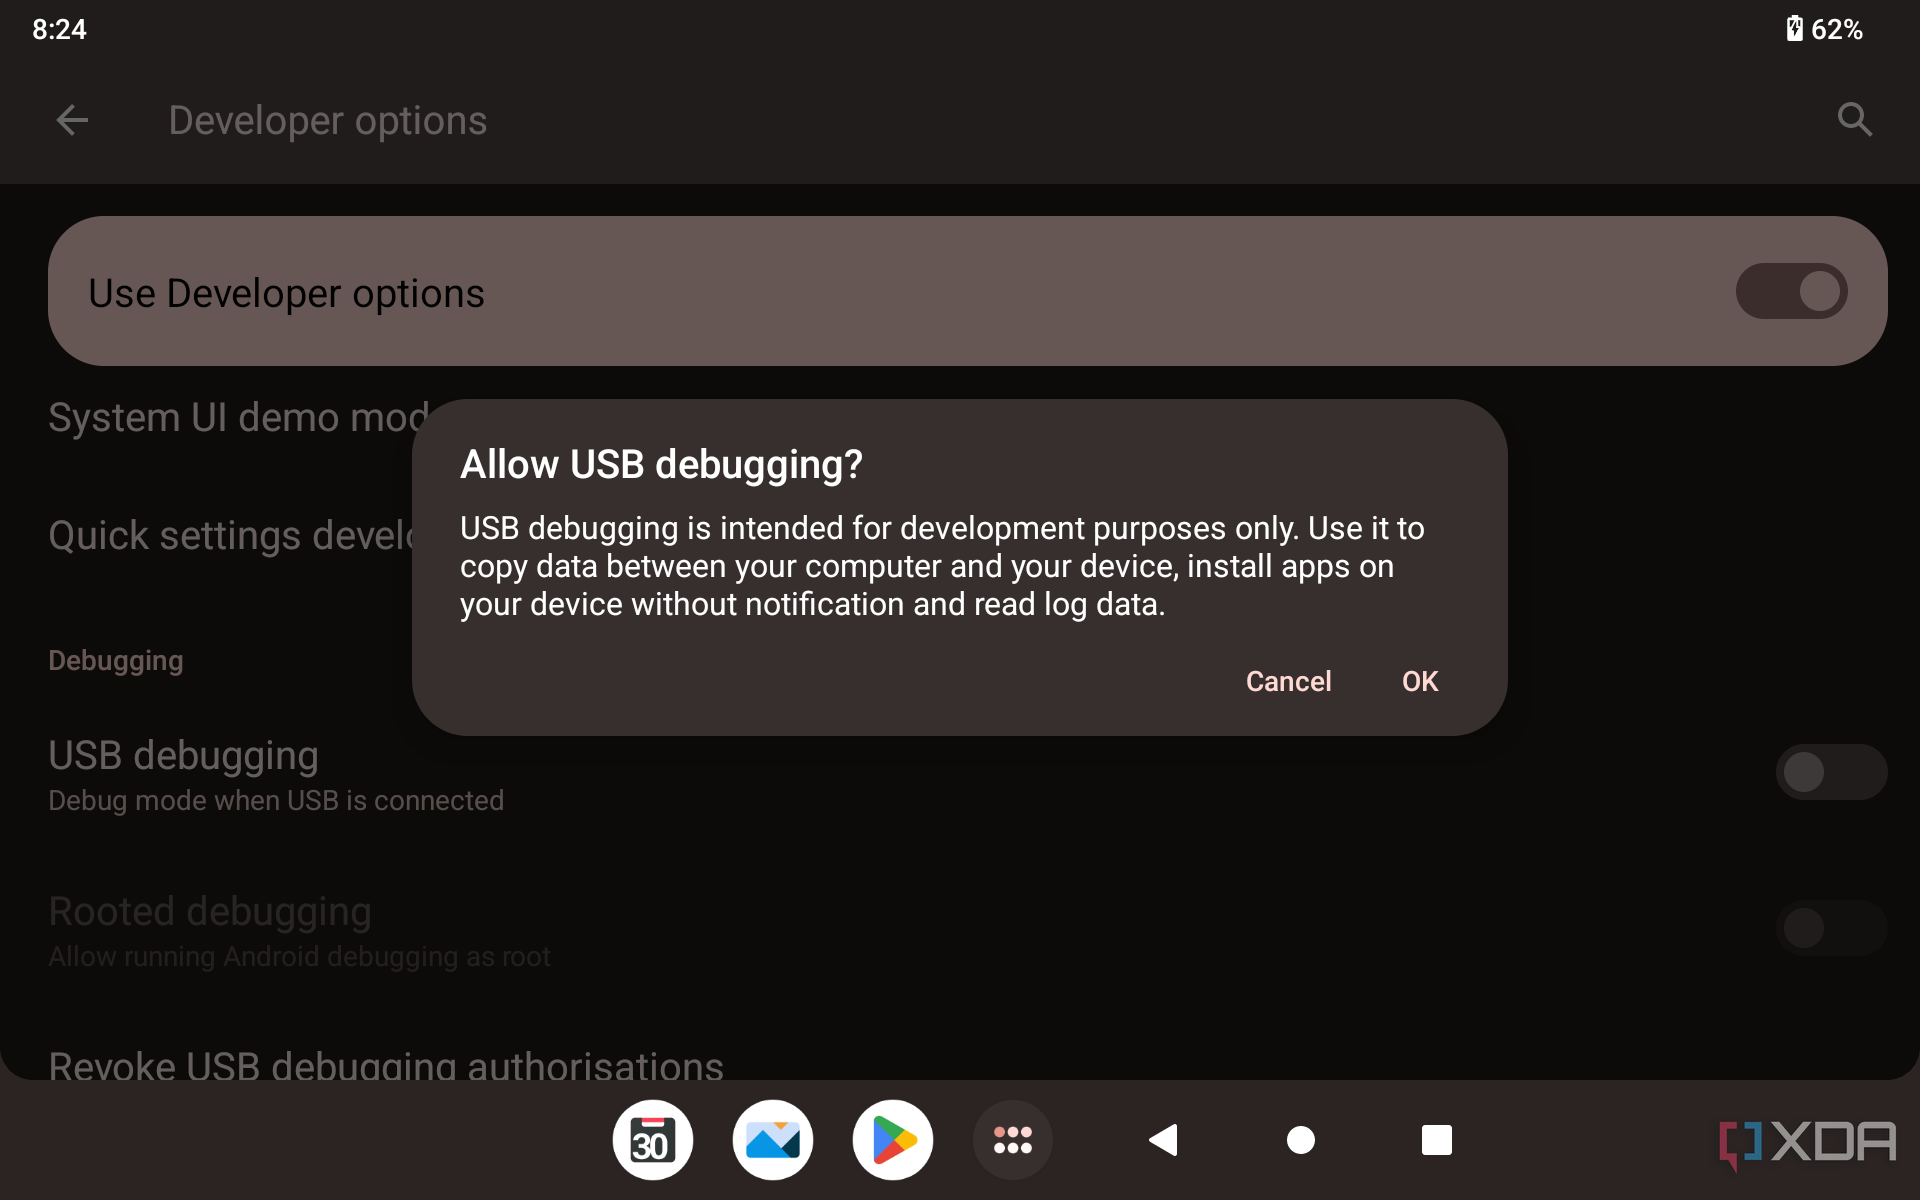
- Step 6. Choose Allow when “Allow USB debugging?” window pops up on your phone screen.

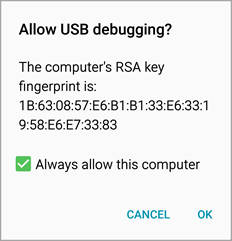
Note: It is suggested that tick Always allow this computer if you are using a trusted computer in order to get smooth experience with ADB and in case of accidents when you need to rescue data but unable to operate on the phone, like Android broken screen data recovery.
Part 3. Test ADB
Once you have finished the above preparing work, you can test if ADB works.
- Step 1. Run ADB command window as described on Part 1.
- Step 2. Connect your phone to PC, and type adb devices in command window and hit Enter.

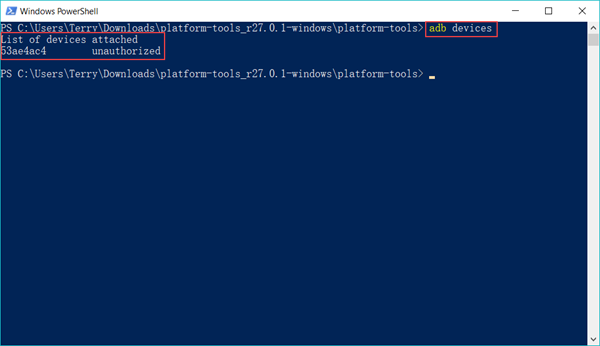
If everything goes right, a result will return as above (with different series code). If nothing appears, then you should check if the driver for your phone is properly installed. A straight indication of functional driver is that your phone should be recognized by the computer.
Part 4. Useful Things You Can Do with ADB
Once ADB is correctly installed on your Windows computer, you can do many useful things with ADB. The following is just a small portion of all the things it can do. You will find that lots of tools can do the same thing in normal environment, but ADB can do it easily and may play important role on some occasions.
USB debugging must be turned on!
Option 1. Backup and Restore Android with ADB
Backup is not necessarily the most frequently used function for Android users, but it should be the very first thing whenever we try anything new or danger. In case of accidents, a backup of mobile phone will work like a saver to our life. ADB can help you make backups for your Android smartphone with no need of root or custom recovery.
adb backup -all -f <path/filename.ab>
adb restore <path/filename.ab>
The path should be a location on your computer system drive. For example,
adb backup -all -f /Backup/backup1.ab
Notes:
- The backups are saved to computer instead of phone memory or SD card.
- You’ll need to unlock your phone to allow the backup to start.
- The backup mainly contains documents and media files on your phone. For a literarily full backup of phone data and whole system, refer how to make a Nandroid backup in custom recovery.
Option 2. Install APK for Android from Computer
There are already lots of methods to install apps to Android phone, including installing apk files on mobile phone, but occasionally you may need to install APK to Android phone from computer. This is especially useful if you know that the installation is completely silent with no need of operation on phone screen.
adb install <path to the apk on your computer>
The path should be a location on your computer system drive. Please move the apk file to the system drive if it is not. For example,
adb install /MyDownloads/TitaniumBackup.apk
Notes:
- No need to operate on phone screen.
- No prompt of permissions from the app.
- No need to enable Unknown source on mobile phone.
- Be care of apk files containing malware.
This function may work magically when you want to install an app to your phone but unable to control the device, like due to broken or black screen.
Option 3. Reboot Phone to Recovery Mode and Bootloader
In recovery mode, people can clear cache and data, factory reset or backup mobile phone. In bootloader (or Download mode for Samsung), people can flash ROMs to handset. If you don’t know anything about recovery mode and bootloader, please make sure you know it clearly and need it first.
adb reboot recovery
adb reboot bootloader
Notes:
- No need to press key/button groups on phone body.
- Occasionally, you may need to reboot manually or even remove battery when the command fails.
- After every reboot, you’ll need to reconnect the phone in order to let ADB work
Option 4. Convert SD Card as Internal Storage with ADB
Since Android Marshmallow, users can format SD card as internal storage, which effectively reduces insufficient storage problem. The conversion is easy to do on Settings > Storage if your phone is supported for the feature. However, some manufacturers intentionally hide this function from users even if their smartphones have upgraded to Android 6.0 or newer. With ADB, we can convert SD card as internal storage when the option is invisible.
Warning: Please move or back up SD files card first. After the conversion, the SD card won’t be recognized by other mobile phones or computers. Once your phone is reset or dead, you may find the SD card inaccessible by any device.
- Step 1. Launch ADB command window.
- Step 2. Connect the phone inserted with SD card to computer.
- Step 3. Type the following commands and hit enter after each:
adb shell
sm list-disks
sm partition disk:179,64 private - Step 4. Go to Settings > Storage to check your storage status.
Note: If there is no change in phone storage, then you may reboot it and check the storage again.
The above are 4 useful things that Android users may like or need to do with ADB. If you have more ideas or questions about what we can do with ADB, please kindly share with us.
You need to install ADB and Fastboot drivers for a variety of reasons. If you are looking to install a factory image, for example, you need this — particularly helpful if you wish to try Android 11 on your Pixel device. However, it is also useful if you want to flash a TWRP recovery image file, or patched boot image (Magisk), sideloading an update, transfer files, and many other purposes.
The ADB and Fastboot toosl are pretty useful if you are interested in root and custom recovery stuff, let alone being able to install an update manually using the sideload command. Let’s see how to install ADB and fastboot driver on your PC, but also, how to use ADB and Fastboot without even installing them systemwide.
What’s ADB?
ADB stands for Android Debug Bridge. It works when the device is powered on and booted into OS or Recovery. The tool helps in sending basic Linux commands, and a variety of Android specific commands from PC to connected Android devices.
What’s Fastboot?
Fastboot is a more powerful tool than ADB and it works only in bootloader/fastboot mode. It allows you to re-flash system partitions on your Android device and requires a device with an unlocked bootloader. It’s particularly useful when you want to update your device manually or in a rare situation when you accidentally soft-brick your device and need to install a clean stock system image.
However, setting up ADB and Fastboot can be very tricky on a Windows machine. But thanks to XDA member Snoop05 who has developed a small program to quickly install both ADB and Fastboot files on your PC (system-wide) along with proper drivers. Downloads and installation instructions are given below.
How to use ADB and fastboot without setting up anything
- Download the latest ‘platform tools’ (ADB and fastboot drivers) from Google from here.
- Extract the content of the file. You will get a folder called ‘platform tools’. So, this is the folder where you have files like adb.exe and fastboot.exe.
- Copy the required file(s) into this folder. However, if no file is required, then simply ignore this step.
- Now, open a PowerShell window or a command window here using the shift+right-click trick.

- Run the command.
Note: If you get an error in PowerShell window, be sure to add .\ before the command without any space. (adb devices will be .\adb devices).

That’s all. It’s that simple, actually!
Is it working?
If the above works for you, simply ignore all the content below. The content below is more about getting the ADB/fastboot to wokr everywhere on Windows so that you don’t need to copy the files into the ‘platform tools’ folder.
But if you insist on becoming a pro, here you go.
Method 1: Install the latest versions manually
Part 1: Get ADB and Fastboot driver
- Download the latest ‘platform tools’ (ADB and fastboot drivers) from Google from here.
- Extract the content of the file. You will get a folder called ‘platform tools’.
- Move the ‘platform tools’ folder to C drive so that you can easily access it anytime.


It’s done!
You can use the ADB and Fastboot commands from this folder by making sure your ADB/PowerShell window points to this folder. For this, simply open the command window or a PowerShell window from this folder only. Open the ‘platform tools’ folder, type cmd in its address bar, and then hit the enter key. A command window will open up and its location will be this folder only.
The next part, though, will help you run ADB and Fastboot from anywhere on PC. Which makes it very easy to use ADB and Fastboot commands.
Part 2: Get ADB and Fastboot driver everywhere on PC
This is not a must, BTW, as you can use the ADB and Fastboot from the platform tools folder anytime as explained above. See another guide on the bottom of the article, in a section called “How to use ADB and Fastboot from the ‘platform tools’ folder”.
- Copy the path (address) of the ‘platform tools’ folder. You can shift+right click to get the option called ‘Copy as Path’, using which will copy the path to PC’s clipboard. Mine is in the C drive, and here is its path: “C:\platform-tools”

- Open Environment Variables settings by searching for it in Windows search. Otherwise, find it manually as given below:
- Right-click the Computer icon.
- Click Properties.
- Click Advanced system properties.
- In the window that pops up, click Advanced.

- Click Environment Variables.
- Under ‘System variables’ section, click Path option to select it.

- Click the Edit button.
- Add the path of the ‘platform tools’ folder:
- On Windows 10, click the New button, and then copy the path of your ‘platform tools’ folder.

- On the older version of Windows, you may need to copy the path after the current paths added there. Paths are separated by the use of semi-colon, so make sure there is a semi-colon before and after the path of your ‘platform tools’ folder.
- On Windows 10, click the New button, and then copy the path of your ‘platform tools’ folder.
- Click OK, then again OK, and then again OK to exit.
- Open a command window or a PowerShell window and type adb and then hit the enter key, you shall get a list of adb commands. Meaning, adb is working from everywhere on your Windows PC. Try the same with fastboot.


Method 2: 15 Second automatic installer
Note that as the ADB and Fastboot files installed by the automatic installer are quite old now, you need to update them, as given in step 4. So, make sure of that. The drivers installed automatically may cause you problems, for example, when trying to flash a factory image (Android 11 developer preview, for example) where the old ADB and Fastboot drivers will be unable to install the Android 11 ROM properly.
- Download the adb-setup-1.4.3.exe file from here.
- Double-click/run the adb-setup-1.4.3.exe file.
- You will see a command prompt window with blue background. Say YES to all the prompts on this screen.
└ To say YES, just type Y and hit enter.

- Update the installation with the latest drivers:
- Download the latest ‘platform tools’ (ADB and fastboot drivers) from Google from here.
- Extract the content of the file. You will get a folder called ‘platform tools’.
- Copy the content of the ‘platform tools’ folder to the ADB folder in the C drive that was created by the automatic installer.
- Yes, replace all the old files in ‘ADB’ with all the new files from ‘platform tools’ folder. Done!

Once ADB, Fastboot and Drivers are installed, the setup window will automatically close and you’ll have a working ADB and Fastboot setup throughout your system. Enjoy!
How to use ADB and Fastboot from the ‘platform tools’ folder
So, if you can’t add the path of the ADB and Fastboot files (the ‘platform tools’ folder, that is), here is how to use these tools.
Method 1: Open the CMD/PowerShell window in platform tools folder
- Open the ‘platform tools’ folder on your PC.

- Left-click on the empty space in the folder. (This is to remove any selection in the folder.)
- Now, shift+right-click on the empty space.
- Click ‘Open PowerShell Window here’ option.
- A PowerShell window will open up whose location will be the ‘platform tools’ folder only.

- Type the command adb devices to test it. (Make sure you have enabled USB Debugging on your Android device.)
- Run the command by hitting the enter key. You shall get a random serial number like below.
- That shows that ADB is working. Test a fastboot command too. Before you do that, reboot the device in fastboot mode (run the command adb reboot bootloader). When in fastboot mode, try a fastboot command like fastboot devices to confirm fastboot is also working alright.

- That’s all. To reboot the device, run the fastboot command fastboot reboot and it shall restart right away.


Done!
Method 2: Use the path of adb.exe or fastboot.exe as required anywhere
You can copy the path of adb.exe and fastboot.exe files for use in the command/PowerShell window that has been opened anywhere on Windows. Here is how we can use and run ADB/fastboot command:
- Open a PowerShell/command window. You can use Windows search for this.

- You can see the location of the PowerShell window above is nor the ‘platform tools’ folder. It’s opened in the user folder, where I don’t have the adb and fastboot files.
- To use adb, we need to copy the adb.exe’s path. Go to the folder where you have the adb.exe (the ‘platform tools’ folder), and shift+right-click on it.

- Click Copy as path.
- Paste it in the PowerShell window.
- Remove the invited commas from path address.
- Hit the space bar, and then type the rest of the command. For example, to run the adb devices command, we only need to add the ‘devices’ in the PowerShell window. Here’s how it will look.
- Hit the enter key now. It will run the adb devices command. Here’s the result:
- You can flash the files like this. For example, if you wish to install TWRP recovery, then download its .img file (let’s call it twrp.img), go to that folder, open a command windows in that folder using shoft+right click, and then use this command with the device in fastboot mode: C:\platform-tools\fastboot.exe flash recovery twrp.img


Done. Let us know if you need any help in this regard.
Method 3: Use the path of the file on your PC
A quick workaround to Method 2 above is to use the path of the file in the ADB folder.
- Go to the folder where you have the adb.exe and fastboot.exe files. Basically, this is your ‘platform tools’ folder.
- Open a PowerShell/command window here using the shit+right click trick mentioned above.
- Run the ADB commands as you like (in PowerShell, add .\ before adb without any space):
- For restarting the device into fastboot mode, simply type adb reboot bootloader and then hit the enter key. (In PowerShell, the command will become: .\adb reboot bootloader)
- For restarting the device into recovery mode, simply type adb reboot recovery and then hit the enter key.
- To transfer a file, type adb push <insert path of the file on your windows PC> /sdcard/
- To sideload an update in recovery mode, type adb sideload <insert path of the file on your windows PC>
(Example: adb sideload “D:\Downloads/walleye-rpp1.200123.016\image-walleye-rpp1.200123.016.zip”)
- Run the fastboot commands as you like (make sure the device is in fastboot/bootloader mode; and you will need to add .\ in PowerShell window)):
- For restarting the device, simply type fastboot reboot and then hit the enter key.
- To boot the device using TWRP file: fastboot boot <path of twrp recovery file on your PC>
- To flash the TWRP file in the boot partition (modern phones): fastboot flash boot <path of twrp recovery file on your PC>
- To flash the TWRP file in the recovery partition (older phones): fastboot flash boot <path of twrp recovery file on your PC>
- To install a factory image, extract the factory image zip file, and copy all files from it in the ‘platform tools’ folder. (Or, copy the files in the platform tool folder to the folder where you extracted the factory image file, so that all the files from factory image and platform tools (adb.exe, fastboot.exe, etc.) are in a single folder). And then, simply run the flash-all.bat to install the factory image.
That’s all.
A step-by-step guide to get you started with the Android Debug Bridge tool.
Quick Links
- What is Android Debug Bridge (ADB)?
- How does ADB work?
- How to set up ADB
- How to use ADB from any directory on your PC or Mac
- Examples of ADB commands
- What else can I do with ADB?
When it comes to smartphone operating systems, Android dominates in global market share. However, several features of Google’s OS can be accessed only through paths and methods that are hidden away from the average user. These have generally been done with the help of some command line Android Debug Bridge (ADB) commands, a tool that Google offers for developers to debug various parts of their applications or the system, but which we can use for all kinds of neat, hidden tricks. A prerequisite to these tricks is installing ADB on your computer. So, in this guide, we will show you how to install ADB on Windows, macOS, and Linux in quick and easy-to-follow steps.
What is Android Debug Bridge (ADB)?
The internal structure of ADB is based on the classic client-server architecture. There are three components that make up the entire process.
- The client, i.e. the PC/Mac/Chromebook you have connected to your Android device. We are sending commands to our device from the computer through the USB cable or wirelessly.
- A daemon (known as «adbd») that runs commands on a device. The daemon runs as a background process on each device.
- A server that manages communication between the client and the daemon. The server runs as a background process on the computer.
How does ADB work?
Because there are three pieces that make up ADB (the client, the daemon, and the server), certain pieces to be up and running in the first place. If you have freshly booted the computer (and you don’t have it set up to start the daemon on boot), then you will need it to be running before any communication can be sent to the target Android device. You’ll see the following message in the command prompt or terminal, which will check to make sure the daemon is running.
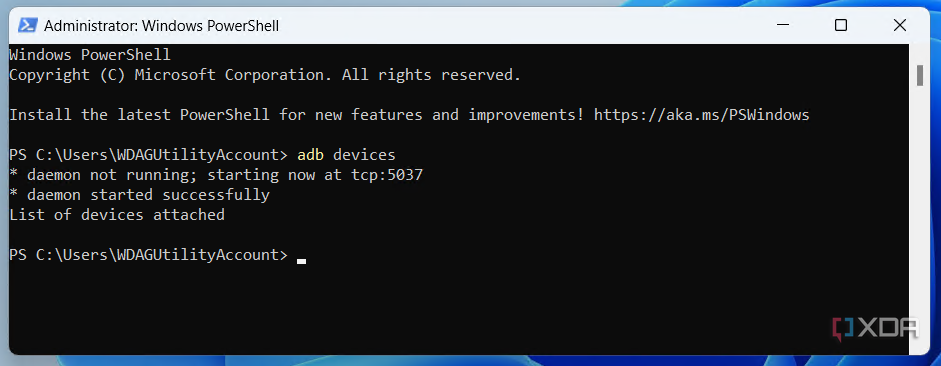
If the daemon isn’t running, then it will start the process and tell you which local TCP port it has been started on. Once that ADB service has been started, it will continue to listen to that specific port for commands that have been sent by the ADB client. It will then set up connections to all running devices that are attached to the computer (including emulators). This is the moment when you’ll receive the authorization request on the Android device if the computer hasn’t been authorized in the past.
How to set up ADB
Setting up ADB on the computer is just half the equation since you’ll also need to do some things on the smartphone or tablet to accept the ADB commands.
Phone setup
- Launch the Settings application on your phone.
- Tap the About phone option generally near the bottom of the list.
- Depending on the OEM skin, the About phone page may be called something else or buried somewhere else in the Settings app on your device.
- Then tap the Build number option seven times to enable Developer Mode. You will see a toast message when it is done.
- Now go back to the main Settings screen, and you should see a new Developer options menu you can access.
- On Google Pixel phones and some other devices, you might need to navigate to Settings > System to find the Developer options menu.
- Go in there and enable the USB debugging option.

- You are partially done with the phone setup process. Next up, you will need to scroll below and follow the rest of the instructions for your particular operating system.
How to set up ADB on Microsoft Windows
- Download the Android SDK Platform Tools ZIP file for Windows.
- Extract the contents of this ZIP file into an easily accessible folder (such as C:\platform-tools).
- Open File Explorer and browse to where you extracted the contents of this ZIP file.
- Open up a Command Prompt/Terminal instance from the same directory as this ADB executable. This can be done by holding Shift and right-clicking within the folder and then clicking Open command window here or Open PowerShell window here. Windows 11 users should see Open in Terminal in the right-click context menu without even pressing the Shift button on the keyboard.

- Connect your smartphone or tablet to your computer with a USB cable. Change the USB mode to “file transfer (MTP)” mode. Some OEMs may or may not require this, but it’s best to just leave it in this mode for general compatibility.
- In the Command Prompt/Terminal window, enter the following command to launch the ADB daemon:
adb devices - On your phone’s screen, you should see a prompt to allow or deny USB Debugging access. Naturally, you will want to grant USB Debugging access when prompted (and tap the always allow check box if you never want to see that prompt again).
- Finally, re-enter the command from step 6. If everything was successful, you should now see your device’s serial number in the command prompt/Terminal window.

You can now run any ADB command on your device! Now, go forth and start modding your phone.
Notably, there exist a plethora of CLI package managers for Windows — WinGet, Scoop, and Chocolatey to name a few. In case you use them to install ADB on your PC, you don’t need to manually download and update Google’s Platform Tools. With that said, version compatibility and installation processes might vary across these package managers, so it would be better to consult the respective help manuals and product forums to get support.
How to set up ADB on macOS
- Download the Android SDK Platform Tools ZIP file for macOS.
- Extract the ZIP to an easily accessible location (like the Desktop, for example).
- Open Terminal.
- To browse to the folder you extracted ADB into, enter the following command:
cd /path/to/extracted/folder/For example, you can place the contents on your desktop:
cd /Users/XDA/Desktop/platform-tools/ - Connect your device to your Mac with a compatible USB cable. Change the USB connection mode to “file transfer (MTP)” mode. This is not always required for every device, but it’s best to just leave it in this mode, so you don’t run into any issues.
- Once the Terminal is in the same folder your ADB tools are in, you can execute the following command to launch the ADB daemon:
./adb devices - On your device, you’ll see an Allow USB debugging prompt. Allow the connection.
- Finally, re-enter the command from step 7. If everything was successful, you should now see your device’s serial number in macOS’s Terminal window.

Congratulations! You can now run any ADB command on your device!
While the guide above will certainly work, veteran macOS users can also opt to install ADB on their Macs using an unofficial package manager such as Homebrew or MacPorts. That way, you don’t have to manually update the binaries.
How to set up ADB on Linux
- Download the Android SDK Platform Tools ZIP file for Linux.
- Extract the ZIP to an easily accessible location (like the Desktop, for example).
- Open a Terminal window.
- Enter the following command:
cd /path/to/extracted/folder/ - This will change the directory to where you extracted the ADB files.
- Example:
cd /home/XDA/Desktop/platform-tools/
- Example:
- Connect your device to your Linux machine with your USB cable. Change the connection mode to file transfer (MTP) mode. This is not always necessary for every device, but it’s recommended, so you don’t run into any issues.
- Once the Terminal is in the same folder your ADB tools are in, you can execute the following command to launch the ADB daemon:
./adb devices - Back on your smartphone or tablet device, you’ll see a prompt asking you to allow USB debugging. Go ahead and grant it.
- Finally, re-enter the command from step 8. If everything was successful, you should now see your device’s serial number in the Terminal window output.

Congrats! You can now run any ADB command on your device!
Linux users should know that there is an easier way to install ADB on their computers. The guide above will certainly work for you, but those who own a mainstream Debian/Ubuntu or Fedora/SUSE-based distro of Linux can skip steps 1 and 2 of the guide above and use one of the following commands:
- Debian/Ubuntu-based Linux users can type the following command to install ADB:
sudo apt-get install android-sdk-platform-tools - Fedora/SUSE-based Linux users can type the following command to install ADB:
sudo dnf install android-tools
However, it is always better to opt for the latest binary from the Android SDK Platform Tools release since the distro-specific packages often contain outdated builds.
How to use ADB from any directory on your PC or Mac
Downloading the ADB executable is the initial step, but power users might want to access it from any folder or directory without navigating back to the original location. Fortunately, the process to do so is quite simple. All you need to do is modify the PATH variable of the host operating system.
The PATH is a powerful environmental variable used by operating systems to specify the location of important executables. For instance, you can type «calc» in the Run prompt of Windows to launch calculator, but not «chrome» to start Google Chrome — simply because the location of the latter isn’t included in the PATH variable.
The OS allows applications as well as end users to change the variable values. This is useful to people using programs/scripts that are dependent on such applications, as the program does not have to attempt to hard code the location. For this particular scenario, adding the ADB executable and other components from Google Platform Tools allows for better organization so that you don’t need to put all of your flashable files in the same folders.
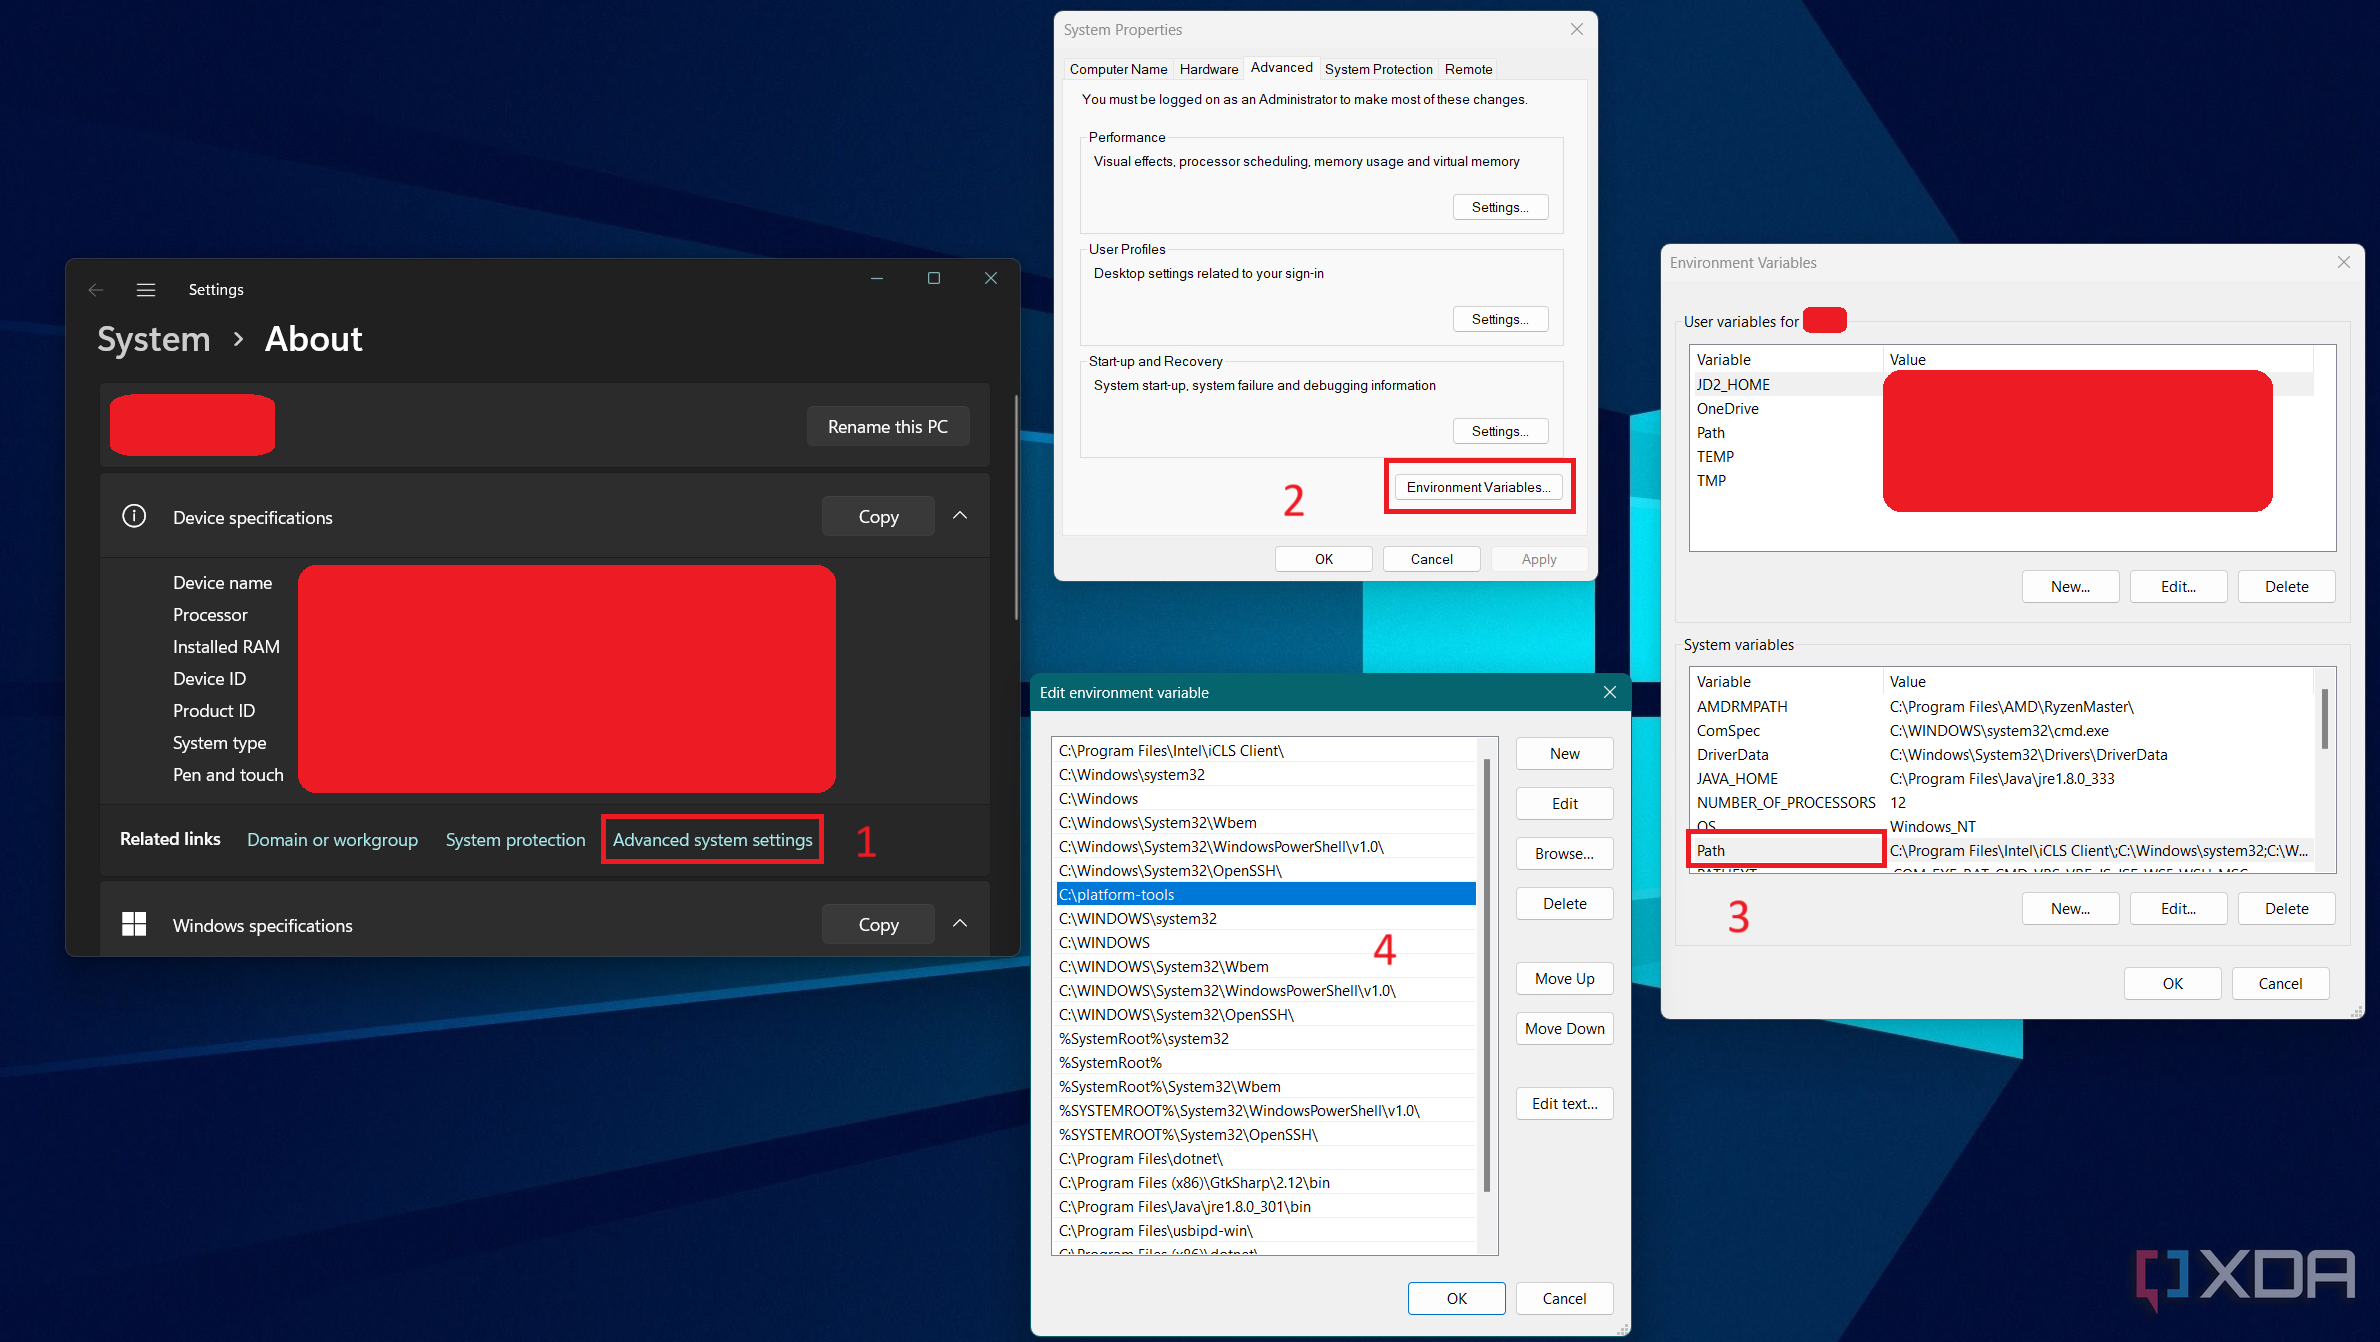
Windows
- Right-click on the Start button (or use the Windows + X keyboard shortcut) and select the System option. You will be greeted with a screen showing some system information.
- Select Advanced system settings from the Related links section under Device specifications.
- Click on the Environment Variables button.
- Look for the variable named «Path» under System variables and double-click it.
- Click Browse and navigate to the folder where you extracted the ADB files (e.g. C:\platform-tools).
- Please ensure before you click Browse that no field is highlighted. If a field is highlighted, you will end up replacing it. Click somewhere in the list that doesn’t contain an entry to ensure that you do not replace a field.
- When you see the folder location is properly listed, click the OK button out of all the Windows you have opened to confirm.
- Sometimes, the graphical shell needs a restart to make the changes take effect. You can simply sign out and sign in again or reboot your PC to force Windows to use the updated PATH settings.
Now start a new terminal or command prompt instance and type adb to verify the location has been added.
In case you use a package manager like Chocolatey to install ADB, it should take care of the PATH variable editing portion as well. As a result, you can skip the above process.
macOS
- Note down the location where you extracted the ADB tools.
- Open the Terminal app and make sure to be in the Home directory:
cd ~
- In case you’re running any macOS version older than Catalina, the default shell should be Bash. For macOS Catalina and newer, the default changed to the Z shell (Zsh). Hence, you need to determine the current shell before changing the PATH variable. Type the following command and press Enter to see the shell your Mac is using:
echo $0
- Depending on the output, create a shell configuration file.
- For Bash:
touch .bash_profile
- For Zsh:
touch .zshrc
- People who are already using custom shell configurations can skip this step.
- For Bash:
- Open the shell configuration file with TextEdit:
- For Bash:
open -e .bash_profile
- For Zsh:
open -e .zshrc
- If you prefer to use nano/pico/vi or any other CLI text editor, you can instead.
- For Bash:
- Adjust the location according to the first step in the following command and add it to the shell configuration file you just opened:
export PATH=$PATH:/path/to/extracted/folder/
For example:
export PATH=$PATH:/Users/XDA/Desktop/platform-tools/
- Save the file and close the TextEdit app. Next, go back to the Terminal app and reload your shell settings.
- For Bash:
source .bash_profile
- For Zsh:
source .zshrc
- For Bash:
- You’re done. Optionally, verify the PATH variable assertions using the following command:
echo $PATH
To test if the process was successful, start a new Terminal instance and type adb.
Keep in mind that if the ADB installation process is performed using a package manager, then you don’t need to modify the PATH variable on your own.
Linux
- Note down the location where you extracted the ADB tools.
- Open the Terminal app and make sure to be in the Home directory:
cd ~
- Due to the fact that most common Linux distributions ship with Bash as their default shell, the next steps will be Bash-specific. You can, of course, consult the documentation of your preferred shell and modify the commands to suit your needs.
- Open the shell configuration file with a text editor:
sudo nano .bashrc
- You can also use other editors like vi or gedit.
- Add the following line to the end of the .bashrc file. Remember to adjust the location according to the first step beforehand.
export PATH=$PATH:/path/to/extracted/folder/
For example:
export PATH=$PATH:/home/xda/platform-tools/
- Be careful editing this file; do not add anything else or change anything else.
- Save the file. Next, go back to the Terminal app and reload your shell settings:
source ~/.bashrc
- Optionally, verify the PATH variable assertions using the following command:
echo $PATH
- And that’s how you can call ADB from anywhere under Linux.
To check, spawn a new Terminal window and type adb (without the quotes).
It is worth mentioning that you don’t need to perform these steps if you prefer to install (and update) ADB using the distro-specific packages.
Special case: How to set up ADB on Windows Subsystem for Linux and ChromeOS
Windows Subsystem for Linux (WSL) offers Windows users a seamless way to run Linux apps. However, the environment has yet to offer full-fledged USB hardware access. As a consequence, ADB under WSL can’t access your Android device, even if you install it using the aforementioned way. Nonetheless, there exists an official workaround, which utilizes the open-source usbipd-win project. To know more, take a look at our tutorial on how to set up USB passthrough in WSL.
For ChromeOS, you need to turn on the built-in Linux development environment first. By default, it offers you a Debian instance. You can then easily set up ADB using the Linux-oriented steps mentioned earlier.
Just to cover all of our bases here, users may need to put a ./ in front of the ADB commands we list in future tutorials, especially when they are using the extracted binaries directly from the Google-provided Platform Tools ZIP. This is something any *nix user (or Windows user running PowerShell/Terminal) will likely know, but again, we want as many people as possible to understand how to do these tweaks for Android no matter how much of your operating system you know.
Optional: How to set up ADB on your browser
The ADB protocol can be implemented using the WebUSB API in order to control Android phones directly from web browsers. Tango (formerly known as Yet Another WebADB) is one such project that allows users to perform most of the functionality provided by ADB right from the web browser without installing any binary. All you need is a web browser that supports the WebUSB API (such as Google Chrome, Microsoft Edge, Firefox, or Vivaldi) and you are good to go.
Optional: How to use ADB over Wi-Fi
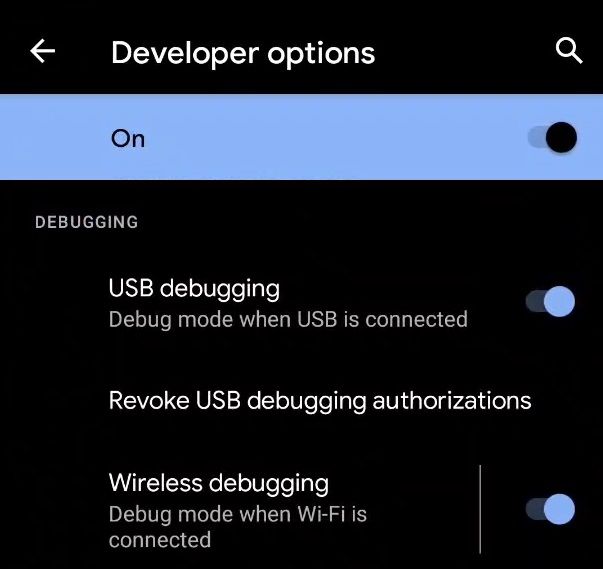
Android 11 and higher editions natively support ADB connection over Wi-Fi. This eliminates the need to deal with common USB connection issues and additional steps, such as Android OEM driver installation on Windows.
In order to set up wireless debugging, do the following:
- Make sure that your PC/Mac and the phone are connected to the same wireless network.
- On your phone, go to Developer options under Settings and enable Wireless debugging. On the Allow wireless debugging on this network? popup, select Allow.

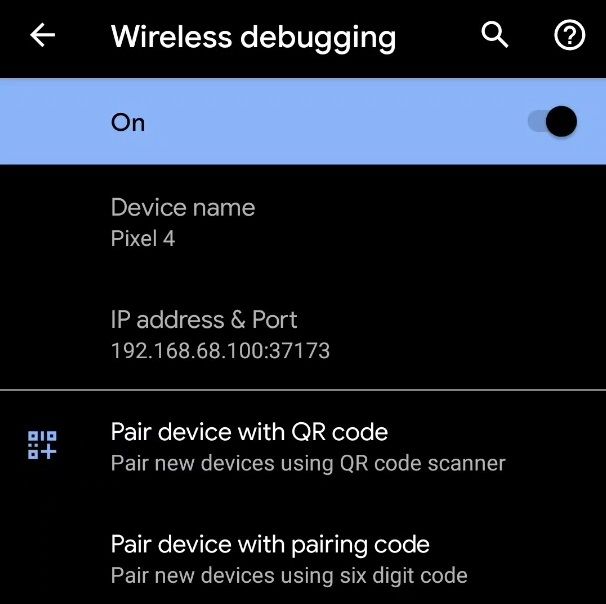
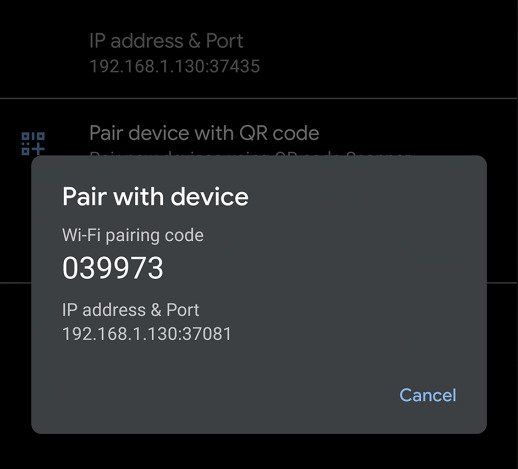
- Tap on the Wireless debugging option and select Pair device with pairing code.

- Take note of the pairing code, IP address, and port number displayed on the phone screen.

- On your PC/Mac, run the following command:
adb pair IP_Address:PortUse the IP address and port number from step 4.
- When prompted, enter the pairing code that you received in step 4. A message should indicate that your device has been successfully paired.
- Next, run the following command on the PC/Mac’s terminal window:
adb connect IP_Address:PortLook at the IP address & Port section under Wireless debugging in step 3 for the IP address and port.
- If everything goes right, then you should see a message like the following:
connected to 192.168.68.100:37173 - Now you’re ready to type whatever ADB shell command you want.
Examples of ADB commands
To check if you have successfully installed ADB, connect your device to your PC/Mac with your USB cable, and run the adb devices command as described above. It should display your device listed in the Command Prompt/PowerShell/Terminal window. If you get a different output, we recommend starting over with the steps.
As mentioned above, you can use ADB to do all sorts of things on an Android device. Some of these commands are built directly into the ADB binary and should work on all devices. You can also open up what is referred to as an ADB Shell that will let you run commands directly on the device. The commands which are run directly on the device can vary from device to device (since OEMs can remove access to certain ones, and also modify ADB behavior) and can vary from one version of Android to the next as well.
Below, you’ll find a list of example commands which you can do on your device:
- Print a list of connected devices:
adb devices - Kill the ADB server:
adb kill-server - Install an application:
adb install <path_to_the_APK_file> - Set up port forwarding:
adb forward tcp:6100 tcp:7100 - Copy a file/directory from the device:
adb pull <path_to_the_remote_object> <path_to_the_local_destination> - Copy a file/directory to the device:
adb push <path_to_the_local_object> <path_to_the_remote_destination> - Initiate an ADB shell:
adb shell
What else can I do with ADB?
Below is a list of XDA tutorials for various devices that detail many applications of ADB commands in order to modify hidden settings, customize OEM features or user interfaces, and much more!
- How to boot into recovery mode using button combos, ADB, and root apps
- How to uninstall carrier/OEM bloatware without root access
- How to debloat your phone (and more) without connecting to a PC
- How to sideload apps on Android TV: APK Install and ADB Sideload methods explained in easy-to-follow steps!
- Control your Android Smartphone from your PC for free with scrcpy
This is just the tip of the iceberg. Don’t forget to check out our ADB commands for every power user tutorial to know more useful tips and tricks for using ADB!