ADB Shell
- Home
- Commands
- Downloads
- ADB Kits (1364 KB)(adb.exe AdbWinApi.dll AdbWinUsbApi.dll)
- ADB Driver InstallerUniversal Android USB Driver for Windows
- APK InstallerAPK Installer for Windows, Android
- ©2020 ADB Shell
Android Debugging Bridge (ADB), as the name suggests, is a command line
utility that allows developers to debug different parts of their
applications. However, ADB Download is not just limited
to developers.
If you want to access certain features of the
ADB installer download platform that cannot be accessed
otherwise, you can also use the ADB command by
universal ADB driver download on your computer, whether
it is Windows, macOS, Linux, or Chrome OS. Once you’ve installed it,
there are a lot of cool things you can do with ADB on your
ADB Android download device. In addition, various
applications require ADB permissions to function. So, if you don’t know
how to install and use ADB download Windows, macOS,
Linux, or Chrome OS, and we’ll help you.
Introduction to ADB Download

The USB driver can only perform basic operations of transferring
files between the PC and the device. But for all other tasks, you
need to install a set of Fastboot ADB drivers. In
this guide, we’ll help you install that. But before that, it is very
important that you familiarize yourself with these
download universal ADB drivers and Fastboot drivers
and why they are needed in the first place. So without further ado,
let’s start by getting started with the tutorial.
Importance of ADB Fastboot Driver Download
If you’ve just entered the world of the Android ecosystem, the ADB and
Fastboot binaries might be among the main things you should know. If
your sole purpose for using Download ADB Android device
is to make calls and send messages, you probably won’t need these
drivers. But the reality is that there are only a limited number of
users in this population. For the vast majority, they want to explore
the full potential of this open source environment.
The usefulness of ADB commands
In this regard, from the first step, you will need Fastboot
ADB software free download. For starters, ADB commands
are used to boot your device in various modes including Fastboot
Bootloader and Downloader and Stock Recovery. Likewise, you can even
ADB install APK Download and uninstall any app on your
device directly from your PC itself. Similarly, these
ADB commands also allow you to transfer files between
your device and your PC. Then using the
ADB shell download [command] you can unleash the full
potential of your device with lots of hidden tweaks.
Configure ADB and Fastboot on Windows and Mac OS:
Setting up ADB and Fastboot seems easy enough. Since
Fastboot ADB download is part of the Android SDK
package, only you can download the toolkit (more than 500MB in size) and
then set the path variables or you can use the methods below to
download ADB drivers for Windows and macOS. But first,
you need to remember that you need to put your device in USB debugging
mode but before that, you need to enable developer options. If you skip
this step, ADB download for PC may not recognize your
device.
Supported Windows Versions
ADB and Fastboot tools already support
Download ADB for Windows 7/8.1/8/ and
ADB Download Windows 10 versions for both 32-bit and
64-bit CPU types. In case you are looking for the latest version of the
ADB driver follow the guide to get ADB exe download on
your computer.
How to install ADB drivers and Fastboot Tools:
Since we got 3 different Android ADB download and Fastboot tools, you
can download and install the 15 Second ADB Installer, Minimal ADB and
Fastboot Tools, or the SDK Platform tool. Well, we recommend using the
Minimal ADB and Fastboot tool or the official Android SDK Platform tool.
Install the ADB installer in 15 seconds

-
Let’s start with, downloading the XDA ADB Installer configuration
file. It not only installs ADB but also Fastboot and USB drivers
in a short period of 15 seconds. - First, run adb setup download.exe.
-
Now, you need to respond with YES (Y) or NO (N). Type ‘Y’ if you
want to install the ADB and fastboot driver. -
Again type ‘Y’ to install the device driver. The device driver
installation may take a few seconds, after which the command
window will close automatically. -
Congratulations!!! You have successfully installed ADB and
fastboot on your Windows PC.
Install Minimal ADB and Fastboot:
- Download ADB Minimal and Fastboot Tool Exe installer package
-
Start the installation by double clicking on it. If a new window
appears to grant permission, confirm with YES or Run - Click the Next button to confirm one by one
-
Now tap Finish to complete the process. If you have checked the
checkmark to run minimal ADB and fastboot - You will see this screen to initiate your order.

Are you ready for ADB Download?
A step-by-step guide to get you started with the Android Debug Bridge tool.
Quick Links
- What is Android Debug Bridge (ADB)?
- How does ADB work?
- How to set up ADB
- How to use ADB from any directory on your PC or Mac
- Examples of ADB commands
- What else can I do with ADB?
When it comes to smartphone operating systems, Android dominates in global market share. However, several features of Google’s OS can be accessed only through paths and methods that are hidden away from the average user. These have generally been done with the help of some command line Android Debug Bridge (ADB) commands, a tool that Google offers for developers to debug various parts of their applications or the system, but which we can use for all kinds of neat, hidden tricks. A prerequisite to these tricks is installing ADB on your computer. So, in this guide, we will show you how to install ADB on Windows, macOS, and Linux in quick and easy-to-follow steps.
What is Android Debug Bridge (ADB)?
The internal structure of ADB is based on the classic client-server architecture. There are three components that make up the entire process.
- The client, i.e. the PC/Mac/Chromebook you have connected to your Android device. We are sending commands to our device from the computer through the USB cable or wirelessly.
- A daemon (known as «adbd») that runs commands on a device. The daemon runs as a background process on each device.
- A server that manages communication between the client and the daemon. The server runs as a background process on the computer.
How does ADB work?
Because there are three pieces that make up ADB (the client, the daemon, and the server), certain pieces to be up and running in the first place. If you have freshly booted the computer (and you don’t have it set up to start the daemon on boot), then you will need it to be running before any communication can be sent to the target Android device. You’ll see the following message in the command prompt or terminal, which will check to make sure the daemon is running.
If the daemon isn’t running, then it will start the process and tell you which local TCP port it has been started on. Once that ADB service has been started, it will continue to listen to that specific port for commands that have been sent by the ADB client. It will then set up connections to all running devices that are attached to the computer (including emulators). This is the moment when you’ll receive the authorization request on the Android device if the computer hasn’t been authorized in the past.
How to set up ADB
Setting up ADB on the computer is just half the equation since you’ll also need to do some things on the smartphone or tablet to accept the ADB commands.
Phone setup
- Launch the Settings application on your phone.
- Tap the About phone option generally near the bottom of the list.
- Depending on the OEM skin, the About phone page may be called something else or buried somewhere else in the Settings app on your device.
- Then tap the Build number option seven times to enable Developer Mode. You will see a toast message when it is done.
- Now go back to the main Settings screen, and you should see a new Developer options menu you can access.
- On Google Pixel phones and some other devices, you might need to navigate to Settings > System to find the Developer options menu.
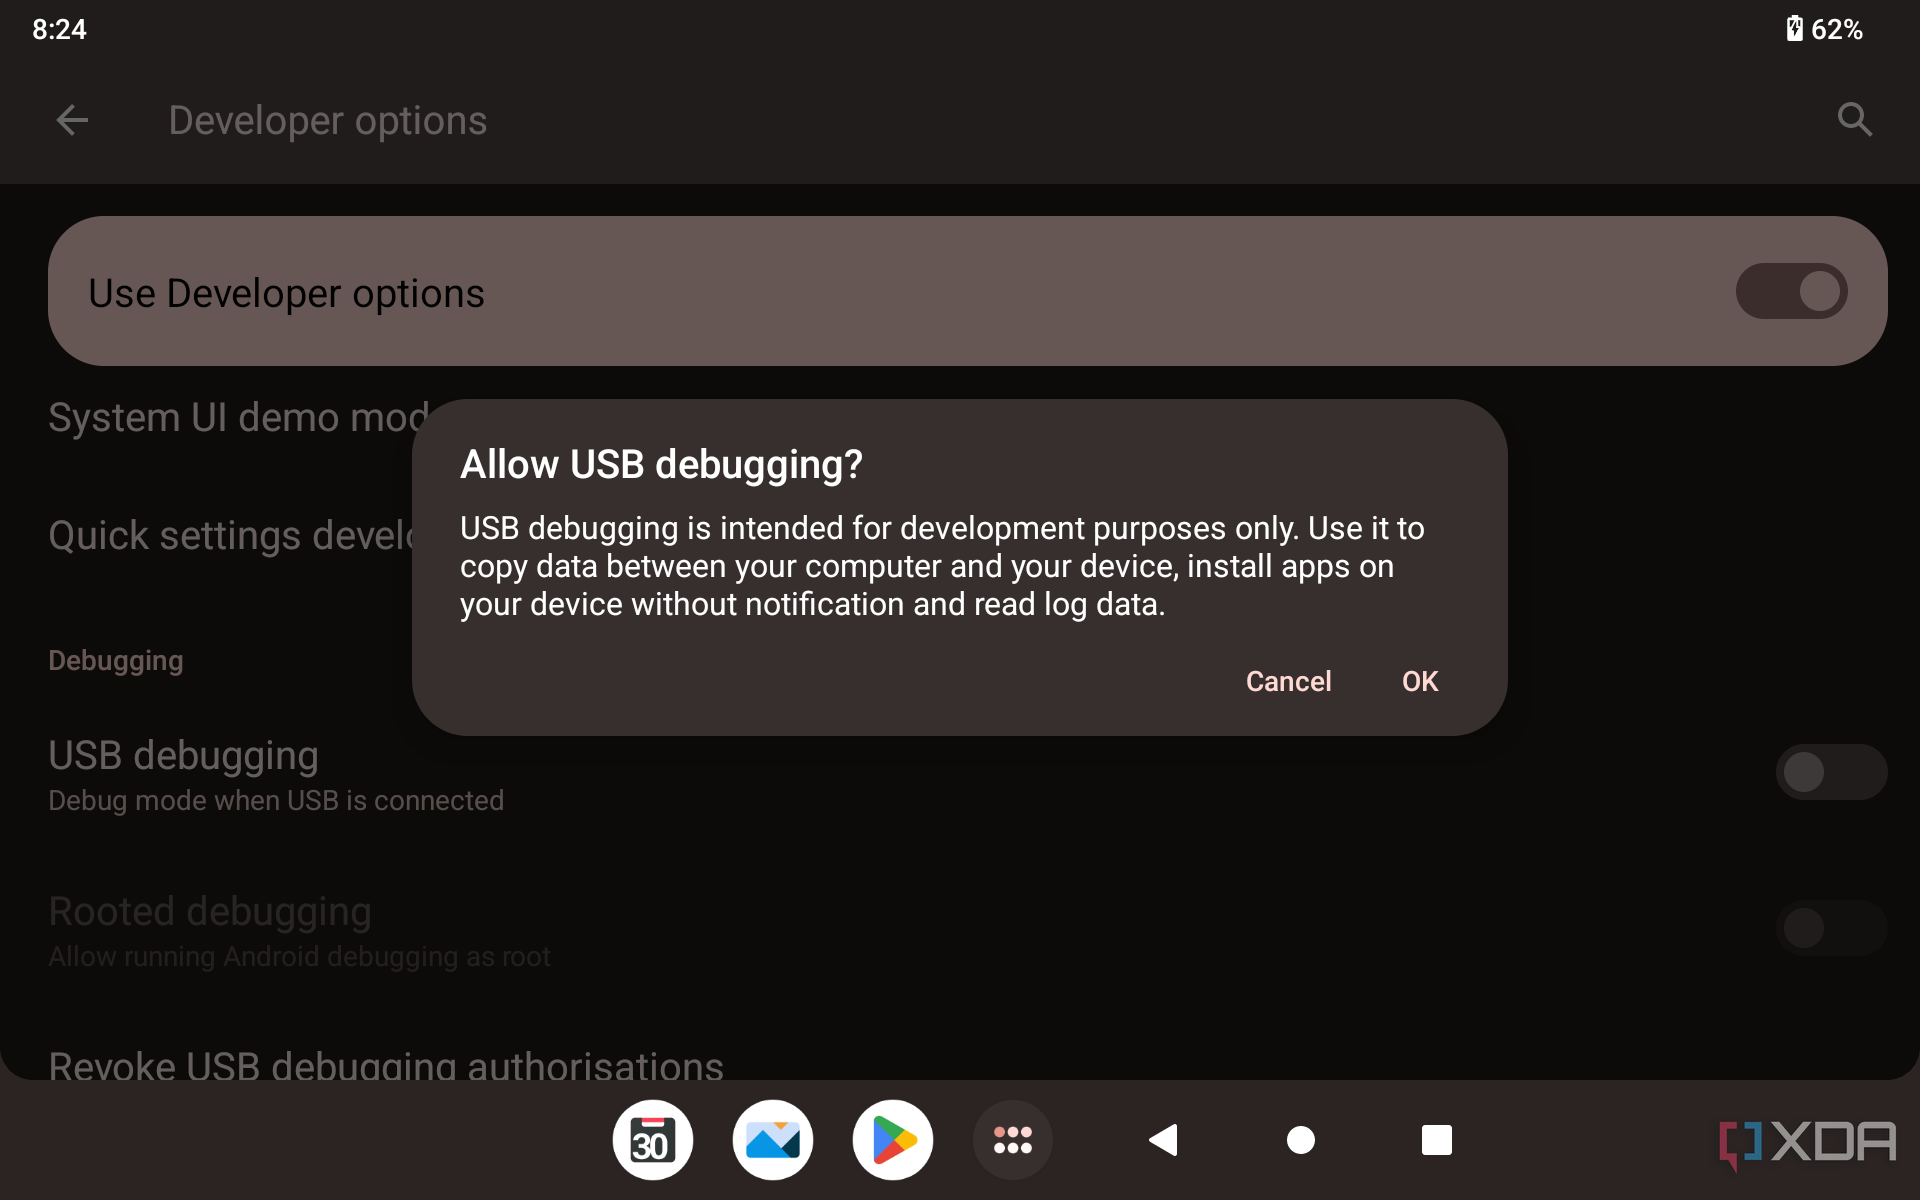
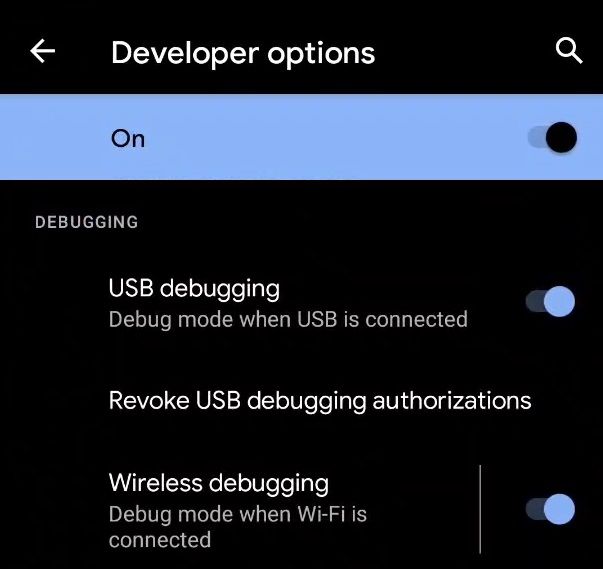
- Go in there and enable the USB debugging option.

- You are partially done with the phone setup process. Next up, you will need to scroll below and follow the rest of the instructions for your particular operating system.
How to set up ADB on Microsoft Windows
- Download the Android SDK Platform Tools ZIP file for Windows.
- Extract the contents of this ZIP file into an easily accessible folder (such as C:\platform-tools).
- Open File Explorer and browse to where you extracted the contents of this ZIP file.
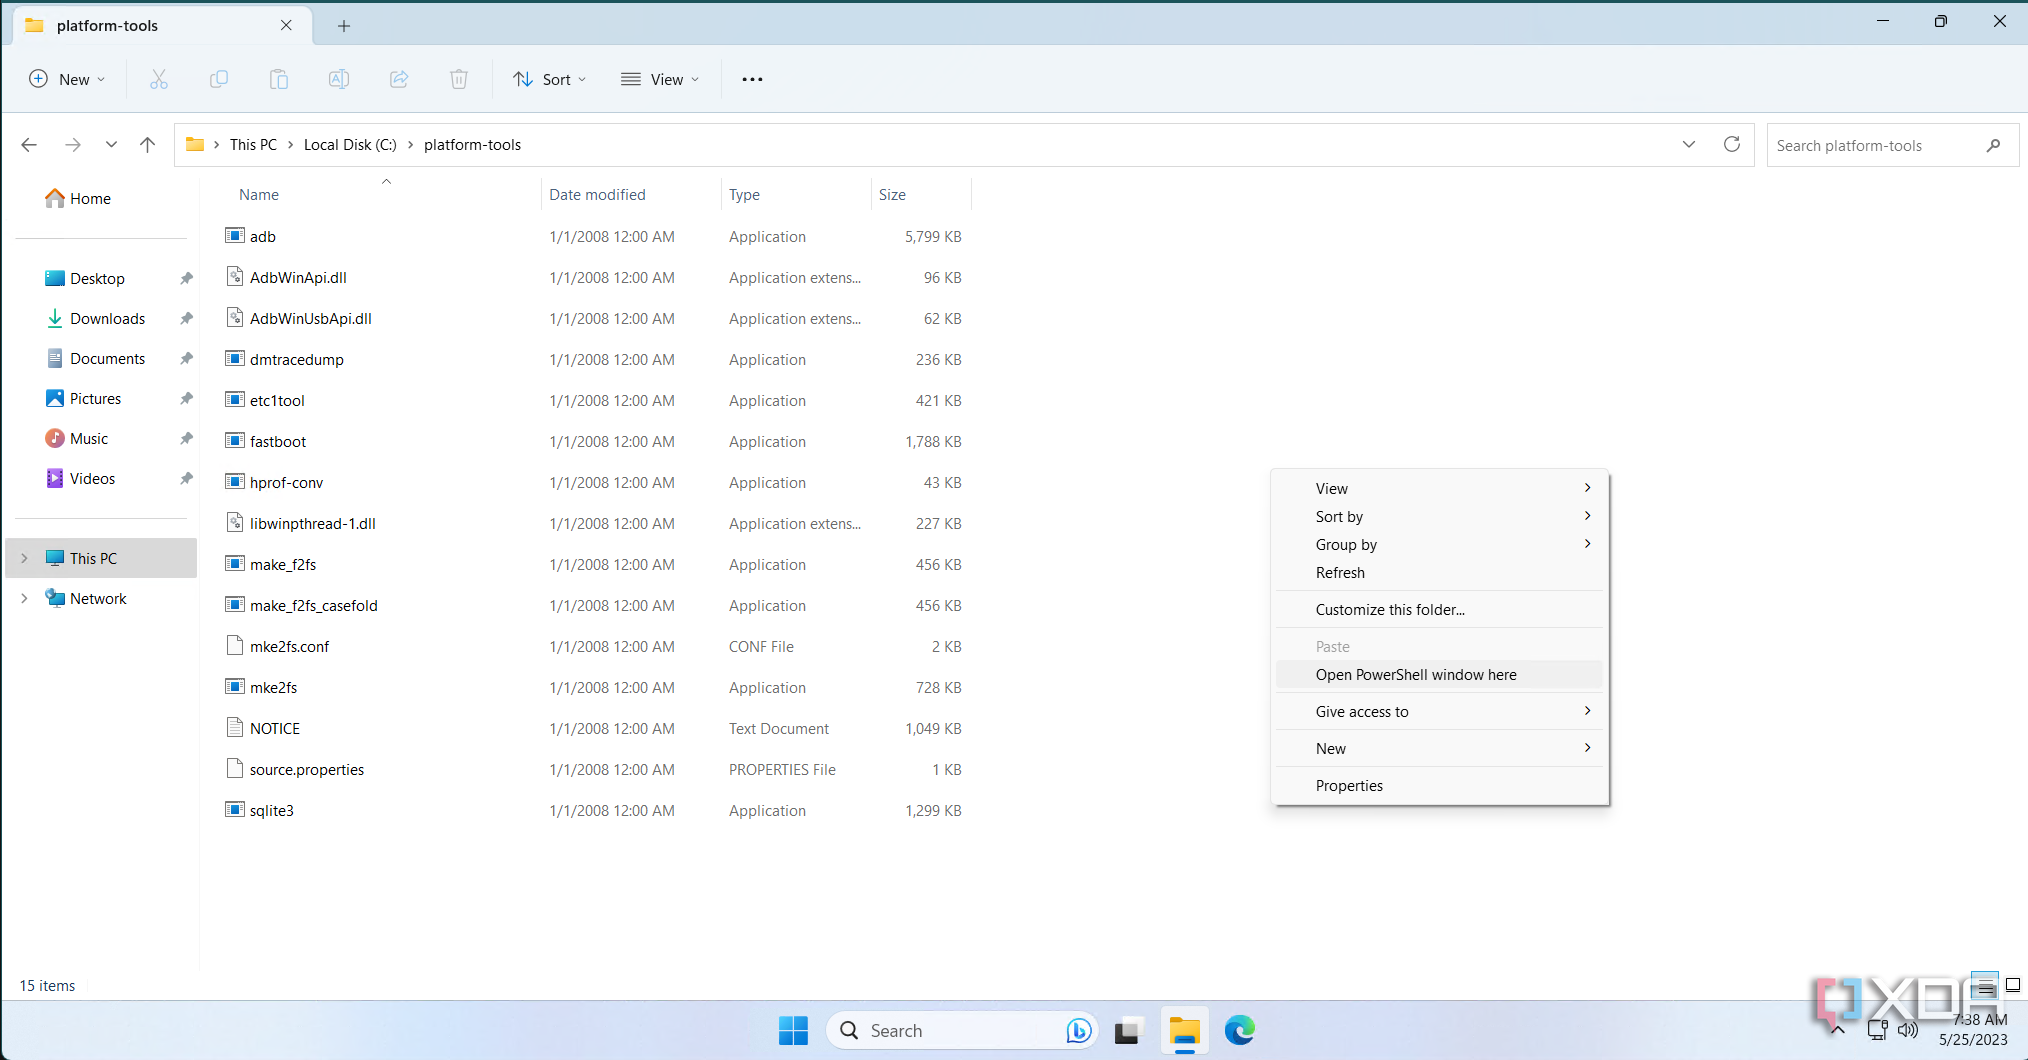
- Open up a Command Prompt/Terminal instance from the same directory as this ADB executable. This can be done by holding Shift and right-clicking within the folder and then clicking Open command window here or Open PowerShell window here. Windows 11 users should see Open in Terminal in the right-click context menu without even pressing the Shift button on the keyboard.

- Connect your smartphone or tablet to your computer with a USB cable. Change the USB mode to “file transfer (MTP)” mode. Some OEMs may or may not require this, but it’s best to just leave it in this mode for general compatibility.
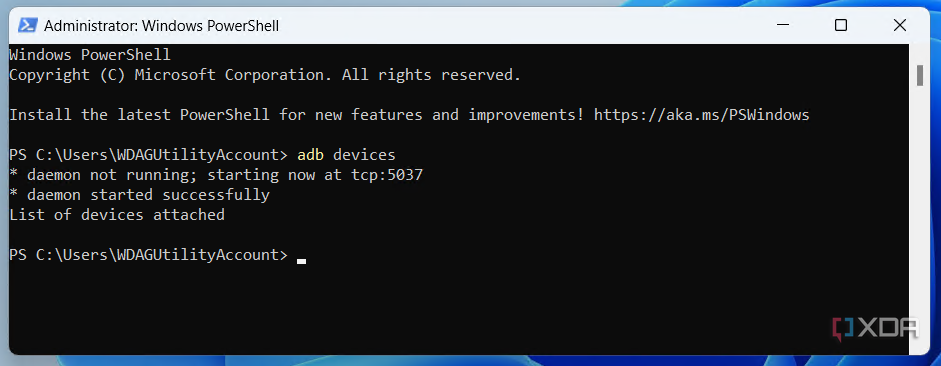
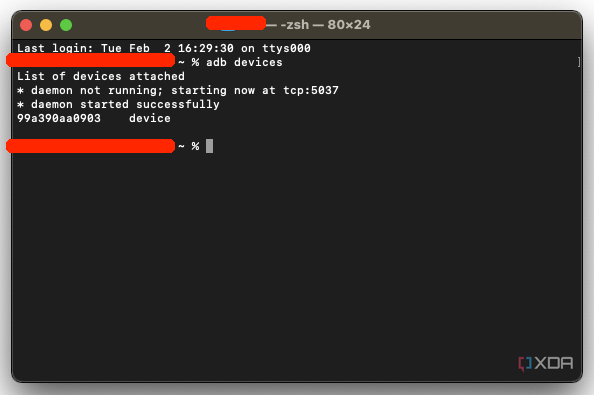
- In the Command Prompt/Terminal window, enter the following command to launch the ADB daemon:
adb devices - On your phone’s screen, you should see a prompt to allow or deny USB Debugging access. Naturally, you will want to grant USB Debugging access when prompted (and tap the always allow check box if you never want to see that prompt again).
- Finally, re-enter the command from step 6. If everything was successful, you should now see your device’s serial number in the command prompt/Terminal window.

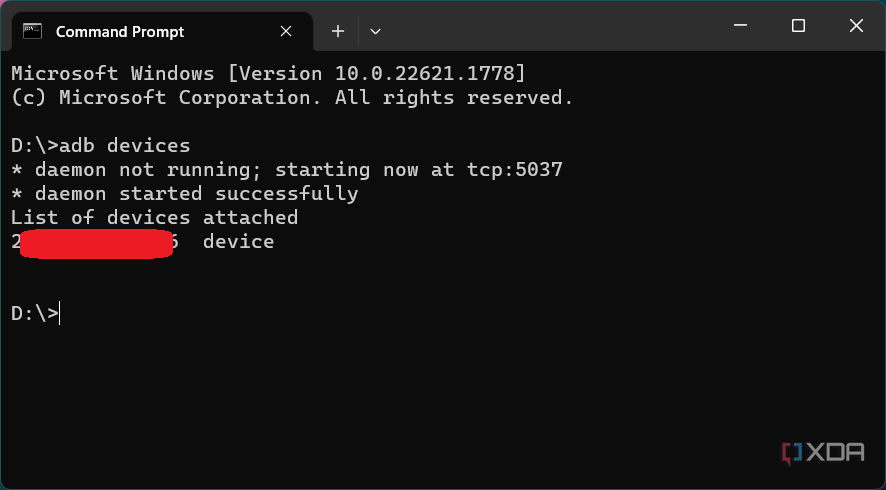
You can now run any ADB command on your device! Now, go forth and start modding your phone.
Notably, there exist a plethora of CLI package managers for Windows — WinGet, Scoop, and Chocolatey to name a few. In case you use them to install ADB on your PC, you don’t need to manually download and update Google’s Platform Tools. With that said, version compatibility and installation processes might vary across these package managers, so it would be better to consult the respective help manuals and product forums to get support.
How to set up ADB on macOS
- Download the Android SDK Platform Tools ZIP file for macOS.
- Extract the ZIP to an easily accessible location (like the Desktop, for example).
- Open Terminal.
- To browse to the folder you extracted ADB into, enter the following command:
cd /path/to/extracted/folder/For example, you can place the contents on your desktop:
cd /Users/XDA/Desktop/platform-tools/ - Connect your device to your Mac with a compatible USB cable. Change the USB connection mode to “file transfer (MTP)” mode. This is not always required for every device, but it’s best to just leave it in this mode, so you don’t run into any issues.
- Once the Terminal is in the same folder your ADB tools are in, you can execute the following command to launch the ADB daemon:
./adb devices - On your device, you’ll see an Allow USB debugging prompt. Allow the connection.
- Finally, re-enter the command from step 7. If everything was successful, you should now see your device’s serial number in macOS’s Terminal window.

Congratulations! You can now run any ADB command on your device!
While the guide above will certainly work, veteran macOS users can also opt to install ADB on their Macs using an unofficial package manager such as Homebrew or MacPorts. That way, you don’t have to manually update the binaries.
How to set up ADB on Linux
- Download the Android SDK Platform Tools ZIP file for Linux.
- Extract the ZIP to an easily accessible location (like the Desktop, for example).
- Open a Terminal window.
- Enter the following command:
cd /path/to/extracted/folder/ - This will change the directory to where you extracted the ADB files.
- Example:
cd /home/XDA/Desktop/platform-tools/
- Example:
- Connect your device to your Linux machine with your USB cable. Change the connection mode to file transfer (MTP) mode. This is not always necessary for every device, but it’s recommended, so you don’t run into any issues.
- Once the Terminal is in the same folder your ADB tools are in, you can execute the following command to launch the ADB daemon:
./adb devices - Back on your smartphone or tablet device, you’ll see a prompt asking you to allow USB debugging. Go ahead and grant it.
- Finally, re-enter the command from step 8. If everything was successful, you should now see your device’s serial number in the Terminal window output.

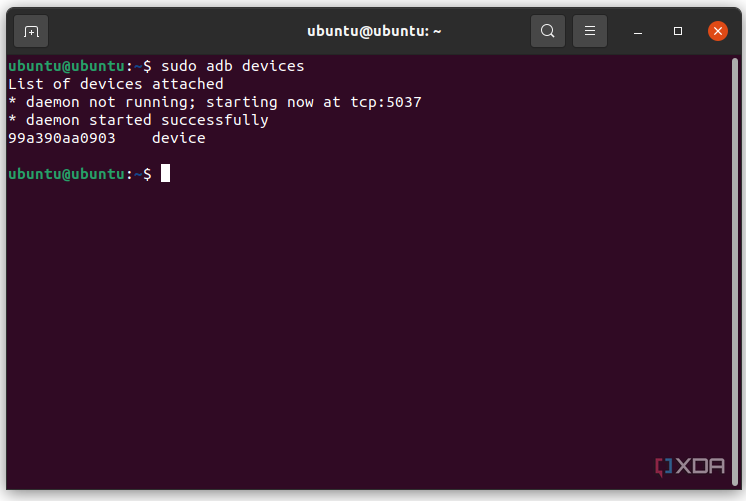
Congrats! You can now run any ADB command on your device!
Linux users should know that there is an easier way to install ADB on their computers. The guide above will certainly work for you, but those who own a mainstream Debian/Ubuntu or Fedora/SUSE-based distro of Linux can skip steps 1 and 2 of the guide above and use one of the following commands:
- Debian/Ubuntu-based Linux users can type the following command to install ADB:
sudo apt-get install android-sdk-platform-tools - Fedora/SUSE-based Linux users can type the following command to install ADB:
sudo dnf install android-tools
However, it is always better to opt for the latest binary from the Android SDK Platform Tools release since the distro-specific packages often contain outdated builds.
How to use ADB from any directory on your PC or Mac
Downloading the ADB executable is the initial step, but power users might want to access it from any folder or directory without navigating back to the original location. Fortunately, the process to do so is quite simple. All you need to do is modify the PATH variable of the host operating system.
The PATH is a powerful environmental variable used by operating systems to specify the location of important executables. For instance, you can type «calc» in the Run prompt of Windows to launch calculator, but not «chrome» to start Google Chrome — simply because the location of the latter isn’t included in the PATH variable.
The OS allows applications as well as end users to change the variable values. This is useful to people using programs/scripts that are dependent on such applications, as the program does not have to attempt to hard code the location. For this particular scenario, adding the ADB executable and other components from Google Platform Tools allows for better organization so that you don’t need to put all of your flashable files in the same folders.
Windows
- Right-click on the Start button (or use the Windows + X keyboard shortcut) and select the System option. You will be greeted with a screen showing some system information.
- Select Advanced system settings from the Related links section under Device specifications.
- Click on the Environment Variables button.
- Look for the variable named «Path» under System variables and double-click it.
- Click Browse and navigate to the folder where you extracted the ADB files (e.g. C:\platform-tools).
- Please ensure before you click Browse that no field is highlighted. If a field is highlighted, you will end up replacing it. Click somewhere in the list that doesn’t contain an entry to ensure that you do not replace a field.
- When you see the folder location is properly listed, click the OK button out of all the Windows you have opened to confirm.
- Sometimes, the graphical shell needs a restart to make the changes take effect. You can simply sign out and sign in again or reboot your PC to force Windows to use the updated PATH settings.
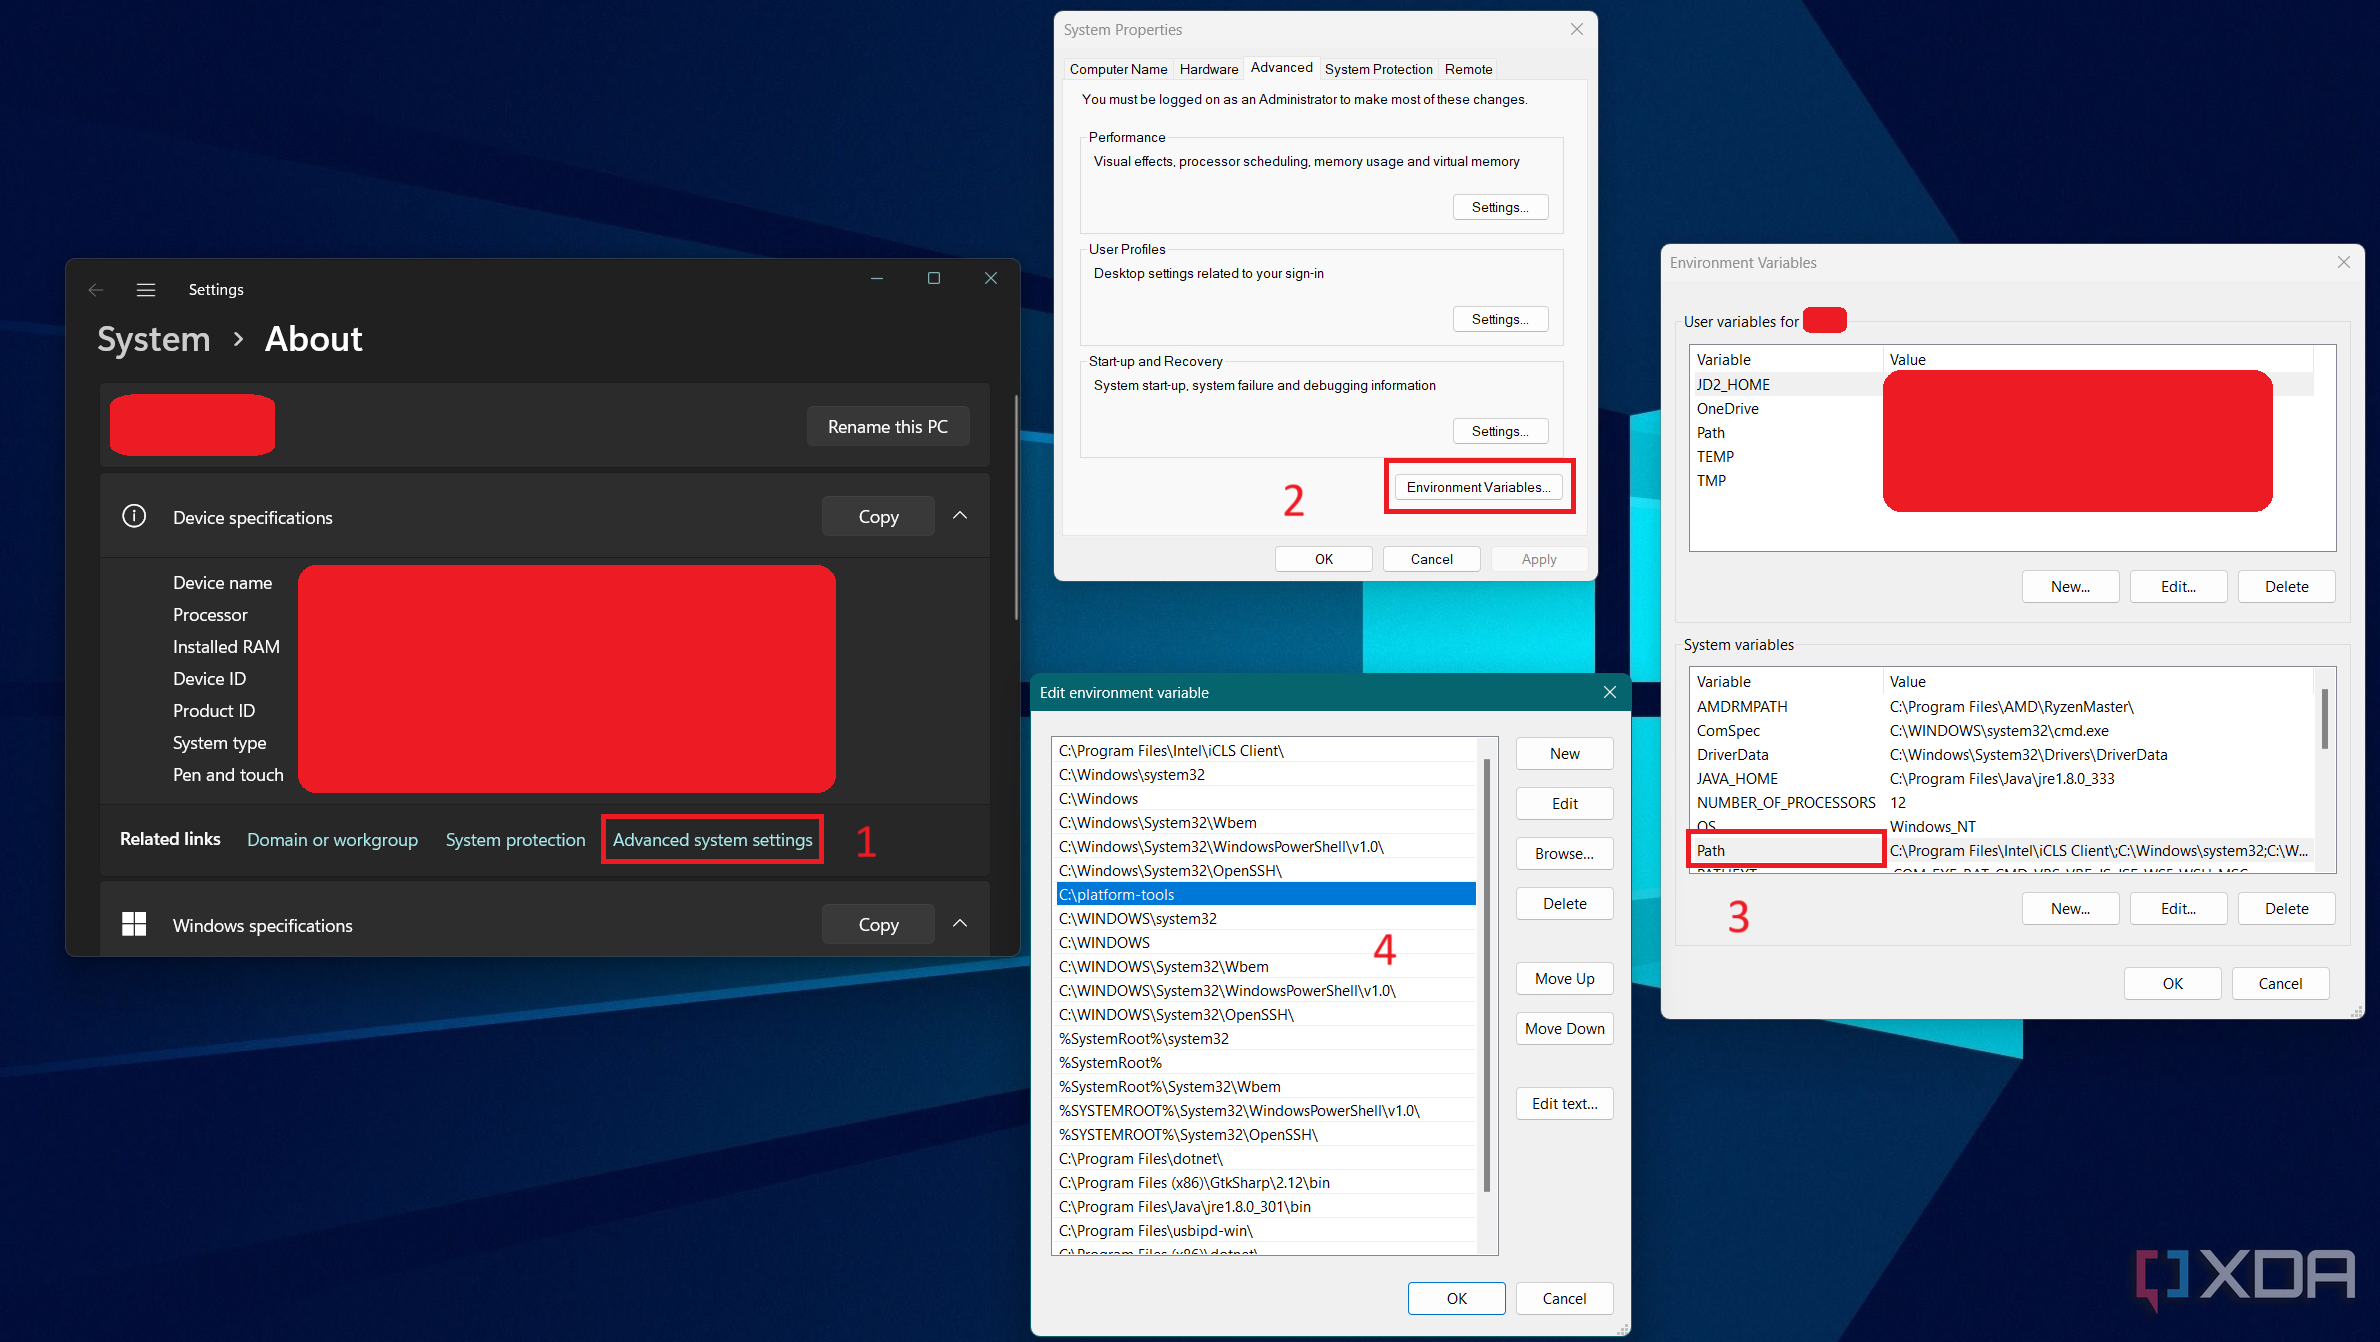
Now start a new terminal or command prompt instance and type adb to verify the location has been added.
In case you use a package manager like Chocolatey to install ADB, it should take care of the PATH variable editing portion as well. As a result, you can skip the above process.
macOS
- Note down the location where you extracted the ADB tools.
- Open the Terminal app and make sure to be in the Home directory:
cd ~
- In case you’re running any macOS version older than Catalina, the default shell should be Bash. For macOS Catalina and newer, the default changed to the Z shell (Zsh). Hence, you need to determine the current shell before changing the PATH variable. Type the following command and press Enter to see the shell your Mac is using:
echo $0
- Depending on the output, create a shell configuration file.
- For Bash:
touch .bash_profile
- For Zsh:
touch .zshrc
- People who are already using custom shell configurations can skip this step.
- For Bash:
- Open the shell configuration file with TextEdit:
- For Bash:
open -e .bash_profile
- For Zsh:
open -e .zshrc
- If you prefer to use nano/pico/vi or any other CLI text editor, you can instead.
- For Bash:
- Adjust the location according to the first step in the following command and add it to the shell configuration file you just opened:
export PATH=$PATH:/path/to/extracted/folder/
For example:
export PATH=$PATH:/Users/XDA/Desktop/platform-tools/
- Save the file and close the TextEdit app. Next, go back to the Terminal app and reload your shell settings.
- For Bash:
source .bash_profile
- For Zsh:
source .zshrc
- For Bash:
- You’re done. Optionally, verify the PATH variable assertions using the following command:
echo $PATH
To test if the process was successful, start a new Terminal instance and type adb.
Keep in mind that if the ADB installation process is performed using a package manager, then you don’t need to modify the PATH variable on your own.
Linux
- Note down the location where you extracted the ADB tools.
- Open the Terminal app and make sure to be in the Home directory:
cd ~
- Due to the fact that most common Linux distributions ship with Bash as their default shell, the next steps will be Bash-specific. You can, of course, consult the documentation of your preferred shell and modify the commands to suit your needs.
- Open the shell configuration file with a text editor:
sudo nano .bashrc
- You can also use other editors like vi or gedit.
- Add the following line to the end of the .bashrc file. Remember to adjust the location according to the first step beforehand.
export PATH=$PATH:/path/to/extracted/folder/
For example:
export PATH=$PATH:/home/xda/platform-tools/
- Be careful editing this file; do not add anything else or change anything else.
- Save the file. Next, go back to the Terminal app and reload your shell settings:
source ~/.bashrc
- Optionally, verify the PATH variable assertions using the following command:
echo $PATH
- And that’s how you can call ADB from anywhere under Linux.
To check, spawn a new Terminal window and type adb (without the quotes).
It is worth mentioning that you don’t need to perform these steps if you prefer to install (and update) ADB using the distro-specific packages.
Special case: How to set up ADB on Windows Subsystem for Linux and ChromeOS
Windows Subsystem for Linux (WSL) offers Windows users a seamless way to run Linux apps. However, the environment has yet to offer full-fledged USB hardware access. As a consequence, ADB under WSL can’t access your Android device, even if you install it using the aforementioned way. Nonetheless, there exists an official workaround, which utilizes the open-source usbipd-win project. To know more, take a look at our tutorial on how to set up USB passthrough in WSL.
For ChromeOS, you need to turn on the built-in Linux development environment first. By default, it offers you a Debian instance. You can then easily set up ADB using the Linux-oriented steps mentioned earlier.
Just to cover all of our bases here, users may need to put a ./ in front of the ADB commands we list in future tutorials, especially when they are using the extracted binaries directly from the Google-provided Platform Tools ZIP. This is something any *nix user (or Windows user running PowerShell/Terminal) will likely know, but again, we want as many people as possible to understand how to do these tweaks for Android no matter how much of your operating system you know.
Optional: How to set up ADB on your browser
The ADB protocol can be implemented using the WebUSB API in order to control Android phones directly from web browsers. Tango (formerly known as Yet Another WebADB) is one such project that allows users to perform most of the functionality provided by ADB right from the web browser without installing any binary. All you need is a web browser that supports the WebUSB API (such as Google Chrome, Microsoft Edge, Firefox, or Vivaldi) and you are good to go.
Optional: How to use ADB over Wi-Fi
Android 11 and higher editions natively support ADB connection over Wi-Fi. This eliminates the need to deal with common USB connection issues and additional steps, such as Android OEM driver installation on Windows.
In order to set up wireless debugging, do the following:
- Make sure that your PC/Mac and the phone are connected to the same wireless network.
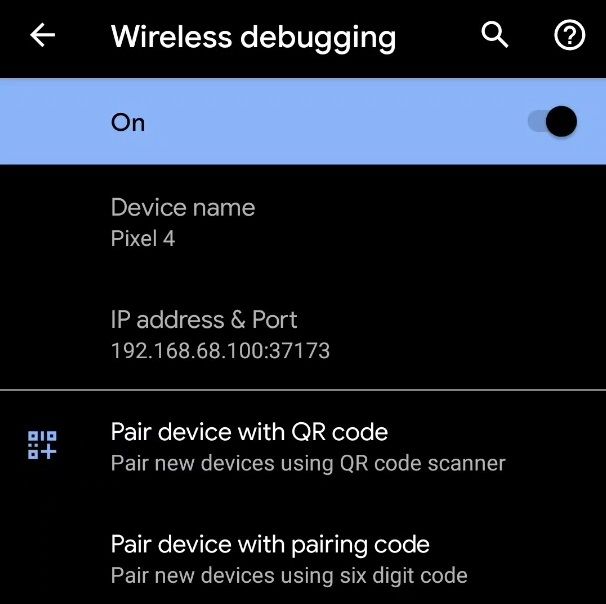
- On your phone, go to Developer options under Settings and enable Wireless debugging. On the Allow wireless debugging on this network? popup, select Allow.

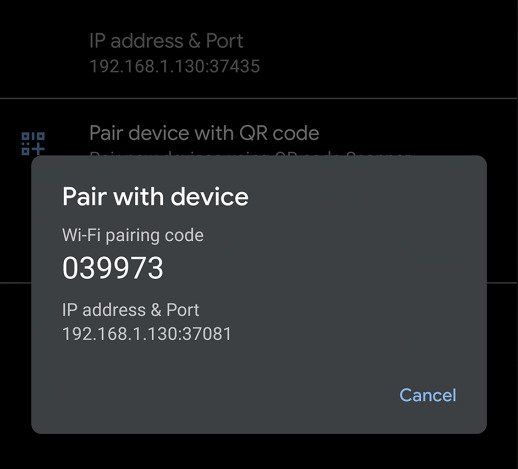
- Tap on the Wireless debugging option and select Pair device with pairing code.

- Take note of the pairing code, IP address, and port number displayed on the phone screen.

- On your PC/Mac, run the following command:
adb pair IP_Address:PortUse the IP address and port number from step 4.
- When prompted, enter the pairing code that you received in step 4. A message should indicate that your device has been successfully paired.
- Next, run the following command on the PC/Mac’s terminal window:
adb connect IP_Address:PortLook at the IP address & Port section under Wireless debugging in step 3 for the IP address and port.
- If everything goes right, then you should see a message like the following:
connected to 192.168.68.100:37173 - Now you’re ready to type whatever ADB shell command you want.
Examples of ADB commands
To check if you have successfully installed ADB, connect your device to your PC/Mac with your USB cable, and run the adb devices command as described above. It should display your device listed in the Command Prompt/PowerShell/Terminal window. If you get a different output, we recommend starting over with the steps.
As mentioned above, you can use ADB to do all sorts of things on an Android device. Some of these commands are built directly into the ADB binary and should work on all devices. You can also open up what is referred to as an ADB Shell that will let you run commands directly on the device. The commands which are run directly on the device can vary from device to device (since OEMs can remove access to certain ones, and also modify ADB behavior) and can vary from one version of Android to the next as well.
Below, you’ll find a list of example commands which you can do on your device:
- Print a list of connected devices:
adb devices - Kill the ADB server:
adb kill-server - Install an application:
adb install <path_to_the_APK_file> - Set up port forwarding:
adb forward tcp:6100 tcp:7100 - Copy a file/directory from the device:
adb pull <path_to_the_remote_object> <path_to_the_local_destination> - Copy a file/directory to the device:
adb push <path_to_the_local_object> <path_to_the_remote_destination> - Initiate an ADB shell:
adb shell
What else can I do with ADB?
Below is a list of XDA tutorials for various devices that detail many applications of ADB commands in order to modify hidden settings, customize OEM features or user interfaces, and much more!
- How to boot into recovery mode using button combos, ADB, and root apps
- How to uninstall carrier/OEM bloatware without root access
- How to debloat your phone (and more) without connecting to a PC
- How to sideload apps on Android TV: APK Install and ADB Sideload methods explained in easy-to-follow steps!
- Control your Android Smartphone from your PC for free with scrcpy
This is just the tip of the iceberg. Don’t forget to check out our ADB commands for every power user tutorial to know more useful tips and tricks for using ADB!
Android is the most feature-rich platform. It has all the options you’ll ever need to control and configure the device however you want. However, some advanced settings are buried deep down. To access them you have to install ADB shell and use it. Today, I will show you how to install ADB on Windows 10.
What is ADB
Android Debug Bridge or more widely knows as ADB shell is a command line tool that helps developers access advanced settings and debug Android apps and system settings. Besides from debugging, you can use ADB shell to back up the android device, install apps on your SD card by default, disable specific features of an app, transfer files, etc. In fact, you can even use ADB to make system level changes.
Generally, ADB is bundled with Android SDK (Software Development Kit). So, if you’ve installed Android SDK then you already have access to the ADB shell on Windows 10 with several other essential tools like Fastboot. However, if you are not a developer and don’t want to install the complete Android SDK package for just one tool that is only used occasionally then you can install ADB on Windows separately. i.e, without installing Android SDK.
Related: How to Run Android Apps on Ubuntu [Natively]
Enable USB Debugging Mode
Before installing ADB on Windows 10, you need to configure your Android device to accept the ADB commands. To do that, you have to enable USB debugging mode. Thankfully, it is very easy to do. Just follow the below instructions.
- Launch apps menu and tap on the “Settings” icon.
- Here, scroll down and tap on the option “About“.
- Now, scroll down again and repeatedly tap on the option “Build number” 7 times.
- Go back to the main Settings screen, scroll down and tap on the new option “Developer Options“.
- Here, toggle the button next to USB Debugging option. Tap on the option “Ok” in the confirmation pop-up to enable USB debugging mode.
That’s it, you’ve configured the Android device to receive ADB shell commands. You can now install ADB on Windows 10.
Related: 10 Best Secret Texting Apps for Android (Private Texting Apps for Android)
Note: the same procedure is applicable for older versions of Windows like 7 and 8.
1. To start off, download ADB for Windows from the official Google website.
2. Create a new folder with the name “ADB” in the root of the C drive. Now, extract all the files in the downloaded ZIP file to the folder you just created. This is how it looks like when you are done extracting.

3. Grab a USB data cable and connect your android device to the Windows computer. If prompted, select “file transfer (MTP)” mode.
4. Now, search for “Command Prompt” in the start menu and open it.

5. In the command prompt, use the below command to navigate the ADB installation folder. If you’ve installed ADB folder in some other place then change the command accordingly.
cd c:\ADB

6. Once you are here, execute the following command ADB Daemon.
adb devices
7. As soon as you execute the command, you will see “Allow USB debugging” prompt on your android device screen. Tap on the “Ok” button. Now, your device will be listed in the command prompt.

If you see your device listed then you’ve successfully installed ADB on Windows 10. If not, make sure that the device is properly connected and you have installed android drives on Windows. Generally, you can download android drivers specific to your device on the manufacturer website.
Related: How to Use Multiple Facebook Accounts on Android
Optional: Access ADB from Any Folder
As you can see, with the above method, you have to first navigate to the ADB installation folder if you want to use the ADB shell. This is not so much a problem but an inconvenience. To deal with that, you can add ADB to Windows Path. This allows you to access ADB from any folder or directory.
1. To add ADB to Windows path, search for “View advanced system settings” in the start menu and open it.

2. In this window, click on the button “Environment Variables“.

3. Here select the Path variable under “User variables for Username” and click on the button “Edit“.
Related: How To Disable Auto Media Download Feature In WhatsApp [Android]

4. Now, click on the “New” button.

5. Enter the path to the ADB folder and click on the button “Ok” to save the changes. In my case, the folder path is C:\ADB.

6. Click on the “Ok” on other main windows to save the changes.
From this point forward, you can access ABD from any folder. As you can see from the below image, I’m starting the ADB daemon from a folder in my E drive.

That’s all there is to do and it is that simple to install ADB on Windows 10 and add ADB to Windows path. If you find this article useful then do read how to disable volume buttons in android and how to hide audiobooks from music players in android.
Comment below sharing your thoughts and experiences about using the above method to install ADB on Windows.
Related: How to Download Android Apps to PC without Installing Any Software [Quick Tip]
 ADB – программа для сопряжения с мобильными устройствами под управлением ОС Android. Работает в ручном и автоматическом режиме, обладает множеством функций. Чтобы загрузить инсталляционный файл на компьютер, необходимо воспользоваться ссылкой.
Установка драйверов на мобильные устройства
Если необходимые драйверы потеряны, повреждены или устарели, данный установщик программного обеспечения поможет решить проблему. ADB легко использовать с мобильными устройствами и современными компьютерами. То есть пользователю не придется инсталлировать две отдельные программы.
Использование ручного или автоматического режима
После инсталляции, программа предложит найти и установить драйвера для мобильных устройств. Пользователь может выбрать автоматический режим, когда будет установлено базовое ПО или ручной, с применением необходимых параметров.
Работа с мобильными устройствами
С помощью утилиты можно получить root права, выполнить перепрошивку операционной системы, а также восстановить функционирование мобильного устройства в случае сбоев в программном обеспечении и другие манипуляции посредством сопряжения между компьютером и ADB. Для работы с программой лучше использовать командную строку.
