@beerisgood
Like #206, this domain has been detected on a healthy system with Windows Stores disabled.
During January 2020, this endpoint has been called 681 times (detected 622 through wireshark/qemu, 30 through sysmon and 29 through proxifier) so I don’t think this is a legitimate/user input call.
If this impinges on the use of Windows Stores, I suggest you whitelist it in your DNS configuration.
- Remove From My Forums
-
Question
-
Hi all,
I’ve a quite question to ask to this community, Due to our company was found some issues on the Firewall Appliance’s Logs about this URL «enterprise.activity.windows.com» was consumed high network traffics (Uploads / Downloads)
So I would like to ask with these below questions.
Some clients that take an effect : Windows 10 (10.0.17763.529)
1. What is the objectives of the URL, And why some clients are consume high network traffics (Uploads / Downloads)? Please give me some advice.
2. Can we block this URL on the Firewall Appliance? And if we’ve blocked this URL, The client side might take an effects or not, Please give me some advice.
3. How to stop the issue on the client side?
Thank you very much for your useful information.
Pairat Rungrassamee
![]()

![]()
One of the most precious things, nowadays, is data and one of the most controversial questions is “Is my data safe?”. Privacy is a major concern and almost all companies, be it Apple, Google, Microsoft, etc are guilty of data collection. We have already seen how you can change Windows Privacy settings – that should suffice for most but if you are looking for more ways to stop Microsoft from tracking you on your Windows 11/10 PC, then this post will help you.
According to Microsoft, your data is collected in order to personalize your experience and if you don’t want to do that, you can disable certain settings from the Settings app to stop Microsoft from tracking you. You may or may not want to disable all of them, as some of them are useful for you. These are the things we are going to do to stop Microsoft from tracking you.
- Disable Personalize ads
- Disable Diagnostic & Feedback
- Disable Activity History
- Disable Location Tracking
- Disable Microphone and Camera
- Stop Contributing your Voice Clip
Let us talk about them in detail.
1] Disable Personalize ads
The first and foremost thing you need to do to stop Microsoft from tracking you is disabling Personalize ads. You can do this by launching the Settings app in Windows 11 and Windows 10 computers and disabling the required toggles.
Windows 11
Windows 11 users can disable the personalized ads by following the steps below:

- Launch the Settings app by pressing Win + I shortcut key.
- In the Settings app, click Privacy & Security option on the left side.
- Now, click the General tab on the right side.
- Turn off the required toggle button to disable the personalized ads.
If you want more privacy, you can turn off all the toggles under the General settings.
Windows 10
Launch Windows 10 Settings app and go to “Privacy > General.” Now, disable the required toggles.
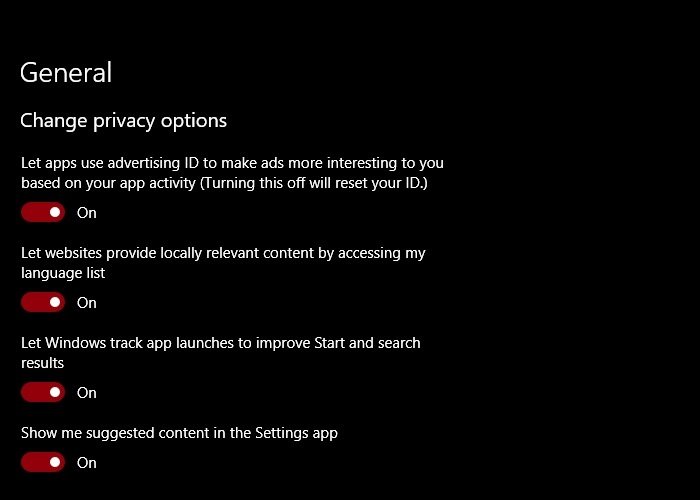
You can disable all the toggles if you want, but if you just want to disable Personalize ads, disable the toggle of “Let apps use advertising ID to make ads more interesting to you based on your app activity (Turning this off will reset your ID).
This will not disable ads but the ads won’t be based on your data. So, your privacy will be secured.
Read: How to disable App Launch Tracking in Windows
2] Disable Diagnostic & Feedback
Microsoft tends to take your data in order to make the components of Windows better. Windows 11 operating system lets users select whether they want to send their optional diagnostic data to Microsoft or not. This option is available in the Settings app. But if we talk about Windows 10 OS, no such option is available. Hence, Windows 10 users cannot disable this feature completely. However, they can improve their privacy by changing the Diagnostic & Feedback settings.
Windows 11
The following steps will guide you on how to turn off Send Optional Diagnostic data to Microsoft in Windows 11:

- Launch the Settings app.
- Select the Privacy & Security on the left pane.
- Click on the Diagnostic & feedback tab on the right side. You might have to scroll down to find it.
- Now, turn off the button next to Send optional diagnostic data.

You can also View the Diagnostic data and delete it if you want.
Windows 10
Open Windows 10 Settings and click Privacy > Diagnostics & feedback.
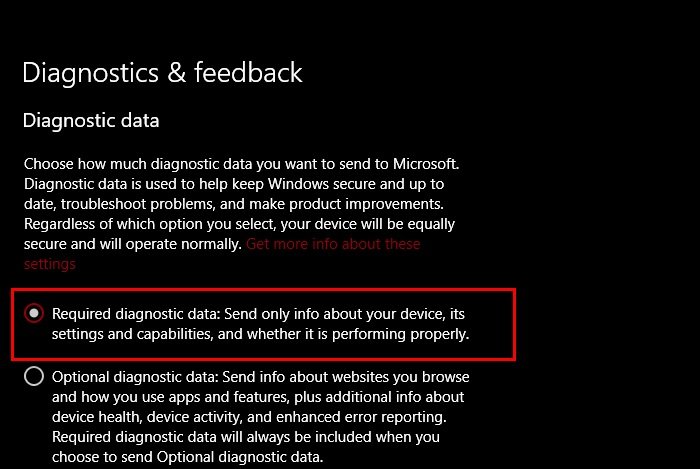
Now, to know more about this policy, click “Get more info about these settings” from the Diagnostic data section.
Select “Required diagnostic data” to only give Microsoft, the information about your device and its settings, which won’t completely stop Microsoft from spying on you but it is the best we can do.
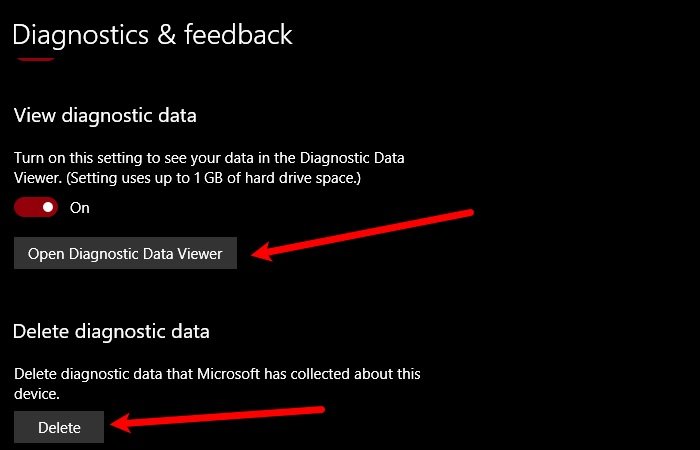
You can even check diagnostic data, to know what information of yours Microsoft has.
To do that, just click Open Diagnostic Data Viewer from “View diagnostic data” or wipe it entirely by clicking on the Delete icon from the “Delete diagnostic data” section.
3] Disable Activity History
Another feature that can be a bit of a concern if you want to ensure privacy is Activity History. “Activity History” is used by Microsoft to help you to jump back into what you were doing if you log in to some other device.
Windows 11

Unfortunately, there is no such option available in Windows 11 to stop sending the activity history to Microsoft. You can only clear your activity history and turn off the feature to store your activity history on your device. For this, you have to deselect the checkbox that says Store my activity history on this device.
Windows 10
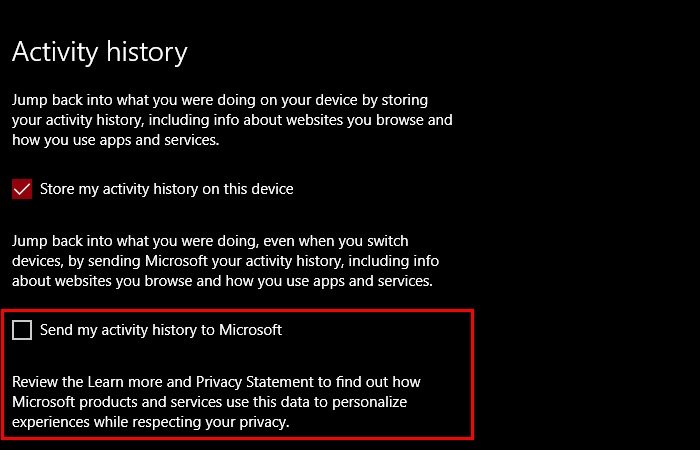
Windows 10 users can stop Microsoft from tracking themselves. If you are a Windows 10 user, you can do this by unticking the “Send my activity history to Microsoft” option from Settings > Privacy >Activity History.
4] Disable Location Tracking
Some apps installed on Windows operating system require your location to deliver you the best services. This can be fine for some users, whereas, for some, it is a privacy concern. That’s why Microsoft provided a feature to disable location tracking in both Windows 11 and Windows 10 operating systems. Disabling the location can help you go completely anonymous.
Windows 11

To turn off your location in Windows 11, open the Settings app and go to “Privacy & security > Location” and turn off the Location Services.
Windows 10
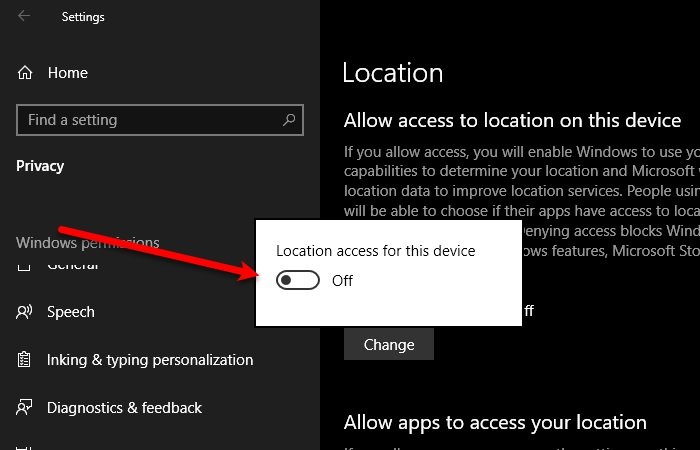
The easiest way to disable Location is by Action Center, just click on the Notification icon from the Taskbar and disable Location. If you are not seeing the option there, launch Settings, click Privacy > Location > Change, and use the toggle to disable it.
5] Disable Microphone and Camera
Many companies are found doing shady stuff by accessing the Camera and Microphones of a user without their consent. Therefore, you should always keep your Camera and Microphone and disabled and only enable them when needed.
Windows 11

In Windows 11, the option to disable both Camera and Microphone is available in the Privacy and Security settings under the App permissions section.
Windows 10
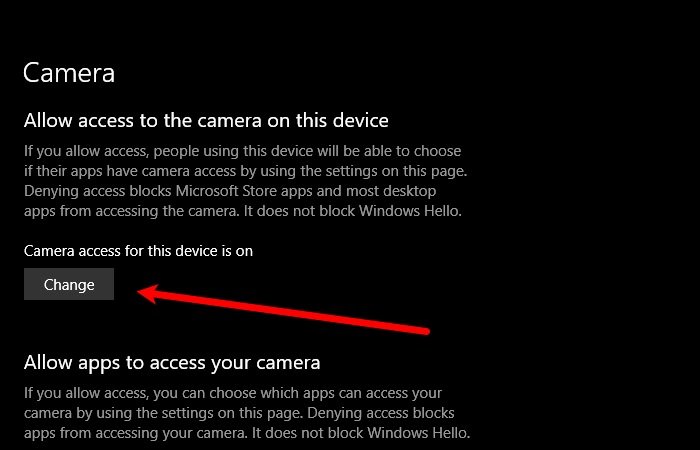
To disable Camera, open Settings, click Privacy > Camera > Change, and use the toggle to disable it.
To disable Microphone, open Settings, click Privacy > Microphone > Change and use the toggle to disable it.
Read: Free tools to tweak Windows 10 Privacy settings.
6] Stop Contributing your Voice Clip
Microsoft tends to take your Voice Clip in order to improve its Voice Assistant. This is not shady as Microsoft clearly mentions that it is doing this. However, if you don’t use Microsoft’s Voice Assistant Cortana or just don’t want to give your Voice Clip, disable this option.
Windows 11

If you are a Windows 11 user, go to “Settings > Privacy & Security > Speech.” You will find the Speech option under the Windows permissions section.
Windows 10

To disable this feature in Windows 10, launch Settings and click Privacy > Speech > Stop contributing my voice clip.
How do I track my laptop if it is stolen?
You will only be able to track your stolen laptop if you have turned on its location in Settings. There is a feature in Windows 11/10, named Find my Device. To track your device location, you have to log into the same Microsoft account that you have used to sign in to your Windows laptop.
How do I stop Microsoft from spying on my Windows 11/10?
You can harden the privacy settings of your Windows 11/10 computer. We have listed in this article, which Privacy settings you need to change if you want to stop Microsoft from tracking you.
Hopefully, we have helped you to stop Microsoft from tracking you.
Read Next: How to opt-out of Data Tracking & Targeted ads on the Internet.
Простой способ, который потребует лишь скачать и запустить один файл.

Недавно выяснилось, что Microsoft сохраняет данные о ваших действиях в Windows 10, даже если у вас отключена функция записи активности.
Вы можете проверить это сами: зайдите в параметры системы, откройте раздел «Конфиденциальность» и во вкладке «Журнал действий» уберите все галочки. Подождите несколько дней, а затем зайдите в информационную панель конфиденциальности. Вы увидите, что данные о некоторых приложениях, файлах и просмотрах сайтов до сих пор отображаются.
Можно постоянно удалять эти данные вручную, но есть и более простой способ, которым поделился пользователь TenForums Шон Бринк.
Как полностью отключить отслеживание активности в Windows 10
- Скачайте файл реестра Disable_Activity_history.reg и сохраните его куда угодно.
- Откройте его и нажмите «Запустить», а затем — «Да» и ещё раз «Да». После этого щёлкните «ОК».
- Когда изменения будут внесены в реестр, подтвердите их, выйди из системы и снова войдя в неё. Можно воспользоваться сочетанием Win+X, нажать «Завершение работы или выход из системы», а затем выбрать «Выход».
Когда вы снова войдёте в систему, отслеживание активности перестанет работать. Если по какой-то причине вы захотите снова его включить, скачайте файл Enable_Activity_history.reg и повторите перечисленные выше действия.