Время на прочтение
6 мин
Количество просмотров 230K
Этот вариант может быть полезен для небольших организаций с компьютерами под управлением Windows.
Нет необходимости приобретать недешевую Windows Server для организации AD и CAL лицензии для доступа к контроллеру домена.
В конечном итоге имеем плюшки AD: групповые политики, разграничение прав доступа к ресурсам и т.д.
Я попытался написать подробный алгоритм действий необходимых для организации Active Directory (AD) Domain Controller (DC) на базе Ubuntu Server.
Рассмотрим настройку контроллера домена на примере Ubuntu Server 12.04.4 LTS или Ubuntu Server 13.10, инструкция подходит для обоих вариантов без дополнительных изменений
1. Установка Ubuntu
Думаю установка Ubuntu-server не вызовет проблем даже у большинства пользователей компьютеров.
Желательно при установке ОС сразу правильно указать название машины в сети (hostname) с указанием домена (для примера использую dc1.domain.local), чтобы в дальнейшем меньше надо было править конфигурацию в файлах.
Если в сети не присутствует DHCP-сервер, установщик предложит ввести IP-адрес, маску сети, шлюз и DNS.
Во время установки, также желательно установить OpenSSH server, чтобы иметь удаленный доступ к серверу, а также правильно указать часовой пояс, в котором находится машина.
2. Настройка параметров сетевого адаптера
Настройки сети хранятся в файле /etc/network/interfaces
Редактируем его на свой вкус. В качестве редактора можно использовать nano, vi и т.п.
Для редактирования файлов понадобятся root права, их можно получить например командой
sudo su
после этого, Вы будете работать из под пользователя root.
О том что Вы работаете с правами root пользователя свидетельствует знак # в приглашении командной строки
Либо Вы можете перед каждой командой, которая требует root доступа, приписывать sudo
sudo nano /etc/network/interfaces
В конфигурации Вашего сетевого интерфейса, скорее всего, будет
iface eth0 inet dhcp
поменяем настройки на использование статичного ip-адреса.
В моем случае они выглядят вот так:
auto lo
iface lo inet loopbackauto eth0
iface eth0 inet static
address 192.168.10.1
netmask 255.255.255.0
gateway 192.168.10.10
dns-nameservers 192.168.10.10
dns-search domain.local domain
После изменения сетевых настроек необходимо перезапустить сетевой сервис
/etc/init.d/networking restart
3. Установка необходимых пакетов
Если Вы все же не установили OpenSSH server на первом этапе, это можно сделать командой
apt-get install ssh
Перед установкой чего либо, лучше сначала обновить систему и пакеты командой
apt-get update && apt-get upgrade
Для того, чтобы компьютеры сети сверяли время по нашему серверу установим ntp-сервер
apt-get install ntp
Samba4 будем использовать последней версии и собирать из исходников, так что нам понадобятся пакеты для её сборки и корректной работы.
apt-get install git checkinstall build-essential libacl1-dev libattr1-dev libblkid-dev libgnutls-dev libreadline-dev python-dev python-dnspython gdb pkg-config libpopt-dev libldap2-dev dnsutils libbsd-dev attr docbook-xsl libcups2-dev acl
4. Сборка Samba4
Для корректной работы Samba потребуется поддержка vfs на уровне файловой системы, для этого внесем изменения в /etc/fstab, необходимо добавить user_xattr,acl,barrier=1 в настройки корневого раздела /
nano /etc/fstab
должна получится строка, что-то вроде этой:
/dev/mapper/dc1—vg-root / ext4 user_xattr,acl,barrier=1,errors=remount-ro 0 1
после чего необходимо перезагрузить компьютер
reboot
Не забываем про root права
sudo suСкачиваем последнюю стабильную версию Samba из GIT репозитария
cd /usr/src
git clone -b v4-1-stable git://git.samba.org/samba.git samba-v4-1-stable
конфигурируем, компилируем и устанавливаем Samba
cd samba-v4-1-stable && ./configure --enable-debug && make && checkinstall
Параметр —enable-debug необходим для отображения более подробной информации в логах Samba.
После того, как соберется и установится Samba (это долгое занятие), для удобства её использования, необходимо прописать пути до исполняемых файлов /usr/local/samba/sbin и /usr/local/samba/bin в файлах /etc/sudoers переменная secure_path и /etc/environment переменная PATH, добавив строку :/usr/local/samba/sbin:/usr/local/samba/bin
nano /etc/sudoers
должна получится строчка что-то вроде этой:
Defaults secure_path=»/usr/local/sbin:/usr/local/bin:/usr/sbin:/usr/bin:/sbin:/bin:/usr/local/samba/sbin:/usr/local/samba/bin«
nano /etc/environment
должна получится строчка что-то вроде этой:
PATH=»/usr/local/sbin:/usr/local/bin:/usr/sbin:/usr/bin:/sbin:/bin:/usr/games:/usr/local/samba/sbin:/usr/local/samba/bin«
перезагрузимся еще раз (на всякий случай)
reboot
5. Поднимаем AD
В качестве DNS сервера AD будем использовать Samba, поэтому отключаем bind командой
service bind9 stop && update-rc.d bind9 disable
Для манипуляций с AD в Samba существует инструмент samba-tool.
Для первоначальной настройки Samba вводим команду
samba-tool domain provision
Если на первом этапе Вы правильно указали имя компьютера, все настройки, которые запросит программа, можно оставить поумолчанию.
Во время настройки будет запрошен пароль пользователя Administrator для AD, он должен соответствовать требованиям сложности пароля поумолчанию: хотябы одна буква верхнего регистра, хотябы одна цифра, минимум 8 символов.
Если же пароль не подошел по сложности и Вы увидели ошибку вроде этой:
ERROR(ldb): uncaught exception — 0000052D: Constraint violation — check_password_restrictions: the password is too short. It should be equal or longer than 7 characters!
то перед повторным выполнением первоначальной настройки, необходимо удалить содержимое каталогов /usr/local/samba/private/ и /usr/local/samba/etc/
Если необходимо изменить сложность паролей это можно сделать командой
samba-tool domain passwordsettings set --min-pwd-length=6 --complexity=off --max-pwd-age=0 --min-pwd-age=0
эта команда отключает требование сложности, отключает сроки действия паролей, устанавливает минимальную длину пароля 6 символов
Далее необходимо подправить настройки Samba и добавить туда следующие строки в секцию [global]
nano /usr/local/samba/etc/smb.conf
allow dns updates = nonsecure and secure
printing = bsd
printcap name = /dev/null
Это позволит динамически обновлять DNS-записи на сервере, при входе рабочей станции (под управлением windows) в домен и отключит поддержку печати, которая постоянно выдает ошибки в лог.
В файле /etc/resolvconf/resolv.conf.d/head необходимо указать наш DNS-сервер Samba 127.0.0.1
echo "nameserver 127.0.0.1" >> /etc/resolvconf/resolv.conf.d/head
и перезапустить сервис resolvconf
service resolvconf restart
Также установим Kerberos клиент
apt-get install krb5-userи настроим на AD с помощью файла созданного на этапе samba-tool domain provision
mv /etc/krb5.conf /etc/krb5.conf.old
cp /usr/local/samba/private/krb5.conf /etc/krb5.conf
Для автоматического запуска сервиса Samba необходим скрипт:
nano /etc/init.d/samba4
/etc/init.d/samba4
#! /bin/sh
### BEGIN INIT INFO
# Provides: samba4
# Required-Start: $network $local_fs $remote_fs
# Required-Stop: $network $local_fs $remote_fs
# Default-Start: 2 3 4 5
# Default-Stop: 0 1 6
# Short-Description: start Samba daemons
### END INIT INFO
#
# Start/stops the Samba daemon (samba).
# Adapted from the Samba 3 packages.
#
PIDDIR=/var/run/samba
SAMBAPID=$PIDDIR/samba.pid

# clear conflicting settings from the environment
unset TMPDIR
# See if the daemon and the config file are there
test -x /usr/local/samba/sbin/samba -a -r /usr/local/samba/etc/smb.conf || exit 0

. /lib/lsb/init-functions

case "$1" in
start)
log_daemon_msg "Starting Samba 4 daemon" "samba"
# Make sure we have our PIDDIR, even if it’s on a tmpfs
install -o root -g root -m 755 -d $PIDDIR
if ! start-stop-daemon --start --quiet --oknodo --exec /usr/local/samba/sbin/samba -- -D; then
log_end_msg 1
exit 1
fi

log_end_msg 0
;;
stop)
log_daemon_msg "Stopping Samba 4 daemon" "samba"

start-stop-daemon --stop --quiet --name samba $SAMBAPID
# Wait a little and remove stale PID file
sleep 1
if [ -f $SAMBAPID ] && ! ps h `cat $SAMBAPID` > /dev/null
then
# Stale PID file (samba was succesfully stopped),
# remove it (should be removed by samba itself IMHO.)
rm -f $SAMBAPID
fi

log_end_msg 0
;;
restart|force-reload)
$0 stop
sleep 1
$0 start
;;
*)
echo "Usage: /etc/init.d/samba4 {start|stop|restart|force-reload}"
exit 1
;;
esac

exit 0
его необходимо сделать исполняемым
chmod 755 /etc/init.d/samba4
и создать настройки поумолчанию
update-rc.d samba4 defaults
Перезагружаем компьютер
reboot
6. Проверяем работоспособность сервера
У нас должна быть запущена samba после перезагрузки
ps aux | grep samba
root 865 0.3 3.0 95408 31748? Ss 18:59 0:00 /usr/local/samba/sbin/samba -D
Должен работать DNS сервер
nslookup dc1
Server: 127.0.0.1
Address: 127.0.0.1#53Name: dc1.domain.local
Address: 192.168.10.1
Должны быть доступны сетевые ресурсы AD
smbclient -L localhost -U%
Domain=[DOMAIN] OS=[Unix] Server=[Samba 4.1.6]
Sharename Type Comment
— — — netlogon Disk
sysvol Disk
IPC$ IPC IPC Service (Samba 4.1.6)
Domain=[DOMAIN] OS=[Unix] Server=[Samba 4.1.6]
Server Comment
— — Workgroup Master
— ——-
Должен подключаться Kerberos
kinit administrator
Warning: Your password will expire in 41 days on Wed Apr 23 18:49:14 2014
Должен храниться Ticket kerberos’a
klist
Valid starting Expires Service principal
12/03/2014 19:17 13/03/2014 05:17 krbtgt/DOMAIN.LOCAL@DOMAIN.LOCAL
Должна проходить аутентификация netlogon
smbclient //localhost/netlogon -UAdministrator -c 'ls'
Domain=[DOMAIN] OS=[Unix] Server=[Samba 4.1.6]
. D 0 Wed Mar 12 18:46:48 2014
… D 0 Wed Mar 12 18:49:15 2014
Вот и всё.
Можно вводить в домен клиентов, заводить пользователей.
Управлять AD можно:
частично при помощи samba-tool на Ubuntu
при помощи Administration Tools Pack на Windows XP
при помощи Remote Server Administration Tools (RSAT) на Windows 7 и выше
Этот пост можно считать неким переводом официального wiki Samba, который находится по адресу:
wiki.samba.org/index.php/Samba_AD_DC_HOWTO, с моими дополнениями.
P.S. Если кому-то будет интересно могу еще написать «мануал» про включение резервного контроллера на Ubuntu в домен.
The Linux operating system has come a long way since 1991 when it was first introduced by Linux Torvalds as a free operating system. Today, some form of Linux is used in everything from high-end servers and virtual machines to IoT devices and embedded devices. More often than not, common database platforms such as Oracle, PostgreSQL, MySQL, and MongoDB are deployed on servers running Linux.
One notable exception was Microsoft SQL Server. That changed when Microsoft announced support for Linux starting with SQL Server 2017. However, Microsoft does not provide a straightforward way to integrate Linux hosts into Active Directory (AD), making it harder to manage them.
Fortunately, there is an easy way to integrate Linux with AD for cloud and on-premise Windows systems — by using realmd and System Security Services Daemon (SSSD).
Read this guide to learn how to integrate Linux with Active Directory. We’ll also cover how to join AD using realmd, what using SSSD is like, and how to map Linux unique identifiers (UIDs) and group IDs (GIDs) to site identifiers (SIDs) in AD.
A Brief Summary of Linux Interaction with Active Directory
As an introduction, here’s a brief summary of how Linux interacts with AD.
The main reasons to join a Linux machine to a Lightweight Directory Access Protocol (LDAP)-based directory service like Windows AD include:
- Business policies
- Access control
- Centralized identity management
When joining a Linux host to Active Directory (AD), two components are required:
- One to manage the central identity and authentication source (Active Directory)
- One to handle domain discovery and act as a middleman between the first component and the identity source
Over the years, there have been a few configuration options to join a Linux machine to AD. Most have been inconvenient to configure and required you to manually set up (SSSD to join domains. However, the realmd suite lets you complete the task without cumbersome configuration file editing.
How to Integrate a Linux Host into a Windows AD Domain
Now let’s walk through the steps of integrating a Linux host running on CentOS 8 into a Windows Active Directory (AD) domain configured on Windows 2012 R2 Server Standard Edition. (The reason we specify the versions and types of the Linux distribution and Windows Server is because there are subtle differences between versions of Linux and Windows. For example, in CentOS/RHEL 8, Network Time Protocol (NTP) client and server activities were managed using the ntp daemon, but in CentOS/RHEL 8, it has been replaced with the chrony daemon.)
Step 1: Ensure that the hostname and FQDN are specified.
Ensure that the hostname and the fully qualified domain name (FQDN) are specified in the /etc/hosts file. The hostname cannot be localhost, as it is mapped to the loop-back adapter 127.0.0.1. If you need to change the existing hostname, use the following command to change it to the desired name. There is no need to specify the FQDN as part of the hostname.
[root@oldhostname ~]# hostnamectl set-hostname <new_host_name>

[root@newhostname~]# echo 192.168.44.9 sblinmssql2019 >> /etc/hosts
Step 2: Specify the AD domain controller.
Specify the AD domain controller (DC) in the /etc/hosts file using the following command:
[root@newhostname~]# echo 192.168.xx.x sbad.sbits.net sbad >> /etc/hosts

[root@newhostname~]# ping sbad.sbits.net
Step 3: Ping the AD domain controller.
Ping the AD domain controller that was specified in Step 2 and make sure you get a ping response.
Step 4: Point the DNS server to the AD domain controller.
In my case, the DNS server needs to be pointed to the AD domain controller because my DC is also the DNS server for my domain, sbits.net.
Step 5: Configure the NTP server, if necessary.
If the primary DC that you are planning to use as the NTP server does not have the NTP server configured, follow the steps in the screenshot to configure and enable the NTP server on the primary DC.
Step 6: Install chrony and configure it to use a DC.
The Linux host needs to synchronize time with one of the DCs in the AD domain. In my case, there is only one domain controller, so the Linux host will be synchronizing the time with it.
If chrony is not already installed, install it and configure it to use the DC to synchronize the time. (If it is already installed, you will get a message reporting that.)
[root@newhostname~]# vi /etc/resolv.conf

[root@newhostname~]# systemctl restart NetworkManager
[root@sblinmssql2019~]# vi /etc/chrony.conf

  [root@sblinmssql2019~]# systemctl enable chronyd

  [root@sblinmssql2019~]# systemctl restart chronyd

  [root@sblinmssql2019~]# systemctl enable chronyd
If chrony is already installed, we need to edit thechrony.conf config file and set the time server to the AD domain controller and restart the chronyd service. If the service was not preinstalled, enable it to start up on reboot and ensure that the firewall is configured to allow NTP traffic after installation.
Once chronyd is configured and enabled, the timedatectl command will show whether the NTP service is active. After confirming that NTP service is active, run the chronyc sources command to confirm that it is using the domain controllers as the time server, as shown below.
Step 7: Install the Samba suite on Linux.
Next, install the Samba suite, including winbind, on the Linux host. The winbind service enables the Linux host to interact with the AD domain like a Windows host. After installation is complete, confirm that the packages shown in the screenshot below are installed.
Step 8: Modify the /etc/samba/smb.conf file to reflect the realm value.
Next, modify the /etc/samba/smb.conf file to reflect the realm value to the fully qualified domain name, and change the workgroup value to the name of the domain, as shown in the screenshot below.
[root@sblinmssql2019~]# yum -y install samba samba-client

[root@sblinmssql2019~]# yum -y install samba-winbind samba-winbind-clients
Step 9: Enable the winbind daemon on system reboot.
Enable the winbind daemon on system reboot using the systemctl command as shown in the screenshot below. Please note that there is no reason to reboot the Linux host, unlike Windows hosts.
Note: The realm parameter is the name of your domain. In this example, it is “sbits.net” and the workgroup parameter is set to “sbits”. The workgroup parameter can instead be set to the Windows default of “WORKGROUP” if you prefer. The security = ADS designates that this host is part of the AD domain. The winbind separator =+ specifies that the plus sign (+) will be used to separate the domain name and username. The traditional Windows separator is not compatible with Linux, and an escape character has to be used every time a username is specified with the domain prefix.
Step 10: Install the Kerberos realms package.
Install the Kerberos realms package using the yum command:
[root@sblinmssql2019~]# yum -y install krb5-workstation
Step 11: Add the Linux host to the AD domain.
Now, add the Linux host to the AD domain using the command below. It is highly likely that you will get the error “DNS update failed: NT_STATUS_INVALID_PARAMETER”.
In my case, even though I got the error, the Linux host was added to the AD domain. I reissued the command with the –no-dns-updates flag, and the error did not pop up.
Step 12: Change the security setting using DNS Manager.
If you do not want to encounter the error and would like to have the DNS update the information about the new Linux hosts, change the security setting using DNS Manager as shown below.
Step 13: Verify that the Linux computer object was added.
On the primary domain controller, verify that the Linux computer object was added by using the Active Directory Users and Computers tool.
Step 14: Confirm that the winbind service is running.
Confirm that the winbind service is running on the Linux host.
Step 15: Validate that the Linux host is part of the AD domain.
Validate that the Linux host is actually part of the AD domain and is able to communicate with the DC by using the wbinfo package to run encrypted RPC calls to the DC:
[root@sblinmssql2019~]# wbinfo -t    # verifies if encrypted RPC are supported

[root@sblinmssql2019~]# wbinfo – u  # enumerates AD the list of users

[root@sblinmssql2019~]# wbinfo – g  # enumerates AD the list of groups
Step 16: Ensure that winbind is selected as the authorization provider.
Next, we need to ensure that winbind is selected as the authorization provider by using the authselect select winbind –force command as shown below. The –force flag will overwrite the entries in the /etc/nsswitch. conffile.
Step 17: Ensure the passwd and group entries are listed to use winbind.
To ensure that Linux will use winbind for user authentication prior to local Linux authentication, make sure the passwd and group entries are listed to use winbind in the /etc/nsswitch.conffile.
Step 18: Use kinit to get a Kerberos TGT.
Finally, use kinit to try to get Kerberos Ticket Granting Ticket (TGT):
[root@sblinmssql2019~]# wbinfo -t    # kinit skumar@sbits.net

[root@sblinmssql2019~]# wbinfo – u  # klist
Chances are you will encounter the error shown in the screenshot above. If so, edit the /etc/krb5.conf file and change the setting as shown below:
Once the file is modified, there is no reason to start any services on the Linux host, and the ticket request should work fine.
You can verify it on the AD domain controller as well, as shown below:
Congratulations! You have added a Linux host to a Windows AD domain.
Joining AD Domains using realmd
Now that you know how to integrate Linux with an Active Directory domain, let’s turn to joining the AD domain. There’s a quick and easy way to set up SSSD to join domains without cumbersome configuration file editing: the realmd suite. This command-line tool can be used to manage enrollment in Kerberos realms, like Active Directory domains or IPA domains. The realmd system provides a clear and simple way to discover and join identity domains to achieve direct domain integration. It’s not too much of a lift, either, as realmd handles the configuration of complex underlying Linux system services, such as SSSD or winbind.
Realmd is also a great tool for access management, event management, configuring domain membership, achieving an integrated direct domain, and network and user SSH authentication. Many enterprise cybersecurity teams use realmd to reduce the attack surface by controlling who has access to what.
Follow these steps to join the Active Directory server using the realmd Desktop Bus (D-Bus) tool. These instructions work for all Linux distributions, including Fedora and Ubuntu.
- To add Linux to an Active Directory domain, ensure that your Linux host can communicate with the DC over the network. Proper DNS and hostname resolution are essential to this process.
- Next, install realmd using root access on your computer account and check to see if we’re already a member of a domain.
sudo apt install realmd

realm list
If realmd wasn’t previously installed, the output should be empty, indicating that:
- The host isn’t joined to AD or other domain services
- We don’t have any domain membership.
If the output lists a domain you’d like to leave, run the following as the domain administrator user account originally used to join the domain:
sudo realm leave example.com -U user@example.com
3. Next, we’ll want to discover our domain:
realm discover <domain_controller_hostname_or_ip_address>
The output is a list of packages that must be installed to join the domain:
example.com

  type: kerberos

  realm-name: EXAMPLE.COM

  domain-name: example.com

  configured: no

  server-software: active-directory

  client-software: sssd

  required-package: sssd-tools

  required-package: sssd

  required-package: libnss-sss

  required-package: libpam-sss

  required-package: adcli

  required-package: samba-common-bin
Realm discovery output may differ depending on your specific host and domain controller setup.
Note that realmd uses SSSD as its default Active Directory client software. SSSD allows local services to check with local user and credential caches in SSSD, but those caches may be taken from any remote identity prover, including AD, an LDAP directory, an identity management domain or a Kerberos realm.
If you don’t want to use SSSD, you can specify winbind to use Samba Winbind.
4. Confirm that the Windows server and Linux are on the same network. If they’re not, your Linux hosts won’t be able to join Active Directory. We highly recommend having a static IP address for the domain controller.
5. Once everything has been confirmed, go ahead and install the listed required packages (shown above) and then use the realm join command. This will do several things, including setting up the local machine for use with a specific domain and creating a host keytab file at /etc/krb5.keytab. It will also join Linux to the Windows domain using credentials with AD Domain Admin permissions:
sudo apt install sssd sssd-tools libnss-sss libpam-sss adcli samba-common-bin

sudo realm join --client-software=sssd <domain_controller_hostname_or_ip> -U <domain_admin>
When specifying the Domain Admin, we can just use the username instead of using example.comuser format, since we’re already specifying a domain controller in the command.
Additionally, we can use the –computer-ou parameter to specify the organizational unit for the computer to be joined to, using distinguished name format (for example, # realm join –computer-ou=”ou=Linux Computers,dc=example,dc=com”). Specifying –computer-ou is also great for creating directory computer accounts in non-default locations.
Note that an invalid hostname error can occur if a hostname isn’t set with the proper format. To resolve this, simply set the hostname properly:
sudo hostnamectl set-hostname '<new_hostname>'
6. After joining the domain, we can run realm list again to confirm success and review the domain info:
example.com

  type: kerberos

  realm-name: EXAMPLE.COM

  domain-name: example.com

  configured: kerberos-member

  server-software: active-directory

  client-software: sssd

  required-package: sssd-tools

  required-package: sssd

  required-package: libnss-sss

  required-package: libpam-sss

  required-package: adcli

  required-package: samba-common-bin

  login-formats: %U@example.com

  login-policy: allow-realm-logins
In this case, the login-formats property indicates that domain accounts will be specified in user@example.com format on this host, rather than domainuser format.
7. Finally, restart the SSSD service and use the command below to verify the Active Directory user information. The output should show a domain user’s UID, groups and more:
sudo service sssd restart

id user@example.com
That’s all there is to it! This is by no means a comprehensive guide for all the options you can manually perform and configure along the way; however, this is the quickest route to get Linux hosts joined to Active Directory using a modern approach.
Optional Steps
Once you’ve joined AD using realmd, you can take optional steps to customize your experience, such as tweaking realmd’s behavior and managing the properties of AD objects by using various options and tools. These include:
OS-Version
The os-version and os-name settings let you specify your operation system version and name. Specifically, you can use them to control the values that are placed in the computer account’s operatingSystemVersion and operatingSystem attributes.
AD Attribute Editor
This is a built-in graphical tool for managing the properties of AD objects, such as computers, users and groups. You can use it by installing the dsa.msc snap-in, which is part of the Windows Remote Server Administration Tools (RSAT).
Deny and Permit
The realm deny command denies local login by real accounts. You can use realm permit to restrict logins to certain accounts.
Changing the Default User Configuration
The realmd system allows you to modify the default user home directory and shell POSIX attributes. You can override the default directory and attributes by specifying the following options in the [users] section in the /etc/realmd.conf file:
- Default-shell: This defines the default user shell; it accepts any supported system shell.
- Default-home: This sets a template for creating a home directory for accounts with no home directory explicitly set.
Mapping Linux UIDs/GIDs to SIDs in Active Directory
You now know how to integrate Linux with Active Directory. However, we’re not done yet. We also need to touch on how POSIX UIDs and GIDs are mapped to SIDs in Active Directory, since Linux clients don’t have a concept of SIDs like Windows does.
Benefits of using SSSD rather than Winbind
As previously mentioned, realmd uses SSSD rather than winbind by default. One big benefit of this approach is that SSSD automatically handles POSIX UID/GID generation using the SID of each Active Directory user or group. If you keep the default SSSD settings on each Linux host that you join to the domain, then these UID and GID values should be mapped consistently across Linux hosts.
For example, in my lab, this result is consistent no matter which Linux machine I run it on, as long as the machines are joined to the same domain:
user@my-linux-host:~$ id user@example.com

uid=778006423(user@example.com) gid=778001234(domain users@example.com) groups=778001234 (domain users@example.com)
Another benefit of this approach is that UIDs and GIDs generated by SSSD can also be applied to the uidNumber and gidNumber attributes in Active Directory for users and groups. This allows applications that query these AD attributes to perform mapping of the UID or GID to the SID, ultimately resulting in the same AD users or groups being referenced regardless of whether a user or group is in use on a Windows or Linux system.
Viewing and Editing the uidNumber and gidNumber Attributes
To view the uidNumber and gidNumber attributes in Active Directory Users and Computers on Windows Server, make sure you have Advanced Features enabled under the View dropdown:
You’ll then be able to view and edit those fields in the user’s or group’s Properties menu on the Attribute Editor tab:
Listing All AD Users and Groups with their UIDs and GIDs
Depending on the number of users and groups in your domain, it may take a long time to manually assign uidNumber and gidNumber values. Although methods to programmatically populate these fields will be environment-specific, we can at least list all AD users and groups, with their UIDs and GIDs, using the getent command from a Linux host joined to the domain.
By default, getent will list only the users and groups on the local machine. Luckily, this can be modified by adding a line to your /etc/sssd/sssd.conf file and restarting SSSD. However, enabling this enumeration option can cause significant stress on the Active Directory server.
Typically, I like to step through this process outside of production hours, save the results, and then disable the full enumeration. Here’s how I do that:
- First, we add enumerate = True to sssd.conf, and then we restart the SSSD service:
echo "enumerate = True" | sudo tee -a /etc/sssd/sssd.conf &> /dev/null

sudo service sssd restart
Depending on the size of your Active Directory, it can take up to 10 minutes to complete the initial enumeration into the local cache. During this period, you’ll notice domain users and groups populating in the outputs from getent passwd and getent group, respectively.
2. Once enumeration to the local credential cache is complete, we can use the following commands to format the getent output (<domain> needs to be replaced with your domain name):
getent passwd | awk -F: '{print $1 "," $3 "," $4}' | grep <domain>

getent group | awk -F: '{print $1 "," $3}' | grep <domain>
The first command outputs each domain user with their UID and their GID in comma-separated format:
user@example.com,778006423,778001234
The second outputs each domain group with its GID in comma-separated format:
domain users@example.com,778001234
3. You can redirect the output to text or CSV files for parsing into Active Directory’s uidNumber and gidNumber attributes. With the UID and GID information in CSV format, you could create a script that imports each CSV and automatically updates uidNumber and gidNumber for Active Directory users and groups. For example, the following Windows PowerShell command adds the specified UID and GID to those attributes in AD:
Set-ADUser <ad_user> -Replace @{uidNumber="<uid>"; gidNumber="<gid>"}
With this command (and Set-ADGroup), you can easily generate a script that fits your environment and speeds up the process of mapping UIDs/GIDs to uidNumber and gidNumber in AD, which ultimately map to Windows SIDs.
4. Once you’ve saved the output from the getent commands, you can remove the enumerate value from sssd.conf and restart the SSSD service to prevent the expensive LDAP enumeration from occurring in the future:
sudo sed -i '/enumerate = True/d' /etc/sssd/sssd.conf

sudo service sssd restart
Conclusion
Linux hosts are often used for critical functions, so admins need to monitor these hosts, understand how they’re used, observe who accesses them and verify how they’re secured.
Admins need to especially be careful when joining Linux hosts to Active Directory. Remember, it takes only one compromised host or user for attackers to move laterally into admin rights in your domain, by exploiting issues like over-provisioned user access, weak passwords and open SMB/NFS shares.
One of the best ways to reduce cybersecurity risks is to use the Netwrix Active Directory Security Solution. Comprehensive and user-friendly, this software makes integrating Linux with Active Directory stress-free and simple. It includes:
- Preconfigured and customizable auditing, logging, analyzing and reporting jobs on both Unix/Linux and Active Directory
- Tools for protecting other parts of your infrastructure, including Google Cloud, network devices, virtualized systems and Kubernetes containers
Interested in experiencing the Netwrix difference? Request a free trial today.
FAQ
Can you join a Linux machine to Active Directory?
Yes. You can join any distro to an AD domain by manually connecting the SSSD client or using the realm join command.
How does Linux connect to Active Directory?
System Security Services Daemon (SSSD) provides a set of daemons to manage access to remote directory services and authentication mechanisms on Linux machines.
What is realmd in Linux?
realmd is a Linux system service that allows callers to configure network authentication and domain membership via SSSD or winbind services.
What is the sudo systemctl command?
The sudo systemctl command is the main management tool for controlling the init system. You can use the start command after it to start a systemd service.
What is the sudo apt-get update command?
The sudo apt-get update command is for downloading package information from all configured sources.
What is sudoers?
Linux and Unix administrators can use the sudoers file to allocate system rights to system users. In other words, it allows administrators to control who does what. You can find this file in /etc/sudoers.

Director of Technical Product Management at Netwrix. Farrah is responsible for building and delivering on the roadmap of Netwrix products and solutions.
Farrah has over 9 years of experience in the cybersecurity industry, having held multiple roles at Stealthbits including Quality Assurance Manager and Scrum Master.

В этой статье будет описан процесс добавления Linux-машины (Ubuntu 20.04) в домен Windows AD.
Шаг 1. Установка пакетов и подготовка
sudo apt updatesudo apt upgrade
После этого установите требуемые пакеты.
sudo apt -y install realmd sssd sssd-tools libnss-sss libpam-sss adcli samba-common-bin oddjob oddjob-mkhomedir packagekit
Далее мы настроим все инструменты. Вам требуется знать:
- Домен: office.local
- IP DNS-сервера: 192.168.0.1
- IP второго DNS-сервера: 192.168.0.2
Шаг 2. Настройка DNS
Откройте конфигурационный файл netplan:
sudo nano /etc/netplan/*.yaml
Если вы видите там «dhcp4: true», то есть ваш DHCP-сервер настроен корректно, переходите к следующему шагу. Если вы настраиваете параметры сетевого подключения вручную, ознакомьтесь с примером настройки:
network:ethernets:enp0s3:addresses:- 192.168.0.15/24gateway4: 192.168.0.10nameservers:addresses: [192.168.0.1, 192.168.0.2]search:- office.localoptional: trueversion: 2
- addresses — это IP, назначаемый сетевой карте;
- gateway4 — IP роутера;
- nameservers — DNS-сервера;
- search — целевой домен.
sudo netplan apply
Шаг 3. Обнаружение домена, присоединение к нему и проверка результата.
В первую очередь требуется обнаружить домен:
realm discover office.local
Вы увидите что-то подобное. Это означает, что настройки сети верны и машина получила ответ от домена. Если нет, вам необходимо проверить настройки сети, домен и работоспособность DNS.
office.localtype: kerberosrealm-name: OFFICE.LOCALdomain-name: office.localconfigured: no...
Затем присоединитесь к домену AD. Замените admin1 на имя администратора и укажите пароль.
realm join -U admin1 office.localPassword for admin1:
Проверьте, возможен ли прием информации о пользователе AD. Замените user1 на имя пользователя вашего домена.
id user1@office.localuid=687821651(user1@office.local) gid=687800512(user1@office.local) groups=687800512(domain users@office.local)
Шаг 4. Последние настройки и авторизация.
Необходимо произвести настройку, чтобы в будущем каждый раз не добавлять имя домена к имени пользователя.
sudo nano /etc/sssd/sssd.conf
Измените значение use_fully_qualified_names на False. Перезагрузите и проверьте:
sudo systemctl restart sssdid useruid=687821651(user1@office.local) gid=687800512(user1@office.local) groups=687800512(domain users@office.local)
Теперь нужно настроить создание домашних каталогов для пользователей AD при входе в систему.
sudo nano /etc/pam.d/common-session#add this line in the end of filesession optional pam_mkhomedir.so skel=/etc/skel umask=077
Войдите в систему как пользователь AD.
su – userPassword:Creating directory '/home/user1@office.local'.user1@ubuntu-server:~$
Это означает, что вы успешно вошли в систему как пользователь AD.
Также вы можете разрешить авторизацию для некоторых пользователей и групп AD или же ограничить других. В приведенном ниже примере настроен запрет для всех пользователей, кроме user0, user1 и группы Main Admins.
sudo realm deny –allsudo realm permit user0@office.local user1@office.localsudo realm permit -g 'Main Admins'
Настройка пользователей AD для получения root-прав такая же, как и для локальных, но выполняется в другом файле.
sudo nano /etc/sudoers.d/admins
Добавьте к нему нужные строки. Например:
user ALL=(ALL) ALL%Domain\\ Admins ALL=(ALL) ALL
191028
Санкт-Петербург
Литейный пр., д. 26, Лит. А
+7 (812) 403-06-99
![]()
700
300
ООО «ИТГЛОБАЛКОМ ЛАБС»
191028
Санкт-Петербург
Литейный пр., д. 26, Лит. А
+7 (812) 403-06-99
![]()
700
300
ООО «ИТГЛОБАЛКОМ ЛАБС»
Состояние перевода: На этой странице представлен перевод статьи Active Directory integration. Дата последней синхронизации: 31 октября 2015. Вы можете помочь синхронизировать перевод, если в английской версии произошли изменения.
Важно: Так как Arch Linux использует систему распространения rolling release,возможно,некоторая информация на странице может быть устаревшей из-за изменений в пакетах или конфигурациях,сделанных разработчиками. Никогда слепо не следуйте этой или любой другой инструкции. Когда в инструкции сказано изменить какой-либо файл, обязательно сделайте бэкап. Проверяйте дату последней проверки статьи.
Основной задачей системных администраторов являются попытки совместного изпользования разнообразных окружений. Мы имеем в виду смешивание разных серверных операционных систем (Обычно Microsoft Windows & Unix/Linux). Управление пользователями и аутентификацией на данный момент является наиболее сложной задачей. Популярнейший способ решения это задачи — Directory Server. Существует много открытых и коммерческих решений для разный типов *NIX; однако, только немногие решают проблему взаимодействия с Windows. Активный Каталог (AD) — служба каталогов созданная Microsoft для доменных сетей Windows. Он входит в большинство операционных систем Windows Server. Сервера,на которых запущен AD, называются контроллерами доменов(domain controllers)
Активный каталог используется как главное средство администрирования сети и безопасности.Он отвечает за аутентификацию и авторизацию все пользователей и компьютеров в доменной сети Windows, назначая и следя за правилами безопасности для всех компьютеров в сети, также устанавливая и обновляя ПО на компьютерах в этой сети. Например,когда пользователь авторизуется в компьютер,который является частью доменной сети, AD проверяет его пароль и яляется он обычным пользователем или же системным администратором.
Активный католог использует Lightweight Directory Access Protocol (LDAP) версий 2 и 3, Kerberos и DNS.
Эти же стандарты доступны в Linux, но их комбинирование — непростая задача. Эта статья поможет вам настроить хост Arch Linux для аутентификация в домене AD.
Эта статья объясняет, как интегрировать хост Arch Linux в сущестующий домен AD.
Перед продолжением у вас должен быть существующий домен AD, и пользователь с правами на добавление пользователей и компьютерных аккаунтов.
Эта сатья не предназначена ни как полное описание AD,ни как полно описание работы с Samba. Обратитесь к разделу ресурсов для дополнительной информации.
Терминология
Если вы не знакомы с AD, здесь приведены некоторые ключевые слова, которые будет полезно знать.
- Домен(Domain) : Имя,используемое для группы компьютеров и аккаунтов.
- SID : Каждый компьютер,присоединяющийся к сети должен иметь уникальный SID / Системный идентификатор.
- SMB : Блок сообщения сервера.
- NETBIOS: Network naming protocol used as an alternative to DNS. Mostly legacy, but still used in Windows Networking.
- WINS: Windows Information Naming Service. Used for resolving Netbios names to windows hosts.
- Winbind: Protocol for windows authentication. Протокол для авторизации windows.
Настройка
Настройка AD
Важно: Эта часть не была проверена, продолжайте с отсторожностью.
Обновление GPO
Возможно, нужно будет отключить Digital Sign Communication (Always) в настройках групп AD. А именно:
Local policies->Security policies->Microsoft Network Server->Digital sign communication (Always)-> выбратьdefine this policyи поставить «галочку» наdisable.
Если вы используете Windows Server 2008 R2, то вам нужно настроить GPO в GPO for Default Domain Controller Policy -> Computer Setting -> Policies -> Windows Setting -> Security Setting -> Local Policies -> Security Option -> Microsoft network client: Digitally sign communications (always)
Настройка Linux хоста
Следующие несколько шагов — начало конфигурации хоста. Вам понадобиться root или sudo доступ.
Установка
Установите следующие пакеты:
- samba, см. Samba
- pam-krb5
- ntp или openntpd, см. также NTPd или OpenNTPD
Обновление DNS
AD сильно зависит от DNS. Вам нужно будет обновить /etc/resolv.conf, чтобы использовать контроллеры доменов AD:
/etc/resolv.conf
nameserver <IP1>
nameserver <IP2>
Замените <IP1> и <IP2> IP адресами для сервера AD.Есили ваши AD домены не позволяют использовать DNS форвардинг или рекурсию,возможно,придётся добавить некоторые вещи.
Если ваша машина имеет дуалбут Windows и Linux, стоит использовать разные имена DNS и netbios для linux,если обе операционные системы будут членами одного домена.
Настройка NTP
См. NTPd или OpenNTPD для инструкции по настройке NTP. Стоит отметить, что OpenNTPD больше не поддерживается.
При настройке используйте IP адреса серверов AD.Как альтернативу можно использовать другие NTP сервера,которые обеспечат синхронизацию AD в то же место.Тем не менее,AD обычно запускают NTP в качестве службы.
Убедитесь,что демон настроен на sync automatically on startup.
Kerberos
Допустим,что ваша AD называется example.com. Далее допустим что ваша AD управляется двумя доменными контроллерами, главным и вторичным, которые называются PDC и BDS, pdc.example.com и bdc.example.com соответственно. Их адреса будут,например, 192.168.1.2 и 192.168.1.3. Следите за написанием,верхний регистр очень важен.
/etc/krb5.conf
[libdefaults]
        default_realm 	= 	EXAMPLE.COM
	clockskew 	= 	300
	ticket_lifetime	=	1d
        forwardable     =       true
        proxiable       =       true
        dns_lookup_realm =      true
        dns_lookup_kdc  =       true

[realms]
	EXAMPLE.COM = {
		kdc 	= 	PDC.EXAMPLE.COM
                admin_server = PDC.EXAMPLE.COM
		default_domain = EXAMPLE.COM
	}

[domain_realm]
        .kerberos.server = EXAMPLE.COM
	.example.com = EXAMPLE.COM
	example.com = EXAMPLE.COM
	example	= EXAMPLE.COM

[appdefaults]
	pam = {
	ticket_lifetime 	= 1d
	renew_lifetime 		= 1d
	forwardable 		= true
	proxiable 		= false
	retain_after_close 	= false
	minimum_uid 		= 0
	debug 			= false
	}

[logging]
	default 		= FILE:/var/log/krb5libs.log
	kdc 			= FILE:/var/log/kdc.log
        admin_server            = FILE:/var/log/kadmind.log
Примечание: Heimdal 1.3.1 не принимает DES шифрование,которое необходимо для аутентификации AD до Windows Server 2008. Скорее всего вам придётся добавить
allow_weak_crypto = true
в раздел [libdefaults]
Создание ключа Kerberos
Теперь во можете запросить ключи для AD (верхний регистр необходим):
kinit administrator@EXAMPLE.COM
Можно использовать любое имя пользователя,у которого есть права администратора домена.
Подтверждение ключа
Запустите klist чтобы проверить,получили ли вы токен,должно быть нечто подобное:
# klist
 Ticket cache: FILE:/tmp/krb5cc_0
 Default principal: administrator@EXAMPLE.COM

 Valid starting    Expires           Service principal
 02/04/12 21:27:47 02/05/12 07:27:42 krbtgt/EXAMPLE.COM@EXAMPLE.COM
         renew until 02/05/12 21:27:47
pam_winbind.conf
Если вы получаете ошибки «/etc/security/pam_winbind.conf не найден»,создайте этот файл и отредактируйте его следующим образом:
/etc/security/pam_winbind.conf
debug=no
debug_state=no
try_first_pass=yes
krb5_auth=yes
krb5_cache_type=FILE
cached_login=yes
silent=no
mkhomedir=yes
Samba
Samba — бесплатная реализация протокола SMB/CIFS. Также она включает инструменты для Linux машин,которые заставляют их вести себя будто Windows сервера и клиенты.
Примечание: Настройка может разниться в зависимости от конфигурации сервера Windows. Будьте готовы изучать и решать проблемы.
В этом разделе мы сначала сфокусируемся на работе аутентификации с помощью изменения секции ‘Global’. Далее, мы вернёмся к остальным.
/etc/samba/smb.conf
[Global]
  netbios name = MYARCHLINUX
  workgroup = EXAMPLE
  realm = EXAMPLE.COM
  server string = %h Arch Linux Host
  security = ads
  encrypt passwords = yes
  password server = pdc.example.com

  idmap config * : backend = rid
  idmap config * : range = 10000-20000

  winbind use default domain = Yes
  winbind enum users = Yes
  winbind enum groups = Yes
  winbind nested groups = Yes
  winbind separator = +
  winbind refresh tickets = yes

  template shell = /bin/bash
  template homedir = /home/%D/%U

  preferred master = no
  dns proxy = no
  wins server = pdc.example.com
  wins proxy = no

  inherit acls = Yes
  map acl inherit = Yes
  acl group control = yes

  load printers = no
  debug level = 3
  use sendfile = no
Теперь надо «объяснить» Samba, что мы будет использовать базы даннх PDC для аутенификации.Будем использовать winbindd, который входит в поставку Samba.Winbind указывает UID и GID Linux машины для AD. Winbind использует UNIX реализацию RPC вызовов, Pluggable Authentication Modules (aka PAM) и Name Service Switch (NSS), чтобы разрешить допуск пользователей и Windows AD на Linux-машинах. Лучшая часть winbindd то,что вам не нужно размечать самому, от вас требуется только указать диапазон UID и GID! Именно их мы объявили в smb.conf.
Обновите файл настроек samba чтобы включить демона winbind
/etc/conf.d/samba
 ##### /etc/conf.d/samba #####
 #SAMBA_DAEMONS=(smbd nmbd)
 SAMBA_DAEMONS=(smbd nmbd winbindd)
Далее, настройте samba так, для запуска вместе со стартом системы. См. Daemons для подробностей.
Запуск и проверка сервисов
Запуск Samba
Надеемся,вы ещё не перезагрузились! Хорошо. Если у вас запущена X-сессия — выходите из неё,чтобы проверить вход в другой терминал не выходя из своей сессии.
Запуск Samba (включая smbd, nmbd и winbindd):
Если вы проверите список процессов,то заметите,что на самом деле winbind не запустился. Быстрый осмотр логов говорит,что SID для этого хоста может быть получен от домена:
# tail /var/log/samba/log.winbindd
[2012/02/05 21:51:30.085574,  0] winbindd/winbindd_cache.c:3147(initialize_winbindd_cache)
  initialize_winbindd_cache: clearing cache and re-creating with version number 2
[2012/02/05 21:51:30.086137,  2] winbindd/winbindd_util.c:233(add_trusted_domain)
  Added domain BUILTIN  S-1-5-32
[2012/02/05 21:51:30.086223,  2] winbindd/winbindd_util.c:233(add_trusted_domain)
  Added domain MYARCHLINUX  S-1-5-21-3777857242-3272519233-2385508432
[2012/02/05 21:51:30.086254,  0] winbindd/winbindd_util.c:635(init_domain_list)
  Could not fetch our SID - did we join?
[2012/02/05 21:51:30.086408,  0] winbindd/winbindd.c:1105(winbindd_register_handlers)
  unable to initialize domain list
Присоединение к Домену
Вам нужен аккаунт администратора AD чтобы сделать это. Пусть наш логин: Administrator. Комана — ‘net ads join’
# net ads join -U Administrator
Administrator's password: xxx
Using short domain name -- EXAMPLE
Joined 'MYARCHLINUX' to realm 'EXAMPLE.COM'
Перезапуск Samba
winbindd не смог запуститься потому,что пока что мы не домен.
Перезапустите сервис Samba и winbind тоже должен запуститься.
NSSwitch говорит Linux хосту как получить игформацию из различных источников и к каком порядке это сделать. В нашем случае мы добаим AD как дополнительный источник для пользователей, групп и хостов.
/etc/nsswitch.conf
 passwd:            files winbind
 shadow:            files winbind
 group:             files winbind

 hosts:             files dns wins
Проверка Winbind
Проверим, может ли winbind получить доступ к AD. Следующие команды возвращают список пользователей AD:
# wbinfo -u
administrator
guest
krbtgt
test.user
- Note мы создали пользователя AD ‘test.user’ в домменом контоллере.
Можно сделать то же самое для групп AD:
# wbinfo -g
domain computers
domain controllers
schema admins
enterprise admins
cert publishers
domain admins
domain users
domain guests
group policy creator owners
ras and ias servers
allowed rodc password replication group
denied rodc password replication group
read-only domain controllers
enterprise read-only domain controllers
dnsadmins
dnsupdateproxy
Проверка nsswitch
Дабы убедиться,что наш хост имеет доступ к домену для пользователей и групп, мы проверим настройки nsswitch, используя ‘getent’. Следующий вывод показывает,как оно дожно выглядеть на нетронутом Arch Linux:
# getent passwd
root:x:0:0:root:/root:/bin/bash
bin:x:1:1:bin:/bin:/bin/false
daemon:x:2:2:daemon:/sbin:/bin/false
mail:x:8:12:mail:/var/spool/mail:/bin/false
ftp:x:14:11:ftp:/srv/ftp:/bin/false
http:x:33:33:http:/srv/http:/bin/false
nobody:x:99:99:nobody:/:/bin/false
dbus:x:81:81:System message bus:/:/bin/false
ntp:x:87:87:Network Time Protocol:/var/empty:/bin/false
avahi:x:84:84:avahi:/:/bin/false
administrator:*:10001:10006:Administrator:/home/EXAMPLE/administrator:/bin/bash
guest:*:10002:10007:Guest:/home/EXAMPLE/guest:/bin/bash
krbtgt:*:10003:10006:krbtgt:/home/EXAMPLE/krbtgt:/bin/bash
test.user:*:10000:10006:Test User:/home/EXAMPLE/test.user:/bin/bash
Для групп:
# getent group
root:x:0:root
bin:x:1:root,bin,daemon
daemon:x:2:root,bin,daemon
sys:x:3:root,bin
adm:x:4:root,daemon
tty:x:5:
disk:x:6:root
lp:x:7:daemon
mem:x:8:
kmem:x:9:
wheel:x:10:root
ftp:x:11:
mail:x:12:
uucp:x:14:
log:x:19:root
utmp:x:20:
locate:x:21:
rfkill:x:24:
smmsp:x:25:
http:x:33:
games:x:50:
network:x:90:
video:x:91:
audio:x:92:
optical:x:93:
floppy:x:94:
storage:x:95:
scanner:x:96:
power:x:98:
nobody:x:99:
users:x:100:
dbus:x:81:
ntp:x:87:
avahi:x:84:
domain computers:x:10008:
domain controllers:x:10009:
schema admins:x:10010:administrator
enterprise admins:x:10011:administrator
cert publishers:x:10012:
domain admins:x:10013:test.user,administrator
domain users:x:10006:
domain guests:x:10007:
group policy creator owners:x:10014:administrator
ras and ias servers:x:10015:
allowed rodc password replication group:x:10016:
denied rodc password replication group:x:10017:krbtgt
read-only domain controllers:x:10018:
enterprise read-only domain controllers:x:10019:
dnsadmins:x:10020:
dnsupdateproxy:x:10021:
Проверка команд Samba
Попробуйте некоторые команды,чтобу увидеть,может ли Samba взаимодействовать с AD:
# net ads info
[2012/02/05 20:21:36.473559,  0] param/loadparm.c:7599(lp_do_parameter)
  Ignoring unknown parameter "idmapd backend"
LDAP server: 192.168.1.2
LDAP server name: PDC.example.com
Realm: EXAMPLE.COM
Bind Path: dc=EXAMPLE,dc=COM
LDAP port: 389
Server time: Sun, 05 Feb 2012 20:21:33 CST
KDC server: 192.168.1.2
Server time offset: -3
# net ads lookup
[2012/02/05 20:22:39.298823,  0] param/loadparm.c:7599(lp_do_parameter)
  Ignoring unknown parameter "idmapd backend"
Information for Domain Controller: 192.168.1.2

Response Type: LOGON_SAM_LOGON_RESPONSE_EX
GUID: 2a098512-4c9f-4fe4-ac22-8f9231fabbad
Flags:
        Is a PDC:                                   yes
        Is a GC of the forest:                      yes
        Is an LDAP server:                          yes
        Supports DS:                                yes
        Is running a KDC:                           yes
        Is running time services:                   yes
        Is the closest DC:                          yes
        Is writable:                                yes
        Has a hardware clock:                       yes
        Is a non-domain NC serviced by LDAP server: no
        Is NT6 DC that has some secrets:            no
        Is NT6 DC that has all secrets:             yes
Forest:                 example.com
Domain:                 example.com
Domain Controller:      PDC.example.com
Pre-Win2k Domain:       EXAMPLE
Pre-Win2k Hostname:     PDC
Server Site Name :              Office
Client Site Name :              Office
NT Version: 5
LMNT Token: ffff
LM20 Token: ffff
# net ads status -U administrator | less
objectClass: top
objectClass: person
objectClass: organizationalPerson
objectClass: user
objectClass: computer
cn: myarchlinux
distinguishedName: CN=myarchlinux,CN=Computers,DC=leafscale,DC=inc
instanceType: 4
whenCreated: 20120206043413.0Z
whenChanged: 20120206043414.0Z
uSNCreated: 16556
uSNChanged: 16563
name: myarchlinux
objectGUID: 2c24029c-8422-42b2-83b3-a255b9cb41b3
userAccountControl: 69632
badPwdCount: 0
codePage: 0
countryCode: 0
badPasswordTime: 0
lastLogoff: 0
lastLogon: 129729780312632000
localPolicyFlags: 0
pwdLastSet: 129729764538848000
primaryGroupID: 515
objectSid: S-1-5-21-719106045-3766251393-3909931865-1105
...<snip>...
Настройка PAM
Теперь мы будем менять разные правила в PAM, чтобы допустить пользователей AD к использованию системы для входа и к sudo доступу. Когда вы меняете правила, запоминание их порядка и помечены ли они как required или как sufficient критически важно,если вы хотите,чтобы всё работало,как вы задумали.Вам не стоит отклоняться от этих правил,если только вы не знаете как писать правила для PAM
В случае со входом,PAM следует сначала запросить аккаунт AD и проверять локальные аккаунты только если аккаунту AD не соответствует локальный аккаунт.Поэтому, мы добавим записи,которые включат pam_winbindd.so в процесс аутентификации.
Главный процесс аутентификации в конфигурации PAM Arch Linux находится в /etc/pam.d/system-auth. Начав со стандартной конфигурации из pambase, измените её следующим образом:
system-auth
Раздел «auth»
Найдите строку:
auth required pam_unix.so ...
Удалите её, и замените следующим:
auth [success=1 default=ignore] pam_localuser.so
auth [success=2 default=die] pam_winbind.so
auth [success=1 default=die] pam_unix.so nullok
auth requisite pam_deny.so
Раздел «account»
Найдите строку:
account required pam_unix.so
Под ней допишите следующее:
account [success=1 default=ignore] pam_localuser.so
account required pam_winbind.so
Раздел «session»
Найдите строку:
session required pam_unix.so
Под ней допишите следующее:
session required pam_mkhomedir.so umask=0022 skel=/etc/skel
session [success=1 default=ignore] pam_localuser.so
session required pam_winbind.so
Раздел «password»
Найдите строку:
password required pam_unix.so ...
Удалите её и замените следующими:
password [success=1 default=ignore] pam_localuser.so
password [success=2 default=die] pam_winbind.so
password [success=1 default=die] pam_unix.so sha512 shadow
password requisite pam_deny.so
Проверка входа
Теперь запустите новую сессию/войдите через ssh и попробуйте войти,использую данные аккаунта AD. Имя домена опционально, так как это было задано в настройках Winbind как ‘default realm’. Заметьте,что в случае с ssh, вам нужно изменить /etc/ssh/sshd_config, чтобы он разрешал аутентификацию через kerberos: (KerberosAuthentication yes).
test.user
EXAMPLE+test.user
Оба должны работать. Стоит подметить,что /home/example/test.user будет создан автоматически.
Войдите в другую сессию использую аккаунт Linux. Удостоверьтесь,что всё ещё можете войти как root — запомните,что вы должны быть под аккаунтом root как минимум в одной сессии!
Настройка общих файлов
Ранее мы пропустили настройку общих файлов. Теперь,когда всё работает, вернитесь к /etc/smb.conf и добавьте эксопрт для хостов,которые вы желаете сделать доступными в Windows
/etc/smb.conf
[MyShare]
  comment = Example Share
  path = /srv/exports/myshare
  read only = no
  browseable = yes
  valid users = @NETWORK+"Domain Admins" NETWORK+test.user
В примере выше, ключевое слово NETWORK. Не путайте его с именем домена. Для добавления групп,добавьте символ ‘@’ к группе. Заметьте, Domain Admins заключается в «цитаты», чтобы Samba корректно считывала их,когда просматривает файл конфигурации.
Добавление файла keytab и включение беспарольного входа на машину через Kerber и ssh
Это объясняет,как сгенерировать keytab файл,который вам нужен,например,чтобы включить беспарольный вход на машину через Kerber и ssh с другой машины в том же домене. Допустим, что у вас много компьютеров в домене и вы только что добавили сервер/рабочую станцию использую описание выше в ваш домен, в котором пользователям нужен ssh для работы — например рабочаю станция GPU или вычислительный узел OpenMP и т.д. В этом случае вам, наверное, не захочется вводить пароль каждый раз при входе. С другой стороны аутентификация с помощью ключа используется множеством пользователей, в этом случае нужных полномочий для,например,монтирования общего NFSv4 с Kerberos. Так что это поможет включить беспарольные входы на машины используя «kerberos ticket forwarding».
Создание key tab файла
Запустите ‘net ads keytab create -U administrator’ как суперпользователь дабы создать keytab файл в ‘/etc/krb5.keytab’. Она напишет ваи,что необходимо включить аутентификацию с помощью keytab в файле конфигурации, чтобы мы могли совершить следующий шаг. Иногда возникают проблемы, если файл krb5.keytab уже существует,в таком случае нужно переименовать его и запустить команду ещё раз, это должно помочь.
# net ads keytab create -U administrator
Проверьте содержание файла следующим образом:
# klist -k /etc/krb5.keytab
Keytab name: FILE:/etc/krb5.keytab
KVNO Principal
---- --------------------------------------------------------------------------
   4 host/myarchlinux.example.com@EXAMPLE.COM
   4 host/myarchlinux.example.com@EXAMPLE.COM
   4 host/myarchlinux.example.com@EXAMPLE.COM
   4 host/myarchlinux.example.com@EXAMPLE.COM
   4 host/myarchlinux.example.com@EXAMPLE.COM
   4 host/MYARCHLINUX@EXAMPLE.COM
   4 host/MYARCHLINUX@EXAMPLE.COM
   4 host/MYARCHLINUX@EXAMPLE.COM
   4 host/MYARCHLINUX@EXAMPLE.COM
   4 host/MYARCHLINUX@EXAMPLE.COM
   4 MYARCHLINUX$@EXAMPLE.COM
   4 MYARCHLINUX$@EXAMPLE.COM
   4 MYARCHLINUX$@EXAMPLE.COM
   4 MYARCHLINUX$@EXAMPLE.COM
   4 MYARCHLINUX$@EXAMPLE.COM
Включение входа через keytab
Теперь вам нужно указать winbind,что он должен использовать keytab файлы,добавив следующий строки в /etc/samba/smb.conf:
/etc/samba/smb.conf
 kerberos method = system keytab
 dedicated keytab file = /etc/krb5.keytab
В итоге всё должно выглядеть примерно так:
/etc/samba/smb.conf
[Global]
  netbios name = MYARCHLINUX
  workgroup = EXAMPLE
  realm = EXAMPLE.COM
  server string = %h Arch Linux Host
  security = ads
  encrypt passwords = yes
  password server = pdc.example.com
  kerberos method = system keytab
  dedicated keytab file = /etc/krb5.keytab

  idmap config * : backend = tdb
  idmap config * : range = 10000-20000

  winbind use default domain = Yes
  winbind enum users = Yes
  winbind enum groups = Yes
  winbind nested groups = Yes
  winbind separator = +
  winbind refresh tickets = yes

  template shell = /bin/bash
  template homedir = /home/%D/%U

  preferred master = no
  dns proxy = no
  wins server = pdc.example.com
  wins proxy = no

  inherit acls = Yes
  map acl inherit = Yes
  acl group control = yes

  load printers = no
  debug level = 3
  use sendfile = no
Перезапустите winbind.service с помощью ‘systemctl restart winbind.service’ с привелегиями суперпользователя.
# systemctl restart winbind.service
Проверьте,всё ли работает,получив тикет для вашей системы и запустив
# kinit MYARCHLINUX$ -kt /etc/krb5.keytab
Эта команда не должна написать ничего в консоль,ондако ‘klist’ должен показать что-то вроде этого:
# klist
 Ticket cache: FILE:/tmp/krb5cc_0
 Default principal: MYARCHLINUX$@EXAMPLE.COM

 Valid starting    Expires           Service principal
 02/04/12 21:27:47 02/05/12 07:27:42 krbtgt/EXAMPLE.COM@EXAMPLE.COM
         renew until 02/05/12 21:27:47
Некоторые частые ошибки : a)забывают поставить $ или b) игнорируют чувствительный регистр — он должен быть точно таким же,как записьв keytab
Подготовка sshd на сервере
Всё,что нам нужно сделать — это добавить некоторые опции в sshd_config и перезапустить sshd.service.
Измените ‘/etc/ssh/sshd_config’ чтобы он выглядел так в нужных местах:
# /etc/ssh/sshd_config
...

# Изсенить на no чтобы выключить s/key пароли
ChallengeResponseAuthentication no

# Опции Kerberos
KerberosAuthentication yes
#KerberosOrLocalPasswd yes
KerberosTicketCleanup yes
KerberosGetAFSToken yes

# Опции GSSAPI
GSSAPIAuthentication yes
GSSAPICleanupCredentials yes

...
Перезапустите sshd.service:
# systemctl restart sshd.service
Добавление опций, нужных для клиента
Для начала нам нужно убедиться в том, что тикеты доступны для клиента. Обычно всё работает, но, на всякий случай, используйте следующий параметр:
forwardable = true
Далее надо добавить опции:
GSSAPIAuthentication yes
GSSAPIDelegateCredentials yes
в наш файл .ssh/config, который говорит ssh использовать эту опцию, как альтернативу: можно использовать ‘ssh -o’ (смотрите страницу справочного руководства ssh(1)).
Проверка установки
Клиент:
Убедитесь,что у вас правильный тикет, используя ‘kinit’. Затем подключитесь к своем машине через ssh
ssh myarchlinux.example.com
Вы должны подключится без просьбы ввести пароль
Если у вас также включна аутентификация ключем,нужно выполнить
ssh -v myarchlinux.example.com
чтобы увидеть,какой метод аутентификации используется на самом деле.
Для дебага вы можете включить DEBUG3 на сервере и посмотреть лог через ‘journalctl’
Настройка для полной аутентификации Kerberos без пароля.
Если ваши клиенты не используют доменные аккаунты на их локальных машинах (по какой бы то не было причине),довольно сложно будет научить их использовать ‘kinit’ перед тем,как ssh подключится к рабочей станции.Так что есть классный способ это решить:
Генерирование keytab, которые будет принимать AD
Пользователь должен выполнить:
ktutil
addent -password -p username@EXAMPLE.COM -k 1 -e RC4-HMAC
- enter password for username -
wkt username.keytab
q
Теперь провертьте файл:
kinit -kt username.keytab
Оно не должно спросить пароль, теперь просто скопируйте это в ‘~/.bashrc’, это позволит не вводит пароль каждый раз.
Интересно знать
Файл ‘username.keytab’ не спецефичен для машины,и,следовательно,может быть скопирован на другие машины. Например,мы создали файл на Linux машине и скопировали на Mac клиента так как команды в неё другие…
Смотрите также
- Wikipedia: Active Directory
- Wikipedia: Samba
- Wikipedia: Kerberos
- Samba: Documentation
- Samba Wiki — Samba, Active Directory & LDAP
- smb.conf(5)
Коммерческие решения
- Centrify
- Likewise
This tutorial will describe how you can join machines that run Linux Mint 17.1 OS to Windows 2012 Active Directory Domain Controller in order to authenticate remote accounts from AD back end identity provider to local Linux workstations with the help of SSSD service and Realmd system DBus service.
The System Security Services Daemon (SSSD) is a relative new service which provides cross-domain compatible methods for Active Directory users to authenticate to local machines using a combination of usernames and domain back end name to create the login identity, even if the Domain Controller goes offline (SSSD caches credentials).
REQUIREMENTS
- Windows Server 2012 configured as an Active Directory Domain Controller
- A Linux Mint 17.1 client machine which will be integrated to Windows PDC
Domain Settings:
- Domain Name:
caezsar.lan - Windows Server 2012 AD FQDN:
server.caezsar.lan - Windows Server 2012 AD IP Address:
192.168.1.130 - Linux Mint Hostname:
mint-desktop - Linux Mint IP Address: automatically assigned by DHCP
- Linux Mint first DNS IP Address: Manually assigned to point to AD PDC –
192.168.1.130
STEP ONE – Linux Mint Network Configuration
1. Before starting with installing the required services in order to integrate the local machine to the PDC Server, first we need to assure that Windows Domain Controller is reachable through DNS resolution on Linux Mint host by adding the DNS PDC IP Address on our Network Configuration. To achieve this goal, first open Network Settings, go to the Network Interface Card (in this case is the Wired Connection, but you can use a Wireless Connection also), open it for editing (hit the settings icon from bottom right) and add your PDC IP Address on IPv4 DNS filed (switch Automatic DNS to OFF) as illustrated in the following screenshots:

network settings
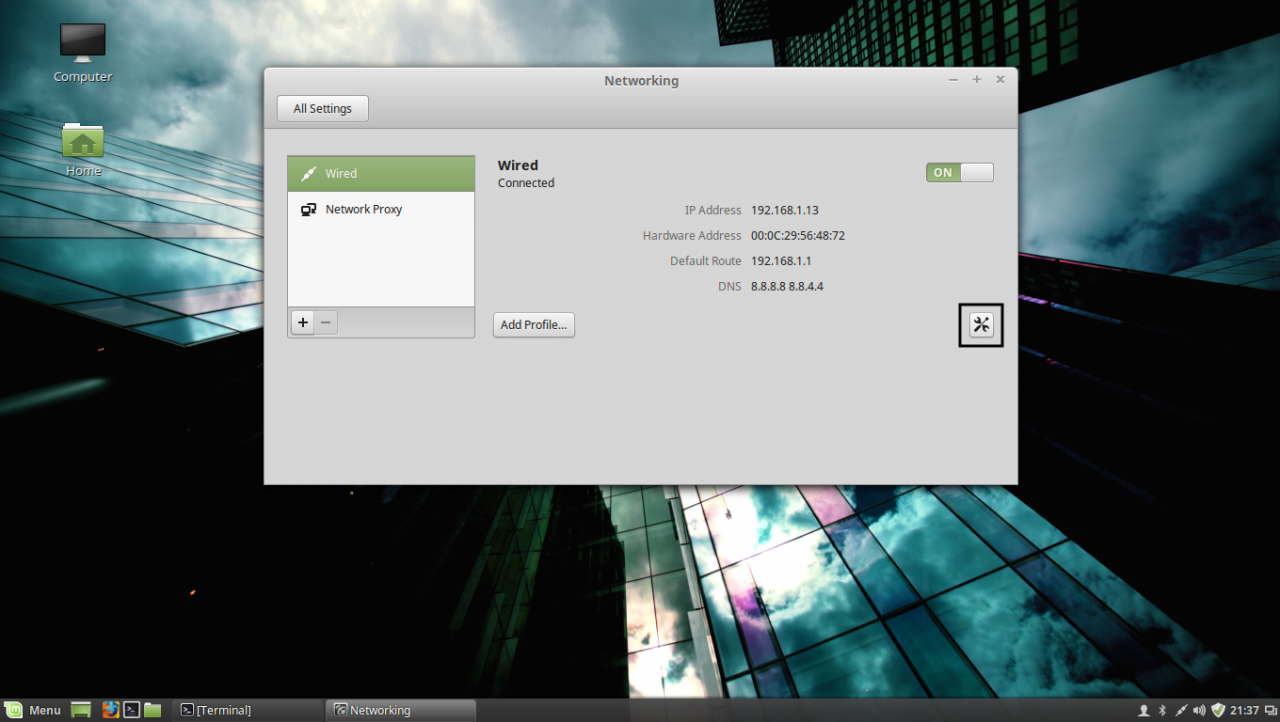
edit network interface settings
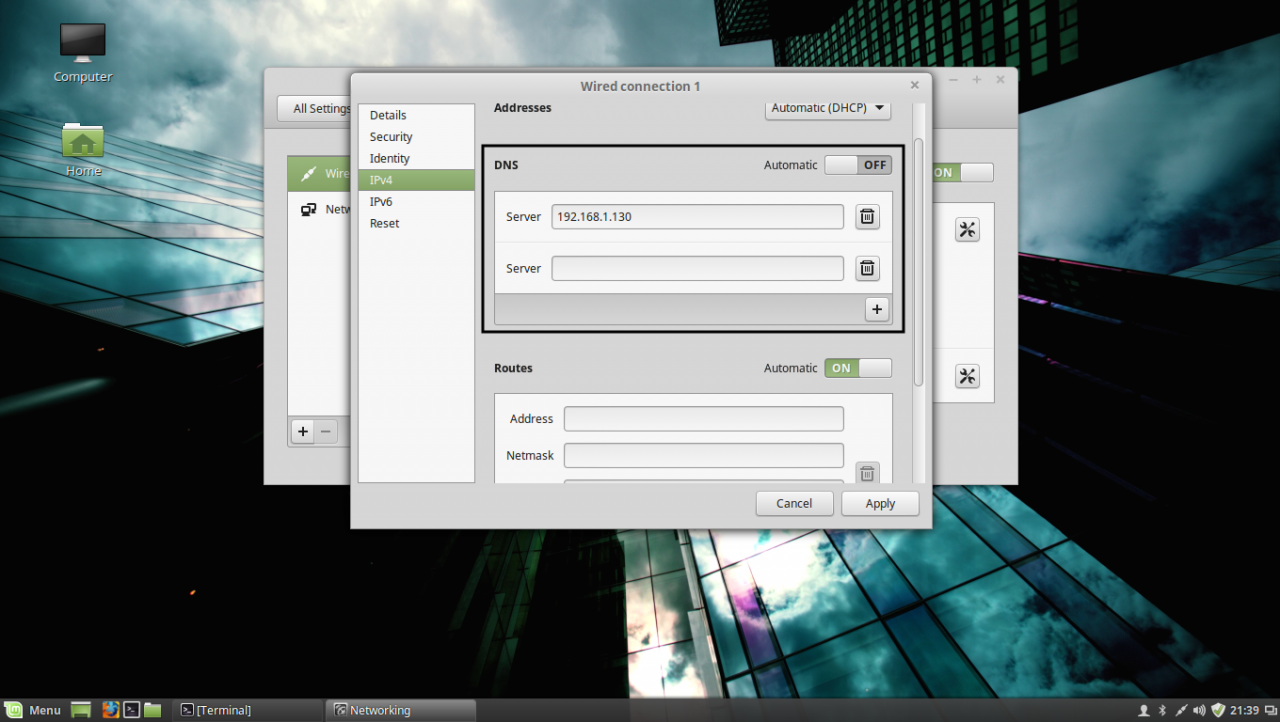
add DNS IP Address
If multiple Domain Controllers machines exists on your network then you can also add their IP Addresses on IPv4 DNS settings fields.
2. After you’re done, hit on Apply button and switch the edited Network Interface from ON to OFF and then back to ON in order to apply the new settings. After the network interface is started again, open a Terminal console and issue a ping command against your PDC domain name in order to verify if the settings are successfully applied and the domain name responds with the correct IP Address and FQDN of the PDC.
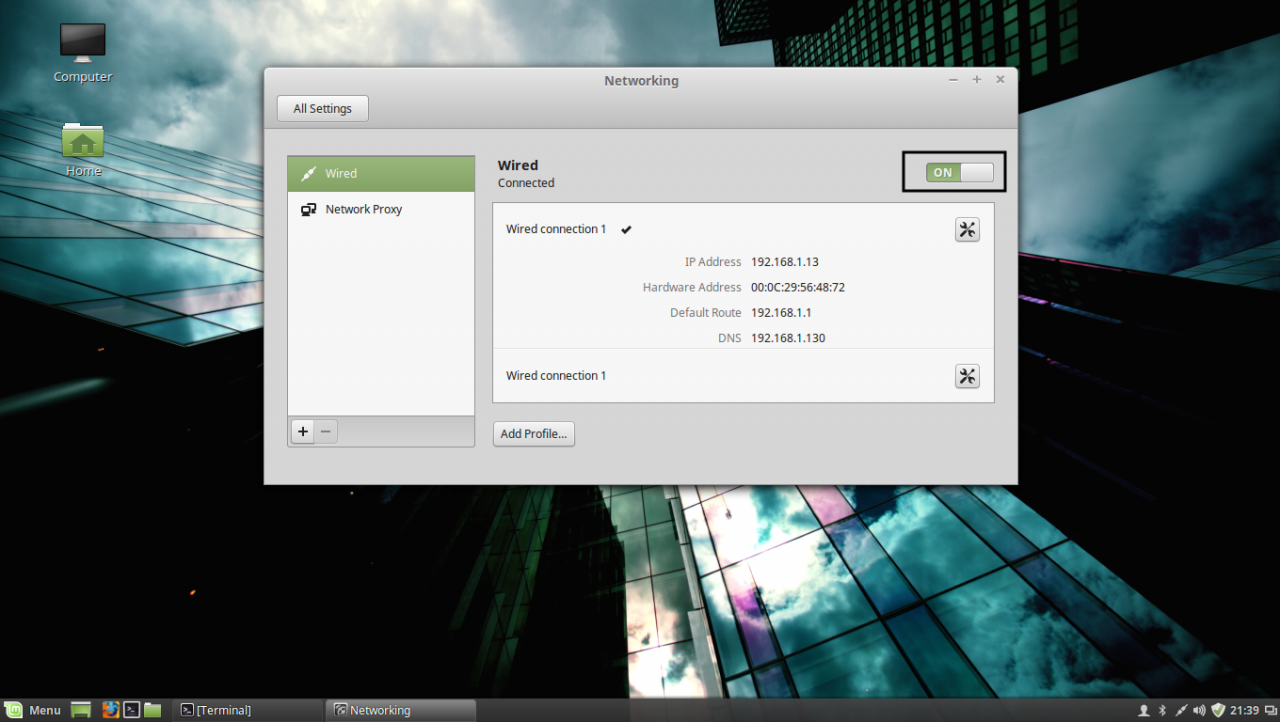
apply network settings
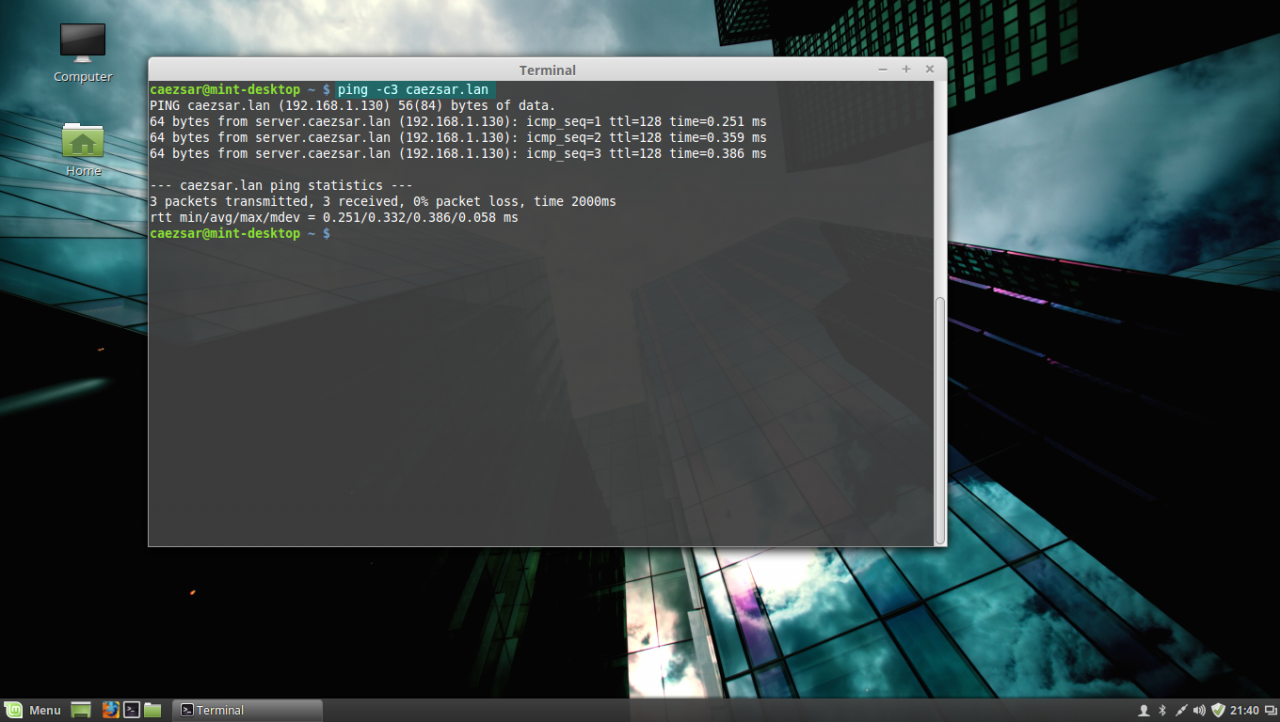
ping domain controller
If you want to avoid all this manual settings, then configure a DHCP server at your premises to automatically assign network settings, especially DNS entries, that will point to your Windows PDC IP Addresses needed for DNS resolution in order to reach the AD PDC.
STEP TWO – Install Required Software Packages
As presented at the beginning of this tutorial, in order to integrate a Linux Mint machine to an Active Directory Domain Controller you need to install the SSSD service along with the following software packages and dependency:
– SSSD service (responsible with back end realm authentication) with the following dependencies: sssd-tools (optional, but useful for sssd cache, user and groups manipulation), libpam-sss (PAM modules for local authentication) and libnss-sss (NSS modules for local DNS resolution)
– Realmd (system DBus service which manages domain integration and local resources permissions)
– The following Samba Modules: samba-common-bin and samba-libs (File sharing compatibility between Windows and Linux machines)
– Krb5-user (Client network authentication and communication with the PDC server)
– ADcli (Tools for joining domain and perform other actions on an AD)
– PackageKit (Linux cross-platform packages management for interoperabillity and user privileges for software installations)
3. Now, let’s start installing the above enumerated packages by opening a Terminal console on Linux Mint and issuing the following commands with sudo privileges:
First install Realmd and SSSD service:
sudo apt-get install realmd sssd sssd-tools libpam-sss libnss-sss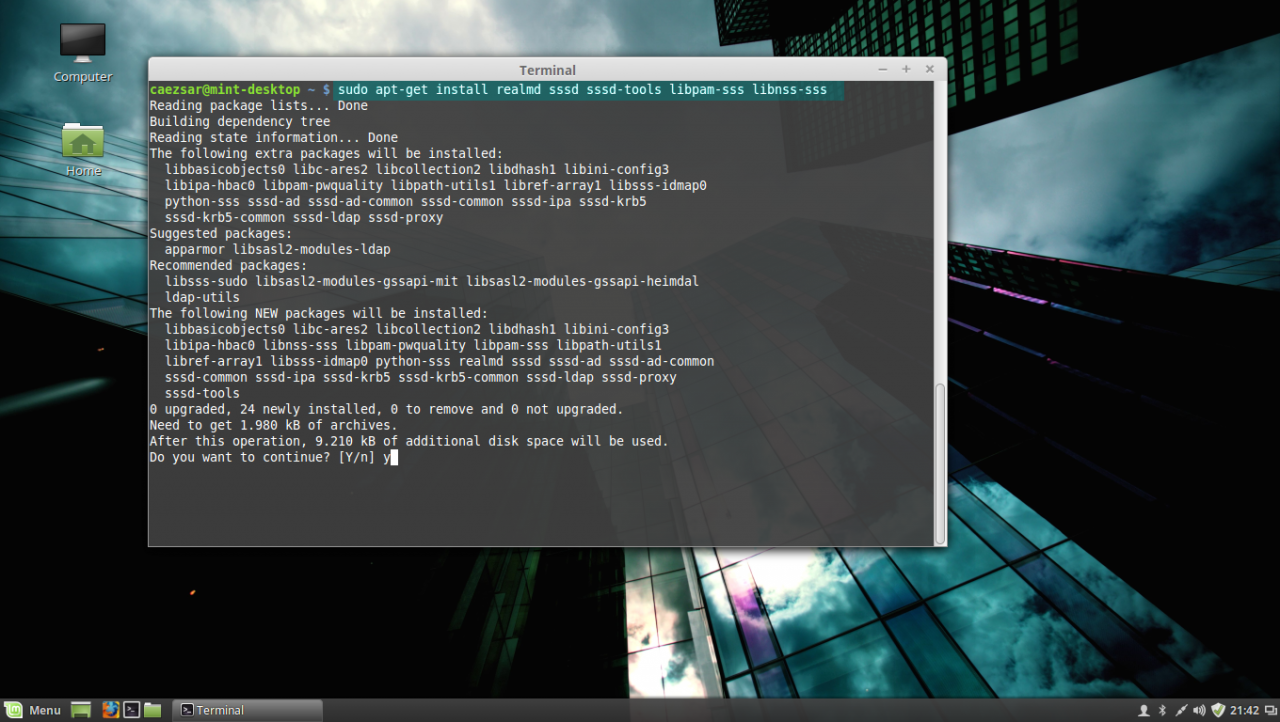
install realmd and sssd service
4. Next install Samba modules (by default this modules might be already installed on your system):
sudo apt-get install samba-libs samba-common-bin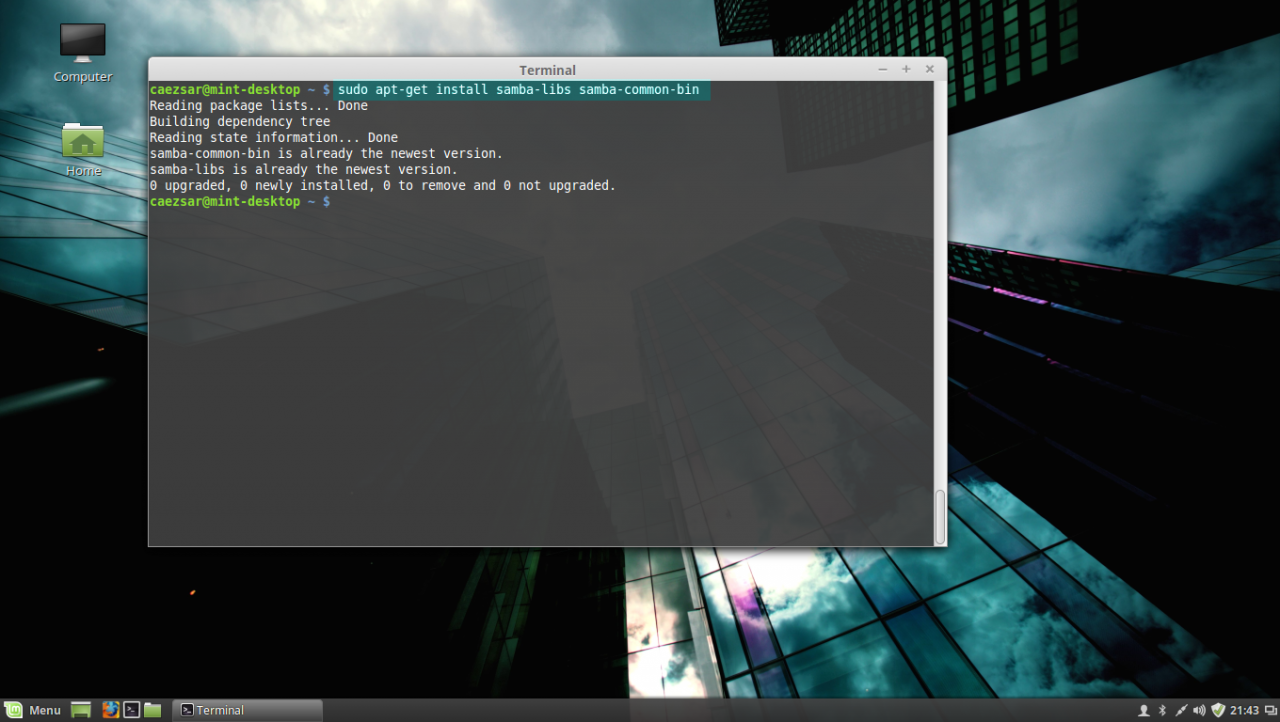
install samba modules
5. Last, install the other remained packages: krb5-user, adcli and packagekit. On krb5-user package, the installer will prompt you to enter the realm that will be used for Kerberos authentication. Use the name of the domain configured for your PDC with UPPERCASE (in this case the domain is CAEZSAR.LAN), then hit Enter key to continue further with the installation packages.
sudo apt-get install krb5-user adcli packagekit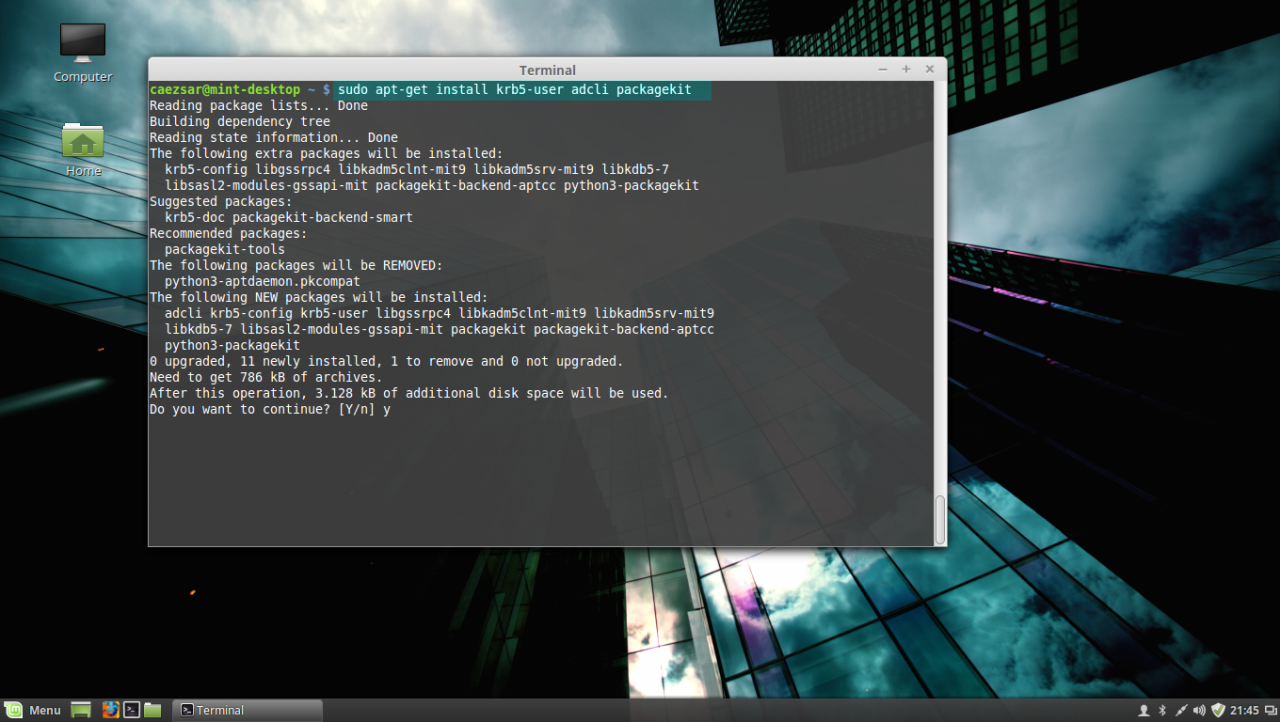
install kerberos, adcli and packagekit packages
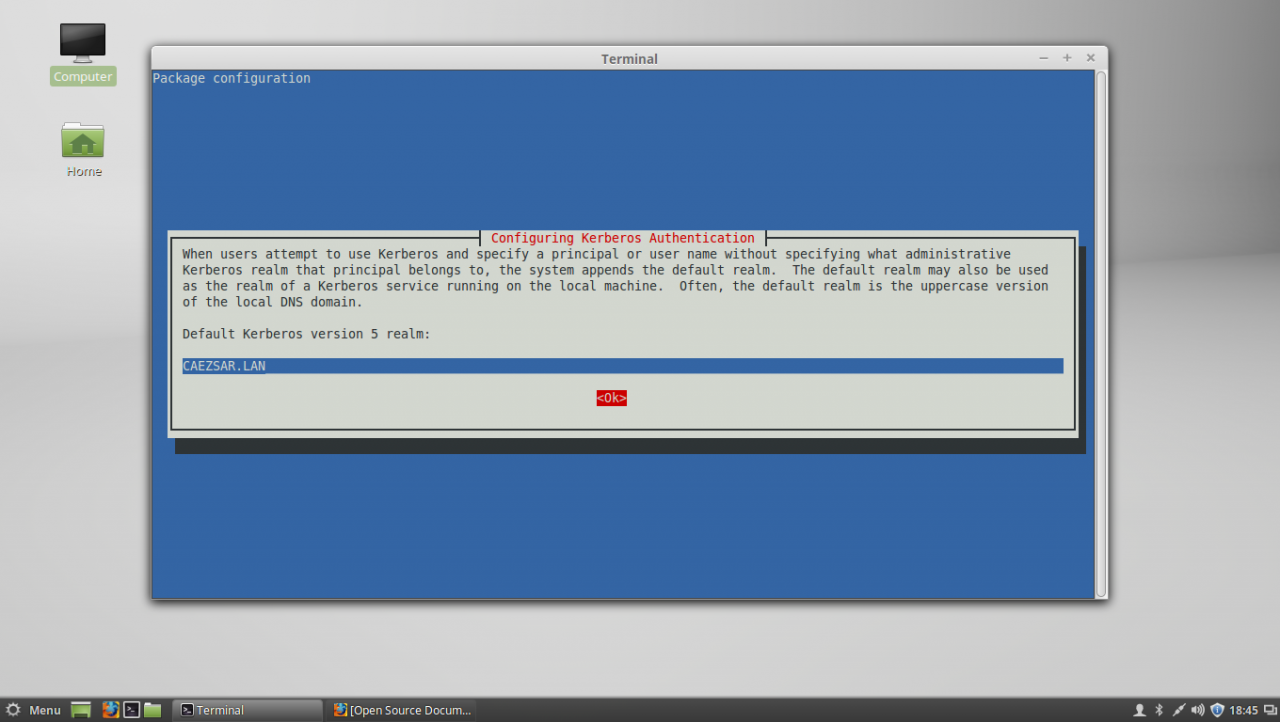
Configure Kerberos realm
STEP THREE – Edit Configuration Files for SSSD, Realmd and PAM
6. Next step before starting joining Linux Mint to Windows Server AD PDC is to configure the local services for AD network authentication. By default the SSSD service has no configuration file defined on /etc/sssd/ path. In order to create a default configuration file for SSSD service, issue the following command to create and simultaneous edit the file:
sudo nano /etc/sssd/sssd.confSSSD configuration file excerpt:
[nss]
filter_groups = root
filter_users = root
reconnection_retries = 3

[pam]
reconnection_retries = 3

[sssd]
domains = CAEZSAR.LAN
config_file_version = 2
services = nss, pam

[domain/CAEZSAR.LAN]
ad_domain = CAEZSAR.LAN
krb5_realm = CAEZSAR.LAN
realmd_tags = manages-system joined-with-adcli
cache_credentials = True
id_provider = ad
krb5_store_password_if_offline = True
default_shell = /bin/bash
ldap_id_mapping = True
use_fully_qualified_names = False
fallback_homedir = /home/%d/%u
access_provider = ad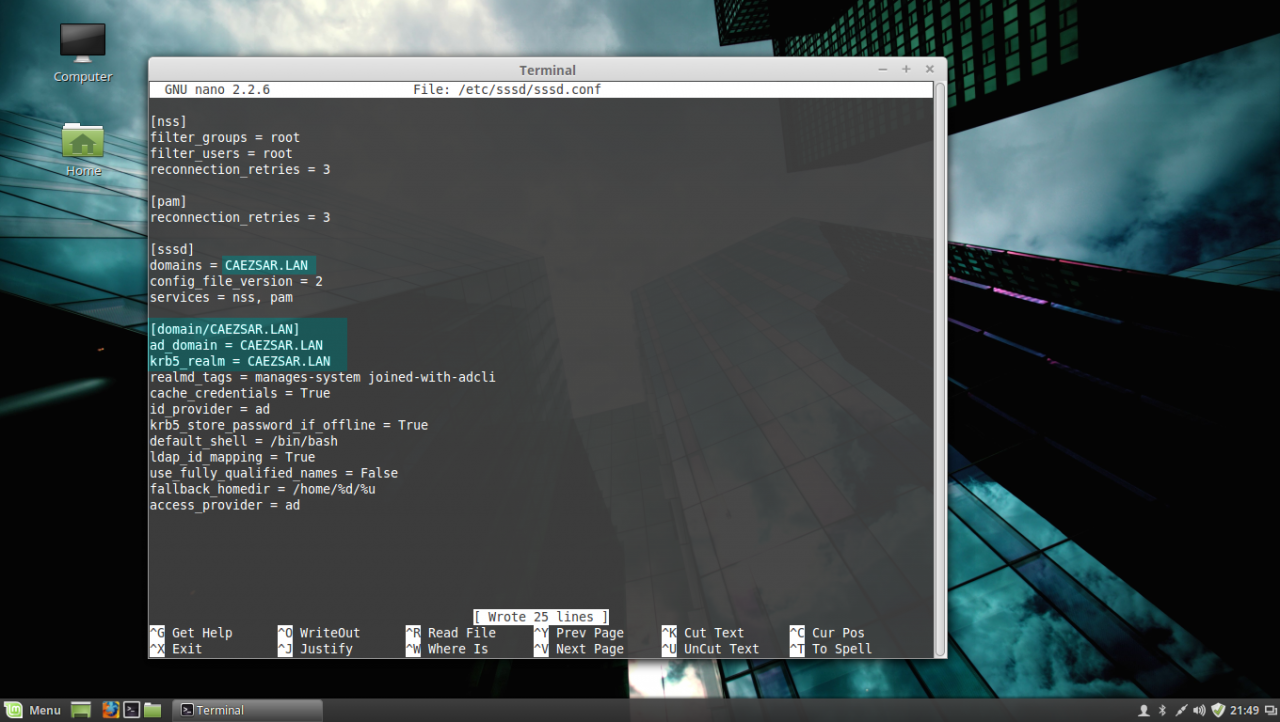
sssd configuration file
While editing the file make sure you replace domains, [domain/], ad_domain and krb5_realm parameters accordingly. Use the UPPERCASES as the above file excerpt suggests.
The fallback_homedir = /home/%d/%u parameter will cause the system to create home directories for all domain logged in users with the following path: /home/domain_name/domain_user, so practically all your domain users homes will be stored into a single directory named after your domain name on /home path. If you want to change this behavior so all domain users homes should be created as normal system users, /home/username, just remove %d variable and you’re done.
For other options and parameters concerning sssd.conf file run man sssd command.
After you finish editing the file, save it with CTRL+O , close it with CTRL+X and proceed further with the below instructions.
7. The next step is to create and edit a configuration file for Realmd in order to avoid some eventual package dependency problems by issuing the following command:
sudo nano /etc/realmd.confUse the following configurations for realmd file:
[service]

automatic-install = no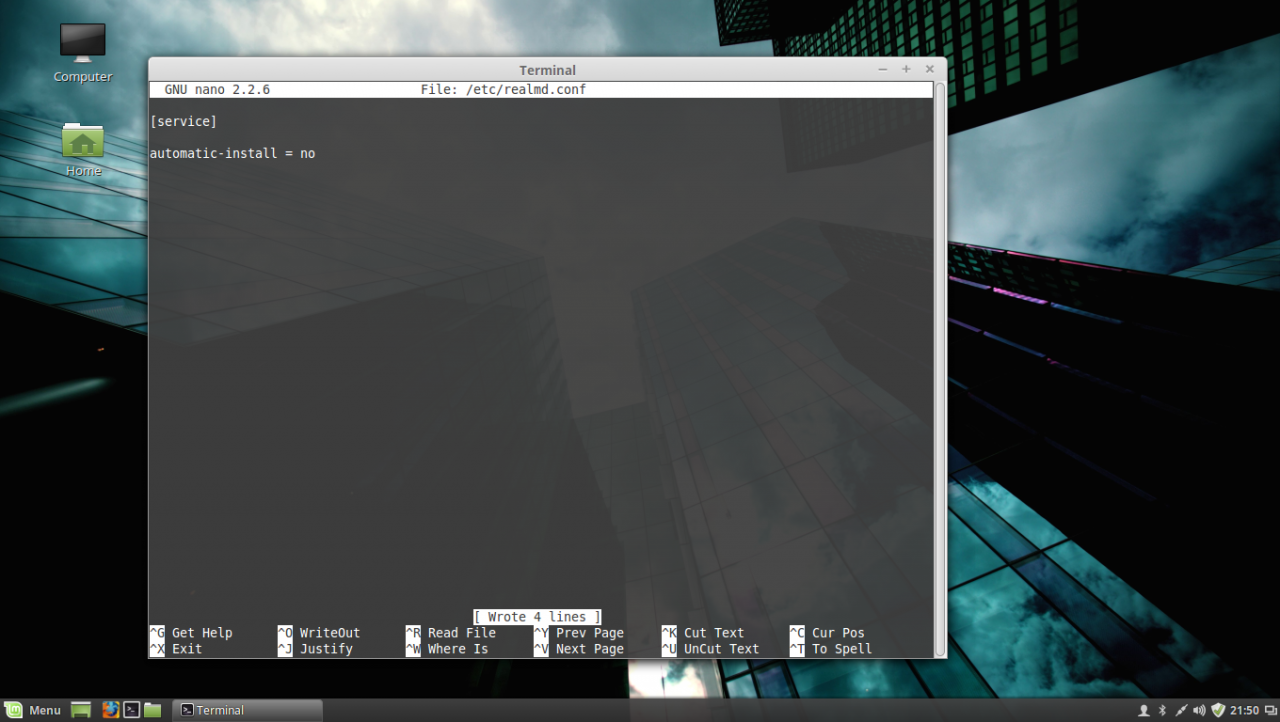
realmd conf file
After you add the above lines, save the file and close it.
8. The last file that you need to edit before joining the domain is the common-session PAM file. So, open this file for editing by running the below command and add the following line after the session optional pam_sss.so line in order for the system to automatically create home directories for the new authenticated AD users .
sudo nano /etc/pam.d/common-sessionAdd the following line as presented on the below screenshot:
session optional pam_mkhomedir.so skel = /etc/skel/ mask=0077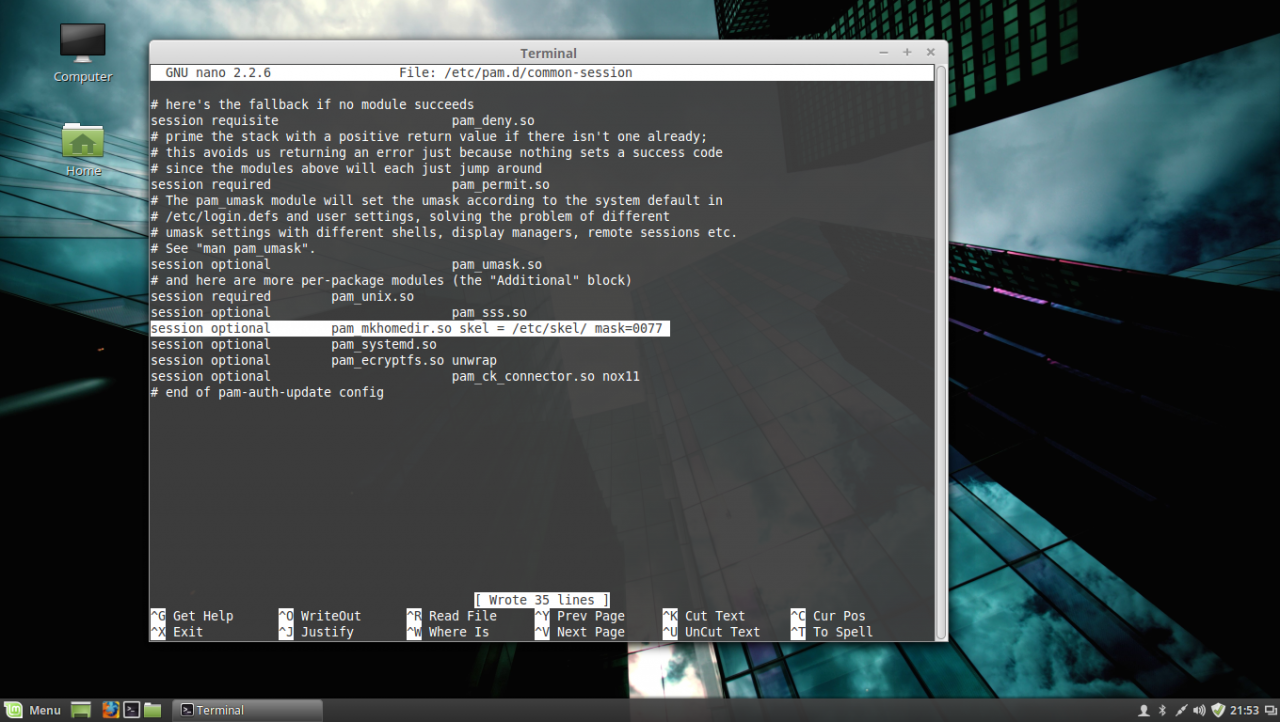
PAM common-session file
After you have edited the file, save it and close it, and proceed to the next step in order to make Linux Mint a part of the Windows Domain Controller.
STEP FOUR – Join Linux Mint to Windows Server 2012 Active Directory Domain Controller
9. Before joining the Linux Mint client to Windows PDC, first issue the discovery command against your domain name in order to view the complete realm configurations and a package list of software that must be installed on the client machine before you enroll it in the realm.
sudo realm discover domain.tld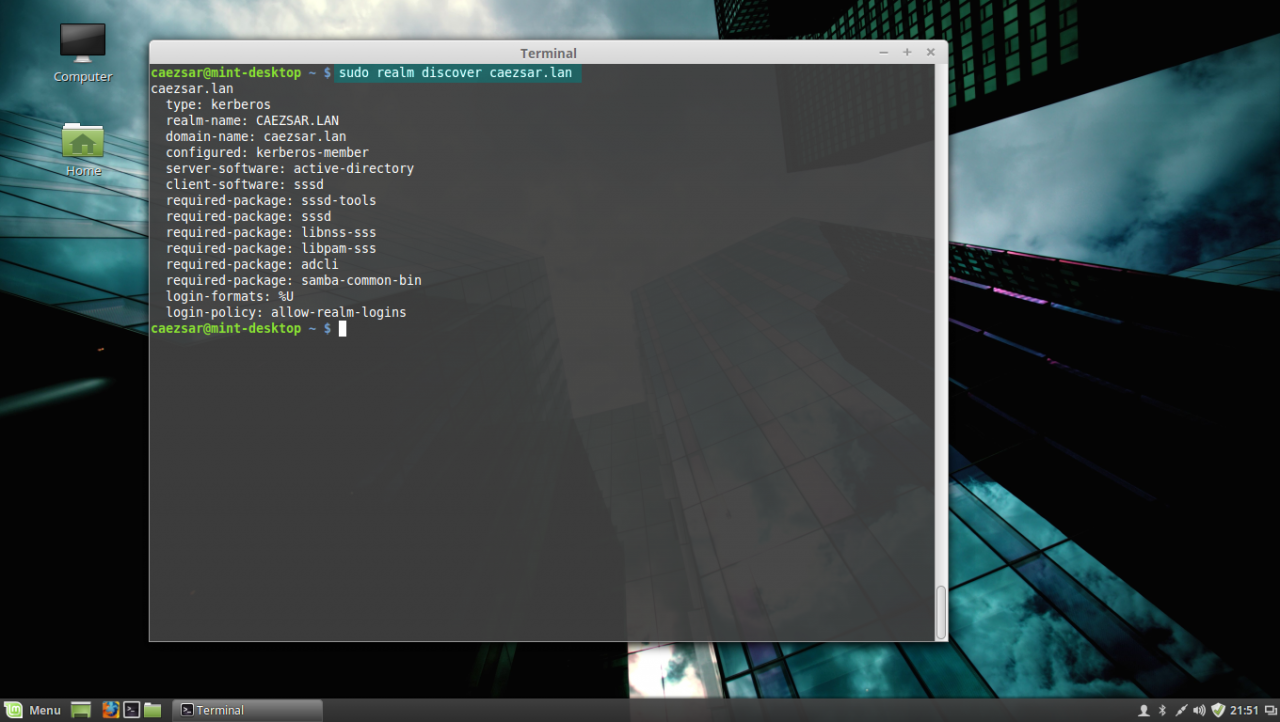
realm discover domain
10. If everything is correctly setup at the client side and the domain controller responds, issue the following command in order to integrate Linux Mint client machine to Windows Server 2012 AD PDC.
sudo realm join domain.tld -U domain_administrator --verbose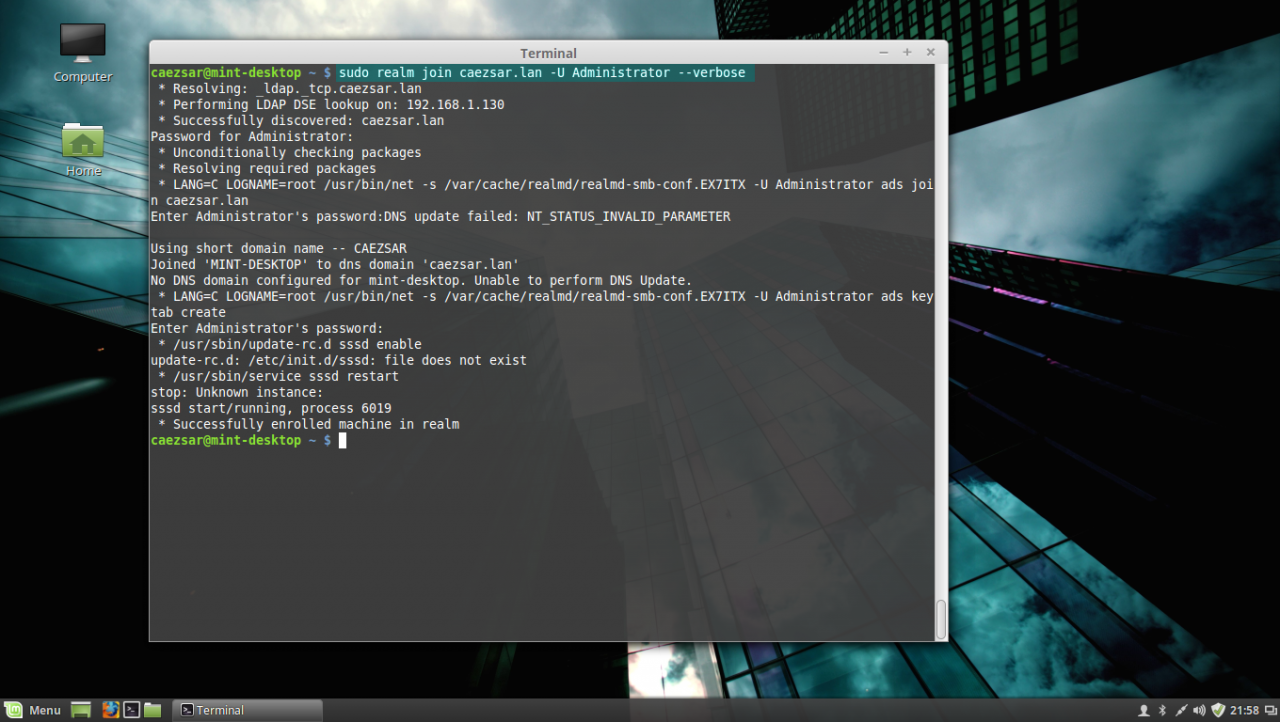
join AD domain
Use the -U option to specify an Active Directory administrative user with privileges to add machines on the server and the --verbose option to get debug output in case something goes wrong with the integration process.
Once the command returns successfully status and ads Linux Mint to AD you can use the sudo realm list command to view full details and the default configurations for your domain.

list realm
To manage sssd service use the following command switches (you don’t need to manually start the sssd service because it’s automatically started by the realmd when the machine is enrolled to realm):
sudo service sssd status|start|stop11. To check if the machine appears on the Domain Controller, go to your Windows Server 2012, open Active Directory Users and Computers utility and search your Linux Mint hostname.
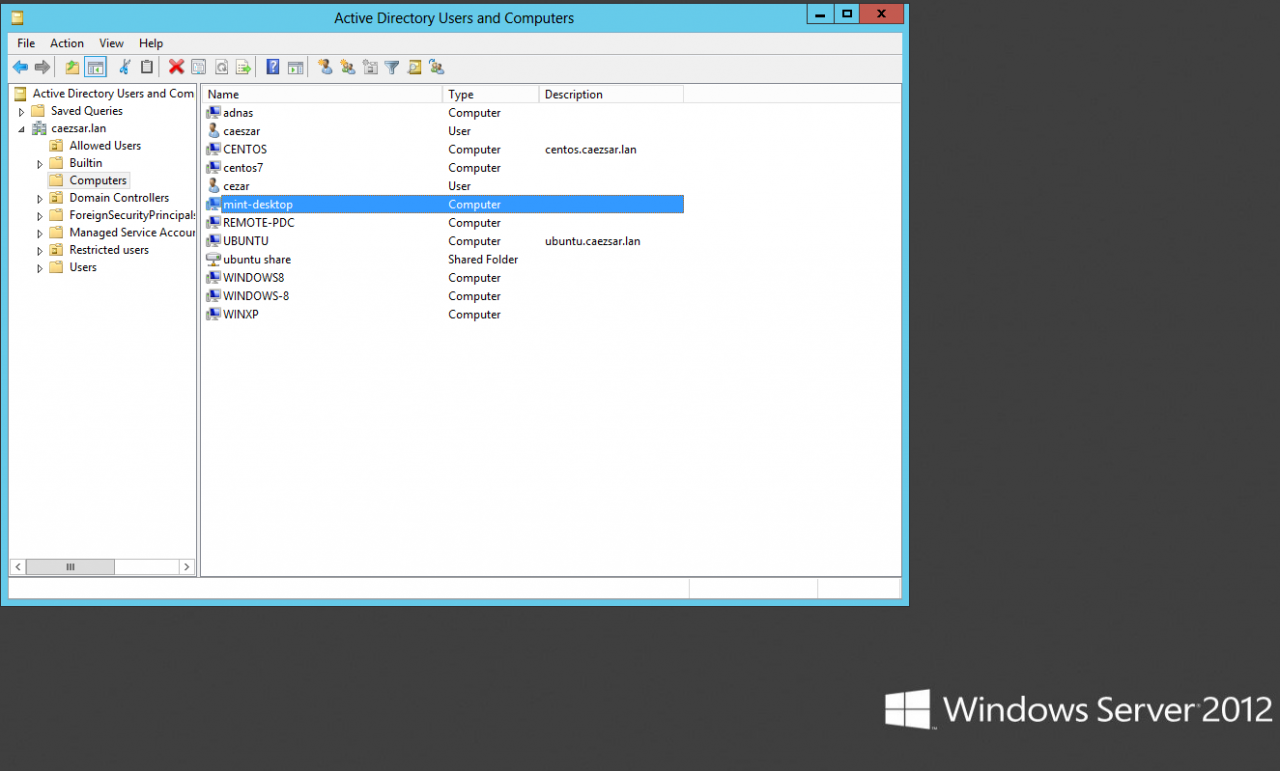
Active Directory Users and Computers
STEP FIVE – Log In on Linux Mint with Active Directory Accounts
12. To authenticate on Linux Mint with and an Active Directory user, first you need to add a permit rule on local policies in order to grant access for all realm users on local machine, by issuing the following command:
sudo realm permit --allTo grant access just for a specific AD user or group use the following command syntax:
sudo realm permit -u AD_usernamesudo realm permit -g AD_groupTo withdraw access for a user use the command with --x switch:
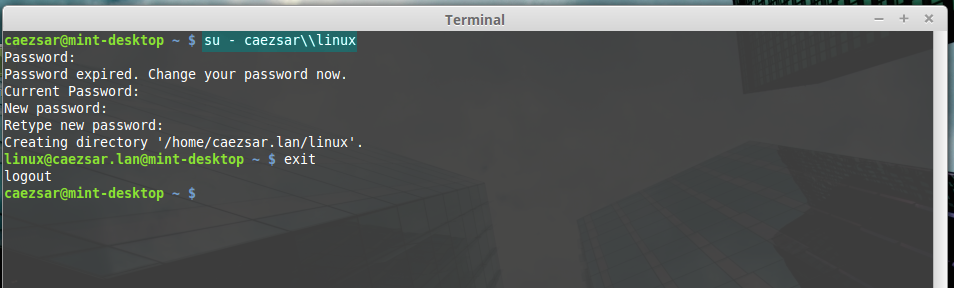
sudo realm permit domain --x domain\AD_username13. To perform Terminal console command line authentications on Linux Mint host with an Active Directory account, use double backslashes to escape the backslash which separates the domain string from user, as shown in the below syntax (you can append the dot domain or use just the domain string):
su - domain.tld\\AD_usernameor
su - domain\\AD_username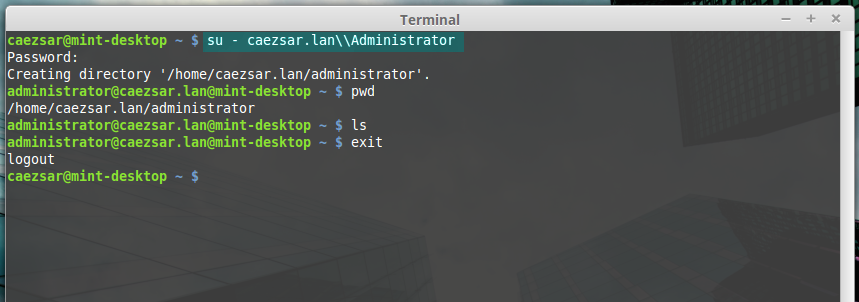
AD user login
ad user login without dot domain
14. To log in with an AD account on Linux using Putty or to perform Linux Mint MDM GUI logins use the following syntax:
domain\AD_username

domain.tld\AD_username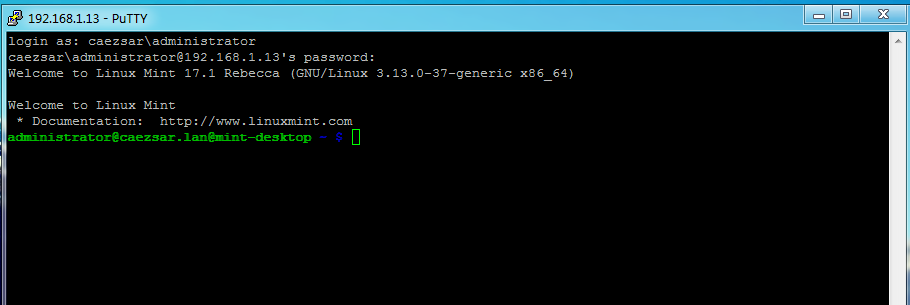
AD user Putty login
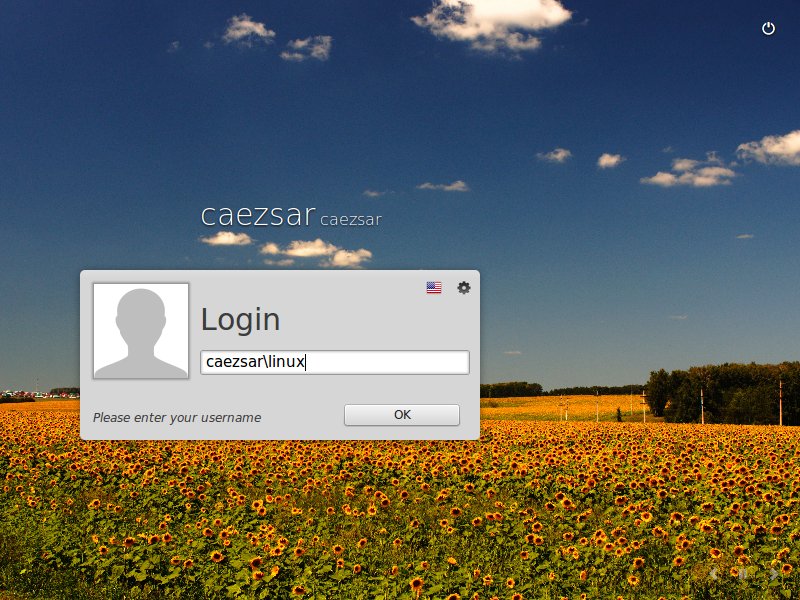
Ad user GUI login
15. In case you have issues with AD users authentication on Linux Mint Logon Screen, log in with a local user account and change the Login Window Theme from an HTML theme to a GDM theme, log out, hit Escape key is case the last logged in user appears on username Login filed and continue the authentication process with a AD account as presented above.
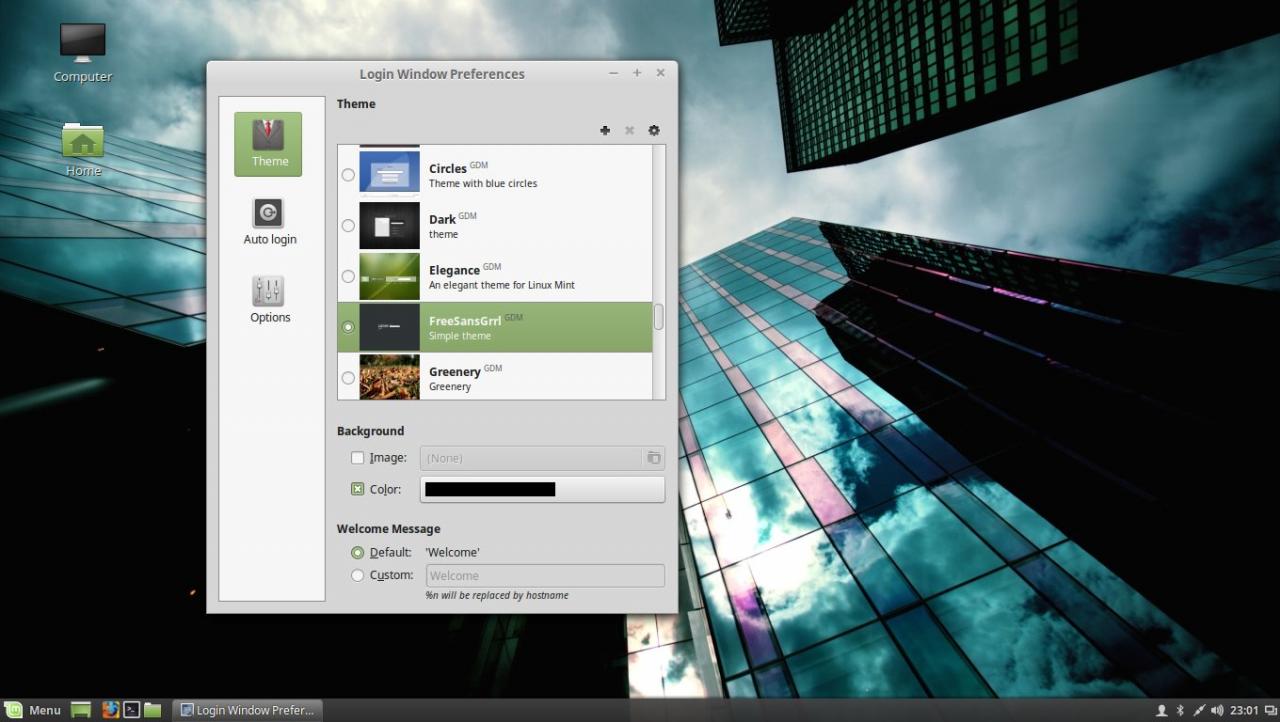
Use GDM theme

GDM login screen
STEP SIX – Add Root Permissions to AD Domain Admins Users
16. In case you want to allow all Active Directory Domain Admins to have full administrative permissions in order to execute any command with root privileges on the Linux Mint machine, open the local sudoers file for editing and add the following line:
sudo nano /etc/sudoersor
sudo visudoAdd this line after %sudo line:
%domain\ admins@domain.tld ALL=(ALL) ALL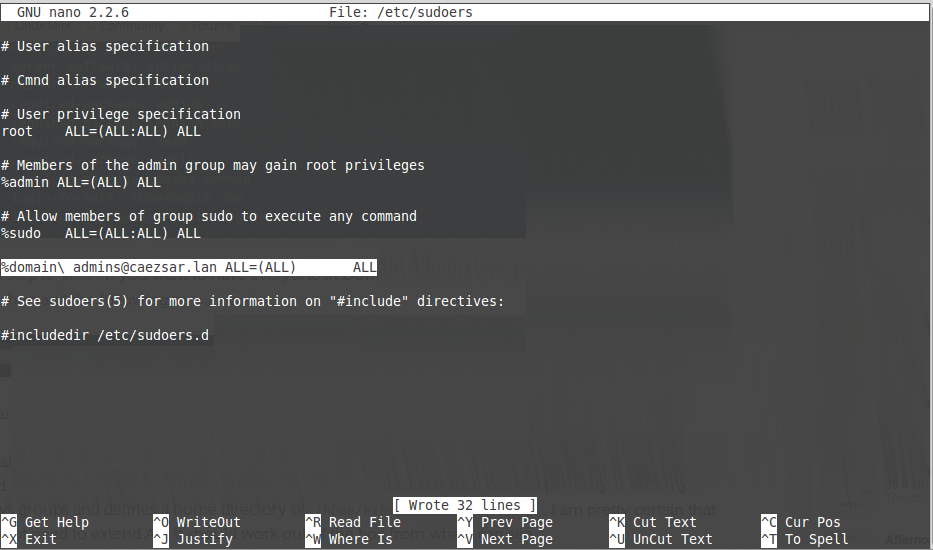
add domain admins root privileges
17. In case you don’t want your Linux Mint machine to be a part of the domain anymore, issue the following command to leave the domain:
sudo realm leave domain.tld -U AD_admin_user --verbose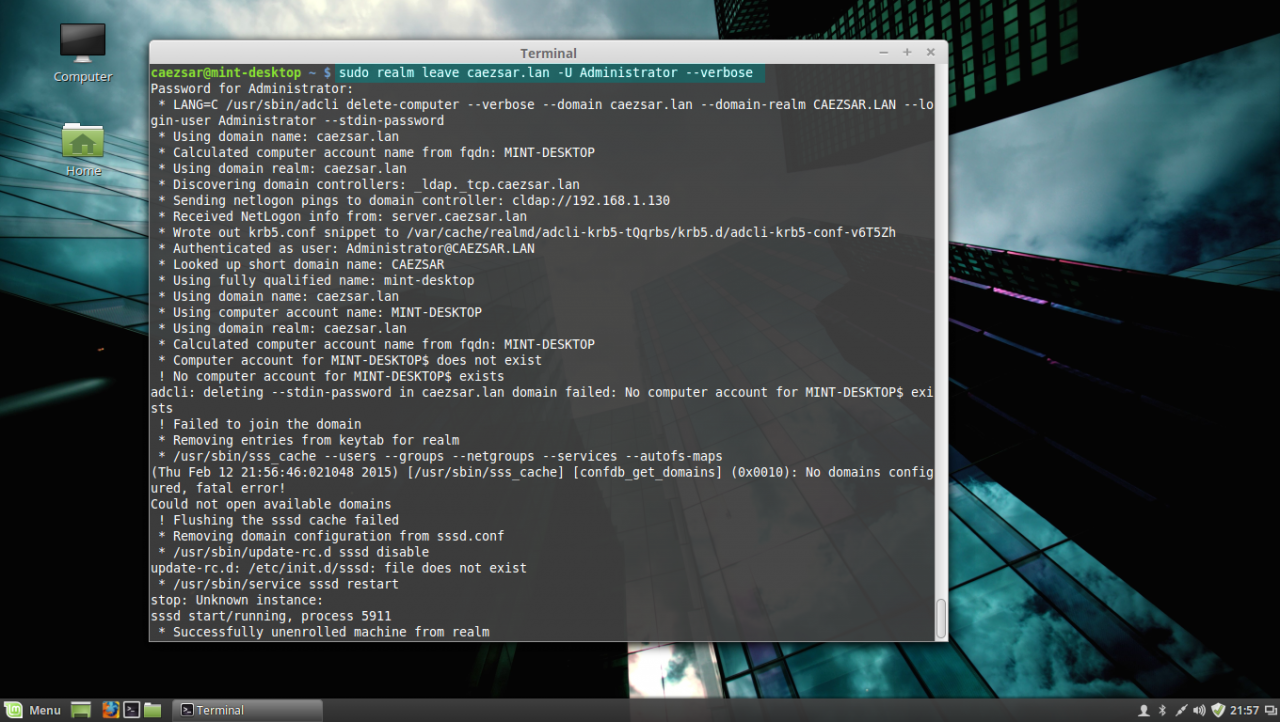
leave AD PDC
That’s all! Now, the machine running Linux Mint 17.1 is integrated as a part of Windows Active Directory Domain Controller and can successfully replace your old Windows XP machine, for which Microsoft has stopped its support, but keep in mind that some features and, especially, a huge part of Active Directory Group Policy, don’t apply on Linux systems.