23.08.2018
Просмотров: 47832
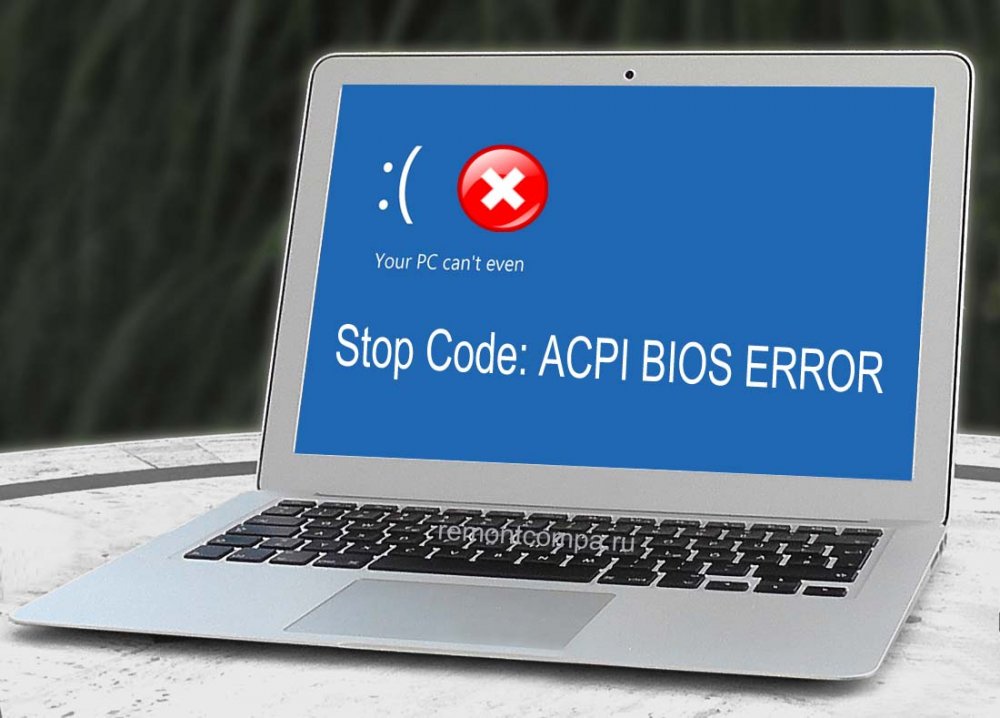
Ошибка на Windows 0x000000a5 с сообщением ACPI_BIOS_ERROR появляется не только на современной Windows 10, но и на старых Windows XP, Vista, 7 и 8. Возникает она как при загрузке системы, так и при её установке. Указывает STOP 0x000000a5 на то, что BIOS не соответствует ACPI или же система обнаружила новую ОЗУ после выхода из сна. Поэтому способов решения этого синего экрана смерти будет несколько.
Содержание:
- Способы решения ошибки ACPI BIOS ERROR с кодом 0x000000a5
- Способ №1
- Способ №2
- Способ №3
- Способ №4
Способы решения ошибки ACPI BIOS ERROR с кодом 0x000000a5
Ошибка 0x000000a5 при установке или загрузке Windows появляется по следующим причинам:
- Старая прошивка BIOS, которая не соответствует ACPI;
- Установка несовместимых модулей ОЗУ;
- Обнаружение системой дополнительной виртуальной памяти при выходе из сна или режима гибернации;
- При активации Windows 7 и XP часто создается бинарный файл в корне системного диска. Он может быть причиной синего экрана смерти ACPI BIOS ERROR при загрузке системы;
- Повреждение драйвера ACPI.
Для того, чтобы исправить такую ошибку, нужно воспользоваться следующими советами.
Способ №1
Этот метод поможет исправить ошибку ACPI BIOS ERROR на Windows 10 и других более старых версиях операционной системы. Нужно скачать с официального сайта производителя материнской платы новую версию BIOS и обновить прошивку. Ошибка будет исправленной.
Способ №2
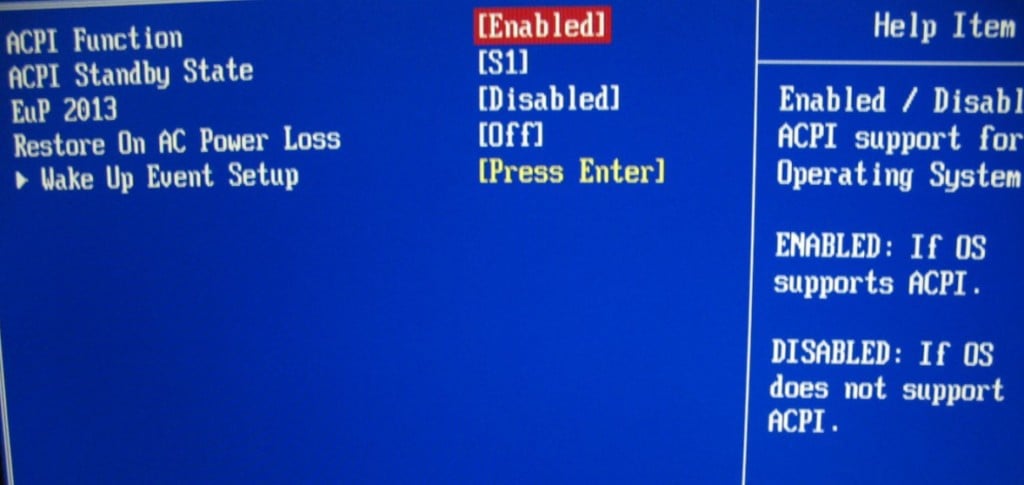
Избавиться от синего экрана смерти можно, отключив режим ACPI. Сделать это можно двумя способами.
- До начала установки Windows загружаемся в BIOS.
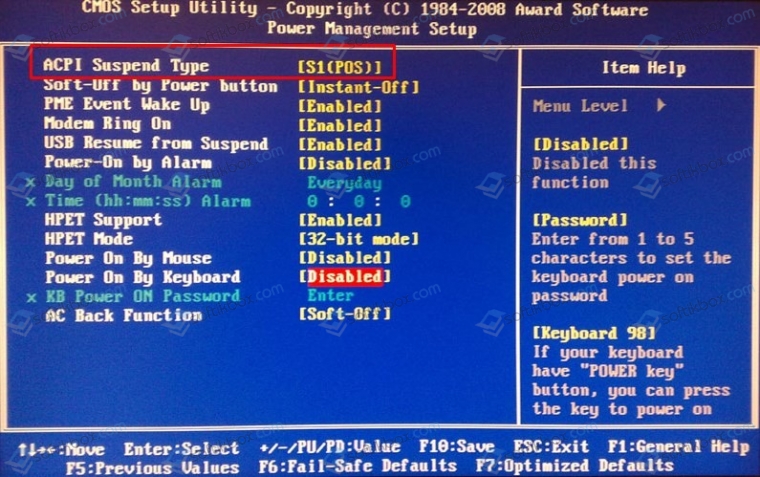
- Находим параметр, отвечающий за электропитание (Power Managmant. Может быть другое обозначение. Зависит от версии прошивки и материнской платы).
- Отключаем ACPI.
- Нажимаем «F10», чтобы сохранить результат и перезагружаем ПК. Теперь можно устанавливать Windows.
Если ошибка ACPI BIOS ERROR возникает на этапе установки операционной системы, то отключить ACPI можно следующим образом:
- Начинаем установку операционной системы заново;
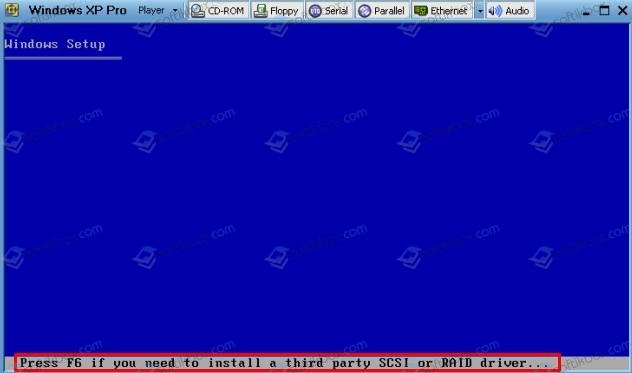
- Как только на экране появится текст «Нажмите F6 для установки драйверов SCSI или RAID» (в переводе на английский появится такой текст «Press F6 if you need to install third-party SCSI or RAID driver»), то нажать нужно клавишу F7.
- Она отменит установку драйвера ACPI и продолжит дальнейшую инсталляцию Windows.
- Установка Windows продолжиться без BSODа.
Способ №3
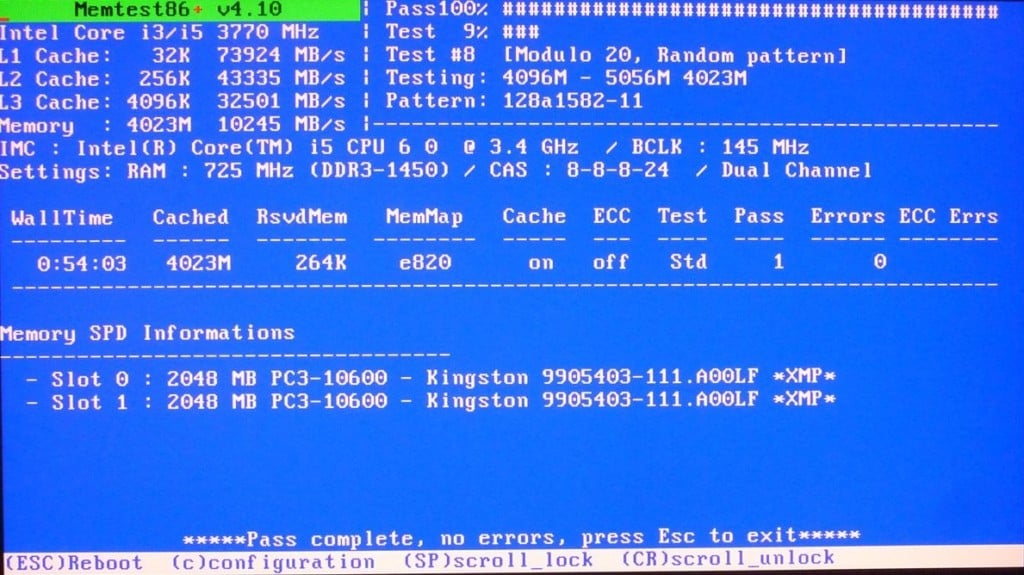
Часто BSOD ACPI_BIOS_ERROR появляется по причине неисправной оперативной памяти, а также её разгона. Если вы выполняли последнее действие, то нужно сбросить все настройки к заводским.
Также не помешает проверить модули оперативной памяти на ошибки. Сделать это можно с помощью программы MemTest86. Или же можно по очереди доставать из слотов модули ОЗУ на некоторое время, запустив систему только с одной планкой. В данном случае вы либо услышите пост, либо система запустится корректно. Так можно исключить планку-виновницу.
Способ №4
Если синий экран смерти возник во время включения ноутбука после режима сна, значит, система обнаружила новую виртуальную память, обозначенную файлом Hiberfil.sys. Этот файл нужно удалить. Однако для начала нужно перезагрузить систему, возможно, ошибка исчезнет сама по себе. Если же BSOD не исчез, то нужно выполнить следующее:
- Вставляем установочный диск в дисковод. Нажимаем «R» на этапе «Добро пожаловать» в Setup.
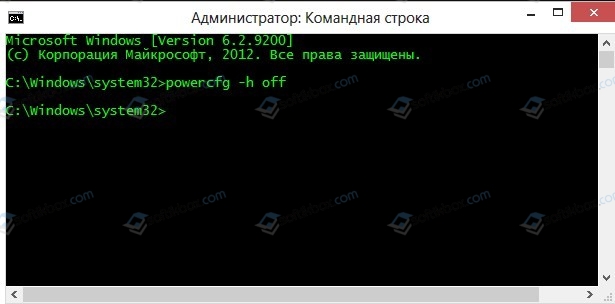
- Выбираем «Командную строку» и прописываем команду «powercfg -h off».
- Или удаляем данный файл вручную, используя встроенный поиск.
И еще один способ, как удалить hiberfil.sys – это внести изменения в редактор реестра Windows. Для этого выполняем следующее:
- Нажимаем «Win+R» и вводим «regedit».
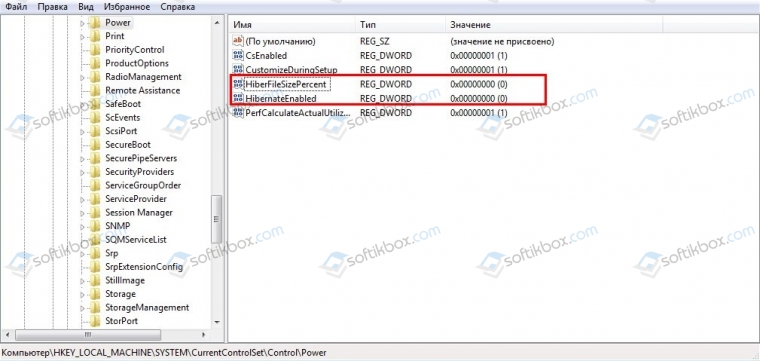
- Откроется редактор реестра. Переходим по ветке «HKEY_LOCAL_MACHINE\SYSTEM\CurrentControlSet\Control\Power». Здесь выбираем параметры «HiberFileSizePercent» и «HibernateEnabled» и задаем им значения, равные «0».
- После редактирования реестра стоит перезагрузить систему.
Важно отметить, что если ошибка не исчезает, то нужно переустановить BIOS и провести полную диагностику аппаратной части ПК.
Disabling the AHCI from the BIOS can solve this issue for good
by Milan Stanojevic
Milan has been enthusiastic about technology ever since his childhood days, and this led him to take interest in all PC-related technologies. He’s a PC enthusiast and he… read more
Updated on
- The ACPI_BIOS_ERROR can be caused by your system settings or outdated BIOS version.
- Keeping your drivers up to date is a great way to enjoy an error-free PC experience.
- Sometimes, overclocking settings can cause system instability, so be sure to disable them.
XINSTALL BY CLICKING THE DOWNLOAD
FILE
Blue Screen of Death errors such as ACPI_BIOS_ERROR can be serious since they will restart your computer every time they appear.
These types of issues can sometimes even prevent Windows from starting, therefore you must know how to fix them right away.
- How does ACPI work?
- Why does ACPI_BIOS_ERROR appear?
- How can I fix the ACPI_BIOS_ERROR BSOD error on Windows 10 & 11?
- 1. Use a third-party BSOD fixer
- 2. Remove your SSD and update your BIOS
- 3. Enter BIOS and disable AHCI
- 4. Update your drivers
- 5. Set the ACPI mode to S1 in BIOS
- 6. Disable the jumper JPME1 and reflash BIOS
- 7. Uninstall the Microsoft ACPI Compliant driver
- 8. Install Windows 10 in UEFI mode
- 9. Remove the overclock settings
- 10. Reset BIOS to default
- How can I fix the ACPI_BIOS_ERROR on Windows 11?
- 1. Use System Restore
- Is ACPI_BIOS_ERROR serious?
- Should I turn off ACPI?
Windows stop code ACPI BIOS is a blue screen error, and just like any other BSOD error, it will force your PC to crash. Speaking of this problem, users reported the following issues:
- ACPI_BIOS_error Windows 10 install – This error can appear while trying to install Windows 10. If this happens, it’s advised to check your BIOS configuration and change a couple of settings before attempting to install Windows 10 again.
- ACPI_BIOS_error Windows 7 – Many users reported this error in Windows 7. Even if you’re not using Windows 10, you should be able to fix your problem by using one of our solutions.
- ACPI_BIOS_error Surface 2 – This issue can affect almost any Windows device and Surface is not an exception. If you have this problem on your Surface device, you will be able to fix it using the solutions from this article.
- ACPI BIOS error RAM – Most common hardware cause for blue screen errors is your RAM. If you have this problem on your PC, it’s advised to scan your RAM and check if it’s faulty. In addition, be sure to remove any overclock settings that you have applied to your RAM.
- ACPI BIOS error Toshiba, Asus, Acer, Sony Vaio, Dell, HP, Lenovo – This issue can affect PCs from any manufacturer. This problem can be related to your drivers, so you might have to update them or find and reinstall the problematic driver.
- ACPI_BIOS_error acpi.sys – This error message will sometimes give you a name of the file that caused the error. If that happens, you need to do a bit of research and find the driver or device that is associated with that file.
- ACPI BIOS error loop, blue screen – Since this is a blue screen error, sometimes it might force your PC into a restart loop. This can be a big problem, but you should be able to fix it by changing your BIOS settings.
How does ACPI work?
ACPI stands for Advanced Configuration and Power Interface, and it’s a feature of BIOS that allows you to manage power consumption on your PC.
Using it you can configure your device to turn off or enter a low-power state when your battery is almost empty.
Why does ACPI_BIOS_ERROR appear?
This issue appears usually due to your BIOS settings, and to fix it, it’s advised that you adjust them accordingly. Outdated motherboard firmware can also cause this problem, so keep it updated.
Device drivers are another potential cause of this problem, so make sure that you’re always using the latest version.
How can I fix the ACPI_BIOS_ERROR BSOD error on Windows 10 & 11?
1. Use a third-party BSOD fixer
One easy way to fix any BSoD error is by installing specialized software. This kind of specialized software scans your device for corrupted system files or harmful files from other software.
How we test, review and rate?
We have worked for the past 6 months on building a new review system on how we produce content. Using it, we have subsequently redone most of our articles to provide actual hands-on expertise on the guides we made.
For more details you can read how we test, review, and rate at WindowsReport.
Afterward, it shows you a list of all of them. You can choose to restore these files with a couple of simple clicks. The program does everything for you.
2. Remove your SSD and update your BIOS
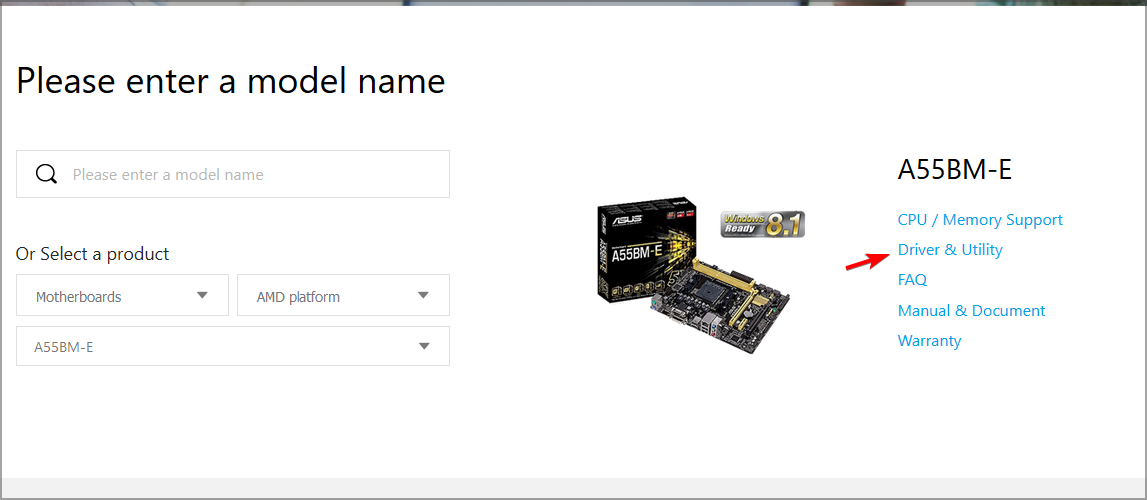
- Visit your motherboard manufacturer’s download page.
- Select your motherboard model and choose Driver & Utility section.
- Navigate to BIOS & Firmware section. Select the latest version of BIOS and click on Download.
- After downloading the file, move it to flash drive.
- Restart your PC and keep pressing F2 to access BIOS.
- Select the Instant Flash option and select the file you downloaded from the USB drive.
- Wait for the process to finish and don’t interrupt it.
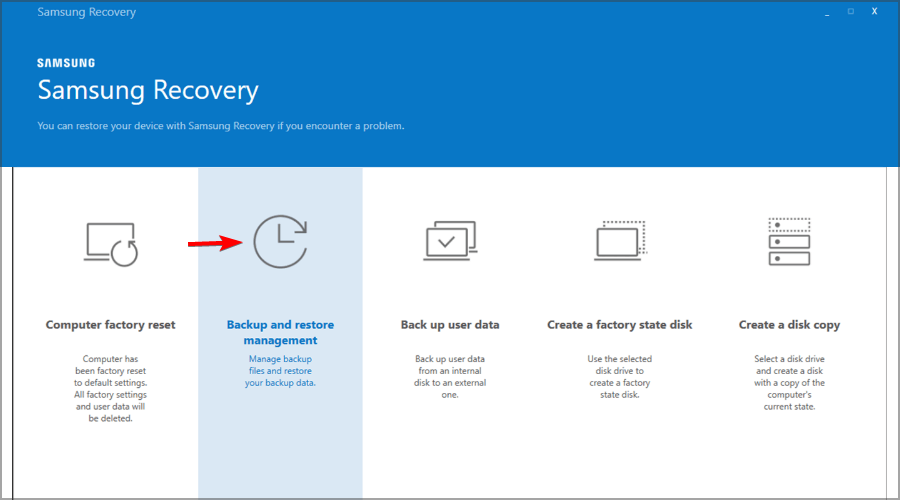
For Samsung laptops:
NOTE
Installing BIOS is an advanced procedure, and you can cause permanent damage to your PC if you don’t perform it properly, so be sure to check your motherboard manual for detailed instructions.
- Locate your SSD drive and disconnect it.
- Start your laptop and you should see Samsung’s prompt asking you to press F4 to start Recovery Mode.
- Press F4 and quickly reconnect your SSD drive.
- Choose the option to restore and wait for the process to complete.
- Run SW Update software and install the BIOS update.
You can also use specialized software such as Fortect to fix these types of issues without having to update your firmware.
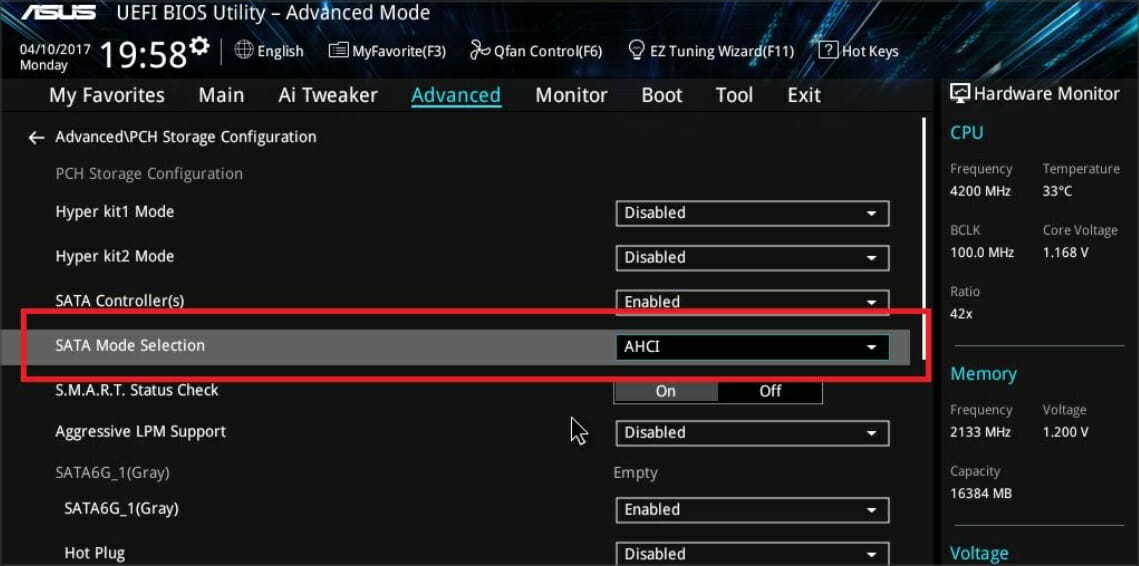
3. Enter BIOS and disable AHCI
- While your PC boots, press F2 to enter BIOS.
- Navigate to Integrated Peripherals.
- Locate the AHCI Mode and set it to Disabled.
For more information on BIOS, we suggest that you check our how to access BIOS guide.
4. Update your drivers
- Visit your motherboard’s website.
- Select your model and go to Driver & Utility.
- In the Driver section, download the latest drivers for all components.
- Now install the drivers and check if that solves the problem.
Do keep in mind that you need to perform these steps for all hardware components that you have on your PC. For more information, visit our how to update drivers guide.
To make this process faster and simpler, you can always use driver updater software.
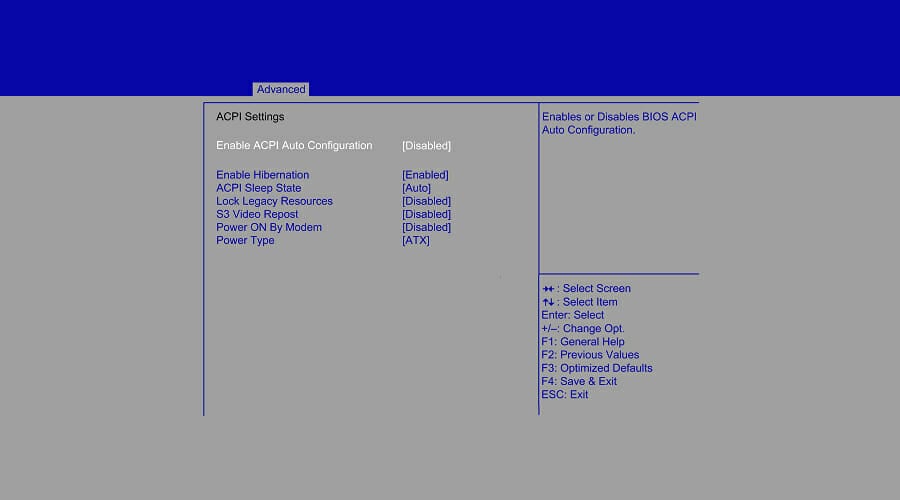
5. Set the ACPI mode to S1 in BIOS
- While your PC boots, keep pressing F2 to enter BIOS.
- Locate the ACPI mode and set it to S1.
- Save the changes.
NOTE
For detailed instructions on how to do that, we strongly advise that you check your motherboard manual since every motherboard’s BIOS has a different UI.
6. Disable the jumper JPME1 and reflash BIOS
- Turn off your PC and disconnect it from the power source.
- Open the computer case.
- Locate the JPME1 jumper and disable it.
- After doing that, reflash your BIOS.
Owners of the X9DAI motherboard reported that disabling the JPME1 jumper and reflashing the BIOS fixed this issue for them. Do keep in mind that this solution might not work for other motherboard models.
7. Uninstall the Microsoft ACPI Compliant driver
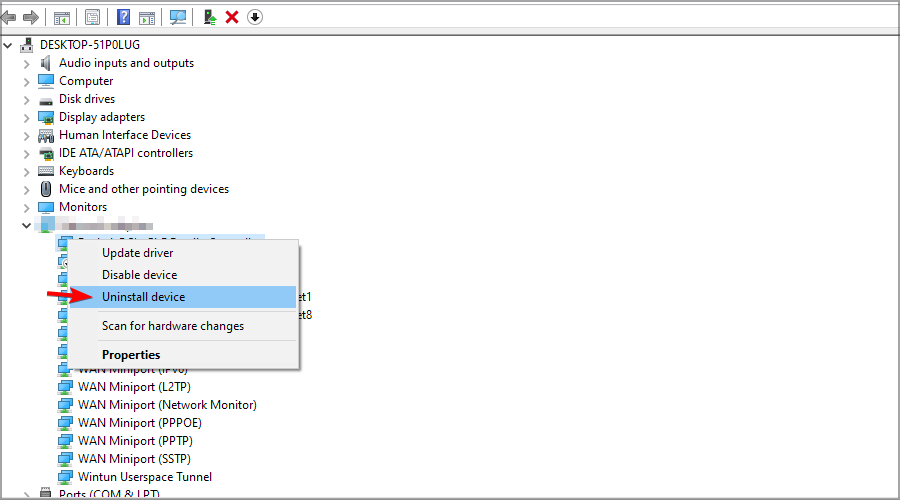
- Press Windows key + X and select Device Manager from the list.
- When Device Manager starts, locate the Microsoft ACPI Compliant Control method battery.
- Right-click it, and choose Uninstall device.
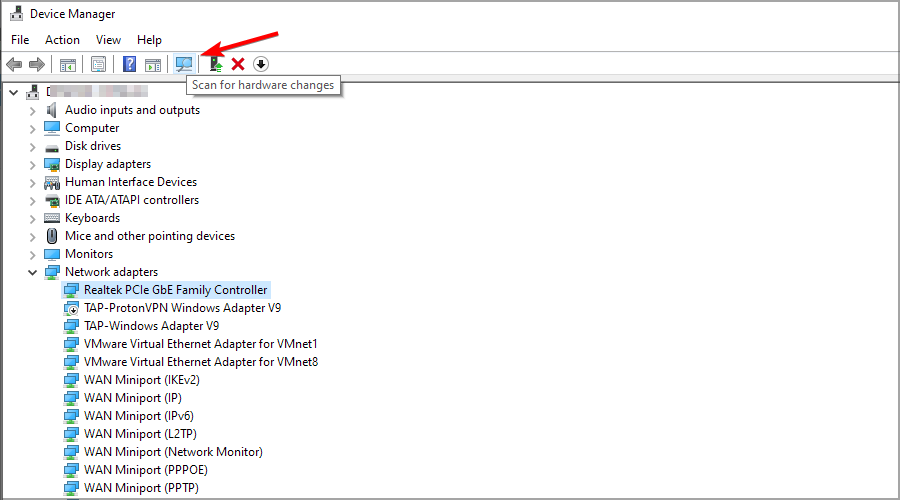
- Click the Scan for hardware changes button and let Windows 10 install any new drivers.
- Restart your PC.
A few users reported that uninstalling the Microsoft ACPI Compliant Control method battery driver fixed the ACPI_BIOS_ERROR BSOD error on certain laptops, so you might want to try it.
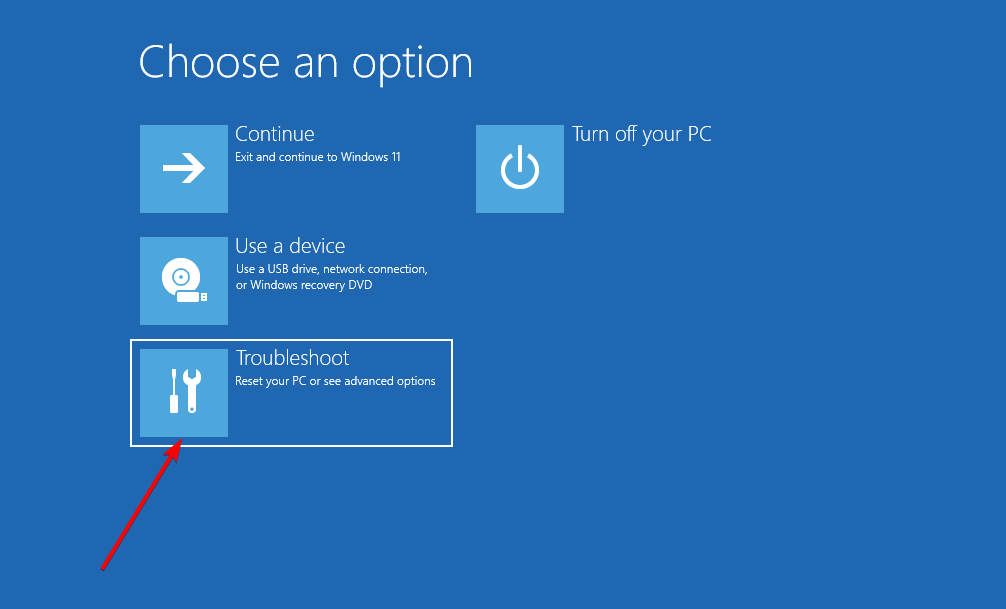
If you cannot access Windows 10 normally, you might have to perform these steps from Safe Mode. To enter Safe Mode do the following:
- Restart your PC during the boot sequence a few times.
- This should start Automatic Repair.
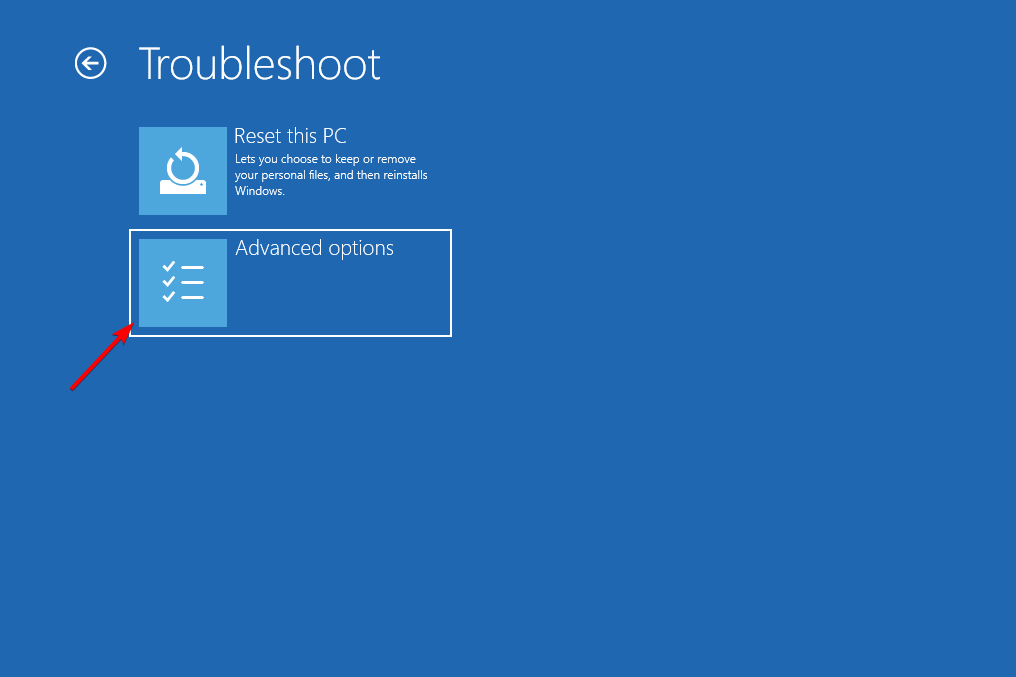
- Select Troubleshoot.
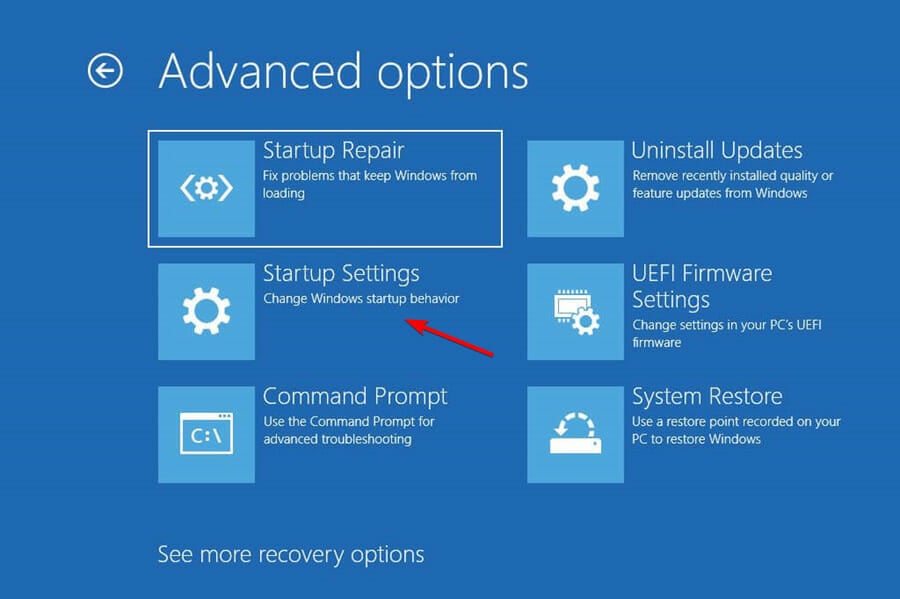
- Navigate to Advanced options.
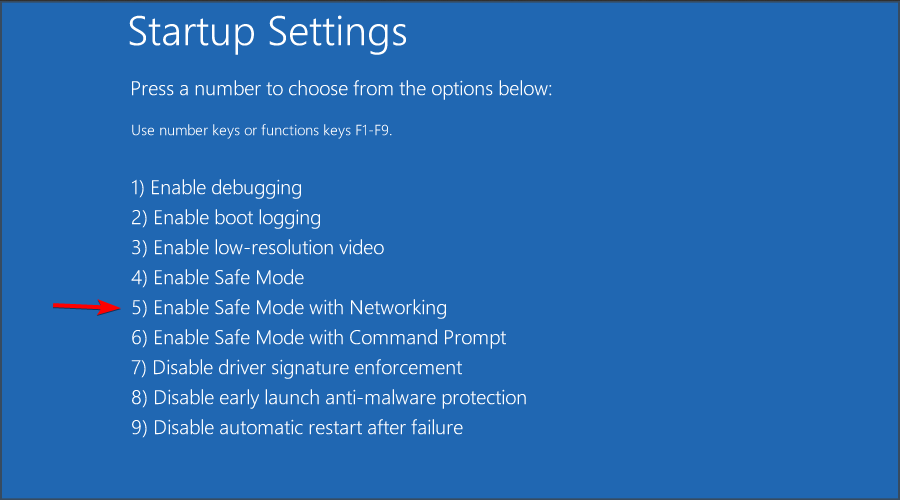
- Then, select Startup Settings and click the Restart button.
- Once your computer restarts, you’ll see a list of options. Press 5 or F5 to enter Safe Mode with Networking.
If you have any issues, you might want to check our guide on what to do if Safe Mode isn’t working.
8. Install Windows 10 in UEFI mode
- Connect the bootable USB flash drive to your PC and restart your computer.
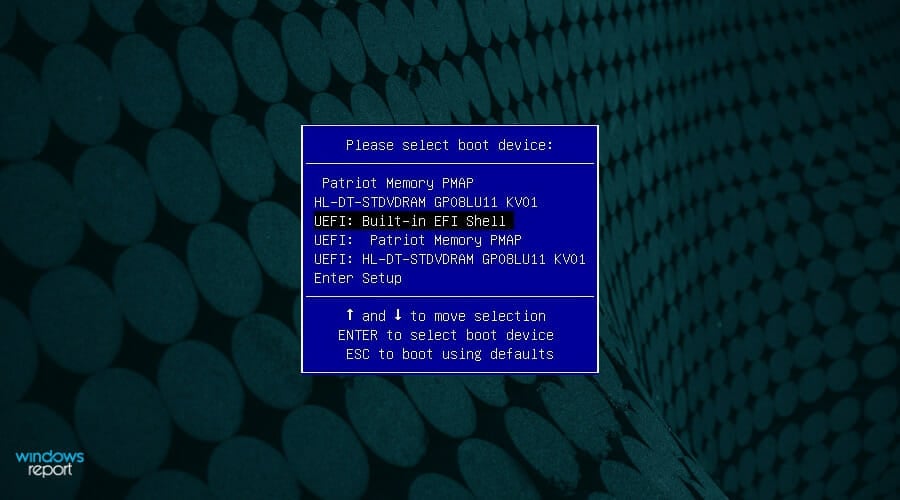
- While your computer boots press F11 to select a boot device. Bear in mind that your motherboard might be using a different key, so be sure to check the motherboard manual for detailed instructions.
- You should see a list of options. Select UEFI: Your USB Flash Drive.
- Follow the instructions to complete Windows 10 setup.
To do this, you’ll need a bootable USB flash drive with Windows 10 on it. You can easily create a bootable USB flash drive with Windows 10 on it.
9. Remove the overclock settings
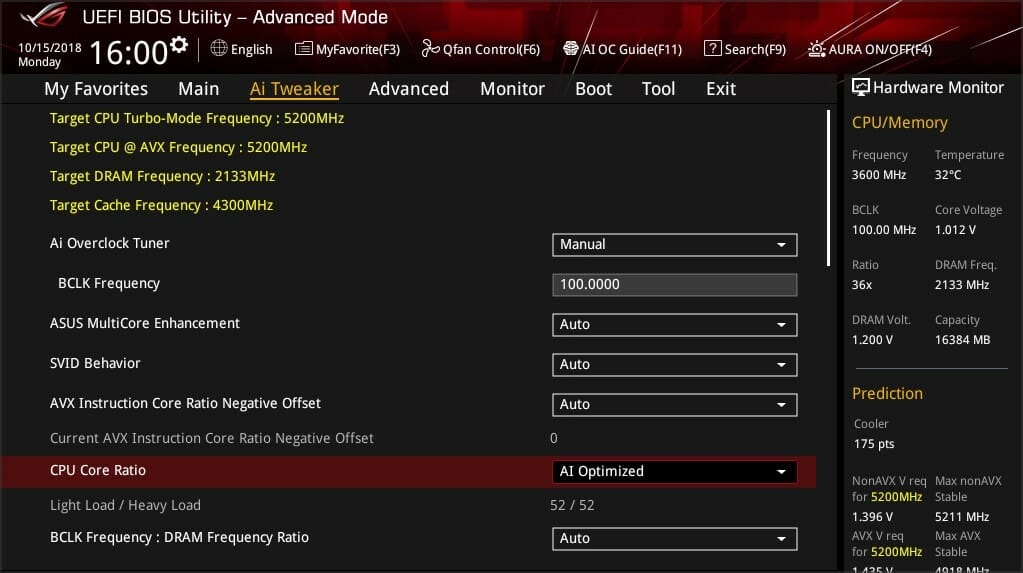
- While your PC boots, keep pressing F2 to enter BIOS.
- Navigate to Overclocking section.
- Now reset all overclocking settings to the default.
If you’re using overclocking software, you should also disable all overclock settings and check if that helps.
10. Reset BIOS to default
- Restart your PC.
- While the PC boots, keep pressing F2 to access BIOS.
- Go to the Exit section and choose Restore Defaults.
- Save changes and restart your PC.
How can I fix the ACPI_BIOS_ERROR on Windows 11?
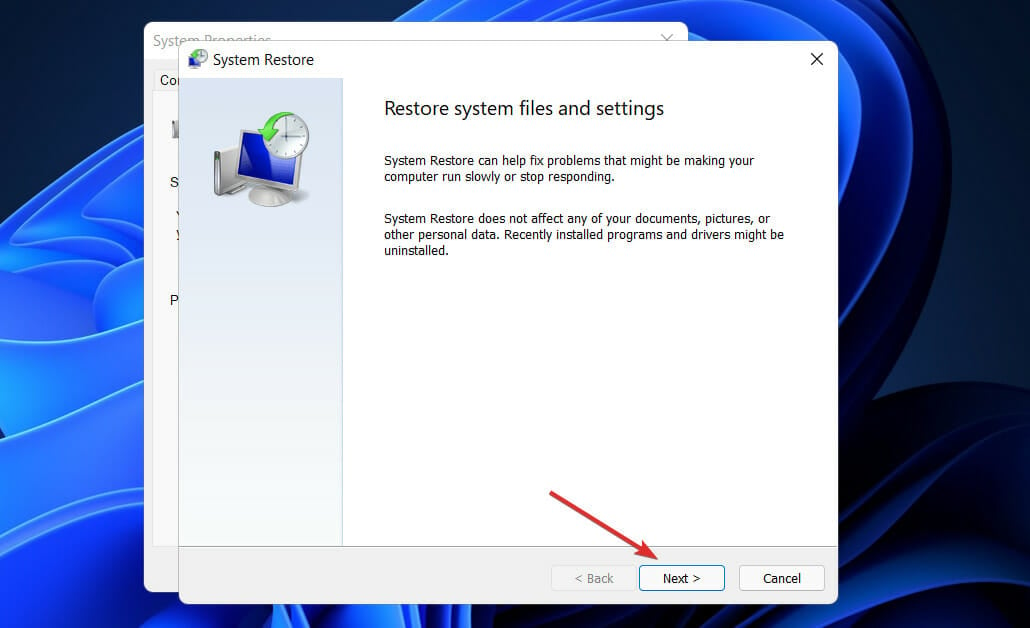
1. Use System Restore
- Press Windows key + R and enter rstrui. Press Enter.
- Click on Next to proceed.
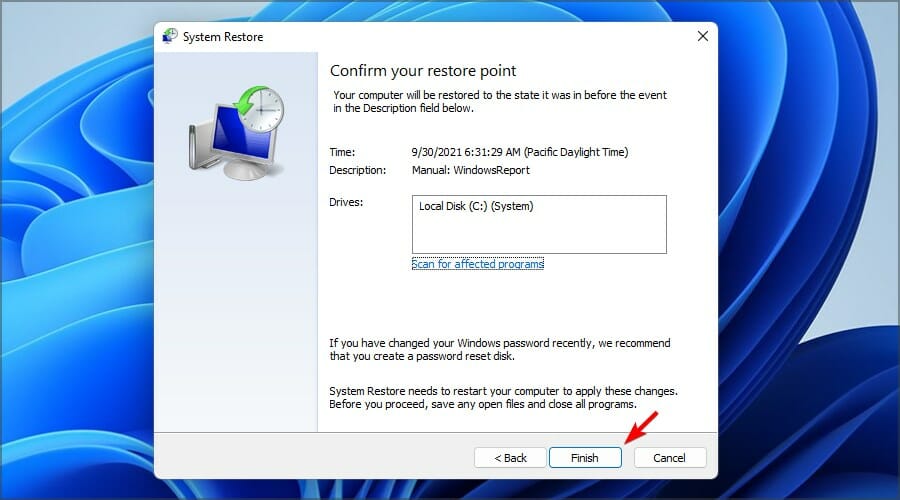
- Select the desired restore point and click Next.
- Click on Finish to confirm that you want to restore your PC.
Is ACPI_BIOS_ERROR serious?
This is a Blue Screen of Death error, and as such, it will always crash your PC and force it to restart, causing you to lose any unsaved data.
Luckily, the error isn’t usually caused by hardware failure, but there might be certain incompatibilities that are causing this issue to appear.
Should I turn off ACPI?
ACPI is a useful feature, and there are no benefits to disabling it. If you choose to turn it off, your power consumption will go up.
In addition, heat emission will increase thus reducing the lifespan of certain hardware components.
If you’re unable to access Windows due to the ACPI_BIOS_ERROR message, the problem is most likely your BIOS configuration. To fix the issue, you might have to reset your BIOS to default.
In case you’re still having issues, be sure to visit our guide on how to fix the blue screen loop on your PC.
That’s about it. We’ve listed lots of solutions for you to try. As always, for more questions or suggestions, let us know in the comments section below.
С начала 2021 года мы посвятили ошибкам BSOD несколько статей, в которых был произведён общий разбор причин появления этих ошибок. Следуя уже сформировавшейся традиции, мы продолжаем разбирать ошибки синего экрана смерти. Ошибка, о которой сегодня пойдёт речь, называется ACPI_BIOS_ERROR и имеет чаще всего код 0x000000A5. Её название недвусмысленно намекает на проблемы с интерфейсом управления конфигурацией и питанием ACPI, но, как и прочие ошибки BSOD, она может вызываться другими причинами. Сталкиваться с ней приходится нечасто, поэтому будем краткими, в двух словах обозначив предпринимаемые по её устранению действия.
Если компьютер всё ещё загружается, обновите драйверы ключевых компонентов — памяти, чипсета, жёсткого диска и прочего важного оборудования. Лучше всего использовать программы для обновления драйверов вроде Driver Booster, это избавит вас от необходимости искать драйвера в сети и устанавливать их в ручном режиме.
Если ошибка стала появляться после внесения изменений в настройки BIOS, следует восстановить исходные параметры или сбросить настройки BIOS, вытащив питающую CMOS-память батарейку на несколько минут (универсальный способ). Радикальное решение — обновление прошивки BIOS оставляем на потом, прибегнуть к нему можно тогда, когда все прочие способы не дали положительного результата.
Не самое разумное решение, стандарт ACPI необходим для автоматизации управления важными функциями питания аппаратных компонентов — материнской платы, процессора, кулеров и так далее. Отключение ACPI в BIOS возможно только перед переустановкой Windows, так как в работающей системе это приведёт к невозможности загрузки компьютера. Если ошибка появляется после выхода из режима сна, установите в BIOS для ACPI значение S1 (первый режим уменьшенного энергопотребления).
Ошибка ACPI_BIOS_ERROR в Windows 10 может быть вызвана неполадками в работе планок оперативной памяти. Проверьте состояние ОЗУ встроенными средствами системы или утилиты MemTest86, если до этого производился разгон памяти, восстановите исходные настройки.
Если вы заметили, что ошибка ACPI_BIOS_ERROR появляется сразу после выхода компьютера из гибернации, попробуйте удалить расположенный в корне системного диска файл Hiberfil.sys. Для этого в командной строке выполняем команду powercfg -h off, также файл гибернации может быть удалён из-под LiveCD.
Если у вас используется UEFI, попробуйте, наконец, переустановить систему в режиме Legacy и наоборот, если Windows установлена в режиме совместимости, попробуйте переустановить её в режиме UEFI. Если ничего не помогает, необходимо провести полную диагностику аппаратной части компьютера в сервисном центре, поскольку ACPI_BIOS_ERROR может быть вызвана неисправностями интегрированных в материнскую плату компонентов.
These types of issues can sometimes even prevent Windows from starting, therefore you must know how to fix them right away.
Windows stop code ACPI BIOS is a blue screen error, and just like any other BSOD error, it will force your PC to crash. Speaking of this problem, users reported the following issues:
ACPI_BIOS_error Windows 10 install – This error can appear while trying to install Windows 10. If this happens, it’s advised to check your BIOS configuration and change a couple of settings before attempting to install Windows 10 again. ACPI_BIOS_error Windows 7 – Many users reported this error in Windows 7. Even if you’re not using Windows 10, you should be able to fix your problem by using one of our solutions. ACPI_BIOS_error Surface 2 – This issue can affect almost any Windows device and Surface is not an exception. If you have this problem on your Surface device, you will be able to fix it using the solutions from this article. ACPI BIOS error RAM – Most common hardware cause for blue screen errors is your RAM. If you have this problem on your PC, it’s advised to scan your RAM and check if it’s faulty. In addition, be sure to remove any overclock settings that you have applied to your RAM. ACPI BIOS error Toshiba, Asus, Acer, Sony Vaio, Dell, HP, Lenovo – This issue can affect PCs from any manufacturer. This problem can be related to your drivers, so you might have to update them or find and reinstall the problematic driver. ACPI_BIOS_error acpi.sys – This error message will sometimes give you a name of the file that caused the error. If that happens, you need to do a bit of research and find the driver or device that is associated with that file. ACPI BIOS error loop, blue screen – Since this is a blue screen error, sometimes it might force your PC into a restart loop. This can be a big problem, but you should be able to fix it by changing your BIOS settings.
How does ACPI work?
ACPI stands for Advanced Configuration and Power Interface, and it’s a feature of BIOS that allows you to manage power consumption on your PC.
Using it you can configure your device to turn off or enter a low-power state when your battery is almost empty.
Why does ACPI_BIOS_ERROR appear?
This issue appears usually due to your BIOS settings, and to fix it, it’s advised that you adjust them accordingly. Outdated motherboard firmware can also cause this problem, so keep it updated.
Device drivers are another potential cause of this problem, so make sure that you’re always using the latest version.
How can I fix the ACPI_BIOS_ERROR BSOD error on Windows 10 & 11?
1. Use a third-party BSOD fixer
One easy way to fix any BSoD error is by installing specialized software. This kind of specialized software scans your device for corrupted system files or harmful files from other software.
Afterward, it shows you a list of all of them. You can choose to restore these files with a couple of simple clicks. The program does everything for you.
2. Remove your SSD and update your BIOS
For Samsung laptops:
This software can also help you by creating a restore point before starting the repairs, enabling you to easily restore the previous version of your system if something goes wrong.
This is how you can fix registry errors using Restoro:
As soon as the fixing process is completed, your PC should work without problems, and you will not have to worry about BSoD errors or slow response times ever again.
⇒ Get Restoro
Disclaimer: This program needs to be upgraded from the free version in order to perform some specific actions.
You can also use specialized software such as Restoro to fix these types of issues without having to update your firmware.
3. Enter BIOS and disable AHCI
For more information on BIOS, we suggest that you check our how to access BIOS guide.
4. Update your drivers
Do keep in mind that you need to perform these steps for all hardware components that you have on your PC. For more information, visit our how to update drivers guide.
To make this process faster and simpler, you can always use driver updater software.
5. Set the ACPI mode to S1 in BIOS
6. Disable the jumper JPME1 and reflash BIOS
Owners of the X9DAI motherboard reported that disabling the JPME1 jumper and reflashing the BIOS fixed this issue for them. Do keep in mind that this solution might not work for other motherboard models.
7. Uninstall the Microsoft ACPI Compliant driver
A few users reported that uninstalling the Microsoft ACPI Compliant Control method battery driver fixed the ACPI_BIOS_ERROR BSOD error on certain laptops, so you might want to try it.
If you cannot access Windows 10 normally, you might have to perform these steps from Safe Mode. To enter Safe Mode do the following:
If you have any issues, you might want to check our guide on what to do if Safe Mode isn’t working.
8. Install Windows 10 in UEFI mode
To do this, you’ll need a bootable USB flash drive with Windows 10 on it. You can easily create a bootable USB flash drive with Windows 10 on it.
9. Remove the overclock settings
If you’re using overclocking software, you should also disable all overclock settings and check if that helps.
10. Reset BIOS to default
How can I fix the ACPI_BIOS_ERROR on Windows 11?
1. Use System Restore
Is ACPI_BIOS_ERROR serious?
This is a Blue Screen of Death error, and as such, it will always crash your PC and force it to restart, causing you to lose any unsaved data.
Luckily, the error isn’t usually caused by hardware failure, but there might be certain incompatibilities that are causing this issue to appear.
Should I turn off ACPI?
ACPI is a useful feature, and there are no benefits to disabling it. If you choose to turn it off, your power consumption will go up.
In addition, heat emission will increase thus reducing the lifespan of certain hardware components.
If you’re unable to access Windows due to the ACPI_BIOS_ERROR message, the problem is most likely your BIOS configuration. To fix the issue, you might have to reset your BIOS to default.
In case you’re still having issues, be sure to visit our guide on how to fix the blue screen loop on your PC.
That’s about it. We’ve listed lots of solutions for you to try. As always, for more questions or suggestions, let us know in the comments section below.
Name *
Email *
Commenting as . Not you?
Save information for future comments
Comment
Δ
«Синий экран смерти» с кодом ACPI BIOS ERROR может указывать на довольно сложные неполадки. Не особо положительный прогноз связан с тем, что в значительной части случае дело в аппаратных поломках. Однако часто проблема и в системных сбоях, которые можно попробовать исправить. По крайней мере попробовать устранить BSOD вручную – вы просто обязаны.
Причины ошибки ACPI_BIOS_ERROR
Первоисточников сбоя очень много, при чем они разносторонние:
- неправильная конфигурация BIOS;
- повреждение операционной системы;
- неисправность драйверов;
- нарушение работы жесткого диска;
- физическая поломка процессора или оперативной памяти.
Что характерно ошибке ACPI_BIOS_ERROR, так это мультиплатформенность. Она может появляться во всех версиях Windows, а также на Linux, Ubuntu. Ошибка может сопровождаться кодом 0x000000A5 или нет. Известны случаи, когда сбой проявлялся один раз и после перезагрузки исчезал, но бывает, что после каждого запуска появляется BSOD и не пускает в систему.
Как исправить BSOD ACPI BIOS ERROR?
Начнем решение из более простых в реализации способов. Их нужно попробовать всем. Если сработают, отлично, теперь вы знаете в чем была проблема. В случаях, когда они не помогают, можно сделать логический вывод о проблемах с оборудованием.
Обновить и переустановить драйвера
«Синие экраны смерти» с различными кодами часто появляются из-за проблем с драйверами. Поломки могут вызывать устаревшие, обновленные, но проблемные, и несовместимые драйвера устройств. Стоит обновить их. Если есть подозрение, что ошибка начала появляться после апдейта какого-то конкретного ПО или подключения нового устройства, стоит попробовать выполнить откат.
Автономное просканировать систему
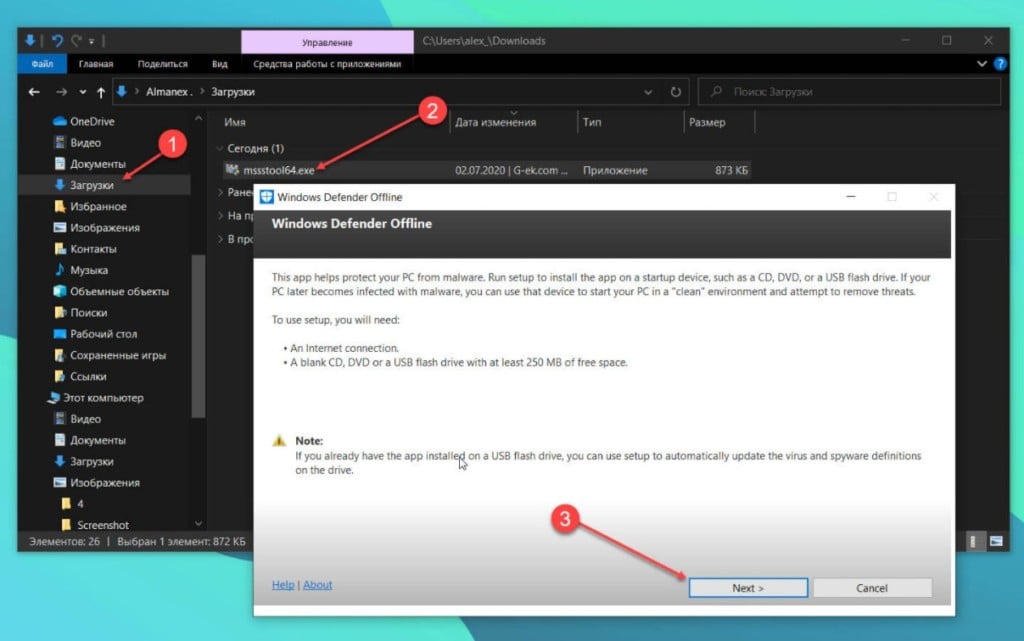
Несколько пользователей положительно откликнулись о данном способе, им удалось исправить свой BSOD с помощью «Защитника Windows». Чтобы реализовать задуманное, нужно загрузить систему в «Безопасном режиме», открыть «Параметры» — «Безопасность» и выбрать «Сканировать в автономном режиме». Есть неплохая вероятность, что это сработает.
Восстановить систему
Еще один способ, получивший положительные отклик пользователей. Он применим к ноутбукам, в частности к Samsung-устройствам. Суть заключается в следующем:
- Выключить ноутбук и отключить накопитель.
- Запустить компьютер и перейти в «Режим восстановления» (чаще всего клавишей F4).
- Подключить SSD-накопитель и выбрать подходящий вариант восстановления.
- Запустить SW Update и обновить BIOS.
Удалить недавно установленные программы
Если в недавнем прошлом было установлено программное обеспечение, способное нанести вред BIOS, стоит его удалить. В общем-то стоит убрать все сомнительные программы, а также те, которые активно работают или управляют системными файлами.
Настроить ACPI и AHCI
Нужно предупредить, что стандарт ACPI на самом деле нужен Windows и его отключение нежелательно. Компьютер после этого не сможет загрузиться, так как ACPI автоматизирует управление электропитанием компонентов ПК. Однако нередко срабатывает переключение его в режим уменьшенного энергопотребления. Пункт ACPI можно найти в BIOS и установить для него значение S1. Это решение особенно актуально для тех, у кого ошибка появляется после выхода из спящего режима. Еще может сработать выключение AHCI тоже через BIOS.
Деактивировать внешнее оборудование
В момент запуска системы после появления BSOD ACPI_BIOS_ERROR к нему должно быть подключено минимум оборудования. Лучше отключить практически все постороннее и уже подключать после полного запуска. Будет установлено необходимое программное обеспечение, а ошибка появляться не должна.
Отключить разгон
В режиме повышенной частоты работы оперативной памяти, процессора или видеокарты «синие экраны смерти» могут стать нормой. Все зависит от модели комплектующих, некоторые плохо переносят разгон. Следует программным путем вернуть свое оборудование к заводским частотам работы.
Проверка состояния оперативной памяти
Выход из строя одной из планок ОЗУ может стать причиной проблемы. Лучше продиагностировать оперативную память, это можно сделать как встроенными инструментами операционной системы, так и утилитой MemTest86. Рекомендуется использовать второй вариант, создав флешку с автозагрузкой.
Переустановить операционную систему
Если ошибка ACPI BIOS ERROR появилась в результате попытки установки системы, стоит изменить режим. К примеру, если инсталляция проходила в режиме совместимости, стоит опробовать Legacy и наоборот.
Большинство из перечисленных выше действий применимы Windows, Linux, Ubuntu и др. Unix-системам, поэтому скорее всего сработают везде. Если же ничего из перечисленного не помогло улучшить ситуацию, ошибка ACPI BIOS ERROR вызвана выходом из строя какого-то комплектующего. Чаще всего пользователи сталкиваются с поломкой оперативной памяти и процессоров. Стоит их продиагностировать в сервисном центре.
