Были ли сведения полезными?
(Чем больше вы сообщите нам, тем больше вероятность, что мы вам поможем.)
(Чем больше вы сообщите нам, тем больше вероятность, что мы вам поможем.)
Насколько вы удовлетворены качеством перевода?
Что повлияло на вашу оценку?
Моя проблема решена
Понятные инструкции
Понятные сведения
Без профессиональной лексики
Полезные изображения
Качество перевода
Не соответствует интерфейсу
Неверные инструкции
Слишком техническая информация
Недостаточно информации
Недостаточно изображений
Качество перевода
Добавите что-нибудь? Это необязательно
Спасибо за ваш отзыв!
×
| Пресс-Центр
Автор – Джефф Петти, Windows Accessibility Program Manager Lead
Я надеюсь, что читатели этого блога, члены их семей, друзья и коллеги здоровы и находятся в безопасности в это непростое время. Я рад рассказать о некоторых обновлениях, которые мы добавляем в Windows 10, чтобы сделать ее более удобной для слабовидящих и слепых пользователей. Эти улучшения появятся в майском обновлении Windows 10 и станут новыми шагами к тому, чтобы расширить возможности каждого человека на планете и помочь ему достичь большего.
Спасибо вам за все отзывы. Пожалуйста, продолжайте в том же духе! Наши пользователи, особенно участники программы предварительной оценки Windows, продолжают формировать будущее специальных возможностей Windows 10, помогая нам понять, какие улучшения особенно нужны. О том, как с нами связаться, написано в конце этого сообщения.
Делаем Windows 10 нагляднее и удобнее
Улучшения текстового курсора
Недавно мы сделали текст и указатели в Windows 10 более удобными для персонализации. Миллионы людей предпочитают более крупный текст и более крупные и яркие указатели, что упрощает чтение и использование Windows 10. Неудивительно, что многие пользователи со слабым зрением просили нас сделать текстовые курсоры более удобными для работы. В частности, нам сообщали, что текстовые курсоры трудно найти, когда они слишком тонкие и недостаточно контрастируют с текстом. Теперь курсоры можно расширять и добавлять индикатор текстового курсора. Появилась даже возможность выбирать пользовательские цвета, чтобы курсор было еще проще найти на экране.

Мы сделали соответствующие изменения и в инструменте «Экранная лупа» (Magnifier). Недавно мы добавили параметр, позволяющий лупе следовать за указателем мыши, чтобы пользователи не искали указатель по экрану, а всегда могли бы найти его в одном месте — в центре экрана. Опять же неудивительно, что пользователи просили нас облегчить работу с экранной лупой и текстовыми курсорами. Теперь «Экранная лупа» будет следовать за текстовым курсором в центре экрана по умолчанию, так что пользователи всегда смогут найти курсор в ожидаемом месте.
«Экранная лупа» уменьшает напряжение и усталость при чтении
Многие пользователи «Экранной лупы» жаловались, что им трудно подолгу читать и работать с текстом: приходится напрягаться, чтобы что-то прочитать, а к концу дня появляется сильная усталость или даже головная боль. Мы добавили новую функцию, которая позволяет читать текст вслух, чтобы уменьшить напряжение от чтения. «Экранная лупа» теперь имеет элементы управления Play (Воспроизведение), Pause (Пауза), Next sentence (Следующее предложение), Previous sentence (Предыдущее предложение) и Read from here (Читать отсюда), облегчающие чтение текста в популярных браузерах, включая Edge, Chrome и Firefox, а также в других приложениях Windows, таких как Microsoft Word, Outlook и PowerPoint. «Экранная лупа» будет подсвечивать каждое произнесенное слово и прокручивать содержимое, чтобы оно попадало в поле зрения, если еще не отображается на экране.
Наконец, мы улучшили пользовательский интерфейс «Экранной лупы». Теперь она будет реагировать на более крупный текст и настройки темного режима, чтобы ее было проще использовать и читать с ее помощью.

Программа для чтения с экрана облегчает использование Windows без зрительного контроля
Мы внесли несколько улучшений в «Экранный диктор» (Narrator) — бесплатную встроенную программу чтения с экрана в Windows 10.
«Экранный диктор» стал удобнее
Мы сделали чтение более естественным, уменьшив неестественные паузы и обрабатывая предложения целиком, чтобы улучшить произношение. Мы также оптимизировали звуки «Экранного диктора», что поможет его пользователям стать эффективнее. Мы добавили звуки для наиболее распространенных действий, одновременно уменьшив общее количество звуков, чтобы их было проще запомнить и использовать. Например, вместо того чтобы слышать «сканирование включено» или «сканирование выключено» при переключении между режимом сканирования и другими режимами, теперь можно выбрать тональные сигналы, которые будут воспроизводиться вместо слов. По умолчанию включены и слова, и звуки, чтобы новые звуки было легче запомнить. В дальнейшем можно изменить уровень детализации того, что «Экранный диктор» говорит о тексте и элементах управления, чтобы слышать меньше слов при выполнении частых действий. Наконец, мы улучшили поддержку объявления букв и слов в верхнем регистре, например, при проверке сообщения или документа. «Экранный диктор» будет обрабатывать слова, написанные прописными, заглавными и смешанными буквами.
Более интеллектуальный просмотр веб-страниц
Мы внесли несколько изменений и в просмотр веб-страниц с помощью «Экранного диктора».
Во-первых, теперь «Экранный диктор» будет автоматически начинать чтение с верхней части веб-страницы. Это повысит эффективность и поможет пользователям понять, что страница загружена. Во-вторых, мы добавили воспроизведение сводной информации о странице по требованию. В дополнение к лучшему пониманию сложности страницы, например, количества ориентиров, ссылок и заголовков, пользователь может также получить список самых популярных ссылок от поисковой системы Bing, чтобы ему было проще перейти в нужное место. Нажмите клавишу «Экранного диктора» + S, чтобы прослушать информацию об ориентирах, ссылках и заголовках на странице, или дважды быстро нажмите клавишу «Экранного диктора» + S, чтобы получить сводную информацию о странице со списком популярных ссылок. В-третьих, мы решили одну из главных проблем доступности плохо подготовленных веб-страниц. Теперь можно устранять неоднозначность ссылок с текстом типа «Нажмите здесь» и узнавать, куда ведет такая ссылка, не переходя по ней. Нажмите клавишу «Экранного диктора» + Ctrl + D (эта же команда позволяет сгенерировать описание изображения), чтобы услышать заголовок связанной страницы перед нажатием на ссылку.
Наконец, мы улучшили работу «Экранного диктора» в популярных браузерах. Кроме Microsoft Edge и Chrome, «Экранный диктор» теперь поддерживает Firefox. Мы улучшили несколько функций «Экранного диктора», в том числе ускорили поиск и оптимизировали чтение таблиц. Мы также добавили поддержку форматированного текста в Chrome и Firefox, что облегчает изучение контента на таких сайтах, как «Википедия».
Более эффективная почта Outlook
Кроме общих улучшений в работе «Экранного диктора» и в просмотре веб-страниц с его помощью, мы улучшили его взаимодействие с Outlook. Мы оптимизировали работу «Экранного диктора» с почтовым ящиком Outlook, чтобы ускорить и упростить сортировку почты; теперь данные читаются в меньшем объеме и в более привычном порядке. Мы также улучшили чтение писем. Как и при загрузке веб-страниц, теперь после открытия письма «Экранный диктор» начинает читать его содержимое автоматически. Кроме того, автоматически включается режим сканирования, а таблицы разметки распознаются и игнорируются, чтобы облегчить навигацию и чтение писем. Мы также улучшили отзывчивость Outlook, например, уменьшили задержки при просмотре писем в папке «Входящие» или при просмотре текста письма.
Нам по-прежнему нужны ваши отзывы
Хотя мы рады рассказать о новых достижениях, мы понимаем, что предстоит еще многое сделать, чтобы облегчить жизнь людям с ограниченными возможностями. Спасибо всем, кто оставлял отзывы, положительные и конструктивные, чтобы помочь в улучшении Windows. Если вы тоже хотите помочь или что-то предложить, мы будем рады получить ваши отзывы через программу предварительной оценки Windows. Все функции, о которых говорится в этой статье, созданы с помощью участников предварительной оценки Windows. Независимо от того, используете ли вы инсайдерскую сборку или общедоступную версию, Windows 10 позволяет легко делиться своими мыслями и предложениями: просто нажмите клавишу с логотипом Windows + F, чтобы запустить Центр отзывов, и сообщите нам свое мнение.
В этой статье мы расскажем, как настроить все специальные возможности, доступные в последнем обновлении Windows 10. Настройки собраны в интерфейсе «Параметры» (Settings), в разделе «Специальные возможности» (Ease of Access).
Экранный диктор
Экранный диктор (Narrator) – незаменимый инструмент для слабовидящих и слепых. Диктор может прочитать вслух содержимое любой страницы, окна или приложения по щелчку мыши.
В Windows 10 сохранились многие функции Экранного диктора из Windows 7, например чтение символов по мере набора, воспроизведение звукового сигнала при нажатии на новых страницах или приложениях, чтение вслух подсказок к кнопкам и другим элементам управления. Тщательно откалиброванные алгоритмы прогнозирования помогают системе направлять действия слабовидящего пользователя.

Одно из нововведений в Windows 10 – женский голос для английского языка. До сих пор по умолчанию использовался голос диктора-мужчины под условным именем Дэвид, а теперь к нему добавилась диктор-женщина Зира. Принципиальных различий по функциональности между ними, конечно, нет – это исключительно вопрос личных предпочтений. На русском языке для компьютеров по-прежнему доступен только женский голос под условным именем Ирина, а на мобильных устройствах есть также диктор Павел.
Экранная лупа
Экранная лупа (Magnifier) – еще одна специальная возможность для людей, испытывающих трудности при чтении текста с экрана. Хотя не прочь воспользоваться лупой и творческие специалисты – им этот инструмент помогает ближе рассмотреть детали работы при 3D-моделировании, рисовании в Photoshop или разработке игр.
В интерфейсе «Параметры» можно включить или отключить Экранную лупу, включить инверсию цветов в зоне увеличения (что, опять-таки, пригодится дизайнерам и художникам), а также настроить автоматический запуск Экранной лупы при входе в Windows.

В Windows 10 добавилась новая настройка, позволяющая указать, как будет работать лупа. Область увеличения может следовать только за курсором либо определяться только выбором с клавиатуры, а можно задействовать и мышь, и клавиатуру одновременно.
Высокая контрастность
Настройки высокой контрастности (High Contrast) следуют в интерфейсе «Параметры» сразу за настройками Экранного диктора и лупы – все три инструмента, предназначенные для тех, кто испытывает проблемы со зрением, собраны вместе.

При включении режима высокой контрастности цветовая схема полностью изменяется, чтобы сделать текст, изображения, окна приложений и значки виднее для тех, кто страдает дальтонизмом, – или разнообразить наскучивший интерфейс для тех, кто особых проблем со зрением не испытывает.
Скрытые субтитры
В разделе «Скрытые субтитры» (Сlosed captions) можно настроить отображение скрытых субтитров при воспроизведении фильмов и телепередач в установленных медиаплеерах.

Те, кто с трудом воспринимает белый текст на движущемся фоне в Проигрывателе Windows Media, могут выбрать любой другой подходящий цвет. Можно также изменить шрифт.
Клавиатура
Специальные возможности, связанные с клавиатурой, всегда были одной из сильных сторон Windows. Здесь предлагается широкий выбор настроек, призванных облегчить пользование компьютером любому человеку с ограниченными возможностями прямо с момента входа в систему.
Экранная клавиатура (On-Screen Keyboard) – прекрасный инструмент для тех, кто пользуется Windows 10 на планшете и не хочет подключать Bluetooth-клавиатуру ради пары слов. Если включено залипание клавиш (Sticky Keys), любые нажатия Ctrl, Shift и Alt будут интерпретироваться как длинные. Это прекрасный выход для тех, кто испытывает трудности с подвижностью пальцев при длительном наборе текста (например, для людей, страдающих артритом). Заодно опция пригодится тем, кому просто лень удерживать нажатыми несколько клавиш одновременно. Кстати, залипание клавиш можно включить не только в «Параметрах» – достаточно пять раз подряд нажать Shift.

Озвучивание переключений (Toggle Keys) поможет не пропустить момент нажатия Caps Lock: при этом будет проигрываться звуковой сигнал (а также при нажатии Num Lock и Scroll Lock). Прекрасное решение не только для слабовидящих людей, но и для обладателей слишком толстых пальцев, которые всякий умудряются нечаянно нажать Caps Lock при вводе пароля на главном экране.
Фильтрация ввода (Filter Keys) отслеживает повторяющиеся нажатия клавиш и сокращает потребность в исправлении написанного. Это поможет и тем, кто испытывает трудности при наборе текста, и тем, кому необходима система, позволяющая отслеживать ввод ошибочных команд с клавиатуры слишком часто за небольшой промежуток времени.
Мышь
Выбор настроек для мыши невелик, но если вы плохо видите курсор и хотите сделать его побольше, вам как раз сюда.

Здесь также можно включить управление мышью с клавиатурой, если вы предпочитаете перемещаться по экрану с помощью клавиш-стрелок. А еще можно использовать Ctrl и Shift для ускорения и замедления перемещения курсора.
Другие параметры
В разделе «Специальные возможности» есть еще несколько настроек, помогающих сделать Windows 10 удобнее в соответствии с индивидуальными особенностями пользователя. Здесь можно отключить анимацию интерфейса и фоновую заставку рабочего стола, а еще – указать, в течение какого времени будут отображаться уведомления.

Ничего революционного в настройках специальных возможностей в Windows 10 нет. Тем не менее, новая система включает массу мелких улучшений, которые помогут людям с ограниченными возможностями использовать компьютер максимально эффективно.
Автор: Chris Stobing
Перевод: Светлана Баранова
Оцените статью: Голосов
Microsoft has been at the forefront of accessibility and first took steps to address it in 1990 with Windows 3.0. Now with Windows 11, they’ve ramped up their Windows Accessibility tools with new features and tools.
So, let’s dive in and peek through all the different accessibility tools on Windows.
You can access all Accessibility tools straight from your Settings on Windows. Launch the Windows Settings by pressing the Windows Key + I, and head to the Accessibility section.
Microsoft has divided its tools into three major sections that aim to cover different types of accessibility issues. They are: Vision, Hearing, and Interaction.
Let’s first start with Vision.
It’s no secret that individuals with vision impairments can face significant problems performing tasks such as typing, using a mouse, and navigating menus and explorers. In fact, according to a 2022 report from WHO, approximately 2 billion people worldwide suffer from a visual impairment of one kind or another.
It’s safe to assume some of them likely use tech to make their lives easier; even if one percent of them use Windows, that’s a massive amount of people possibly struggling with their tech.
The Vision Accessibility tool on Windows serves the needs and abilities of many such Windows users who’d otherwise fail to make the best use of Windows.
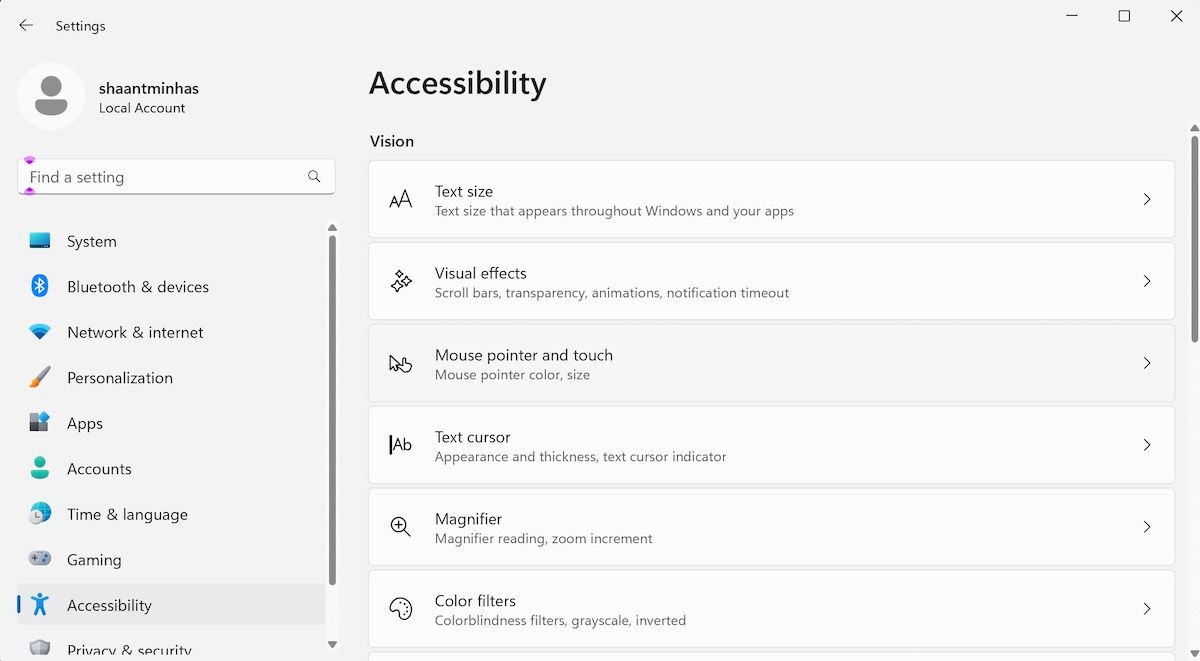
To that end, Windows has provided a plethora of tools under the Vision section. Let’s cover all of them individually.
1. Text Size
Text size does what it says on the tin. It helps you tweak the size of your text all over your PC and apps with a simple adjustment through the slider.
After you’ve made the changes, make sure you click on Apply to save them.
2. Visual Effects
It’s sometimes quipped that visual effects are not just eye candy; they are, in fact, an integral part of the user interface, giving you critical context and clarity.
Moreover, the visual effects on Windows can make or break the user experience for many users with partial visual impairments. With the tools in Visual effects, you can manage these visual effects to some degree, and get the most out of them.
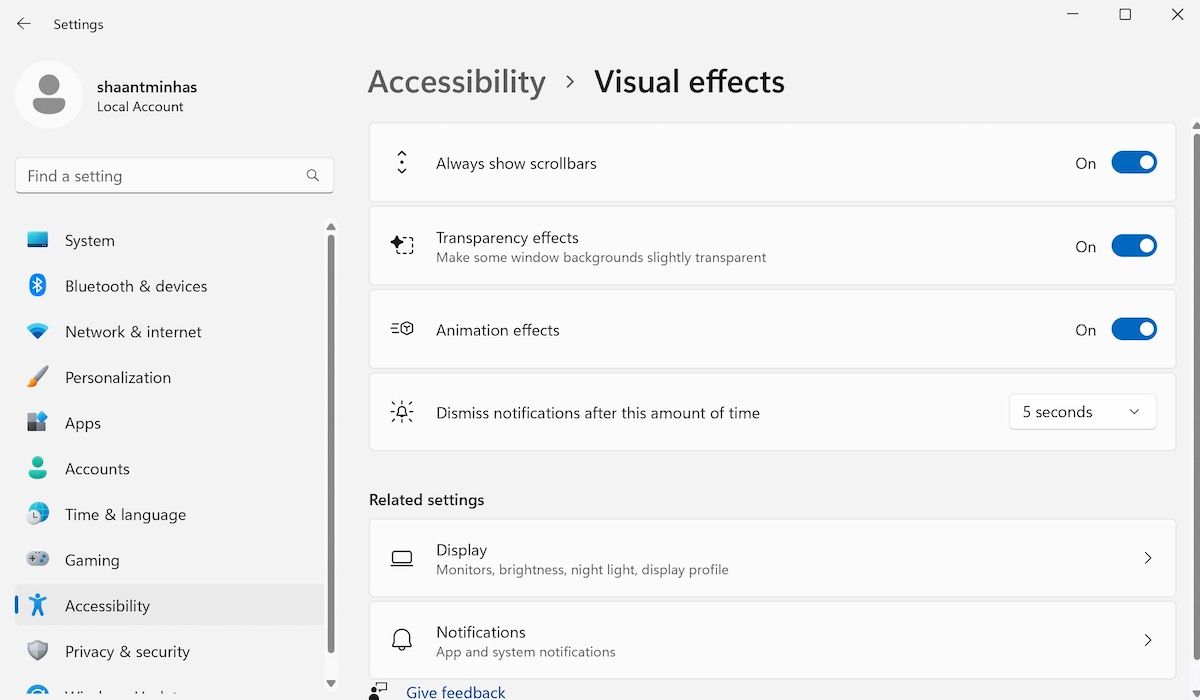
Scrollbar
By default, the scrollbar next to your search results will disappear whenever you search for something from the Start menu. You can change this, though.
Simply toggle on the button for Always show scrollbars, and you will be good to go from there.
Transparency Effects
Transparency effects improve your PC’s aesthetics, and Windows keeps them enabled by default. But if you face any visual impairments, they can unnecessarily make your eyes work hard.
Toggle off the switch in front of Transparency effects, and the tool will turn off all the shiny effects on your PC.
Animation Effects
Windows packs a ton of cool animations that briefly appear on your screen throughout transitions of one sort or the other, usually as an enhancement.
However, they are not everyone’s cup of tea. If you find them distracting, you can easily disable them by toggling off the button for Animation effects.
Notifications
Every notification on your Windows stays for a specific amount of time. With Dismiss notification after this time, you can tweak the time to increase or decrease it with ease, anywhere from 5 seconds up to 5 minutes.
3. Mouse Pointer and Touch
This tool lets you easily change your mouse cursor’s size and style. For instance, you can tweak the pointer character from four different shapes. Alternatively, you can increase or decrease its size as well.
Touch Indicator
You can toggle on the switch for the Touch indicator, and wherever you touch the screen, you will see an enlarged circle. You can also check the Make the circle darker and larger radio box to get things set up.
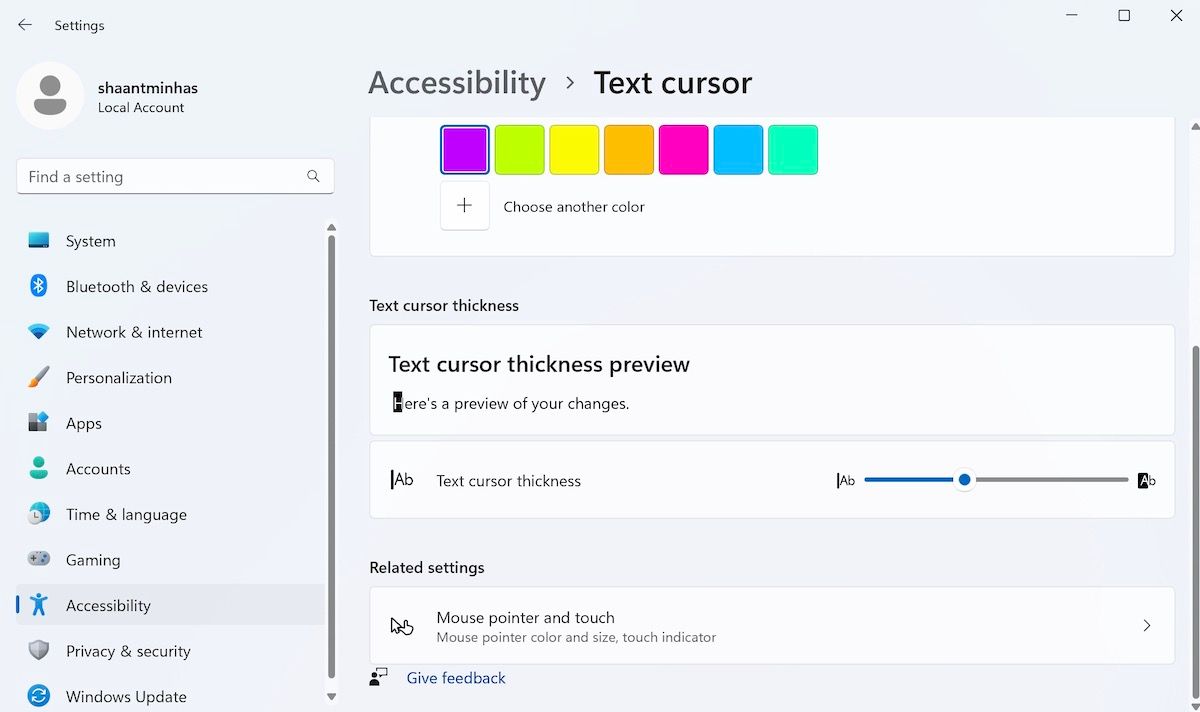
4. Text Cursor
Windows also lets you change the appearance and thickness of the text cursor, which will help you improve the visibility of your text.
First, toggle on the Text cursor indicator to turn on the tools. From there, you can also tweak the size of the cursor by sliding it sideways.
On top of this, you also have many different colors to pick from below; choose one, and your Text cursor’s indicator will be tweaked.
Text Color Thickness
Alternatively, you can also tweak the cursor’s thickness by moving the slider as shown below:
5. Magnifier
As you can probably guess from the name, Magnifier is a handy tool for users with bad eyesight. Even if your eyesight is fine, you can use them to read any hidden text on the internet or any document you otherwise wouldn’t be able to read. To turn on Magnifier, toggle on the switch for Magnifier.
Alternatively, you can use the shortcut by pressing the Windows logo key + the Plus sign. After you have the Magnifier on, you can zoom in and out by holding the Ctrl + Alt and rotating your mouse wheel. You can also choose to increase the increment simply by picking from a variety of values.
You can learn how to use Magnifier from one of our previous guides.
6. Color Filters
Next up on the list is Color filters. If you face any trouble in seeing and differentiating between the colors on your PC, then this is the tool for you.
After you’ve toggled on the switch for Color filter, you have the following shades to pick from:
- Red-green (green weak, deuteranopia)
- Red-green (red weak, protanopia)
- Blue-yellow (tritanopia)
- Grayscale
- Grayscale inverted
- Inverted
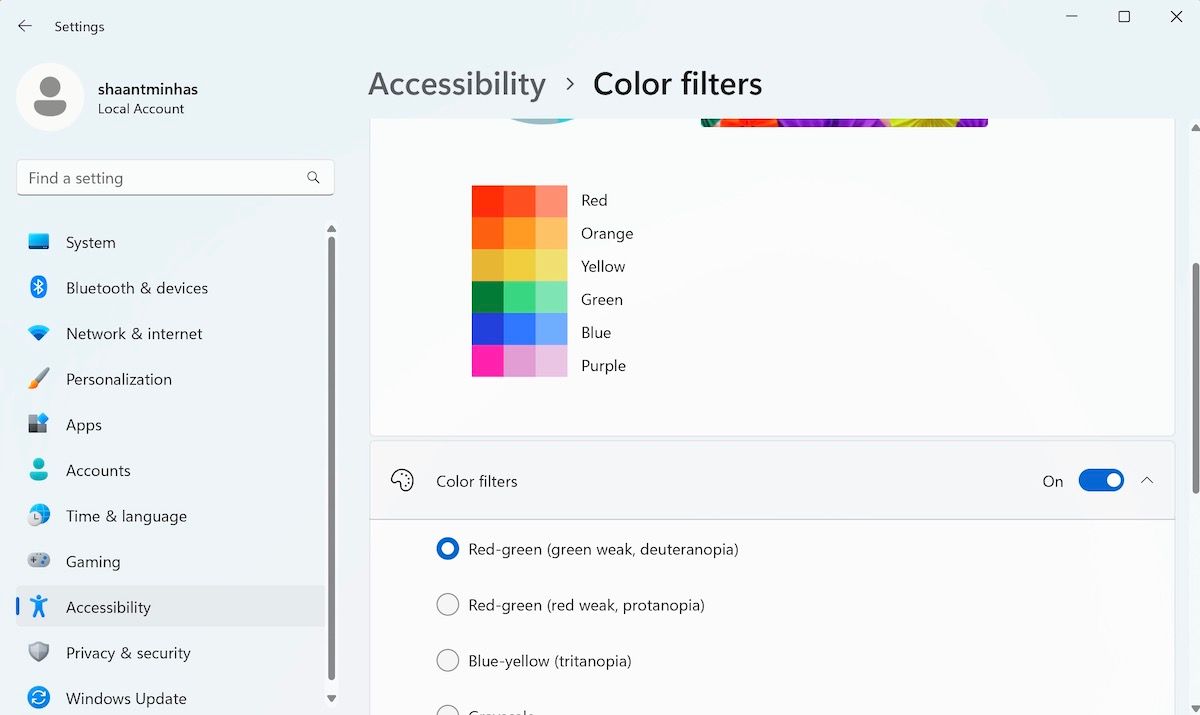
Alternatively, you can use simple shortcuts like Windows key logo + Ctrl + C to turn color filters on or off.
7. Contrast Themes
If you have trouble figuring out what’s what on an app or document, then Contrast Themes is for you.
With Contrast themes, you can pick a theme using a combination of colors and effects to make reading easier for yourself. In total, you have four different Contrast themes to pick from:
- Aquatic
- Desert
- Dusk
- Night sky
To pick a specific theme, click on the toggle menu and select one of the themes from there.
8. Narrator
In brief, the Narrator helps you navigate web pages and documents by reading your screen text on your screen aloud. We have a detailed guide that covers everything about Narrator on your PC. You can learn all things about Narrator from the linked guide.
The second section of Accessibility tools, Hearing, helps you use your device easily even if you face hearing impairments. First, let’s look at the first tool, that covers audio of your PC.
1. Audio
When you click on Audio, you will find two different options: Mono Audio and a feature to flash your screen.
By toggling on the switch for Mono Audio, you get the ability to the right and left channels into a single one. Don’t take our word for it; do it, and you will notice an instant difference in sound quality. This feature will be handy if you’re facing any hearing troubles.
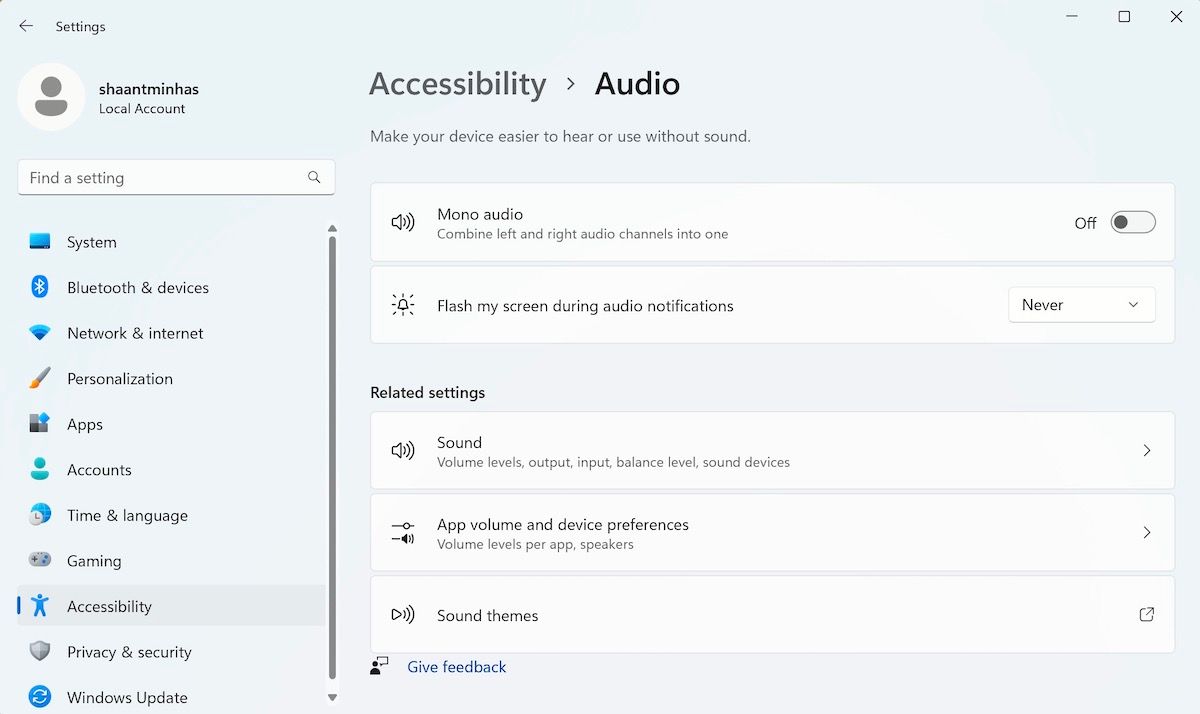
On the other hand, if you turn on the switch for Flash my screen during audio notifications, you will get an option to pick from various settings like:
- Flash the title bar of the active windows
- Flash the active window
- Flash the entire screen
2. Captions
Captions is another boon for users with hearing impairments. But even if you have perfect hearing, using subtitles can enhance your user experience; this will be particularly true if you’re trying to learn a new language through watching movies or other videos, where watching subtitled videos can boost your learning process.
To turn on live captions, simply toggle on the Live caption switch, and you will be good to go. Alternatively, you can use the Windows logo key + Ctrl + L.
You will also get to choose how your caption style looks. Simply select the caption style from White on black, Small caps, Large text, Yellow on blue. If you’d like to add more variation, click on Edit to choose the new settings for Text, Background, or Window.
Interaction
The last feature of Accessibility tools on Windows, unsurprisingly as its name suggests, covers all things that help you interact with your PC. This includes everything from Speech, Keyboard, Mouse, or Eye Control.
1. Speech
Toggle on the Voice access tool to do things on your PC—all with your voice. And while you’re at it, you can toggle on the Start voice access after you sign in to your PC switch.
2. Keyboard
The keyboard accessibility section is about making it easier to make the most out of your keyboard on Windows.
From turning on specific keys and shortcuts for various keys to other valuable settings like the On-screen keyboard, Underline access keys, etc.—the Keyboard section is what you’re looking for if you want to make the most out of your keyboard.
3. Mouse
Like the keyboard above, the Mouse tool is about improving your mouse’s accessibility to all users. Toggle on the Mouse keys switch, and you will find a host of settings such as Mouse key speed, Mouse keys acceleration, etc.
The Accessibility tools from Microsoft make Windows more inclusive and is part of a growing approach to design known as Universal Design. This makes Windows useful for as many people as possible, regardless of their age, disability, or place in life.
While we’ve covered almost all accessibility tools available on Windows, we’ll also encourage you to go through individual tools.
Written By
published
June 13, 2019
At Microsoft, we’re on a journey to empower every person on the planet, including people with disabilities, to achieve more.
A recent blog post, entitled “Inspired by Insiders: Accessibility,” shared how we are creating experiences that support our users’ needs. We are collecting, analyzing and acting on feedback from users; we are increasingly customer driven, some might even say we’re becoming customer obsessed. If you haven’t read the blog, please do. I highly recommend it.
In this blog post, I am happy to share how our latest update, the Windows 10 May 2019 Update, delivers on our mission by continuing to act on user feedback, in particular feedback from people with low vision or who are blind. We’re continuing to make Windows 10 easier to see and easier to use without a display with Narrator.
Making Windows easier to see
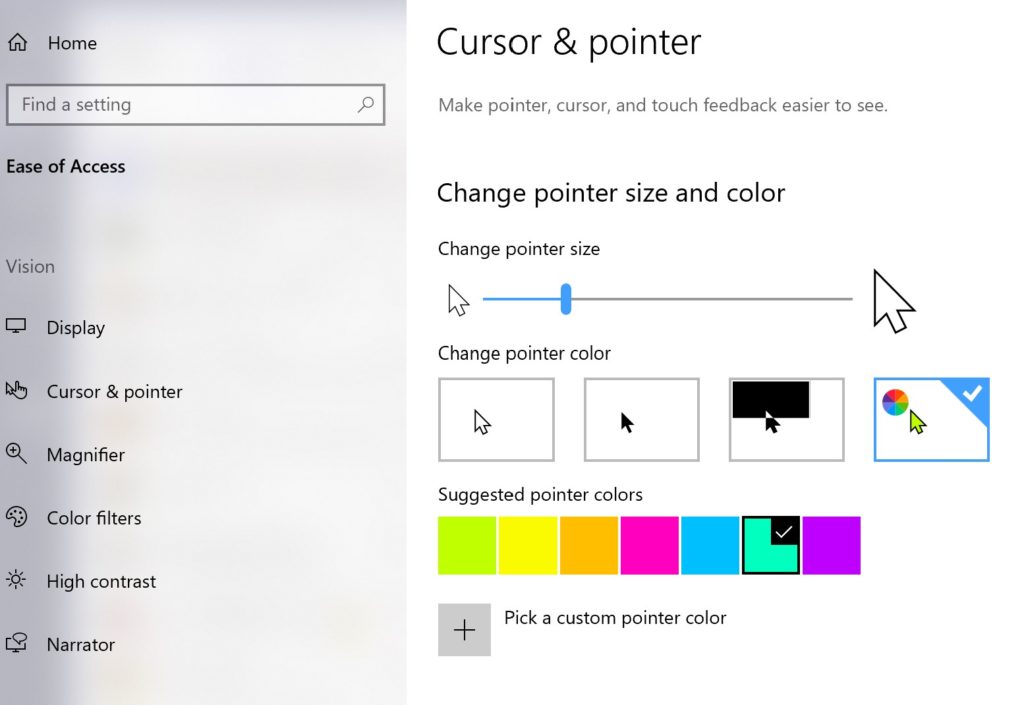
Bigger, brighter mouse pointers
In the previous release, we made it easier to make text larger across Windows. Already, more than 900,000 people are using larger text to make Windows 10 easier to see. Many of the same users indicated that while larger text was great, they were having trouble tracking their mouse pointer especially on high resolution displays. You now have more ways to see Windows 10 your way, with the addition of new bigger and brighter mouse pointers. In addition to making the pointer larger, you can choose from a recommended set of bright highlight colors or you can also change the pointer to your favorite color by going to Settings > Ease of Access > Cursor & pointer.
Magnifier improvements
For some users with low vision, the combination of setting larger text and mouse pointers makes Windows easier to use. Others prefer using Magnifier. We made several improvements to Magnifier in this release, including new defaults for Magnifier settings and smoother interactions when you opt in to Keep the mouse pointer… Centered on the screen. Now, Magnifier will follow along with what you type and as you navigate Windows with your keyboard, e.g. navigating up and down a list with arrow keys, by default. And, we’ve reduced jitter when the mouse is centered on the screen, which is an option many people use to make their mouse pointer easier to find by keeping it in a predictable location.
Making Windows easier to use without a display, with Narrator
Thanks to your feedback, we’ve made another round of improvements to Narrator, which is our built-in screen reader for people who are blind. We’ve made Narrator easier to learn, more natural and responsive, and easier to use, including with popular applications like the Chrome web browser.
Narrator is easier to learn
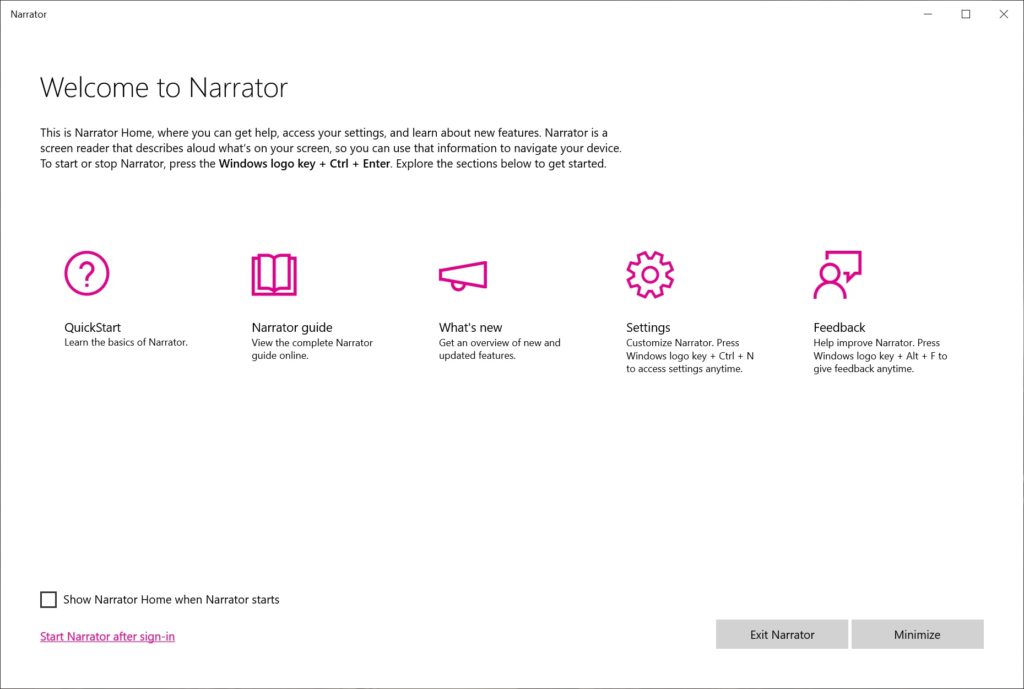
In the previous release, we introduced Narrator Quick Start, which is a built-in tutorial that helps users learn to accomplish common goals like browsing the web or reading and writing email. Many users indicated that while the Narrator Quick Start was great, they were having trouble finding all the Narrator resources. So we made easier to do just that. We consolidated Narrator Settings, which were located in multiple places to make it easier to personalize Narrator and we created the new Narrator Home to make it easier to access the Narrator Quick Start, User Guide and Settings; and to provide feedback to improve the Narrator experience directly to our team. We even made it possible to minimize the Narrator Home page to the Windows System Tray to remove Narrator from the Alt + Tab sequence so you don’t have to hear about Narrator every time you want to switch applications.
Narrator is more natural and responsive
We improved the way Narrator handles common phrases. For example, phrases like “$2.7 billion dollars” are now read “two point seven billion dollars” instead of “two point seven dollars billion.” And, we reduced the number of times Narrator pauses mid-sentence, which made it difficult to proofread a document in Word or read an article on the web.
We made Narrator more succinct, e.g. with improved URL reading, and we gave users more options to control what Narrator speaks. You can now hear as much or as little detail as you want about application controls and text. For example, if you are reading a digital book or a long paper and all you are interested in is the text content, you can set your Verbosity level to 1 and you will not be bothered by other information that may be present on the page. On the other hand, if you are actively authoring a paper and need to know all of the text formatting and control information, dial up your Verbosity to 5 and you won’t miss anything.
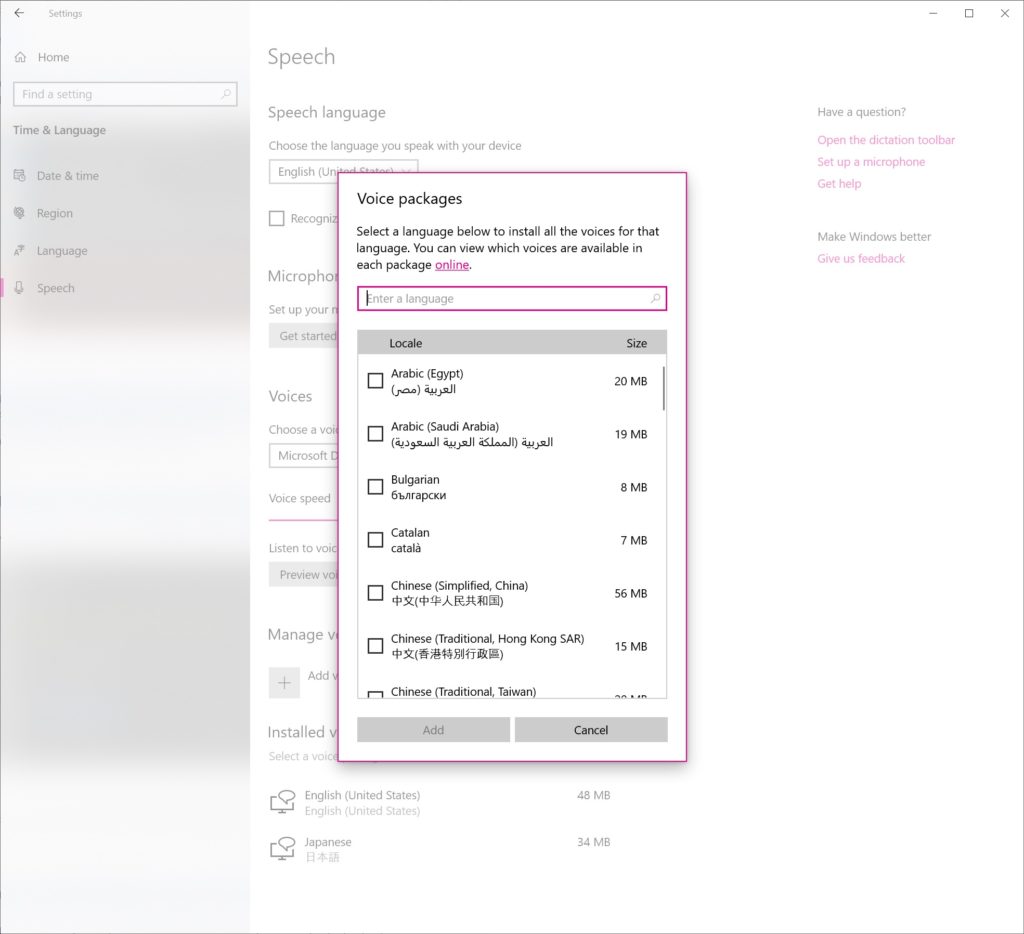
We made it easier to download and install additional voices. Now you can download and install voices without having to install a complete language pack. For example, although I speak and type U.S. English, I often prefer U.K. English text to speech voices. Now I can install these voices without having to install the full U.K. English language pack. Go to Settings > Time & Language > Language and choose Add a preferred language to add specific language features.
And finally, we improved Narrator responsiveness with applications like Word and Outlook.
Narrator is easier to use, including with popular applications like Chrome
We’ve added support for Chrome, so Narrator users can have a choice of browsers.
We also added new ways to navigate that users need and expect. You can now move by sentence when navigating text, e.g. in an eBook, document or web page. And, you can now use Narrator reading commands to seamlessly read the contents of the any application, from top to bottom or from bottom to top. For example, you can move by character, word, line, sentence or paragraph from the top of the Windows Settings application to the bottom without interruption.
Finally, we continue to make it easier to consume content with Scan Mode. We made it easier to browse the web and read mail messages by focusing Scan Mode commands in the browsing content area or canvas, and message content area. You no longer have to worry about unintentionally navigating into the browser or mail application frame. And, we improved the way Scan Mode works with some controls. For example, you can now use your left and right arrow keys to adjust a slider control while in Scan Mode and you will be able to correctly identify editable combo edit boxes as Narrator will announce these as Combo Edit controls.
Some of the new Narrator shortcuts introduced in this release include:
- Windows logo key + Ctrl + N: Quickly Access Narrator’s Settings
- Narrator + 0: Reads the advanced details of the control being focused on, e.g. for a link this will read the entire URL
- Narrator + V: Increase verbosity levels
- Shift + Narrator + V: Decrease verbosity levels
- Narrator + 5 twice quickly: Read current item spelled out
Please keep the feedback coming
Thank you to the many people who have provided feedback — both positive and constructive — to help make Windows accessibility delightful. If you’re interested in providing help or suggestions, we welcome your feedback via the Windows Insider Program. The features referenced in this blog were shared with and shaped by Insiders. Whether you’re using and Insider build, or a generally available version of Windows, Windows 10 makes it easy to share your thoughts and suggestions — just press Windows logo key + F to launch the Feedback hub and share what’s top of mind.
Finally, if you are a customer with a disability (of any kind) and need technical assistance, the Disability Answer Desk is there to assist via phone (800-936-5900) and chat, and in the U.S., we also have an ASL option for our customers with hearing loss (+1 503-427-1234). Please contact us, we are happy to help.