Windows 10: A problem with your hardware caused Windows to stop working correctly
Discus and support A problem with your hardware caused Windows to stop working correctly in Windows 10 Gaming to solve the problem; I’ve been experiencing this issue for the past few days already after I clean reinstall windows 11, whenever I play games, it crashes in the middle of…
Discussion in ‘Windows 10 Gaming’ started by LockonStratos, Jun 23, 2023.
-
A problem with your hardware caused Windows to stop working correctly
I’ve been experiencing this issue for the past few days already after I clean reinstall windows 11, whenever I play games, it crashes in the middle of it and I checked this from google queriesProblem Event Name: LiveKernelEventCode: 141Parameter 1: ffffe186667d4010Parameter 2: fffff801563cba70Parameter 3: 0Parameter 4: 1810OS version: 10_0_22621Service Pack: 0_0Product: 768_1OS Version: 10.0.22621.2.0.0.768.101Locale ID: 13321Processor IntelR CoreTM i7-8750H CPU @ 2.20GHz 2.20 GHz Graphics Nvidia GTX 1050ti Max-Q 4.0 GBInstalled

-
A problem with your hardware caused Windows to stop working correctly.
Anyone idea this id ?
Source
WindowsSummary
Hardware errorDate
6.04.2020 19:43Status
Not reportedDescription
A problem with your hardware caused Windows to stop working correctly.Problem signature
Problem Event Name: LiveKernelEvent
Code: 144
Parameter 1: 1009
Parameter 2: fffff587e8335860
Parameter 3: 0
Parameter 4: 0
OS version: 10_0_18363
Service Pack: 0_0
Product: 256_1
OS Version: 10.0.18363.2.0.0.256.48
Locale ID: 1033 -
A problem with your hardware caused Windows to stop working correctly.
Started my Surface laptop this morning and I noticed the following error in Security and Maintenance:
Source
Windows
SummaryHardware error
Date24-Oct-18 5:38 AM
StatusNot reported
DescriptionA problem with your hardware caused Windows to stop working correctly.
Problem signatureProblem Event Name: LiveKernelEvent
Code: ab
Parameter 1: 1
Parameter 2: 120
Parameter 3: 0
Parameter 4: 9
OS version: 10_0_17134
Service Pack: 0_0
Product: 256_1
OS Version: 10.0.17134.2.0.0.256.48
Locale ID: 1033
Not sure what this means or why it happened. W10 Pro version 1803, build 17134.345
Surface Laptop (new Sep 18):
- Name: SLTWMA
- Serial number: 007468382957
- SKU: Surface Laptop i5
- Version Information
- System aggregator: 135.2244.257.0
- UEFI: 137.2268.769.0
- Touch: 187.0.30.19
- Wi-Fi driver: 15.68.9120.47
-
A problem with your hardware caused Windows to stop working correctly
A problem with your hardware caused Windows to stop working correctly
Hi,
With regard to your query, we suggest that you run the Hardware and Devices troubleshooter to determine if this issue is coming from a hardware. To run Hardware and Devices troubleshooter, please follow the steps below:
- Press Windows key and search for Troubleshooting.
- Click on Troubleshooting.
- Select View all.
- Click on Hardware and Devices
and follow the on-screen wizard. - Once it’s done, reboot the PC for the changes to take effect.
Let us know the result.

A problem with your hardware caused Windows to stop working correctly
-
A problem with your hardware caused Windows to stop working correctly — Similar Threads — problem hardware caused
-
A problem with your hardware caused Windows to stop working correctly.
in Windows 10 Software and Apps
A problem with your hardware caused Windows to stop working correctly.: Hello, started having this error and cannot find a fix. SourceWindowsSummaryHardware errorDate9/30/2022 1:10 PMStatusNot reportedDescriptionA problem with your hardware caused Windows to stop working correctly.Problem signatureProblem Event Name: LiveKernelEventCode:… -
A problem with your hardware caused Windows to stop working correctly.
in Windows 10 Drivers and Hardware
A problem with your hardware caused Windows to stop working correctly.: SourceWindowsSummaryHardware errorDate6/6/2022 6:50 PMStatusReport sentDescriptionA problem with your hardware caused Windows to stop working correctly.Problem signatureProblem Event Name: LiveKernelEventCode: 144Parameter 1: 1006Parameter 2: fffff60afc34f960Parameter 3:… -
A problem with your hardware caused Windows to stop working correctly.
in Windows 10 BSOD Crashes and Debugging
A problem with your hardware caused Windows to stop working correctly.: opening perfomance monitor i have this description that i am looking for assistance: Source Windows Summary Hardware error Date 2021/12/23 02:13 Status Not reported Description A problem with your hardware caused Windows to stop working correctly. Problem signature Problem… -
A problem with your hardware caused Windows to stop working correctly.
in Windows 10 Drivers and Hardware
A problem with your hardware caused Windows to stop working correctly.: Description
A problem with your hardware caused Windows to stop working correctly.Problem signature
Problem Event Name: LiveKernelEvent
Code: 141
Parameter 1: ffff99841ecd6460
Parameter 2: fffff8023f616550
Parameter 3: 0
Parameter 4: 2a6c
OS version: 10_0_19042
Service… -
A problem with your hardware caused windows to stop working correctly
in Windows 10 Installation and Upgrade
A problem with your hardware caused windows to stop working correctly: Problem signatureProblem event name: LiveKernelEvent
Code: 117
Parameter 1: ffffe5813a264460
Parameter 2: fffff80270aef99c
Parameter 3: 0
Parameter 4: 0
OS…
-
A problem with your hardware caused Windows to stop working correctly.
in Windows 10 Drivers and Hardware
A problem with your hardware caused Windows to stop working correctly.: Hi All.I have been experiencing random system shutdown since last week. It used to happen once or twice a day but has since progressed to be increasing lately.
Summary
Hardware errorDate
19/08/2020 4:30 PMStatus
Report sentDescription
A problem with your… -
A problem with your hardware caused Windows to stop working correctly.
in Windows 10 BSOD Crashes and Debugging
A problem with your hardware caused Windows to stop working correctly.: Description
A problem with your hardware caused Windows to stop working correctly.Problem signature
Problem Event Name: LiveKernelEvent
Code: 193
Parameter 1: 804
Parameter 2: ffffffffc0000001
Parameter 3: 108
Parameter 4: fffff8021225b760
OS version: 10_0_18362
Service… -
A problem with your hardware caused Windows to stop working correctly.
in Windows 10 BSOD Crashes and Debugging
A problem with your hardware caused Windows to stop working correctly.: I’ve been having crashes for awhile usually related to a few moments after waking up from sleep and sometimes randomly. I’m pretty sure it’s hardware related but not sure which hardware is faulty.Description
A problem with your hardware caused Windows to stop working…
-
A problem with your hardware caused Windows to stop working correctly.
in Windows 10 BSOD Crashes and Debugging
A problem with your hardware caused Windows to stop working correctly.: Hi, I bought a USB C to USB C cable so I can charge my S8 directly from my computer which is the GM501GS. Sometimes when I connect the cable my laptop suddenly freezes and then displays a BSOD. No minidump file is generated, only info I could get was from the Reliability…

Contents
- 1 A Problem With Your Hardware Caused Windows To Stop Working Correctly
- 2 Fix Windows Hardware And Devices Problems With Troubleshooter
- 2.1 Conclusion
- 2.1.1 Related image with a problem with your hardware caused windows to stop working correctly
- 2.1.2 Related image with a problem with your hardware caused windows to stop working correctly
- 2.1 Conclusion
Welcome to the fascinating world of technology, where innovation knows no bounds. Join us on an exhilarating journey as we explore cutting-edge advancements, share insightful analyses, and unravel the mysteries of the digital age in our A Problem With Your Hardware Caused Windows To Stop Working Correctly section. Removable the from broken media side network run side running the as as the to already this if installation is use the use repair client windows or dvd your update as a source windows such the windows of do files- windows folder from a following command by or a However instead- a source share
A Problem With Your Hardware Caused Windows To Stop Working Correctly
A Problem With Your Hardware Caused Windows To Stop Working Correctly
A problem with your hardware caused windows to stop working correctly. problem signature problem event name: livekernelevent code: 1a1 parameter 1: ffffbe8804655040 parameter 2: 0 parameter 3: 0 parameter 4: 0 os version: 10 0 19041 service pack: 0 0 product: 768 1 os version: 10.0.19041.2.0.0.768.100 locale id: 14345. A problem with your hardware caused windows to stop working correctly. problem signature problem event name: livekernelevent code: 1a8 parameter 1: 1 parameter 2: 0 parameter 3: 0 parameter.

Fix A Problem Caused The Program To Stop Working Correctly On Windows 10
Fix A Problem Caused The Program To Stop Working Correctly On Windows 10
A problem with your hardware caused windows to stop working correctly. problem signature problem event name: livekernelevent code: 141 parameter 1: ffff85087e0ce010 parameter 2: fffff8038ee0bd5c parameter 3: 0 parameter 4: 680 os version: 10 0 22000 service pack: 0 0 product: 768 1 os version: 10.0.22000.2.0.0.768.101 locale id: 1033. 🔴 follow thewindowsclub 🔴 if you see livekernelevent error code 193 on windows 11 10, then this post will be able to help you fix the problem with your hardware. Open start. search for device manager and click the top result to open the app. expand the branch with the device you want to check. right click the device and select the properties option. source. However, if your windows update client is already broken, use a running windows installation as the repair source, or use a windows side by side folder from a network share or from a removable media, such as the windows dvd, as the source of the files. to do this, run the following command instead:.

A Problem Caused The Program To Stop Working Correctly Windows Will Close The Program And Notify
A Problem Caused The Program To Stop Working Correctly Windows Will Close The Program And Notify
Open start. search for device manager and click the top result to open the app. expand the branch with the device you want to check. right click the device and select the properties option. source. However, if your windows update client is already broken, use a running windows installation as the repair source, or use a windows side by side folder from a network share or from a removable media, such as the windows dvd, as the source of the files. to do this, run the following command instead:. 2 repeated error i have been repeatedly encountering the following error when my laptop freezes. it may occur multiple times during the day, and should take several minutes to recover. One of the errors you might encounter is livekernelevent code: 141. the livekernelevent code: 141 error is not uncommon on windows devices. one element that baffles many windows 10 11 users encountering this error is its sudden, unexpected appearance. affected users see this error message:.
Fix Windows Hardware And Devices Problems With Troubleshooter
Fix Windows Hardware And Devices Problems With Troubleshooter
if you find that your windows 10 8 7 computer is facing some hardware or device issues or problems, you can run the hardware how to tell a pc hardware problem from a software problem the easiest way to find out whether the pc problem is related to find out hardware & software problems in windows pc, windows 7, windows 8.1 and windows 10 click here for more a problem caused the program to stop working correctly windows will close the program and notify you update your graphics a problem caused the program to stop working correctly. windows will close the program and notify you if solution is available you may have experienced that you properly shut down your pc after finishing your work. but, next time when will open it, you fix livekernelevent 141 hardware error – 2022. accu membership: tinyurl ydnfkcyn accu.org accuconference.org accu lightning talks: omnibus learn more about all of ifixit and there selection of tools at ifixit jayztwocents get your jayztwocents merch here best fix windows 10 computer keeps freezing randomly tutorial if windows 10 freezes randomly or windows 11 freezes randomly. this video shows how to fix startup error with automatic repair loop in windows10. get genuine windows keys at prime
Conclusion
All things considered, there is no doubt that article provides informative information about A Problem With Your Hardware Caused Windows To Stop Working Correctly. From start to finish, the author presents an impressive level of expertise on the topic. In particular, the section on Y stands out as particularly informative. Thank you for reading the post. If you need further information, feel free to contact me through email. I look forward to your feedback. Furthermore, below are some relevant articles that you may find interesting:
[SOLVED] Problem with my hardware caused Windows 10 to stop working correctly.
-
Thread starterAlanW1
-
Start date
You should upgrade or use an alternative browser.
-
#1
Windows
Summary
Hardware error
Date
12/30/2019 12:37 PM
Status
Not reported
Description
A problem with your hardware caused Windows to stop working correctly.
Problem signature
Problem Event Name: LiveKernelEvent
Code: 144
Parameter 1: 100d
Parameter 2: ffff868b0fb30960
Parameter 3: 0
Parameter 4: 0
OS version: 10_0_18363
Service Pack: 0_0
Product: 256_1
OS Version: 10.0.18363.2.0.0.256.48
Locale ID: 1033
Would be really helpful if anyone new how to fix this.
![]()
-
#2
Source
WindowsSummary
Hardware errorDate
12/30/2019 12:37 PMStatus
Not reportedDescription
A problem with your hardware caused Windows to stop working correctly.Problem signature
Problem Event Name: LiveKernelEvent
Code: 144
Parameter 1: 100d
Parameter 2: ffff868b0fb30960
Parameter 3: 0
Parameter 4: 0
OS version: 10_0_18363
Service Pack: 0_0
Product: 256_1
OS Version: 10.0.18363.2.0.0.256.48
Locale ID: 1033Would be really helpful if anyone new how to fix this.
Try updating your graphics card and see if it happens again
-
#3
Thank you for the help!
Similar threads
- Advertising
- Cookies Policies
- Privacy
- Term & Conditions
Windows PCs are often preferred for gaming because of their flexibility. They offer options for customization, such as enhanced graphics drivers and increased memory, which can significantly improve performance. Compared to other computers, they are easier to upgrade and meet software or game requirements.
A computer with higher specifications tends to be more powerful and, therefore, is likely to experience fewer performance issues. Unfortunately, that is not always the case. However, even when using a high-performance gaming system, errors may occur. One of the errors you might encounter is LiveKernelEvent Code: 141.

The LiveKernelEvent Code: 141 error is not uncommon on Windows devices. One element that baffles many Windows 10/11 users encountering this error is its sudden, unexpected appearance. Affected users see this error message:
A problem with your hardware caused Windows to stop working correctly.
- Problem signature
- Problem Event Name: LiveKernelEvent
- Code: 141
- Parameter 1: ffffba08b4e4a010
- Parameter 2: fffff8054373c188
- Parameter 3: 0
- Parameter 4: 120c
- OS version: 10_0_19041
- Service Pack: 0_0
- Product: 256_1
- OS Version: 10.0.19041.2.0.0.256.48
- Locale ID: 1033
The effect of this error varies per device. Some users suffer from mild screen flickering, while others cannot identify what’s on their screens anymore. Some users report their screens graying out or turning green after the occurrence of the LiveKernelEvent Code: 141 error. There are also instances when the affected computer restarts by itself after the error occurs.
This error has brought a lot of frustration to Windows users because the cause of the problem is not known. Common troubleshooting methods also don’t work, leaving the affected users at their wits’ end.
If you’re one of the unlucky users who came across the error LiveKernelEvent Code: 141 in Windows 10/11, then this guide should be useful to you. We will explain what LiveKernelEvent Code: 141 is, what the possible causes of the error are, and how to fix it.
What Is LiveKernelEvent Code: 141?
LiveKernelEvent Code: 141 is a Windows error that is associated with one of your computer’s hardware components. It is hard to figure out which hardware component is causing the problem because the error message does not say much about what triggered the error.
The notification message usually reads as follows:
A problem with your hardware caused Windows to stop working correctly.
Problem signature
Problem Event Name: LiveKernelEvent
Code: 141
In some instances, the error comes with a more detailed message:
A problem with your hardware caused Windows to stop working correctly.
Problem signature
Problem Event Name: LiveKernelEvent
Code: 141
Parameter 1: ffff9f88ee238460
Parameter 2: fffff80479d5b938
Parameter 3: 0
Parameter 4: 6b4
OS version: 10_0_18363
Service Pack: 0_0
Product: 768_1
OS Version: 10.0.18363.2.0.0.768.101
Locale ID: 4105
There are no specific symptoms for this error, but some affected users report experiencing sluggishness and unresponsiveness before LiveKernelEvent Code: 141 pops up. One thing common among those affected by this problem is that they are playing a game when the error happens.
However, most of the games they were reportedly playing when the error occurred do not have high hardware and software requirements. Some were even able to play resource-heavy games without trouble, only to encounter the error when playing a less intensive game.
What Are the Potential Causes of LiveKernelEvent Code: 141?
Because the error is hardware-related, it is important to check the computer’s hardware components, such as the graphics card, memory, hard disk, and fans. Overclocking and overheating should also be listed as possible culprits. It is also possible that the error is being caused by faulty, outdated, or conflicting device drivers.
There is no specific cause of the LiveKernelEvent Code: 141 error, which makes this issue harder to resolve. What you can do is go through our troubleshooting guide below and work your way down the list of solutions until you find one that works for you.
How to Fix Windows 10/11’s LiveKernelEvent Code: 141
As mentioned above, there is no universal fix for the LiveKernelEvent Code: 141 error in Windows 10/11 because it could be caused by different factors. Thus, it is important to perform a system-wide assessment to pinpoint the source of the problem. Let’s start with these simple troubleshooting tips to try and resolve the error:
- Install all available system and security updates. Click on Start > Settings (the gear icon) > Update & Security, then click Check for updates to automatically scan for any pending updates you need to install.
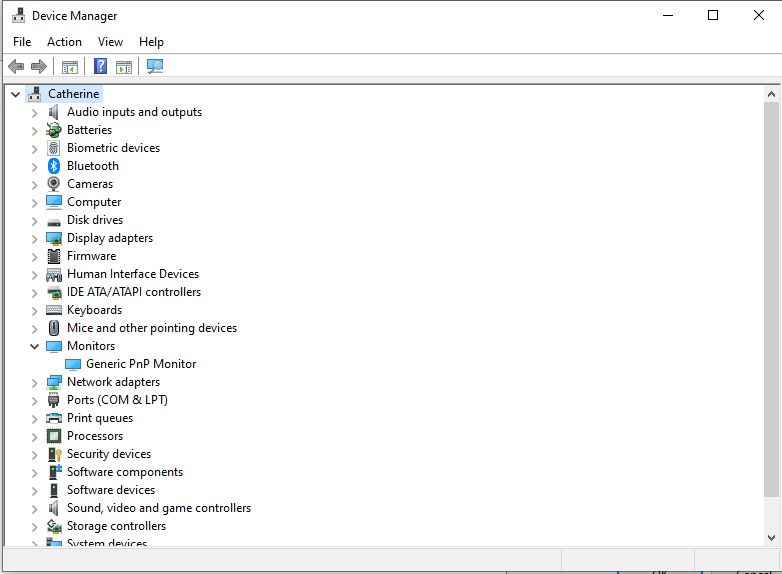
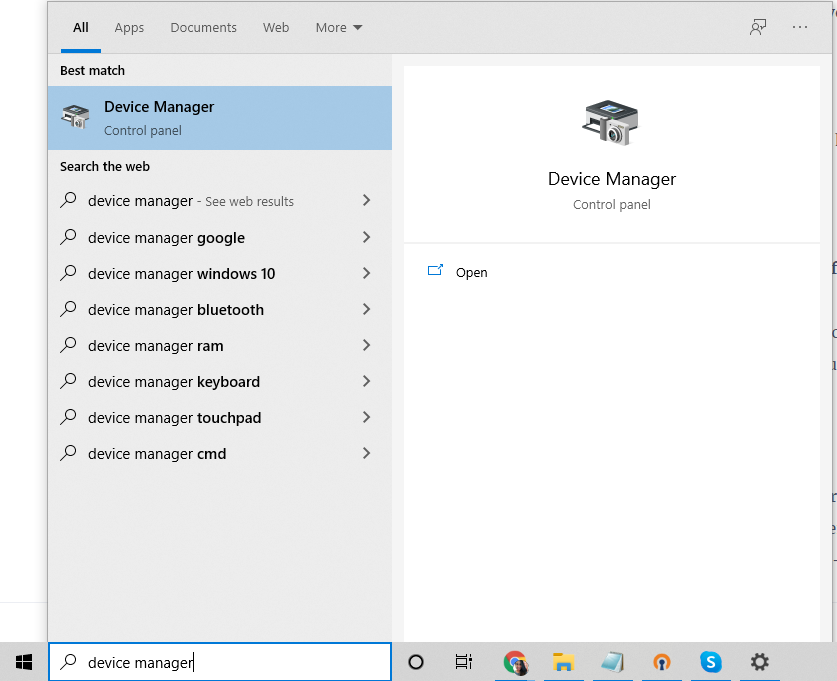
- Update all device drivers. Sometimes, not all driver updates are included in automatic Windows updates, so you may need to update each of your device drivers manually. Type device manager into the search box, then click on Device Manager from the results. Look for any entry with a question mark and update the driver for that particular hardware. Right-click on the entry, then choose Update driver.
- Turn off your antivirus software temporarily. An overprotective security software program can also cause inconsistencies within your system, leading to computer errors.
- Conducting regular system cleanups can help optimize your computer resources, streamline system processes, and reduce errors like LiveKernelEvent Code: 141. Outbyte PC Repair is one of the software tools you might consider using for this purpose.
Once you’ve done all of the above, reboot your computer and observe whether the LiveKernelEvent Code: 141 issue has been resolved. If not, give the solutions below a try.
Fix #1: Run a Disk Check
One of the initial hardware components to check when troubleshooting is the hard disk. A hard drive with a corrupted component or file can cause various problems, including the LiveKernelEvent Code: 141 error. Fortunately, Windows 10/11 is equipped with a tool called CHKDSK, which is designed to scan and fix hard drives automatically.
To perform a disk check, follow the instructions below:
- Press Win + X to bring up the Power User menu.
- Hold the A key, then click the Windows PowerShell program to run it in administrative mode.
- Click Yes to confirm the launch.
- Type in the following command: chkdsk c: /f /r /x (C: refers to the disk you want to check).
- Press Enter.
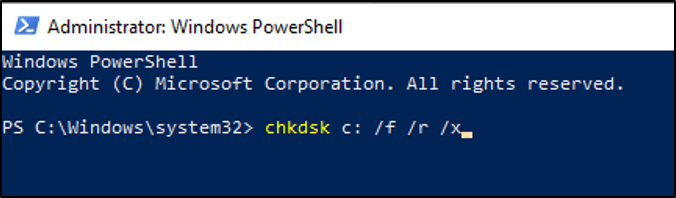
Let the program run its diagnostic process and wait for the results. CHKDSK should repair any error it encounters, otherwise, it will provide you with more information or further instructions at the end.
Fix #2: Check Your Memory
Following the hard disk, the computer’s RAM is another critical component to check. You can use the Windows Memory Diagnostic tool to determine if your PC has a faulty memory stick. To run this program, do the following:
- Search for Control Panel using the search menu.
- Click on System and Security > Administrative Tools.
- Double-click the Windows Memory Diagnostic tool. Another way to launch this tool is by pressing Win + R (this will launch the Run dialog), typing mdsched.exe into the dialog box and clicking OK.

- Choose between Restart now and check for problems (recommended) and Check for problems the next time I start my computer. For the purpose of this guide, click on the first option.
Your computer will restart and boot into the Windows Memory Diagnostics environment. Wait for the scan to be completed to check for any problems with your computer’s memory. If there is no issue with your RAM, proceed to the next solution.
Fix #3: Set Your Fan Speed to the Maximum
Overheating is one of the possible reasons behind the LiveKernelEvent Code: 141 error in Windows 10/11. To make sure that your system is well-ventilated and doesn’t overheat, you can set the speed of the CPU fan to the maximum.
Regulating your CPU fan speed could be achieved either manually via BIOS settings or with the help of third-party applications. SpeedFan is one of the tools available that can assist in managing your system’s temperature. Although manufacturers might call this feature differently, there is always a fan speed setting hidden somewhere within the BIOS.
To edit your fan speed using the BIOS settings, follow the steps listed below:
- Press Win + I to launch Settings, then click Update & security.
- Choose Recovery from the left menu, then click Restart now under the Advanced startup section.
- Click Troubleshoot > Advanced options.
- Choose UEFI Firmware settings, then click Restart.
- Your PC will then boot into the BIOS/UEFI settings, and all you need to do is find the setting for the fan speed and adjust it from there.
Fix #4: Underclock Your GPU
Before proceeding with the rest of the troubleshooting steps, make sure that this type of system instability is not caused by your GPU, CPU, or RAM being overclocked.
Furthermore, if you are still overclocking your component, determining the exact cause of the 141 LiveKernelEvent error is nearly impossible.
Overclocking causes certain components (CPU, RAM, or GPU) to run at higher frequencies than usual, resulting in higher temperatures.
Even if you haven’t manually adjusted the frequencies or voltages of your components, you might be using software that enables overclocking. Examples of these include MSI Afterburner, AMDRyzenMaster, Intel Extreme Tuning, Performance Maximizer, or CPU-Z.
Here are the steps on how to revert any overclocked frequencies:
- Boot into the BIOS/UEFI environment using the instructions above.
- Look for the Frequency/Voltage Control settings.
- Scroll down to CPU Frequency/Voltage Control, then press Enter to select it.
- Lower the value of the clock speed.
- Lower the vCore or core voltage setting as well.
- Save your settings and exit the BIOS.
Once you have adjusted the settings, you can go back to your usual activity and see if the error appears again.
Fix #5: Reinstall GPU Drivers
In most cases, the LiveKernelEvent Code: 141 issue is related to the GPU of the affected computer. A simple solution to this issue can be to uninstall the graphics driver and then install a fresh and updated version of the software. Here is how to do this:
- Press Win + R to launch the Run dialog.
- Type in devmgmt.msc, then press Enter to open the Device Manager.
- Scroll down to Display adapters and expand the option to reveal the devices included in that category.
- Right-click your graphics card, then click Uninstall device.
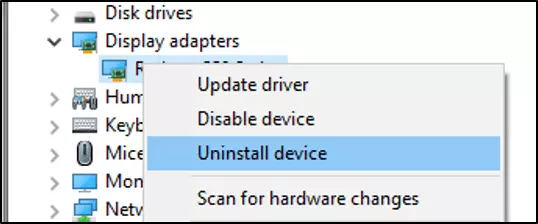
The driver software for your graphics card will then be uninstalled from your computer. The next step is to download the latest driver for your graphics card from the manufacturer’s website and install it on your computer. For this, you will need to find out the model and version of your graphics card, as well as the Windows 10 version you are using.
Fix #6: Reinstall GPU Drivers Using DDU
Sometimes, uninstalling and then reinstalling your GPU drivers is not enough because the previous driver version has not been completely deleted. If this is the case, you can use a program called Display Driver Uninstaller, or DDU, to do the job.
DDU is a driver utility program that lets you remove all traces of your previous display and audio drivers on Windows. This works for NVIDIA, AMD, and INTEL. This tool is useful when you’re having trouble reinstalling driver files due to a conflict with the older version.
All you need to do is download and install the DDU program and choose the driver you want to uninstall. Restart your device after the driver has been deleted and then install an updated version of the driver file.

If you don’t fancy the idea of using the DDU program, you can use another driver updater tool instead. One app we can suggest is Auslogics Driver Updater. This tool updates all your PC drivers in one click. Also, it prevents driver conflicts and helps achieve smooth hardware operation.
Fix #7: Update your GPU driver
If the problem is caused by obsolete driver components, updating the affected driver should resolve it. GPU manufacturers release driver updates when games require new software capabilities for efficient communication with the graphics card.
You should update your device driver software if you haven’t done so in a while.
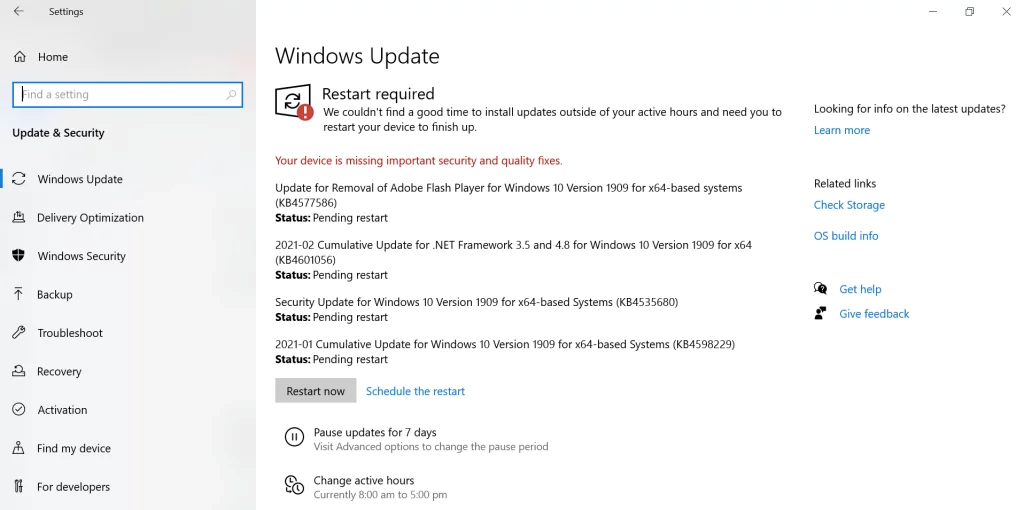
To begin, install updates for your computer using the Windows Update client. Updates are necessary because they fix bugs and improve performance. If Microsoft has released a new version of your graphics card driver, the client will assist you in installing it. If you don’t know how to update your system, follow these steps:
- Using the Win + I keyboard shortcut, open the Settings app.
- Click on the Update & Security icon after Windows Settings opens.
- Allow the Windows Update client to check for and download updates.
- Click the Download and Install button if you have optional updates, such as quality and feature updates.
- When the client has finished downloading the updates, click the Restart Now button to allow it to reboot your computer and begin the installation process.
- It is important to note that your computer will most likely reboot several times before the installation process is complete.
When the process is finished, your computer will restart normally. You can now launch the game or app to investigate the issue.
Fix #8: Disconnect Any External Peripherals and Reinstall Their Drivers
Your device drivers may be in conflict. To identify the problem, disconnect your external peripherals, then reconnect them one by one to isolate if any of them is causing the ‘livekernelevent code’ error.
After that, you may try reinstalling or updating any associated device drivers.
To reinstall a device driver, do the following:
- Into the search field, type device manager. Click on the top result.
- Right-click on the problematic device and select Uninstall.
- Restart your computer.
- Upon restarting, Windows will automatically try to reinstall the device driver.
Alternatively, you can use your driver updater tool. This option is faster and safer, helping to avoid any compatibility issues with your CPU architecture.
Fix #9: Examine Your GPU Card for Signs of Failure
If this error (Live Kernel Event 141) only appears when your computer is processing a GPU-intensive task, and reinstalling the drivers didn’t help, the next step is to troubleshoot potential hardware issues with your graphics card.
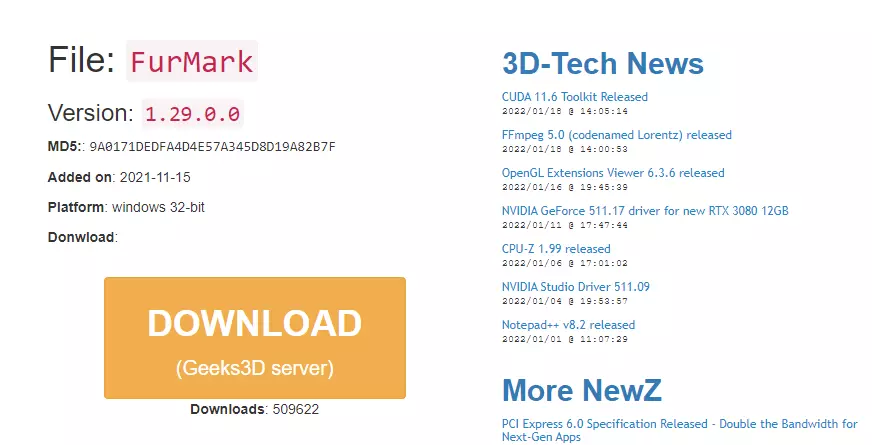
One tool often recommended for this purpose is FurMark, due to its simplicity and effectiveness in testing GPU performance and stability. FurMark will identify heat issues, power deficiencies, incorrectly seated power cables, and other potential factors contributing to GPU card malfunction.
Important: FurMark will subject your GPU to extreme stress, causing your graphics card’s temperature to skyrocket. Stop the test if the temperature exceeds 80°C and continues to rise. This will prevent further damage to the GPU.
If you’re ready to test your GPU for any hardware issues, follow the steps below to install, configure, and run FurMark on the machine that’s facing the 141 Live Kernel Event error:
- First and foremost, download the most recent version of FurMark.
- After the download is complete, double-click the installer and, if prompted, click Yes in the User Account Control window.
- To accept the EULA, select I accept the agreement and press Next on the first installation screen.
- Next, choose a suitable location for FurMark to be installed and click Next once more.
- Navigate through the remaining installation prompts before finally clicking Install to begin the Furmark installation.
- Wait until the installation is finished, then launch FurMark and click Yes when prompted to grant admin access via User Account Control (UAC).
- After you’ve successfully installed and launched Furmark, change the Resolution setting to the highest resolution your monitor supports.
- Then, click the Settings button and make sure the following checkboxes are ticked off:
- Burn-in
- Xtreme burn-in
- Post-FX
- GPU temperature alarm
- Log GPU data
- After checking all relevant boxes, click OK to save the changes and close the Settings window.
- When the FurMark utility is ready to use, click the GPU stress test button and then confirm the operation by clicking GO.
Now that the utility is running, carefully examine the output display to see if you can spot any artifacts. If you do notice artifacts or even a system crash, you’ve just determined that you’re dealing with a GPU card that is beginning to fail – in this case, return your GPU to the warranty issuer (if the warranty is still valid) or order a replacement.
Note: If the temperature quickly exceeds 80°C after starting the stress test, stop the operation immediately to avoid further GPU damage.
Fix #10: Install Pending Updates
If your system isn’t running the latest Windows version, you may encounter issues like the “livekernelevent code 141” error. So, always check for any available Windows updates and apply them as soon as possible.
Here’s how to complete this task:
- Press the Win + I shortcut to launch the Settings program.
- Select Update and Security.
- Navigate to Windows Update. If an update is available, it will be shown on your screen.
- If you agree with updating Windows, click the Update button.
- Wait while the updates are downloaded and installed.
- Restart your computer.
Fix #11: Perform a Clean Boot
When you initiate a clean boot, Windows runs with a minimal set of features and processes. So, if you suspect that a third-party app is causing the error to show, you can quickly rule out that possibility.
To perform a clean boot, do the following:
- Press the Win + R combo to launch the Run utility.
- Into the text field, type msconfig.
- Go to the System Configuration section and navigate to the General tab.
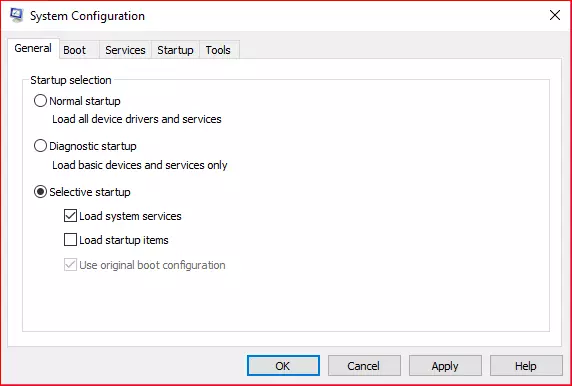
- Find the Selective Startup section and untick the Load Startup Item option.
- Hover over to the Services tab.
- Tick the Hide All Microsoft Services option and click the Disable All button.
- Next, go to the Startup tab and click the Open Task Manager link.
- In the window that opens, disable all startup programs.
- Save all your changes and close windows.
- Restart your device.
Fix #12: Run the Hardware and Devices Troubleshooter
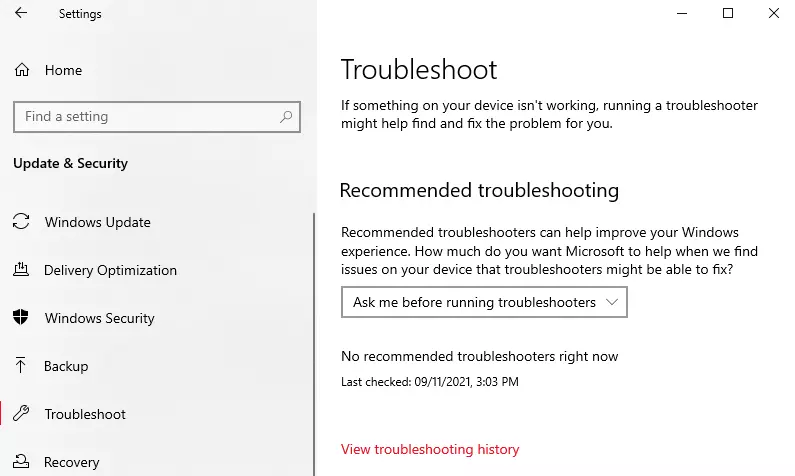
Windows 10/11 comes with a built-in troubleshooter that can be used to diagnose and fix problems with your hardware components. It will detect any existing issues and provide adequate solutions. You can use it if you are facing the livekernelevent code error.
Here’s how to use it:
- Press the Win + I shortcut to launch the Settings utility.
- Go to Update and Security and select Troubleshoot.
- Double-click on the Hardware and Devices section and select Run the Troubleshooter.
- Once the troubleshooting process completes, restart your computer and see if the error is fixed.
Fix #13: Ask Help From Pros
If you have tried all the solutions above but you are still seeing the livekernelevent with service pack 0_0 product code, then you may try seeking assistance from professionals. You can take your device to a technician who is more knowledgeable about the ins and outs of your computer’s hardware.
Fix #14: Perform a Clean Install
Consider this fix as a last resort. But before you proceed with performing a clean install, you should prepare a backup of your files. The clean install process will delete everything on your hard drive. So, if anything happens in the process, you can quickly recover your files.
You can back up your files to an external storage device. This is a much better option if you have a large number of files as syncing them to the cloud will take a long time.
To back up your files to an external storage device, follow these steps:
- Open File Explorer.
- Into the address bar, type this path: %HOMEPATH%.
- Hit the Enter button to proceed.
- Now, click the Select All button on the Home tab.
- Click the Copy to button.
- Choose the Choose Location option.
- Select your preferred destination location.
- Next, click the Copy button.
- And then, repeat the above steps to back up your files in the remaining accounts.
Once you have prepared a backup, you can proceed with the clean installation process. Don’t worry because it is a straightforward procedure. Here’s how you can perform it:
- Use your Windows 10/11 USB bootable media.
- Press any key to proceed.
- In the Windows Setup section, click the Next button.
- Click the Install Now button.
- If you’re reinstalling Windows 10/11, click the I don’t have a product key option. Otherwise, provide your product key.
- Click Next and choose your Windows 10/11 edition.
- Proceed by clicking Next.
- After that, agree to the terms and conditions.
- Click Next and select the Custom: Install Windows Only option.
- Choose the partition where you installed your Windows 10/11 OS.
- Click the Delete button.
- Click Yes and select an empty drive.
- Finally, click Next.
Once you finish the above steps, a fresh copy of Windows 10/11 will be installed.
Conclusion
The LiveKernelEvent Code 141 error in Windows 10/11 can be frustrating, particularly when you’re unsure which hardware component is causing the problem. Luckily, you can use the guide above to narrow down the culprit and take some steps to resolve the problem.
The next time you encounter the error code, perform basic troubleshooting first. Install any available system update via the Windows Update utility. If it does not work, update all device drivers. You may also want to try disabling your antivirus software temporarily to check if it triggers the error.
Another troubleshooting method you can consider is getting rid of unwanted files on your PC. This will allow you to eliminate any harmful entities that disguise as system files and, at the same time, free up significant system space.
Now, if troubleshooting doesn’t seem to do the trick, perform a disk check. It could be the case of a corrupted hard drive that needs to be fixed. You can also try doing a memory check to find out if your computer has a faulty memory stick. Another solution you can try is to set your fan speed to the maximum. This is helpful if you suspect that the error is caused by overheating.
If all else fails, you can try doing a clean install of Windows 10/11, and hopefully, it fixes the LiveKernelEvent Code: 142 error for good.
Give us some love and rate our post!
llinfeng
Повторная ошибка
Я неоднократно сталкивался со следующей ошибкой, когда мой ноутбук зависает. Это может происходить несколько раз в течение дня, и восстановление может занять несколько минут.
Source Windows Summary Hardware error Date 11/1/2018 10:11 AM Status Not reported Description A problem with your hardware caused Windows to stop working correctly. Problem signature Problem Event Name: LiveKernelEvent Code: 144 Parameter 1: 3003 Parameter 2: ffffad8c0b1a75c8 Parameter 3: 40010002 Parameter 4: 0 OS version: 10_0_17134 Service Pack: 0_0 Product: 256_1 OS Version: 10.0.17134.2.0.0.256.48 Locale ID: 1033 Подробнее
Насколько я могу судить, аппаратная ошибка возникает, когда я использую ноутбук на док-станции. Вот что я наблюдаю:
- При использовании ноутбука в обычном режиме произойдет «зависание», и я вряд ли смогу управлять ноутбуком: курсор мыши не будет двигаться непрерывно и Alt+ Tabне сможет переключаться между двумя окнами.
- Вскоре (обычно несколько минут) все вернется на круги своя. После проверки на вкладке «Быстродействие» в Диспетчере задач ничего не было обнаружено, будь то процессор, память или диск.
- Когда я открою
View reliability historyинструмент, я найду другую запись об ошибке оборудования Windows
Спецификация машины:
- Thinkpad T480, i7-8650U (недавно замененный модуль благодаря изготовлению)
- С той же парой док-станций, более старая модель T480 имела точно такую же проблему.
- Док-станция: Thinkpad Ultra Док-станция . Та же проблема возникла в двух одинаковых доках с немного разными мониторами и аксессуарами.
- Спецификация OS:
OS build 17134.376. - Самый последний сборник «отчета о надежности»: ссылка на файл XML
Возможные решения
- Во-первых, я хотел бы узнать, что именно пошло не так, аппаратно: команда поддержки производителя не слишком беспокоилась о точных сообщениях об ошибках и приказала мне переустанавливать ОС Windows до 5 раз. [Это то, что они называли «отладкой».]
Пожалуйста, сообщите, если вы можете расшифровать повторяющуюся «Аппаратную ошибку».
- Во-вторых, я постараюсь подтолкнуть производителя к замене док-станций и посмотреть, сохраняется ли та же «проблема замерзания».
1 ответ на вопрос
David Marshall
Код проверки ошибки 144 с параметром 1, установленным на 3003, указывает на проблему с драйвером USB3. В частности, устройство USB не удалось перечисления. Это может быть связано с док-станциями. Это должно быть обострено в Lenovo. Вероятно, им потребуется полный дамп ядра для диагностики проблемы.
https://docs.microsoft.com/en-us/windows-hardware/drivers/debugger/bug-check-0x144—bugcode-usb3-driver
Язык 1033 означает, что у вас есть версия Windows на английском языке (США).
Если вы хотите выполнить некоторую отладку самостоятельно, вы можете включить дамп ядра в дополнительных настройках системы .
Это скрыто в Windows 10. Самый простой способ добраться до него — это поиск с помощью Cortana. Затем вы должны установить WinDbg. Вы можете либо получить классическую версию из Windows 10 SDK, либо использовать ту, которая теперь доступна в Магазине Windows. Но я думаю, что вам понадобится какая-то внутренняя информация от Lenovo, чтобы понять это.
Я полагаю, что они установили все последние версии драйверов и прошивок.
Похожие вопросы
-
12
Почему папка / winsxs становится такой большой и ее можно уменьшить?
-
2
Повышенные привилегии для запуска приложений в Windows?
-
14
PDF Viewer в Windows
-
-
7
Какие службы Windows можно безопасно отключить?
-
8
Firefox PDF плагин для просмотра PDF в браузере на Windows
-
1
Windows теряет макет экрана
-
1
Есть ли способ предотвратить установку / обновление, чтобы засорять мой жесткий диск загадочными пап…
-
1
Как я могу получить доступ к принтеру Windows Vista из Ubuntu по сети?
-
6
Просмотр журнала в Windows
-
3
Фоновая проблема Windows с двумя экранами