Windows Update Windows Vista Business Windows Vista Enterprise Windows Vista Home Basic Windows Vista Home Premium Windows Vista Starter Windows Vista Ultimate Windows 7 Enterprise Windows 7 Home Premium Windows 7 Professional Windows 7 Starter Windows 7 Ultimate More…Less
Resolution
To fix this error, follow the methods below. If the first method doesn’t resolve this issue, proceed to the next method.
Method 1: Use the Last Known Good Configuration to start Windows
When starting the PC using the Last Known Good Configuration, your computer starts with the configuration from the last time your PC booted successfully. To do this, follow these steps:
-
Click the Start button, then click the arrow next to Shut Down, then click Restart.
-
As your computer starts, press and hold the F8 button. If the Windows logo appears, you’ll need to try again by shutting down and restarting your computer.
-
On the Advanced Boot Options screen, use the arrow keys to highlight Last Known Good Configuration (advanced), and then press Enter. Windows will start normally.
If you still can’t boot into Windows successfully, proceed to method 2.
Method 2: Remove boot sector viruses :
Boot sector viruses infect your computer before Windows starts. This may result in the error you’re receiving. The Windows Defender Offline Beta tool will help remove boot sector viruses.
-
On another computer, go to the Windows Defender Offline Beta site at: What is Windows Defender Offline Beta?
-
Depending on your version of Windows, click Download the 32-bit version or Download the 64-bit version.
-
If you’re unsure of which version of Windows you are running, click the Start button, right click Computer, then left click Properties. The version will be listed next to System Type.
-
-
When prompted, click the arrow next to Save, then click Save as. When the download is finished, remove the removable media.
-
Insert a CD, DVD, or removable USB drive. On the left hand pane of the Save As window, click the removable media and click Save.
-
Insert the Windows Defender Offline CD, DVD or USB in the PC infected with a virus or malware. Restart the PC.
-
If your PC will detect the media automatically follow the steps below. If your PC doesn’t detect media automatically, skip to step 7:
-
Read the instructions on the screen to turn on this option. In some cases, you might need to press any key to start from the CD, DVD, or USB drive or to press a specific key, such as F12.
-
Press the key (usually F12). A list of available devices is shown. There will be an entry for each hard drive, one for each CD, DVD drive, and a USB flash drive.
-
Use the arrow key to scroll to the drive that has the bootable CD, DVD, or USB flash drive in it, and then press Enter.
-
The PC will start from the Windows Defender Offline CD, DVD, or USB flash drive. The scan will take a few minutes and remove any malware that may be infecting your computer.
-
-
If your PC will not detect the media automatically:
-
During the restart process, read the screen for any instructions that explain how to interrupt normal startup and enter the BIOS Setup Utility. Most PCs use the F2, F10, ESC, or DEL key to begin the BIOS Setup.
-
Look for a tab in the BIOS Setup Utility that is labeled Boot Order, Boot Options, or Boot. Following the directions on the screen, use the arrow keys to go to the Boot Order, then press Enter.
-
Locate the CD, DVD, or USB flash drive (this might be called Removable Device) in the Boot list. Following the directions on the screen, use the arrow keys to move the drive up so that it appears first in the Boot list. Press Enter. The boot order sequence is now changed to boot from the CD, DVD, or USB flash drive.
-
Press F10to save your changes and to exit the BIOS Setup Utility. Select Yes in the confirmation window. The PC will restart. Allow the PC to restart normally. The scan will take a few minutes and remove any malware that may be infecting your computer.
-
-
After the scan is complete, the PC will boot into Windows normally.
If you still cannot boot into Windows, proceed to method 3.
Method 3: Use the Startup Repair feature
Startup Repair can detect and fix certain types of system problems that might prevent Windows from starting.
To run Startup Repair using preinstalled recovery options:
-
Restart your computer using the PC’s power button. Do one of the following:
-
If your computer has a single operating system installed, press and hold the F8 key as your computer restarts. You need to press F8 before the Windows logo appears. If the Windows logo appears, you need to try again by waiting until the Windows logon prompt appears, and then shutting down and restarting your computer.
-
If your computer has more than one operating system, use the arrow keys to highlight the operating system you want to repair, and then press and hold F8.
-
-
On the Advanced Boot Options screen, use the arrow keys to highlight Repair your computer, and then press Enter.
-
Select a keyboard layout, and then click Next.
-
On the System Recovery Options menu, click Startup Repair, and then follow the on screen instructions.
To run Startup Repair using the Windows installation disc or a system repair disc:
-
Insert the Windows 7 installation disc or a system repair disc, and then shut down your computer.
-
Restart your computer using the computer’s power button.
-
If prompted, press any key and then follow the instructions that appear.
-
On the Install Windows page, or on the System Recovery Options page, choose your language and other preferences, and then click Next.
-
If you’re using the Windows installation disc, click Repair your computer.
-
Select the Windows installation you want to repair, and then click Next.
-
On the System Recovery Optionsmenu, click Startup Repair, and then follow the on screen instructions.
More Information
Need more help?
Want more options?
Explore subscription benefits, browse training courses, learn how to secure your device, and more.
Communities help you ask and answer questions, give feedback, and hear from experts with rich knowledge.
Новое сообщение
та же фигня на asus k50in ставлю винду а он вирус и ету ошибку
Всем привет, помгоите пожалуйста!
Компьютер не грузится до конца вылезает, этот страшный синий экран и пишет:
A problem has been detected and windows has been shut down to prevent damage to your computer.
If this is the first time you’ve seen this stop error screen, restert your computer. If this screen appears again, follow these steps:
Check for viruses on your computer. Remove any newly installed hard drives or hard drive controllers. Check your hard drive to make sure it is properly configured and terminated. Run CHKDSK /F to check for hard drive corruption, and then restart your computer.
Technical information:
***STOP: 0x0000007B (0xF7BBA524, 0xC0000034, 0x00000000,0x00000000)
Помогите пожалуйста!!!!!!!!!!!!!!!!
Что можно сделать?!
Желаю доброго времени суток! Ноутбук — Toshiba A 300-10C.
Точно знаю, что он работал на OS Windows XP вместо положенной Vista
Возникла следующая проблема — ноутбук стал включаться самостоятельно после выключения(полного) минут через десять и так каждый раз.
Сбросил настройки BIOS на заводские — система перестала загружаться вообще, шла постоянная перезагрузка системы. Пробовал загрузить с PE Windows, но выдавалась ошибкаMaryAlice:
Запустил систему только после полного форматирования винчестера и перемены значение SATA Controller Mod c AHCI на Compatibility.
Всё работает!!!
люди добрые помогите у меня asus 901 проблема такая при загрузке винды он выдает синий экран ну как у всех. Но я не увидел если у кого нету в биосе переключателя на IDE что делать. Форматировать я не могу да и нельзя очень нужная инфа на компе. Пробовал снимал ж\д на другой комп жеский вообще не видит. Пробовал через live usb windows видит но скачать не дает. Короче у кого такая проблема ушла помогите плиз. А то время идет а мне работать надо…
banderlog — Вам в фирму, кто винтами занимается нужно.
Люди добрые и умные, подскажите в чем дело?! Новый ноутбук. Стояла Linux. При установке Win xp zver sp3 выдает ошибку 7b. Я так понимаю ругается на жесткий диск? Подумал, может винда глючная- win2K такая же песня. Снес вручную разделы linux-тоже не помогает? Подскажите, что делать?
Дмитрий:
Cпасибо, помогло!!!
хоть ктото решил эту проблему?
заменил AHCI на Compabillity и не работает всеравно
семёрка встаёт без проблем а xp приустановке выдаёт stop0x0000007B(0x78de524,0xc0000034,0x00000000,0x00000000).
Таки шалом) заменил AHCI на Ide не помогло у меня асер жмахаю при загрузке Alt+F10 рековер менеджер заработал…….. Не буду жене хп ставить))))))))))))
у меня ноут asus k40in,все работало нормально а позже прога(asus live update) обновила bios и после ребута вылазиет ошибка 0x0000007b…что делать???мучаюсь 3 день…ОС:хрюша хом эдишин…заранее благодарен
У МЕНЯ УЖЕ БЫЛО ТАКОЕ! ТА ЖЕ ОШИБКА, И ТОЖЕ ЖЕСТАК НЕ ВИДЕЛ ДВА РАЗА, НА ПК И НА БУКЕ. СПОСОБ: С ДИСКА CD ЗАГРУЗИ ПРОГРАММУ ДЕЛЕНИЯ ЖЕСТАКА, УДОЛИ ВСЕ РАЗДЕЛЫ И СОЗДАЙ ВСЕ ЗАНОАО, НЕ ЗАБУДЬ ЧАТЕЛЬНО ОТФАРМАТИРОВАТЬ, (при создании поставь все правельно) ЕСЛИ ИПСЛЕ ЭТОГО НЕ ПОЙДЕТ УСТАНОВКА, ПОПРОБУЙ ДРУГУЮ ВИНДУ. 100% ВАРИАНТ!!! 2 РАЗА ПОМОГАЛА!
ЕСЛИ ЧТО ПИШИТЕ!
Приветствую всех, прочитал всё выше сказаное и вот что могу сказать по этому поводу: встречал сотни раз ошибку 7b-чаще всего просто жёсткому попендра, в результате резкого ребута сильно ударился башкой и потерял адресацию-это хлам, в буках часто жалуется на то, что просит дрова на SATA контроллер, в случае с видяхой-проверь кондёры на матери, скорее всего ты воткнул более мощную видяху, если кондёры вздуты, то замена иногда прокатывает, но чаще приходится перепаивать входной транзистор, а там уже на ура(((, самое смешное, что может быть-это запоратый диск с виндой, где=то в конце установки, частенько видал что не может прочитать какой-то dll фаил(не помню какаой) при нажатии повторить-якобы справился, а тут 7B, с другого диска обычно помогает, вообщем случаев много устал печатать, но повторюсь-это чаще всего ошибка адрисации винта-можно его разобрать и пазабовляться над ним, другой пользы не принесёт)))
1 … 3 4 5 6 7 8 9 … 1819
Get the fix for the error 0x0000007B(INACCESSIBLE BOOT DEVICE) on Windows XP, Windows Vista, Windows 7, Windows 8 and Windows 10.
About “0x0000007B“
The following information on this error has been compiled by NeoSmart Technologies, based on the information gathered and reported by our global network of engineers, developers, and technicians or partner organizations.
Description and Symptoms
The error messages, alerts, warnings, and symptoms below are tied to this error.
Symptom 1: “0x0000007b” error screen on startup
When a computer is turned on, the BIOS picks an eligible, bootable hard drive and then calls code stored in the MBR at the start of that hard drive. That MBR code in turn loads the bootsector from the active partition. Then, the bootsector code loads the bootloader, which is responsible for loading the operating system. However, if the PC suddenly loses access to the system partition during startup, then the “0x0000007b” error screen is displayed and the boot process is halted.
Here is an example of “0x0000007b” error screen for Windows XP, Vista and Windows 7:
A problem has been detected and Windows has been shut down to prevent damage to your computer.

If this is the first time you've seen this Stop error screen, restart your computer. If this screen appears again, follow these steps:

Check for viruses on your computer. Remove any newly installed hard drives or hard drive controllers. Check your hard drive to make sure it is properly configured and terminated. Run CHKDSK /F to check for hard drive corruption, and then restart your computer.

Technical information:

*** STOP: 0x0000007B (0xFFFFF880009AE7E8, 0xFFFFFFFFC0000034, 0x0000000000000000, 0x0000000000000000)
On some PC’s the error text may be a little different:
A problem has been detect and Windows has been shut down to prevent damage to your computer.

INACCESSIBLE_BOOT_DEVICE

If this is the first time you've seen this Stop error screen, restart your computer. If this screen appears again, follow these steps:

Check to make sure any new hardware or software is properly installed. If this is a new installation, ask your hardware or software manufacturer for any Windows updates you might need.

If problems continue, disable or remove any newly installed hardware or software. Disable BIOS memory options such as caching or shadowing. If you need to use Safe Mode to remove or disable components, restart your computer, press F8 to select Advanced Startup Options, and then select Safe Mode.

Technical information:

*** STOP: 0x0000007B (0xF8975528, 0xc0000034, 0x00000000, 0x00000000)
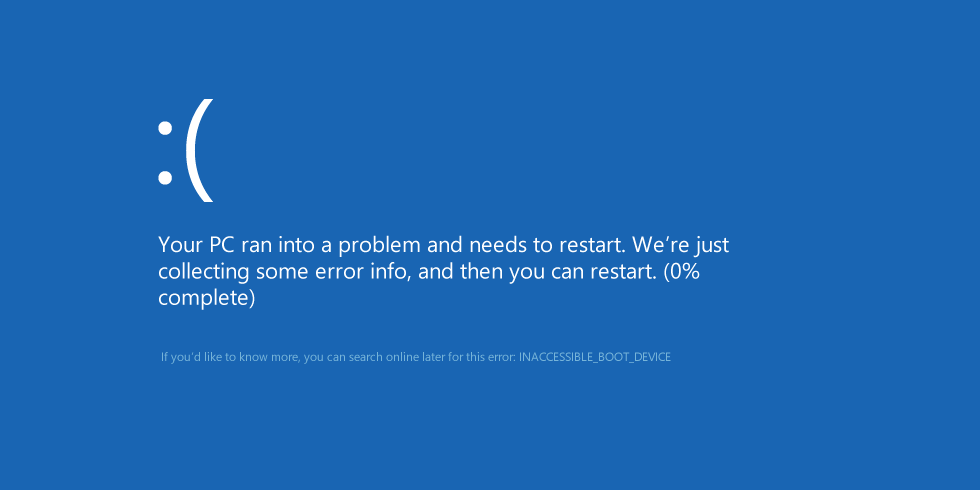
And here is an example of “0x0000007b” error screen for Windows 8, Windows 8.1 and Windows 10:
Your PC ran into a problem and needs to restart. We're just collecting some error info, and then you can restart. (0% complete)

If you'd like to know more, you can search online later for this error: INACCESSIBLE_BOOT_DEVICE
Causes of this Error
This error has been known to occur as a result of one of the following causes:
Cause 1: Bootloader files are missing or corrupt
One of the most common causes of this error is the boot-related files that became either missing, corrupt, or misconfigured. That could happen because of disk write errors, power outages, boot sector viruses, or errors made while configuring these files manually.
Cause 2: Incorrect BIOS configuration
the user made changes to the BIOS recently, the new settings he has entered might not be compatible with the hard drive. The UEFI/Legacy BOOT mode setting is the most infamous one in that regard, so users should take extra care when making changes to the BIOS.
Another thing that could happen is that the SATA controller has an incorrect work mode selected in BIOS. For most PC’s, there are three main SATA controller work modes available:
- IDE is the most-basic mode that treats the SATA controller in the same way legacy IDE controllers treat ATA drives: the controller itself contains almost no read/write-related logic and simply serves as the most ascetic of bridges, simply proxying data to and from the drives.
- AHCI is the more advanced and modern mode that also offers substantial optimized hardware-level read/write logic and caching, which results in a significant speed increase compared to IDE.
- RAID mode that allows the user to combine multiple physical disk drivers into a single logical unit for optimized performance, redundancy, or combination thereof.
If the user’s hard drive does not support one of these modes, or if Windows was installed and booted using one mode, but a different mode was configured, then the boot process will be halted.
Cause 3: Boot sector virus
Another possible reason for this error is a boot sector virus that prevents the computer from loading. In that case, running an antivirus program that is capable of deleting boot-sector viruses may solve the issue.
Cause 4: Registry is damaged
This error may also occur after the key parts of system registry became corrupt. This usually happens after disk read/write errors, and in that case, a disk check program should be used to scan the disk for errors and fix them.
Cause 5: EFI bootloader is corrupt
The special EFI bootloader introduced in Windows 8 may also become corrupt or misconfigured. If that’s the case, it should be rebuilt to fix the error.
Fixing “0x0000007b” on Windows
Windows Setup CD/DVD Required!
Some of the solutions below require the use of the Microsoft Windows setup CD or DVD. If your PC did not come with a Windows installation disc or if you no longer have your Windows setup media, you can use Easy Recovery Essentials for Windows instead. EasyRE will automatically find and fix many problems, and can also be used to solve this problem with the directions below.
Fix #1: Rebuild boot files with Easy Recovery Essentials
Easy Recovery Essentials’ one-click automated system repair corrects issues caused by missing or misconfigured boot.ini and BCD by recreating them from scratch on the active bootable partition for Windows. It also checks the drive for viruses and removes them from the PC. This is done automatically as part of the automated repair process, and requires no manual action or user intervention.
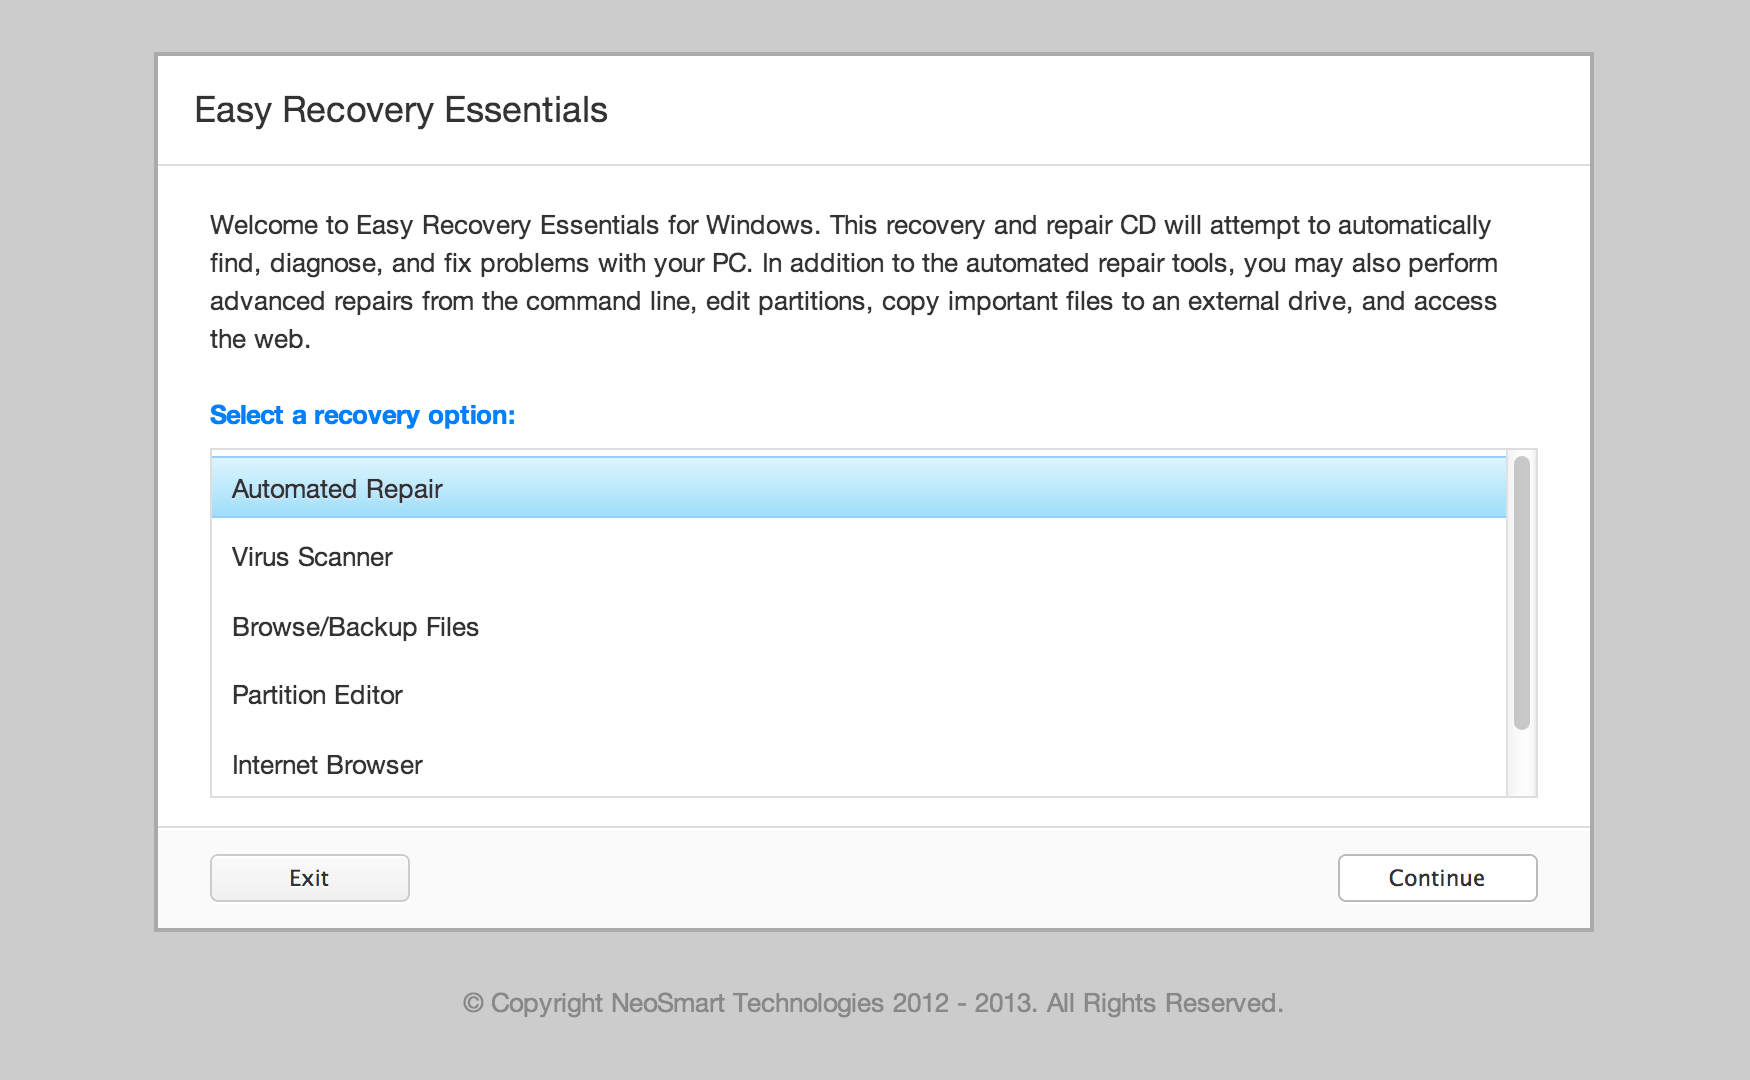
Easy Recovery Essentials is guaranteed to fix the “0x0000007b” error automatically using its built-in Automated Repair option. EasyRE is currently available for Windows XP, Vista, 7, 8, Windows 10, and Windows 11 and can be downloaded and created on any PC.
- Download Easy Recovery Essentials. Make sure to note your Windows version (XP, Vista, 7, 8, 10, or Windows 11) before you download EasyRE. This guide can help you identify what version of Windows you have installed.
- Burn the image. Follow these instructions on how to burn the bootable ISO image very carefully, as making a bootable CD can be tricky! Alternatively, these instructions explain how to create a bootable EasyRE recovery USB stick/drive.
- Boot up your PC from the Easy Recovery Essentials CD or USB you created.
- Once EasyRE is running, choose the “Automated Repair” option and click Continue.
Choose “Automated Repair” in Easy Recovery Essentials
- After EasyRE scans your computer’s drives, identify and select the drive letter for your Windows installation from the list, and then click on the Automated Repair button to begin.
Choose the drive associated with the Windows installation you’re trying to repair.
- Easy Recovery Essentials will start analyzing the selected drive for problems. EasyRE will test for and attempt to automatically correct errors with the disk, partition, bootsector, filesystem, bootloader, and registry. No intervention is required, as EasyRE’s repair is fully automated:
Easy Recovery Essentials searches for errors and makes corrections to the selected Windows installation.
- Once the process is complete, EasyRE will report its findings. Click on the Restart button to reboot your PC and test the changes.
- The “0x0000007b” error should now be fixed as your PC begins to load:
You can download Easy Recovery Essentials from here.
Fix #2: Check drive for viruses with Easy Recovery Essentials
If your computer is infected with a boot-sector virus, run an antivirus scan to remove all viruses from your computer to possibly fix this error.
Use any up-to-date modern antivirus scanner.
If you don’t have an antivirus scanner or can’t boot into Windows to run a scan, use the Virus Scanner of Easy Recovery Essentials (our recovery disk):
- Download Easy Recovery Essentials from here
- Burn the image. Follow these instructions on how to burn the bootable ISO image very carefully, as making a bootable CD can be tricky.
- Boot Easy Recovery Essentials
- Choose Virus Scanner
- Wait for the scan to complete
Fix #3: Boot into Last Known Good Configuration
Windows features a “Last Known Good Configuration” mode that can potentially fix certain issues caused by misconfigured drivers or any other corruptions.
This mode forces your system to use a previously saved version of the registry.
The instructions are:
- Restart the computer
- Tap the F8 key repeatedly before the Windows logo appears
- At the Boot Options list screen, choose Last Known Good Configuration (Advanced)
- Press Enter
Advanced Boot Options Menu
Fix #4: Repair corrupted system files with the SFC command
On Windows Vista and Windows 7, it is possible to use the built-in Windows SFC(system file checker) tool to automatically scan a computer’s system files and repair them if necessary.
Here are the steps to run SFC:
- Boot from your Windows install disc
- Click on Repair your computer after selecting proper language, time and keyboard input.
- Select the Windows installation drive, which is usually
C:\, and click Next - Choose Command Prompt when the System Recovery Options box appears
- Write the following command and press Enter afterwards:
sfc /scannow /offbootdir=D:\ /offwindir=D:\Windows\
Replace D: with the letter of the driver where Windows is installed, and D:\Windows with the Windows folder location.
Here is an example of what the PC’s console output should look like once the sfc.exe scan is complete and missing files are successfully restored:
System files restored by the SFC utility
Fix #5: Check your disk with CHKDSK utility
If the hard drive has its file integrity compromised, it is possible to use built-in Windows CHKDSK utility to scan the disk and fix the file system errors.
Here are the steps to run CHKDSK:
- Boot from your Windows install disc
- Click on Repair your computer after selecting proper language, time and keyboard input.
- Select the Windows installation drive, which is usually
C:\, and click Next - Choose Command Prompt when the System Recovery Options box appears
- Write the following command and press Enter afterwards:
chkdsk C: /f
Replace C: with the letter of the driver where Windows is installed.
Here is an example of what the PC’s console output should look like once the chkdsk.exe is complete:
Chkdsk utility results screen
Fix #6: Replace NTLDR and NTDETECT.COM files
Windows XP users can replace the required files for NTLDR to load correctly by using your Windows Installation Disc. The files are named NTLDR and NTDETECT.COM.
Here are the steps to replace these files:
- Insert the Windows XP install CD in your CD drive
- Restart the PC and boot from the CD
- Press any key to boot from the CD
- Press R after the Windows Options menu is done loading to access Repair Console
- After this step, log into Windows by pressing 1 using the Administrator password
- Use the following commands to copy the NTLDR and NTDETECT.COM files from the Windows installation disk to the hard disk:
copy D:\i386\ntldr C:\
copy D:\i386\ntdetect.com C:\
Where
D:\is the install CD’s drive letter andC:\is the Windows XP partition’s drive letter - Once these files are copied, remove the Windows installation disc from the disc drive
- Restart the PC
Here is an example of what the PC’s console output should look like once NTLDR and NTDETECT files are properly restored:
Replacing ntldr and ntdetect.com files
Fix #7: Rebuild boot.ini file
The next steps to fix this error on Windows XP are to rebuild the boot.ini file:
- Insert the Windows XP install CD in your CD drive
- Restart the PC and boot from the CD
- Press any key to boot from the CD
- Press R after the Windows Options menu is done loading to access Repair Console
- After this step, log into Windows by pressing 1 using the Administrator password
- Enter the following command when Command Prompt appears:
bootcfg /rebuild
- When the systems prompts about whether it should add an identified Windows installation to the boot list, answer “Y”(Yes)
- Enter “Windows XP” as Load Identifier and “/fastdetect” as OS Load Options.
- Remove the install CD
- Restart the PC
Here is an example of what the PC’s console output should look like once the boot.ini file is properly restored:
Fixing Boot.ini file
Fix #8: Rebuild the BOOTMGR file
Since on newer systems, this error screen is often caused by a damaged BOOTMGR, replacing it with the correct version is often a good and effective solution.
Here are the steps to replace the BOOTMGR:
- Boot from the Windows install disc
- Click on Repair your computer after selecting proper language, time and keyboard input.
- Select the Windows installation drive, which is usually
C:\, and click Next - Choose “Command Prompt” when the System Recovery Options box appears
- Type in the following command and then press Enter:
Bcdboot C:\Windows /s D:\
Where C:\Windows is your Windows installation folder and D:\ is your active boot partition.
Here is an example screenshot of what the PC’s console output should look like after the BOOTMGR is updated correctly:
Windows 7 BcdBoot utility screen
Fix #9: Recover the registry
The corrupted registry may also be fixed by replacing it with a clean copy that was created on the hard drive when Windows was installed. Note that this operation will restore the system to a state that might be very far from its current state; however, it still should be possible to recover user data in that state. This procedure also should not be used if the computer has an OEM-installed operating system, because the system registry hive on OEM installations creates passwords and user accounts that did not exist previously. This means that if these steps are followed on an OEM machine, then it may not be possible to log back into the recovery console to restore the original registry hives.
First, a backup of all current registry files is made so that they could be restored if anything goes wrong. Then, the existing registry is deleted, and replaced with a clean copy from the C:\Windows\Repair folder.
- Insert the Windows XP setup CD and restart the computer
- Press any key to boot from the CD
- Press R to access Repair Console
- Enter the Administrator password. When the Command Prompt appears, type the following commands, one at a time and press Enter after each command, replacing
C:with the Windows’ drive letter:md tmp copy c:\windows\system32\config\system c:\windows\tmp\system.bak copy c:\windows\system32\config\software c:\windows\tmp\software.bak copy c:\windows\system32\config\sam c:\windows\tmp\sam.bak copy c:\windows\system32\config\security c:\windows\tmp\security.bak copy c:\windows\system32\config\default c:\windows\tmp\default.bak
Backing up current registry hives
delete c:\windows\system32\config\system
delete c:\windows\system32\config\software
delete c:\windows\system32\config\sam
delete c:\windows\system32\config\security
delete c:\windows\system32\config\default
Deleting current registry hives
copy c:\windows\repair\system c:\windows\system32\config\system
copy c:\windows\repair\software c:\windows\system32\config\software
copy c:\windows\repair\sam c:\windows\system32\config\sam
copy c:\windows\repair\security c:\windows\system32\config\security
copy c:\windows\repair\default c:\windows\system32\config\default
Restoring registry hives from a repair folder
- Type
exitand remove your CD:exit
- Press Enter
- Restart your computer
Right after the boot process is completed successfully, it is possible to either backup all user data and reinstall Windows from scratch, or follow the procedure described in the Windows KB corrupted registry article to manually restore the system registry to a more newer version that was backed up by System Restore.
For more details on Windows XP System Restore, go to our Restore Windows XP – Windows System Restore guide.
Fix #10: Repair the EFI bootloader
Windows 8/8.1/10 feature a EFI bootloader that you repair if the commands from Rebuild the BCD don’t work.
To do so, follow these steps:
- Restart your computer and boot from the Windows DVD/USB
- Click Repair your computer, then Troubleshoot, Advanced Options, and then Command Prompt
- Type these commands and press Enter after each:
diskpart
sel disk 0
list vol
- Check the “Fs” column and find the item that has “FAT32” at this “Fs” column. The EFI partition is formatted under FAT32.
- If, for example, the number for the EFI item is “1”, type this command:
sel vol 1
- Now you need to assign a letter to the partition, a unique letter that isn’t already available on your computer (for example,
y:\):assign letter=y:
- When this message appears – DiskPart successfully assigned the drive letter or mount point – type
exitto quit the utility softwareexit
- Type this command, but replace
y:\with the letter of your choice:cd /d y:\EFI\Microsoft\Boot\
- Type this command:
bootrec /fixboot
- Type this command to backup the old BCD:
ren BCD BCD.backup
- Type this command to recreate the BCD. Remember to replace
y:\, if needed:bcdboot c:\Windows /l en-us /s y: /f ALL
- Type
exit, hit Enter and remove the disk from your disk tray - Restart the PC
Fix #11: Other fixes
If none of the fixes above work, try any of these tips too:
- If you installed a new hardware piece recently, try to remove it and then restart your computer
- Make sure all hard disk cables are connected properly
- If you installed any device drivers, try booting into Safe Mode and uninstall that particular driver and then restart your computer. Make sure the driver is compatible with your Windows version
More Information
Linked Entries
- bootrec
- chkdsk
Support Links
- Easy Recovery Essentials for Windows – our repair and recovery disk.
It’s an easy-to-use and automated diagnostics disk. It’s available for Windows 8, Windows 7 and Windows Vista. It’s also available for Windows XP and Windows Server.
Read more at Windows Recovery Disks.
- The NeoSmart Support Forums, member-to-member technical support and troubleshooting.
- Get a discounted price on replacement setup and installation discs: Windows XP, Windows Vista, Windows 7, Windows 8, Windows 10.
Applicable Systems
This Windows-related knowledgebase article applies to the following operating systems:
- Windows XP (all editions)
- Windows Vista (all editions)
- Windows 7 (all editions)
- Windows 8 (all editions)
- Windows 8.1 (all editions)
- Windows 10 (all editions)
- Windows Server 2003 (all editions)
- Windows Server 2008 (all editions)
- Windows Server 2012 (all editions)
Propose an edit
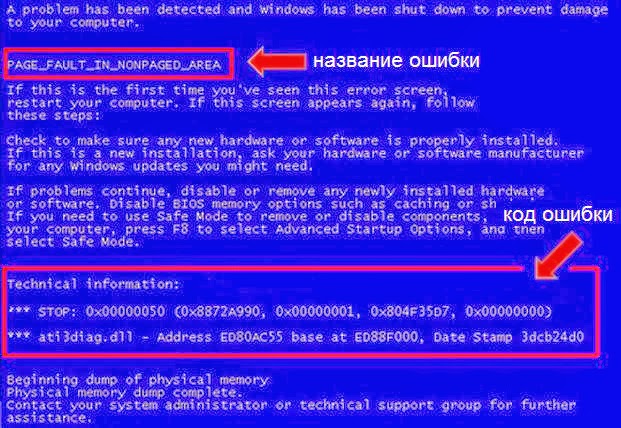
Само собой разумеется, что появление синих экранов смерти либо при загрузке Windows, либо в работающей системе, да еще и с выдачей сообщений вроде «A problem has been detected and Windows…», любого пользователя заставляет задуматься над тем, почему это происходит и как устранить возникшие сбои, применяя для этого простейшие методы. К сожалению, выявить истинную причину такого поведения компьютера сразу удается далеко не всегда. Дело в том, что сам синий экран может содержать только описание проблемы и стоп-код без четкого объяснения, почему это случилось, не говоря уже об информации о проблемном устройстве. Хорошо, если внизу экрана имеется ссылка на какой-то файл драйвера, по которому сразу можно определить, что послужило причиной сбоя. Но что делать, если таких указаний нет? Попробуем разобраться в сложившейся ситуации и рассмотрим наиболее действенные методы их исправления.
Причины появления синего экрана («A problem has been detected and Windows has been shut down to prevent damage to your computer»)
Для начала давайте разберемся, что именно означает появление этого сообщения. Если его перевести, получается, что в системе была обнаружена проблема, и работа Windows во избежание повреждения компьютера была прекращена. Что за этим стоит, часто понять очень сложно, однако все сбои условно можно разделить на аппаратные и программные. К проблемам с аппаратной частью (установленным оборудованием) чаще всего относят сбои в работе или поломки, связанные с основными компонентами компьютера (жесткие диски, оперативная память, видеокарты, системы охлаждения и т. д.).
Что касается сбоев программных, чаще всего к появлению экранов с сообщением «A problem has been… and Windows…» приводит некорректная работа драйверов устройств (причем далеко не всегда именно графических ускорителей), некоторых важных служб самих операционных систем, повреждение системных файлов и библиотек, воздействие вирусов и т. д.
Проверка аппаратной части компьютера
Как правило, большинство специалистов рекомендует начать устранение проблем с чистки компьютера от пыли и засорения (это в первую очередь относится к стационарным системным блокам, а не к ноутбукам). Попробуйте хотя бы удалить пыль при помощи самого обычного пылесоса, установив мощность всасывания на самый минимум, какой только возможен, а то можно повредить некоторые важные компоненты на материнской плате.
Неплохо заодно посмотреть на характеристики блока питания и установленную систему охлаждения. Синий экран с уведомлением «A problem has been detected…» как раз и может появляться в случае нехватки для некоторых компонентов питания или их перегрева при ненадлежащем охлаждении (чаще всего такие проблемы наблюдаются с процессорами и графическими адаптерами). Скачки напряжения тоже могут приводить к сбоям в работе оборудования.
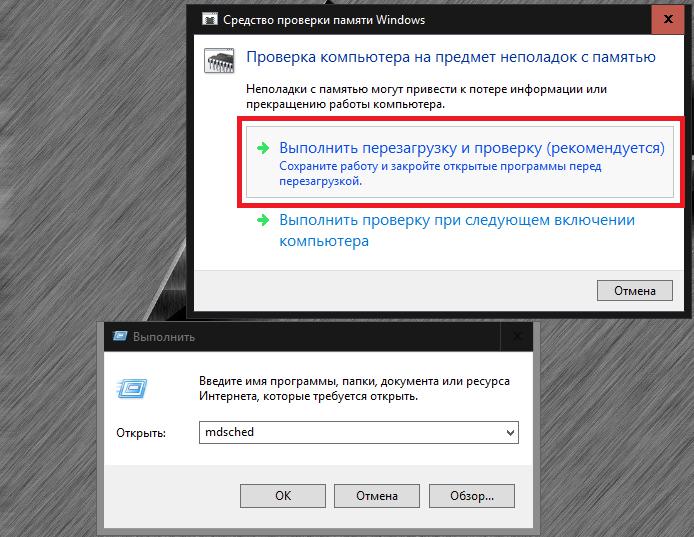
Очень часто появление синего экрана, сопровождаемое сообщением «A problem has been detected and Windows…», специалисты связывают с нарушениями в работе оперативной памяти.
Проверить ее можно стандартным средством диагностики Windows (mdsched) или при помощи утилиты Memtest86/86+, которую можно записать на съемный носитель и загрузить еще до старта системы.
Не менее распространенными являются и проблемы с жесткими дисками, когда на них присутствует слишком много сбойных или нестабильных секторов и ошибок, или они просто начали выходить из строя, отслужив свой срок.
Как определить точную причину сбоя?
Как уже было сказано выше, если после сообщения «A problem has been detected and Windows…» имеется ссылка на какой-то файл, чаще всего представляющий собой сбойный драйвер, устранением проблем можно заняться немедленно. Но для случаев, когда присутствует только стоп-код, определить «виновника» такого поведения системы можно и по нему.
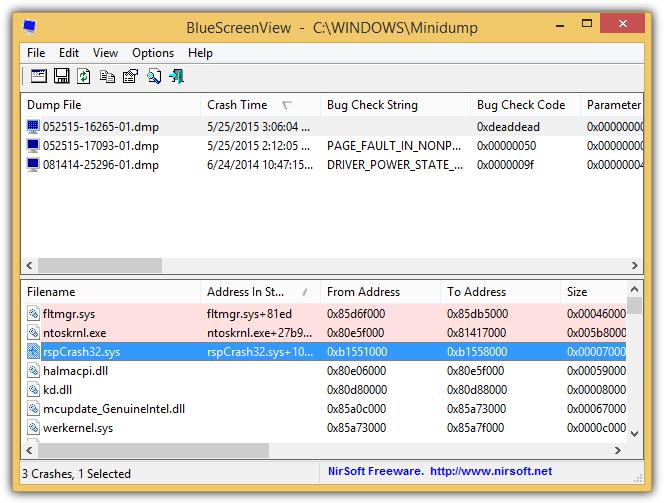
Оптимальным вариантом считается использование программы BlueScreenView, в которой нужно нажать ссылку AppCrashView, после чего и будет выдано подробное описание проблемы.
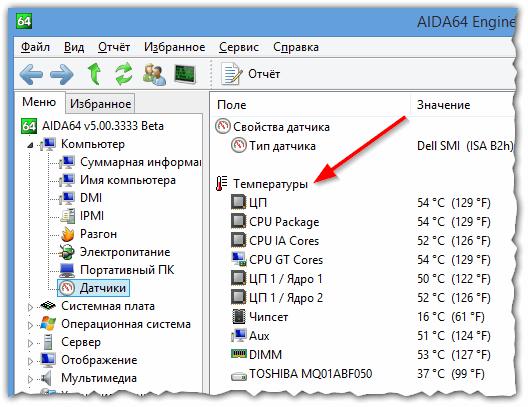
Для обнаружения проблем, связанных с перегревом оборудования, следует воспользоваться утилитами вроде AIDA64 (бывший Everest), CPU-Z, GPU-Z и им подобными, а перенастроить систему охлаждения можно за счет использования программы SpeedFan.
Что делать, если сообщение «A problem has been detected and…» выскакивает в работающей системе постоянно?
Если вышеуказанных приложений под рукой нет, желательно по возможности извлекать из материнской платы основные компоненты (планки памяти, звуковые и сетевые карты и т. д.), после чего проверять загрузку системы. Кстати, такая методика позволяет достаточно просто выявить и нерабочие планки памяти, если их установлено несколько.
Программные сбои и методы их устранения
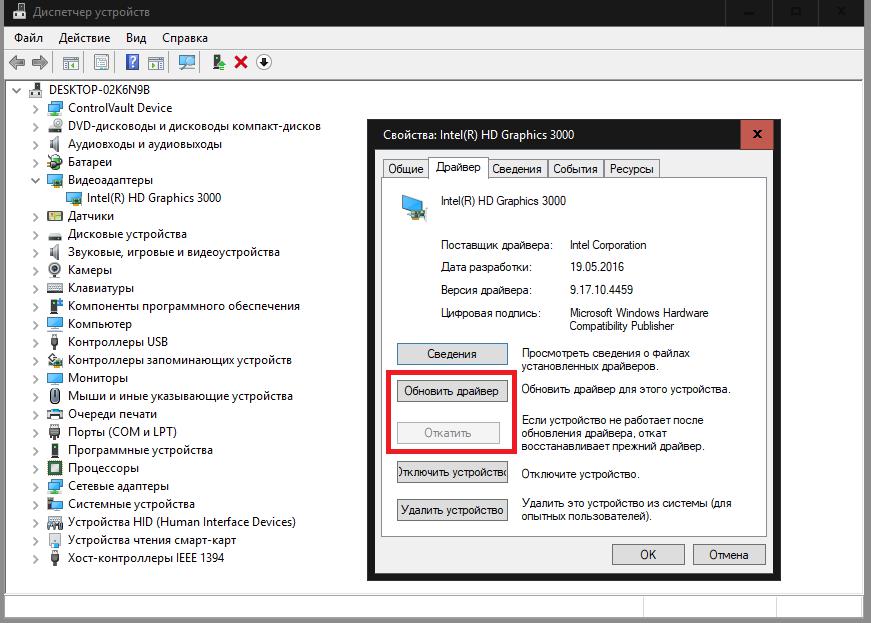
Наконец, рассмотрим некоторые методы избавления от синего экрана «A problem has been detected and Windows…» путем устранения программных сбоев. Очень часто они связаны именно с драйверами устройств. Если автоматизированных программ для установки или обновления управляющего ПО (Driver Booster, SlimDrivers, DriverMax, DriverPack Solution) у пользователя нет, в самом простом случае можно попытаться переустановить сбойный драйвер в «Диспетчере устройств».
В случае возможного наличия обновленного драйвера, который теоретически мог бы вызвать появление такой проблемы, тут же можно выполнить откат.
Само собой разумеется, что иногда даже отсутствие свободного места в системном разделе может провоцировать появление таких ошибок и сбоев. На всякий случай почистите диск «С», причем так, чтобы свободным оказалось пространство на уровне 5-10 % от его общего размера.
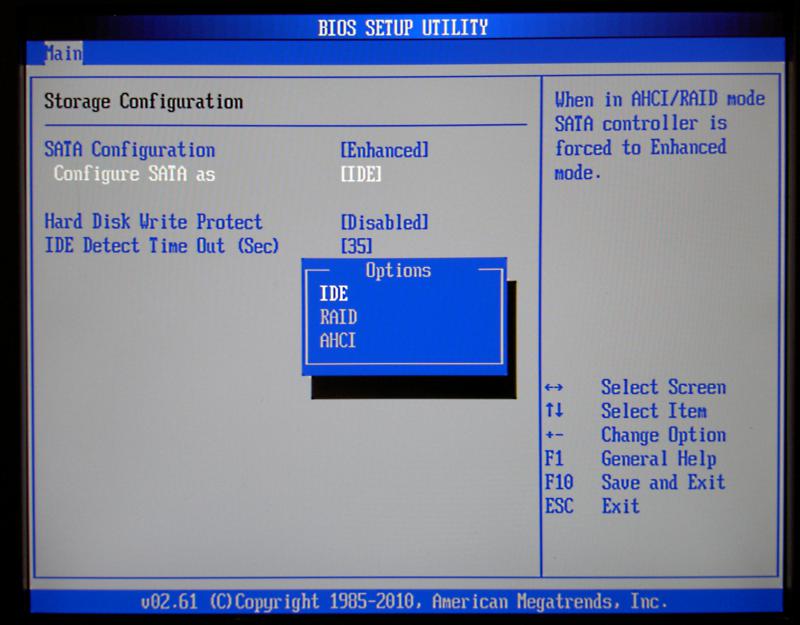
Для жестких дисков иногда бывает необходимо переключить контроллер SATA в режим IDE вместо AHCI в настройках BIOS/UEFI. В некоторых случаях также дает результат полный сброс настроек или обновление прошивки первичных систем.
Наконец, проверьте систему на вирусы, используя для этого портативные сканеры или загрузочные утилиты, в общем случае обозначаемые как «Rescue Disk», с которых можно загрузить интерфейс антивируса вместо Windows и выполнить углубленное сканирование, включая скрытые области жесткого диска и оперативную память.
Что делать, если ничего не помогло?
Если уж совсем ничего не сработает, загрузитесь со съемного носителя, выполните проверку системных файлов (sfc /scannow), восстановите или перезапишите загрузочные записи с помощью инструментария Bootrec.exe с дополнительными атрибутами или, если это возможно, произведите откат системы до предыдущего состояния, которое предшествовало появлению такого сбоя.

