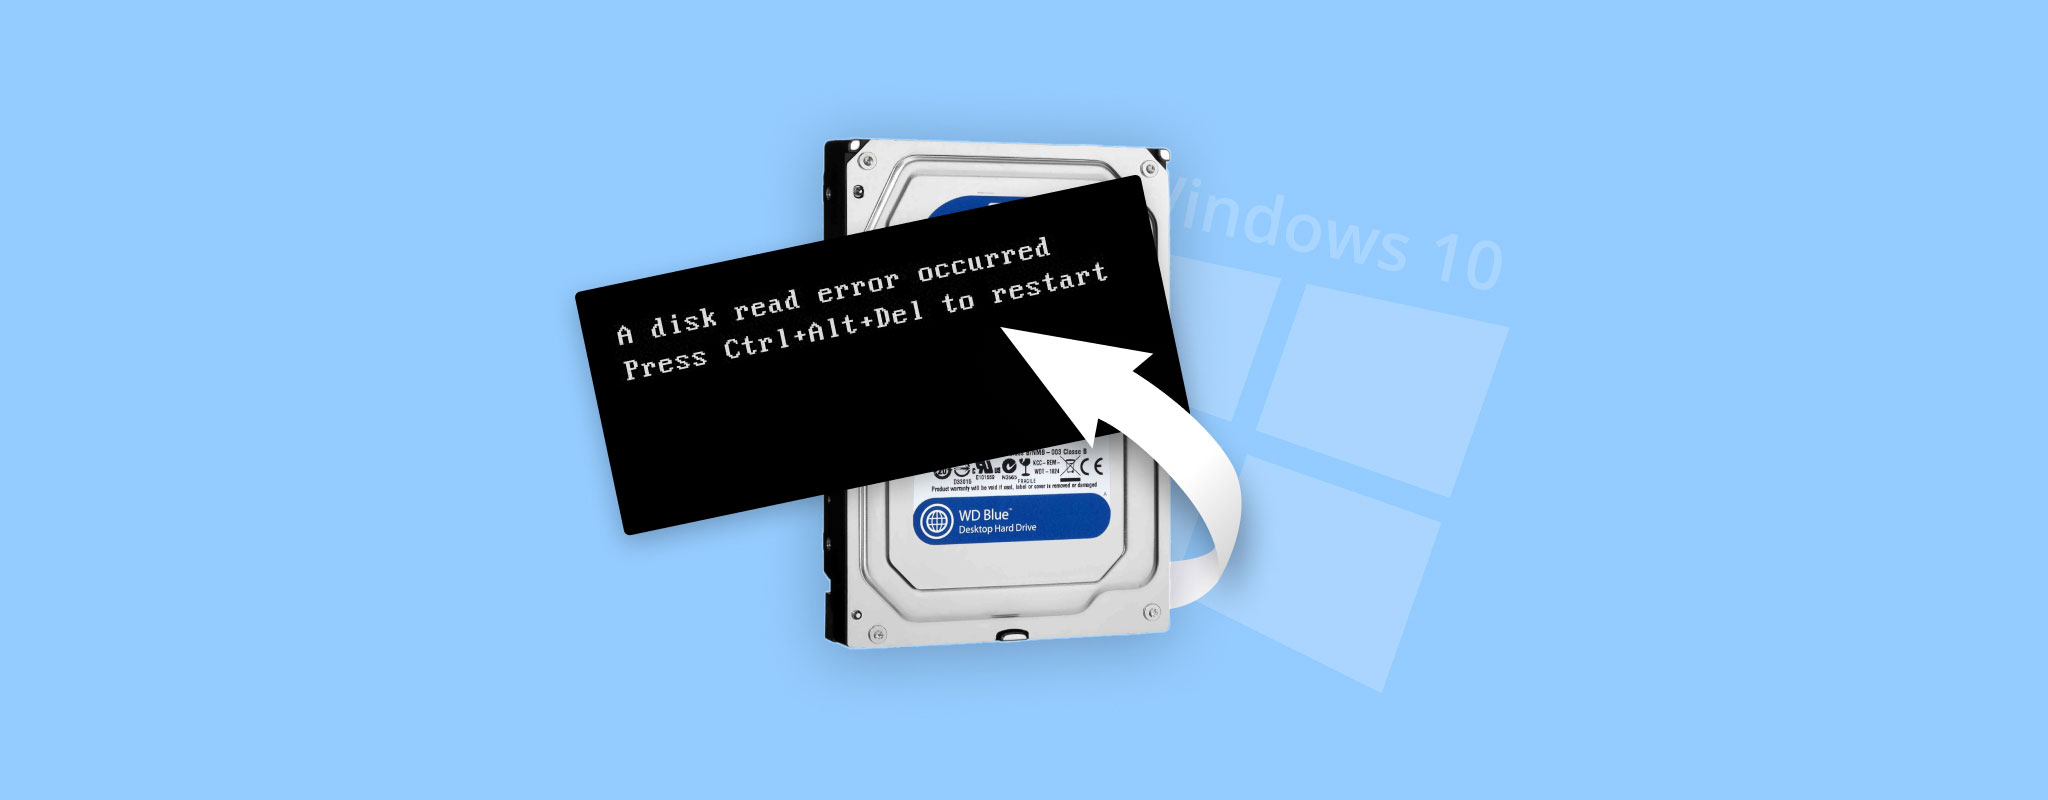
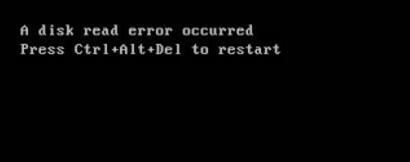
 As you’re using your computer, suddenly it freezes and forces you to perform a hard reboot. Once it powers on, you’re met with the message “A disk read error occurred”, along with a suggestion to press Ctrl+Alt+Del to restart Windows 10.
However, even after performing the suggested restart, the error continues to persist. There are many causes for this error, but don’t worry as there are ways to fix it. This is how you can fix the disk read error on Windows 10.
Go to data recovery ⤵
What Causes “A Disk Read Error Occured”?
The “A disk read error occurred” problem doesn’t necessarily have to be a drive-related issue. Here are a few of the common causes behind the message:
- 🔥 Disk corruption or overheating: Disk corruption affects the integrity of the drive and its ability to perform. The same is true with overheating, as the hardware is not rated to operate at extremely high temperatures.
- ⚠️ Bad sectors: If a bad sector has appeared where the MBR is stored, the MBR will no longer be accessible or usable.
- 🔌 Bad connections on the ports: The hard drive not showing up on a Windows computer can be due to faulty ports or bad cables that either prevent communication or cause it to be inconsistent.
- 🧠 Corrupted RAM: Since your computer uses RAM to access readily available data, corrupted RAM can cause this issue because the computer is constantly trying to get information that it can’t access.
- ⚙️ Incorrect BIOS settings: Incorrect BIOS settings can cause a BIOS disk read error. This often happens when another device has modified the boot order.
- 💾 Error with boot sector of the drive: The boot sector on your drive contains code that’s loaded into RAM and plays an essential role in your computer’s startup. Without it, booting is not possible.
- 🦠 Viruses: Viruses can be designed to perform any kind of malicious task, including attacking your hard drive. A virus attack can result in the error appearing.
This problem requires a systematic approach to troubleshoot it and figure out what’s causing it. Oftentimes it’s either in relation to a faulty hard drive, an incorrect BIOS setting, or a problematic RAM module. Checking the status of your hard drive and confirming your BIOS settings are all in order are just some of the solutions we’ll be exploring.
Method 1: Turn the Computer Off
An overheating computer can prompt this message if your hardware components are getting too hot. Your hardware has ideal operating temperatures, so if they’re operating above them, anomalies will begin to occur. Let your computer rest for several hours, then turn it back on to see if the message continues to appear.
If the message disappears, immediately make a backup of your drive and determine what is causing your computer to overheat. This commonly occurs due to a lack of airflow or insufficient cooling.
Method 2: Check the Boot Sequence
An incorrect boot sequence can lead to the disk read error appearing on Windows 10. If you have more than one storage source installed or connected, your computer may be trying to boot from the other source that doesn’t contain an operating system. The boot sequence can be updated in your BIOS.
The exact process will look slightly different for each brand of computer:
- Enter your BIOS. This can be achieved by your BIOS key after you power on your computer but before Windows boots. It’s often one of the following keys: DEL, F1, F2, F10, or F12.
- In the Boot section, go to Boot Device Priority.
- Make sure your hard drive is at the top.
Method 3: Reset BIOS Settings or Update BIOS
Your BIOS may either be outdated or running outdated settings. This can cause the error to appear as your BIOS plays a role in the communication between your hardware. First, try resetting your BIOS settings to see if that fixes the issue. Again, this will be slightly different depending on the brand of your computer.
- Enter your BIOS.
- Load the factory default settings. Usually, you can do this by pressing F9.
- Save the changes and exit the BIOS.
If the problem persists, try updating your BIOS to the latest version instead. The below instructions will guide you through checking your existing BIOS version and installing the updated one.
- Visit the website of your motherboard manufacturer and check for a new version. Download it if it’s available and put it on a USB drive.
- Enter your BIOS and uses the menus to install the updated BIOS from the USB.
Method 4: Check Port Connections
When your hard drive isn’t properly connected to the motherboard, Windows can produce this error in response. Laptop users can check their hard drive compartment and make sure it hasn’t come loose or become blocked from lint and dust. For desktop computers, ensure that the connecting cable (often SATA) is securely connected to both the motherboard and hard drive ends.
If it’s still not working now, try changing the SATA port you’re connecting to. You may need to update the boot sequence to look for the new SATA port, but this will eliminate the chances that it’s a faulty connection point. Additionally, you can also try swapping out the cable.
Method 5: Restore MBR
The Master Boot Record (MBR) sits in the first sector of your hard drive or SSD and contains the information needed for your computer to find and load the operating system. If it’s damaged or corrupted, your computer won’t boot. For this step, you will need a bootable USB drive with Windows on it to enter the recovery environment.
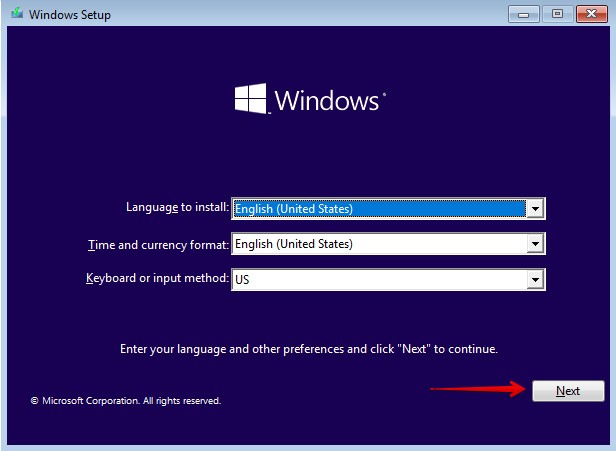
- Boot from the USB, select your language and currency formats, then click Next.

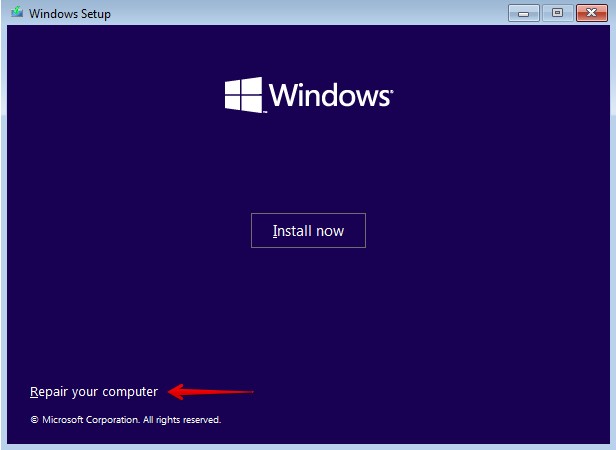
- Click the Repair your computer option on the first screen.

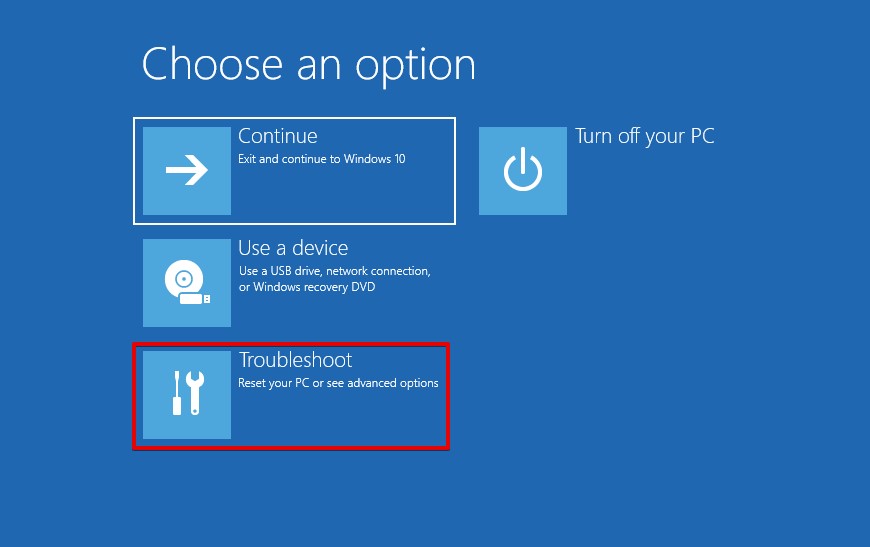
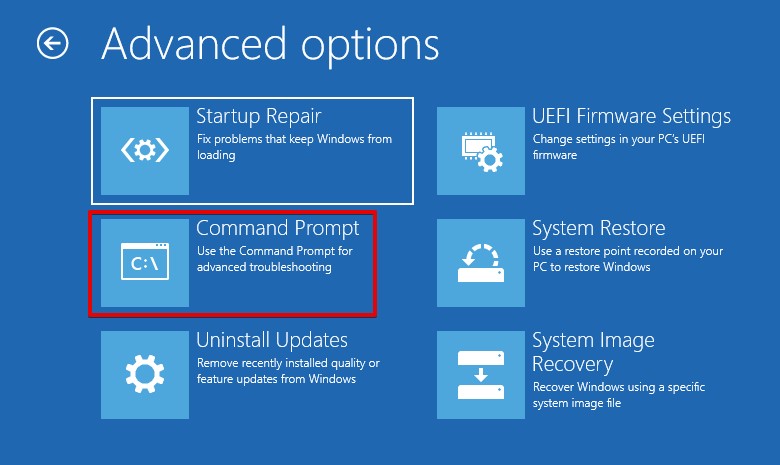
- Click Troubleshoot.

- Click Command Prompt.

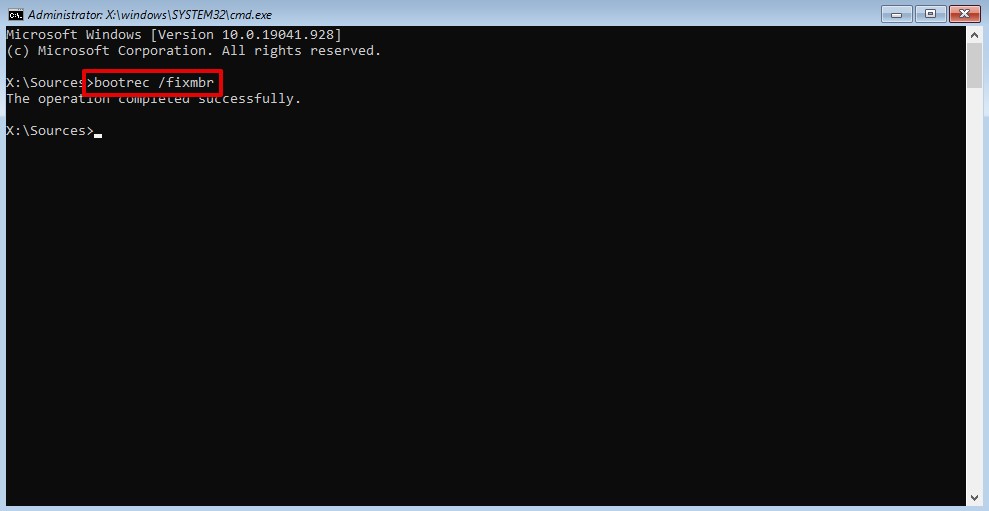
- Type
bootrec /fixmbr
and press Enter.
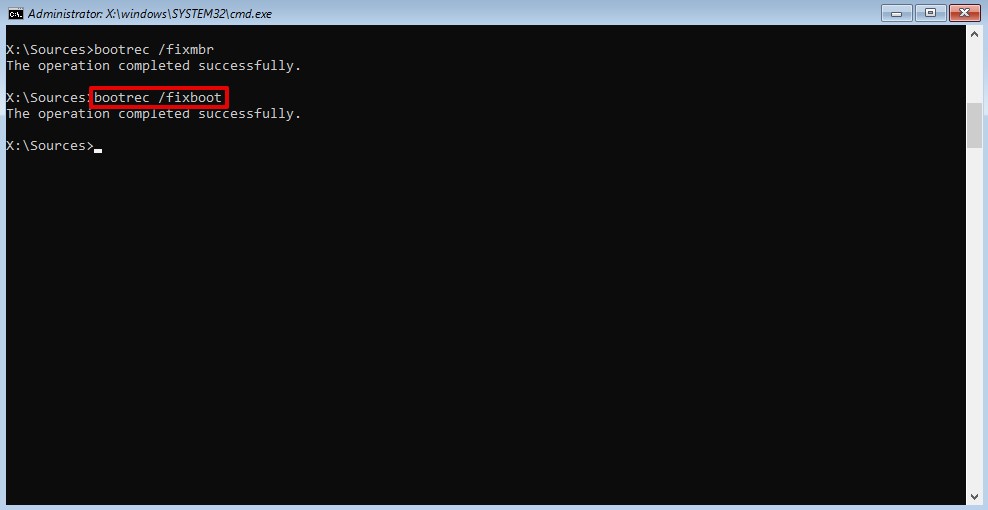
- Type
bootrec /fixboot
and press Enter.
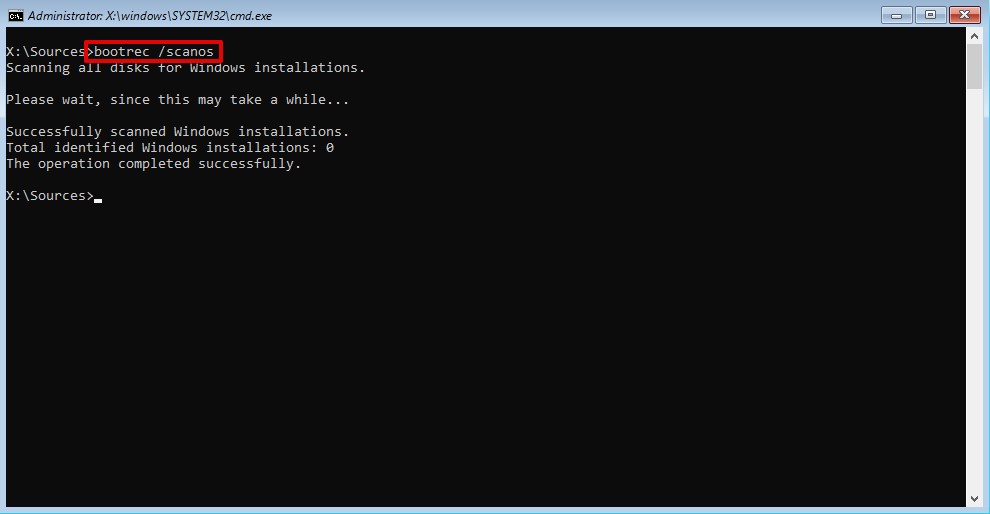
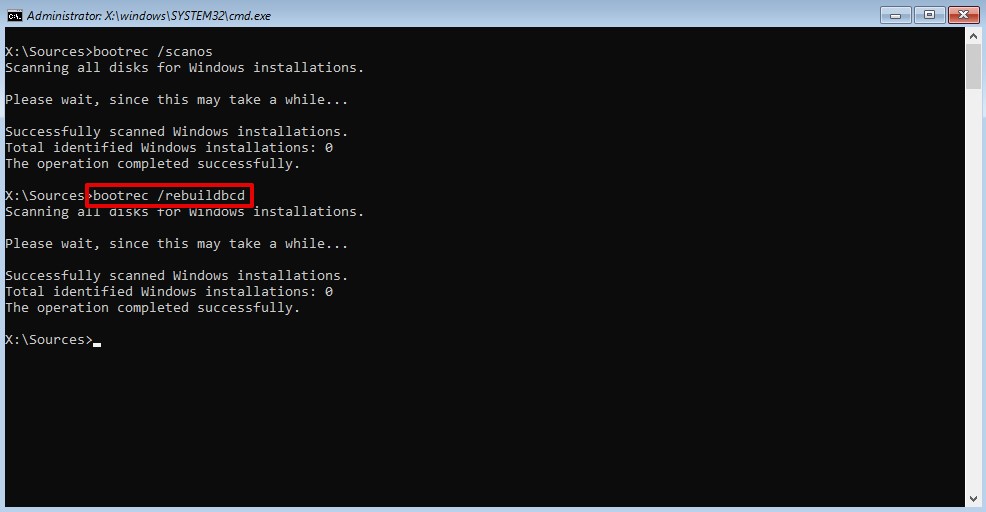
- Type
bootrec /scanos
and press Enter.
- Type
bootrec /rebuildbcd
and press Enter.
- Restart your computer and boot from your hard drive.
Method 6: Run CheckDisk
CheckDisk is a repair tool that can scan your drive for logical and physical errors. It’s typically used for fixing disk errors that it discovers, but it can also be used in a read-only mode without the use of parameters. It can even be used to fix bad sectors.
You will also need a bootable USB for this step.
- Boot from the USB and click Next.
- Click the Repair your computer option on the first screen.
- Click Troubleshoot.
- Click Command Prompt.
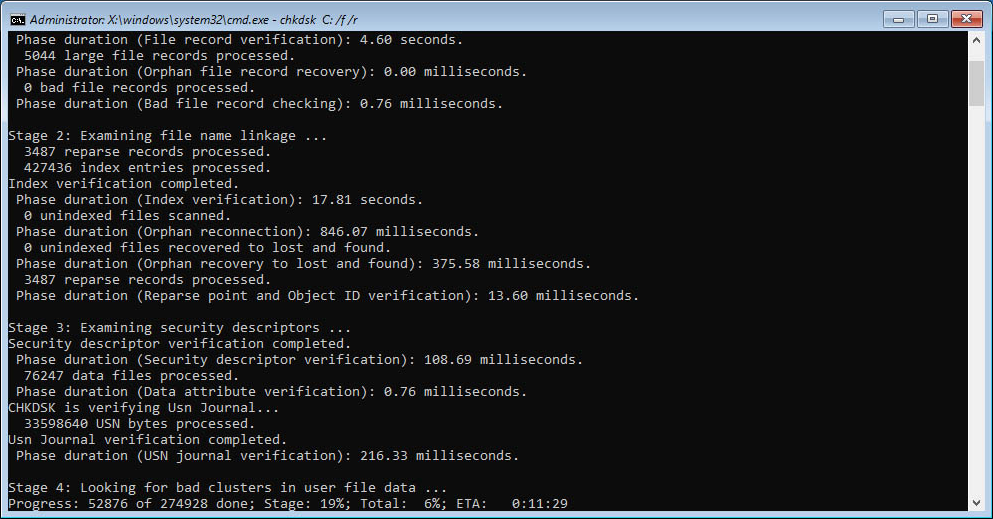
- Type
chkdsk C: /f /r
. Replace C: with your own drive letter. Press Enter.
- Restart your computer and boot from your hard drive.
Method 7: Check the RAM
It’s not uncommon for this problem to originate from a problem with your RAM. First, try reseating your RAM to ensure it’s firmly connected. If that doesn’t work and you’re using a single stick of RAM, try putting it in a different slot. If you’re using dual channel RAM, try switching their places.
If you get the opportunity to test the RAM in another device, you can do so by running the Windows Memory Diagnostic tool. Simply press ⊞ Win + R, type “mdsched” and press Enter.
Method 8: Perform Virus Removal and Defragmentation
If none of the above methods have worked, try removing the hard drive from your computer and connecting it to another. This allows you to see if the disk appears and perform diagnostics such as virus removal and defragmentation.
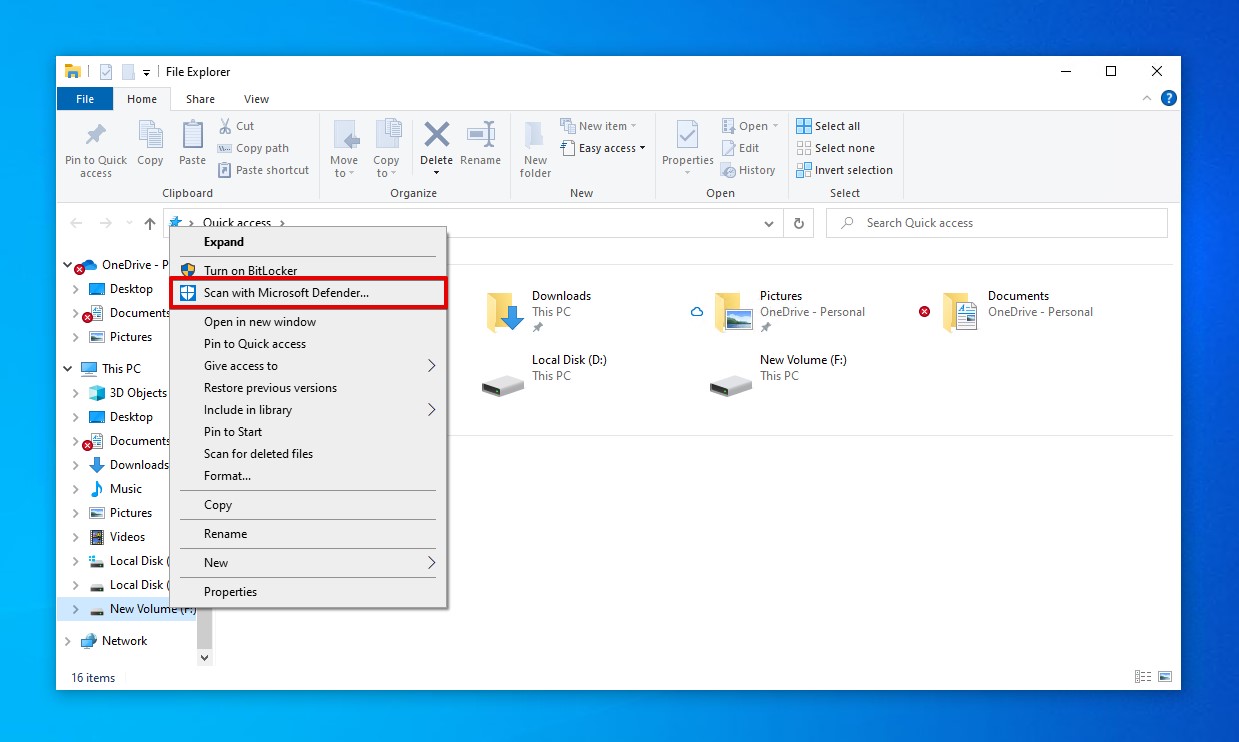
Start by scanning the hard drive for viruses. You can do this using Windows Defender:
- Open File Explorer.
- Right-click your drive in the left navigation pane, then select Scan with Microsoft Defender.

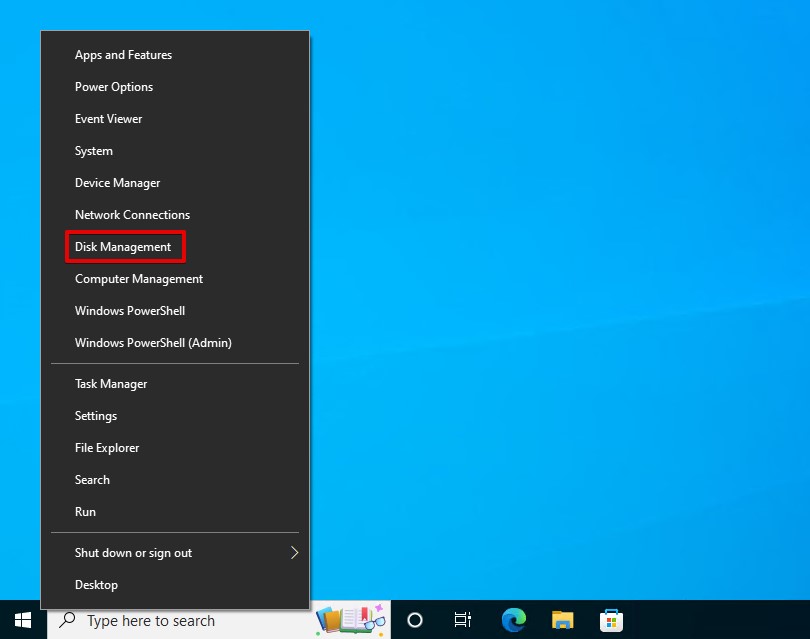
After the scan has been completed and returns no viruses, perform defragmentation by following the below steps. Skip this part if you’re using an SSD.
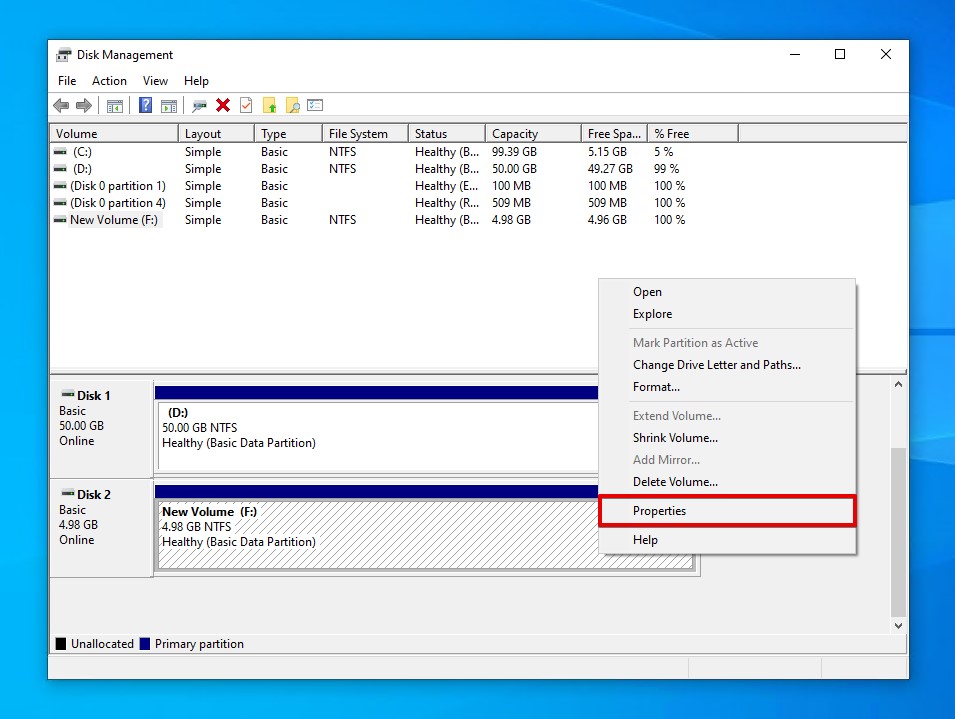
- Right-click Start and select Disk Management.

- Right-click the volume of the troubled drive and select Properties.

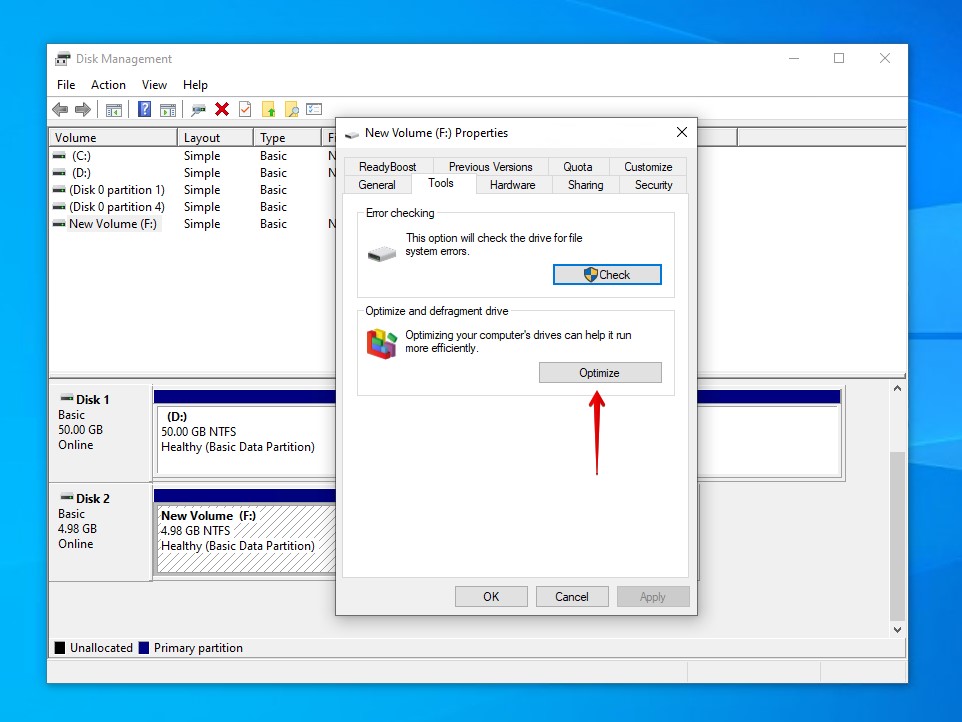
- Click Tools, then Optimize.

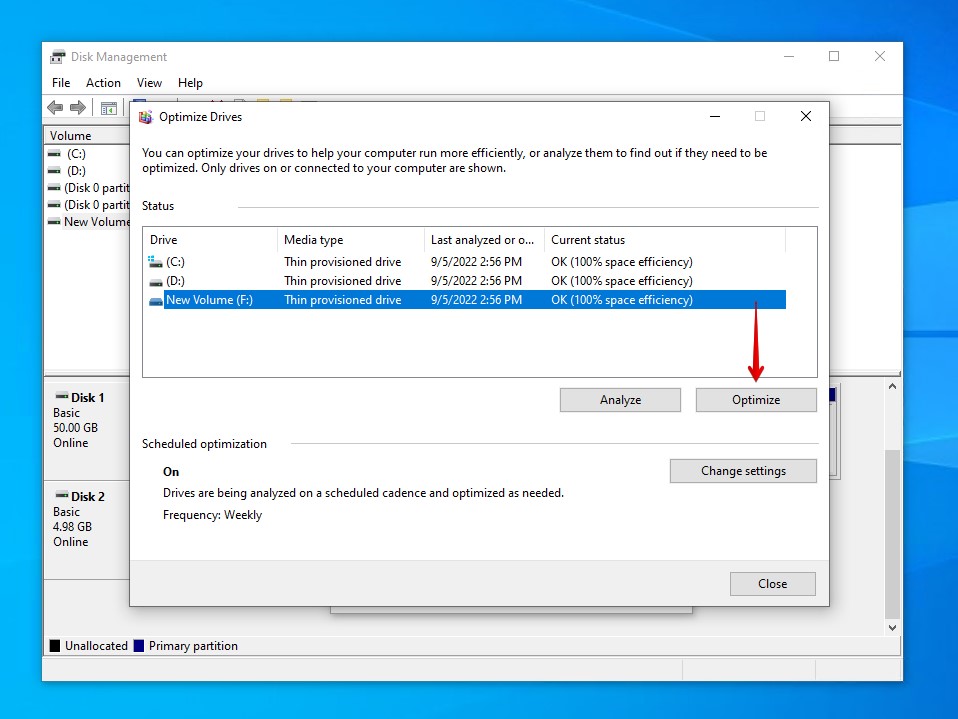
- Click Optimize.

How to Recover Files After Fixing Disk Read Error
The damage that caused this Windows 10 boot error may have also affected the data on your drive. If you act fast enough, you may be able to recover the data that was lost or damaged using the data recovery tool Disk Drill. Disk Drill is a data recovery tool capable of restoring data that was previously thought to be lost forever.
To do this, you should remove your drive and connect it to a working computer that you can install Disk Drill on. Follow these steps to recover data using Disk Drill:
- Download and open Disk Drill.
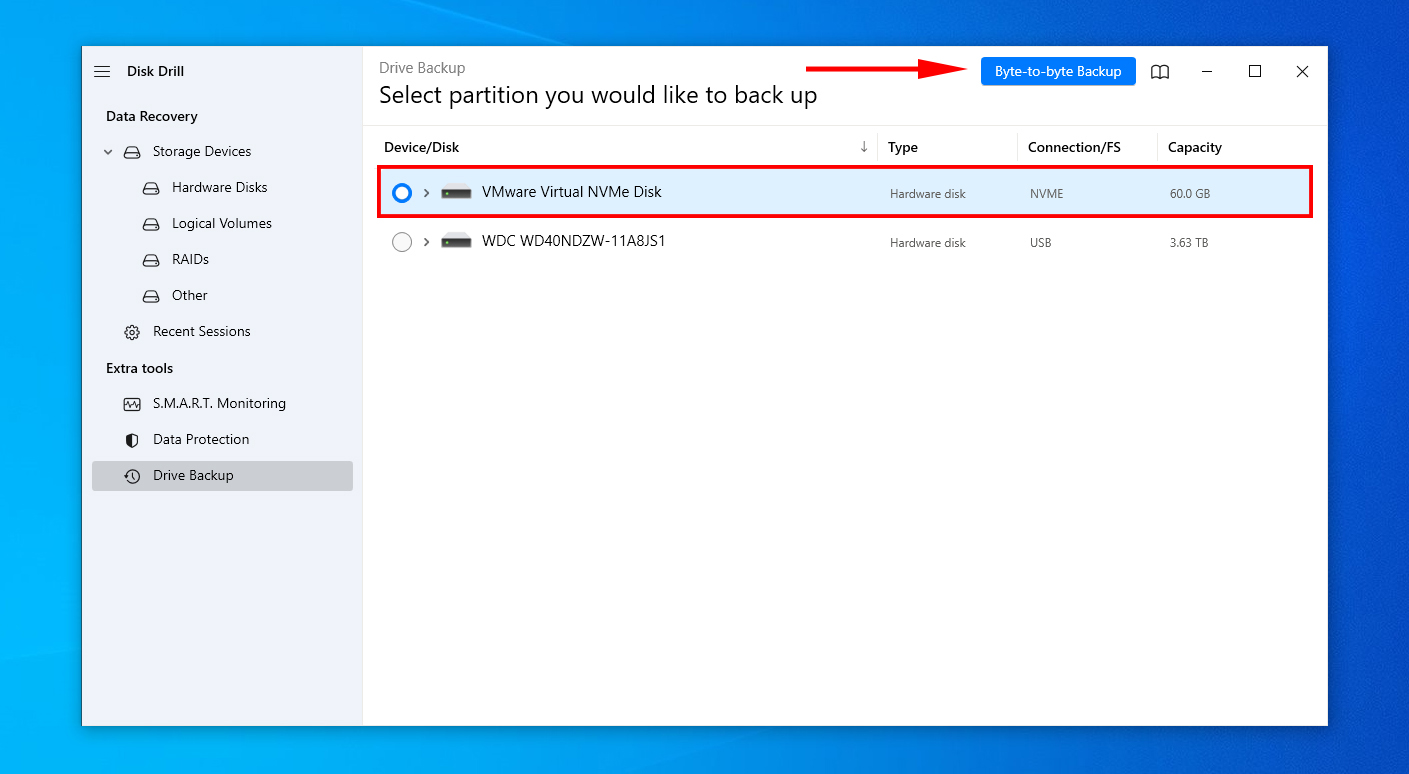
- Click Drive Backup.
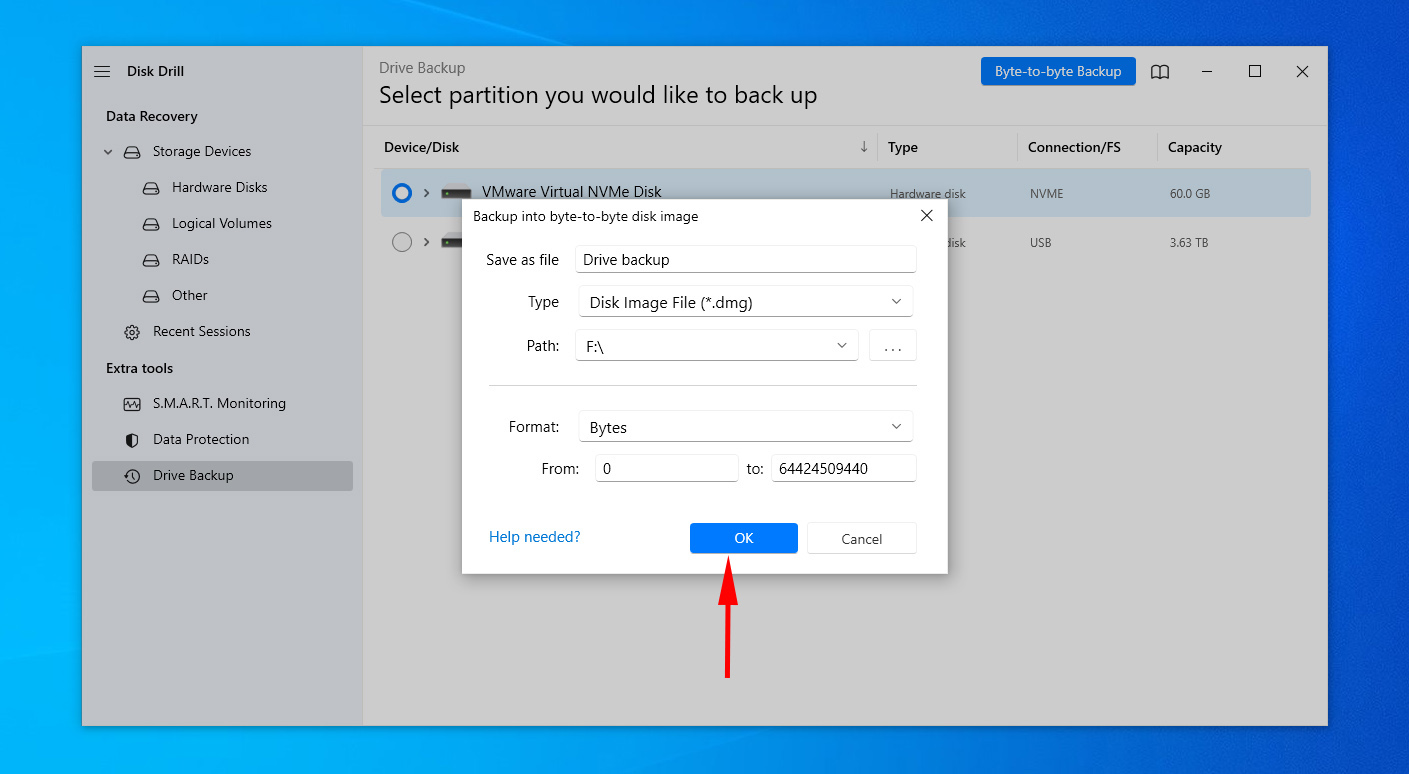
- Select the affected disk, then click Byte-to-byte Backup.

- Fill in the desired fields, then click OK.
- Click Data Recovery.
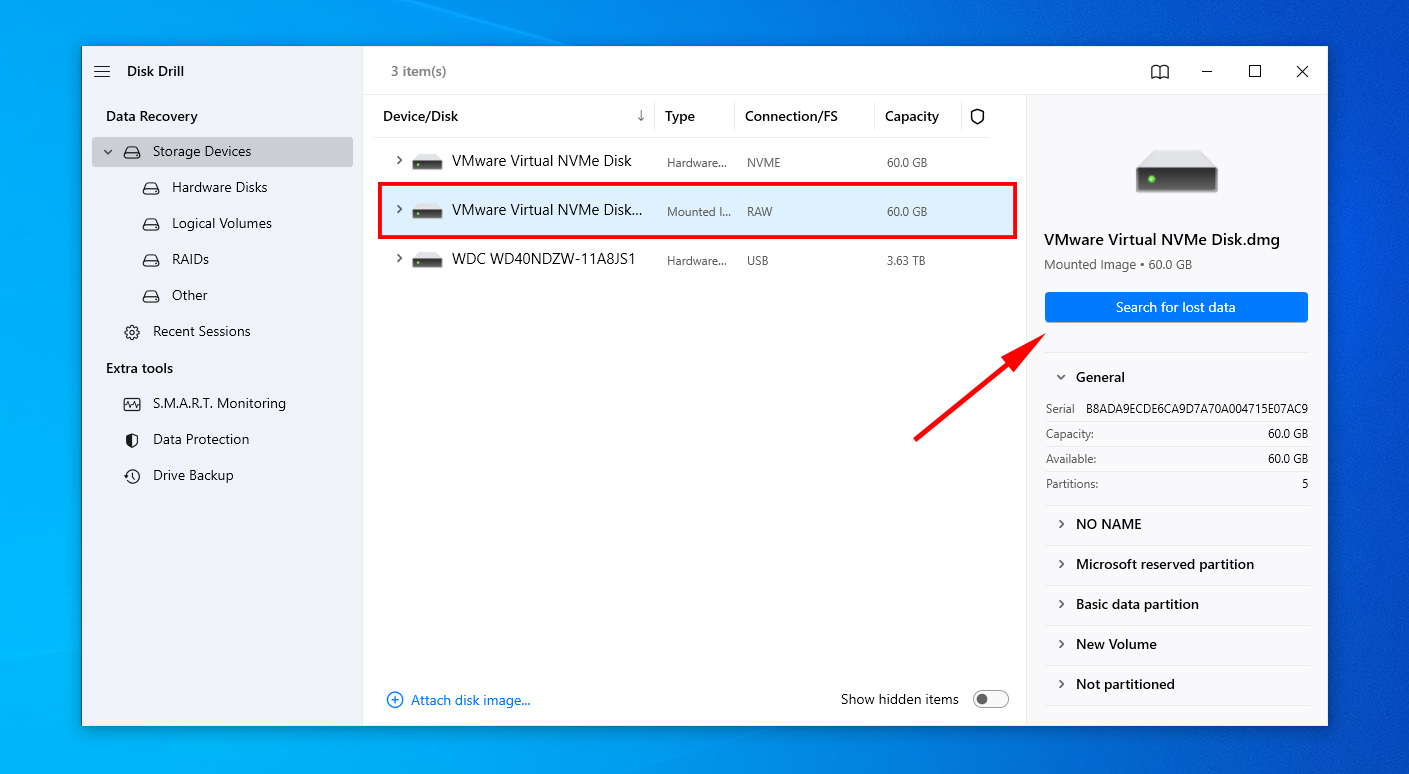
- Click Attach disk image and add the newly created disk image. Then, select the image file and click Search for lost data.
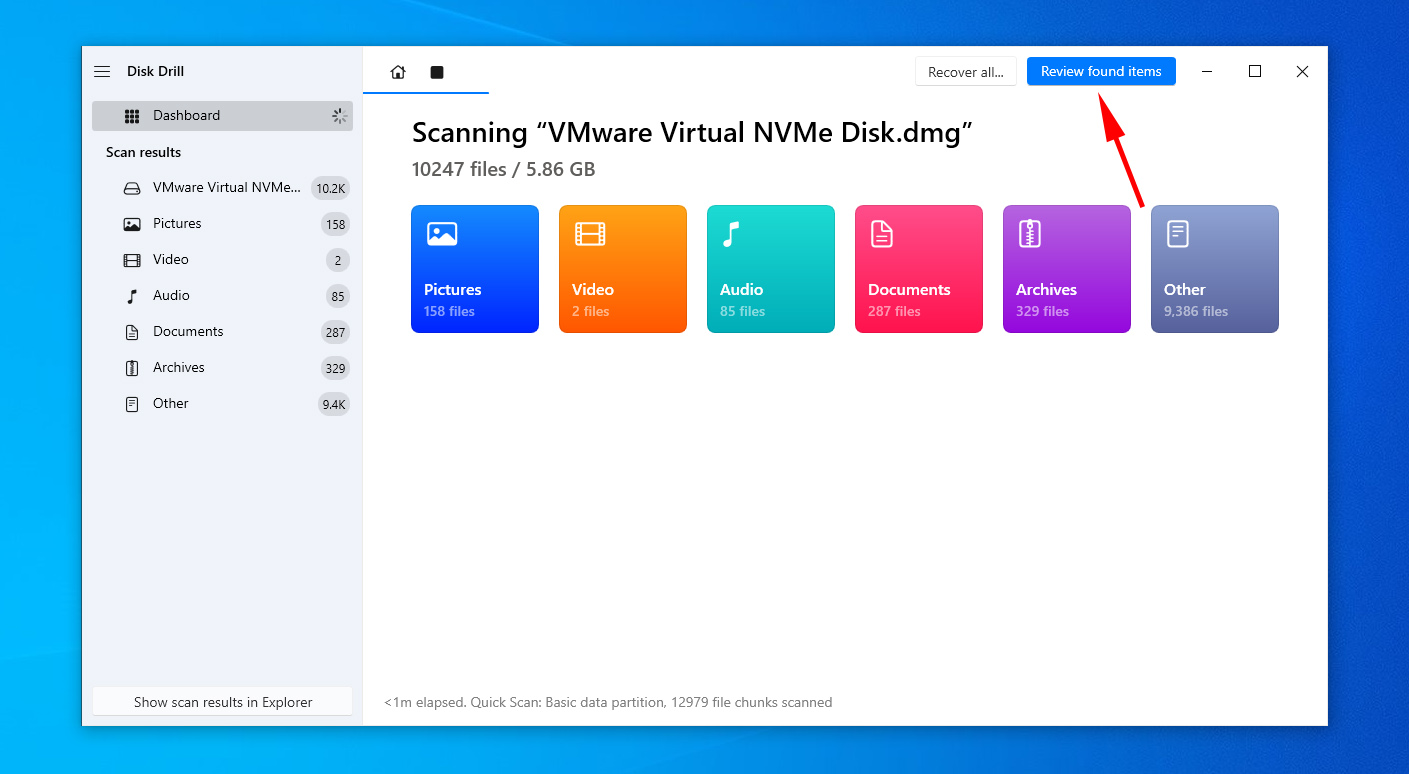
- Click Review found items once the scan is complete.
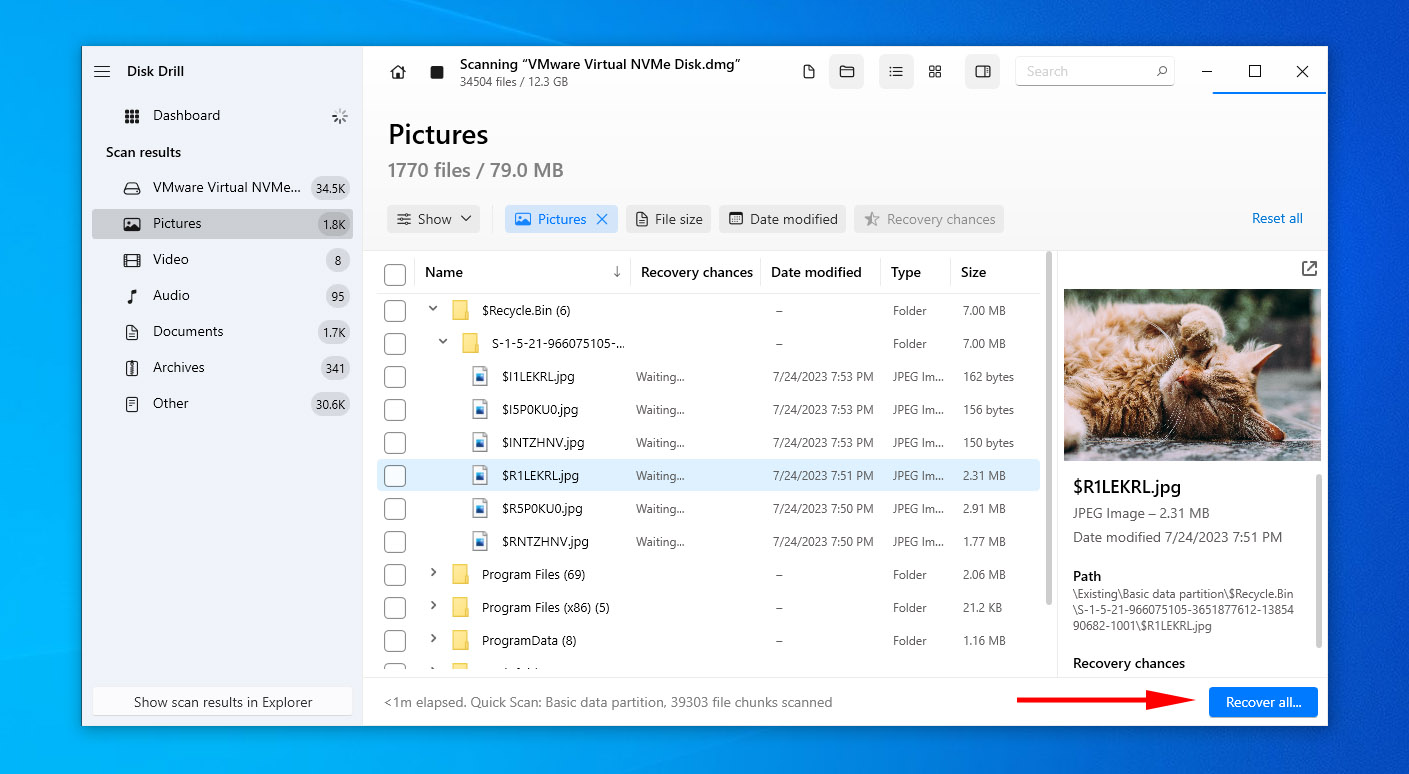
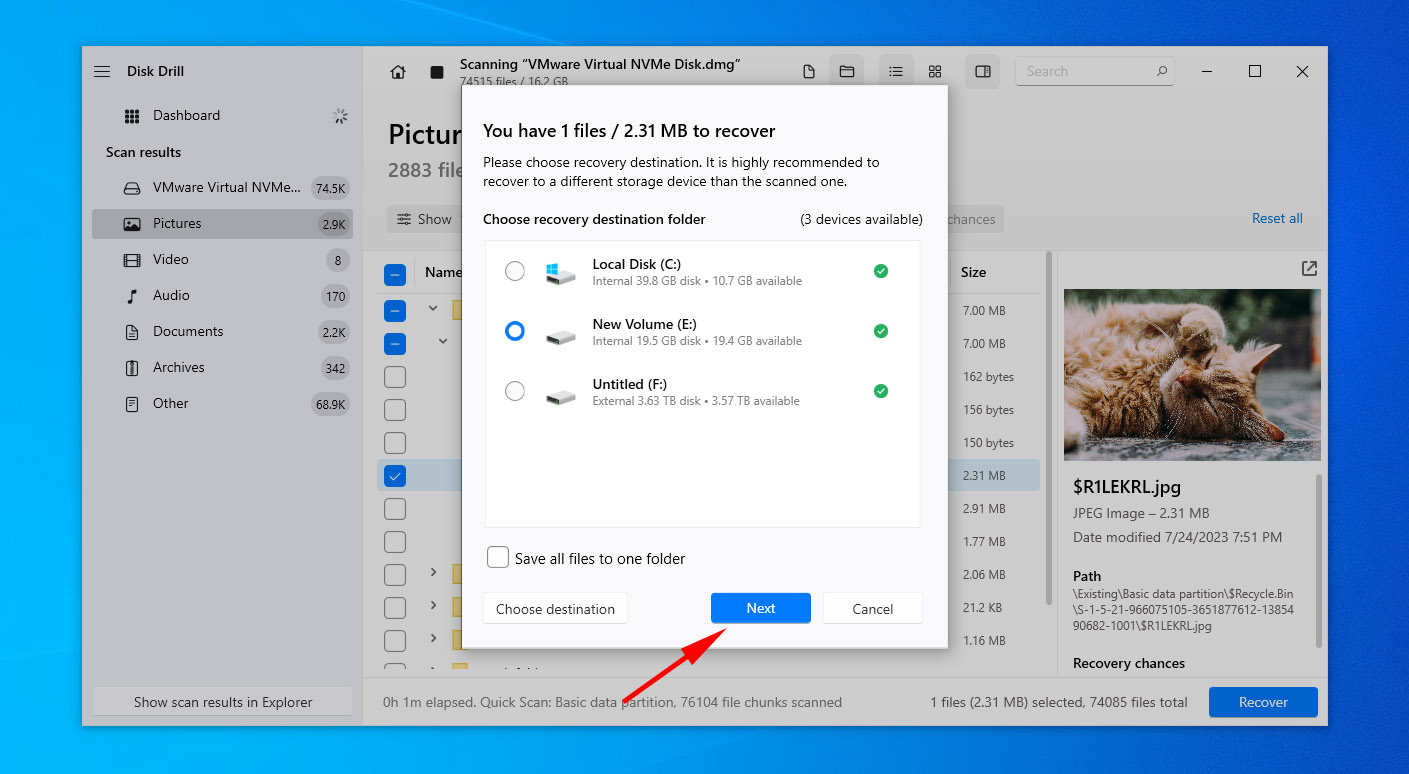
- Select the files you want to recover. Use the Recovery chances column for an indication of how recoverable each file is. When ready, click Recover.
- Choose where you want to store the recovered files. Make sure you’re not saving them to the same disk you’re recovering from.
Conclusion
The “A disk error occurred” issue can appear in Windows XP, Windows Vista, Windows 7, Windows 8, and Windows 10. The problem resides with either your hard disk, RAM, or BIOS settings. The best way to fix this issue is to repair any hard drive-related issues with CheckDisk. If that doesn’t help, confirm your boot order is correct and make sure your RAM is functioning and properly seated.
При работе с компьютером вы вероятно сталкивались с множеством ошибок. Одной из них могла стать «A disk read error occurred. Press Ctrl + Alt + Del to restart» или «BOOTMGR is missing. Press Ctrl + Alt + Del to restart». Читайте о причинах возникновения данных ошибок, а также как их исправить.

Такие ошибки могут быть вызваны многими факторами, это неверная настройка BIOS, заражение вирусом, повреждение жесткого диска и другое. Представляем вам несколько методов для их решения:
Содержание
- Отключите внешние устройства хранения данных
- Проверьте подключение
- Проверьте устройство на других рабочих ПК
- Проверьте приоритет устройства загрузки ОС
- Восстановите (MBR) или загрузочный сектор
- Обновите BIOS
- Сбросьте BIOS
- Протестируйте ОЗУ
- Сделайте дефрагментацию диска
- Выполните команду CHKDSK
- Вопросы и ответы
- Комментарии
Перейти к просмотру

Не загружается Windows? Восстанови загрузку Windows 10, 8 или 7 (bootrec, fixmbr, fixboot) 👨💻⚕️💻
Отключите внешние устройства хранения данных
Если есть какие-либо внешние диски, которые подключены к вашему компьютеру, например, DVD или USB- накопители, отключите их и посмотрите, появится ли ошибка снова.

Проверьте подключение
Хотя компьютер в последний раз работал нормально, это не значит, что при следующей загрузке он будет работать так же. Вполне возможно что к такого рода ошибке, может привести плохое подключение жесткого диска. Проверьте правильность его подключения.

Проверьте устройство на других рабочих ПК
Помимо сбоя жесткого диска, выйти из строя могут другие компоненты компьютера. Соответственно, нужно проверить работоспособность диска на другом рабочем ПК.
Перейти к просмотру
Компьютер с Windows 10, 8, 7 не видит жесткий диск или SSD в 2019 — Как подключить! 💻⚙️🗄️
Проверьте приоритет устройства загрузки ОС
Выбор неправильного приоритета загрузки в BIOS, тоже может привести к данной проблеме. Если на компьютере установлено несколько устройств, нужно проверить правильность выбора загрузочного устройства.

Восстановите (MBR) или загрузочный сектор
Перейти к просмотру
Как включить AHCI для SATA в BIOS без переустановки Windows, ошибка INACCESSIBLE BOOT DEVICE 💻🛠️🤔
Повреждение записи (MBR), тоже вызывает ошибку чтения диска. Для ее устранения нужно будет загрузиться с диска или флешки для установки Windows.

Жмем далее. Выбираем «Восстановление системы».

Дальше «Поиск и устранение неисправностей»

Потом «Дополнительные параметры»

Открываем командную строку.

В ней пишем команды:
bootrec /fixmbr
— перезаписывает основную загрузочную запись (MBR)
bootrec /fixboot
— записывает новый загрузочный сектор.

После перезагрузки система должна загрузиться без ошибки. Подробнее про возможности автоматического восстановления Windows смотрите в видео:
Перейти к просмотру
Автоматическое восстановление Windows из консоли, вход в среду восстановления 🛠️👨💻⚕️
Обновите BIOS
Если BIOS не обновлялся в течение длительного времени или было установлено новые комплектующие, устаревший BIOS может повлиять на загрузку Windows. В итоге возможно придётся обновить его.
Как обновить BIOS вы можете посмотреть в видео
Перейти к просмотру
Как обновить BIOS ASUS, HP, Lenovo, MSI, Acer, Samsung, Dell, Gigabyte, AMI, Phenix Award 💽💻🤔
Сбросьте BIOS
В некоторых ситуациях решить эту проблему помогает сброс BIOS. Сделать это можно в его настройках или вытащив батарейку.


Протестируйте ОЗУ
Неисправная ОЗУ память или слот, могут быть причиной возникновения ошибки «A Disk Read Error Occurred».

Как это сделать писалось в одной из наших статей.
Перейти к просмотру
Как узнать сколько оперативной памяти установлено, сделать тест или освободить память ПК 🤖⚙️💻
Сделайте дефрагментацию диска
Если у вас есть возможность подключить диск к другому устройству, можно сделать его дефрагментацию. Осуществить ее помогут уже встроенные в систему утилиты. Это решение поможет устранить «A Disk Read Error Occurred».


Или же используя другое ПО. Подробнее в видео:
Перейти к просмотру
Дефрагментация дисков в Windows 10: автоматическая дефрагментация, настройка! 🛠️🗄️⏲️
Выполните команду CHKDSK
Для этого нужно зайти в командную строку, способом описанном в пункте 6 и ввести:
chkdsk «имя диска»: / r, (например chkdsk с: / r), и нажать «Enter».

Подробнее в видео:
Перейти к просмотру
Как проверить жесткий диск на ошибки и исправить ошибки в Windows 10, 8, 7 🔎🛠️🗄️

Вопрос от пользователя
Здравствуйте.
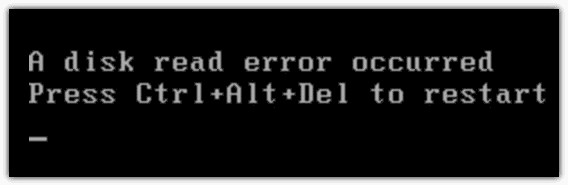
Сегодня из ниоткуда на экране ПК появилась одна пакость: «A disk read error occurred… Press Ctrl+Alt+Del». С системой ничего не делал: не удалял, не обновлял, не устанавливал… и т.д.
Есть подозрение только на одно: я накануне часа 2 вечером копировал фильмы на флешки и DVD-диски. Может с диском что-то случилось? Подскажите, как это можно исправить…
Здравствуйте.
Если перевести эту ошибку на русский (для более простого понимания широкой аудитории) — то она означает, что «Произошла ошибка чтения диска». Возникать она может не всегда из-за поломки диска (хватает и других причин: сбившиеся настройки BIOS; неправильное отключение, приведшее к ошибкам файловой системы и т.д.).
Ниже, постараюсь в пошаговом и простом «стиле» представить первичную диагностику. Думаю, большинство с ней справятся… 👌
*
Содержание статьи📎
- 1 Что можно посоветовать для исправления ошибки чтения диска
- 1.1 ШАГ 1
- 1.2 ШАГ 2
- 1.3 ШАГ 3 (если не определяется диск)
- 1.4 ШАГ 4 (если диск определяется)
→ Задать вопрос | дополнить
Что можно посоветовать для исправления ошибки чтения диска
ШАГ 1
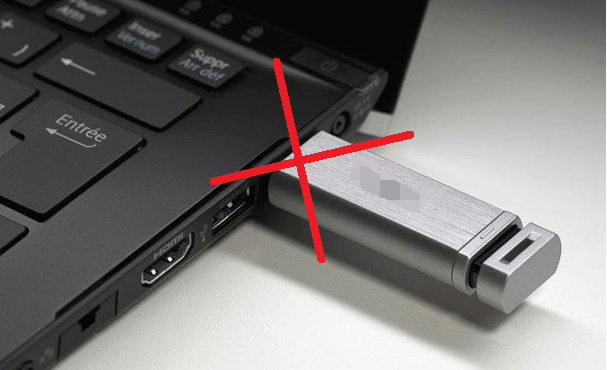
И так, первый совет банальный: проверьте и отключите от компьютера все флешки, CD/DVD-диски, внешние HDD, дискеты и т.д. (тем более, если вы накануне что-то записывали на эти типы накопителей).
Примечание: многие пользователи, скинув на внешний накопитель данные, забывают его в USB и выключают компьютер. А затем, при включении, ПК начинает искать загрузочные записи на этой самой флешке (например) — разумеется, их не находит и возникает ошибка*!
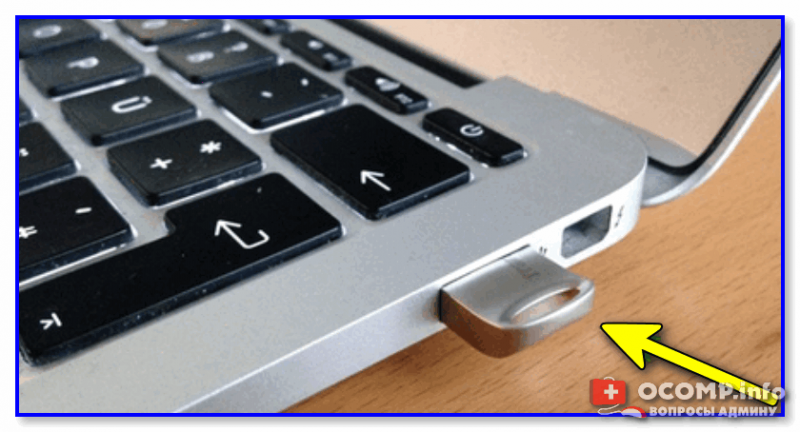
Флешка подключена к USB-порту!
👉 Дополнение: если к компьютеру подключен сканер, принтер, телефон и пр. периферийные устройства — отключите их также на время диагностики. Оставьте мышь, клавиатуру, монитор — т.е. самый «минимум».
Если накануне устанавливали доп. диски (HDD/SSD и пр.) — отключите их!
*
ШАГ 2
Если первый шаг не помог — следующее, что я порекомендую — это проверить настройки BIOS (UEFI) компьютера.
👉 В помощь!
1) Как войти в БИОС (BIOS) на компьютере / ноутбуке.
2) Как сбросить настройки BIOS.
*
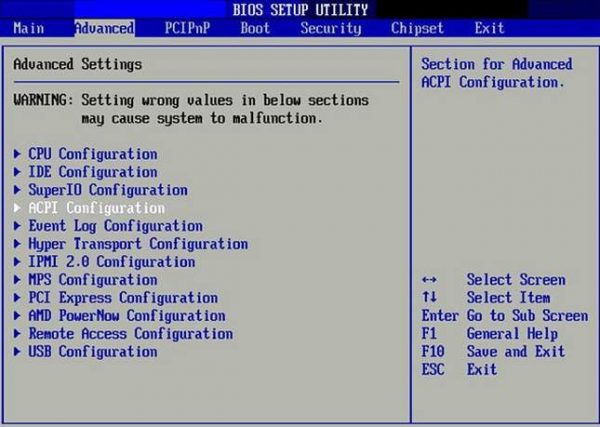
👉 В первую очередь в BIOS нужно проверить 2 вещи:
- определяется ли диск (на котором установлена Windows). Видна ли его модель/размер? Если не определяется — см. шаг 3.
- стоит ли диск первым в очереди* загрузки (примечание: в BIOS можно задавать приоритет накопителей: т.е., например, можно задать, чтобы компьютер сначала искал загрузочную флешку, а если ее нет, загружался с диска. Нам нужно сразу же указать диск…).
Как правило, модель диска (если он определился) можно увидеть сразу же после входа в BIOS (на странице «Main»). Установлен ли этот диск первым по приоритету загрузки — см. раздел BOOT. Пример привел на фотографиях ниже. 👇
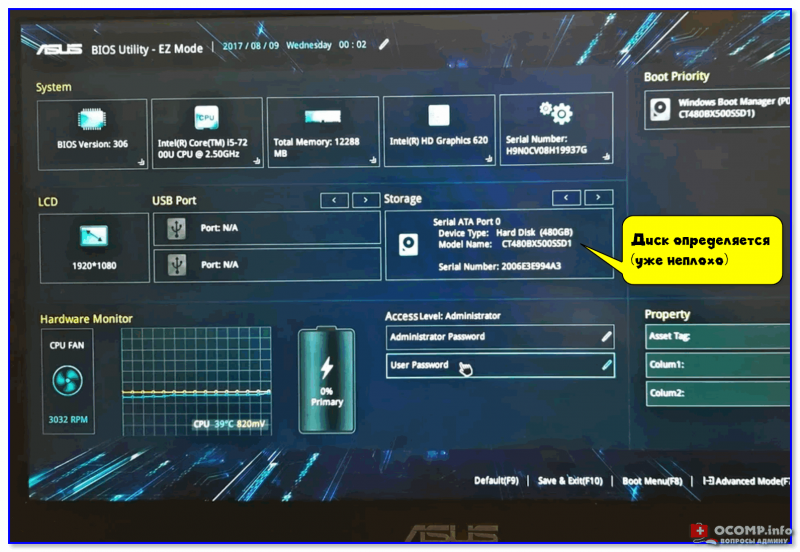
Диск определяется (уже неплохо)

Boot Option #1 — указан диск с ОС Windows (настройки BIOS)
Примечание: после проведенных изменений в BIOS — не забудьте сохранить настройки. Как правило, для этого достаточно нажать клавишу F10.
*
ШАГ 3 (если не определяется диск)
Это явно указывает на какую-то аппаратную причину… (не всегда не определяющийся диск начал сыпаться и нуждается в замене).
Для начала я бы посоветовал отключить системный блок от питания и посмотреть, не отошел ли какой-нибудь шлейф от диска. Желательно попробовать подключить диск к другому разъему на мат. плате (благо на любой мат. плате есть по несколько SATA-портов).
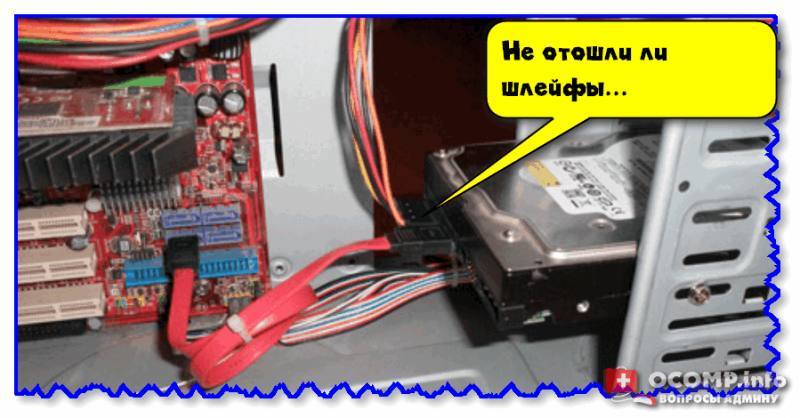
Не отошли ли шлейфы…
Если диск компьютер так и не увидел, то первое в чем необходимо убедиться — исправен ли он вообще, не пришел ли в негодность. Для этого лучше всего диск подключить к другому компьютеру / ноутбуку. Если у вас есть спец. переходники — диск можно даже подключить к USB-порту (пару ссылок ниже о том, как это сделать).
👉 В помощь!
1) Как подключить второй жесткий диск к компьютеру, ноутбуку.
2) Как подключить жесткий диск к USB-порту.
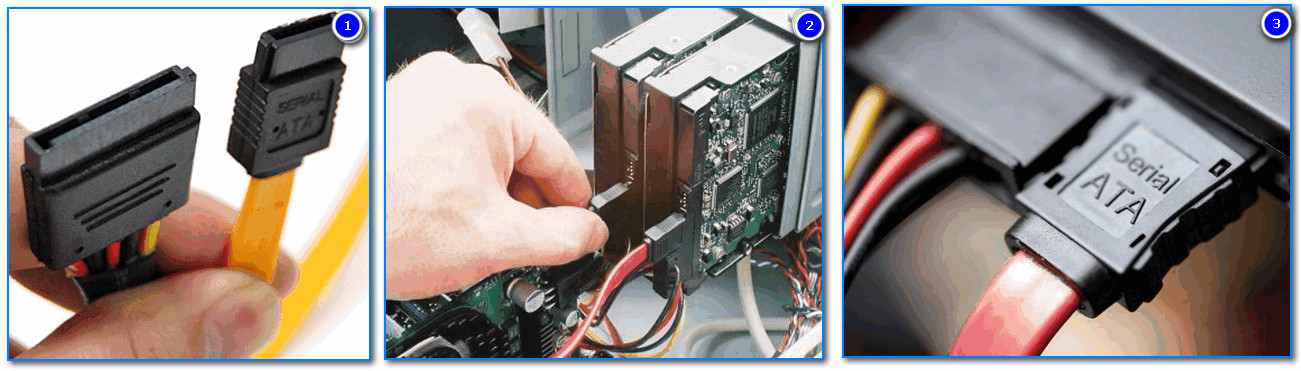
Подключение SATA и кабеля питания к диску
👉 Кстати!
Компьютер можно использовать даже без диска! Для этого вам понадобиться спец. подготовленная флешка (так называемый «живой» LiveCD) — Windows будет загружена прямо с нее (и она мало чем отличается от обычной ОС).
О том, где загрузить нужный ISO образ с LiveCD и как его правильно подготовить — можете узнать из этой статьи.
*
ШАГ 4 (если диск определяется)
И так, на этом этапе будем считать, что диск определяется в BIOS, он первый в приоритете загрузки, и с него раньше ПК благополучно загружался…
Для дальнейшей работы нам понадобиться 👉 LiveCD-флешка от Сергея Стрельца.
👉 Загрузившись с нее — необходимо открыть программу Victoria и проверить диск (оценить его состояние — не начал ли он сыпаться (из-за этого, кстати, «часть» диска могла перестать читаться и, как следствие, ошибка «A disk read error occurred»)).
👉 В помощь!
Диагностика и проверка диска за 5 мин. для начинающих (быстрый тест в новой Victoria 5)
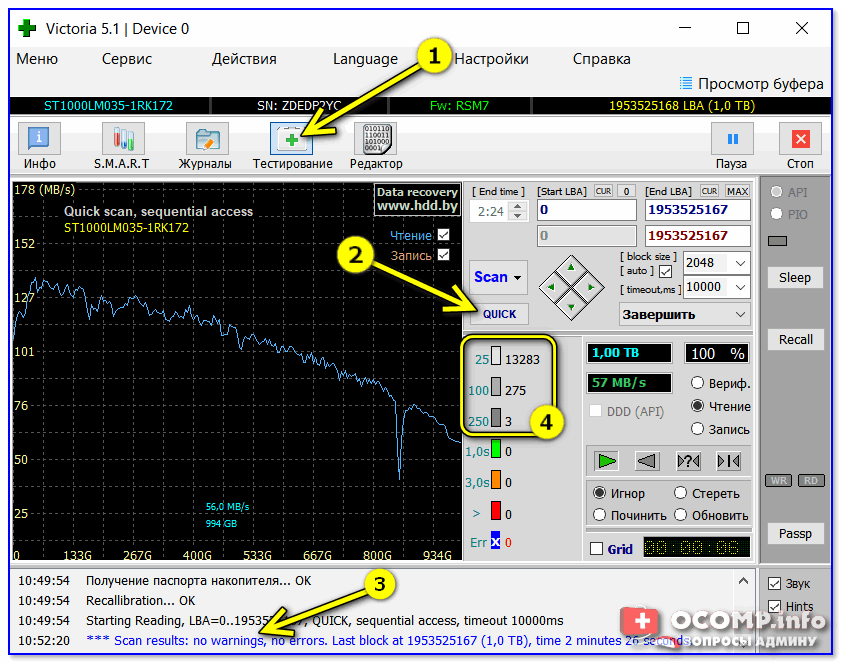
Тестирование быстрое (Quick) — Victoria 5
👉 Если с самим диском всё в порядке — не лишним было бы проверить файловую систему на ошибки (делается также с LiveCD-флешки!).
Для этого необходимо будет открыть командную строку, ввести chkdsk C: /f /r и нажать Enter. 👇 В течении 5-15 мин. (в среднем) диск будет проверен, а ошибки исправлены.

Пример команды
👉 Если вышеприведенное не помогло, то как вариант, можно попробовать с помощью установочной флешки (с Windows) восстановить систему (загрузчик ОС). О том, как это сделать — см. эту заметку.
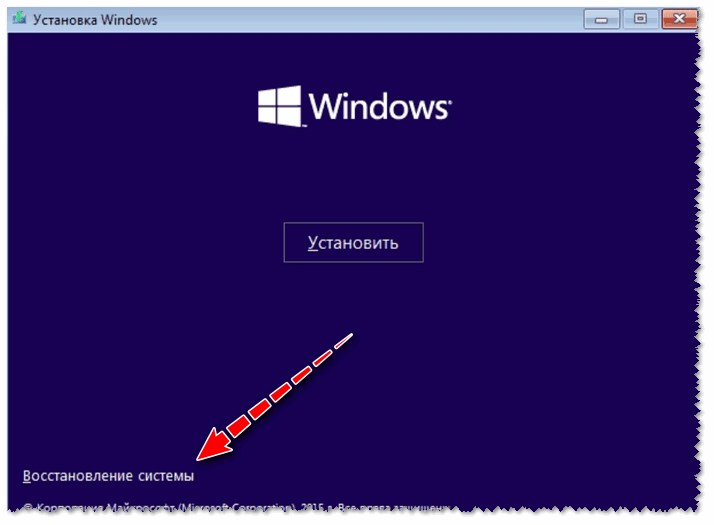
Восстановление системы (при установке ОС)
👉 Ну и как «последняя инстанция» возможно стоит переустановить систему, или лучше сказать установить вторую ОС в свободное место диска (благо, это можно сделать без затрагивания «старой» Windows, без потери данных и форматирования всего диска).
*
Иные способы решения — приветствуются в комментариях!
Успехов!
👋


Fix A Disk Read Error Occurred with 7 Solutions in Windows 10/8/7
You will be asked to press the Ctrl+Alt +Del to restart. However, most times, it won’t help, and you won’t be able to boot your computer correctly. The issue has infected a large number of users in Windows 10/8/7/XP. On this page, we have collected seven ways that said to be the most effective solutions to fix a disk read error occurred.
| Workable Solutions | Step-by-step Troubleshooting |
|---|---|
| 1. Back Up Data Without OS | Download and Install EaseUS Todo Backup on the working computer. Click Tools…Full steps |
| 2. Check SATA Cables | Try a different port for the SATA/SATA M2 cables. If you have more than one HDD…Full steps |
| 3. Run Surface Test | Run EaseUS Partition Master, right-click the disk you want to check…Full steps |
| 4. Repair MBR | Download and launch EaseUS Partition Master on a new PC…Full steps |
| 5. Other Effective Solutions | Run bootrec > Check RAM Memory > Reset or Update BIOS…Full steps |
A Disk Read Error Occurred Press Ctrl+Alt+Del to Restart
As a computer user, you may get many errors that prevent you from accessing your hard drive or data. Among them, disk read error is the most frustrating one. When it appears, you will receive the following message: «A disk read error occurred. Press Ctrl+Alt+Del to restart«. It is a common error that you can encounter and it indicates that Windows detects a hard disk problem or the process of reading hard disk goes wrong. Restart the computer by pressing Ctrl + Alt + Del cannot fix the error and you can still get the same screen.
Fix 1. Back Up Data Without Boot into Windows (Protect Data)
It would be an easy job to fix the «A disk read error occurred» issue. But the problem is that most users have essential personal stuff on the hard drive. So, they are puzzled about how to protect their files. You know, some troubleshooting steps might do lousy damage to their data and finally result-in irreversible data loss disaster.
Because of this, we recommend you to back up data first. You can export the data, and try to restore data on another healthy computer. Here is an example of creating a backup without booting into Windows 10/8/7/XP.
To boot into Windows without OS, you need EaseUS Todo Backup with bootable Media. With it, you can back up and export data even when the operating system fails to start or crashes. Download and install EaseUS Todo Backup on a healthy computer and export data without booting into Windows.
Also read: Recover Data from Corrupted Windows OS
Fix 2. Check Hard Disk SATA Cables to Fix a Disk Read Error
Damaged SATA cables can cause «A disk read error occurred» issue. So, try the following tips to fix the error if the above methods don’t work.
Step 1. Try a different port for the SATA/SATA M2 cables.
Step 2. If you have more than one HDD, leave only the HDD with Windows installed and test multiple SATA ports and cables.
If there is something wrong, the faulty cables will need to be replaced to fix «A disk read error occurred».
Fix 3. Run Surface Test to Check HDD If Disk Read Error Occurred
If your hard drive has a bad sector, it could cause «a disk read error occurred» issue during the process of computer startup. You can run a professional partition software to check your hard drive for bad sectors.
To make it, you need EaseUS Partition Master to create a bootable USB flash drive or CD/DVD. Then, restart the computer from the bootable device you just created. Follow the steps to check bad sectors:
Step 1. Open EaseUS Partition Master. Right-click the disk that you want to check, and then click «Surface Test».
Step 2. The operation will be immediately performed and all bad sectors will be marked as red.
If there is a bad sector, take out the hard drive. Connect the hard drive to a healthy computer and fix the bad sectors.
Fix 4. Repair MBR to Resolve Disk Read Error
If you also meet the «A disk read error occurred» error message, it suggests that BIOS is not the problem. Then try to rebuild MBR with EaseUS partition software. Follow the steps below:
Step 1. Create a WinPE bootable disk
- Launch EaseUS Partition Master, and click «Bootable Media» on the toolbar. Select «Create bootable media».
- Click «Next» to finish the process.

Step 2. Boot EaseUS Partition Master Bootable USB
- Connect the bootable USB or CD/DVD to your PC.
- Press F2 or Del when you restart the computer to enter the BIOS screen. Set and boot your computer from «Removable Devices» or «CD-ROM Drive». And then EaseUS Partition Master will run automatically.
Step 3. Rebuild MBR
- Click «Toolkit» and choose «Rebuild MBR».

- Select the disk and the type of MBR. Then, click «Rebuild».

- After that, you can see «MBR has been successfully rebuilt on Disk X».

Fix 5. Run Bootrec to Fix A Disk Read Error Occurred
If the bootloader installation or configuration comes with some errors, you can also meet «a disk read error occurred press ctrl+alt+del to restart» error.
You could solve this error by following the steps below.
Step 1. Press Win+R to open the Run dialog. Type cmd and click «OK».
Step 2. In the Command Prompt window, type those following commands and press «Enter».
bootrec /fixmbr
bootrec /fixboot
bootrec /rebuildbcd
Step 3. Restart the system and let bootrec repair MBR.
Fix 6. Check RAM Memory to Fix a Disk Read Error Occurred
Sometimes, a read disk error is related to a faulty RAM stick or RAM slot. If you have added new RAM memory to your computer, you can try this way.
Step 1. Remove the new RAM modules you’ve recently added.
Step 2. Leave only one single RAM module.
Step 3. Restart the computer.
You can also download a professional RAM test tool — MemTest86 to test your RAM (https://www.wikihow.com/Test-PC-RAM-with-MemTest86).
Fix 7. Reset or Upgrade BIOS to Fix a Disk Read Error Occurred
You can also try to reset BIOS to fix disk read errors. Some people say resetting your computer BIOS to default or upgrading to the latest version might be able to solve «A disk read error occurred» in Windows XP/7/8/10. Follow the steps below to reset BIOS:
Step 1. Restart the computer
Step 2. Press F2, F8, F12, Esc or Del to boot into BIOS
Step 3. Find the option to reset BIOS to default.
The option name varies depending on different computer manufacturers and BIOS versions, which can be «Load BIOS Defaults», «Load Setup Defaults», «Load Default Settings», «Load Fail-Safe Defaults», or «Get Default Values».
Conclusion
These practical solutions may have got you out of your Disk Read error. When a hard drive fails or gets severely corrupt, you need to replace the hard drive. You can turn to EaseUS disk management tool to upgrade to a larger hard drive.
A Disk Read Error Occurred in Windows 10/8/7 FAQs
You have learned the seven ways to troubleshoot a disk read error. If you still have problems, you can read these topics below.
How do I fix a disk read error?
There are seven ways to fix a disk read error:
- Back Up Data Without OS
- Check SATA Cables
- Run Surface Test
- Repair MBR
- Run Bootrec
- Check RAM Memory
- Reset or Upgrade BIOS
Can external hard disk be repaired?
Yes, you can. As long as the external hard drive is not physically damaged, you can repair bad sectors or other external hard drive issues with ease.
How do I fix a corrupted external hard drive?
To Repair Corrupted External Hard Drive:
- Restore Corrupted File System
- Recover Data
- Repair Corrupted External Drive
- Repair External Drive without Formatting
A disk read error occurred. Press Ctrl + Alt + Del to restart error pops up when you boot Windows 10. Even after you try to restart your computer, you get the same error message again. It’s very annoying, and the causes can vary from one to another, but the most common causes are:
- Loose or faulty connections.
- Insufficient RAM.
- A damaged hard drive.
- Incorrect MBR Configuration.
If you encounter A disk read error occurred on your Windows 10, don’t worry. Whatever the cause is, you can troubleshoot the issue and solve the problem with the following tried-and-true fixes.
Try these fixes:
No.1–Unplug any USB or DVD drive
No.2–Shut down your computer and cool it down for several hours
No.3-–Reset or update your BIOS
No.4–Check your hard drives’ cables
No.5–Test RAM memory
No.6– Fix MBR and Fix Boot
Fix 1. Unplug any USB or DVD drive
If you have plugged in any removable flash drives like USB or DVD, make sure to unplug them and then try to reboot your Windows 10. It’s possible that your system is trying to boot from one of the connected devices due to modification in boot priority.
After removing all these devices, check if the error still persists.
If you see the error again, there might be something wrong with your hard drive or configuration. You can move on to the next fix to solve the problem.
Fix 2. Shut down your computer and cool it down for several hours
Once A disk read error occurred pops upon your Windows 10, you need to shut down your computer and cool it down for a few hours like 5-8 hrs to give it a rest. After cooling down, turn on your computer to see if you can access Windows 10 normally.
It’s very likely that the temperature is causing the error. However, cooling down your computer takes for hours, you can skip to the next fix if you’re in a rush.
If the your computer works properly, you need to back up your data and files to an external drive immediately before bumping into the same problem again.
Fix 3. Reset or update your BIOS
Resetting BIOS could fix A disk read error occurred error by restoring your system’s default settings. Here is how to do it:
1) Make sure you computer is turned off.
2) Turn on your computer and press F12 till BIOS screen pops up.
Note: The key to enter BIOS usually is F12, but also could be F1, F10, Del, etc.
Just look carefully on the screen while your computer starts or check your user manual to know the exact key.
2) Use the down arrow key ↓ to choose Load Setup Defaults to reset your BIOS, then press Enter. Choose YES when you’re prompted to confirm the setup.
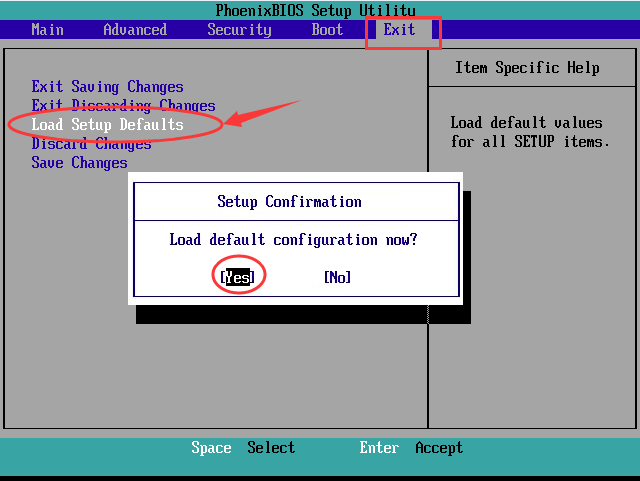
Note: For different computers, the option to reset BIOS could also be Load Fail-Safe Defaults, Apply Default, Load BIOS Defaults, Load Default Settings, Load Setup Default, Factory settings, etc.
3) Use the down arrow key ↓ to choose Exit Saving Changes to exit BIOS.
4) Restart your computer to check if you can boot into your Windows 10 now.
Alternatively, you can also try to update your BIOS to fix disk read error. You should always have the latest BIOS version installed.
Fix 4. Check your hard drives cables
Check the cables connect your computer’s hard drives to your computer’s motherboard under its hood. If the cable is loose or defective, disk errors may occur.
In this case, open your computer’s hood and check if each cable is fastened on both ends. Disconnect them, inspect the cables for any damage and then connect them firmly. Be sure to replace the faulty cables if you find any.
Fix 5. Test RAM memory
RAM(Random Access Memory) problem brings about various issues. As the RAM memory test is easy and non-destructive, you may as well do a complete test for RAM memory to fix the disk error.
- If you’ve added new RAM memory to computer recently, try to remove it and leave only one RAM. Then restart computer to check if the error still occurs.
- Leave one RAM module on one slot and restart computer. If the disk read error still occurs, move the RAM to the other slot and start computer again.
Now you can see if you can boot into Windows again. If not, don’t give up here, you can try the next fix to solve the problem.
Fix 6. Fix MBR and Fix Boot
This error might occur if there’s a problem with the Master Boot Record (MBR) file or the boot sector. To fix them, you will need the original Windows 10 installation disc to repair the MBR and the boot sector. Here’s how to do it:
1) Boot from the original disk, then select the language.
2) Click Repair your computer, then select Command Prompt.
3) Enter the following Commands in the Command prompt separately and press Enter after each command:
bootrec /FixMbr

bootrec /FixBoot

bootrec /ScanOs

bootrec /RebuildBcd
4) Now remove the disc from the drive.
5) Type exit and hit Enter.
exit
6) Now restart your computer and check if Windows is booting normally.
If unluckily, A disk read error occurred still exists after you tried all the fixes above, you can try to do a clean install of Windows 10.
Bonus Tips:
If you run into computer problems randomly, there might be something wrong with your drivers. Missing or outdated drivers can cause many issues. If you want to have better computer experience and prevent potential problems, it’s recommended to keep your drivers update to date.
To update your device drivers, you can visit the manufacture’s official website to find exactly the right the driver online, download it and install it step by step. You’ll need some computer skills and patience to update your drivers this way.
If you don’t have time or patience to manually update your network drivers, you can do it automatically with Driver Easy. It’s all done with just a couple of mouse clicks – easy even if you’re a computer newbie.
Driver Easy will automatically recognize your system and find the correct drivers for it. You don’t need to know exactly what system your computer is running, you don’t need to risk downloading and installing the wrong driver, and you don’t need to worry about making a mistake when installing.
You can update your drivers automatically with either the FREE or the Pro version of Driver Easy. But with the Pro version it takes just 2 clicks (and you get full support and a 30-day money back guarantee):
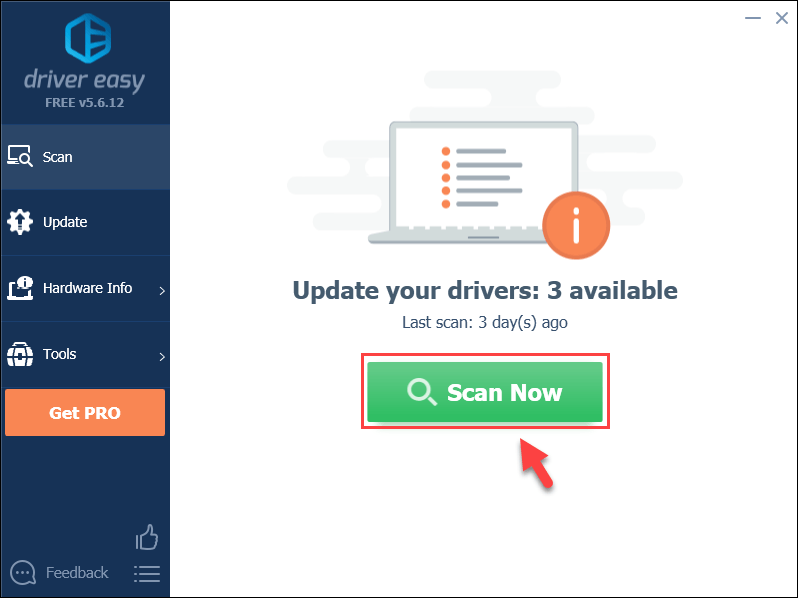
1) Download and install Driver Easy.
2) Run Driver Easy and click the Scan Now button. Driver Easy will then scan your computer and detect any problem drivers.
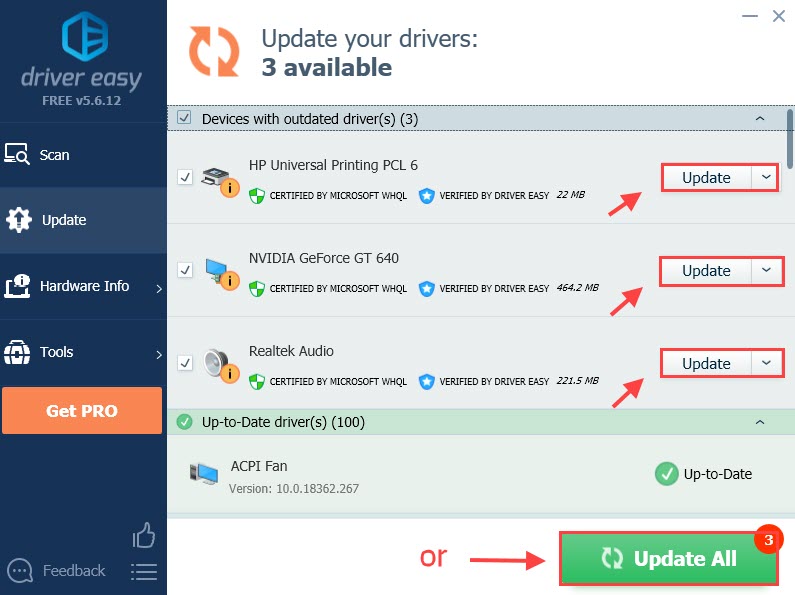
3) Click the Update button next to the flagged driver to automatically download the correct version of that driver, then you can manually install it (you can do this with the FREE version).
Or
Click Update All to automatically download and install the correct version of all the drivers that are missing or out of date on your system. (This requires the Pro version which comes with full support and a 30-day money back guarantee. You’ll be prompted to upgrade when you click Update All.)
4) Restart your computer for the changes to take effect.
Note: If you have any problems while using Driver Easy, feel free to contact our support team at support@drivereasy.com.
Hopefully, one of these fixes can help you sole your disk read error. If you have any questions, feel free to add a comment below and let us know.