
Вопрос от пользователя
Здравствуйте.
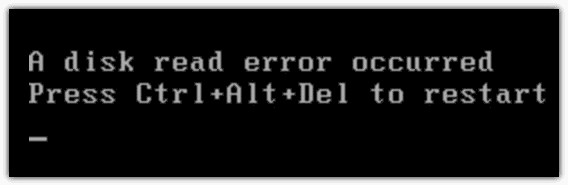
Сегодня из ниоткуда на экране ПК появилась одна пакость: «A disk read error occurred… Press Ctrl+Alt+Del». С системой ничего не делал: не удалял, не обновлял, не устанавливал… и т.д.
Есть подозрение только на одно: я накануне часа 2 вечером копировал фильмы на флешки и DVD-диски. Может с диском что-то случилось? Подскажите, как это можно исправить…
Здравствуйте.
Если перевести эту ошибку на русский (для более простого понимания широкой аудитории) — то она означает, что «Произошла ошибка чтения диска». Возникать она может не всегда из-за поломки диска (хватает и других причин: сбившиеся настройки BIOS; неправильное отключение, приведшее к ошибкам файловой системы и т.д.).
Ниже, постараюсь в пошаговом и простом «стиле» представить первичную диагностику. Думаю, большинство с ней справятся… 👌
*
Содержание статьи📎
- 1 Что можно посоветовать для исправления ошибки чтения диска
- 1.1 ШАГ 1
- 1.2 ШАГ 2
- 1.3 ШАГ 3 (если не определяется диск)
- 1.4 ШАГ 4 (если диск определяется)
→ Задать вопрос | дополнить
Что можно посоветовать для исправления ошибки чтения диска
ШАГ 1
И так, первый совет банальный: проверьте и отключите от компьютера все флешки, CD/DVD-диски, внешние HDD, дискеты и т.д. (тем более, если вы накануне что-то записывали на эти типы накопителей).
Примечание: многие пользователи, скинув на внешний накопитель данные, забывают его в USB и выключают компьютер. А затем, при включении, ПК начинает искать загрузочные записи на этой самой флешке (например) — разумеется, их не находит и возникает ошибка*!
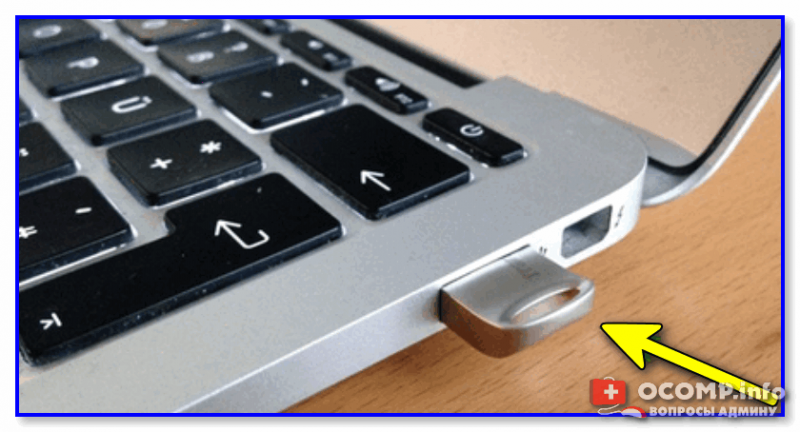
Флешка подключена к USB-порту!
👉 Дополнение: если к компьютеру подключен сканер, принтер, телефон и пр. периферийные устройства — отключите их также на время диагностики. Оставьте мышь, клавиатуру, монитор — т.е. самый «минимум».
Если накануне устанавливали доп. диски (HDD/SSD и пр.) — отключите их!
*
ШАГ 2
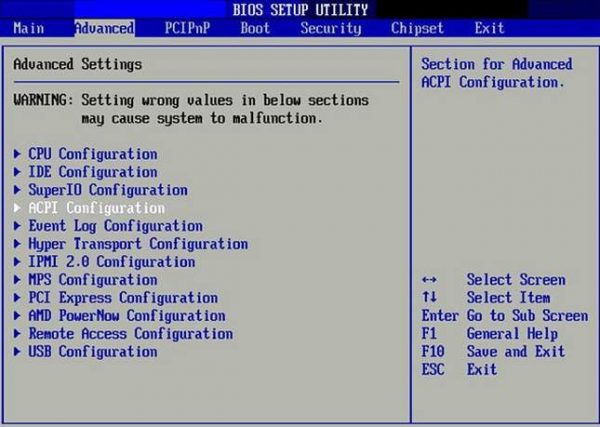
Если первый шаг не помог — следующее, что я порекомендую — это проверить настройки BIOS (UEFI) компьютера.
👉 В помощь!
1) Как войти в БИОС (BIOS) на компьютере / ноутбуке.
2) Как сбросить настройки BIOS.
*
👉 В первую очередь в BIOS нужно проверить 2 вещи:
- определяется ли диск (на котором установлена Windows). Видна ли его модель/размер? Если не определяется — см. шаг 3.
- стоит ли диск первым в очереди* загрузки (примечание: в BIOS можно задавать приоритет накопителей: т.е., например, можно задать, чтобы компьютер сначала искал загрузочную флешку, а если ее нет, загружался с диска. Нам нужно сразу же указать диск…).
Как правило, модель диска (если он определился) можно увидеть сразу же после входа в BIOS (на странице «Main»). Установлен ли этот диск первым по приоритету загрузки — см. раздел BOOT. Пример привел на фотографиях ниже. 👇
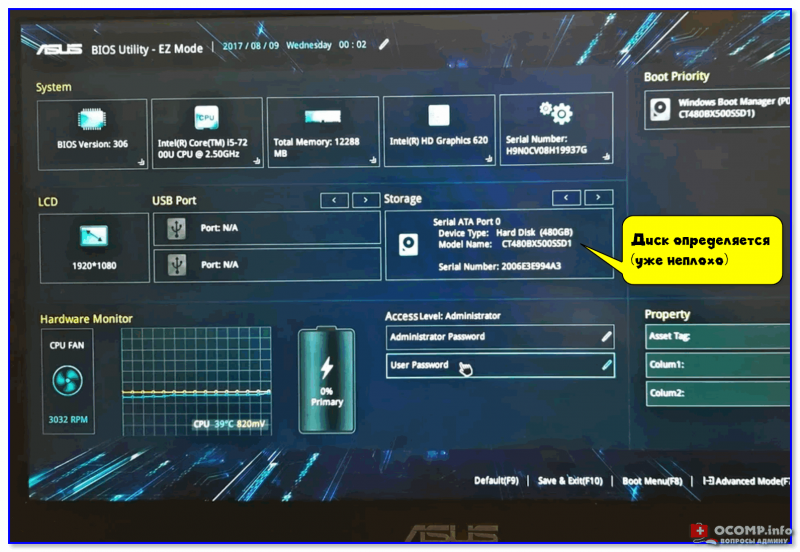
Диск определяется (уже неплохо)

Boot Option #1 — указан диск с ОС Windows (настройки BIOS)
Примечание: после проведенных изменений в BIOS — не забудьте сохранить настройки. Как правило, для этого достаточно нажать клавишу F10.
*
ШАГ 3 (если не определяется диск)
Это явно указывает на какую-то аппаратную причину… (не всегда не определяющийся диск начал сыпаться и нуждается в замене).
Для начала я бы посоветовал отключить системный блок от питания и посмотреть, не отошел ли какой-нибудь шлейф от диска. Желательно попробовать подключить диск к другому разъему на мат. плате (благо на любой мат. плате есть по несколько SATA-портов).
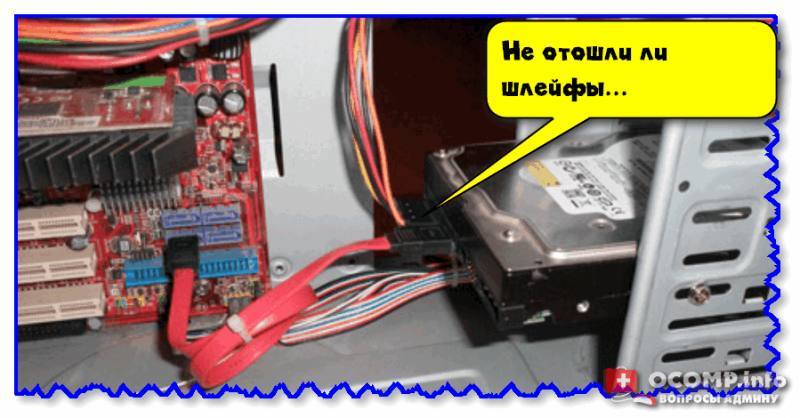
Не отошли ли шлейфы…
Если диск компьютер так и не увидел, то первое в чем необходимо убедиться — исправен ли он вообще, не пришел ли в негодность. Для этого лучше всего диск подключить к другому компьютеру / ноутбуку. Если у вас есть спец. переходники — диск можно даже подключить к USB-порту (пару ссылок ниже о том, как это сделать).
👉 В помощь!
1) Как подключить второй жесткий диск к компьютеру, ноутбуку.
2) Как подключить жесткий диск к USB-порту.
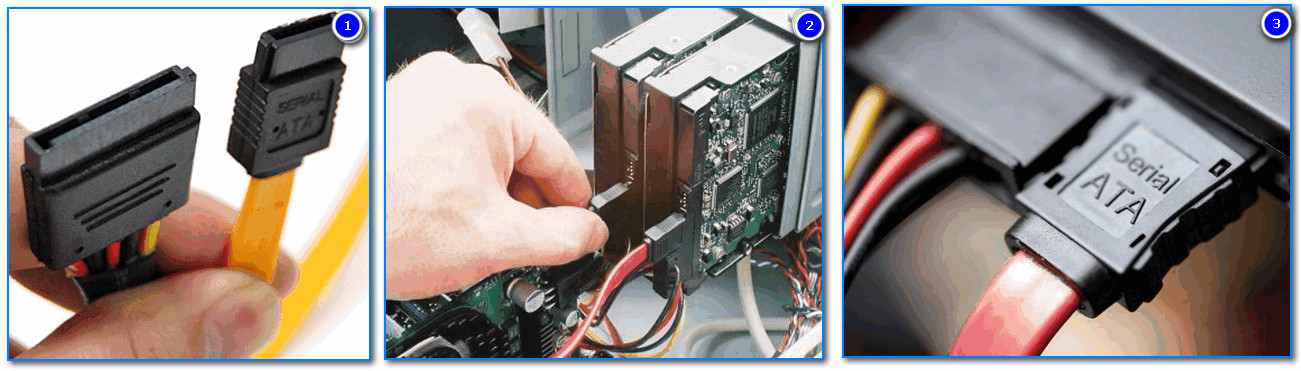
Подключение SATA и кабеля питания к диску
👉 Кстати!
Компьютер можно использовать даже без диска! Для этого вам понадобиться спец. подготовленная флешка (так называемый «живой» LiveCD) — Windows будет загружена прямо с нее (и она мало чем отличается от обычной ОС).
О том, где загрузить нужный ISO образ с LiveCD и как его правильно подготовить — можете узнать из этой статьи.
*
ШАГ 4 (если диск определяется)
И так, на этом этапе будем считать, что диск определяется в BIOS, он первый в приоритете загрузки, и с него раньше ПК благополучно загружался…
Для дальнейшей работы нам понадобиться 👉 LiveCD-флешка от Сергея Стрельца.
👉 Загрузившись с нее — необходимо открыть программу Victoria и проверить диск (оценить его состояние — не начал ли он сыпаться (из-за этого, кстати, «часть» диска могла перестать читаться и, как следствие, ошибка «A disk read error occurred»)).
👉 В помощь!
Диагностика и проверка диска за 5 мин. для начинающих (быстрый тест в новой Victoria 5)
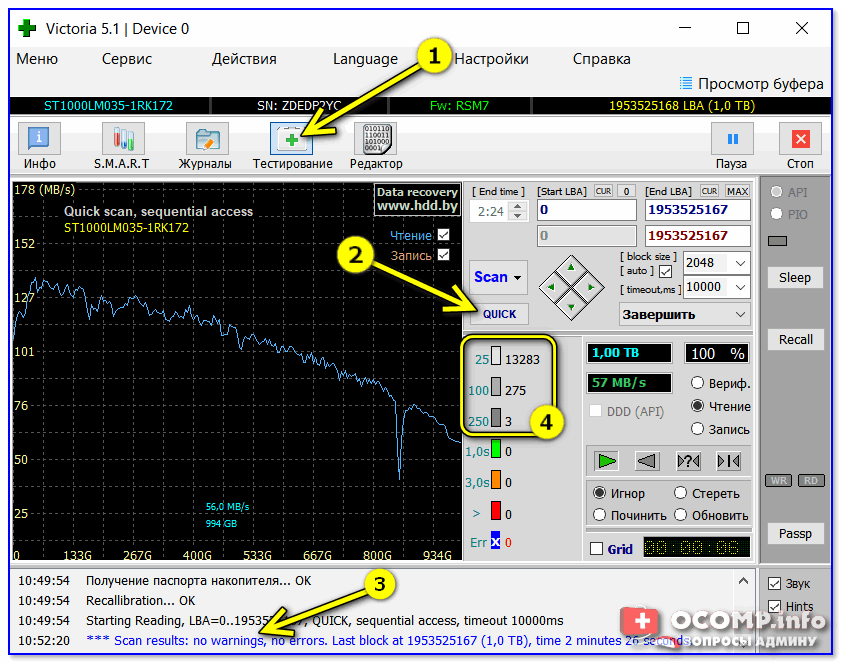
Тестирование быстрое (Quick) — Victoria 5
👉 Если с самим диском всё в порядке — не лишним было бы проверить файловую систему на ошибки (делается также с LiveCD-флешки!).
Для этого необходимо будет открыть командную строку, ввести chkdsk C: /f /r и нажать Enter. 👇 В течении 5-15 мин. (в среднем) диск будет проверен, а ошибки исправлены.

Пример команды
👉 Если вышеприведенное не помогло, то как вариант, можно попробовать с помощью установочной флешки (с Windows) восстановить систему (загрузчик ОС). О том, как это сделать — см. эту заметку.
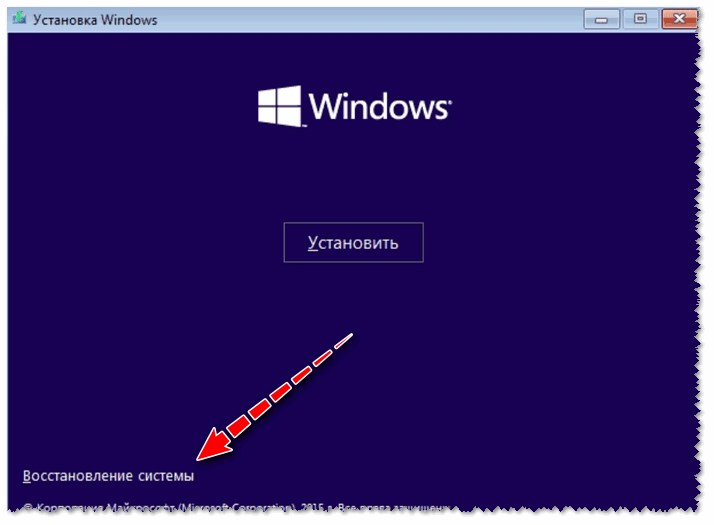
Восстановление системы (при установке ОС)
👉 Ну и как «последняя инстанция» возможно стоит переустановить систему, или лучше сказать установить вторую ОС в свободное место диска (благо, это можно сделать без затрагивания «старой» Windows, без потери данных и форматирования всего диска).
*
Иные способы решения — приветствуются в комментариях!
Успехов!
👋


Как правило, ошибка «A disk read error occurred. Press Ctrl+Alt+Del to restart» возникает при включении компьютера, при этом не исправляется обычной перезагрузкой. На то есть несколько причин: какие-то из них носят программный характер, а некоторые являются чисто техническими. Стоит разобраться, по каким причинам потенциально может возникнуть данная ошибка и какие действия следует предпринять для ее устранения.
Содержание статьи
- Общая информация
- Изменение приоритета загрузки
- Восстановление файловой системы и загрузчика
- Настройка BIOS
- Разбираемся с жестким диском
- Дополнительные способы
- Видео по теме:
- Комментарии пользователей
Общая информация
В переводе на русский «A disk read error occurred» означает ошибку чтения диска. Но это не говорит о том, что есть проблемы с самим жестким диском или SSD, на котором установлена Windows.
Выделю наиболее распространенные причины появления сбоя:
- Повредилась файловая система. Обычно это происходит при неправильном выключении компьютера, например, после резкого выключения электричества или при наличии вирусов.
- Повреждение загрузчика «MBR».
- Неверные настройки BIOS, в том числе измененный порядок загрузки устройств.
- Неисправность жесткого диска. Особенно, если до появления проблемы наблюдались периодические зависания, странные звуки или имело место физическое воздействие (устройство уронили, потрясли, перегрелся).
- Неправильно или неплотно подключили HDD.
- Недостаток питания. Несмотря на то, что винчестеры потребляют мало мощности, плохой или полуживой блок питания может нарушать его работу.
Перед тем как переходить к исправлению проблемы убедитесь, что накопитель виден в БИОС. Если его там нет, то проверьте подключение и при необходимости замените SATA кабель. Иногда достаточно протереть контактные дорожки ластиком. Если это не помогло, то, скорее всего, он неисправен и подлежит замене.
Важно! Не помешает проверить целостность проводов. При неправильной установке компонентов системы отдельные проводки могут быть изогнуты слишком сильно.
Изменение приоритета загрузки
Проще всего восстановить порядок загрузки можно, отключив от компьютера второстепенные устройства (внешние HDD, флешки, карты памяти и прочие).
Но есть еще и ручной способ.
- Зайдите в BIOS и найдите параметр «Boot Option» или аналогичный.

- Установите на первое место накопитель с Windows и сохраните изменения.

Перезагрузите компьютер. В некоторых случаях это простейшее действие устраняет проблему.
Восстановление файловой системы и загрузчика
Это самый безопасный способ, который может помочь в восстановлении работы ПК. Обзаведитесь загрузочной флешкой, LiveCD или WinPE. Буду показывать на примере WinPE (мне нравится сборка от Sergei Strelec). Принцип записи этой сборки на флешку тот же, что и с Windows, поэтому проблем возникнуть не должно.
Инструкция:
- Загружаете с накопителя ОС и запускаете командную строку (найти ее можно в Пуске).
- Вводите «chkdsk C: /f /r» – где под буквой «C» подразумевается раздел с операционной системой, которая вышла из строя. Жмете «Enter». Начнется автоматическая проверка и исправление ошибок.

Внимание! В некоторых случаях раздел, на котором установлена операционная система, может иметь другую букву. В этом случае в строке с командой нужно указать ее.
- Теперь выполните другую команду — «bcdboot C:\windows». Она восстановит загрузочную область.


Закрываем все окна и загружаем компьютер в обычном режиме. Все должно работать.
Настройка BIOS
Иногда, изменение настроек BIOS влечет за собой появления различных ошибок. Ситуация налаживается следующим образом – необходимо выполнить сбор текущих системных параметров. Для это допустимо воспользоваться опцией «Optimized Defaults» или аналогичной.

Найдите опцию, отвечающую за режим работы накопителя. Обычно это «Sata Mode» ,«Sata Type». Установите значение «AHCI». Если и так стоит «AHCI», то измените на «IDE». Сохраните изменения и перезапуститесь.

Если проблема возникла после обновления BIOS, то установите старую версию. Загружается с официального сайта материнской платы или ноутбука. Иногда, наоборот, помогает обновление. Последовательно опробуйте оба варианта.
Важно! Если настройки не сохраняются, то замените батарею питания, скорее всего она отжила свое. Производить замену желательно каждые 5 лет. Делать это чаще – смысла нет.
Разбираемся с жестким диском
Рассмотрим несколько типичных проблем и попробуем их исправить.
- Проверьте подключение носителя. Особенно, если до появления сбоя проводились какие-либо работы внутри корпуса ПК. Также можно подключить его к другому порту.
- Замените SATA кабель.
- Удостоверьтесь, что винчестер исправен. Проведите сканирование через «Victoria» (скачать утилиту с официального сайта) или «MHDD» (скачать утилиту с официального сайта). Иногда, казалось бы, нормальный HDD с хорошим смартом и результатами тестирования все равно может быть неисправным. Подтверждать это будет невозможность установить Windows, зависания и сбои приложений.

Если и это не избавило от ошибки «A disk read error occurred», то напоследок предложу еще несколько вариантов, в редких случаях способных помочь справиться с проблемой.
Дополнительные способы
Представленные методы исправления ошибки взяты с различных технических форумов:
- Протестируйте оперативную память. Предварительно следует очистить планки от пыли, извлекая каждую из гнезда. При обнаружении неисправности замените битые планки. Также если установлено два или более модулей ОЗУ, попробуйте поменять их местами или вынуть все, кроме одного.
- Проведите дефрагментацию. Скептически отношусь к этому пункту.
- Переустановите ОС. Возможно, используется «кривая» или поврежденная сборка. Делать это стоить лишь в самую последнюю очередь. Скачать актуальную версию Windows можно, перейдя на официальный сайт Microsoft.

- Проведите сканирование на вирусы.

- Редко виновником становится материнская плата (в том числе SATA разъем) или блок питания. Поэтому протестируйте HDD на другом компьютере.
- Бывает, что системный диск с операционкой пропадает (удаляется) сам по себе. Решается восстановлением раздела с помощью специальных программ, например, «Acronis Disk Director» или созданием нового раздела (при этом придется заново устанавливать ОС). Если это повторяется часто, то желательно заменить такой накопитель.
- Посмотрите на контакты на обратной стороне платы (нужно открутить отверткой), возможно, произошло окисление. Почистите их и прикрутите плату обратно. Выполняйте эту процедуру осторожно и только в крайнем случае, когда нечего терять.


Причин, по которым может возникнуть рассматриваемая ошибка, довольно много. Рекомендуется последовательно следовать указаниям, размещенным в статье. В какой-то момент проблема будет решена.
Напишите в комментариях, если возникли сложности. Буду рад помочь.
Видео по теме:
Fix A Disk Read Error Occurred with 7 Solutions in Windows 10/8/7
You will be asked to press the Ctrl+Alt +Del to restart. However, most times, it won’t help, and you won’t be able to boot your computer correctly. The issue has infected a large number of users in Windows 10/8/7/XP. On this page, we have collected seven ways that said to be the most effective solutions to fix a disk read error occurred.
| Workable Solutions | Step-by-step Troubleshooting |
|---|---|
| 1. Back Up Data Without OS | Download and Install EaseUS Todo Backup on the working computer. Click Tools…Full steps |
| 2. Check SATA Cables | Try a different port for the SATA/SATA M2 cables. If you have more than one HDD…Full steps |
| 3. Run Surface Test | Run EaseUS Partition Master, right-click the disk you want to check…Full steps |
| 4. Repair MBR | Download and launch EaseUS Partition Master on a new PC…Full steps |
| 5. Other Effective Solutions | Run bootrec > Check RAM Memory > Reset or Update BIOS…Full steps |
A Disk Read Error Occurred Press Ctrl+Alt+Del to Restart
As a computer user, you may get many errors that prevent you from accessing your hard drive or data. Among them, disk read error is the most frustrating one. When it appears, you will receive the following message: «A disk read error occurred. Press Ctrl+Alt+Del to restart«. It is a common error that you can encounter and it indicates that Windows detects a hard disk problem or the process of reading hard disk goes wrong. Restart the computer by pressing Ctrl + Alt + Del cannot fix the error and you can still get the same screen.
Fix 1. Back Up Data Without Boot into Windows (Protect Data)
It would be an easy job to fix the «A disk read error occurred» issue. But the problem is that most users have essential personal stuff on the hard drive. So, they are puzzled about how to protect their files. You know, some troubleshooting steps might do lousy damage to their data and finally result-in irreversible data loss disaster.
Because of this, we recommend you to back up data first. You can export the data, and try to restore data on another healthy computer. Here is an example of creating a backup without booting into Windows 10/8/7/XP.
To boot into Windows without OS, you need EaseUS Todo Backup with bootable Media. With it, you can back up and export data even when the operating system fails to start or crashes. Download and install EaseUS Todo Backup on a healthy computer and export data without booting into Windows.
Also read: Recover Data from Corrupted Windows OS
Fix 2. Check Hard Disk SATA Cables to Fix a Disk Read Error
Damaged SATA cables can cause «A disk read error occurred» issue. So, try the following tips to fix the error if the above methods don’t work.
Step 1. Try a different port for the SATA/SATA M2 cables.
Step 2. If you have more than one HDD, leave only the HDD with Windows installed and test multiple SATA ports and cables.
If there is something wrong, the faulty cables will need to be replaced to fix «A disk read error occurred».
Fix 3. Run Surface Test to Check HDD If Disk Read Error Occurred
If your hard drive has a bad sector, it could cause «a disk read error occurred» issue during the process of computer startup. You can run a professional partition software to check your hard drive for bad sectors.
To make it, you need EaseUS Partition Master to create a bootable USB flash drive or CD/DVD. Then, restart the computer from the bootable device you just created. Follow the steps to check bad sectors:
Step 1. Open EaseUS Partition Master. Right-click the disk that you want to check, and then click «Surface Test».
Step 2. The operation will be immediately performed and all bad sectors will be marked as red.
If there is a bad sector, take out the hard drive. Connect the hard drive to a healthy computer and fix the bad sectors.
Fix 4. Repair MBR to Resolve Disk Read Error
If you also meet the «A disk read error occurred» error message, it suggests that BIOS is not the problem. Then try to rebuild MBR with EaseUS partition software. Follow the steps below:
Step 1. Create a WinPE bootable disk
- Launch EaseUS Partition Master, and click «Bootable Media» on the toolbar. Select «Create bootable media».
- Click «Next» to finish the process.

Step 2. Boot EaseUS Partition Master Bootable USB
- Connect the bootable USB or CD/DVD to your PC.
- Press F2 or Del when you restart the computer to enter the BIOS screen. Set and boot your computer from «Removable Devices» or «CD-ROM Drive». And then EaseUS Partition Master will run automatically.
Step 3. Rebuild MBR
- Click «Toolkit» and choose «Rebuild MBR».

- Select the disk and the type of MBR. Then, click «Rebuild».

- After that, you can see «MBR has been successfully rebuilt on Disk X».

Fix 5. Run Bootrec to Fix A Disk Read Error Occurred
If the bootloader installation or configuration comes with some errors, you can also meet «a disk read error occurred press ctrl+alt+del to restart» error.
You could solve this error by following the steps below.
Step 1. Press Win+R to open the Run dialog. Type cmd and click «OK».
Step 2. In the Command Prompt window, type those following commands and press «Enter».
bootrec /fixmbr
bootrec /fixboot
bootrec /rebuildbcd
Step 3. Restart the system and let bootrec repair MBR.
Fix 6. Check RAM Memory to Fix a Disk Read Error Occurred
Sometimes, a read disk error is related to a faulty RAM stick or RAM slot. If you have added new RAM memory to your computer, you can try this way.
Step 1. Remove the new RAM modules you’ve recently added.
Step 2. Leave only one single RAM module.
Step 3. Restart the computer.
You can also download a professional RAM test tool — MemTest86 to test your RAM (https://www.wikihow.com/Test-PC-RAM-with-MemTest86).
Fix 7. Reset or Upgrade BIOS to Fix a Disk Read Error Occurred
You can also try to reset BIOS to fix disk read errors. Some people say resetting your computer BIOS to default or upgrading to the latest version might be able to solve «A disk read error occurred» in Windows XP/7/8/10. Follow the steps below to reset BIOS:
Step 1. Restart the computer
Step 2. Press F2, F8, F12, Esc or Del to boot into BIOS
Step 3. Find the option to reset BIOS to default.
The option name varies depending on different computer manufacturers and BIOS versions, which can be «Load BIOS Defaults», «Load Setup Defaults», «Load Default Settings», «Load Fail-Safe Defaults», or «Get Default Values».
Conclusion
These practical solutions may have got you out of your Disk Read error. When a hard drive fails or gets severely corrupt, you need to replace the hard drive. You can turn to EaseUS disk management tool to upgrade to a larger hard drive.
A Disk Read Error Occurred in Windows 10/8/7 FAQs
You have learned the seven ways to troubleshoot a disk read error. If you still have problems, you can read these topics below.
How do I fix a disk read error?
There are seven ways to fix a disk read error:
- Back Up Data Without OS
- Check SATA Cables
- Run Surface Test
- Repair MBR
- Run Bootrec
- Check RAM Memory
- Reset or Upgrade BIOS
Can external hard disk be repaired?
Yes, you can. As long as the external hard drive is not physically damaged, you can repair bad sectors or other external hard drive issues with ease.
How do I fix a corrupted external hard drive?
To Repair Corrupted External Hard Drive:
- Restore Corrupted File System
- Recover Data
- Repair Corrupted External Drive
- Repair External Drive without Formatting
Get the fix for the error A disk read error occurred on Windows XP, Windows Vista, Windows 7 and Windows 8.
About “A disk read error occurred“
The following information on this error has been compiled by NeoSmart Technologies, based on the information gathered and reported by our global network of engineers, developers, and technicians or partner organizations.
Description and Symptoms
The error messages, alerts, warnings, and symptoms below are tied to this error.
Symptom 1: “A disk read error occurred” error screen on startup
The “A disk read error occurred error” appears on a black screen without an identifiable error code.
Pressing the Ctrl, Alt and Del keys will only restart the computer and boot into the same error screen:

A disk read error occurred
Press Ctrl+Alt+Del to restart
In most cases the error can appear for any of the following reasons:
- Incorrect or invalid MBR configuration
- Improperly configured partition table
- Faulty hard drive
- IDE cables failing
- Bad RAM memory
- Issues with your computer’s BIOS version
The most common cases of this error are attributable to an incorrectly-flashed MBR to the system startup disk or the absence of an active partition on the startup disk. In these situations, the recommendations below should resolve the problem readily. If the problem is with hardware, additional diagnosis and the possible replacement of system components may be needed.
Causes of this Error
This error has been known to occur as a result of one of the following causes:
Cause 1: Incorrect or invalid MBR configuration
The most common cause for this error is an incorrect MBR configuration. This is usually caused by disk write errors, virus attacks or power outages.
Cause 2: Misconfigured partition table
For the same reasons, the partition table may become misconfigured. If that’s the case, it is possible to rebuild the partition table from scratch to make sure system loads correctly.
Fixing “A disk read error occurred” on Windows
Windows Setup CD/DVD Required!
Some of the solutions below require the use of the Microsoft Windows setup CD or DVD. If your PC did not come with a Windows installation disc or if you no longer have your Windows setup media, you can use Easy Recovery Essentials for Windows instead. EasyRE will automatically find and fix many problems, and can also be used to solve this problem with the directions below.
Fix #1: Use Easy Recovery Essentials
Easy Recovery Essentials can fix many errors such as this automatically using its built-in Automated Repair option. EasyRE is currently available for Windows XP, Vista, 7, 8, Windows 10, and Windows 11 and can be downloaded and created on any PC.
- Download Easy Recovery Essentials. Make sure to note your Windows version (XP, Vista, 7, 8, 10, or Windows 11) before you download EasyRE. This guide can help you identify what version of Windows you have installed.
- Burn the image. Follow these instructions on how to burn the bootable ISO image very carefully, as making a bootable CD can be tricky! Alternatively, these instructions explain how to create a bootable EasyRE recovery USB stick/drive.
- Boot up your PC from the Easy Recovery Essentials CD or USB you created.
- Once EasyRE is running, choose the “Automated Repair” option and click Continue.

Choose “Automated Repair” in Easy Recovery Essentials
- After EasyRE scans your computer’s drives, identify and select the drive letter for your Windows installation from the list, and then click on the Automated Repair button to begin.
Choose the drive associated with the Windows installation you’re trying to repair.
- Easy Recovery Essentials will start analyzing the selected drive for problems. EasyRE will test for and attempt to automatically correct errors with the disk, partition, bootsector, filesystem, bootloader, and registry. No intervention is required, as EasyRE’s repair is fully automated:
Easy Recovery Essentials searches for errors and makes corrections to the selected Windows installation.
- Once the process is complete, EasyRE will report its findings. Click on the Restart button to reboot your PC and test the changes.
- The “A disk read error occurred” error should now be fixed as your PC begins to load:


You can download Easy Recovery Essentials from here.
Fix #2: Check RAM memory
If you recently added new RAM memory to your computer, you can try to:
- Remove the new RAM modules you’ve recently added
- Leave only 1 single RAM module
- Restart the computer
You can also try to move the single RAM module on a different slot to troubleshoot if any of your RAM slots are damaged. To do that, simply follow these steps:
- Leave 1 RAM module on Slot #1
- Restart the computer
If “A disk read error occurred” still appears, move the RAM module on Slot #2 and start the computer again.
Fix #3: Check Hard Disk Cables
If the error is caused by damaged hard disk cables, try any of the following tips to fix the error:
- Try a different port for the SATA/IDE cables
- If you have more than 1 HDD, leave only the HDD with Windows installed and test multiple SATA/IDE ports and cables
The “A disk read error occurred” error can appear if:
- The SATA/IDE cables are damaged
- The SATA/IDE ports of your hard disks are damaged
If the HDD cables and ports are not damaged, the issue can also be from the hard disk itself.
To test if your hard disk is failing or it’s already failed, use Easy Recovery Essentials’ Automated Repair. Automated Repair process will report any issues found with your hard disk or RAM memory:
- Download Easy Recovery Essentials
- Burn the ISO Image. Follow our instructions on how to burn a bootable ISO image. If you’d like to have a recovery USB instead, follow our instructions on how to make a recovery USB.
- Boot into Easy Recovery Essentials
- Select Automated Repair
- Click Continue and wait for the Automated Repair process to finish. Automated Repair process will report any issues found with your hard disk or RAM memory:


To download Easy Recovery Essentials, click here.
Fix #4: Reset or Upgrade BIOS
In some cases, “A disk read error occurred” can be fixed by either reverting your BIOS to its default settings or upgrading BIOS to the latest version available for your computer.
To revert your computer’s BIOS to its default settings or default configuration, follow these steps:
- Restart the computer
- Press the key to boot into BIOS. This is usually any of the following keys: F2, F8, F12, Esc or Del. The key you need to press will be listed at the first screen when you boot your computer:

- Once booted into BIOS, find a “Load Defaults” options. The option name to revert to default settings can be different, depending on your computer manufacturer and BIOS version:
- Load Fail-Safe Defaults
- Load BIOS Defaults
- Load Default Settings
- Load Setup Default
- Get Default Values
- Select to revert the settings and hit Enter to select the option
- Exit BIOS by saving the changes
If reverting to BIOS defaults doesn’t make “A disk read error occurred” disappear, you can also try to update the BIOS version to the latest available.
Fix #5: Run chkdsk
The chkdsk utility checks for hard drives integrity and can attempt to fix various file system errors.
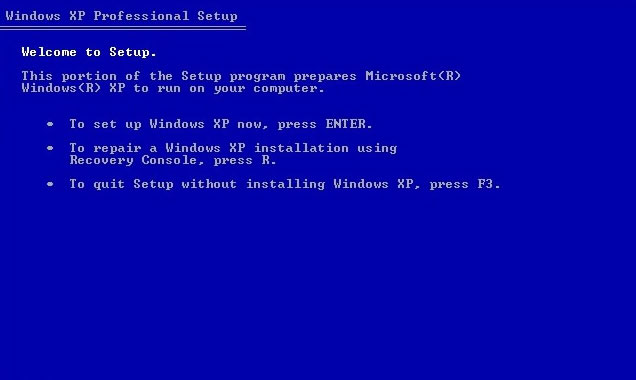
To run chkdsk on a Windows XP system, follow these steps:
- Insert the Windows XP CD and boot from it
- At the Windows Options screen, press R to open Recovery Console

- At Command Prompt, type the
chkdskcommand:chkdsk C: /r
Make sure you replace
C:with the drive where Windows XP is installed - Press Enter
- Restart the computer
To run chkdsk on a Windows Vista or Windows 7 system, follow these steps:
- Insert the Windows Vista or Windows 7 DVD and boot from it
- At the Install Windows screen, select Repair your computer to access System Recovery Options
- Once at System Recovery Options, select Command Prompt
- Type the same chkdsk command as that of Windows XP:
chkdsk C: /r
where
C:is the letter of the drive where Windows Vista or Windows 7 is installed on - Hit Enter


On Windows 8 or 8.1, chkdsk can accessed through the same steps:
- Insert the installation media (DVD or USB drive) and boot from it
- Select a language, keyboard method and time
- Click Next
- At the Install now screen, select Repair your computer or press R
- Navigate to Troubleshoot > Advanced Options
- Click Command Prompt
- Type the chsksk command and press Enter:
chkdsk C: /f /x /r
Replace
C:with the drive where Windows 8 is installed


chkdsk utility results screen
Fix #6: Run bootrec
If chkdsk doesn’t fix the “A disk read error occurred” error, you can also try to run the bootrec utility in order to fix damaged or corrupt BCD files.
If you have a Windows XP system, run the bootcfg utility. Bootrec is only available for Windows Vista, 7, 8.
- Insert the Windows XP CD in the disc tray and boot from it
- Press R to access Recovery Console
- At Command Prompt, type the
bootcfgcommand:bootcfg /rebuild
- Press Enter
- When bootcfg finishes the procedure, type
exitand hit Enter to exit Command Prompt - Restart the computer
If you have a Windows Vista or Windows 7 computer, run the bootrec command by following these steps:
- Insert the original install media and boot from it
- Click Repair your computer
- Once at System Recovery Options, select Command Prompt
- Type the bootrec commands and press Enter:
bootrec /rebuildbcd
- Type:
bootrec /fixmbr
- Press Enter
- Type:
bootrec /fixboot
- Press Enter
- Restart the computer

If “A disk read error occurred” appears on a Windows 8, run the same bootrec utility:
- Boot from the installation media
- Click Repair your computer or press R
- Click Troubleshoot
- Click Advanced options
- Click Command Prompt
- Type the commands and press Enter after each:
bootrec /rebuildbcd
bootrec /fixmbr
bootrec /fixboot
- Type
exitand press Enter to quit Command Prompt - Restart the computer

bootrec utility results screen
More Information
Linked Entries
- bootrec
- bootcfg
- chkdsk
Support Links
- Easy Recovery Essentials for Windows – our repair and recovery disk.
It’s an easy-to-use and automated diagnostics disk. It’s available for Windows 8, Windows 7 and Windows Vista. It’s also available for Windows XP and Windows Server.
Read more at Windows Recovery Disks.
- The NeoSmart Support Forums, member-to-member technical support and troubleshooting.
- Get a discounted price on replacement setup and installation discs: Windows XP, Windows Vista, Windows 7, Windows 8.
Applicable Systems
This Windows-related knowledgebase article applies to the following operating systems:
- Windows XP (all editions)
- Windows Vista (all editions)
- Windows 7 (all editions)
- Windows 8 (all editions)
- Windows 8.1 (all editions)
Propose an edit
Появление ошибки

Вот такую ошибку может выдать компьютер, при этом перестав загружаться. Проблема проявит себя с того момента, когда система сделает предложение по перезагрузке компьютера: захочет установить обновление или просто во время включения.
Возможные причины ее появления:
— проблемы с жестким диском;
— повреждение основной загрузочной записи, которая содержит все нужные сведения, на основании чего загружается операционная система.
Решение проблемы
Прежде всего, надо зайти в BIOS, проверить виден ли жесткий диск. Если да, то дальнейшим вашим шагом должна быть проверка его SATA-подключения. В большинстве случаев, такого рода проблема показывает наличие проблем в аппаратной части.
Рассмотрим несколько шагов, которые могут помочь в решении проблемы:
- Прежде всего, выключите компьютер.
- Открутите крышку «системника», вытащите оперативную память (модуль из слота) и переставьте его в любой свободный слот.
- После этих манипуляций попробуйте вновь загрузить компьютер.
Если проблема осталась (надпись никуда не исчезла), можно попробовать следующий шаг:
- Выключите машину.
- Вытащите кабель и переместите его из одного разъема в любой другой свободный SATA-разъем, находящийся на материнской плате.
- Попробуйте вновь включить компьютер. Ошибка должна исчезнуть.
Если ошибка не ушла, скорее всего проблема в контроллере жесткого диска и его следует заменить.
Подводим итоги
В результате, чтобы устранить рассматриваемую проблему, вам надо будет проделать следующие действия (это касается только стационарных компьютеров):
- планка оперативной памяти переставляется из одного слота в другой. Или же просто вытаскивается и ставится обратно;
- у жесткого диска проверяется работоспособность его SATA-кабеля. Оптимально если есть еще один: в таком случае он просто заменяется;
- переподключить SATA-кабель к другому разъему на материнской плате.
Если же ничего не помогло, воспользуйтесь следующими способами устранения проблемы:
- проверьте раздел System Reserved (скрытый) на наличие того, активный он или пассивный);
- восстановите загрузчик MBR;
- восстановите целостность системы файлов (с помощью утилиты Сhkdsk).
Надеюсь, что компьютер удастся загрузить в обычном режиме и вам не придется переустанавливать систему, что будет самым крайним случаем.
0
0
голоса
Рейтинг статьи