The problem we are going to discuss here can occur when upgrading by any method whether through Update assistant, automatic mode, or Media creation tool. Moreover, sometimes this will trouble when you try to install or update applications from Microsoft Store by causing the process to fail and showing a message. However, we have covered this issue earlier in – How to Fix 0x80248014 Windows 10 Update error WU_E_DS_UNKNOWNSERVICE but it needs more attention.
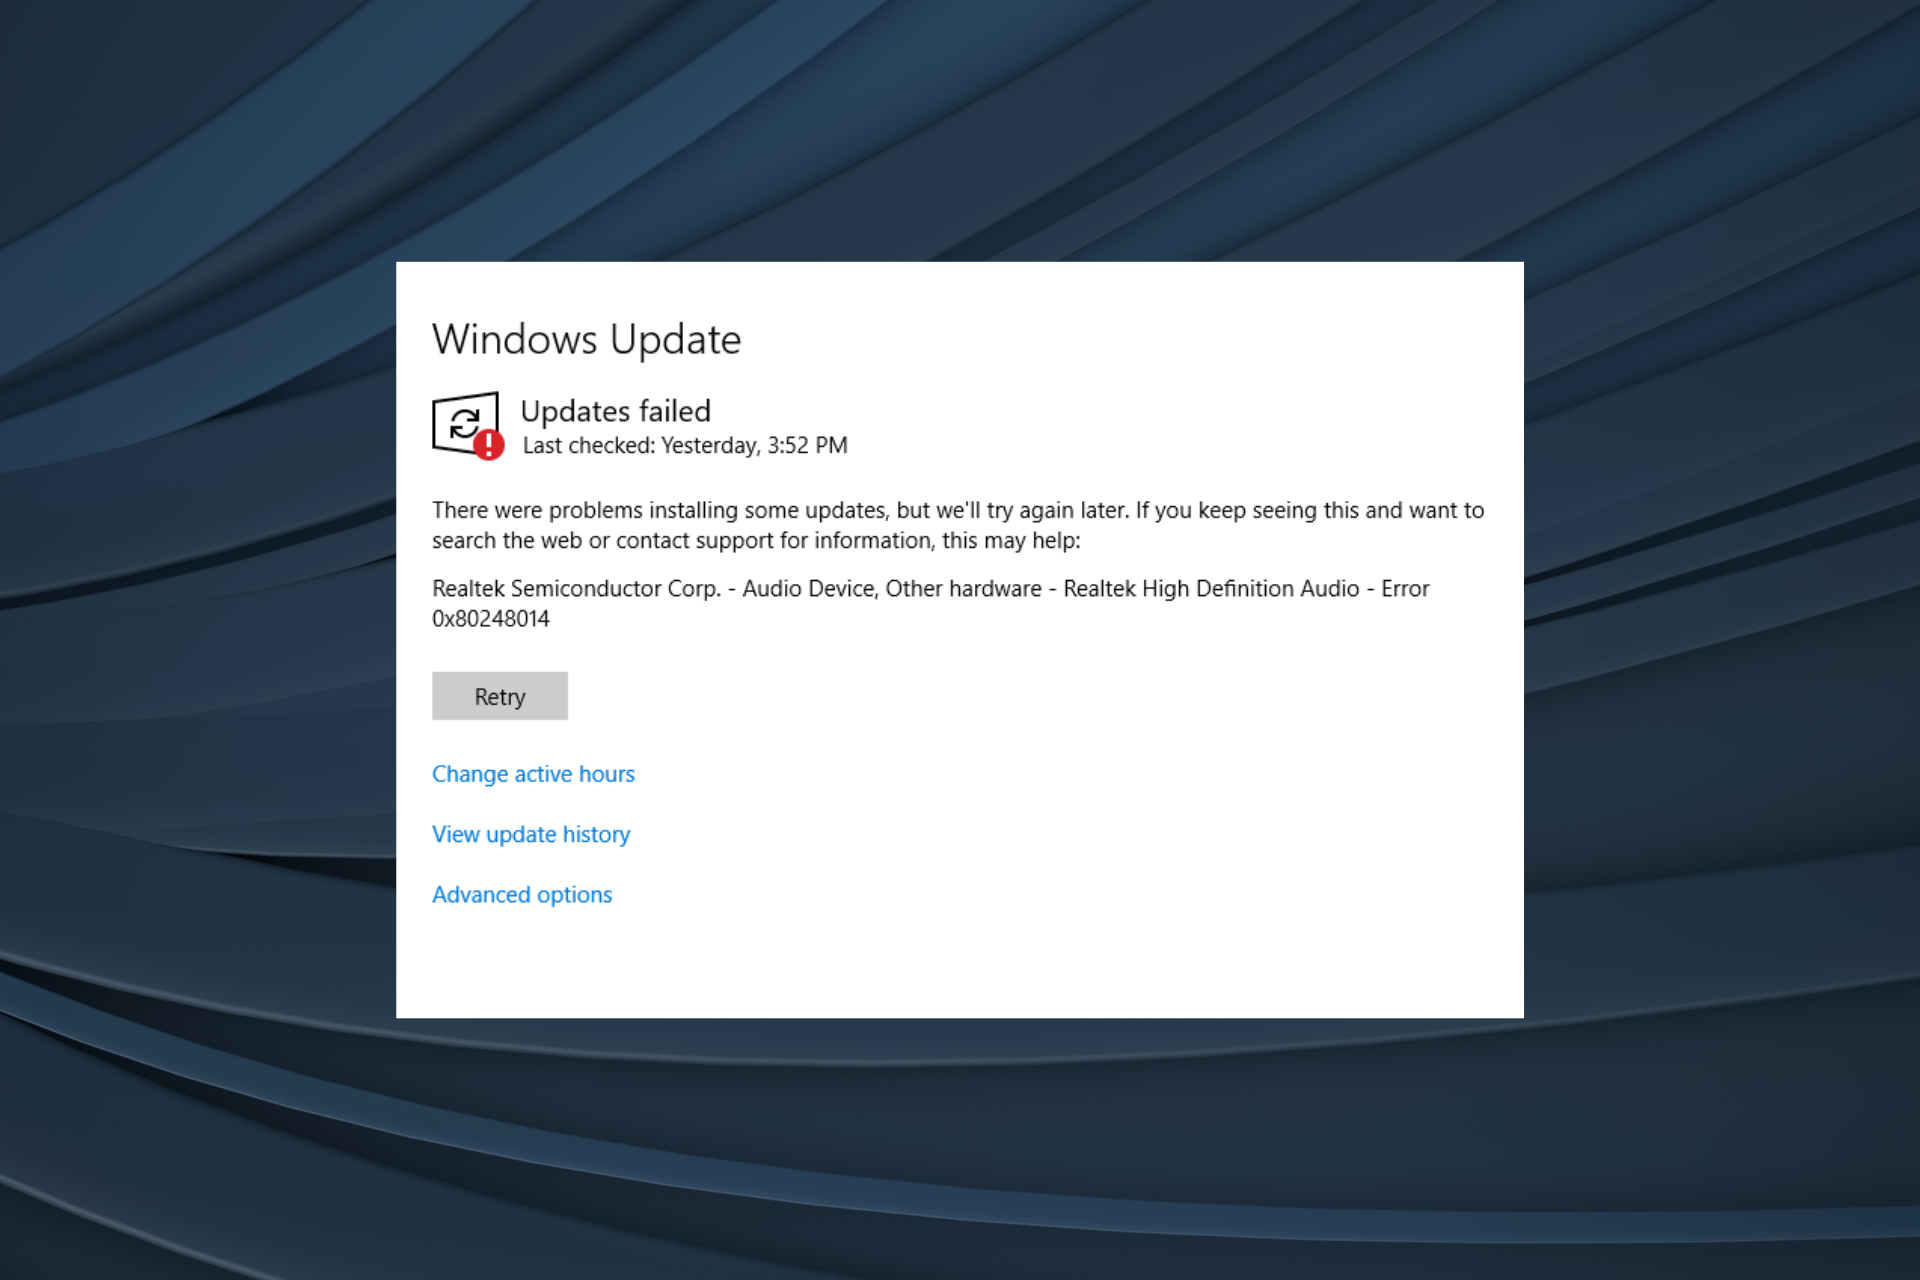
Error 0x80248014 generally shows up because of malfunctions in components or missing the associated files. The message that will come across during this occurrence in Windows 11 or 10 is “Error 0x8024801, There were some problems installing updates, but we”ll try again later.” Windows Update failures occur due to a variety of factors, including insufficient disk space, problems with internet connectivity, damaged Windows Update Components, etc.
Here is how to fix error 0x80248014 in Windows 11 or 10 –
Way-1: Launch the Windows Update Troubleshooter
Windows Update Troubleshooter is a built-in program that detects problems and restores the related settings to default. Running this tool will likely solve 0x80248014 error automatically.
- Click on Start.
- Type – Control Panel.
- Press – “Enter”.
- Change the “View By” setting to “Large icons“. See – How to Make Windows 10 Control Panel Icon Size Bigger.
- Click – Troubleshooting.
- Choose the option Fix problems with Windows Update from the right pane.
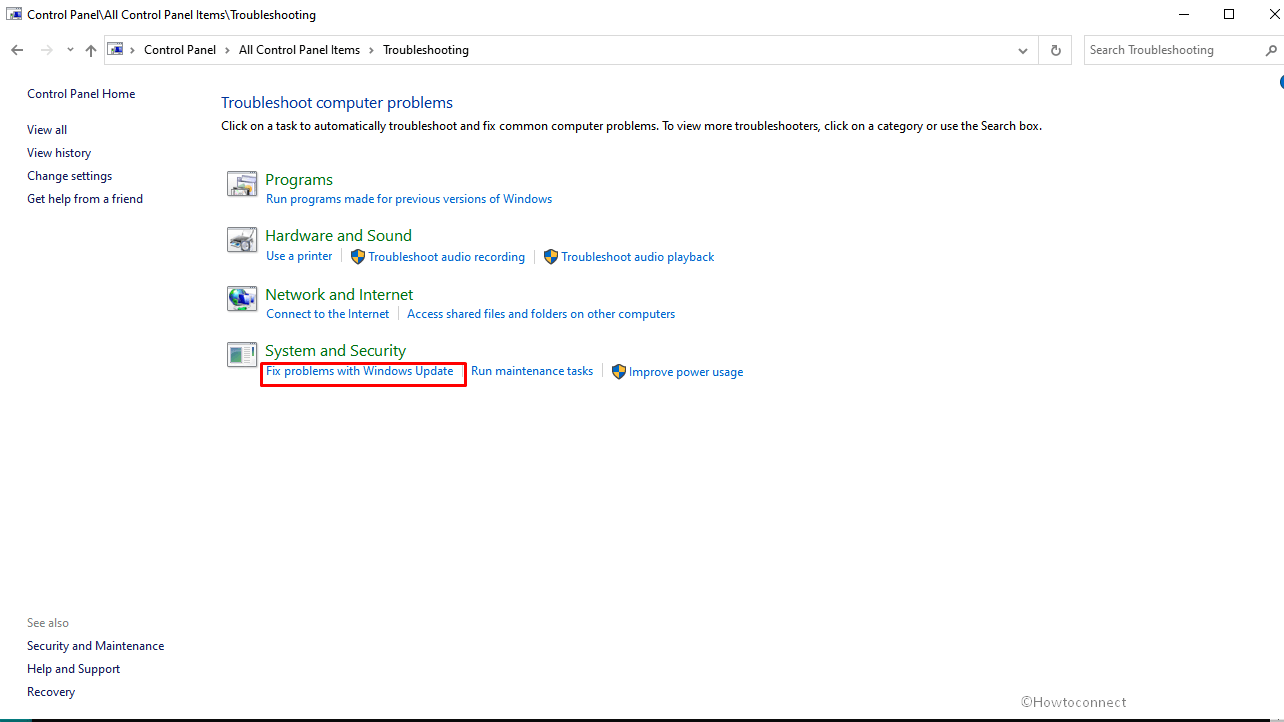
- Troubleshooter window will appear; select – Next.
- Close the ‘Troubleshooter’ then restart your system.
Way-2: Reset the Windows Update Component
Windows Update Component is a crucial element of the process that includes the associated services and SoftwareDistribution having deciding folders. A faulty component may be a culprit for any errors you see while updating Windows. Luckily, you can reset the Windows Update Component using manual method or PowerShell script without any risks and hazards. This post elaborates the same – How to Reset Windows Update to Default in Windows 10. Let’s see an easier way aka using PowerShell script –
- Press Window and R.
- Type – cmd.
- Hit – Ctrl + Shift + Enter.
- Select Yes on the confirmation prompt.
- On the command prompt copy-paste below lines one by one, and press Enter each time –
net stop wuauserv
net stop cryptSvc
net stop bits
net stop msiserver
ren C:\Windows\SoftwareDistribution SoftwareDistribution.old
net start wuauserv
net start cryptSvc
net start bits
net start msiserver
ren C:\Windows\System32\catroot2 Catroot2.old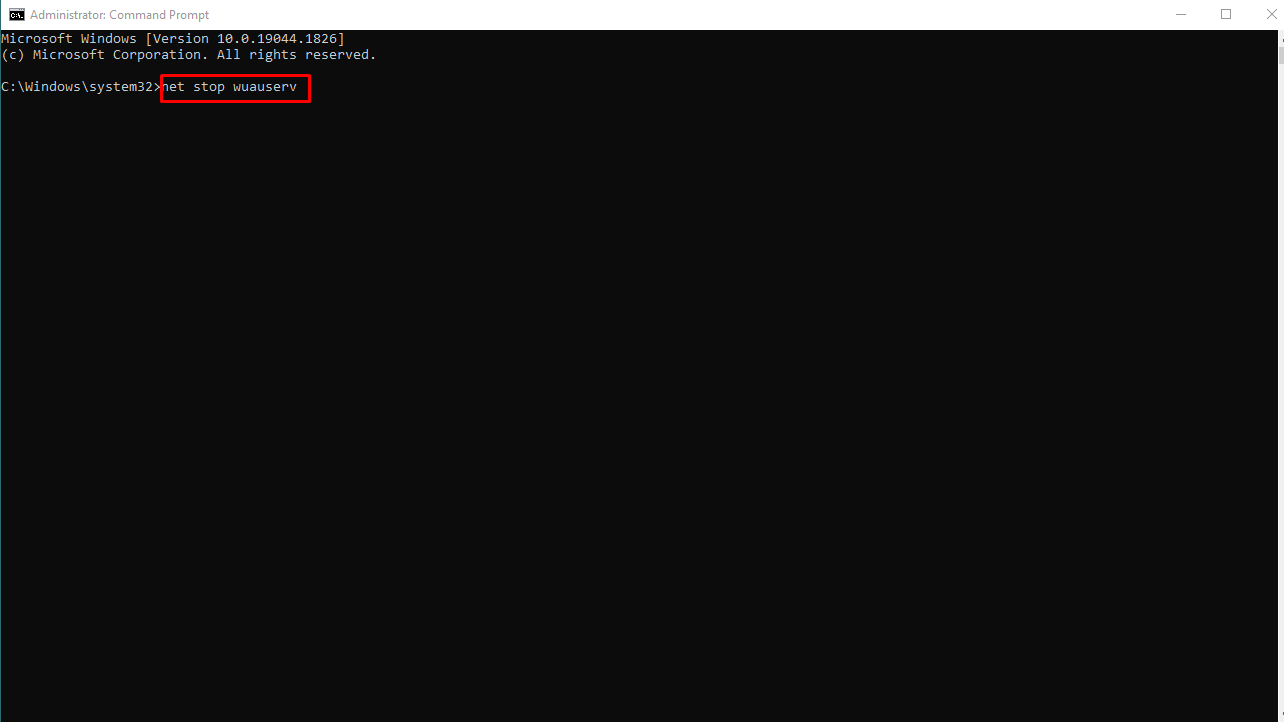
- Restart the system and check if the error 0x80248014 is solved.
Way-3: Reset Windows Store Cache
Store error 0x80248014 is also prevalent in addition to the same code with Windows update so it also needs remediation. Because Reset store cache is all-in-one solution to problems with the application this single method has the ability to fix this message appearing when installing or updating apps. Follow the steps –
- Click on Search from the Taskbar.
- Type – WSReset.exe.
- Select the same command from result.
- Allow the syntax to complete its task through Command prompt and Windows Store open.
See – 5 Ways to Reset Microsoft Store in Windows 10.
Way-4: Verify the status of Windows Update Services
Access the Services tool and verify that the services associated with Windows Update, for example, “Windows Update Medic”, “Windows Update”, “Update Orchestrator Service”, etc., are not disabled:
- Right click on Taskbar.
- Select Run.
- Type – services.msc.
- Hit Enter to launch the Services tool.
- Set the services Startup types as given below –
1] Manual – Windows Update Service or wuauserv (Triggered).
2] Services for Windows Update Medic or WaaSMedicSvc – Manual.
3] Automatic Cryptographic Service or CryptSvc.
4] Manual – Background Intelligent Transfer Service or BITS.
5] Automatic – DCOM Server Process Launcher or DcomLaunch.
6] Automatic – RPC Endpoint Mapper or RpcEptMapper.
7] Manual – Windows Installer or msiserver.
Way-5: Manually Install the Windows Update
This is one of the best methods to fix Error 0x80248014 in Windows 11 or 10. Using KB number, conduct a search for the patch on Update Catalog website and grab the standalone copy of installer. Now manually apply the patch by following the instructions –
- Start with knowing the patch number of the updates from Settings > “Update & Security > View update history”.
- Now navigate to Microsoft update catalog.
- Type the KB number in the search box.
- Hit Enter to have the results in front.
- Locate the file having architecture identical to the architecture of your CPU.
- Click on Download.
- Go to the location where the standalone file is kept and double-click on it.
- Click on Yes if prompted.
Way-6: Run a Virus Check
Use a Full scan to look for and eliminate any viruses or dangerous programs that could be running on your system. Several malicious codes can not only interfere with Windows update installing process but also steal your data. Move with the steps under and remove them –
- Click on Start.
- Type “Security”.
- Hit Enter to launch Windows Security app.
- Choose the option ‘Virus & threat protection.
- Select the link Scan options.
- Check the – ‘Full scan’.
- Finally, click on – Scan now.
- In case, you have already third-party anti-malware run a thorough scan using that.
- When finished reboot the device and check if the error is resolved.
Way-7: Rebuild or Recreate the Software Distribution Folder
Windows 11 or 10 stores its Updates in the SoftwareDistribution folder (aka “C:\Windows\SoftwareDistribution\Download“). In order to download and install updates from scratch, this folder may occasionally become corrupted, and you will need to recreate it. Follow these steps to recreate or rebuild the “SoftwareDistribution”:
- Press – Win+R.
- Type – services.msc.
- Click – OK
- Right click on – Windows Update service.
- Select – Stop from the Context menu.
- Then, open Windows Explorer (Win+E) and go to: C:/Windows/.
- Locate the SoftwareDistribution folder and remove it.
- Restart your computer.
- Go to “Windows Update Settings” and click on Check for updates.
Way-8: Clear the Catroots2 folders’ Contents
You might want to try emptying the catroot and catroot2 contents to see if it helps. These folders contain files and ‘folders’ having signature of Windows Update package.
- Go to “C:\Windows\System32\catroot2” and ‘delete’ all items there.
- Similarly access “C:\Windows\System32\catroot2”. Select all the files and folders in the directory and press Delete.
- Restart your computer and recheck for updates.
Way-9: Restart Windows PC
To ensure maximum performance, you should reboot the Windows 10/11 device once a week at least. Some users inform that only restarting the system has solved error 0x80248014 in Windows 11 or 10 for them so you can give an attempt to it
Way-10: Remove Unnecessary Temp Files
A built-in function in Windows 10 and Windows 11 following their predecessors allows users to delete temporary files. To remove any superfluous transient files go with the instructions below.
- Click on – Search.
- Type – cleanmgr.
- Press – Enter.
- On Disk cleanup small pop-up, click on OK.
- Select Clean up system files on the next window.
- Again choose OK
- Check all the boxes under “Files to delete” section.
- Click on OK and then on Delete Files.
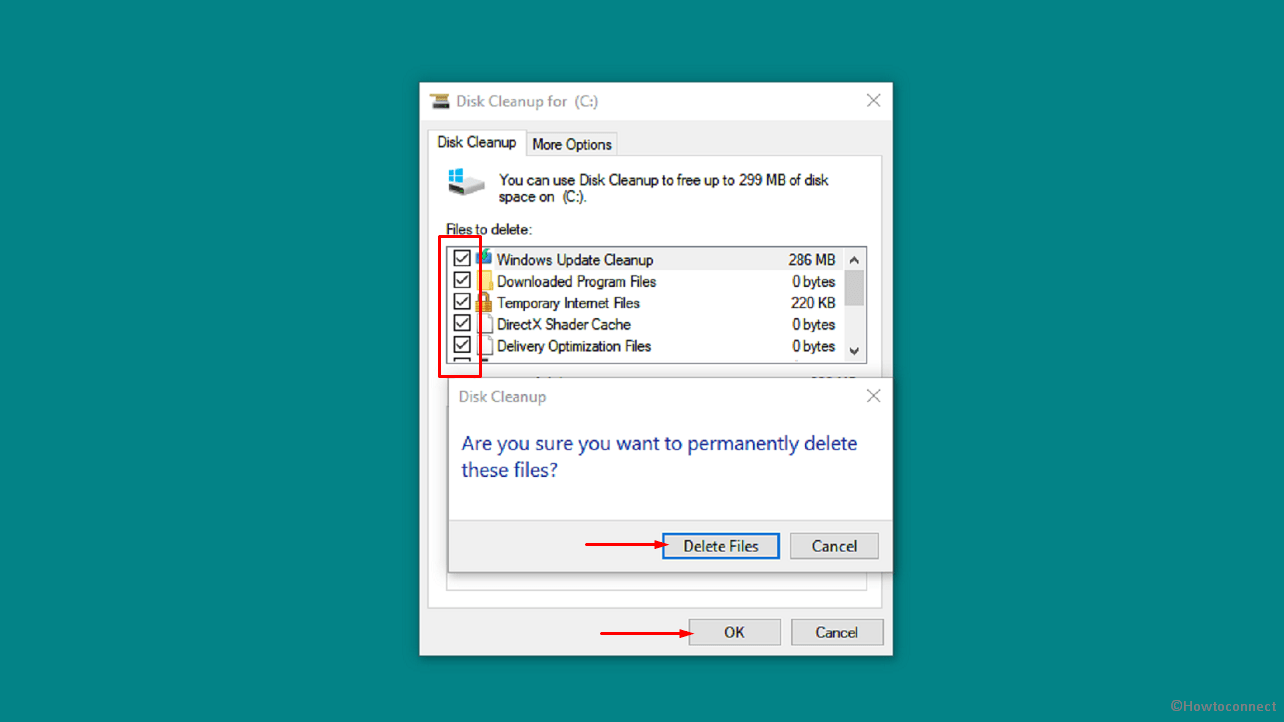
- Restart the PC and check if Error 0x80248014 no longer occurs.
Methods:
Way-1: Launch the Windows Update Troubleshooter
Way-2: Reset the Windows Update Component
Way-3: Reset Windows Store Cache
Way-4: Verify the status of Windows Update Services
Way-5: Manually Install the Windows Update
Way-6: Run a Virus Check
Way-7: Rebuild or Recreate the Software Distribution Folder
Way-8: Clear the Catroots2 folders’ Contents
Way-9: Restart Windows PC
Way-10: Remove Unnecessary Temp Files
That’s all!!
Repair any Windows problems such as Blue/Black Screen, DLL, Exe, application, Regisrty error and quickly recover system from issues using Reimage.
Find out what worked for other users
by Ivan Jenic
Passionate about all elements related to Windows and combined with his innate curiosity, Ivan has delved deep into understanding this operating system, with a specialization in drivers and… read more
Updated on
- Windows Updates automatically installs fresh updates as they become available. However, Windows 10 lets you decide when and how to get the latest updates.
- Users often describe getting the 0x80248014 error when they’re unable to check for updates.
- Fixing this problem is simple, and in most cases, resetting Network components will do the trick.
- However, this issue is also related to Microsoft Store purchases.
Users have reported that the download error 0x80248014 errors appear in two cases – when they’re unable to check for updates and when they cannot complete a purchase in Microsoft Store.
We have solutions for both problems, so just follow the instructions from this article.
How can I fix the download error 0x80248014?
- How can I fix the download error 0x80248014?
- 1. Reset Network components
- 2. Delete the Software Distribution folder
- 3. Run the Troubleshooter
- 4. Run the SFC scan
- 5. Run the DISM
- 6. Flush DNS
- How can I fix error code 0x80248014 in Microsoft Store?
- 1. Run the Troubleshooter
- 2. Disable UAC
1. Reset Network components
There’s a simple solution for error code 0x80248014 which prevents you from checking for updates.
Just follow these steps to solve error code 0x80248014, so you can check for updates normally again:
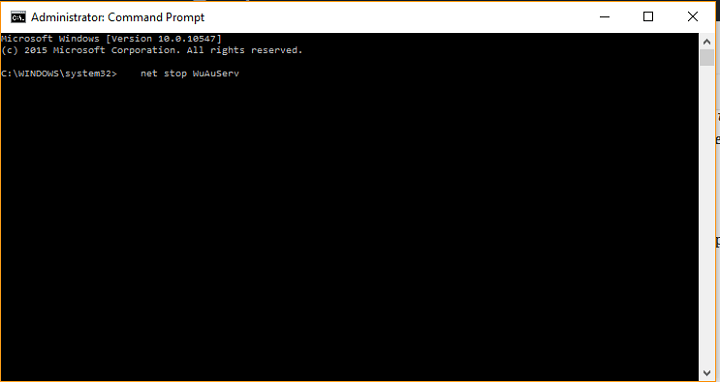
- Right-click on the Start Menu button, and choose Command Prompt (Admin).
- Enter the following command and press Enter: net stop WuAuServ

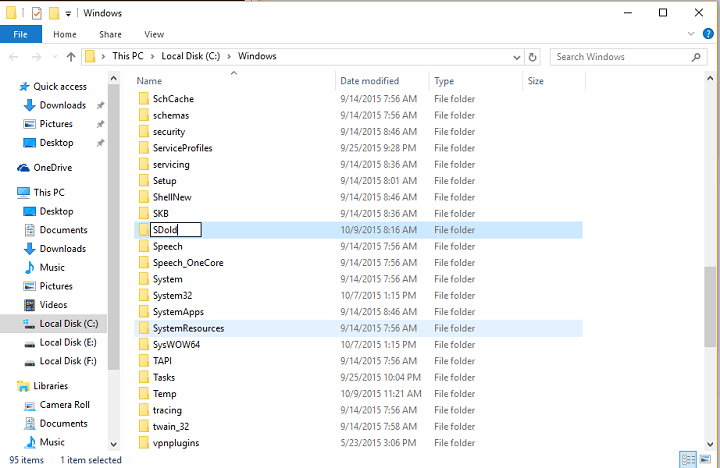
- Now, past the following into Search and press Enter: %windir%
- In Windows folder, find SoftwareDistribution folder, and rename it to SDold.

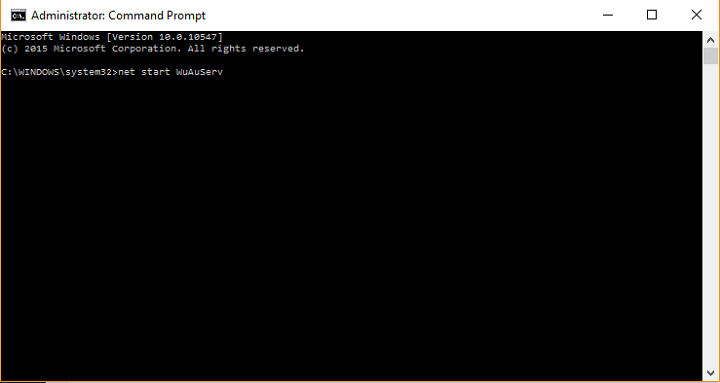
- Open Command Prompt (Admin) again, and enter the following command: net start WuAuServ

- Try to check for updates again
This error probably occurred because of the corrupted update file, which we removed by renaming the SoftwareDistribution folder.
Most users have reported that removing the Software Distribution folder helped them to solve error code 0x80248014, and I hope it will help you, as well.
2. Delete the Software Distribution folder
Software Distribution folder is the most important Windows folder for updates. Namely, all updates files and data are stored in this folder.
How we test, review and rate?
We have worked for the past 6 months on building a new review system on how we produce content. Using it, we have subsequently redone most of our articles to provide actual hands-on expertise on the guides we made.
For more details you can read how we test, review, and rate at WindowsReport.
So, if there’s some corruption inside it, you’ll likely have problems installing updates. So, we’re going to reset this folder, in order to resolve the problem.
But before we reset the Software Distribution folder, we need to stop the Windows Update service:
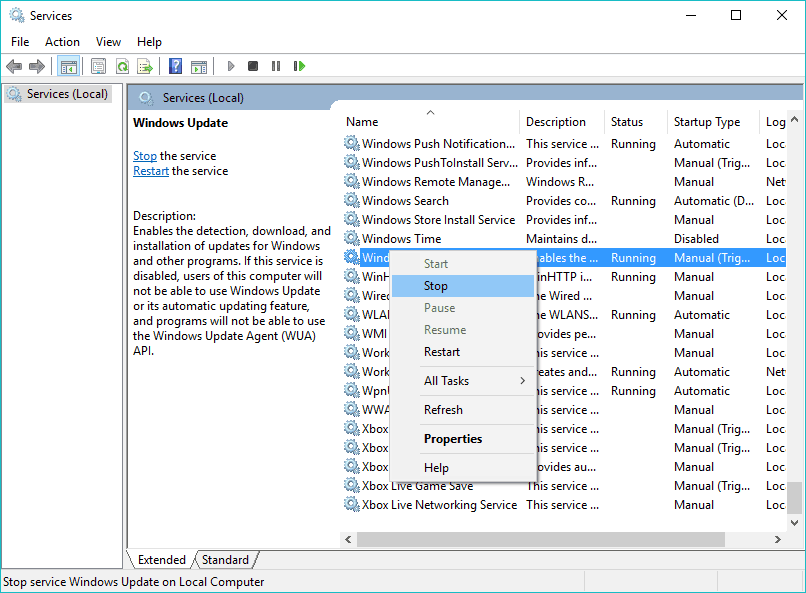
- Go to Search, type services.msc, and go to Services.
- In the Services list, search for Windows Update.
- Right-click and go to Properties, then choose Disable.

- Restart your computer.
Now that the Windows Update service is disabled, let’s go and delete (rename) the SoftwareDistribution folder:
- Navigate to C:Windows and find the SoftwareDistribution folder.
- Rename folder to SoftwareDistribution.OLD (you can delete it, but it’s safer if we just leave it there).
- Restart your computer.
Once you do that, go and re-enable the Windows Update service:
- Once again navigate to Services and find Windows Update and, in Properties, change from Disabled to Manual.
- Restart your computer once again.
- Check for updates.
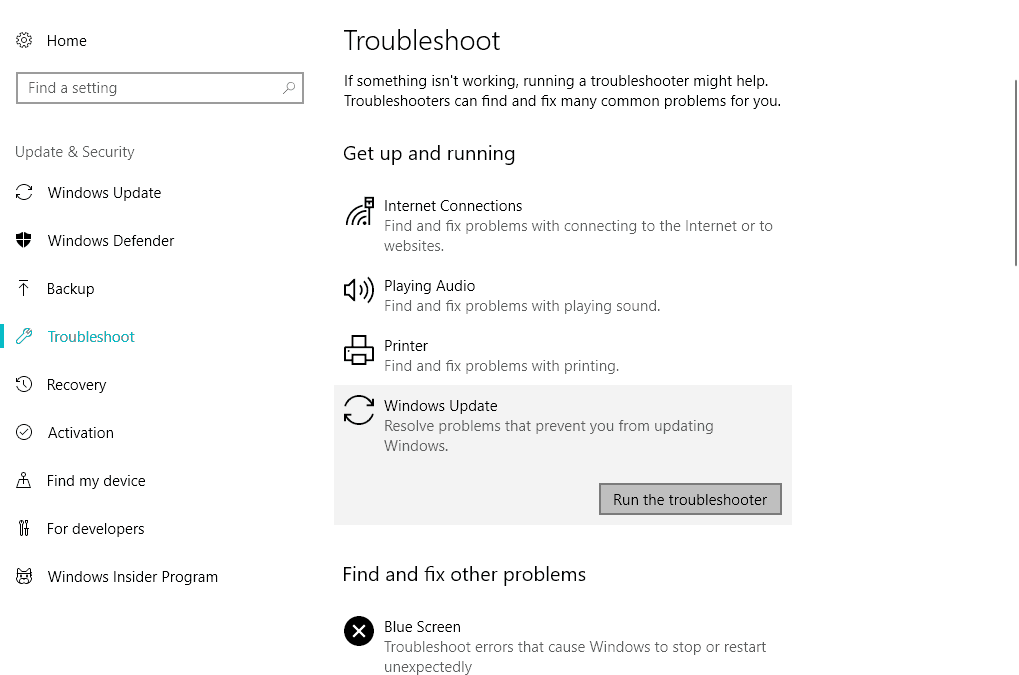
3. Run the Troubleshooter
If you’re still experiencing this update error, you can also try the new Troubleshooter in Windows 10.
This troubleshooter deals with a wide range of system issues, including update errors. But it’s only available in Windows 10 Creators Update or later.
Here’s how to use the Windows 10 Troubleshooter:
- Go to Settings.
- Head over to Updates & Security > Troubleshoot.

- Now, click Windows Update, and choose Run the troubleshooter.
- Follow further on-screen instructions.
Alternatively, you can use a third-party troubleshooting tool. Choose one from our great list.
- Windows 11 23H2: How to Download the Official ISO
- A 64-bit Windows 12 ISO is out, theoretically. Here’s all you need to know
- Dev Build 23550 comes with a huge undocumented improvement
- How to enable automatic optional updates in Windows 11
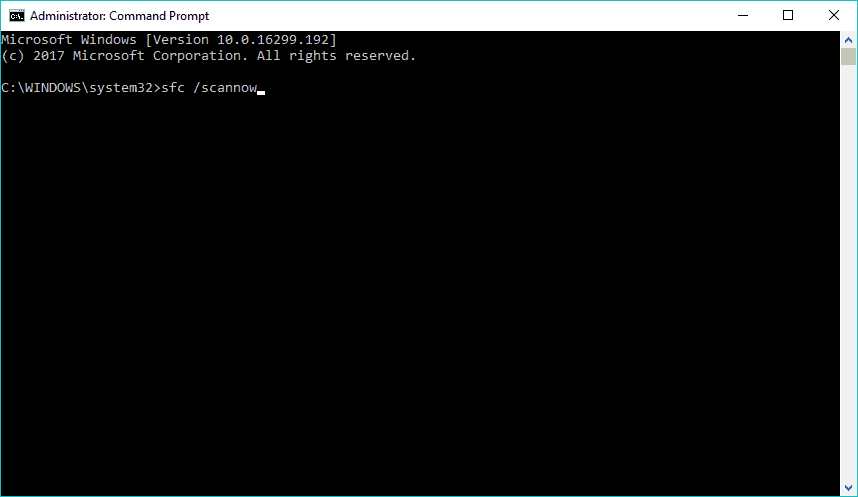
4. Run the SFC scan
Another troubleshooter you can try is the SFC scan. This is a universal tool that also deals with various system errors. Here’s how to run the SFC scan in Windows 10:
- Go to Search, type cmd in the Search box, and then right-click on Command Prompt.
- Click on Run as administrator. (If you are prompted for an administrator password or for a confirmation, type the password, or click Allow).
- At the Command Prompt, type the following command, and then press ENTER: sfc /scannow

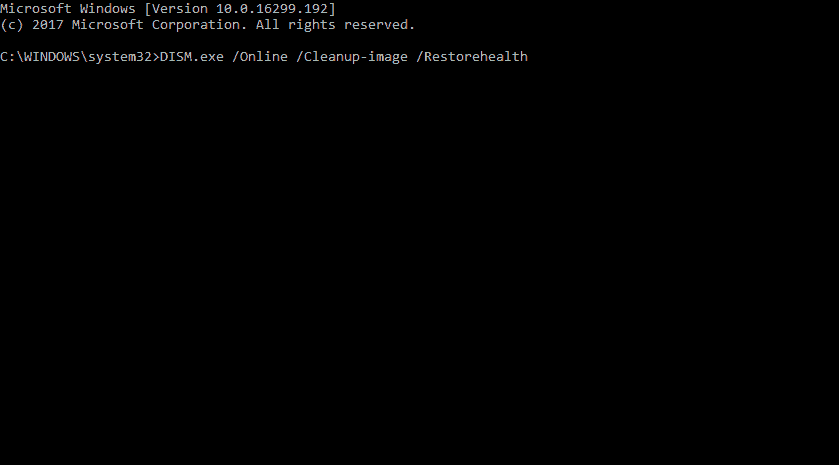
5. Run the DISM
And finally, the last troubleshooter I’m going to mention in this article is also the most powerful one – Deployment Image Servicing and Management (DISM).
So, if the previous two troubleshooters failed to resolve the problem, you can as well try with this one.
Here’s how to run DISM in Windows 10:
- Open the Command Prompt as shown above.
- Enter the following command and press Enter: DISM.exe /Online /Cleanup-image /Restorehealth

- Wait for the process to finish.
- Restart your computer.
- In case the DISM can’t obtain files online, try using your installation USB or DVD. Insert media and type following command: DISM.exe /Online /Cleanup-Image /RestoreHealth /Source:C:RepairSourceWindows /LimitAccess
- Make sure to replace the C:RepairSourceWindows path of your DVD or USB.
- Follow further on-screen instructions.
Learn everything there is to know about DISM from our comprehensive guide!
6. Flush DNS
And finally, if none of the previous solutions worked the last thing we’re going to try is flushing the DNS. Here’s how to do that:
- Start Command Prompt as administrator. To do that press Windows Key + X and choose Command Prompt (Admin) from the menu.
- When Command Prompt opens, enter the following lines before closing Command Prompt and restarting your PC:
- ipconfig /release
- ipconfig /flushdns
- and ipconfig /renew
How can I fix error code 0x80248014 in Microsoft Store?
1. Run the Troubleshooter
We’re going to run the Troubleshooter once again, but this time, we’ll be checking the hardware:
- Go to Settings.
- Head over to Updates & Security > Troubleshoot.
- Now, click Hardware & devices, and choose Run the troubleshooter.
- Follow further on-screen instructions.
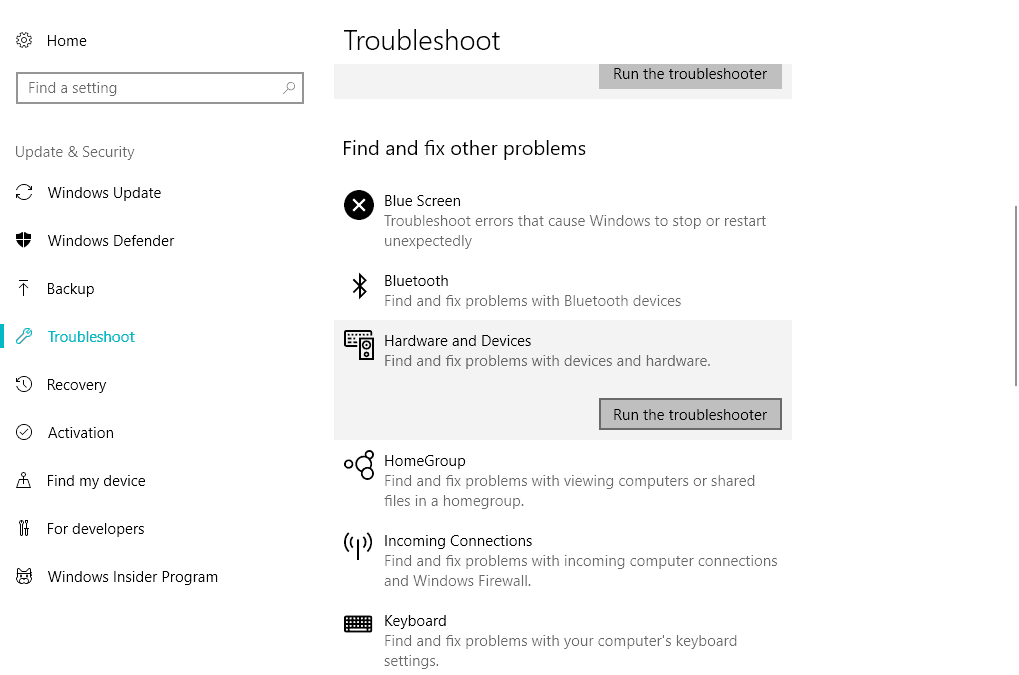
An error occurred while loading the troubleshooter? Don’t panic! Check out our guide to solve the problem!
2. Disable UAC
And finally, let’s try with disabling the User Account Control, as well:
- Go to Search and type user account. Choose User Account Control from the menu.
- User Account Control Settings window will appear. Move the slider all the way down to Never notify and click OK to save changes.
We hope you managed to fix the Windows Update error 0x80248014, as well as the error with the same name that appears on Microsoft Store.
Let us know how it went in the comments section below.
![]()
Introduction:
Error code 0x80248014 is a common Windows update error that users may encounter on their Windows 11 PCs. These errors typically occur when there is a problem connecting to the Windows Update servers or when the update process is interrupted. Fortunately, there are several troubleshooting steps you can take to resolve these errors and get your PC updated. In this step-by-step solution, I will guide you through the process of fixing these errors.
Step-by-Step Solution:
Step 1: Check your internet connection
Ensure that your Windows 11 PC is properly connected to the internet. Verify that you have a stable and active internet connection by browsing websites or running a network diagnostic test. If you’re using a Wi-Fi connection, try connecting via Ethernet cable to rule out any wireless connectivity issues.
Step 2: Temporarily disable the firewall and antivirus software
Firewall or antivirus software may sometimes interfere with the Windows Update process. Temporarily disable any third-party firewall or antivirus software you have installed on your PC. You can usually do this by right-clicking on the software’s icon in the system tray and selecting the appropriate option.
Step 3: Restart Windows Update services
- Press the Windows key + R on your keyboard to open the Run dialog box.
- Type «services.msc» (without quotes) and press Enter to open the Services window.
- Scroll down and locate the following services:
- Background Intelligent Transfer Service (BITS)
- Cryptographic Services
- Windows Update
- Right-click on each service, select «Restart» from the context menu, and wait for the process to complete.
- After restarting all three services, close the Services window.
Step 4: Clear Windows Update cache
- Press the Windows key + R to open the Run dialog box.
- Type «cmd» (without quotes) and press Ctrl + Shift + Enter to open an elevated Command Prompt.
- In the Command Prompt window, type the following commands one by one and press Enter after each command:
- net stop wuauserv
- net stop cryptSvc
- net stop bits
- net stop msiserver
- After stopping the services, type the following commands to rename the SoftwareDistribution and Catroot2 folders:
- ren C:\Windows\SoftwareDistribution SoftwareDistribution.old
- ren C:\Windows\System32\catroot2 Catroot2.old
- Finally, restart the services by entering the following commands:
- net start wuauserv
- net start cryptSvc
- net start bits
- net start msiserver
- Close the Command Prompt window.
Step 5: Run Windows Update troubleshooter
- Press the Windows key + I to open the Settings app.
- Click on «System» and select «Troubleshoot» from the left-hand side menu.
- Scroll down and click on «Additional troubleshooters.»
- Locate «Windows Update» and click on it.
- Click on the «Run the troubleshooter» button and follow the on-screen instructions.
- After the troubleshooter completes its process, restart your PC.
Step 6: Check date and time settings
Ensure that your PC’s date and time settings are correct. Incorrect date and time settings can sometimes cause issues with Windows Update. To check and adjust your date and time settings:
- Right-click on the date and time in the taskbar and select «Adjust date/time.»
- In the Date & Time settings window, toggle on the «Set time automatically» and «Set time zone automatically» options.
- Close the settings window.
Step 7: Perform a clean boot
Performing a clean boot can help identify and resolve software conflicts that may be interfering with Windows Update. Here’s how to do it:
- Press the Windows key + R to open the Run dialog box.
- Type «msconfig» (without quotes) and press Enter to open the System Configuration window.
- In the System Configuration window, go to the «Services» tab.
- Check the «Hide all Microsoft services» box and then click on «Disable all.»
- Next, go to the «Startup» tab and click on «Open Task Manager.»
- In the Task Manager window, disable all the listed startup applications by right-clicking on each and selecting «Disable.»
- Close the Task Manager and go back to the System Configuration window.
- Click on «Apply» and then «OK» to save the changes.
- Restart your PC.
Step 8: Reset Windows Update components
If the previous steps didn’t resolve the issue, you can try resetting the Windows Update components using the Windows Update Reset script provided by Microsoft. Here’s how:
- Visit the following Microsoft support page using your web browser: https://support.microsoft.com/en-us/topic/fix-windows-update-errors-by-using-the-dism-or-system-update-readiness-tool-02b84f2a-9b4b-2fb6-3e63-aeed1509943f
- Scroll down to the «Resolution» section and locate the «Windows Update Reset script» subsection.
- Download the script by clicking on the «Download» link provided.
- Once downloaded, right-click on the script file and select «Run as administrator.»
- Follow the on-screen instructions to reset the Windows Update components.
- Restart your PC.
After following these steps, attempt to update your Windows 11 PC again and check if the error code 0x80248014 is resolved. If the issue persists, it may be helpful to seek further assistance from Microsoft support or their community forums.
TECHSORE
TECHSORE

- Remove From My Forums
-
Question
-
Hi, I have the error above
It is a clean installation of Win10TP Ent 9926
Any ideas?
Thanks
Answers
-
I figured out the solution for the update error
My Store was disabled in the GPO
Once enabled, there was no problem with the update…
-
Marked as answer by
threeeye
Wednesday, April 22, 2015 3:39 PM
-
Marked as answer by
All replies
-
Try restart your Pc and run update again.
Open start and search for Action Center and open it and under troubleshoot, run Windows Update troubleshooter.
-
Try restart your Pc and run update again.
Open start and search for Action Center and open it and under troubleshoot, run Windows Update troubleshooter.
OK, so restart didn’t help, and the troubleshooter didn’t find anything wrong with the update…
-
See if the first answer in this thread helps:
http://answers.microsoft.com/en-us/protect/forum/mse-protect_start/error-code-0x80248014-while-trying-to-upgrade/4ac3c200-0c4b-42ee-b4fb-8626b5e8c91e
Jerry
-
See if the first answer in this thread helps:
http://answers.microsoft.com/en-us/protect/forum/mse-protect_start/error-code-0x80248014-while-trying-to-upgrade/4ac3c200-0c4b-42ee-b4fb-8626b5e8c91e
Jerry
That didn’t help,I also had a problem with the «Start» menu not opening, and AVG Internet Security not updating…
I tried «Refresh your PC» with no luck…
I reinstalled Win10TP, and everything worked fine UNTIL I connected to my domain, then the Update error 0x80248014 returned…
Any suggestions?
-
Have you manually refreshing the SoftwareDistribution folder using the following sequence of commands?
net stop wuauserv
cd %windir%
ren SoftwareDistribution SDold
net start wuauserv
Edit: Another suggestion, though maybe a simple one, is to verify that your time and date is accurate.
Brandon
Windows Outreach Team- IT Pro
Windows for IT Pros on TechNet-
Edited by
Brandon RecordsModerator
Tuesday, March 3, 2015 9:43 PM
-
Edited by
-
Have you manually refreshing the SoftwareDistribution folder using the following sequence of commands?
net stop wuauserv
cd %windir%
ren SoftwareDistribution SDold
net start wuauserv
Edit: Another suggestion, though maybe a simple one, is to verify that your time and date is accurate.
Brandon
Windows Outreach Team- IT Pro
Windows for IT Pros on TechNetThanks for the reply.
After doing the commands, the update hangs at «Checking for updates…» for about 10-20min
then stops with an error «There were some problems installing updates, but we’ll try again later.» Error 0x800705b4
-
OK, so I reinstalled my PC
The update was fine until I joined my Domain
Then the 0x80248014 returned
Yes, my user IS a Domain Admin
Win build = 9926
Any fix for that ?
-
I figured out the solution for the update error
My Store was disabled in the GPO
Once enabled, there was no problem with the update…
-
Marked as answer by
threeeye
Wednesday, April 22, 2015 3:39 PM
-
Marked as answer by
Если вы боретесь с кодом ошибки 0x80248014 при обновлении версии Windows 10, этот пост может помочь исправить основные причины, лежащие в основе этого.
Обычно эта ошибка возникает из-за повреждения системного файла, устаревшего образа Windows или огромного кеша, хранящегося в папках кэша Windows. В этой статье мы обсудили 4 способа, которые могут помочь вам преодолеть этот код ошибки в Windows 11/10 или более ранних версиях.
В случае возникновения кода ошибки 0x80248014 при обновлении Windows просмотрите приведенный ниже список решений и посмотрите, помогает ли какое-либо устранить основную причину –
1]Запустите средство устранения неполадок Центра обновления Windows.
Устранение неполадок Центра обновления Windows помогает в большей степени решить проблемы, которые могли изначально вызвать проблему. Вот как проходит процесс –
- Нажмите Win + X и выберите Настройки.
- Нажмите «Обновление и безопасность», а затем – «Устранение неполадок» на левой панели.
- На правой панели найдите и щелкните ссылку – Дополнительные средства устранения неполадок.
- Щелкните, чтобы развернуть Центр обновления Windows, и нажмите Запустите средство устранения неполадок.
Средство устранения неполадок немедленно начнет искать причины, которые могли вызвать код ошибки 0x800f0989 на вашем устройстве.
- Все, что вам нужно, – это продолжать нажимать кнопку «Далее» и посмотреть, решит ли это проблему, с которой вы столкнулись.
Если это не так, это подскажет вам, что делать дальше. Иногда этот инструмент может предлагать способы, однако требуются разрешения для выполнения этого решения. Что ж, нажмите «Применить это исправление» и посмотрите, устранит ли он код ошибки.
- В конце концов перезагрузите компьютер, чтобы внесенные изменения вступили в силу.
2]Исправить повреждение файлов с помощью SFC и DISM
Наличие поврежденных файлов также может привести к проблемам, связанным с обновлением, включая ошибку 0x80248014. Чтобы решить эту проблему, вы можете воспользоваться помощью инструмента SFC. SFC – это, по сути, служебная программа, которая запускается от вашего имени для проверки наличия поврежденных или отсутствующих файлов. Лучшее в этом инструменте то, что нет необходимости вручную восстанавливать найденные файлы.
Вот как запустить эту программу на вашем компьютере –
sfc / scannow
- Весь процесс сканирования / восстановления может занять 10-15 минут в зависимости от уровня повреждения файла.
- Дождитесь завершения этого процесса.
Когда это закончится, выполните приведенный ниже код, чтобы найти и устранить любую проблему внутри образа Windows. Приведенный ниже код представляет собой инструмент DISM –
DISM / Онлайн / Очистка-Образ / RestoreHealth
- Это снова займет 10-15 минут, чтобы найти и исправить любые проблемы с образом Windows.
- Перезагрузите компьютер после завершения сканирования SFC и DISM.
Когда ваше устройство загрузится, проверьте, можете ли вы теперь обновить Windows.
3]Сбросить компоненты Центра обновления Windows
Если ошибка 0x80248014 все еще существует, это означает, что компоненты обновления должны быть повреждены. Чтобы исправить это, вы можете остановить / перезапустить все службы, связанные с обновлением. При этом не забудьте также очистить папки кэша Windows. По сути, существует две такие папки, в которых хранятся все обновления, которые вы когда-либо устанавливали на свой компьютер.
Microsoft выпускает слишком много обновлений каждый месяц. Таким образом, вполне вероятно, что папки кэша Windows были заполнены ненужными сохраненными данными и, следовательно, ошибкой 0x80248014.
4]Загрузите и установите накопительные обновления вручную.
Если ни один из вышеперечисленных способов решения проблемы с кодом ошибки 0x80248014 не помог, вы также можете вручную обновить свое устройство. Как правило, для каждого обновления безопасности / дополнительного обновления для Windows 10 Microsoft загружает автономный пакет (файл .msu), соответствующий этому файлу.
Все, что вам нужно, это найти номер последнего накопительного обновления и найти его на Обновить каталог сайт. Найдя его там, найдите обновление, соответствующее архитектуре вашей системы, и нажмите кнопку «Загрузить».
В открывшемся окне щелкните верхнюю ссылку, чтобы начать загрузку файла установки. Когда загрузка завершится, откройте папку, содержащую этот файл, и дважды щелкните по нему. Вскоре после этого начнется установка обновления.
Примечание: Ваш компьютер может перезагружаться несколько раз в течение всего процесса обновления.