Windows Update is a utility tool that keeps your system up-to-date. They keep your system running smoothly by regularly providing important fixes and security updates to the OS. While updating, it often encounters some errors that prevent the process from being completed. Such an error is the Windows Update error 0×80248007.
The 0×80248007 error generally occurs because of the following reasons:
- Missing Files
- Unidentified Microsoft Software License Terms
There are some useful methods that can help you fix the error. These methods include:
Method 1:Start the Windows Installer Service
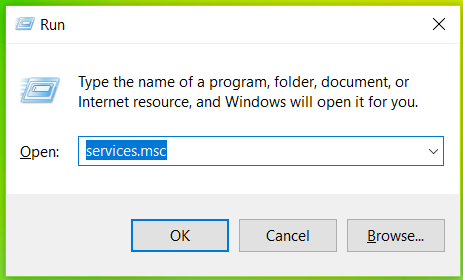
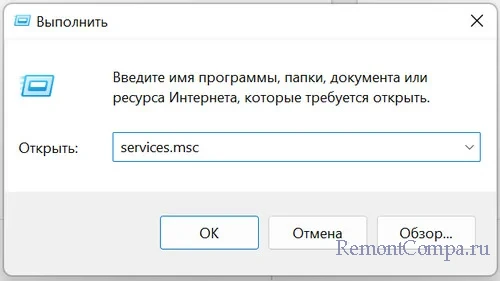
There is a service called Windows Installer, which is directly associated with the Windows Update Service. Starting the service manually can help fix the error. To do that, you need to access the Services console. To get there, open Run by pressing Windows + R. Then, type services.msc in the message box and hit OK.
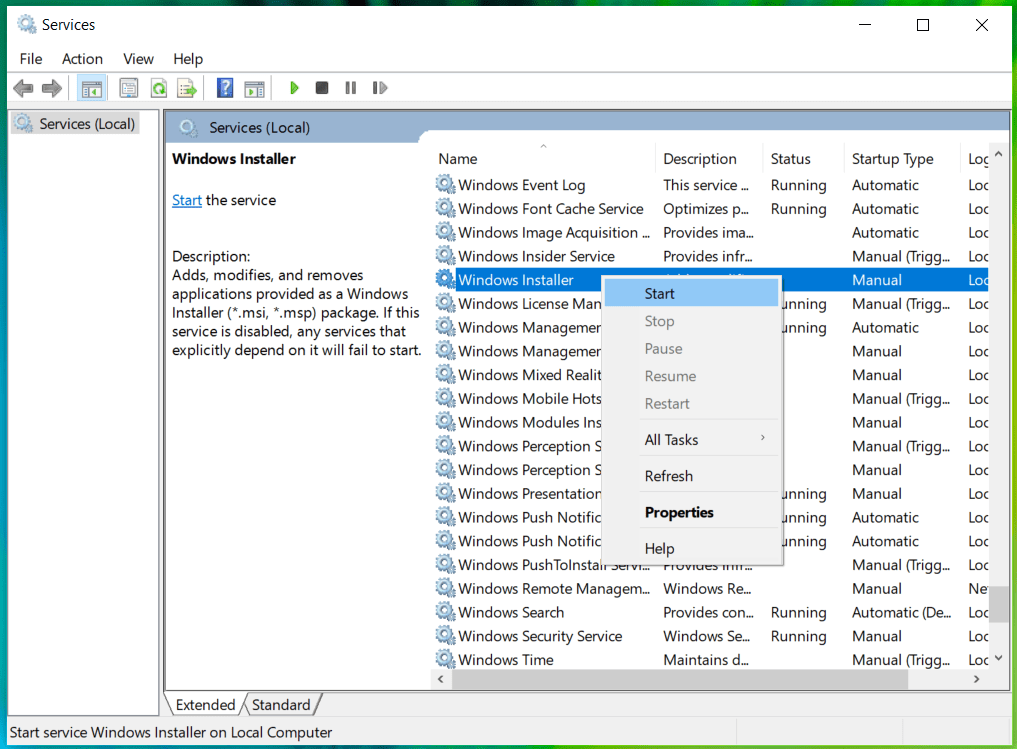
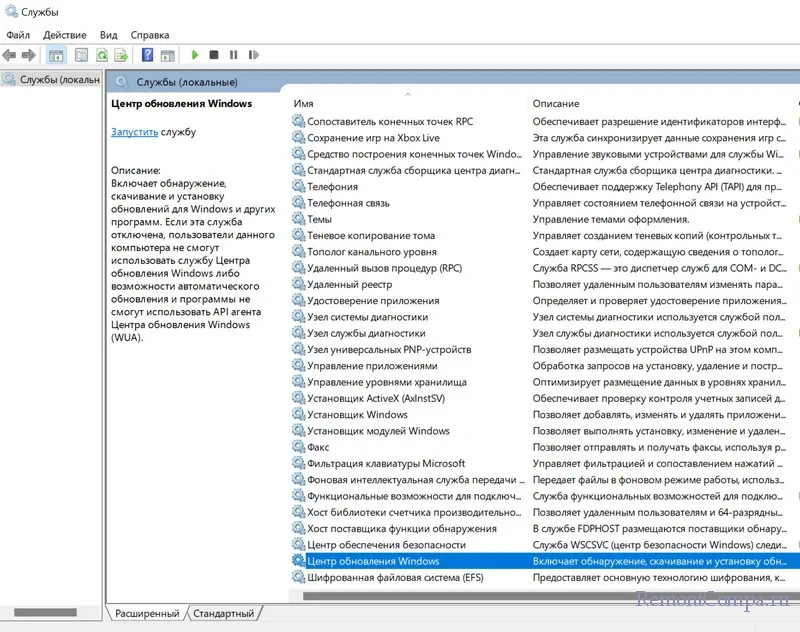
In the Services window, scroll down to find the Windows Installer service. Then, right-click on it and hit Start.
Check if the issue is resolved by running Windows Update again.
Method 2: Reboot the Windows Update Service
The Windows Update Service is a utility that is responsible for the download and installation of Windows updates. If any changes occur to this utility, you are likely to encounter the 0×80248007 error. In this case, you need to restart the Windows Update Service to fix this issue.
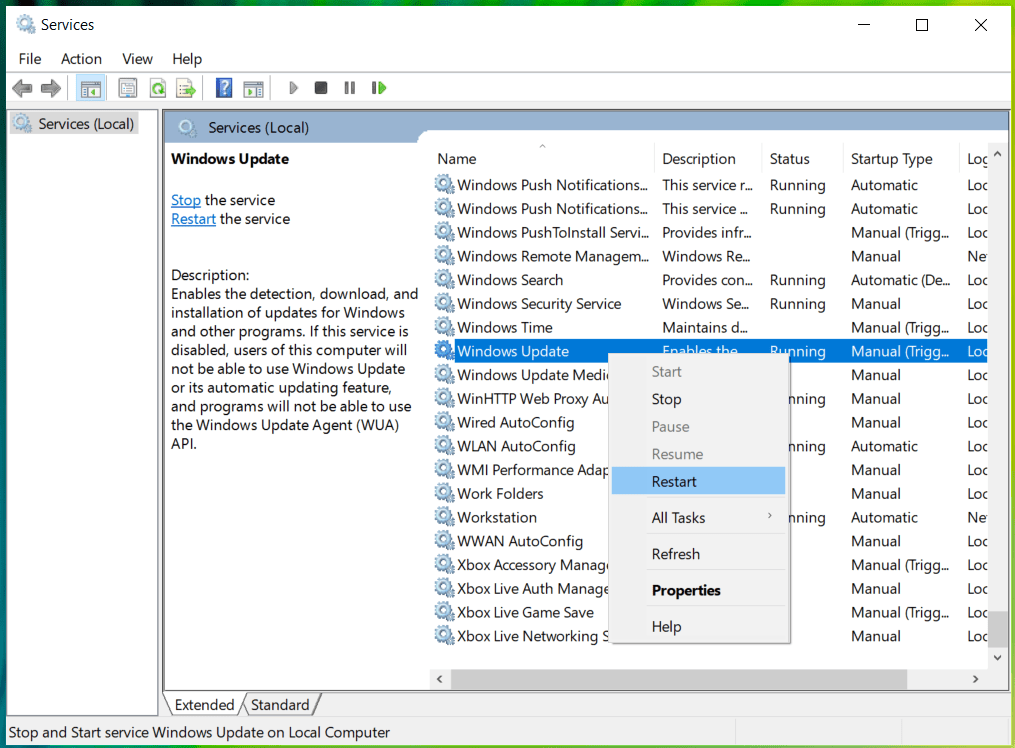
To do this, you need to go to services.msc, just like in the previous method. From the list of services, find the Windows Update Service. Then, right-click on it and hit Restart.
Method 3: Run the Windows Update Troubleshooter
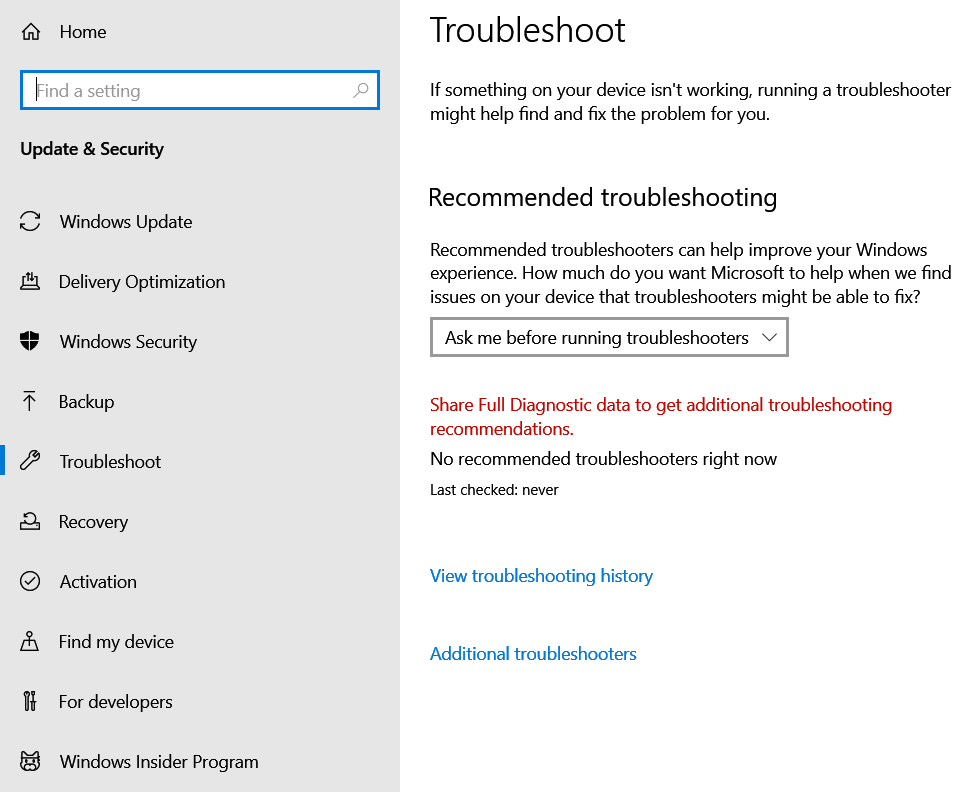
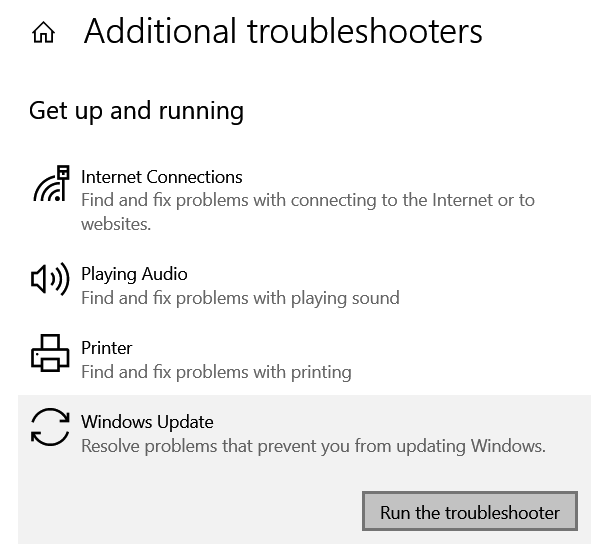
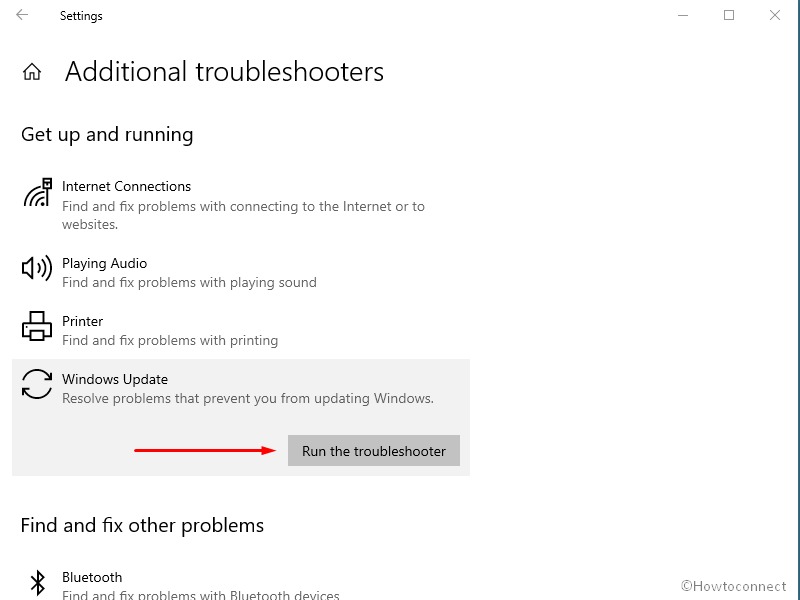
The Windows Update Troubleshooter is a utility that checks your PC for Windows Update errors and reports back to you if there are any. It can help fix this error too. To troubleshoot, go to Settings > Update & Security > Troubleshoot. On the page, there will be an option called Additional troubleshooters. Click on it to see the list of available troubleshooters.
You will see an option called Windows Update on the list. Click on it and hit Run the troubleshooter to perform the operation.
The troubleshooter will check for errors and automatically fix them if there are any. After the process is complete, try running Windows Update again.
Method 4: Delete Software Distribution Folder
Software Distribution is a system folder on Windows that contains several Windows Update files and components. If any file or component gets corrupted, then you will face some issues in the process of installing Windows updates. We can fix these issues by deleting certain folders that are located inside the Software Distribution folder.
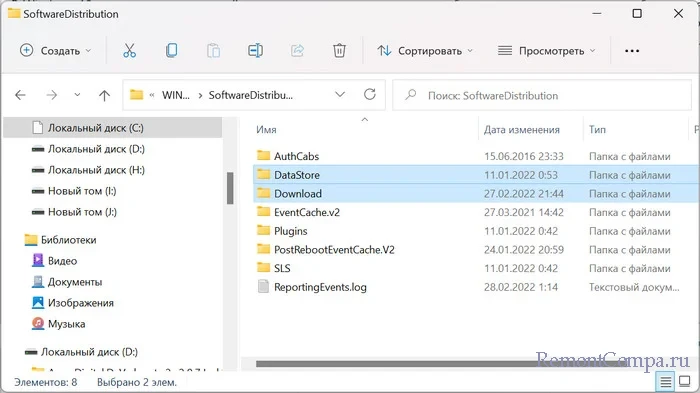
To do this, navigate to C > Windows > Software Distribution. Then, find the files named Data Store and Download. Go to these folders and delete everything inside them.
After performing these steps, restart your PC and run Windows Update again.
Last Updated :
19 Dec, 2022
Like Article
Save Article
- Почему возникает ошибка?
- 5 способов решить проблему
Центр обновления — важный компонент Windows, позволяющий автоматически загружать новые компоненты и дополнения для операционной системы. В его работе нередко возникают неисправности, которые не всегда решаются очевидными методами. Рассмотрим одну из таких ошибок, 0x80248007, разберем ее причины и способы устранения.
Почему возникает ошибка?
Среди основных причин неисправности, являющихся ее источником в большинстве случаев, можно выделить следующие:
- Некоторые файлы Центра обновления повреждены или отсутствуют;
- Центру обновления не удается найти условия лицензионного соглашения для ПО.
5 способов решить проблему
Способов решения этой ошибки немного. В основном они сводятся к настройке службы обновления. Разберем 5 методов устранения сбоя.
Стандартная утилита для исправления ошибок
В Windows предусмотрен ряд стандартных служб для автоматического устранения неисправностей. Такая утилита есть и для Центра обновления. Этот способ помогает далеко не всегда, но его все же стоит попробовать. Для этого:
1. Откройте Параметры любым способом. Например, через меню Пуск.
2. Выберите раздел Обновление и безопасность.
3. Зайдите в Устранение неполадок.
4. Откройте Дополнительные средства устранения.
5. Нажмите на пункт Центр обновления Windows и выберите Запустить средство. Открывшаяся утилита автоматически проведет поиск неисправностей и исправит их, по возможности.
6. По завершению работы мастера устранения ошибок перезагрузите ПК и проверьте работу Центра обновления повторно.
Перезапуск службы и очистка директорий
Этот способ решения заключается в перезапуске службы Центра обновления и очистке его кэша. Чтобы проделать это, проследуйте инструкции:
1. Введите в поиске на строке задач или в меню Пуск слово services. Среди результатов выберите программу Службы.
2. В открывшемся списке служб найдите пункт Центр обновления Windows и кликните по нему дважды.
3. Нажмите на кнопку Остановить, затем Применить и ОК для выхода с сохранением изменений.
4. Откройте проводник и пройдите по следующему пути: C:\Windows\SoftwareDistribution.
5. Перейдите в папку DataStore и полностью очистите ее содержимое.
6. Вернитесь в SoftwareDistribution.
7. Откройте в директорию Download и удалите все содержимое из нее.
8. Вновь перейдите в управление службами, найдите пункт Центр обновления и кликните по нему дважды.
9. Запустите службу соответствующей кнопкой.
10. Перезагрузите Windows и попробуйте воспользоваться Центром обновления еще раз.
Такой путь решения помогает во многих случаях.
Применение командной строки
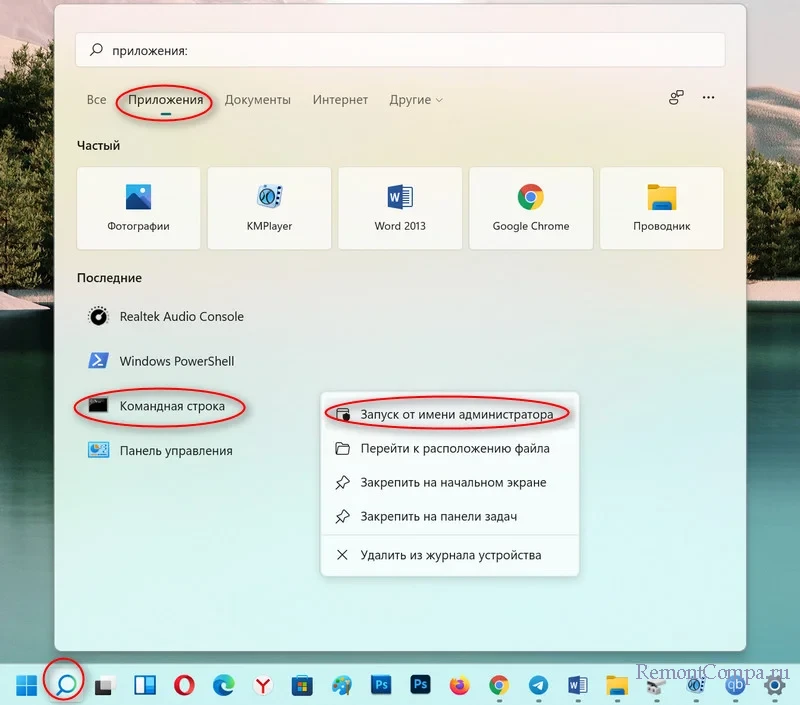
При помощи консоли Windows можно устранить многие неисправности операционной системы. В том числе, данную ошибку. Этот способ работает не всегда, но в некоторых случаях позволяет полностью избавиться от сбоя. Чтобы применить его, нужно открыть командную строку с разрешениями администратора. Для этого введите cmd в поиске в меню Пуск или на строке задач, кликните ПКМ по пункту Командная строка и в контекстном меню выберите Запуск от имени администратора.
В появившемся окне консоли введите команду net start msiserver и нажмите Enter. Дождитесь ее завершения, закройте CMD и выполните перезагрузку ПК. После этого проверьте работу обновлений повторно.
Восстановление Windows
Если Центр обновления раньше работал без ошибок и сбой возник только в определенный момент, можно попробовать выполнить откат ОС до точки восстановления. Это вернет операционную систему в состояние, в котором она находилась на момент создания резервного слепка. Помните, что это существенно повлияет на ее облик. Кроме того, восстановление таким способом возможно только если оно активировано в настройках и в системе есть созданные точки отката. Тогда можно попробовать выполнить процедуру. Для этого:
1. Откройте классическую панель управления. Для этого одновременно нажмите клавиши Win и R на клавиатуре, после чего введите в появившемся окне слово control и нажмите Enter.
2. Найдите Восстановление через поиск.
3. Кликните на ссылку Запуск восстановления системы.
4. Нажмите на кнопку Далее в открывшемся окне мастера восстановления. Если она неактивна, значит восстановление отключено в системе и недоступно в данный момент.
5. Выберите точку отката и проследуйте всем дальнейшим инструкциям программы.
Переустановка операционной системы
Полная переустановка ОС позволит настроить ее компоненты с нуля, что исправит все ошибки, присутствующие ранее. Это радикальный способ, который гарантированно работает всегда, даже если другие методы не помогли.
Помимо обычной переустановки с полным форматированием системного диска, можно выполнить частичное обновление файлов ОС из установочного образа. Это позволит сохранить все личные данные. Чтобы выполнить такое восстановление, подмонтируйте ISO-образ Windows или подключите внешний носитель, на который он записан. Запустите setup.exe и проследуйте инструкциям инсталлятора, выбрав опцию установки системы с сохранением личных файлов.
В Windows 10 у многих пользователей при попытке установить какое-то обновление или патч в центре обновления выскакивала ошибка 0x80248007. Скачать и установить обновление при этом было невозможно. Microsoft обещали ее исправить, но как мы видим она появляется до сих пор, даже в уже более новой Windows 11. Причин такой проблемы может быть достаточно много, начиная от поврежденных служб обновления и аппаратных компонентов до отсутствия какого-либо лицензионного соглашения.
Исправить такую ошибку можно несколькими способами.
1. Нажмите Пуск и выбираем пункт «Командная строка», либо в поиске Windows пишем cmd и кликаем на результат.
2. Пишем команду и жмем Enter
net start msiserverПробуем скачать обновление. Если не помогает, то переходим к следующему методу.
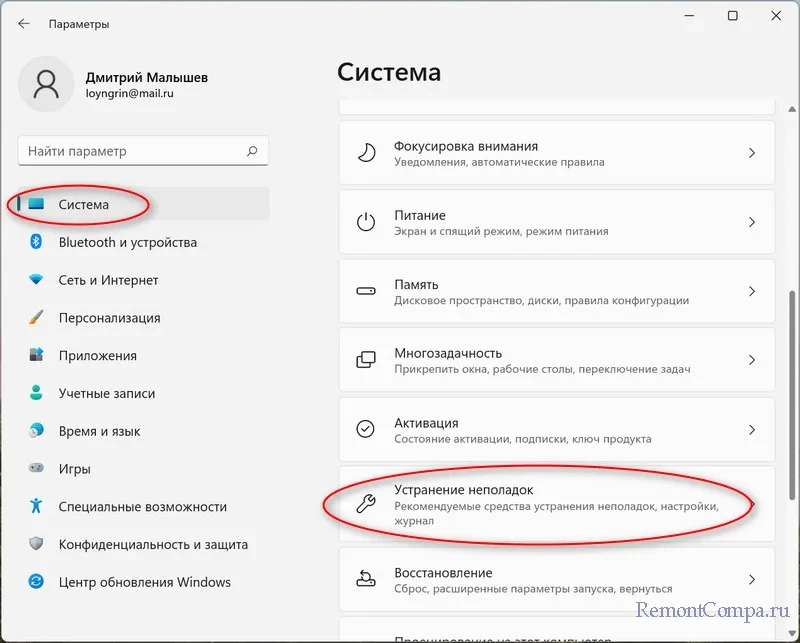
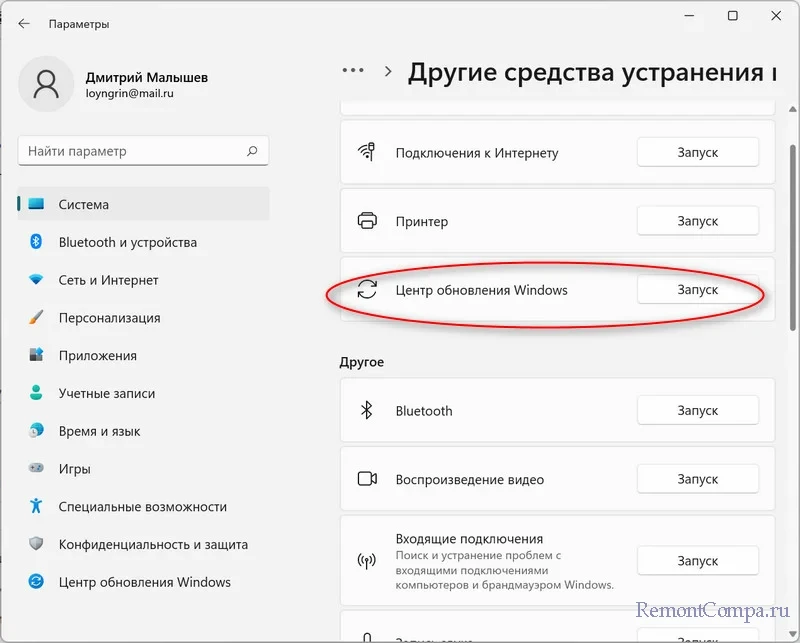
1. Жмем Пуск и выбираем «Параметры».
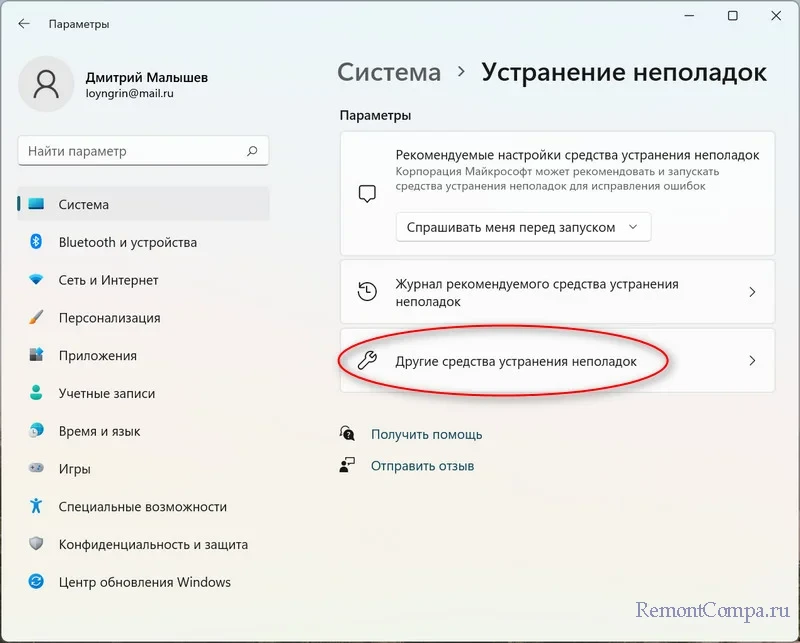
2. В разделе «Система» выбираем «Устранения неполадок».
3. Затем жмем на «Другие средства устранения неполадок» и «Центр обновления Windows».
1. Нажимаем сочетание «Win+R».
2. В окне «Выполнить» пишем
services.msc
3. В списке необходимо найти «Центр обновления Windows», нажать на него ПКМ и выбрать «Остановить».
4. Далее проходим по маршруту и удаляем там все файлы
C:\Windows\SoftwareDistribution\DataStore
5. Затем в папке SoftwareDistribution надо зайти в папку Download. Здесь также все удаляем.
6. Теперь снова щелкаем по «Центру обновления Windows» ПКМ и кликаем на пункт «Запустить».
1. Жмем сочетание «Win+X». В контекстном меню выбираем «Терминал Windows (администратор)».
2. Затем прописываем по очереди команды, после каждой нажимая Enter.
net stop wuauserv
net stop cryptSvc
net stop bits
net stop msiserver
ren C:\Windows\SoftwareDistribution SoftwareDistribution.mvp
ren C:\Windows\System32\catroot2 catroot2.mvp
net start wuauserv
net start cryptSvc
net start bits
net start msiserver
3. Перезапускаем компьютер.
1. Нажимаем на Пуск ПКМ и выбираем «Терминал Windows».
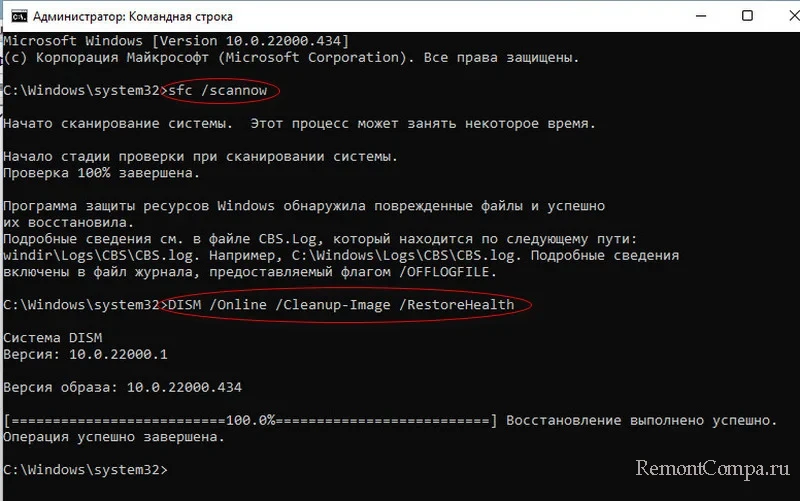
2. Затем вводим команду
sfc /scannow
3. По окончании вводим другую
DISM /Online /Cleanup-Image /RestoreHealth
4. Перезапускаем ПК.
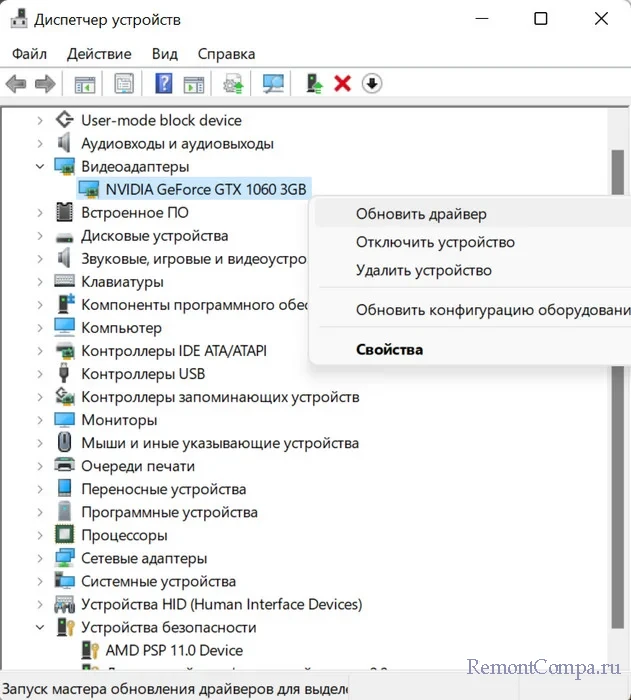
Иногда причиной появления такой ошибки являются устаревшие или поврежденные драйвера устройств. Обновляем драйвера через Диспетчер устройств.
1. Нажимаем «Win+X» и выбираем «Диспетчер устройств».
2. Устаревшие и поврежденные драйвера будут отмечены желтым значком. Кликаем на него ПКМ и выбираем «Обновить драйвер».
3. Перезагружаем компьютер.
Обновить можно и остальными способами. Недавно мы их рассматривали.
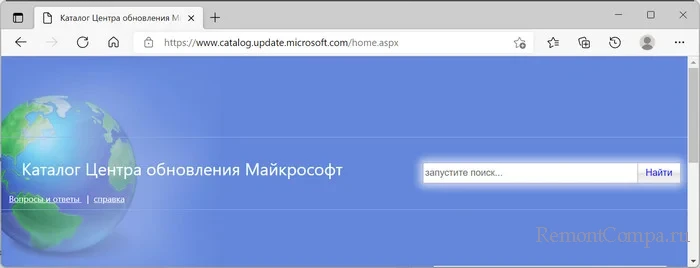
Можно вручную скачать необходимый патч с официального сайта Microsoft и установить. Найти патч можно по ссылке, достаточно ввести номер обновления.
https://www.catalog.update.microsoft.com/home.aspx
Также можно скачать ISO образ с уже установленными обновлениями, запустить setup.exe. Файлы обновятся, и ошибка исчезнет.
Windows 10 or 11 receives different types of updates to maintain the health of operating system, add improvements, and fix bugs. These are Security updates, out-of-band updates, cumulative updates which arrive regularly and keep Windows up-to-date. One such is Definition update that comes to Windows Defender and increases the strength of this security app to fight new mischievous threats. 0x80248007 is an annoying error that commonly appears when you try to install the Definition update. However, this code may also show up while getting other updates on Windows 10 or 11.
Update error 0x80248007 generally occurs because of broken update cache, corrupted or missing system files, fluctuating internet connection, and more. Sometimes the same may also appear when the configuration of Windows Installer service is incorrect and doesn’t support the update process. The complete error message is – “There were problems installing some updates, but we’ll try again later. If you keep seeing this and want to search the web or contact support for information, this may help: Definition Update for Windows Defender –KB2267602 (Version 1.361.1116.0) – Error 0x80248007”. It may also happen when the update cannot find the Microsoft Software License Terms.
Here is how to fix update error 0x80248007 in Windows 10 or 11 –
Way-1: Run System File Checker
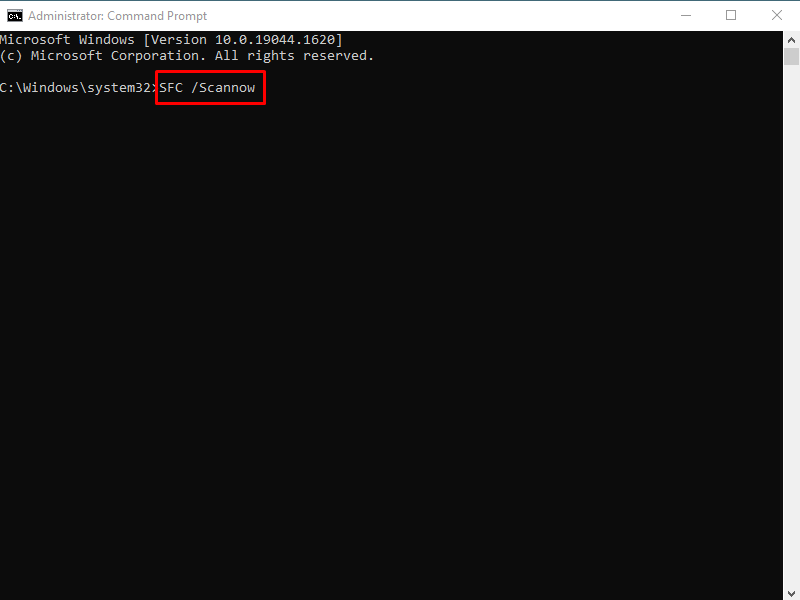
The most likely reason for this issue is the malfunction of system files that disrupt the Windows update process and cause to fail the installation. Fortunately, you can rescue from 0x80248007 error using System Files Checker aka SFC by running it through command prompt with administrative privilege. However, for Windows update error, System files are not responsible in normal scenarios but this is a rare case. Follow the steps –
- Click on – Start.
- Type – CMD.
- Press – Ctrl + Shift + Enter.
- Once a User Account Control confirmation dialog appears, click – Yes.
- On the Command prompt, type –
SFC /Scannow.
- Press – ‘Enter’.
- You will come across a message –
Beginning system scan. This process will take some time.
Beginning verification phase of system scan.
Verification x% complete.
- Allow this to reach 100% and then restart your PC.
Way-2: Check Internet Connection
Consistent and spontaneous internet access is a precondition for a Windows update to perform in any version of Windows. Error code 0x80248007 indicates some faults with internet connection, so, you need to check the network and fix it. These posts will help you deal with them How To Fix Unable to Access Internet In Windows 10, How to Run Network Adapter Troubleshooter in Windows 10, How to Fix Network Connection Problems in Windows 10 All in One. Generally, you can go ahead with the steps to solve the common issues –
- Power off the Router for at least 10 seconds.
- Switch on the router.
- Connect to the internet.
- Now go to Settings > Update & Security > Windows update.
- Click on – Check for updates.
- If you are able to download and install the update then good otherwise follow this article – How to Reset Network Settings to Default in Windows 10.
Way-3: Bring Windows Update troubleshooter into action
To repair the issues such as update error 0x80248007 in Windows 10 or 11 the Operating Systems comprise a built-in tool that can detect, check for pending reboot, restart Windows update and bits services. Windows update troubleshooter is the utility that is able to fix the errors with minimum effort and maximum productivity. So, follow the guideline –
- Press the Windows key.
- Type troubleshoot.
- Hit Enter.
- When Troubleshoot Settings opens up, click on Additional troubleshooters.
- From the next page, select – Windows update.
- Click – Run the troubleshooter.
- The tool will quickly start recognizing the cause of the issue and give you suggestions to follow in order to fix it.
Way-4: Reset Windows update components
Windows update is a requisite component of Windows that brings new drivers for the hardware devices installed in the computer, security patches, Known bugs fixed, Major updates, and upgrades. However, due to some problems, usually associated with certain corruption in system files, Windows update may not work properly. Luckily, Windows allows resetting the component which is pretty helpful when you encounter an error with failing to install update. Generally, you run multiple cmd commands to reset which is quite bothering, therefore, we are putting forward a script. This is the easiest way to reset Windows update component, so, move forward with the guidelines to reset the component –
- Download Wureset_ Windows 10
- Right-click on this file and select Extract.
- From the extracted folder, double click on WuReset.bat.
- Press any key when you are asked to continue the command.
- You may be asked to press the key a few more times on the command prompt so follow it.
- Restart the computer and check if 0x80248007 still persists.
See – How to Reset Windows Update to Default in Windows 10.
Way-5: Start Windows Installer service
Windows Installer service is to help Windows with the deployment of an app and fix the conflicts that occur between shared DLLs. Oftentimes, incorrectly configured Windows Installer service can generate 0x80248007 error code. The service also contributes to uninstalling and installing an app in Windows, so, follow the instructions and set the service correctly –
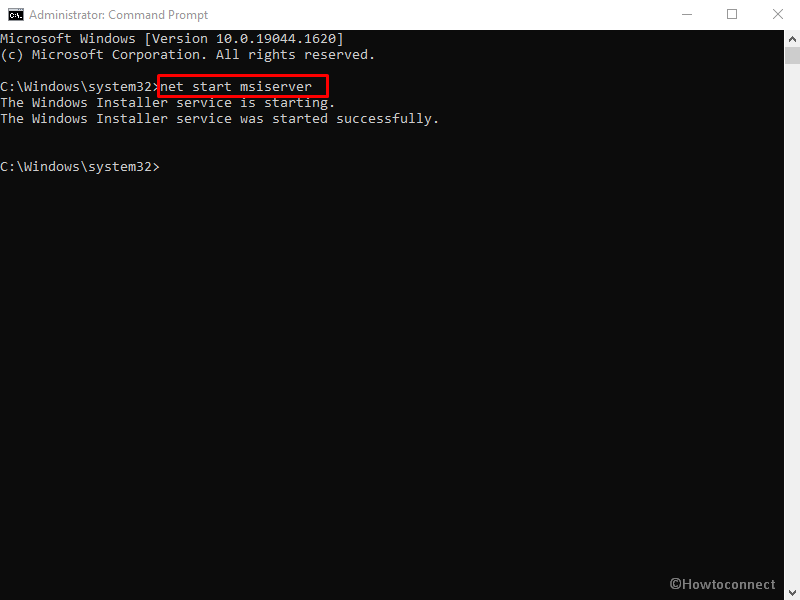
- Open Command prompt as administrator. You may also follow the steps from Way-1 to open the prompt.
- Type –
net start msiserver.
- Press – Enter.
- You will see a message – The Windows Installer service was started successfully.
- Close the command prompt and reboot the device.
- Hopefully, the update error should be solved now.
Way-6: Use the DISM tool
Deployment Image Servicing and Management aka DISM, is a built-in utility offered from Windows to deal with errors related to Windows images. Sometimes the update error 0x80248007 might also be triggered because of malfunction in the Windows image file therefore run the command line tool using the below guidelines –
- Press – Winkey+R.
- Type – cmd.exe.
- Right-click on Command prompt showing in the result section.
- Select – Run as administrator.
- Once a UAC pop app rolls in click on Yes.
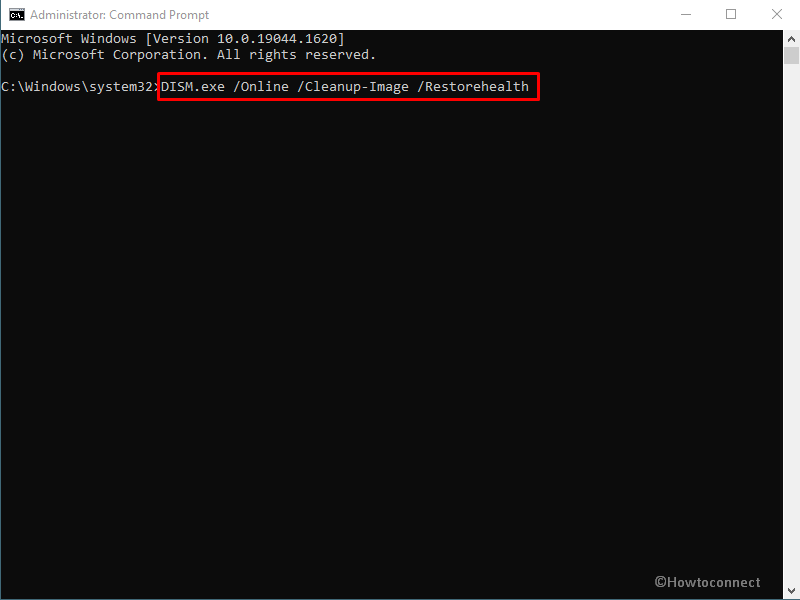
- Type –
DISM.exe /Online /Cleanup-Image /Restorehealth.
- Press Enter.
- The command will perform the task in a few minutes so stay still and then restart the computer.
Way-7: Perform System Restore
In case, the methods above fail to fix the Windows update error code 0x80248007 then system restore is a usable tool. This will reinstate the operating system to the time and date of your choice when there was not any problem occurring, most of all, without affecting your apps and personal files. Advance with the steps to fix it –
- Click on – Search.
- Type – rstrui.
- Press Enter.
- System Restore wizard will appear; click on “Next”.
- Select one date and time when the error was not in existence on your device.
- Click on Next.
- Now click on Finish.
- A pop-up will ask you, “Once started System Restore cannot be interrupted. Do you want to continue?”; select “Yes”.
- This will take a long, possibly 1 or 2 hours so allow the restoration to complete patiently.
Way-8: Take help of in-place upgrade
In-place upgrade is an installation method for Windows 10 that directly deploys the operating system to the latest edition. It means you don’t need to check for updates and you bypass the manual or automatic update process to reach the most recent version of Windows. Performing an in-place upgrade will fix error 0x80248007 on Windows 10 or 11 therefore go with the following steps –
- Go to Software Download.
- Select the version of Windows you want to install.
- Scroll a bit down and click Download tool now.
- After the downloading is completed, double click on the setup file.
- on UAC pop up, select – Yes.
- Next, on the license terms page, click – Accept.
- Select – Upgrade this PC now.
- Click – Next.
Methods list:
Way-1: Run System File Checker
Way-2: Check Internet Connection
Way-3: Bring Windows Update troubleshooter into action
Way-4: Reset Windows update components
Way-5: Start Windows Installer service
Way-6: Use the DISM tool
Way-7: Perform System Restore
Way-8: Take help of in-place upgrade
That’s all!!
Repair any Windows problems such as Blue/Black Screen, DLL, Exe, application, Regisrty error and quickly recover system from issues using Reimage.
