by Matthew Adams
Matthew is a freelancer who has produced a variety of articles on various topics related to technology. His main focus is the Windows OS and all the things… read more
Updated on
- Windows Update errors are quite common, but so are the solutions to fixing them.
- For example, we will be showing you how to fix Windows Update error 0x8024000b in this article.
- This error occurs when Windows cannot read a file required for the installation of an update.

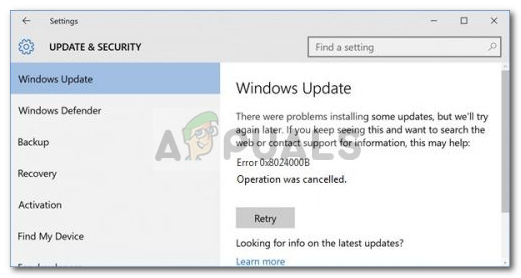
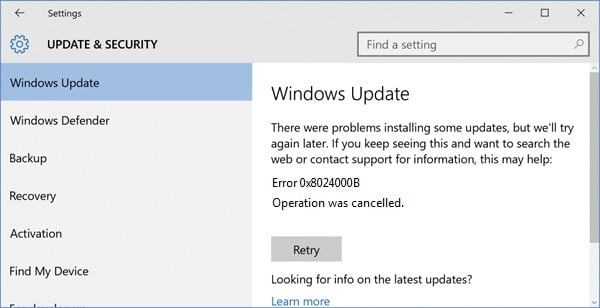
Error 0x8024000b is another in a long line of Windows Update error codes. That error, like the other update issues, stops Windows receiving updates. This error arises when Windows can’t access the manifest update file.
When the error occurs, you’ll see an error 0x8024000b and Operation was cancelled error message within Settings’ Windows Update tab. Read on to find out how to fix it.
How can I fix the error 0x8024000b?
- How can I fix the error 0x8024000b?
- 1. Run the Windows Update troubleshooter
- 2. Clear superseded updates
- 3. Change the Spupdsvc.exe’s file title
- 4. Reset Windows Update components
- 5. Restore Windows to an earlier date
1. Run the Windows Update troubleshooter
Numerous users have confirmed that the Windows Update troubleshooter fixed error 0x8024000b for them.
How we test, review and rate?
We have worked for the past 6 months on building a new review system on how we produce content. Using it, we have subsequently redone most of our articles to provide actual hands-on expertise on the guides we made.
For more details you can read how we test, review, and rate at WindowsReport.
2. Clear superseded updates
Clearing superseded updates on your desktop or laptop is another way to fix error 0x8024000b.
- To do that, open the Cleanup (decline) superseded updates page on Microsoft Technet.
- Click the Cleanup-WSUSserver.ps1 button on that page.

- Open File Explorer by clicking its taskbar button.
- Open the folder you downloaded the script to.
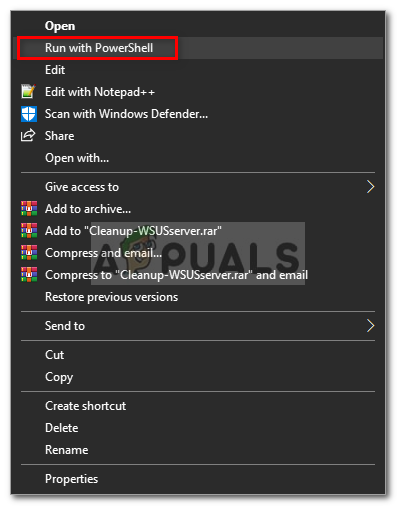
- Right-click the script file and select the Run with Powershell context menu option.
- Then restart Windows after running the script.

3. Change the Spupdsvc.exe’s file title
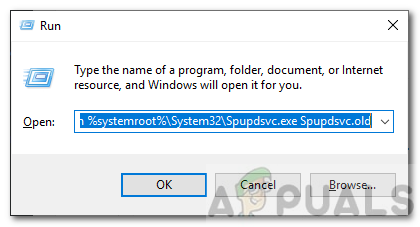
- Try renaming the Spupdsvc file. To do that, press the Windows key + R key combination, which opens Run.
- Input this command into Run’s text box and press Enter:
- cmd /c ren %systemroot%System32Spupdsvc.exe Spupdsvc.old.

- cmd /c ren %systemroot%System32Spupdsvc.exe Spupdsvc.old.
- Close Run’s window, and restart your desktop and laptop.
- Run the Windows Update once more.

4. Reset Windows Update components
Some users might need to reset Windows Update components to fix error 0x8024000b.
- To do so, open Windows 10’s search utility.
- Type cmd in the search utility’s text box.
- Right-click Command Prompt to open its context menu, and select the Run as administrator option.
- Then input these separate commands into the Command Prompt:
net stop wuauserv
net stop cryptSvc
net stop bits
net stop msiserver
- Enter Ren C:WindowsSoftwareDistribution SoftwareDistribution.old in the Prompt, and press the Return keyboard key.
- Input the Ren C:WindowsSystem32catroot2 Catroot2.old command and press Return to edit the catroot2 folder title.
- Enter the following commands separately, and press Return after each one:
net start wuauserv
net start cryptSvc
net start bits
net start msiserver

5. Restore Windows to an earlier date
- Rolling Windows back to a restore point with System Restore might also be worth a shot.
- Enter rstrui in Run and click OK to open System Restore.
- Press the Next button to proceed to the restore points list.
- Select the Show more restore points option to fully expand the list of restoration points.

- Choose a restore point that will roll back Windows to a time when there wasn’t an update issue.
- You’ll lose some software installed after the selected restore point.
- To see what software gets deleted, click the Check for affected programs button.

- To see what software gets deleted, click the Check for affected programs button.
- Click Next and Finish to roll back the platform.


- Windows 11 23H2: How to Download the Official ISO
- A 64-bit Windows 12 ISO is out, theoretically. Here’s all you need to know
- Dev Build 23550 comes with a huge undocumented improvement
So, try fixing error 0x8024000b with the resolutions above. They are among the most likely fixes for the error, as researched online.
Let us know which of the solutions worked best by leaving us a message in the comments section below.
![]()
The Windows update error 0x8024000b is caused when the operating system cannot access the manifest files for updates that are used while installing updates on the system. Manifest files are basically XML files that are accompanied by applications as well as Windows updates.
Microsoft pushes out updates for various Windows applications as well as for the operating system to keep things going smoothly. These updates are often packed with security flaw patches, various bug fixes along with stability and sometimes a new design for certain applications. Even though updates are appreciated, they can sometimes tend to be daunting without providing much information about the possible cause of the error. Nonetheless, in this article, we’ll be going through the cause of the said error code and later on provide a list of solutions that you can implement to get rid of it.
To provide you with more detailed insight, let us cover what actually triggers the error while updating your operating system.
- Update Manifest Files: The reason due to which the error is being shown are the manifest files that are associated with Windows updates. The error pops up when Windows is not able to access/read the manifest files for Windows updates. This happens when the update is canceled in the middle by either the Windows Update service or the user itself. That is why the error message is accompanied by the context ‘Operation was canceled’.
Now that you are aware of the cause of the issue, let us continue with the solutions for the said error message.
Solution 1: Running a Powershell Script
The easiest way of fixing the error message is to run a Powershell script that will clean up superseded updates on your system. The script is provided on Microsoft Technet, thus, you don’t have to worry about your system getting infected. Here’s how to run the script:
- Go to this page and download the script.
- Once you have downloaded the script, go to your downloads directory and right-click the file.
- Select Run with Powershell to execute the script and then wait for it to complete.

Running the Script with Powershell - Restart your system and then try updating again.
Solution 2: Using the Windows Update Troubleshooter
The next thing that you can do in order to resolve your issue is to use the Windows Update Troubleshooter. In case you didn’t cancel the update yourself, then the Windows Update Troubleshooter might be able to pinpoint the issue with your Windows update services and circumvent it. To run the Window Update Troubleshooter, follow the given steps:
- Press Windows Key + I to open up the Settings window.
- Go to Update & Security.
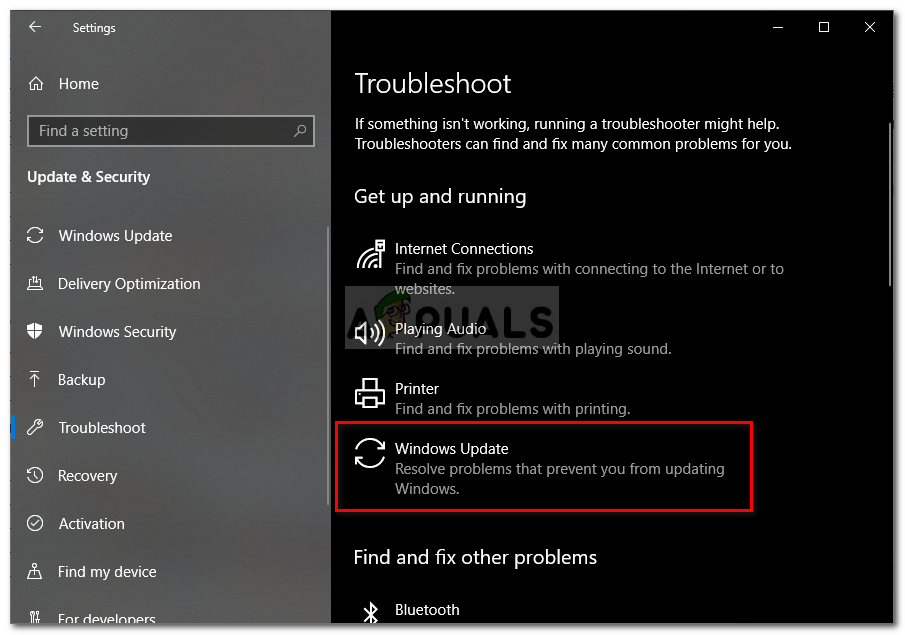
- Navigate to the Troubleshoot pane on the left-hand side.
- Select Windows Update to run the troubleshooter.

Running Windows Update Troubleshooter - Wait for it to complete troubleshooting and then run the update again to see if it the issue has been resolved.
Solution 3: Renaming the Spupdsvc.exe File
Lastly, the error can be solved by renaming a file named spupdsvc.exe. Spupdsvc basically stands for Microsoft Update RunOnce Service and the file is a process of this service. This is utilized while downloading Windows updates, however, at times it needs to be renamed to solve some issues. Here’s how to rename the file:
- Press Windows Key + R to open up the Run dialog box.
- Once it opens up, paste in the following command and then hit the Enter key:
cmd /c ren %systemroot%\System32\Spupdsvc.exe Spupdsvc.old

Renaming spupdsvc.exe - Finally, restart your computer and then try to run the update, hope it fixes your issue.

Kevin Arrows
Kevin Arrows is a highly experienced and knowledgeable technology specialist with over a decade of industry experience. He holds a Microsoft Certified Technology Specialist (MCTS) certification and has a deep passion for staying up-to-date on the latest tech developments. Kevin has written extensively on a wide range of tech-related topics, showcasing his expertise and knowledge in areas such as software development, cybersecurity, and cloud computing. His contributions to the tech field have been widely recognized and respected by his peers, and he is highly regarded for his ability to explain complex technical concepts in a clear and concise manner.
Microsoft regularly comes up with new builds, cumulative updates, and more in order to maintain smooth operation of the system. But some users confront Failed to Install 0x8024000b Error during their update attempt. The issue mostly occurs when the operating system fails to decode the Update Manifest file required for installing the patches.
This happens when users cancel Windows Update service in the middle either accidentally or intentionally. The updates are often packed with fixes for several bugs and issues, new features, security updates, and more. So to get them successfully installed in the system without the above error, the following workarounds will be helpful.
Here is how to Fix Failed to Install 0x8024000b Windows Update Error in Windows 10 –
1] Run the Windows Update Troubleshooter
Windows Update troubleshooter is one of the finest utilities to mitigate any issues regarding updating the operating system. The tool can also fix the Install error 0x8024000b easily. To accomplish the task, follow the below steps –
- Fire up the Start Menu and click the gear icon.
- Click Update & Security.
- Moving forward to the next page, choose Troubleshoot located at the left pane.
- Jump to alongside pane and select Windows update under Get up and running section.
- Hit Run the troubleshooter button.
- The tool will, therefore, detect and find the associated issues from the system. Make sure the device is connected to an active internet connection. Follow the tasks guided by the tool on display to end this process.
- When the process ends finally, Restart Windows 10 PC to make the changes effective.
2] Execute PowerShell script to fix Failed to Install 0x8024000b Error
The most prominent way of fixing Install 0x8024000b error is to run a PowerShell script which will eventually clean all the superseded updates from system. Microsoft Technet has provided the script hence, it’s purely trustworthy. To run it, follow the below steps –
- Open any web browser and visit this site of Technet. Download the script from there. If legal terms and conditions stuff pop-up for confirmation, agree to them.
- Once the downloading gets over, launch File Explorer and go to Downloads folder and make a right-click on it.
- Select Run with PowerShell option and execute the script.
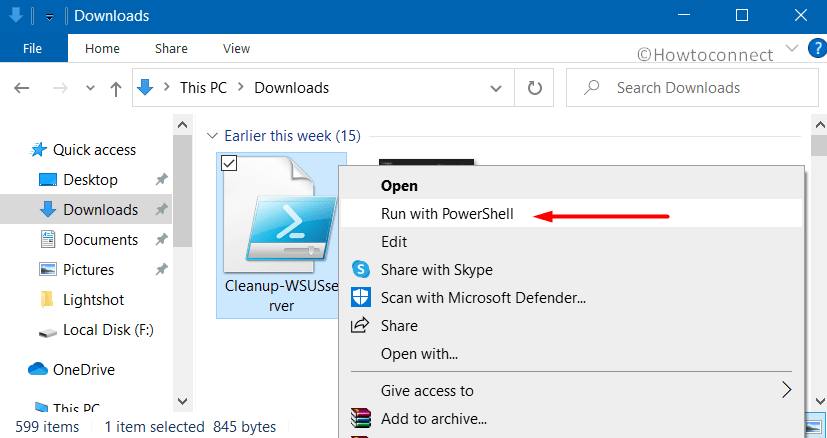
- Once the process ends successfully, reboot the device to implement the changes.
- After coming back to the new session, there will be no issues with Windows Update as expected.
3] Rename the Spupdsvc.exe File
Renaming a file entitled spupdsvc.exe. is often found to resolve the Install error 0x8024000b. This file usually stands for Microsoft Update RunOnce Service and it’s a process that is necessary for downloading Windows Update. The renaming must be done using the Run dialog as shown in below instructions –
- Right-click on Start icon and select Run from the Win+X menu.
- Insert the following text in the empty typing box and click OK or press Enter to execute it.
cmd /c ren %systemroot%\System32\Spupdsvc.exe Spupdsvc.old
- Once the process ends, reboot Windows 10 to save the changes.
4] Fix 0x8024000b by Resetting Windows Update Components
Sometimes, error 0x8024000b can occur due to some of the faulty update cache files in the system. Therefore, deleting those related files may resolve the issue. For that, follow-through below guidelines –
- Open Run dialog box by pressing “Winlogo+R” hotkey together. Type services.msc in the void text space and click OK.
- Once the Services Manager shows up, locate, and right-click Background Intelligent Transfer Service (BITS).
- Select Stop from the list of options.
- Now, move forward to Windows Update Service (wuauserv) and do a right-click on it as well.
- Choose Stop from the appearing menu.
- After stopping both the services, fire up File Explorer pressing Win+E hotkey at once.
- Navigate to the below-mentioned path –
C:\Windows\SoftwareDistribution
- Press Ctrl+A to select all from SoftwareDistribution folder and press Delete key on the keyboard. If a pop-up appears for confirmation, click Continue.
- Again head back to the Services console and right-click on Background Intelligent Transfer Service (BITS) and Windows Update Service (wuauserv) respectively.
- Choose Start and then make an attempt to grab the updates. Hopefully, this will mitigate the 0x8024000b Windows Update Error.
5] Perform System File Checker
To resolve any Windows 10 issues, executing the System File Checker tool is very handy. Certain significant system files go missing or get faulty due to several reasons. This built-in utility will detect and restore the corrupted files.
- Go to the taskbar search box and type in cmd.exe in its text box.
- Right-click on Command Prompt and choose Run as administrator.
- Upon a UAC popup, click Yes to proceed ahead.
- Once the black window shows up, insert the below command line and press Enter –
sfc /scannow
- The entire scan will take some good amount of time to complete. If the utility detects any issues, it will replace them with the files from the Windows cache folder.
- To successfully make this workaround effective, it is best to reboot the device.
6] Change Advanced Windows Update Settings
Failed to Install 0x8024000b can occur when the Windows Update Settings are faulty. In that case, tweaking the settings a bit can provide good results. Here are the instructions you can follow –
- Open Windows Settings app pressing “Win+I” hotkeys at once.
- When in the UI, click the Update & Security tile.
- Upon opening the next page, select Windows Update from the left pane.
- Jump to the right side pane and click the Advanced options.
- When the succeeding page unrolls, toggle OFF the slider under “Receive updates for other Microsoft products when you update Windows“.
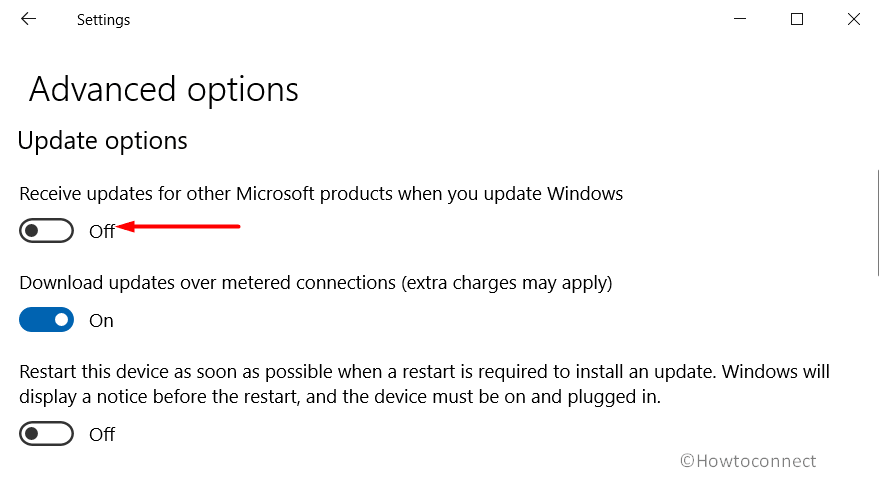
- Now, reboot the device and upon startup navigate to the Windows Updates Settings page once again.
- Click the Check for updates button.
- Once all the patches are installed, you will see “Your device is up to date.” dialog.
- Do a click on the Advanced options again and pass forward to the next page.
- If you prefer, then turn ON the slider under “Receive updates for other Microsoft products when you update Windows“.
Methods:
1] Run the Windows Update Troubleshooter
2] Execute PowerShell script
3] Rename the Spupdsvc.exe File
4] Reset Windows Update Components
5] Perform System File Checker
6] Change Advanced Windows Update Settings
That’s all!!
Repair any Windows problems such as Blue/Black Screen, DLL, Exe, application, Regisrty error and quickly recover system from issues using Reimage.
Сообщение об ошибке 0x8024000b не дает возможности обновить Windows версии от XP до 10. Корень неисправности — файл Update Manifest, который обязателен для апдейта, но в текущий момент времени не доступен. Способ исправления ошибки зависит от того, каким образом обновления попадают на ПК.
Методы решения ошибки 0x8024000b
№1: апдейт — с сервера Майкрософт
Зажмите комбинацию клавиш Win+R. В появившемся окне введите следующее: Cmd /c ren %systemroot%\System32\Spupdsvc.exe Spupdsvc.old. Выполните команду нажатием на Ок. После успешно обновляйте ОС.
№2: апдейт — с корпоративного сервера WSUS
Измените название файла Spupdsvc.exe. Скиньте настройки Центра обновлений. Переименуйте директорию SoftwareDistribution, перед этим приостановите службу обновления за счет запуска в командной строке запроса net stop wuauserv. После этого службу обязательно включите — net start wuauserv. Это должно избавить от ошибки 0x8024000b.
Did you receive the 0x8024000b error while trying to update Windows 10 to its latest Build version? Well, this error mainly occurs when Windows can’t read the Update Manifest files which are essential for the update process. As a result, the installation automatically fails on error WU_E_CALL_CANCELLED: Operation was canceled. In short, this implies the operation was either canceled by the user or from the server-side.
Moreover, the same issue might also occur when users aren’t able to filter the results. Here, in this post, we have outlined three working ways in order to address this issue for Windows 10 devices. They are as follows –
- Rename Spupdsc.exe File
- Run a PowerShell Script
- Use Windows Update Troubleshooter
To solve the update error 0x8024000b on Windows 10 PC, attempt these fixes –
1] Rename Spupdsc.exe File
The error 0x8024000b may occur due to the presence of a troublesome file i.e. Spupdsvc.exe. In order to fix this issue, you must rename this file to something spupdsvc.old. Here’s how to proceed –
Note: You may rename this file to anything, however, we suggest keeping the original name intact so as to re-use this whenever required.
- Use WinKey + R to start the Run command.
- Copy/paste the below path inside the dialog box and press Enter –
cmd /c ren %systemroot%\System32\Spupdsvc.exe Spupdsvc.old

- When this code executes successfully, Restart your device.
- Sign back into your computer and check if the update process works without getting into the same trouble or not.
2] Running a PowerShell Script
If the error 0x8024000b doesn’t get solved by the above solution, you may try running a PowerShell script. This script will clean the superseded updates from WSUS. Here are the essential steps to work upon –
- First of all, visit the Microsoft Technet website.
- There you may notice “
Cleanup-WSUSserver.ps1” downloadable link. - Click over this to download the script file.
Note: Now that you have downloaded this file, you must modify the server and port values by opening the script using notepad. To do so, use these simple steps –
- Right-click on the downloaded script and select “Open with…“.
- Select Notepad on the upcoming pop-up window.
- Fill the required fields next to “$server” and “$port” using your WSUS server and port.
Tip: There are certain updates like monthly security patches that you mustn’t decline for any reason. However, if you do want to halt these updates as well, simply remove the “-and $_.ComputersNeedingThisUpdate -eq 0” in between the line – "$superseded = $approvedupdates | ? {$_.Update.IsSuperseded -eq $true -and $_.ComputersNeedingThisUpdate -eq 0}".

- After making the desired changes, press Ctrl + S to save this script, and close Notepad.
- Right-click on the lately modified PowerShell Script and hit “Run as Administrator“.
3] Run Windows Update troubleshooter
In case the error persists even after cleansing the superseded updates from WSUS, you may use the Windows update troubleshooter. Running this tool will look for possible reasons that may cause this issue and fix them (if this finds any). The procedure to troubleshoot Windows Update is as follows –
- Click the Start Menu and select the gear icon. Doing so will invoke the Windows Settings UI.
- Go to
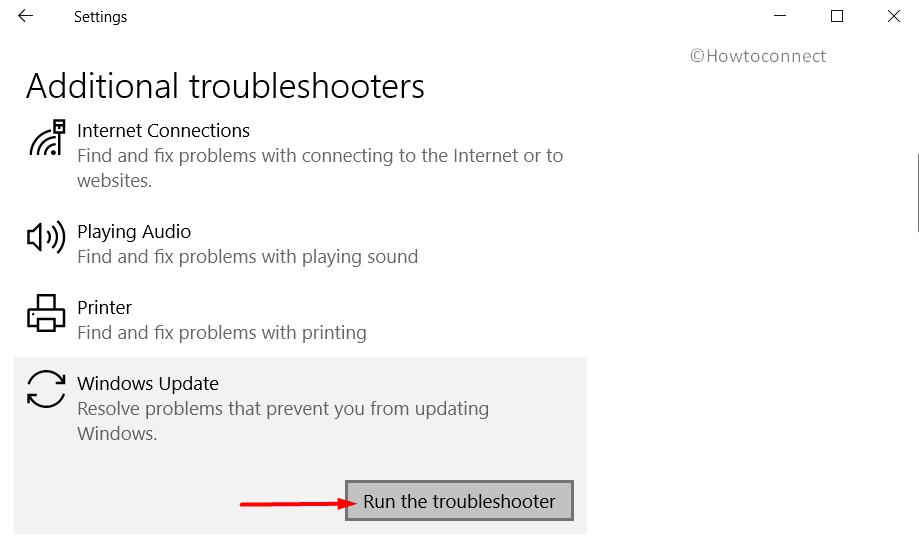
Update & Security > Troubleshoot. - Jump to the right side and click Additional troubleshooters.
- On the next screen, click
Windows Update > Run the troubleshooter.

- This may take some time in locating and repairing any bugs or errors on the computer.
- When this finishes troubleshooting, close all running tabs and windows, and Reboot the PC.
When Windows 10 reloads, sign back in and check if the update process is occurring smoothly or not. I hope you do find this post worth insightful and helpful in solving your issue.
How do I fix error 0x800f0831?
If you are facing trouble installing Windows 10 updates, you better follow this workaround –
- First of all, visit Microsoft Update Catalog.
- Enter the package ID of the <Missing_Package> in the search bar, and press Enter –
- After the download completes, reinstall the <Failed_Package>.
Alternatively, you may also download and install the pending updates manually as well.
Read Next:
- How to Fix Update Error 0x80070490 in Windows 10
- How to Fix Microsoft Store Error Code 0x000001F7
- Fix Windows 10 Update Error Code 0x800f0984