Ошибка с кодом 0x80070652 – одна из самых распространенных, появляющихся при попытке выполнить обновление ОС. Она встречается во всех актуальных версиях Windows 7, 8.1, 10. Ее особенность в том, что ошибку могут вызывать многочисленные причины. Это приводит к высокой частоте появления неполадок и усложняет процесс их исправления. Однако, одними из самых распространенных причин является конфликт между уже установленным апгрейдом и «Центром обновлений». Даже сам инструмент обновления может провоцировать неполадку. Этому может как предшествовать установка проблемных программ, так и нет. В любом случае, исправить ошибку 0x80070652 реально, этим мы и займемся.
Убираем ошибку «Центра обновлений»
Уже традиционно мы предлагаем начинать с наиболее эффективных и простых методов и постепенно переходить более трудным решениям.
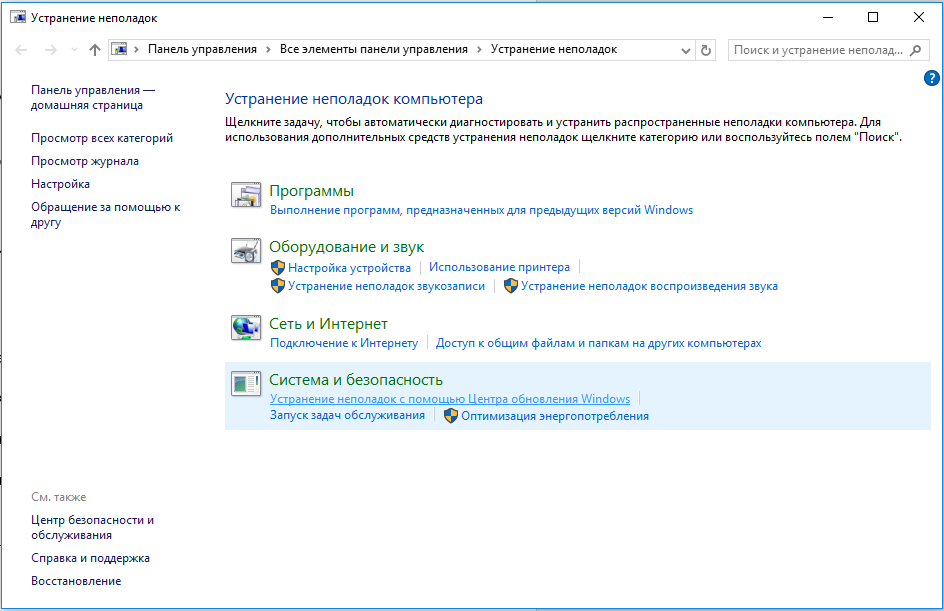
Метод 1: используем средство устранения неполадок
Самый простой в использовании способ – использовать предусмотренный разработчиками Microsoft инструмент для поиска и исправления проблем с центром обновлений.
Инструкция:
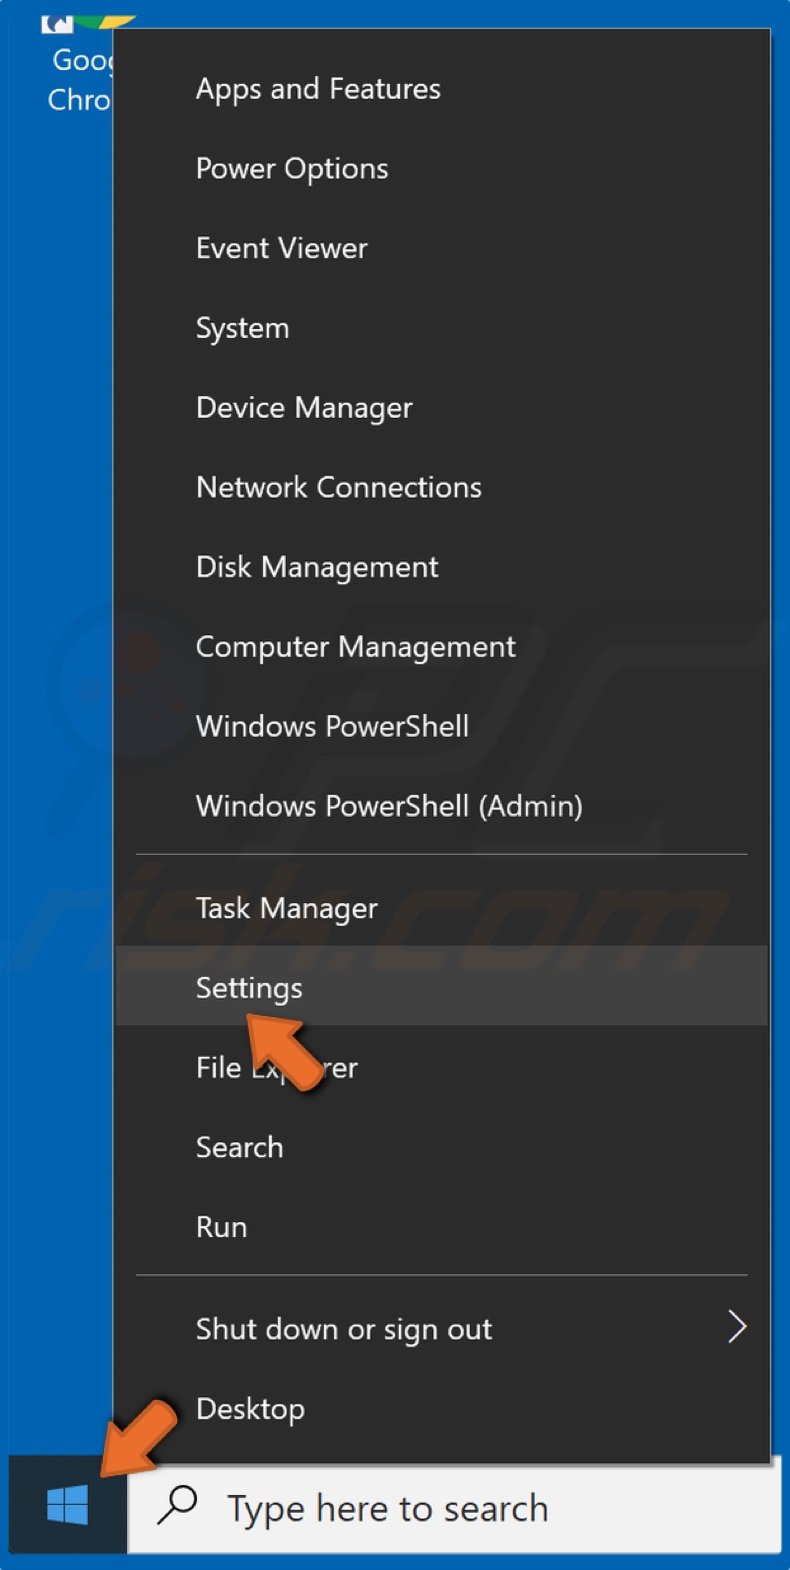
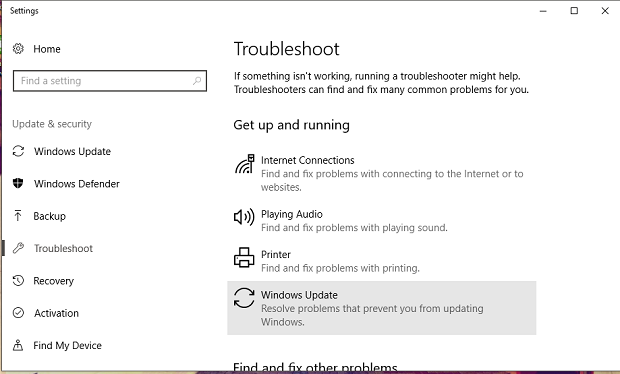
- В поиск Windows вводим «Устранение неполадок» и открываем одноименный результат.
- В блоке «Система и безопасность» нажимаем на «Устранение неполадок с помощью «Центра обновлений Windows».

- Жмем на кнопку «Далее» и делаем то, что просит мастер.
Метод 2: удаляем последние обновления
Порой причиной ошибки 0x80070652 становится конфликт уже установленных обновлений с теми, что Windows пытается загрузить и поставить теперь. Периодически такое случается. Исправлением может служить удаление предыдущих апгрейдов.
Инструкции:
- Нажимаем сочетание Win + I и в окне «Параметров» выбираем «Обновление и безопасность».
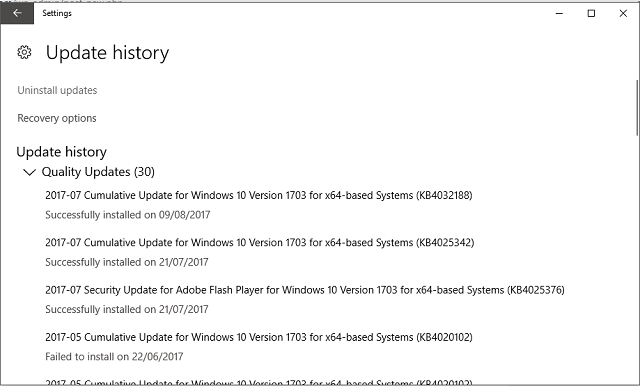
- На вкладке «Центр обновления Windows» нажимаем на ссылку «Журнал обновлений».

- Кликаем по элементу «Удалить обновления».
- Возвращаемся назад к «Центру обновлений Windows» и нажимаем на кнопку «Проверка наличия обновлений.
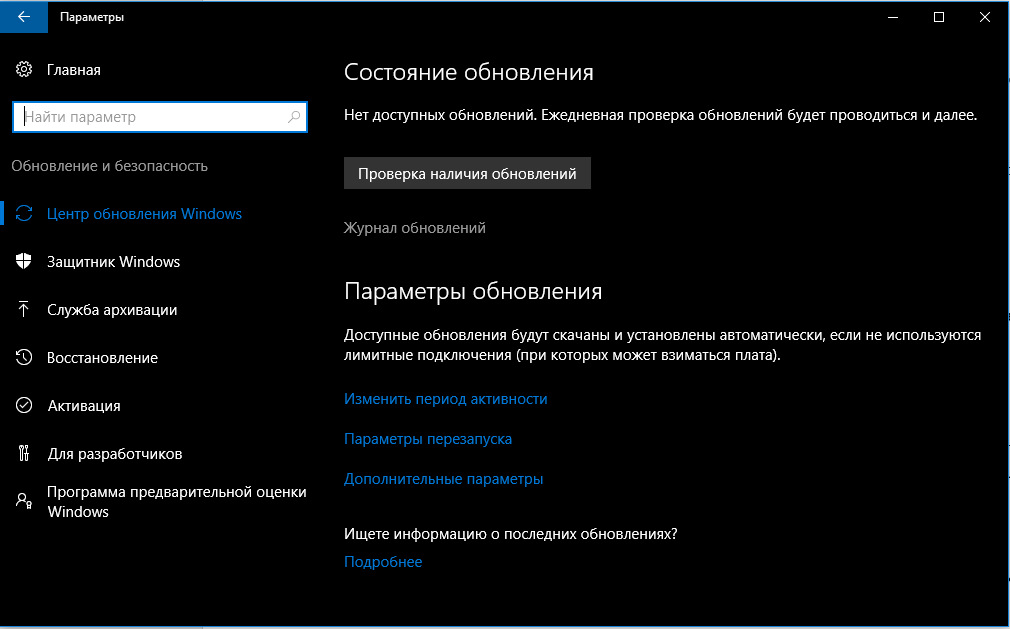
Сейчас должна запуститься инсталляция всех обновлений: и только что удаленных, и проблемных, которые не удавалось установить.
Метод 3: используем Media Creation Tool
Если встроенный инструмент Windows не может выполнить обновление, стоит попробовать альтернативный метод с использованием Media Creation Tool. Для начала следует загрузить программу с официального сайта. После скачивания следует запустить программу и через нее запустить обновление. Необходимая опция отображается в главном меню и называется «Обновить этот компьютер сейчас».
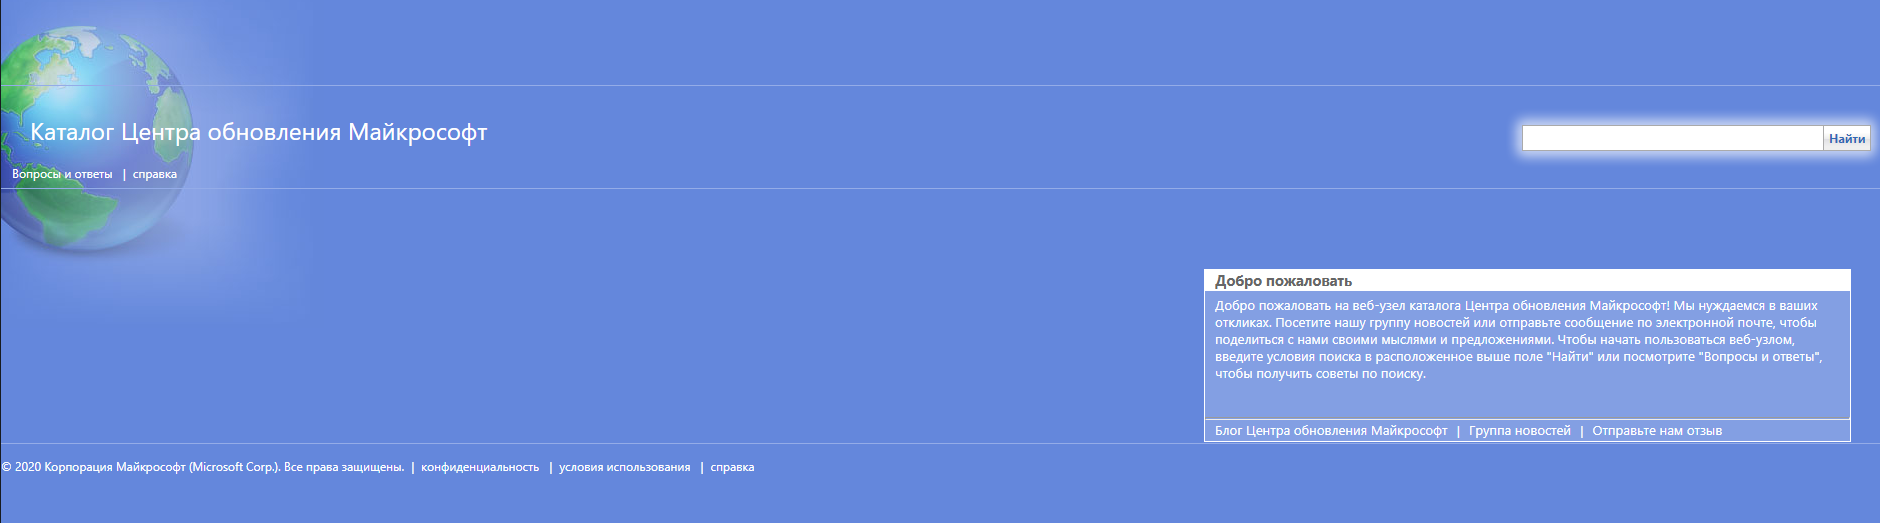
Метод 4: применяем каталог Центра обновлений Microsoft
В обычных ситуациях обновление происходит автоматически, но никто не мешает попробовать загрузить его вручную с сайта Microsoft. Достаточно ввести в поиск идентификатор целевого обновления и нажать на кнопку «Найти». Остается только кликнуть по клавише «Загрузить» напротив целевого обновления. После загрузки файл стоит разархивировать и вручную запустить обновление Windows.
Метод 5: сбрасываем Центр обновления
Если причиной проблемы стал «Центр обновления», все предыдущие инструкции могут оказаться неэффективными. Должен помочь сброс компонента, после чего он вернется в исходный вид. Для достижения поставленной цели нужно использовать много команд для консоли, но есть и более простой способ – использовать BAT-файл. Чтобы читатели не создавали его вручную, просто скачайте файл отсюда. Его запуск должен помочь.
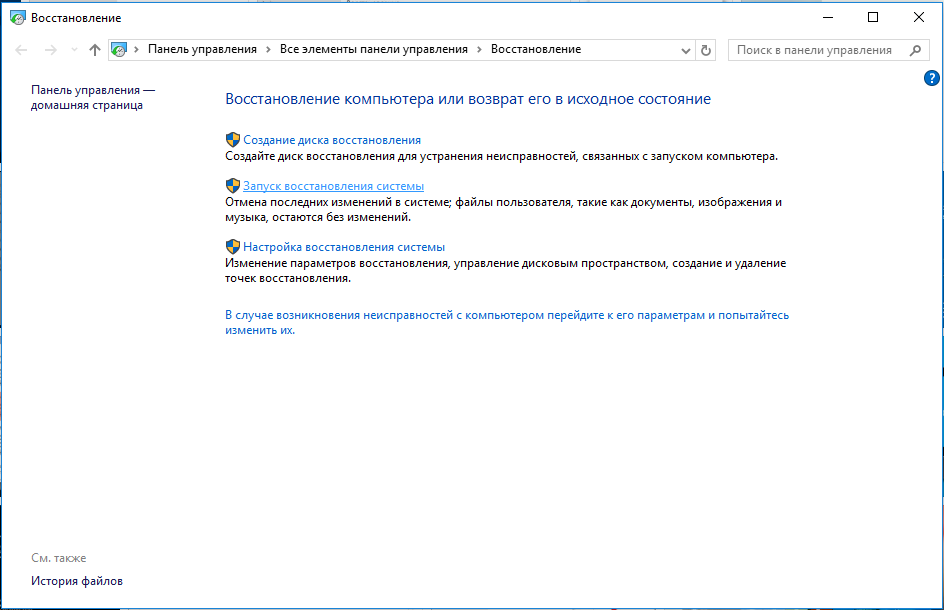
Метод 6: откатываем систему Windows
Если существует точка восстановления, созданная в момент нормальной работы системы, стоит ей воспользоваться. В таком случае Windows восстановится к нормальному состоянию и будет исправно работать. Для этого в поиск вводим «Восстановление» и выбираем «Запуск восстановления системы». Дальше следует просто руководствоваться подсказками мастера.
На этом все, Windows любых версий должна получить возможность нормально обновляться, а ошибка 0x80070652 – отступит. Скорее всего после удачного апгрейда системы в дальнейшем этот сбой проявляться не будет.
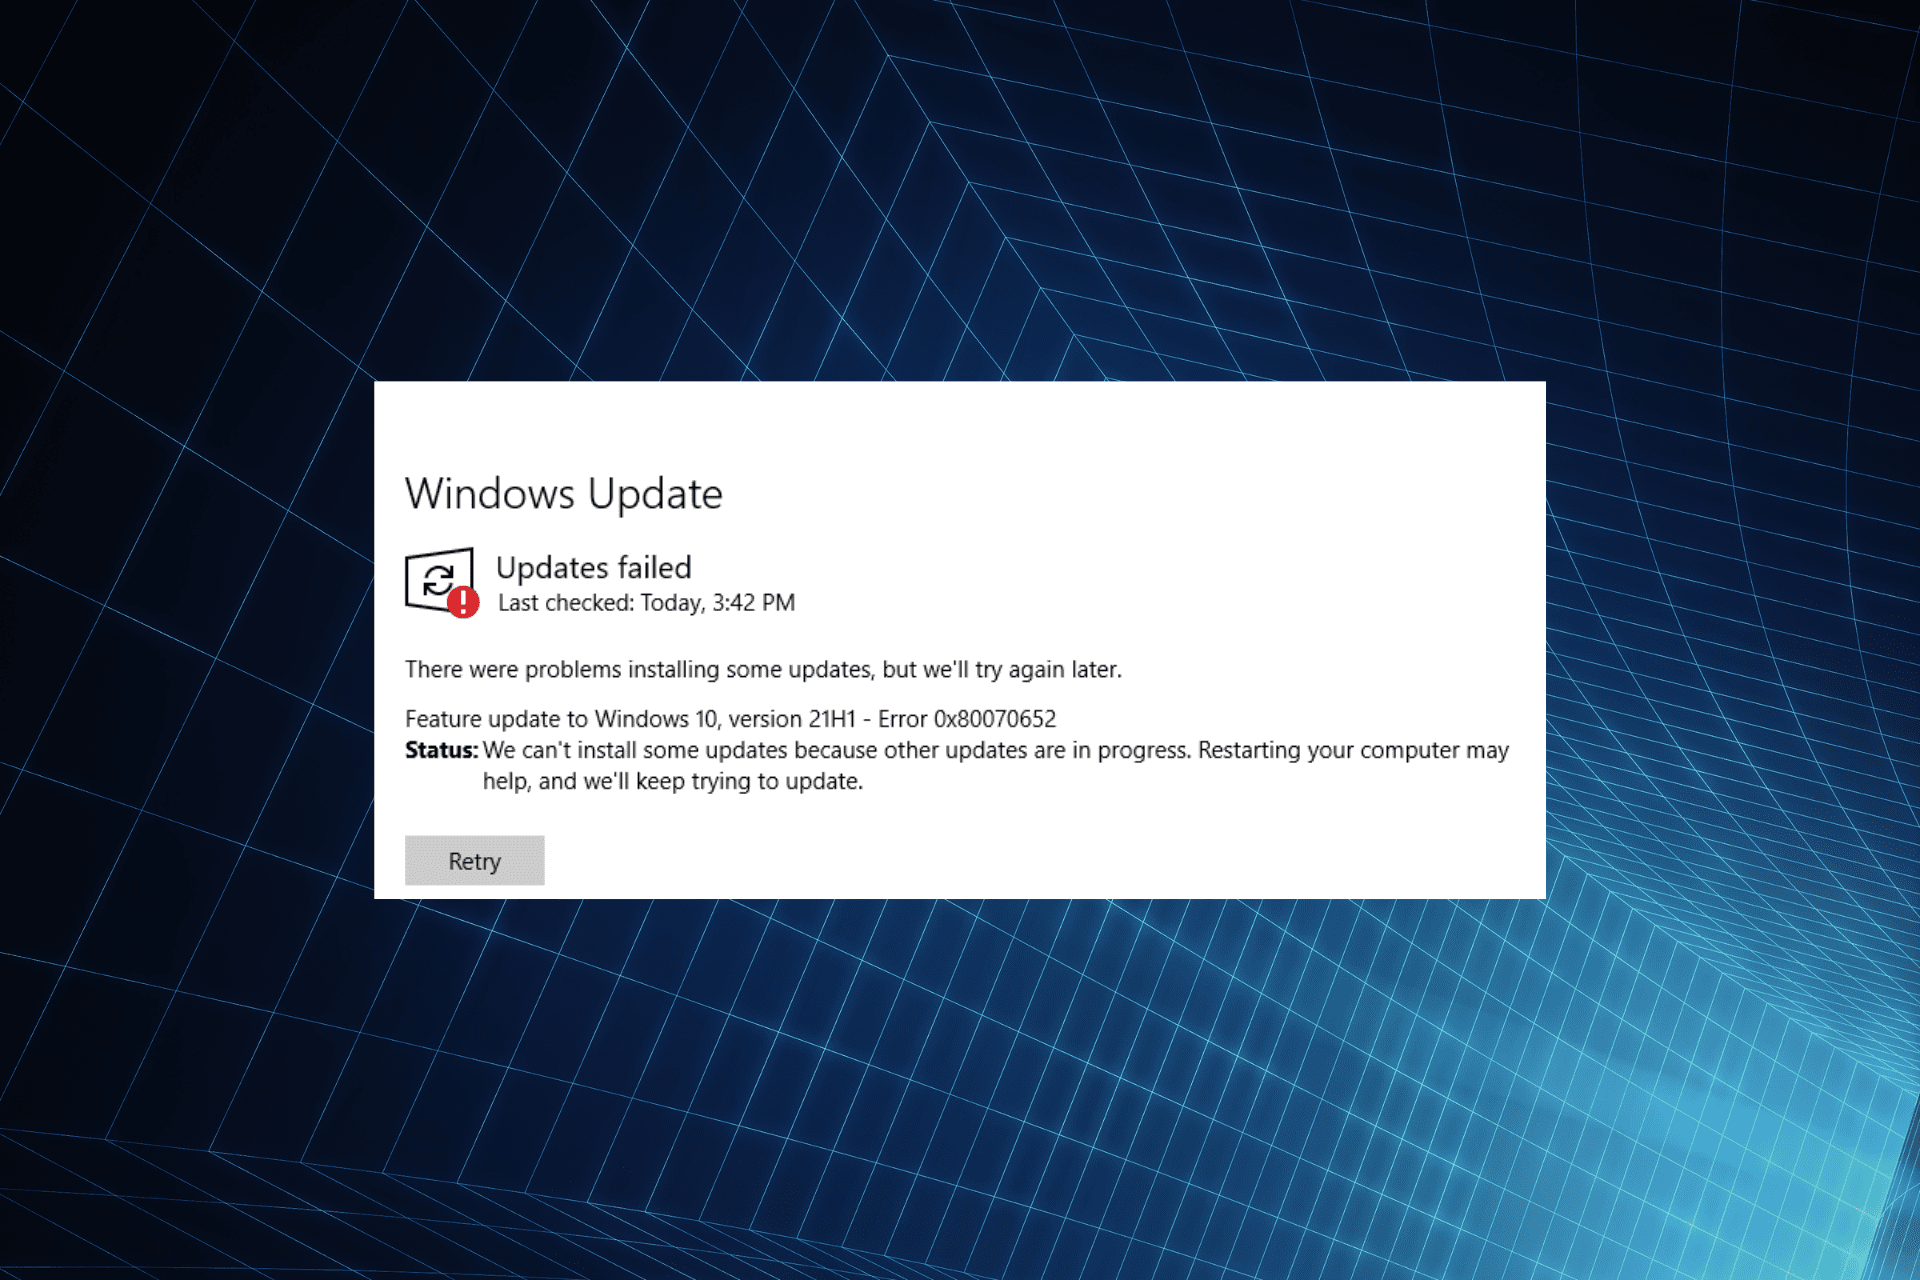
Windows 10 — система далеко не безупречная, особенно когда речь заходит об установке обновлений. Еще с самого выпуска системы пользователи сталкиваются с различными ошибками обновлений. Windows — сложная операционная система, которая вряд ли избавится от таких проблем когда-либо. Большое количество функций и настроек Windows рано или поздно столкнутся с какой-то ошибкой по неожиданным причинам. В Ошибка 0x80070652 появляется при установке новых обновлений. Она останавливает процесс установки и иногда может привести к сбою системы (Синему экрану смерти). Чаще всего такие ошибки возникают из-за поврежденных файлов, какой-то несовместимости и проблем с конфигурацией. Однако иногда пользователям требуется больше времени и попыток для решения проблемы, поскольку могут быть более широкие причины ее появления. Ниже мы покажем 7 решений от простых до более сложных. Обязательно следуйте каждому шагу, чтобы не пропустить ни одной важной детали.

Ошибка Центра обновления Windows 0x80070652 (пример 1)

Ошибка Центра обновления Windows 0x80070652 (пример 2)
Скачать средство восстановления Windows
Скачать средство восстановления Windows

Существуют специальные утилиты для восстановления Windows, которые могут решить проблемы, связанные с повреждением реестра, неисправностью файловой системы, нестабильностью драйверов Windows. Мы рекомендуем вам использовать Advanced System Repair Pro, чтобы исправить «Ошибку Центра обновления Windows 0x80070652» в Windows 10.
1. Воспользуйтесь средством устранения неполадок Центра обновления Windows
Как правило, первым делом следует попробовать встроенное «Средство устранения неполадок». В большинстве случаев это не помогает решить проблемы. Тем не менее, все же стоит попробовать этот простой, но иногда эффективный метод устранения проблемы. Встроенная утилита просканирует вашу систему на предмет потенциальных проблем и попытается исправить их в конечном итоге.
- Открытые Настройки , а затем перейдите в Обновление и безопасность > Устранение неполадок.
- На правой панели найдите Центр обновления Windows и нажмите Запустить средство устранения неполадок.
- Завершите процесс, следуя инструкциям на экране, и перезагрузите компьютер.
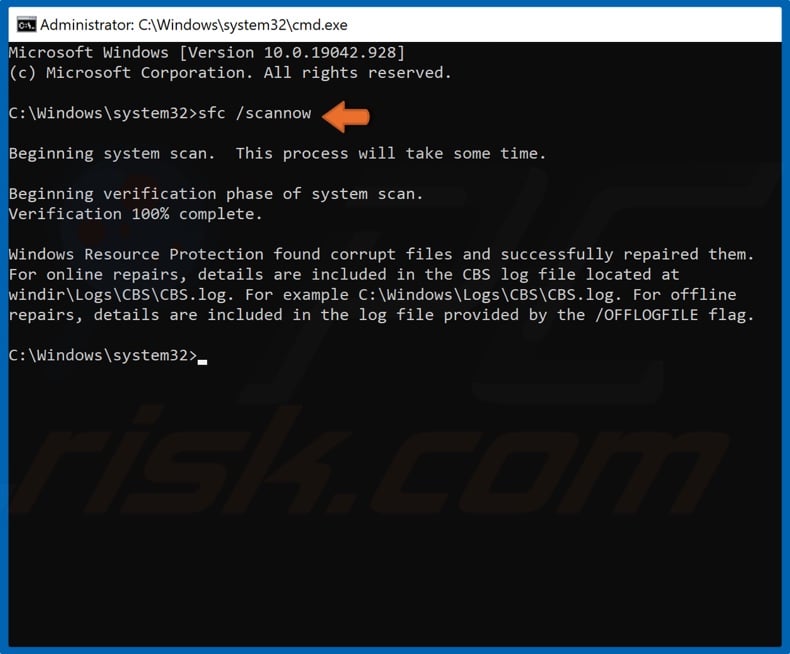
2. Проверьте целостность системных файлов.
Как мы уже упоминали в начале, проблемы с обновлением могут возникать из-за поврежденных или отсутствующих файлов. Эти файлы необходимы для правильной работы служб Windows. Если некоторые из этих файлов находятся вне их родной среды, то вероятнее всего это и будет причиной ошибок обновления. Ниже мы воспользуемся SFC (средство проверки системных файлов) и DISM (обслуживание образов развертывания и управление ими), которые помогут обнаружить и восстановить отсутствующие компоненты. Вот как:
С помощью SFC
- Открытые Командная строка , введя
cmdв поле поиска рядом с Меню Пуск кнопку. - Щелкните правой кнопкой мыши по Командная строка , а затем выбрать Запуск от имени администратора.
- После открытия консоли введите
sfc /scannowкоманду и нажмите Enter. - Когда процесс восстановления будет завершен, перезагрузите компьютер.
С помощью DISM
- Открытые Командная строка как мы это делали на предыдущем шаге.
- Скопируйте и вставьте эту команду
DISM.exe /Online /Cleanup-image /Restorehealth. - Нажмите Enter и подождите, пока Windows закончит сканирование и исправление.
- После этого перезагрузите компьютер и снова установите обновление.
После выполнения обоих этих сканирований попробуйте снова установить проблемное обновление. Если это не помогло, переходите к дальнейшим действиям, упомянутым ниже.
3. Включите Чистый запуск Windows.
Ошибка 0x80070652 также может быть вызвана проблемами несовместимости. Антивредоносное ПО или какая-то другая сторонняя программа может конфликтовать со службами Windows, вызывая ошибку. Чистая загрузка позволит запустить ваш компьютер только со встроенными приложениями и службами, чтобы выяснить, вызывает ли проблему какое-то дополнительное приложение. Чтобы запустить ПК в режиме чистой загрузки, просто выполните следующие действия:
- Нажмите Windows Key + R кнопки одновременно и вставьте
msconfig. - Затем в открывшемся окне перейдите в Услуги сверху.
- Установите флажок рядом с Не отображать службы Майкрософт и нажмите на Отключить все кнопку.
- Теперь перейдите в Общие и выберите Выборочный запуск опцию. Убедитесь, что флажок установлен только рядом с Загружать системные службы.
- Нажмите Применить и OK. Затем перезагрузите компьютер.
Теперь вы можете попробовать обновить свою систему, находясь в режиме Чистой загрузки. Независимо от того, удалось ли вам установить обновление или нет, необходимо вернуть Windows к параметрам обычного запуска. Для этого просто повторите все шаги, которые были описаны выше, включив отключенные службы и изменив параметры запуска с Выборочный запуск в нормальная.
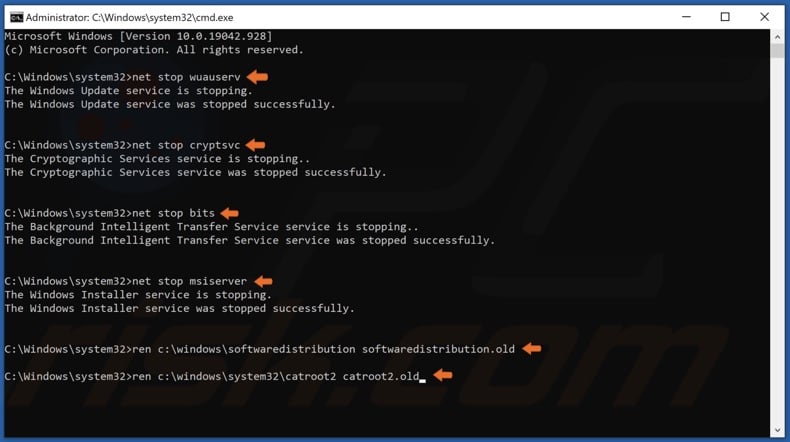
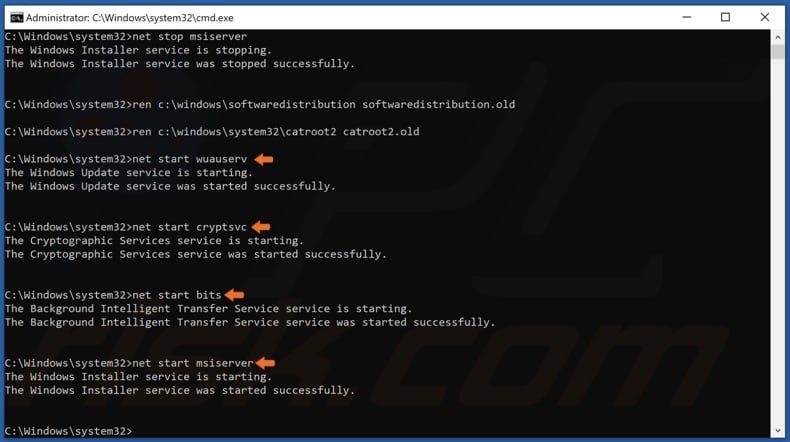
4. Сбросьте компоненты Центра обновления Windows.
Еще один хороший способ решения проблем с обновлениями, — это сброс настроек Центра обновления Windows. Данный метод довольно эффективен в большинстве случаев. Вся процедура включает перезапуск служб BITS, Cryptographic, MSI Installer и Windows Update, а также переименование некоторых папок обновлений (SoftwareDistribution и Catroot2). Эти папки содержат временные файлы, необходимые для установки обновлений Windows. Исходя из этого, мы заставим Windows удалить поврежденные элементы и создать компоненты обновления с нуля. Ниже мы покажем вам два способа выполнения этого шага. Первый потребует ввода и выполнения каждой консольной команды вручную. Другой включает в себя так называемый пакетный файлы, написанный в Блокноте и сохраненный как WUReset.bat. Большой разницы в этих двух методах практически нет. Вся процедура может показаться сложной, но для ее выполнения не потребуется много времени и сил. Просто следуйте инструкциям, перечисленным ниже:
Вручную
- Открытые Командная строка , введя
cmdв поле поиска рядом с Меню Пуск кнопку. - Щелкните правой кнопкой мыши по Командная строка , а затем выбрать Запуск от имени администратора.
- Скопируйте и вставьте этот список команд одну за другой, нажимая Enter после каждой. (Это действие отключит службы, ответственные за Обновления Windows)
- Затем мы должны переименовать вышеупомянутые папки. Просто вставьте эти команды, нажимая Enter после каждой.
- Наконец, все, что осталось сделать, это вернуть отключенные службы. Введите эти команды так же, как мы делали ранее.
- На этом все. Перейдите в центр обновления Windows и попробуйте выполнить установку снова.
net stop wuauserv
 net stop cryptSvc
 net stop bits
 net stop msiserver
ren C:\Windows\SoftwareDistribution SoftwareDistribution.old
 ren C:\Windows\System32\catroot2 Catroot2.old
net start wuauserv
 net start cryptSvc
 net start bits
 net start msiserver
С помощью Пакетного файла
Это альтернативный метод. Пакетный сценарий используется для запуска тех же команд в целях сброса всех компонентов Центра обновления Windows, Криптографических служб и папок, таких как SoftwareDistribution. Это не так сложно, как можно подумать, даже проще, чем предыдущий. Все, что вам нужно, это Блокнот Windows и немного копирования и вставки:
- Откройте новый Блокнот . Для этого щелкните правой кнопкой мыши на любую свободную область на рабочем столе, выберите Новая и Текстовый документ.
- Затем вставьте этот список команд в блокнот:
- После вставки, нажмите Файл > Сохранить как и назовите файл WUReset.bat, Обязательно установите Кодирование в ANSI и сохраните файл в любом месте.
- Наконец, нажмите на файл правой кнопкой мыши и выберите Запуск от имени администратора и наслаждайтесь автоматическим сбросом компонентов обновлений Windows.
@ECHO OFF
 echo Simple Script to Reset / Clear Windows Update
 echo.
 PAUSE
 echo.
 attrib -h -r -s %windir%system32catroot2
 attrib -h -r -s %windir%system32catroot2*.*
 net stop wuauserv
 net stop CryptSvc
 net stop BITS
 ren %windir%system32catroot2 catroot2.old
 ren %windir%SoftwareDistribution sold.old
 ren "%ALLUSERSPROFILE%\Application Data\Microsoft\Network\Downloader" downloader.old
 net Start BITS
 net start CryptSvc
 net start wuauserv
 echo.
 echo Task completed successfully...
 echo.
 PAUSE
Прелесть пакетных сценариев заключается в том, что они помогают выполнять все шаги одновременно, не вводя команды вручную. Если вы когда-нибудь столкнетесь с подобными проблемами в будущем, можно просто запустить уже созданный .bat файл для сброса компонентов обновления.
5. Загрузите конфликтующее обновление из каталога Microsoft.
Если вы до сих пор не можете установить необходимое обновление, тогда можно попробовать сделать это вручную. Иными словами, вам придется загрузить конфликтующее обновление прямо из каталога Microsoft. Для этого выполните шаги, отмеченные ниже:
- Нажмите Windows key + I одновременно.
- Затем перейдите в Обновление и безопасность.
- В правой части окна выберите Просмотр журнала обновлений.
- После этого найдите и запишите самое последнее обновление (вверху списка).
- Затем загрузите записанное обновление из Microsoft Update Catalog.
6. Используйте Media Creation Tool.
Еще один мощный инструмент, предназначенный для получения последних обновлений, — это Media Creation Tool. Эта утилита является отличной альтернативой Центру обновления Windows по умолчанию. Она помогает устанавливать свежие обновления в обход различных ошибок. Эта процедура не коснется ваших личных данных, а просто обновит компьютер. Для этого выполните следующие действия:
- Сначала вам нужно скачать утилиту с веб-сайта Microsoft.
- Затем запустите загруженный файл.
- После того, как вы согласитесь с Условиями использования, вам будет предложено два варианта на выбор. Выберите Обновить этот компьютер сейчас.
- Выберите Сохранить личные файлы чтобы они не пострадали.
- Наконец, запустите процесс и дождитесь его завершения.
- Надеемся, этот метод помог вам избавиться от ошибки 0x80070652.
7. Обновите драйверы
Довольно часто проблемы совместимости также могут быть вызваны устаревшими или неисправными драйверами. В результате это может мешать успешному обновлению Windows. Именно поэтому рекомендуется просканировать все устройства на наличие драйверов и обновить их при необходимости. Вы можете сделать это вручную или с помощью специальной утилиты для более быстрого решения. Оба варианта показаны ниже:
- Щелкните левой кнопкой мыши на Меню Пуск и выберите Диспетчер устройств.
- В идеале следует обновить все доступные устройства. Если какое-то устройство отмечено желтым треугольником, то его следует обновить в первую очередь.
- Для этого щелкните на драйвер правой кнопкой мыши, выберите Обновление ПОи следуйте инструкциям на экране.
- Позвольте Windows найти новые драйверы и загрузить их.
Драйверы являются ключом к правильной конфигурации вашей системы. Именно они обеспечивают стабильное соединение между оборудованием и вашей операционной машиной. Обновление ряда драйверов вручную может занять много времени из-за монотонного повторения шагов. Здесь вы можете скачать лучшую утилиту для обновления драйверов, которая сама справится с этой задачей — Driver Booster от IObit:

Стартовый экран Driver Booster

Результаты сканирования Driver Booster

Раздел инструментов Driver Booster
Скачать Driver Booster
Итоги
Ошибки обновлений трудно искоренить навсегда. Они будут появляться время от времени у случайных пользователей. Если вас беспокоят какие-то другие проблемы на вашем ПК, поищите их решения на нашем веб-сайте. Ежедневно публикуется множество новых статей, которые помогают людям решать различные проблемы, от ошибок до удаления вирусов.
How to Fix Update Error 0x80070652 in Windows 10
Many people have reported getting error code 0x80070652 when trying to update Windows 10. This article should help you fix error code 0x80070652 and update Windows.
What is Windows Update Error 0x80070652?
Windows Update error code 0x80070652, also known as ERROR_INSTALL_ALREADY_RUNNING, occurs because Microsoft Windows Installer can only run one installation at a time unless it is a nested installation. Error 0x80070652 means that a previous Windows installation has not yet been completed.
Having two or more installations running simultaneously confuses the operating system since Windows wasn’t designed to run several Windows Installer instances at the same time. If you get Error 0x80070652, the first thing you should do is allow the other installation to complete.
However, you may not see an installer window as the installation may be running in the background. You should be able to identify the installation process in the Task Manager. If you think the installation is stuck, you should restart your PC and update Windows again.
You may also get error 0x80070652 due to a slow Internet connection, missing or damaged DLL files, corrupted Windows Registry items, corrupted Windows update files, and outdated hardware drivers.
Video Guide on How to Fix Windows Update Error 0x80070652
Table of Contents:
- Introduction
- Solution 1. Run the Windows Update Troubleshooter
- Solution 2. Install the Update Manually
- Solution 3. Update Windows 10 Using the Media Creation Tool
- Solution 4. Run the Deployment Imaging and Servicing Management (DISM) Scan
- Solution 5. Run System File Checker (SFC) Scan
- Solution 6. Reset Windows Update Components Manually
- Video Guide on How to Fix Windows Update Error 0x80070652
Solution 1. Run the Windows Update Troubleshooter
1. Right-click the Start Menu button and select Settings.
2. Choose Update & Security.

3. Select Troubleshoot in the left pane.
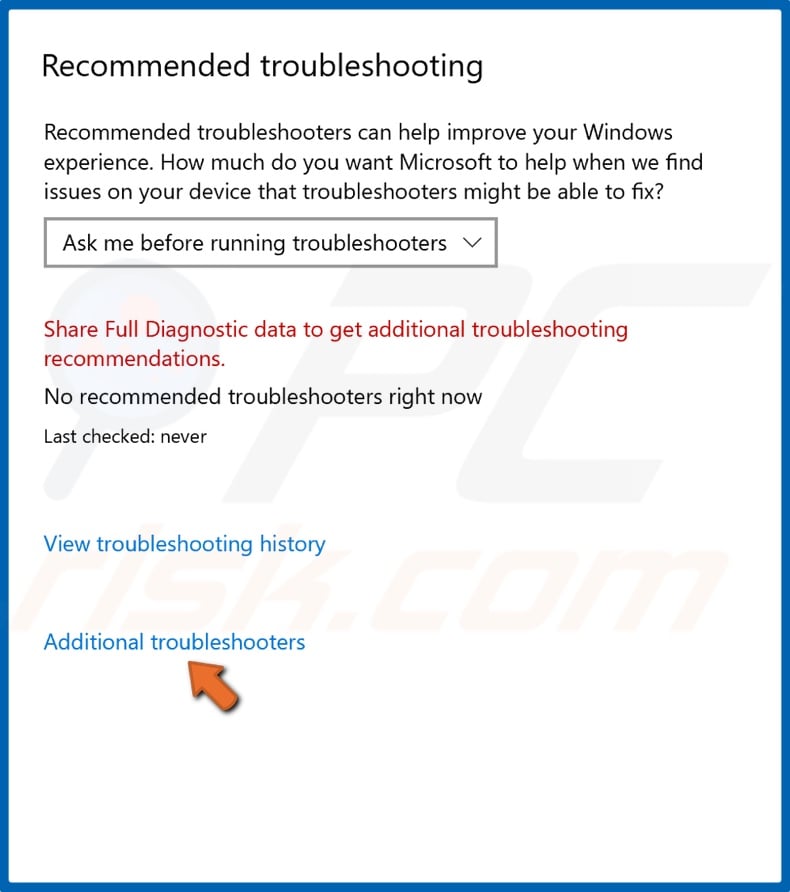
4. Click Additional troubleshooters in the right pane.
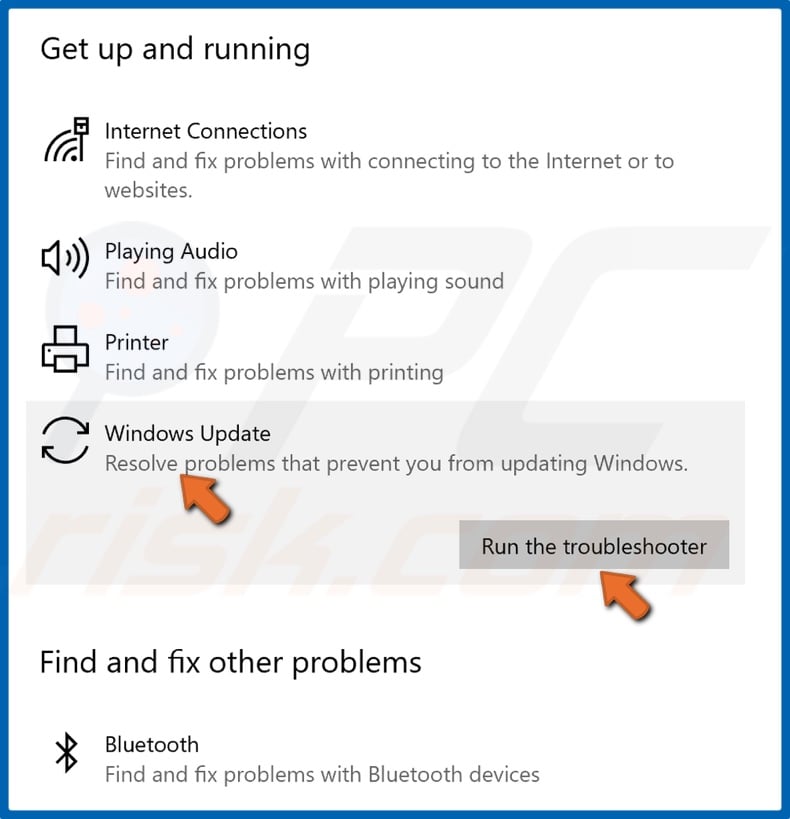
5. Choose Windows Update and then click Run the troubleshooter.
6. The troubleshooter will identify the issue and apply a fix automatically.
7. Try updating Windows.
[Back to Table of Contents]
Solution 2. Install the Update Manually
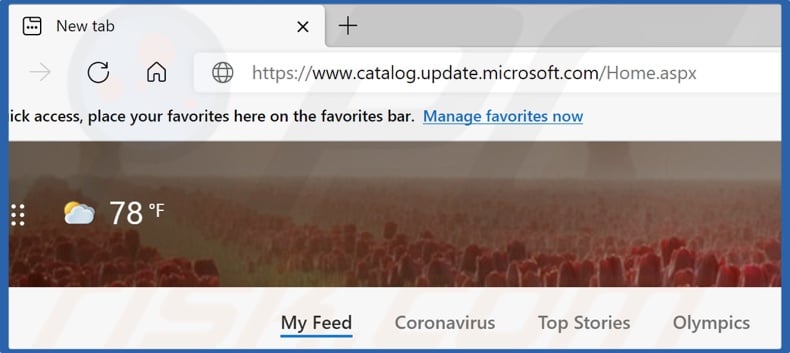
1. Open your web browser and go to the Microsoft Update Catalog webpage.
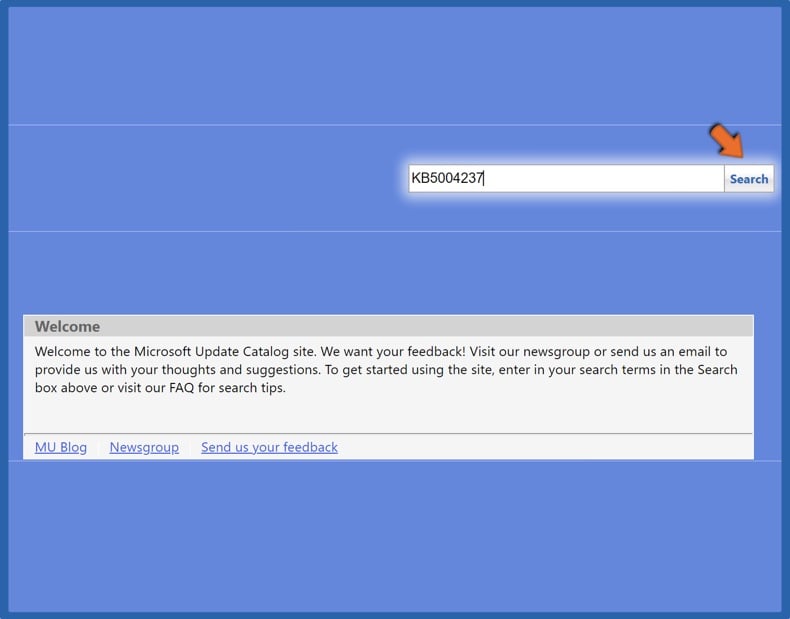
2. Type in the KB (Knowledge Base) code (e.g., KB5004237) in the search box, and click Search.
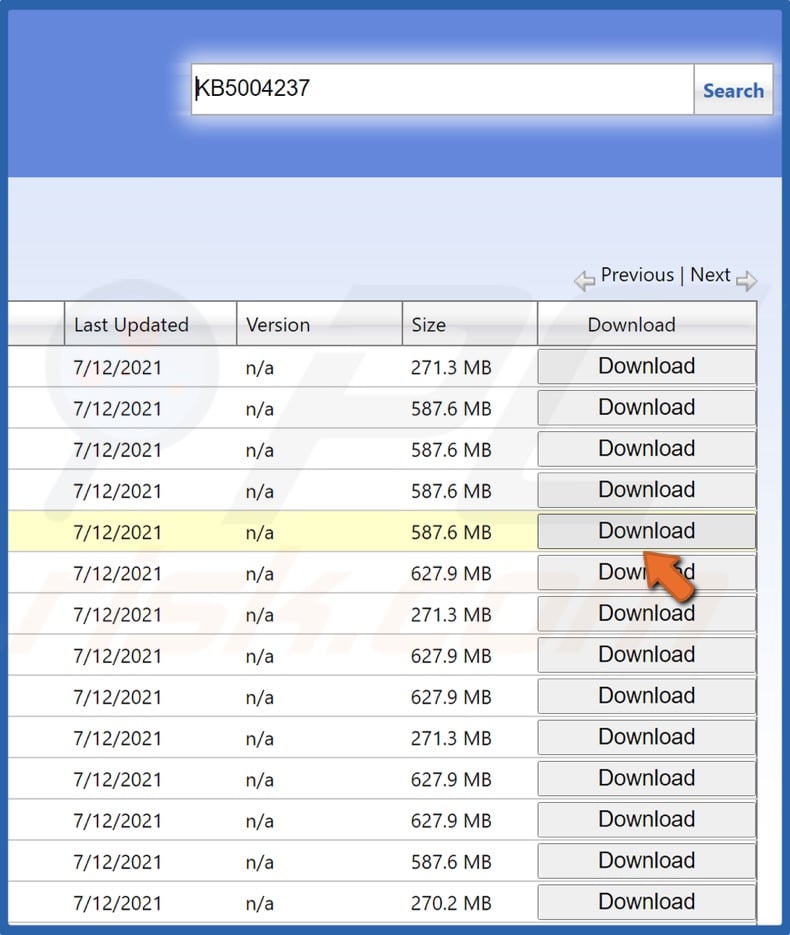
3. Then, select the version for your operating system and CPU architecture, and click Download.
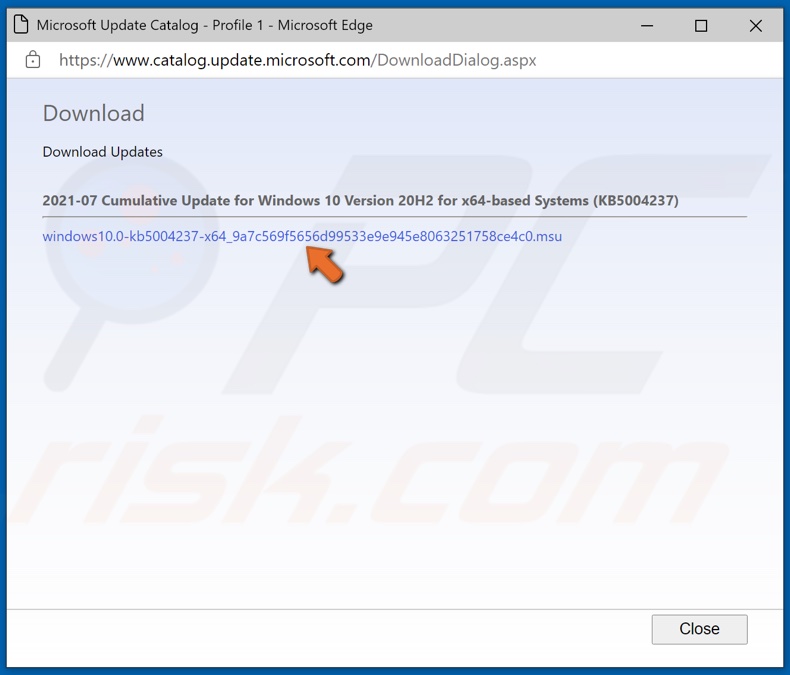
4. A new window will open. Click the update link, and the update will start to download.
5. Once the update is downloaded, run its installer.
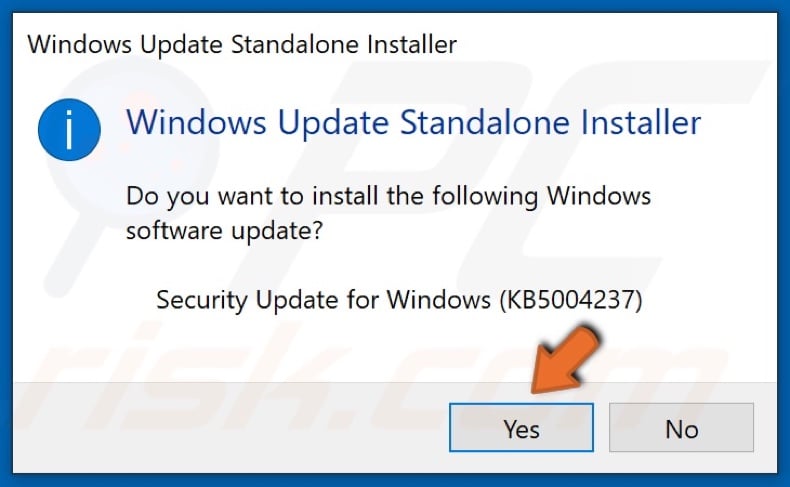
6. The installer will scan your PC for updates and then ask whether you want to install the update. Click Yes.
7. The Standalone installer will begin installing the update.
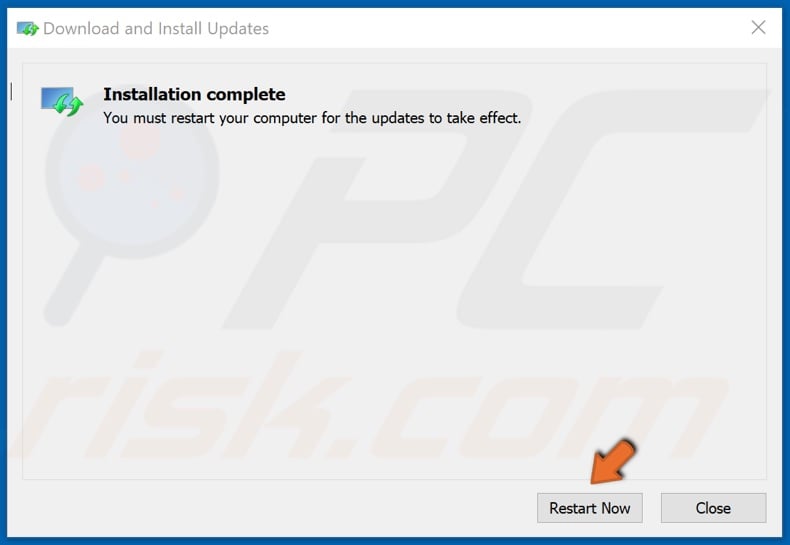
8. Once the update is installed, click Restart now.
9. Try updating Windows.
[Back to Table of Contents]
Solution 3. Update Windows 10 Using the Media Creation Tool
1. Open your web browser and go to the Media Creation Tool download page.
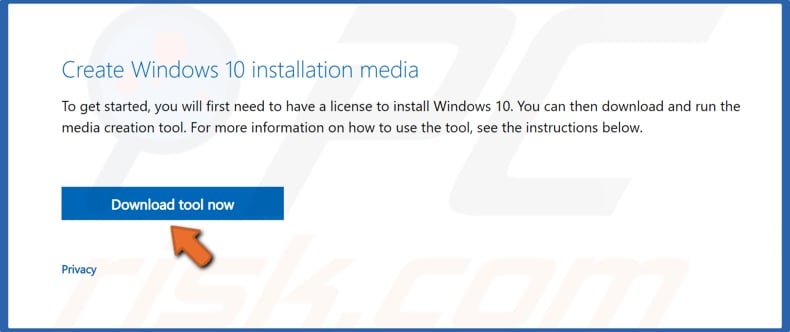
2. Click the Download tool now button.
3. Run the Media Creation Tool (MediaCreationTool21H1.exe) executable file.
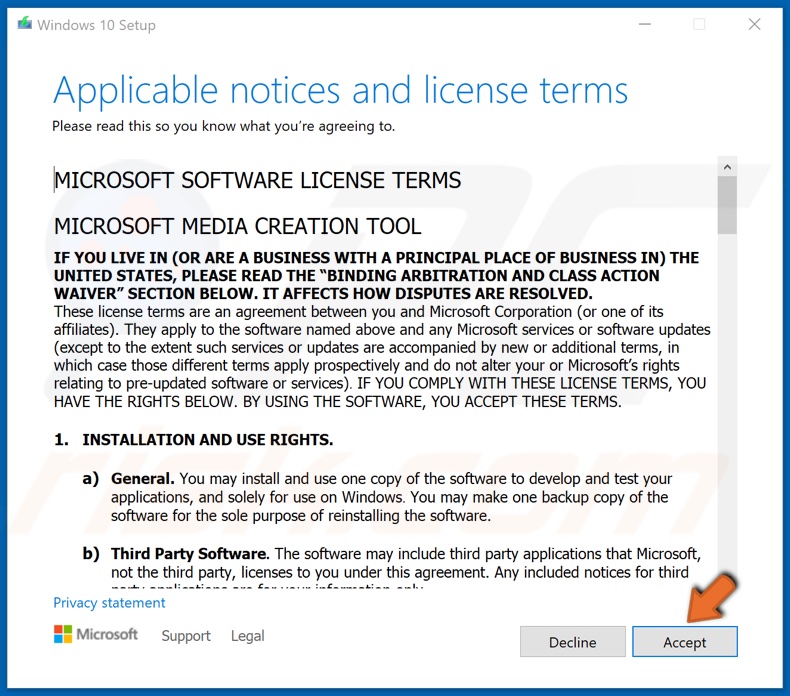
4. Then, Accept the Media Creation Tool license agreement.
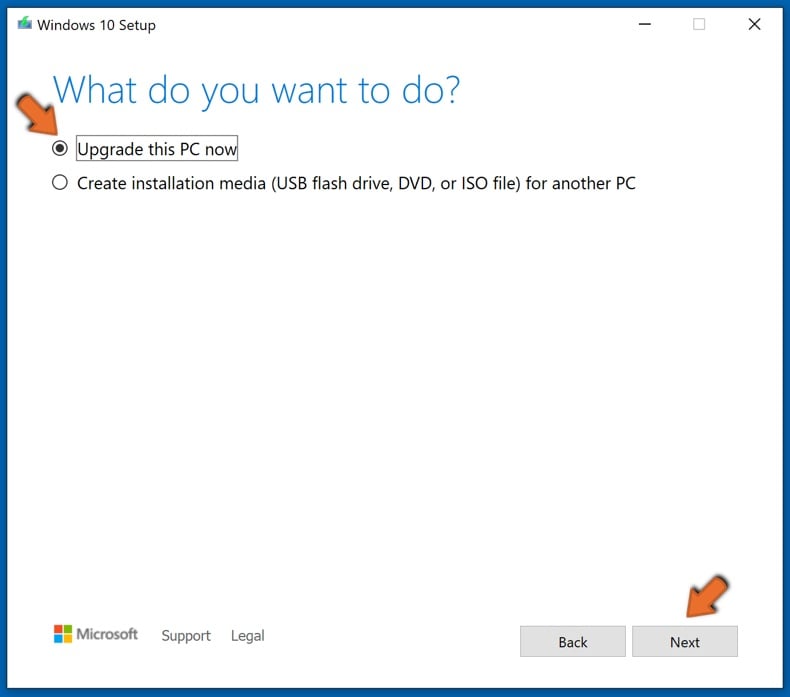
5. Select Upgrade this PC now and click Next.
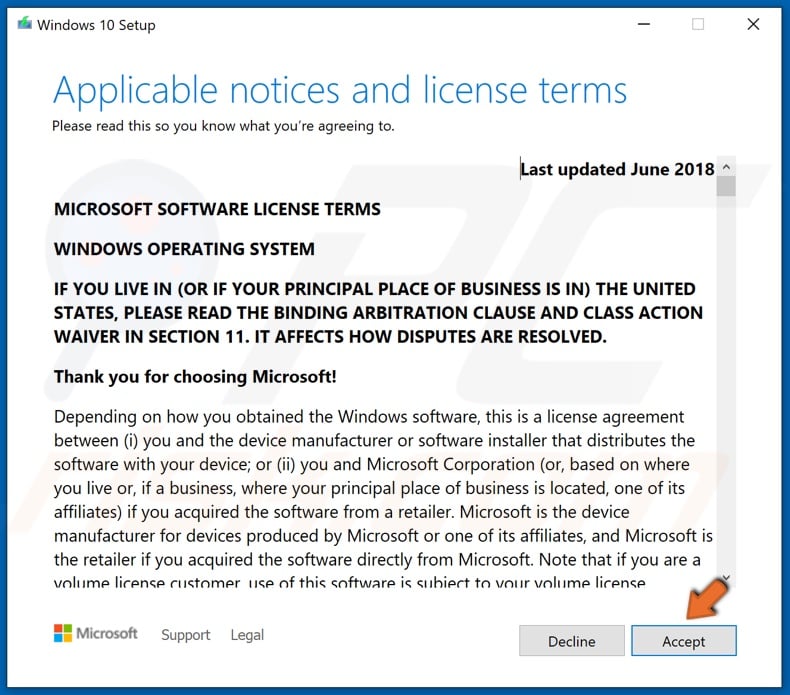
6. Accept the Windows 10 license agreement.
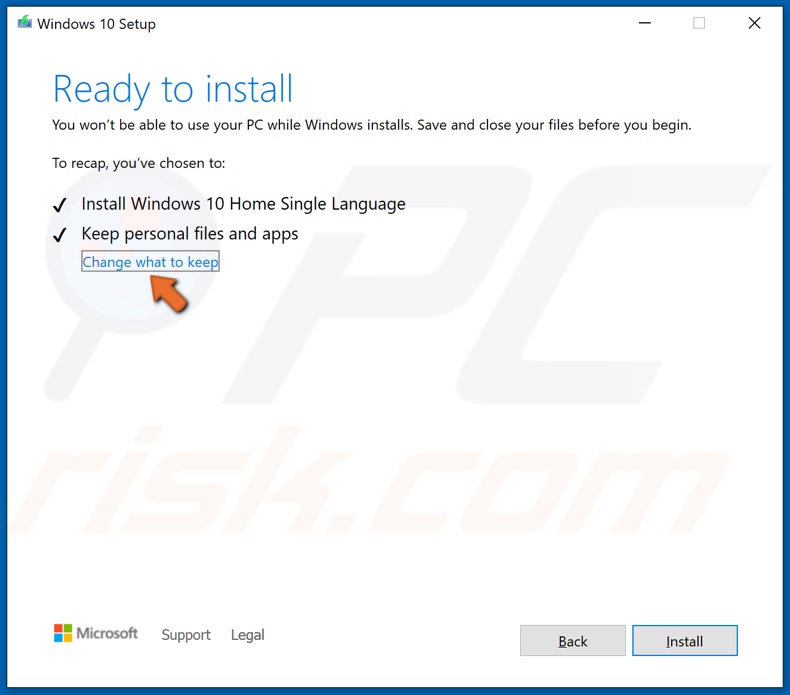
7. You may keep your personal files and apps, but if you want a clean Windows 10 installation, click the Change what to keep button to customize the installation settings.
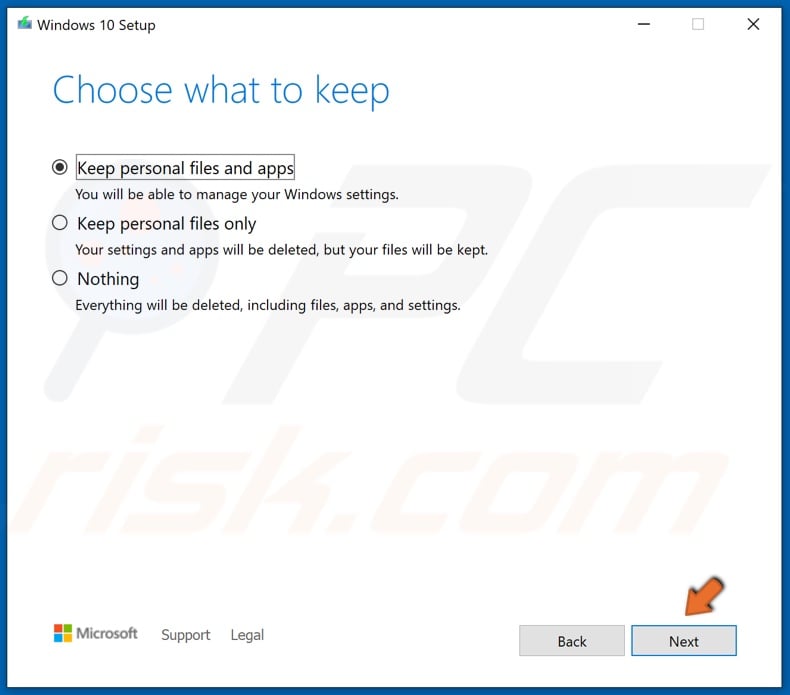
8. Choose what to keep and then click Next.

9. Click Install, and the setup will start upgrading Windows 10.
[Back to Table of Contents]
Solution 4. Run the Deployment Imaging and Servicing Management (DISM) Scan
1. Hold down Windows+R keys to open Run.
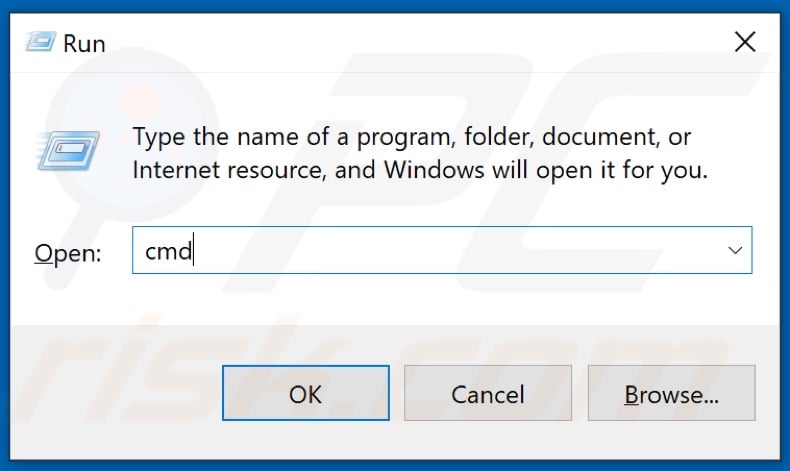
2. In the Run dialog box, type in CMD and hold down Ctrl+Shift+Enter keys to open the elevated Command Prompt.
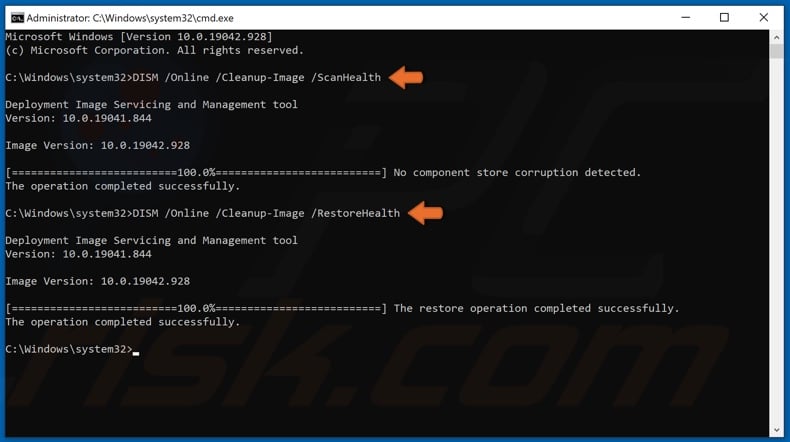
3. In the Command Prompt window, type in DISM /Online /Cleanup-Image /ScanHealth and hit the Enter key.
4. Lastly, type in DISM /Online /Cleanup-Image /RestoreHealth and hit Enter.
5. Restart your PC and try updating Windows.
[Back to Table of Contents]
Solution 5. Run System File Checker (SFC) Scan
1. Hold down Windows+R keys to open Run.
2. In the Run dialog box, type in CMD and hold down Ctrl+Shift+Enter keys to open the elevated Command Prompt.
3. In the Command Prompt window, type in SFC /ScanNow and hit the Enter key.
4. Restart your PC and try updating Windows.
[Back to Table of Contents]
Solution 6. Reset Windows Update Components Manually
1. Hold down Windows+R keys to open Run.
2. In the Run dialog box, type in CMD and hold down Ctrl+Shift+Enter keys to open the elevated Command Prompt.
3. In the Command Prompt window, type in the commands listed below, and hit the Enter key after entering each one:
- net stop wuauserv
- net stop cryptSvc
- net stop bits
- net stop msiserver
4. Then, type in ren C:\Windows\SoftwareDistribution SoftwareDistribution.old and hit the Enter key.
5. Type in ren C:\Windows\System32\catroot2 Catroot2.old and hit Enter.
6. Type in the commands listed below, and hit Enter after entering each one:
- net start wuauserv
- net start cryptSvc
- net start bits
- net start msiserver
7. Close the Command Prompt and try updating Windows.
[Back to Top]
Contents
- Tip 1. Run the Windows Update troubleshooter
- Tip 2. Run System File Checker
- Tip 3. Uninstall the latest updates
- Tip 4. Update your drivers
- Tip 5. Reset the Software Distribution folder
- Tip 6. Use Media Creation Tool
- Tip 7. Install the update manually
- Tip 8. Run the batch script

‘The trick is to fix the problem you have,
rather than the problem you want.’
Bram Cohen
Despite being the most polished of all Microsoft’s operating systems, Windows 10 is notorious for an unprecedented number of update errors that come up out of the blue and interfere with its normal operations. The error 0x80070652 is a case in point: this issue prevents you from installing the updates your system needs to run smoothly on your computer.
If you are looking how to fix the error code 0x80070652 in Windows 10, you are on the right track: we have prepared a rundown of proven and easy-to-implement tips how to fix the error 80070652 when installing Windows updates. Since there are plenty of underlying issues that are capable of triggering the error in question, we recommend that you start with the first pointer on our list and move on until you come across the one that is helpful in your scenario. Make sure to follow the instructions carefully to achieve the best possible result when troubleshooting your update problem.
Tip 1. Run the Windows Update troubleshooter
Fortunately, the latest Microsoft’s OS is packed with helpful troubleshooters designed to resolve the most common problems and complications that users encounter. Using such tools is often enough to get rid of the issues that occur with the components of Windows 10. Hopefully, this method will prove useful to you:
- Press the Windows logo key + I shortcut to open the Settings app.
- Open Update & security and navigate to the left pane.
- Select Troubleshoot and click on Windows Update.
- Run the troubleshooter.
The tool will start scanning your system. It will resolve your update issues along the way or provide you with recommendations on what measures should be taken.
Tip 2. Run System File Checker
Corrupt system files often trigger errors like the one defined by the 0x80070652 error code. In such a case, it is advisable to run System File Checker (SFC), which is a built-in tool designed to fix system file issues on the Windows OS. To perform an SFC scan, follow the instructions below:
- Open the Search box (Windows logo key + S).
- Type cmd and press Enter.
- Locate and right-click Command Prompt.
- Select Run as administrator.
- Type sfc /scannow and hit Enter.
Wait for the scan to finish. Then exit Command Prompt and restart your computer. This should fix your corrupt system files.
Tip 3. Uninstall the latest updates
In some cases, updates do more harm than good. For instance, they can cause your Windows Update center to malfunction. In a situation like this, you are justified in doing away with the problematic update. Here is how you can do that:
- Open the Settings app (Windows logo key + I).
- Click Update & Security.
- Navigate to the left pane.
- Select Windows Update.
- Click on Advanced Options.
- Select View your update history.
- Click Uninstall updates.
- Select the update that you consider to be the culprit and then proceed to uninstall it.
Finally, check if the 0x80070652 error code is here no more.
Tip 4. Update your drivers
If your drivers are over the hill, it should come as no surprise that the 0x80070652 update issue is causing you headaches. The point is, you should always keep your drivers updated to prevent your system from acting up.
You can update your drivers manually, but this method is so taxing that we won’t go over it in detail. Just make sure you know what software your system needs to work properly and update drivers for each of your devices.
Another option is to configure Device Manager to carry out the search. This method is not an easy task though:
- Right-click on your Windows logo icon (it is always on your taskbar).
- Select Device Manager.
- You will see a list of your devices. One by one, right-click them and select Update driver. You should choose the option ‘Search automatically for updated driver software’.
The easiest way to go about the task is updating all your drivers in bulk. This can be achieved with the help of a special tool such as Auslogics Driver Updater. This reliable program will provide you with the latest manufacturer-recommended versions your Windows 10 needs to offer maximum performance.
After updating your drivers, no matter which method you used, proceed to restart your computer – your new drivers may fail to settle down and become effective otherwise. Finally, see if you can update your Windows 10.
Tip 5. Reset the Software Distribution folder
Another manoeuvre that is reportedly effective in getting rid of the 0x80070652 error code implies resetting the Software Distribution folder. This may sound a bit complicated, but it is quite a straightforward procedure in practice:
- Open your Command Prompt with administrative privileges (see the second tip for more detailed instructions).
- Then type of the following commands:
net stop wuauserv
net stop cryptSvc
net stop bits
net stop msiserver
ren C:\Windows\SoftwareDistribution SoftwareDistribution.old
ren C:\Windows\System32\catroot2 Catroot2.old
net start wuauserv
net start cryptSvc
net start bits
net start msiserver
- Exit Command Prompt.
Check if your Windows Update is up and running again.
Media Creation Tool is designed to help you with installation and upgrade procedures. So, now is the time to make use of the tool in question:
- Launch your browser. Search for Media Creation Tool.
- Download it from Microsoft’s official website.
- Install the tool on your computer.
- Run the tool.
- Click Upgrade PC now.
The tool is supposed to provide you with all the available updates for your Windows 10.
Tip 7. Install the update manually
If you encounter the error code 0x80070652 when trying to install a particular update via the Windows Update center, you can circumvent the issue by reinstalling the update file. Here is what you should do:
- Launch your browser and go to the Microsoft Update catalog.
- Search for the update file you need.
- Download it. Then run the file.
Restart your PC when the process is over. If everything is OK, you are good to go.
Tip 8. Run the batch script
All to no avail? Then it may be time to create and run the following batch script:
- Launch Notepad.
- Paste the following:
@CHECH OFF
echo Simple Script to Reset / Clear Windows Update
echo.
PAUSE
echo.
attrib -h -r-% windir% \ system32 \ catroot2
attrib -h -r-% windir% \ system32 \ catroot2 \ *. *
net stop wuauserv
net stop CryptSvc
net stop BITS
ren% windir% \ system32 \ catroot2 catroot2 .reg
ren% windir% \ SoftwareDistribution sold.old
ren “% ALLUSERSPROFILE% \ application data \ Microsoft \ Network \ downloader” downloader.old
net Start BITS
net start CryptSvc
net start wuauserv
echo.
echo Task completed successfully …
echo.
PAUSE
- Save the file as “WUReset.bat” (those quotes are part of the name).
- Right-click on the file.
- Select Run as administrator.
Get the all-clear to go on and restart your machine.
Have our tips on how to fix the error code 0x80070652 in Windows 10 proved useful? We are looking forward to your feedback!
Do you like this post? 🙂
Please rate and share it and subscribe to our newsletter!
6 votes,
average: 5.00 out of
5
Loading…
Error Code 0x80070652 in Windows Update [SOLVED]
Expert-tested solutions for you to resume your updates
by Ivan Jenic
Passionate about all elements related to Windows and combined with his innate curiosity, Ivan has delved deep into understanding this operating system, with a specialization in drivers and… read more
Updated on
- Many users claimed that error 0x80070652 in Windows 10 prevents them from installing updates.
- The first step is to restart your computer and run the Windows Troubleshoot tool.
- It may also help to uninstall the latest updates and check again for upgrades.
- You can also use the Media Creation tool to install the necessary patches.
XINSTALL BY CLICKING THE DOWNLOAD
FILE
Besides the abundance of the new features, Windows 10 also has some distinctive problems that were rarely seen in the previous system editions.
One of those troubling segments is the update errors that are sometimes hard to cope with.
To make things even harder, there’s no way to ignore updates, like that, was the case in some other Windows versions.
At least, not without some effort. Don’t get us wrong, it’s advised to install updates, but what if some annoying error prevents you from doing so?
Just like the error we’ll try and address today. This error goes by the code 0x80070652, and if you’ve encountered it, you should definitely check the workarounds we have provided below.
How can I fix the error code 0x80070652 in Windows 10?
1. Restart the PC and run Windows Troubleshoot tool
- Press the Windows key + I to open the Settings app.
- Open Update & security.
- Under the left pane, click Troubleshoot.

- Click on the Windows Update and run the troubleshooter.
The first obvious step is the PC reboot. On more than one occasion, troubled users resolved update issues by a simple restart.
Restart can clear the infliction brought by some of the system’s features, like third-party programs or update services.
How we test, review and rate?
We have worked for the past 6 months on building a new review system on how we produce content. Using it, we have subsequently redone most of our articles to provide actual hands-on expertise on the guides we made.
For more details you can read how we test, review, and rate at WindowsReport.
Another thing you should do as soon as possible is hidden under the refurbished Troubleshoot menu that came with the Creators update.
We now have the troubleshooting tools that cover most of the system errors in one spot. You can utilize the Windows Update troubleshooter by following the above steps.
2. Uninstall the latest updates and try again
- Open the Settings app, and go to the Update & security section.
- Click Windows Update in the left pane, and select the Advanced Options.
- Choose View your update history.
- Click Uninstall updates.

- Choose the latest update that probably caused the issue, and uninstall it.
- Check for updates again, and watch out for any interference that may corrupt the update during the process.
With Windows 10, we got ourselves a bunch of mandatory updates installed on (almost) a daily basis. And it’s quite hard to prevent them from appearing, almost impossible.
But, you can at least uninstall them if something goes wrong and check for updates again. If your problem goes deeper than this, you’ll probably want to check the remaining solutions.
3. Use third-party tool for Windows issues
Clutter in your system and damaged registry files can sometimes lead to errors like 0x80070652. Restoring the registry settings to their default values and performing an in-depth cleanup might prevent these issues.
We recommend using third-party software that delivers a complete OS optimization.
4. Run the batch script
- Download the script file.
- Right-click on the file, and run it as an administrator.
- After the process is finished, restart your PC and check for updates once more.
It not uncommon for the Windows update services to get unresponsive. But, luckily, there’s a way to reset them.
Now, you can do that manually by resetting certain update services or use the pre-created batch script that can do that for you. You can use the batch file in a few simple steps.
If you want to create the script on your own, the complete instructions can be found in our comprehensive guide.
5. Reinstall the update file manually
- Go to the Microsoft Update catalog.
- Write the number of KB in the search bar.
- Download the file and run it.
- After the installation is finished, restart your PC.
If you have a problem with a major patch (build) you may need to restore your system in order to start from scratch. Follow the above instructions to reinstall the update file manually.
Luckily, that’s not the case with the small security patches or cumulative updates. You can download those from Microsoft’s official site and manually install them.
In the end, if all of these steps weren’t enough to overcome the error, you can use the final step to force the updates.
- 0x80072ee7 on Windows 11: How to Fix This Error
- Xbox Sign in error 0x80072ee7: How to fix it
- Fix: Xbox One S error code 0x80072ee7
6. Use the Media Creation tool to install updates
- Download the Media Creation tool.
- Just in case, backup your data and license key.
- Start the desktop client, and click Upgrade this PC now.
- The tool should obtain and install the available updates.
- After that, restart your PC, and you’re good to go.
Media Creation Tool was introduced with Windows 10 to vastly improve the digital delivery of the system.
And it’s more than a welcomed tool for the multitude of upgrade/installation procedures.
Additionally, you can use it to force the updates and surpass the issues brought by the standard over-the-air update system.
That should wrap it up. These methods can be used for a large variety of update issues, but we advise you to check our site for detailed explanations and workarounds for a multitude of distinctive errors.
In addition, make sure to share your experiences and suggestions in the comments section below.
![]()