Windows 11 brings along numerous changes to the new UI and among these is the new right-click context menu. The context menu has been a long-standing controversial addition of Windows 11, especially during the early days due to the missing ‘Refresh’ option. The option has now been restored, though you are still missing essential options, including compression shortcuts that were available in the traditional context menu. So can you add these options back to the context menu in Windows 11? Let’s find out!
Can you get WinRAR and 7-Zip in the context menu?
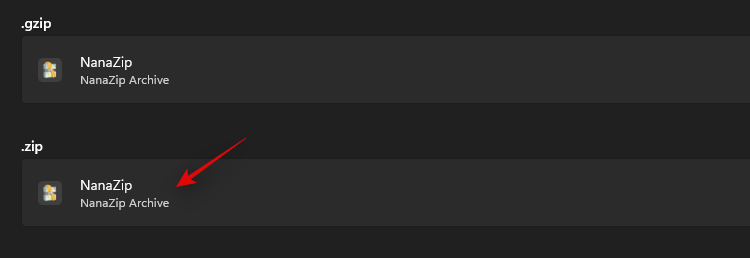
Well, you can. Finally! It was about time, anyway. As of October 13, 2021, Winrar Beta v6.10 gives you the ability to access the app right from the context menu was you used to on the good old Windows 10. Not WinRAR, but 7-Zip is also available via the context menu, but things are not that simple here. Another open source software called NanaZip — a fork of the 7-Zip’s code — is now available that gets you 7-Zip in a new form and adds support for the context menu too.
Check out the guides below to get WinRAR and NanaZip (thus, 7-Zip) into the context menu on your Windows 11.
We recommend using NanaZip to get context menu compression shortcuts in Windows 11. NanaZip is a fork of 7-Zip which ensures maximum compatibility and stability when using it on Windows 11. If however, you aren’t happy with NanaZip, you can opt for the latest WinRAR beta instead. The beta version adds context menu compression shortcuts in Windows 11 however it might include some bugs.
Install NanaZip on your Windows 11 PC using the link below.
- Get NanaZip from Microsoft Store
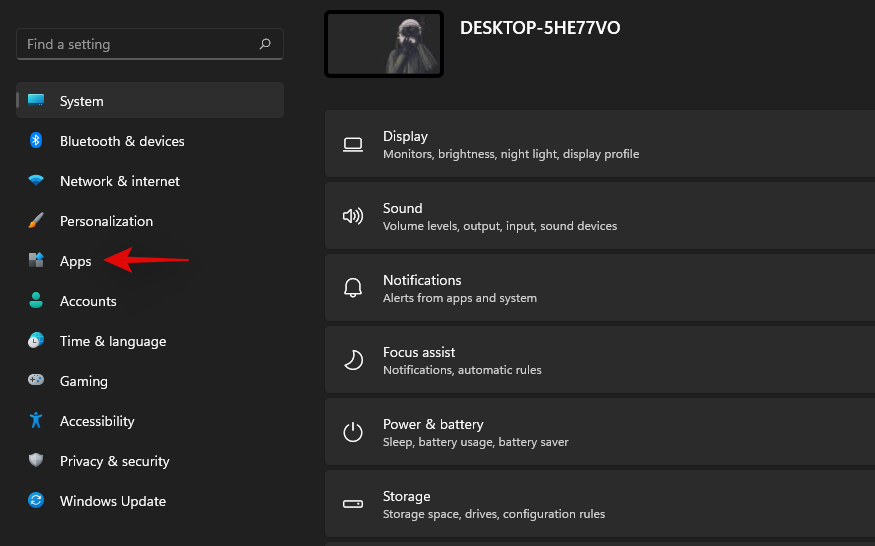
Press Windows + I on your keyboard to open the Settings app instead. Click on ‘Apps’ on your left.
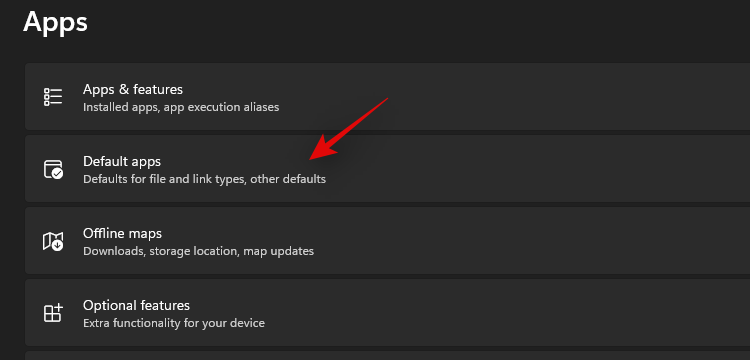
Click on ‘Default Apps’ now.
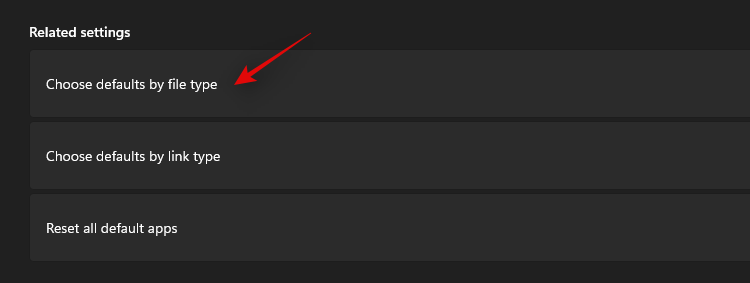
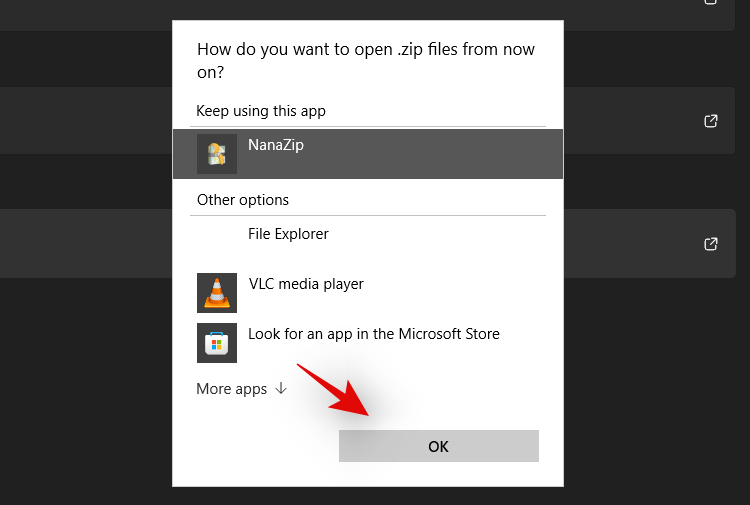
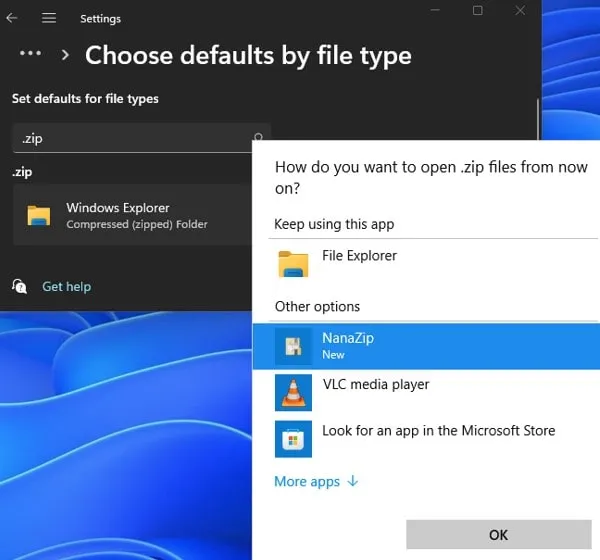
Scroll down and click on ‘Choose defaults by file type’.
Use the search box at the top and search for ‘zip’.
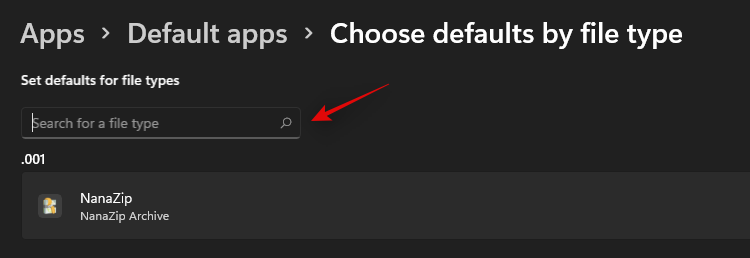
Click on the listing under .zip.
Select ‘NanaZip’.

Click on ‘Ok’.
Right-click on any random file in the file explorer now and you should now have a listing for NanaZip which can be used to create a zip archive or unzip them.

NanaZip will now be set up and ready to use on your system.
You can also use the latest WinRAR Beta to get context menu compression shortcuts in Windows 11. Use the guide below to get you started.
Download the setup file from the link given below.
- Required version: WinRAR Beta v6.10 | Download Link
Double-click the setup file to run Setup and install WinRAR on your PC.

Once installed, it will give apop-up windows for setting up integrations with the common files types it supports. Be sure to select zip, rar and other file types you want WinRAR to handle on your PC.

Click OK after selecting the file types.
(If you miss the integration part during setup, then you can do so by opening WinRAR app and then heading to Options (in the menu bar at the top) > Settings. In the pop-up, click Integration, and then select the file as shown above.)
Now, right-click on a random file and you should now have WinRAR compression shortcuts in your right-click context menu.
FAQs
Here are some common queries around the new context menu additions that should help you get up to date with the latest information.
Windows 11 comes with a new minimalistic frosted glass aesthetic which calls for a minimized context menu. The traditional all option context menu can always be accessed by clicking on ‘Show more options’. The new context menu requires third-party apps to update their upcoming apps accordingly while there seems to be no way to access the native compression utility directly from the current context menu for now.
Yes, you can easily restore the old context menu in Windows 11 by following the steps in this guide. You can also use updated versions of third-party utilities like WinAero Tweaker, OpenShell, or more.
What is the ‘Show More Options’ shortcut?
You can use Shift + F10 on your keyboard to directly get the old context menu in Windows 11.
How to install NanaZip without Microsoft Store
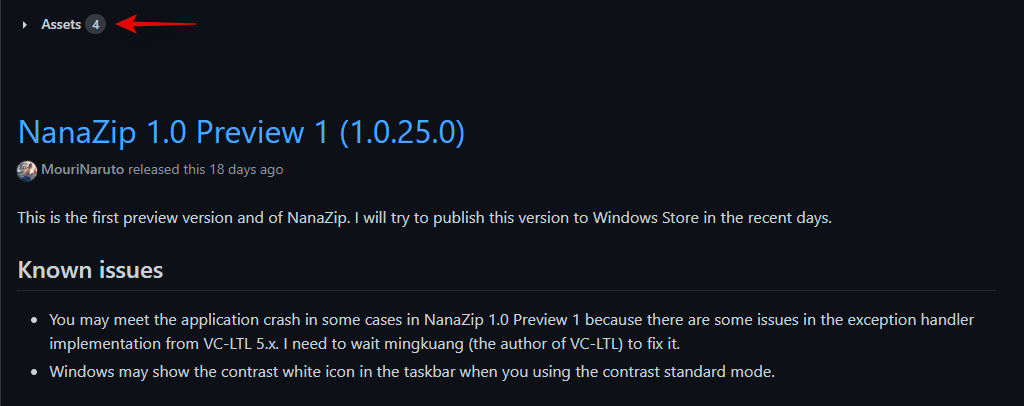
Visit the Github download page given below and click and expand ‘Assets for the latest release.
- NanaZip | Download Link
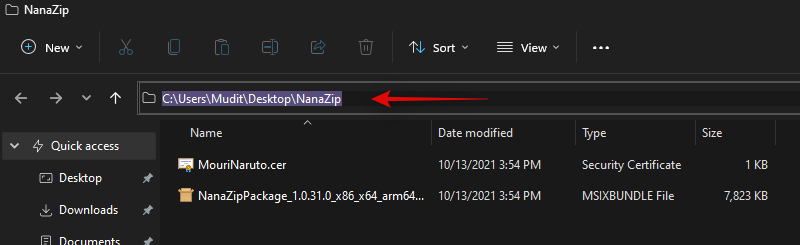
Download the following files by clicking on them. Save both the files in a folder on your desktop to ensure you don’t encounter any bugs when installing the certificate.

- MouriNaruto.cer
- NanaZipPackage_1.0.31.0_x86_x64_arm64.msixbundle
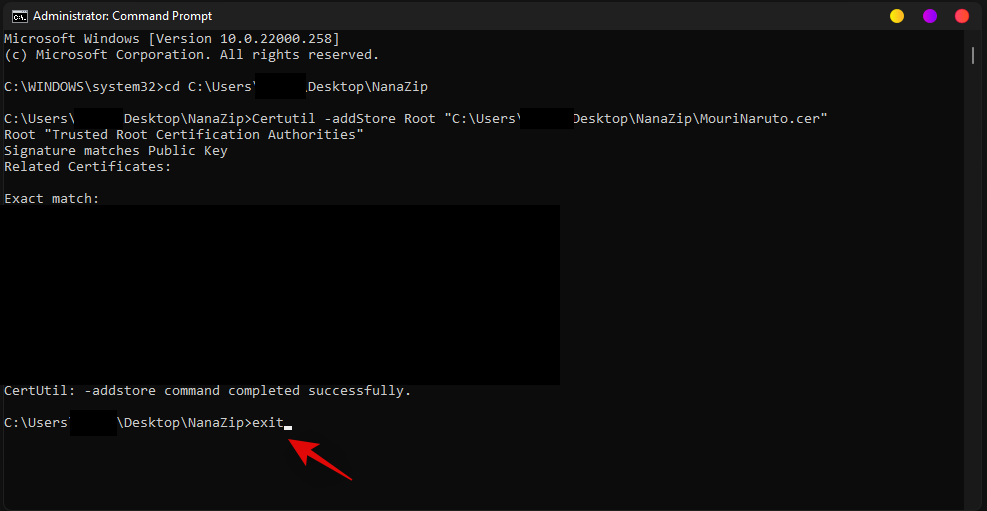
Now open the location where you saved your files, click in the address bar, and copy the address to your clipboard.
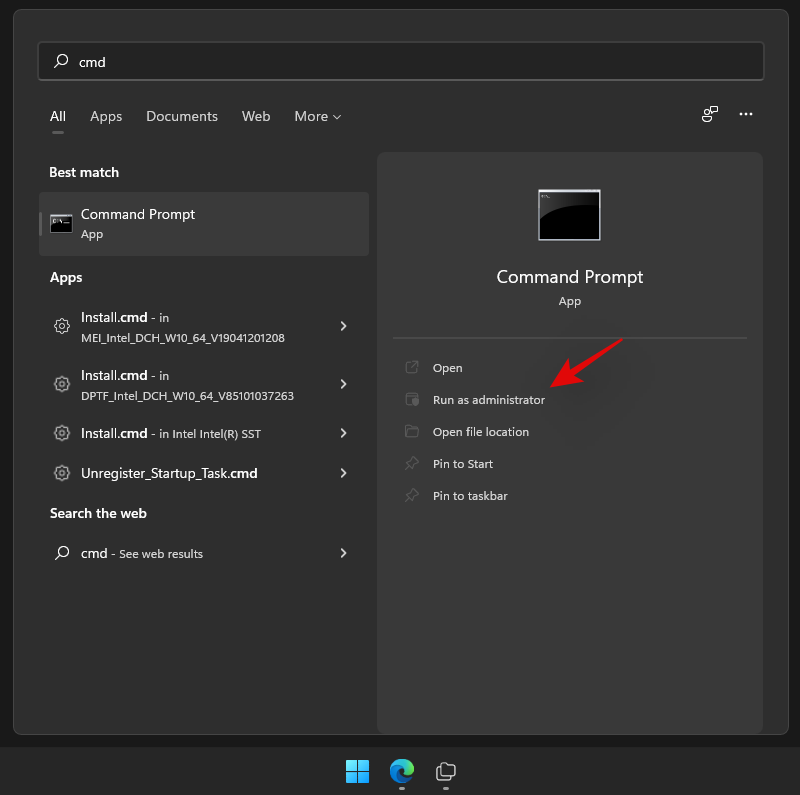
Press Windows + S on your keyboard and search for CMD. Click on ‘Run as administrator’ once the app shows up in your search results.
Type in the following command and replace PATH with the path copied to your clipboard.
cd PATH

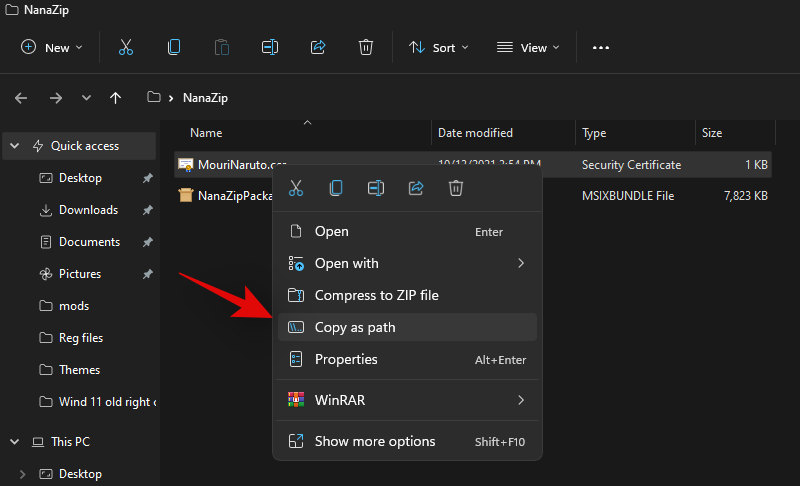
Now head back to the folder, right-click on ‘MouriNaruto.cer’ and select ‘Copy as path’.
Switch to CMD and execute the following command. Replace PATH with the path for the certificate copied to your clipboard in the last step.
Certutil -addStore Root "PATH"
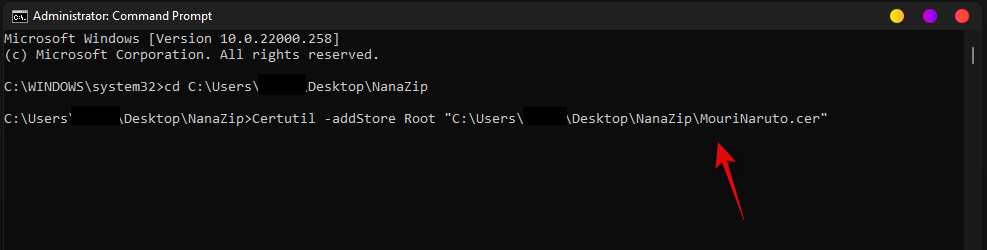
The certificate will now be installed on your PC. Type in ‘Exit’ to close the command prompt.
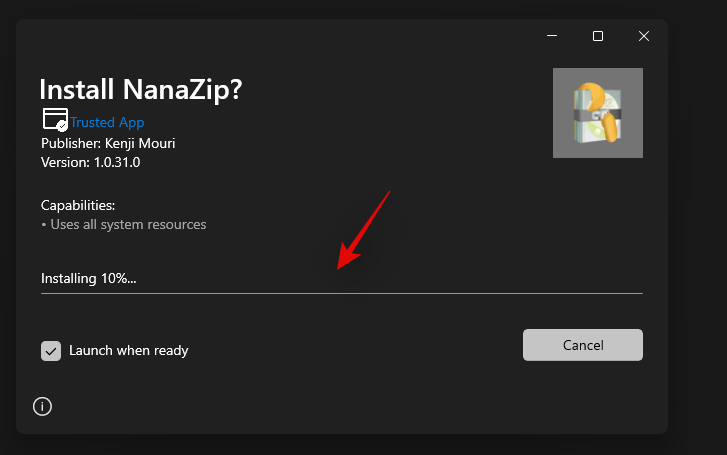
Now double click and run the other package file downloaded along with the certificate. Click on ‘Install’.

NanaZip will be be installed on your PC in no time.
We hope you were able to easily get new compression shortcuts in the right-click in context menu using the guide above. If you need help with anything, feel free to drop a comment below.
Related:
- What Is Windows 11 Registry Bypass?
- How to Use Disable TPM and Secure Boot in Rufus
- Will Windows 11 Support More Processors?
- How to Download and Install Official Windows 11 ISO yourself
- How to install Windows 11 with Windows 11 Installation Assistant
i don’t see the new start menu as a improvement.
the old menu would have managed to rearrange the menu items.
the new menu is a major limitation for the end user.
I am no longer allowed to remove menu items.
regardless of their importance and function. (terminal)
or I can no longer add any functions I want, as was possible with the registry.
it kills my entire tool set!
now I’m forced to build an app, to get an ID+Manifest to create a menu item.
but I can’t program at all!
somebody would have to build a universal menu tool.
and that can then be kept up to date. the registry didn’t need that!
I once attached a picture to underline my drama.
and that’s just my context menu all for zip files.
just imagine what my other menus should look like…
(scrips, pdf, audio, video, pictures, other archives,…)
the context menu is my start menue.
(I use this since Win95, no joke, back then there was even a GUI for it)
it’s where my cursor is, it is hardly necessary to move it.
I only use the stupid and broken start menu as a command line.
{win}+{«cmd»} = go!!!
or {win}+{«po…»} = for powershell
or {win}+{«te…»} = for terminal users
to open a shell this is faster for me, usable even if everything is covered.
and I do not need tabs, I have 4 monitors,
enough space to place them visibly.
I don’t tell anyone how to operate YOUR workplace,
use what is best for YOU and not what microsoft is trying to FORCE me into now.
the sad thing is, not even microsoft programmers see the problem.
script files (and other programming files) alone have at least 2 functions.
‘open’ or ‘run’ the file and ‘edit’ the file.
the new menu just has ‘open’… nothing more.
very very sad…
Last edit: zeddler 2021-09-03
In Windows 11, Microsoft has made numerous changes to the UI, including a new right-click context menu. The new context menu shows only a few options. And, to access the traditional right-click menu, you have to click on “show more options”. Or, you can press the Shift + F10 shortcut key. Initially, the refresh option was missing in the context menu. Which was later restored in Windows update. But still, many essential options are missing.
Like, when you install 7Zip software, it doesn’t appear in right-click menu. Yes, Microsoft offers an “Extract All” option to extract folders. But, it can only extract zip file format, not all. To extract and compress all kinds of files and formats, you have to install third-party tools like WinRAR or 7Zip. Well, now the question arises, can you get WinRAR and 7-Zip in the context menu? Let’s find out!
Get WinRAR and 7-Zip on Windows 11 Context Menu.
If you’re a WinRAR user, then the good news is, you can now add WinRAR in Windows 11 right-click menu. WinRAR now officially offers some integrations options for the new Windows 11. So that, you can quickly access the app from right-click like Windows 10.
Although, If you’re a 7Zip user, then things are not simple for you. Because, till now, 7Zip doesn’t offer such an option. But, there is an open-source software called NanaZip available. Which is a fork of the 7-Zip’s code. And, NanaZip comes with context menu support. So, you can use NanaZip to compress and extract files in Windows 11. Ok, so here is how you can get WinRAR and NanaZip (7Zip Alternative) into Windows 11 Context Menu.
NanaZip (Modern Version of 7Zip.)
NanaZip is a 7-Zip derivative, developed for the modern Windows experience. Yes, as of now, it is in the early development stage. But since it is forked from a well-known open-source file archiver 7-Zip, so it will work flawlessly. It does support Brotli, Fast-LZMA2, Lizard, LZ4, LZ5 and Zstandard codecs. Mainly, it does support the context menu in Windows 10/11 File Explorer. Which is all we need.
Add 7-Zip on Windows 11 Context Menu using NanaZip.
There are two ways to install NanaZip on Windows 11 PC. Either you can install it from Microsoft Store, or you can get the latest version from GitHub.
- Open the following link to install NanaZip from Microsoft Store. Once link get open, Click on Get. And, NanaZip will get installed on your Windows 11 PC.

Alternatively, you can download the NanaZip MsixBundle file from Github. And, install it by running the setup file.

- Once NanaZip gets installed, open the Settings App by pressing Windows + I keyboard shortcut. (You can also check out Windows 11 Keyboard Shortcuts List.)
- Click on Apps > Default Apps.

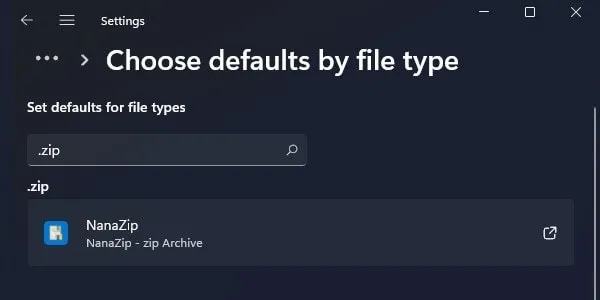
- Scroll down to the default apps page, and at the bottom, you will find the “Choose defaults by file type” option in related settings. Do click on it.

- Search for “.Zip” and you will see Windows Explorer is set for the compressed (zipped) folder.

- Click on it, and select NanaZip from the app list, and click on ok.
- NanaZip will be set as a default app for Zip files.
- Now, Do right-click on any Zip file you have. And, you will see NanaZip in the context menu.

Take mouse pointer over NanaZip and you will find all 7Zip options that you like to use.
Add WinRAR on Windows 11 Context Menu
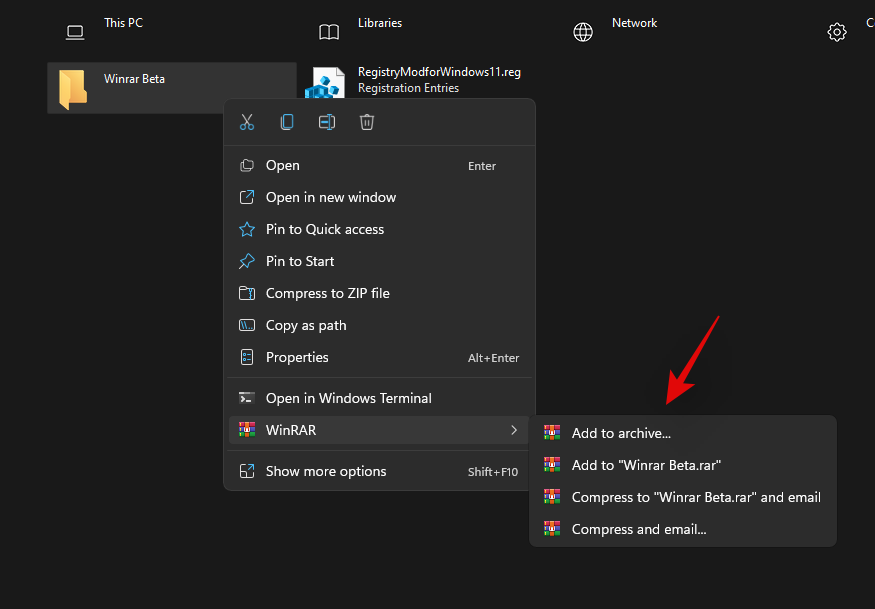
To Get WinRAR option in Windows 11 Context Menu or Right-Click Menu. You have to install the beta version of WinRAR. Because it comes with the “Legacy Context menu” option. With that option, you can get WinRAR in right-click menu of Windows 11.
- First, download the latest version WinRAR setup file. (Do check your system type before downloading the WinRAR version. Open Windows 11 Settings App > scroll down and click on About.)
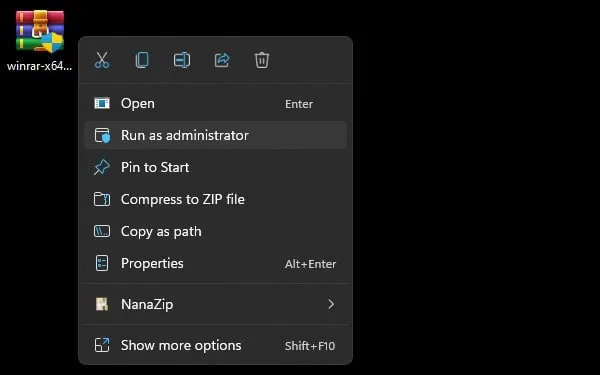
- Now, do right-click on the setup file and then click on “Run as administrator”.
- WinRAR setup window will now appear, click on install.

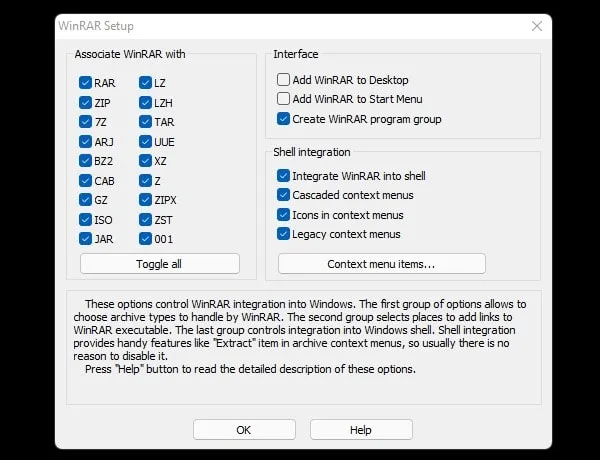
- Next, the WinRAR setup window will appear. In the shell integration section, you will find the “Legacy Context Menus” option. Enable it, and click on OK.
- That’s it, WinRAR will now get installed, click on Done.

- Now, right-click on any zip file and you will see the WinRAR option in the context menu.

Ok, so that’s how you can add 7Zip and WinRAR in Windows 11 context menu. You can use NanaZip instead of 7Zip. Or, you can download the beta version of WinRAR.
Windows 11 has brought about several changes to its user interface, including a new right-click context menu. This feature has been a topic of controversy among users, particularly during the early days, due to the absence of the ‘Refresh’ option.
However, the option has now been restored, but certain essential options, such as compression shortcuts, that were present in the traditional context menu are still missing.
Therefore, the question arises: can these options be added back to the context menu in Windows 11? Let’s explore.
Have you been wondering whether it is possible to add 7-Zip to the context menu in Windows 11? The answer is yes.
While 7-Zip is not available in the context menu by default, another open-source software, NanaZip, a fork of the 7-Zip’s code, is now available that can get you 7-Zip in a new form and adds support for the context menu too.
To get WinRAR and NanaZip (and therefore 7-Zip) into the context menu on your Windows 11, you can check out the guides below.
We suggest using NanaZip to get context menu compression shortcuts in Windows 11. NanaZip, being a fork of 7-Zip, ensures maximum compatibility and stability when used on Windows 11.
Note: The same method can also be used to get WinRar to Context Menu. However, if you are not satisfied with NanaZip, you can choose to use the latest WinRAR beta instead. The beta version also adds context menu compression shortcuts in Windows 11, but it may contain some bugs.
Follow the below steps to add 7-Zip to Windows 11 context menu.
1. First, get the NanaZip app from Microsoft Store.
2. Open Settings on your Windows PC. To access the Settings app, press the Windows key and I simultaneously on your keyboard.
3. Now, click on Apps on the left-hand pan.

4. Go to the Default Apps from the right side afterward.

3. Scroll down and click on the Choose defaults by file type option.

4. Utilize the search box at the top of the screen to search for zip.

5. Click on the listing beneath the .zip search results.

6. Select NanaZip from the list of Apps and click on OK.

And you are done!
To confirm that NanaZip has been successfully installed, right-click on any random file in your file explorer. You should now be able to create a zip archive or unzip files using the NanaZip listing.
Your system is now set up and ready to use NanaZip.
Frequently Asked Questions (FAQs)
-
Does 7-Zip work on Windows 11?
Yes, 7-Zip works on Windows 11. It is a popular file archiver and compression tool that supports a wide variety of formats, including ZIP, RAR, and 7Z. You can download the latest version of 7-Zip from its official website and install it on your Windows 11 PC without any issues.
-
Is 7-Zip better than WinRAR?
Both 7-Zip and WinRAR are excellent file compression and archiving tools. They both have their own unique features and advantages.
7-Zip is an open-source software that supports a wide range of formats, including its own 7z format, which provides better compression rates than other formats. It also has a simple and easy-to-use interface, making it a popular choice among users.
WinRAR, on the other hand, is a proprietary software that has been around for a long time. It supports a variety of formats and also provides strong encryption features to protect your archives. It also has a powerful compression algorithm that can compress files efficiently.
Ultimately, which tool is better for you depends on your specific needs and preferences. However, both 7-Zip and WinRAR are great choices for file compression and archiving.
-
To access the context menu in Windows 11, simply right-click on an item or folder in the file explorer or desktop. The context menu will appear, displaying a list of available options that are relevant to the item or folder you have clicked on.
Alternatively, you can also use the keyboard shortcut “Shift + F10” to open the context menu. This can be particularly useful if you prefer using keyboard shortcuts over using the mouse or touchpad.
We hope that our guide has helped you to easily add new compression shortcuts to your right-click context menu. If you have any further questions or need assistance with anything, please don’t hesitate to leave a comment below. We will do our best to help you out.
Also Read:
- Fix File Explorer Not Responding, Crashing upon Right-Click in Windows
- How to Enable Advanced Graphics Settings in Windows 11
- How to Enable or Disable Hardware Accelerated GPU Scheduling on Windows
- How to Fix Windows Script Host Error in Windows
- Fix Volume Shadow Copy Service (VSS) Error in windows
Windows 11 is the latest iteration in the family of Microsoft Windows, allowing users to experience a best-in-class operating system in 2022 that’s a ton of steps up from its popular predecessor. Although the program is a visual overhaul and improves upon Windows 10 in many aspects, there are still some features of the latter that have been unable to make it to Windows 11. In other cases, the new functionality is unwelcome, and users want their previous functions back.
One such case is the context menu, which is more of a hassle and less of an improvement in the newest Windows operating system. In this guide, we will walk you through how to get back the 7-Zip right-click context menu in Windows 11 so you can get back to using your PC the same way. Moreover, the forthcoming guidelines will also work for users with the context menu missing on Windows 10.
What is the right-click context menu in Windows?
Right-click the context menu in Windows 11
When you double-click or right-click anywhere on the screen, you visualize what is known as the context menu. This simple, go-to shortcut section allows you to access many compatible applications quickly. For example, tools, programs, and software like 7-Zip or WinRar are best utilized from the right-click context menu. It’s also what you use to maneuver the Chrome browser, especially when you are not too fond of using keyboard shortcuts.
The original Windows 10 context menu is plain and straightforward, but the developers thought it fit to upgrade the feature to a higher level for Windows 11. To access the proper context menu that grants access to usable tools, you first need to perform a right-click, then hover over “Show more options” and click on it again to get the actual context menu. This may not sit well with a plethora of users, so it’s imminent for individuals to start demanding a change in this respect.
With no further ado, let us get right down to the matter and talk about reverting the context menu to the original one on your Windows 11 PC.
Getting back the 7-Zip right-click context menu in Windows 11/10
The following instructions are going to work for not only Windows 11 but for Windows 10 as well. Although we will write down the steps as plainly as possible to the best of our ability, please try to implement them on your end diligently for the best results.
1. first, open the Windows Start menu and type in “Registry Editor.” Click on the system utility once done. Run the program as an administrator for the best results and unbounded access. You must confirm the User Account Control (UAC) prompt afterward.
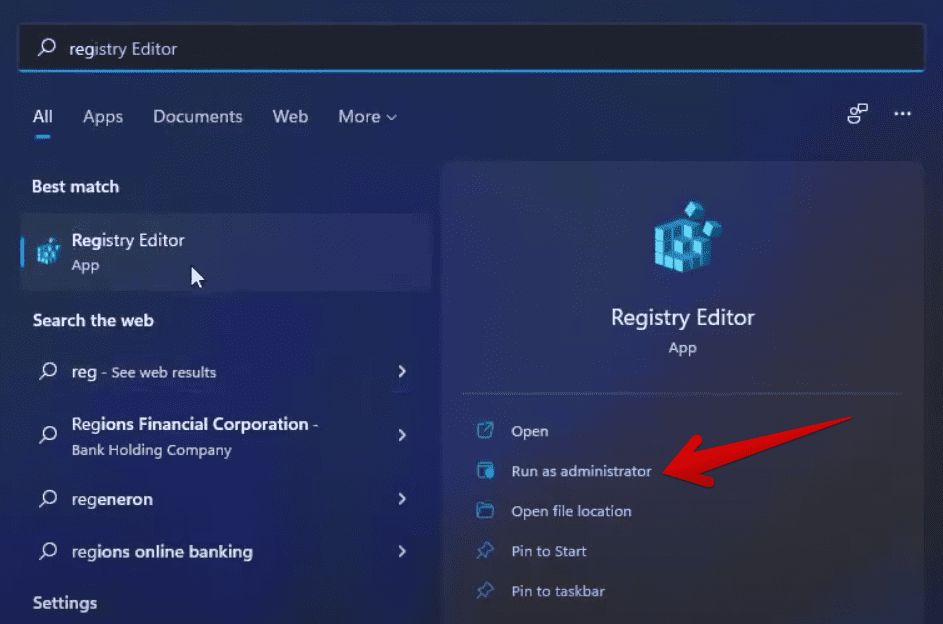
Running the Registry Editor with admin privileges
2. Now that you have the Registry Editor application up and running, you must focus on the side panel and click the “HKEY_CURRENT_USER” directory. Doing so will reveal multiple options on the screen for you. Proceed by clicking “Software,” and follow it up by selecting “Classes” next.
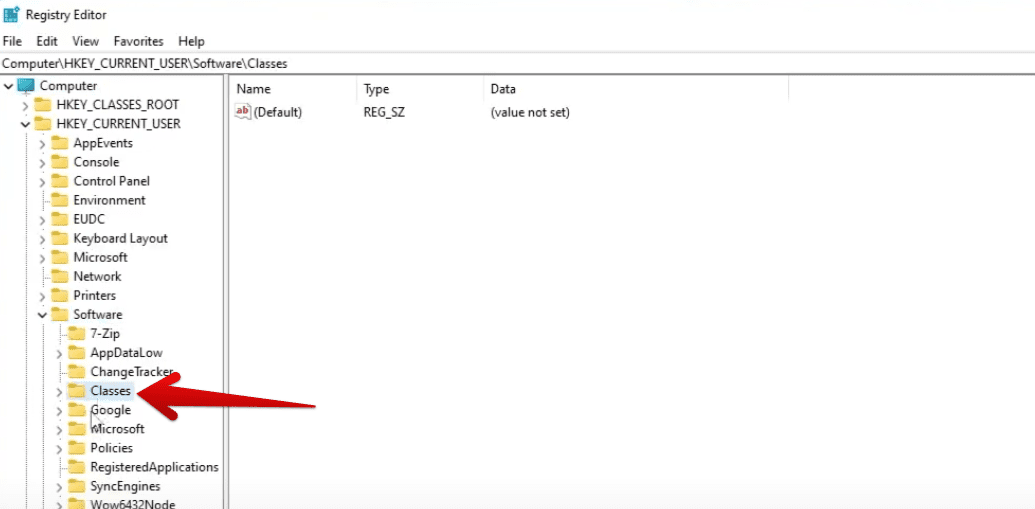
Heading to the correct directory
3. You must now click on the “CLSID” directory and right-click there to create a new “Key.” Check out the following screenshot for a visual explanation. Until now therefore, you should follow the address below to complete the process successfully ahead.
HKEY_CURRENT_USER > Software > Classes > CLSID
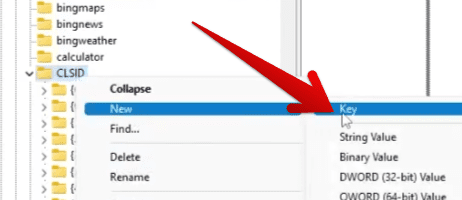
Creating a new key within the CLSID directory
4. This new key has to be named”{86ca1aa0-34aa-4e8b-a509-50c905bae2a2}.” Please do not make any errors in inputting the name of the key, or the process will not bear fruit otherwise. Now, after renaming the key, you must create another key within this key and name it “InprocServer32.”
Now, click on the “(Default)” file that you see on the right-hand side of the opened window, and you should see the “(Value not set)” remark under the “Data” option. Double-click here and click on “Modify” to move forward.
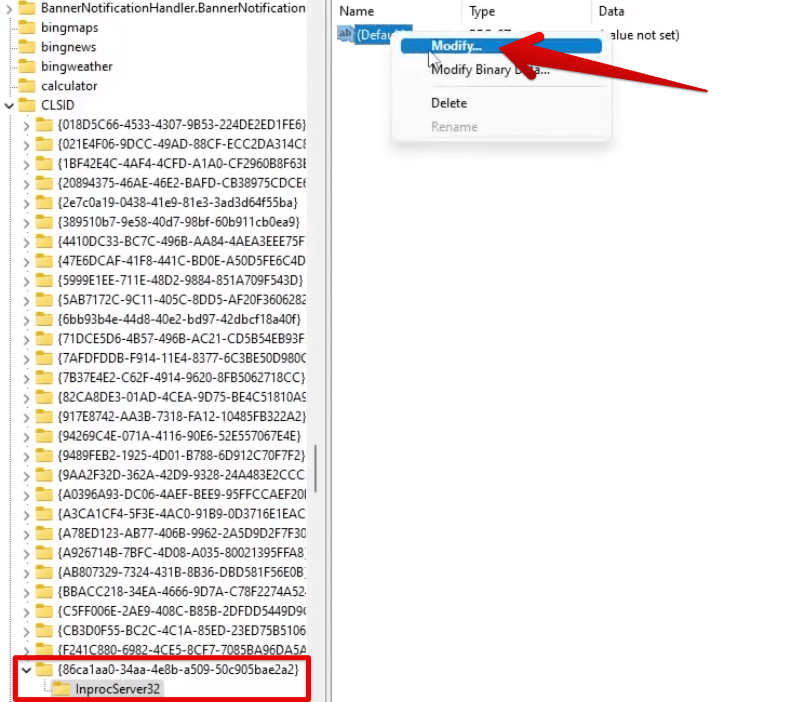
Modifying the newly created key
5. Completing the previous step successfully should open the “Edit String” window. You’ll do nothing here and click “OK” to leave things as they were. However, if you notice, the “(Value Not Set)” remark won’t be present anymore within the “Data” section. If you’ve done everything correctly up until now, the next step is to restart your PC.
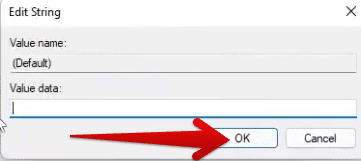
Leaving the window as it is
That’s all there is to the process! After restarting your PC, double-click anywhere on the desktop to return the 7-ZIP context menu on your Windows 11 or Windows 10 PC. It’s time to conclude the article.
Conclusion
Windows 11 might be the next big thing, but there are still some instances where it has left users wanting the functionalities of Windows 10. One buzzing case is the presence of an additional right-click context menu that you’ll need to navigate to get the fully functional menu back. Well, now that you’ve gone past this issue using this guide, you hopefully won’t be running into any like-minded problems again.
Do let us know whether you found the guide helpful for your cause. We would love to read your feedback!