Restarting Windows services works for many of our readers
by Afam Onyimadu
Afam is a geek and the go-to among his peers for computer solutions. He has a wealth of experience with Windows operating systems, dating back to his introduction… read more
Updated on
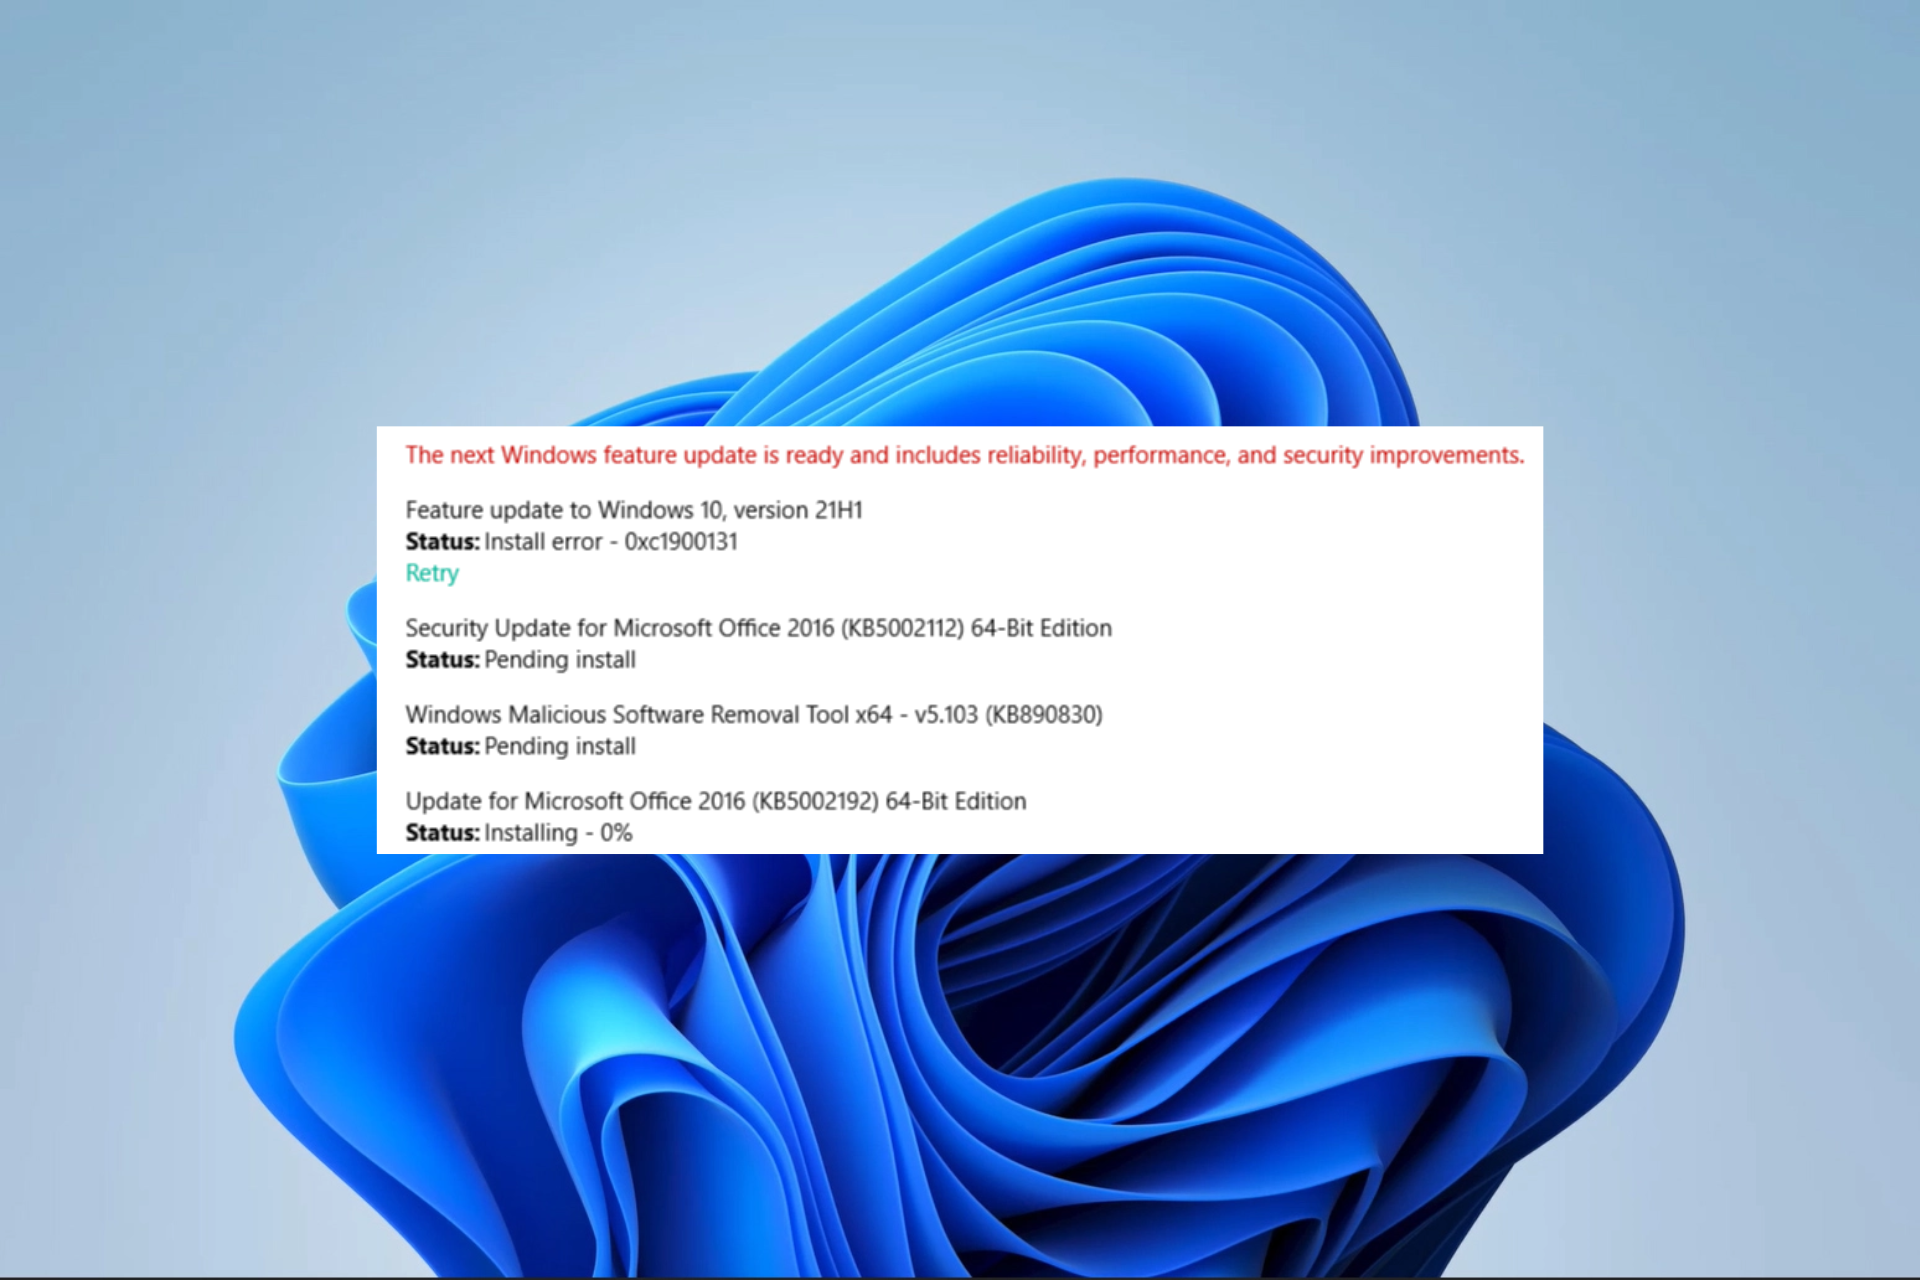
- The 0xc1900131 error interrupts the update process and makes it impossible to get new patches and features for your computer.
- Hardware problems, as well as outdated drivers and corrupted system files, are often the cause of this error.
XINSTALL BY CLICKING THE DOWNLOAD
FILE
Updates are an integral part of the Windows OS, providing useful fixes, patches, and security features for your device. The 0xc1900131 update error, however, makes it impossible to update and install these patches.
Sometimes you get the notification the install cannot continue because the instance hash does not match. So, in this article, we show you some of the easiest ways to fix this error on Windows 11.
What is the 0xc1900131 Windows update error?
This error is an indication that there is an issue during the update process or system configuration, and it is often caused by one of the following:
How we test, review and rate?
We have worked for the past 6 months on building a new review system on how we produce content. Using it, we have subsequently redone most of our articles to provide actual hands-on expertise on the guides we made.
For more details you can read how we test, review, and rate at WindowsReport.
- Corrupted system files – Corruption may ruin an update’s integrity and stop the process from completely executing.
- Insufficient disk space – Sometimes, low disk space has triggered this error, so we recommend getting additional storage before the update.
- Invalid registry entries – A few registry files are tied to the update process. If these files have a problem, you may experience the 0xc1900131 error.
- Driver issues – Outdated, incompatible, or corrupted drivers also cause the update error on Windows 11.
While this is not an exhaustive list, it would help you determine which solutions below are most applicable.
How do I fix error 0xc1900131?
Before going into any detailed fixes, the following workarounds may be helpful:
- Free up disk space – We recommend removing temporal or unnecessary files or getting additional storage.
- Restart your computer – A reboot may fix minor glitches that trigger the error, so the first step may be to reboot and retry.
- Use a fast internet connection – Changing your ISP may help since a slow internet connection may lead to update failure.
If you fail to fix error 0xc1900131 with the above steps, proceed to the more detailed solutions below.
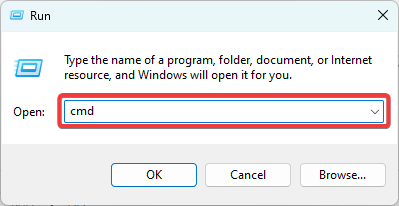
1. Run a file scan
- Press Windows + R, type cmd, and hit Ctrl + Shift + Enter.

- Type the script below and hit Enter.
sfc /scannow
- Now run the following scripts to fix the error spotted by the scan:
DISM /Online /Cleanup-Image /CheckHealthDISM /Online /Cleanup-Image /ScanHealthDISM /Online /Cleanup-Image /RestoreHealth
- These scripts may take a while to execute, but once completed, restart your device and verify if the update error still exists.


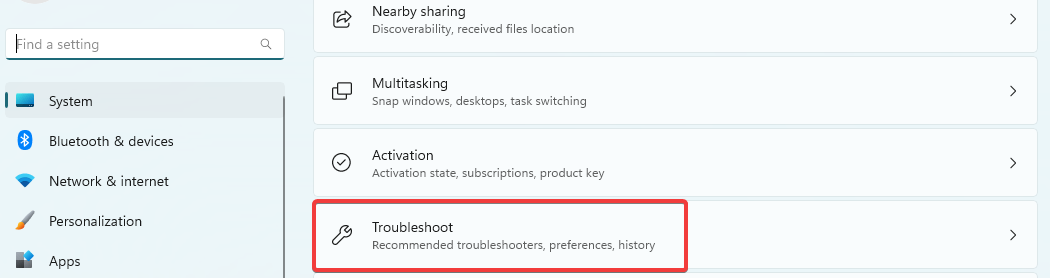
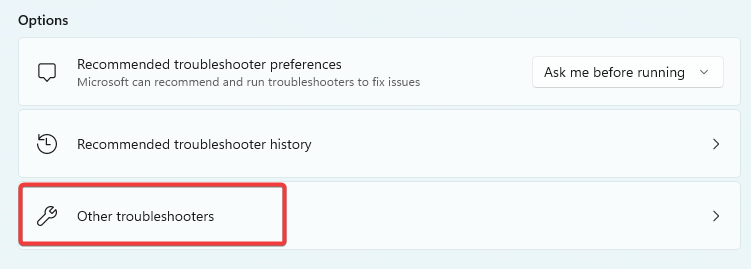
2. Run Windows Update troubleshooter
- Press Windows + I to open the Settings app.
- On the right pane, click on Troubleshoot.

- Select Other troubleshooters.

- Click the Run button in front of Windows Update.

- Wait while the process executes, then apply the recommended changes.

3. Restart Windows services
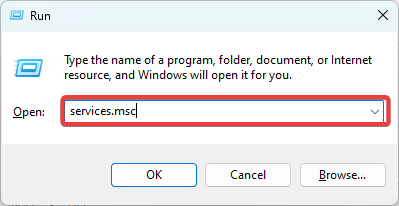
- Press Windows + R, type services.msc, and hit Ctrl + Shift + Enter.
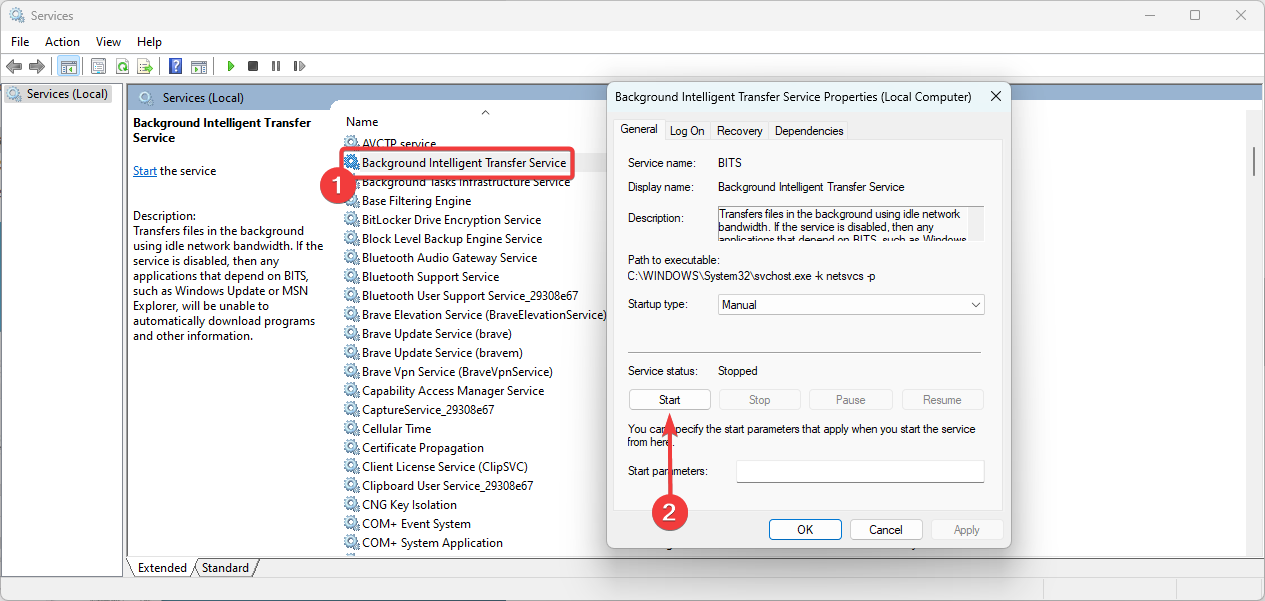
- Search for the Background Intelligent Transfer Service and double-click on it.
- If it is not running, click on Start.

- Start the Windows Update service using the same steps, then verify that the 0xc1900131 error is fixed.
4. Run the Check Disk utility
- Press Windows + R, type cmd, and hit Ctrl + Shift + Enter.
- If you use a HDD, type the script below and hit Enter:
chkdsk c: /f
- If you use an SDD, type the script below and hit Enter:
chkdsk c: /f /r /x - When there are hard drive errors, hit Y to complete the process, then restart your computer.

5. Reset update components
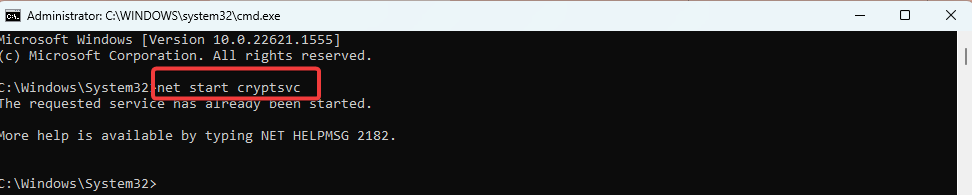
- Press Windows + R, type cmd, and hit Ctrl + Shift + Enter.
- Stop vital services by running the scripts below (You may have to confirm the actions by hitting Y or N):
net stop bitsnet stop wuauservnet stop appidsvcnet stop cryptsvc
- Restart the services by inputting the scripts below, hitting Enter after each one:
net start bitsnet start wuauservnet start appidsvcnet start cryptsvc
- Restart the computer.

There you go. Most of the time, you can fix this error by running scripts on an elevated command prompt. Read this guide if the Terminal is not launching.
We want to hear from you, so tell us in the comments below which solutions were effective for you.
![]()
Перейти к контенту
Здравствуйте, Владимир!
Пожалуйста, укажите полное название модели Вашего компьютера/материнской платы.
Попробуйте выполнить следующие действия:
1. Отключите или удалите стороннее антивирусное ПО. Перед этим убедитесь, что у Вас есть все ключи (официальные методы активации), чтобы потом успешно переустановить этот антивирус.
2. Выполните «чистую» загрузку в Windows. После перезагрузки и устранений неполадок, включите обратно все службы, чтобы не пропала строка для ввода пароля на экране блокировки.
3. Устраните ошибки Центра обновления Windows с помощью DISM или средства проверки готовности системы к обновлению.
4. Используйте средство проверки системных файлов для восстановления отсутствующих или поврежденных системных файлов.
5. Восстановите исходное состояние компонентов Центра обновления Windows.
6. Исправьте ошибки в Центре обновления Windows.
7. Извлеките все ненужные (в том числе Bluetooth) устройства. Беспроводные клавиатуры/мыши тоже могут помешать обновлению.
8. Попытайтесь заново установить обновления или используйте это средство.
9. Восстановите образ Windows — помеченный ответ из этой темы. Если это не поможет, переустановите операционную систему
Restarting Windows services works for many of our readers
by Afam Onyimadu
Afam is a geek and the go-to among his peers for computer solutions. He has a wealth of experience with Windows operating systems, dating back to his introduction… read more
Updated on April 27, 2023
Reviewed by
Alex Serban

After moving away from the corporate work-style, Alex has found rewards in a lifestyle of constant analysis, team coordination and pestering his colleagues. Holding an MCSA Windows Server… read more
- The 0xc1900131 error interrupts the update process and makes it impossible to get new patches and features for your computer.
- Hardware problems, as well as outdated drivers and corrupted system files, are often the cause of this error.
XINSTALL BY CLICKING THE DOWNLOAD FILE
Windows update failures can be annoying! With Fortect, you will get rid of errors caused by missing or corrupted files after an update. The utility maintains a repository of the original Windows system file versions, and it uses a reverse algorithm to swap out the damaged ones for good ones.
- Download Fortect and install it on your PC
- Start the tool’s scanning process to look for corrupt files that are the source of the issues
- Right-click on Start Repair to resolve security and performance issues with your computer
- Fortect has been downloaded by 0 readers this month.
Updates are an integral part of the Windows OS, providing useful fixes, patches, and security features for your device. The 0xc1900131 update error, however, makes it impossible to update and install these patches.
Sometimes you get the notification the install cannot continue because the instance hash does not match. So, in this article, we show you some of the easiest ways to fix this error on Windows 11.
What is the 0xc1900131 Windows update error?
This error is an indication that there is an issue during the update process or system configuration, and it is often caused by one of the following:
- Corrupted system files – Corruption may ruin an update’s integrity and stop the process from completely executing.
- Insufficient disk space – Sometimes, low disk space has triggered this error, so we recommend getting additional storage before the update.
- Invalid registry entries – A few registry files are tied to the update process. If these files have a problem, you may experience the 0xc1900131 error.
- Driver issues – Outdated, incompatible, or corrupted drivers also cause the update error on Windows 11.
While this is not an exhaustive list, it would help you determine which solutions below are most applicable.
How do I fix error 0xc1900131?
Before going into any detailed fixes, the following workarounds may be helpful:
- Free up disk space – We recommend removing temporal or unnecessary files or getting additional storage.
- Restart your computer – A reboot may fix minor glitches that trigger the error, so the first step may be to reboot and retry.
- Use a fast internet connection – Changing your ISP may help since a slow internet connection may lead to update failure.
If you fail to fix error 0xc1900131 with the above steps, proceed to the more detailed solutions below.
1. Run a file scan
- Press Windows + R, type cmd, and hit Ctrl + Shift + Enter.
- Type the script below and hit Enter.
sfc /scannow - Now run the following scripts to fix the error spotted by the scan:
DISM /Online /Cleanup-Image /CheckHealthDISM /Online /Cleanup-Image /ScanHealthDISM /Online /Cleanup-Image /RestoreHealth - These scripts may take a while to execute, but once completed, restart your device and verify if the update error still exists.
2. Run Windows Update troubleshooter
- Press Windows + I to open the Settings app.
- On the right pane, click on Troubleshoot.
- Select Other troubleshooters.
- Click the Run button in front of Windows Update.
- Wait while the process executes, then apply the recommended changes.
3. Restart Windows services
- Press Windows + R, type services.msc, and hit Ctrl + Shift + Enter.
- Search for the Background Intelligent Transfer Service and double-click on it.
- If it is not running, click on Start.
- Start the Windows Update service using the same steps, then verify that the 0xc1900131 error is fixed.
4. Run the Check Disk utility
- Press Windows + R, type cmd, and hit Ctrl + Shift + Enter.
- If you use a HDD, type the script below and hit Enter:
chkdsk c: /f - If you use an SDD, type the script below and hit Enter:
chkdsk c: /f /r /x - When there are hard drive errors, hit Y to complete the process, then restart your computer.
5. Reset update components
- Press Windows + R, type cmd, and hit Ctrl + Shift + Enter.
- Stop vital services by running the scripts below (You may have to confirm the actions by hitting Y or N):
net stop bitsnet stop wuauservnet stop appidsvcnet stop cryptsvc - Restart the services by inputting the scripts below, hitting Enter after each one:
net start bitsnet start wuauservnet start appidsvcnet start cryptsvc - Restart the computer.
There you go. Most of the time, you can fix this error by running scripts on an elevated command prompt. Read this guide if the Terminal is not launching.
We want to hear from you, so tell us in the comments below which solutions were effective for you.
Still experiencing issues?
SPONSORED
If the above suggestions have not solved your problem, your computer may experience more severe Windows troubles. We suggest choosing an all-in-one solution like Fortect to fix problems efficiently. After installation, just click the View&Fix button and then press Start Repair.
![]()

OverDrive

This person is a verified professional.
Verify your account
to enable IT peers to see that you are a professional.
mace
WSUS Expert
-
check
397
Best Answers -
thumb_up
580
Helpful Votes
Update Drivers, update Firmware, update to the latest CU and the latest SSU if older than 2004. Verify there’s at least 20GB free of HDD space on the C drive, and try again.
Also verify your WSUS Setup for Windows as a Service (WaaS).
https://www.ajtek.ca/wsus/how-to-setup-manage-and-maintain-wsus-part-3-windows-as-a-service-waas-and-group-policy-administrative-templates/ Opens a new window
Was this post helpful?
thumb_up
thumb_down
Thanks Adam, I followed that guide to setup my WSUS environment.
My Drivers are all up to date, used the Lenovo Vantage software to do that. 20H2 has installed now.
I’ll double check the 2004 after my machine finishes restarting.
Was this post helpful?
thumb_up
thumb_down
![]()
Windows 10 Update Assistant Opens a new window is a better way to upgrade the Windows 10 clients. Perhaps we could have a try.
0 of 1 found this helpful
thumb_up
thumb_down
Question
Issue: How to fix Windows update error 0x1900131?
Hello. I tried to install an update on my Windows computer but I received a 0x1900131 error. Is there anything I can do about it?
Solved Answer
If you have a Windows computer, then you know how important it is to keep your system up-to-date with the latest Microsoft updates. Not only do these updates fix various bugs and introduce new features, but they also help patch any security issues that might leave your device vulnerable to attack. However, sometimes users can run into errors when trying to install these updates – like the recent 0x1900131 error code.
There are different ways to go about fixing bugs on your computer. If it is just a simple bug, an automatic built-in Windows troubleshooter should help you. However, if the problem is more complicated, there are many different things that could have gone wrong. Windows is an extremely complicated system that relies on thousands of processes running in the background to keep it running smoothly.
The most common reason Windows updates fail to install is that the operating system is missing some files required by Windows Updates. When error code 0x1900131 appears, it means that Windows cannot finish updating the operating system. Other reasons for update failures may include incorrect user input and accidentally deleted files from the registry that now cause system malfunctions.
Rather than spending hours attempting to fix your computer manually, we suggest using a repair tool FortectMac Washing Machine X9. Not only will it resolve various Windows errors, like BSODs,[1] and registry[2] issues, but it can also clear cookies and cache[3] from your browsers. As an added bonus, you should notice increased performance. However, if you would prefer to follow step-by-step instructions, they are provided below.

Method 1. Run the Update Troubleshooter
Fix it now!
Fix it now!
To repair damaged system, you have to purchase the licensed version of Fortect Mac Washing Machine X9.
- Press the Windows + X keys and go to Settings
- Go to Update and Security
- Click Troubleshooter
- Select Additional troubleshooters

- Run the Update troubleshooter
- Restart
Method 2. Repair Corrupted System Files
Fix it now!
Fix it now!
To repair damaged system, you have to purchase the licensed version of Fortect Mac Washing Machine X9.
Use Command Prompt commands to repair system file corruption:
- Open Command Prompt as administrator
- Use the following command and press Enter:
sfc /scannow

- Reboot your system
- If SFC returned an error, then use the following command lines, pressing Enter after each:
DISM /Online /Cleanup-Image /CheckHealth
DISM /Online /Cleanup-Image /ScanHealth
DISM /Online /Cleanup-Image /RestoreHealth
Method 3. Check Disk
Fix it now!
Fix it now!
To repair damaged system, you have to purchase the licensed version of Fortect Mac Washing Machine X9.
Ensure that your disk is not damaged. You can perform checks using Administrative Command Prompt:
- If you are using an HDD as your main driver (where your operating system is installed – C: by default), use the following command and press Enter:
chkdsk c: /f - If you are using SSD, use this command:
chkdsk c: /f /r /x

- If you receive an error, type in Y and hit Enter
- Restart your device to perform the check
Method 4. Restart Windows Services
Fix it now!
Fix it now!
To repair damaged system, you have to purchase the licensed version of Fortect Mac Washing Machine X9.
- Press Windows + R to open the Run box
- Type in services.msc and press OK
- Double-click Background Intelligent Transfer Service
- If the Startup status lists Stopped, click Start and then click OK
- If the status is Running, right-click then select Restart

- Locate the Windows Update service and double-click it
- If the Startup status lists Stopped, click Start and OK. If the status is Running, right-click, then select Restart
Method 5. Reset Windows Update Components
Fix it now!
Fix it now!
To repair damaged system, you have to purchase the licensed version of Fortect Mac Washing Machine X9.
- Open Command Prompt as administrator again
- Copy and paste the following commands, pressing Enter after each:
net stop bits
net stop wuauserv
net stop appidsvc
net stop cryptsvc
Del “%ALLUSERSPROFILE%Application DataMicrosoftNetworkDownloader*.*”
rmdir %systemroot%SoftwareDistribution /S /Q
rmdir %systemroot%system32catroot2 /S /Q
regsvr32.exe /s atl.dll
regsvr32.exe /s urlmon.dll
regsvr32.exe /s mshtml.dll
netsh winsock reset
netsh winsock reset proxy
net start bits
net start wuauserv
net start appidsvc
net start cryptsvc

- Restart your PC
Method 6. Download the Update Manually
Fix it now!
Fix it now!
To repair damaged system, you have to purchase the licensed version of Fortect Mac Washing Machine X9.
Whenever Windows updates fail to install automatically, you can always try doing it manually. First, you need to find out which KB number is relevant to you.
- Right-click Start button and pick Settings
- Go to Update & Security
- On the right, locate and click View update history
- From the list, note the KB number that fails to install with the error code

- Go to Microsoft Update Catalog page, type in the KB number, and press Search
- Download the update and install it manually
Method 7. Update via Media Creation Tool
Fix it now!
Fix it now!
To repair damaged system, you have to purchase the licensed version of Fortect Mac Washing Machine X9.
- Download Windows 10 installation media from the official website

- Open the tool once it installed
- Agree to license terms
- Choose Upgrade this PC now
- Wait for the update to be installed
Repair your Errors automatically
ugetfix.com team is trying to do its best to help users find the best solutions for eliminating their errors. If you don’t want to struggle with manual repair techniques, please use the automatic software. All recommended products have been tested and approved by our professionals. Tools that you can use to fix your error are listed bellow:
do it now!
Download Fix
Happiness
Guarantee
do it now!
Download Fix
Happiness
Guarantee
Compatible with Microsoft Windows
Compatible with OS X
Still having problems?
If you failed to fix your error using FortectMac Washing Machine X9, reach our support team for help. Please, let us know all details that you think we should know about your problem.
Fortect — a patented specialized Windows repair program. It will diagnose your damaged PC. It will scan all System Files, DLLs and Registry Keys that have been damaged by security threats.Mac Washing Machine X9 — a patented specialized Mac OS X repair program. It will diagnose your damaged computer. It will scan all System Files and Registry Keys that have been damaged by security threats.
This patented repair process uses a database of 25 million components that can replace any damaged or missing file on user’s computer.
To repair damaged system, you have to purchase the licensed version of Fortect malware removal tool.To repair damaged system, you have to purchase the licensed version of Mac Washing Machine X9 malware removal tool.
A VPN is crucial when it comes to user privacy. Online trackers such as cookies can not only be used by social media platforms and other websites but also your Internet Service Provider and the government. Even if you apply the most secure settings via your web browser, you can still be tracked via apps that are connected to the internet. Besides, privacy-focused browsers like Tor is are not an optimal choice due to diminished connection speeds. The best solution for your ultimate privacy is Private Internet Access – be anonymous and secure online.
Data recovery software is one of the options that could help you recover your files. Once you delete a file, it does not vanish into thin air – it remains on your system as long as no new data is written on top of it. Data Recovery Pro is recovery software that searchers for working copies of deleted files within your hard drive. By using the tool, you can prevent loss of valuable documents, school work, personal pictures, and other crucial files.
Сообщение о сбое с номером 0xc1900130 появляется при разрыве соединения между компьютером и серверами «Центра обновления». Если вы столкнулись с этой ошибкой первый раз, проверьте состояние подключения к интернету и попробуйте скачать обновление заново. Если ошибка повторяется неоднократно, попробуйте способы её устранения, указанные ниже.
Очищаем DNS сетевого подключения
Даже если внешне подключение к интернету работает без сбоев, а в браузере загружаются страницы, причиной ошибки 0xc1900130 может быть ошибка в DNS сетевого соединения. Исправить её поможет сброс через консоль.
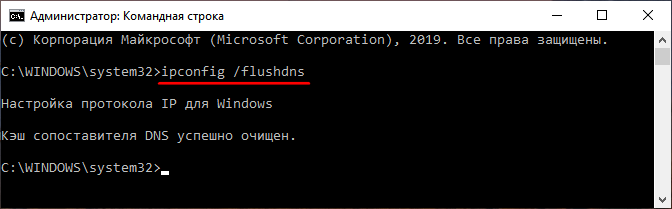
- Запускаем командную строку с правами администратора.
- Выполняем команду «ipconfig /flushdns».
- Перезагружаем компьютер.

Сбрасываем кэш DNS
После повторного запуска системы ещё раз пробуем установить обновление. Если ошибка 0xc1900130 повторяется, переходим к проверке других способов устранения сбоя.
Запускаем средство устранения неполадок
Windows 10 предлагает удобные инструменты для автоматического исправления ошибок в работе основных системных компонентов, в том числе «Центра обновления».
- Открываем «Параметры».
- Переходим в раздел «Обновление и безопасность».
- Выбираем вкладку «Устранение неполадок».
- В списке слева выделяем «Центр обновления» и нажимаем на кнопку «Запустить средство устранения неполадок».

Пробуем устранить неполадки в автоматическом режиме
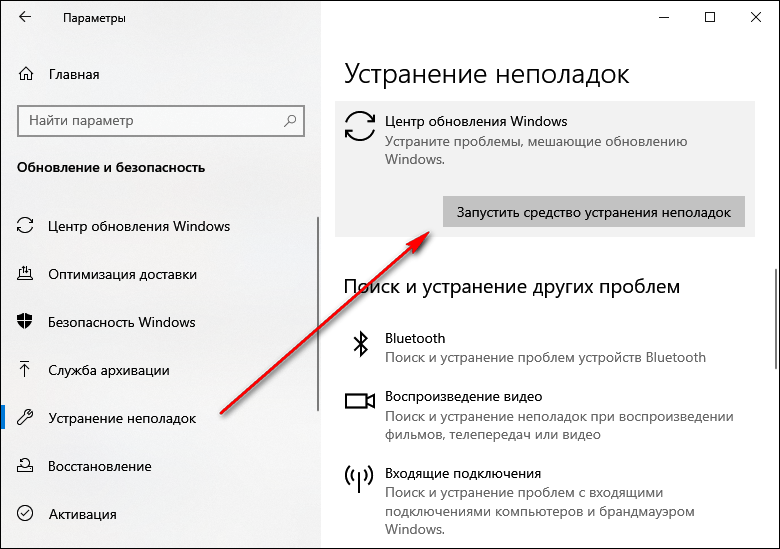
Ждём, пока мастер восстановления обнаружит проблемы, и следуем его рекомендациям, чтобы устранить неполадки.
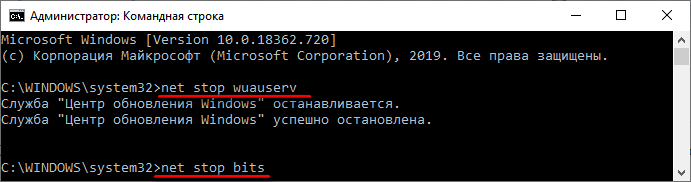
Очищаем папку SoftwareDistribution
Если в автоматическом режиме исправить ошибки не удалось, приступаем к ручной отладке системы. Начнём с очистки папки SoftwareDistribution, в которой хранятся скачанные файлы обновления.
- Запускаем командную строку от имени администратора.
- Выполняем последовательно две команды: «net stop wuauserv» и «net stop bits». Они остановят работу двух важных компонентов системы обновления: службы «Центра обновления» и «Фоновой интеллектуальной службы передачи».

Останавливаем две ключевые службы обновления системы
- Открываем в «Проводнике» папку C:WindowsSoftwareDistribution и удаляем её содержимое. Вместо «С» может быть другой путь, это метка системного диска, на который установлена Windows.

Удаляем всё, что есть в папке SoftwareDistribution
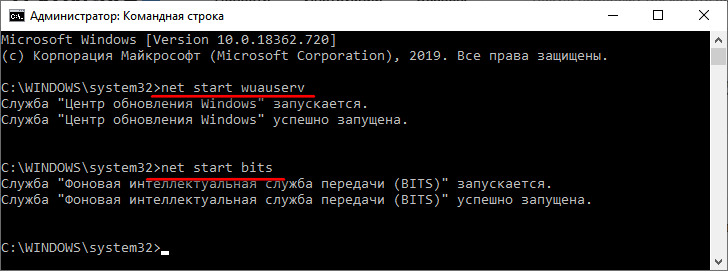
- После удаления содержимого папки SoftwareDistribution возвращаемся в командную строку и выполняем последовательно две команды: «net start wuauserv» и «net start bits». Она запустят службы, которые мы отключили ранее.

Запускаем отключенные ранее компоненты системы обновления
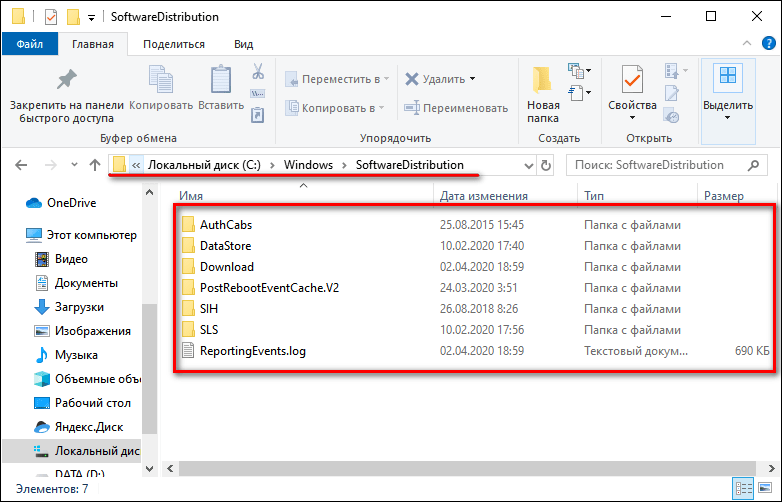
Если причина сбоя была во временных файлах, которые хранились в папке SoftwareDistribution, то после их удаления ошибка больше не появится, а мы сможем без проблем установить доступные обновления системы.
Сбрасываем папку catroot2
С «Центром обновления» связана ещё одна системная папка — catroot2. Её очистка также помогает устранить некоторые неполадки, в том числе ошибку 0xc1900130.
Запускаем командную строку с правами администратора и выполняем последовательно следующие команды:
- net stop cryptsvc
- md %systemroot%system32catroot2.old
- xcopy %systemroot%system32catroot2 %systemroot%system32catroot2.old /s
Затем открываем папку C:WindowsSystem32catroot2 и удаляем её содержимое. Вместо буквы «С» может быть другая метка системного раздела.
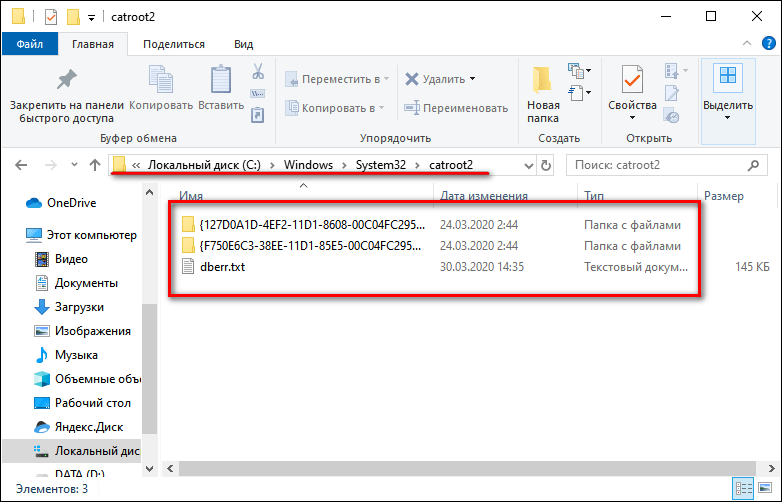
Удаляем все файлы и папки
После очистки папки возвращаемся в командную строку и выполняем команду «net start cryptsvc», чтобы запустить ранее отключенную службу криптографии Windows. Затем открываем «Центр обновления» и снова пробуем установить доступные апдейты.
Настраиваем компоненты системы обновления
За работу системы обновления отвечает целый ряд системных служб. Некорректные настройки любого компонента могут привести к появлению ошибок. Чтобы исключить этот фактор, заново настраиваем конфигурацию системы обновления. Для этого запускаем командную строку с правами администратора и последовательно выполняем следующие команды:
- SC config wuauserv start= auto
- SC config bits start= auto
- SC config cryptsvc start= auto
- SC config trustedinstaller start= auto
После выполнения последней команды закрываем окно консоли и перезагружаем компьютер. Затем снова проверяем, заработал ли «Центр обновлений».
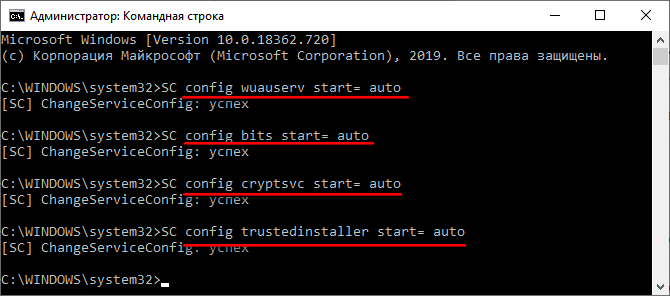
Устанавливаем автоматический запуск компонентов системы обновления
Вместо командной строки можно использовать системную оснастку «Службы». В ней нужно установить автоматический запуск для следующих компонентов:
- Центр обновления Windows.
- Фоновая интеллектуальная служба передачи (BITS).
- Службы криптографии.
- TrustedInstaller.
Всё это части системы обновления, без которых она не работает.
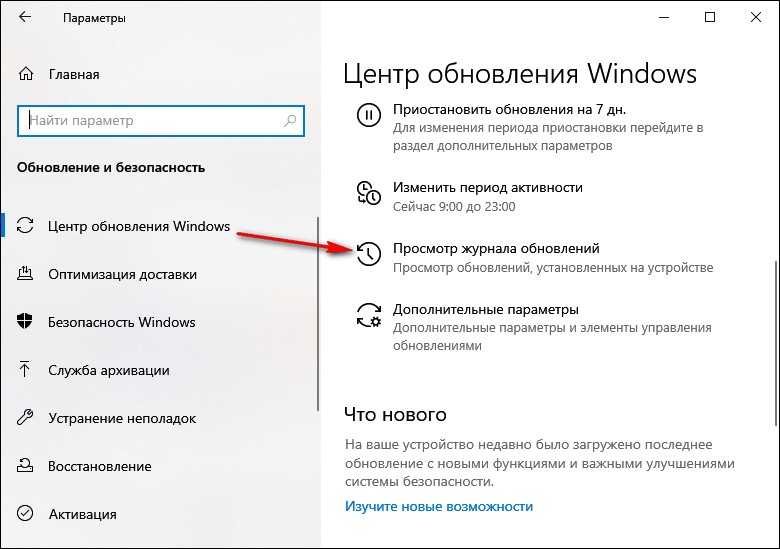
Загружаем обновление вручную
Ошибка 0xc1900130 можно обойти, скачав нужное обновление вручную. В таком случае нам никак не помешает отсутствие соединения с серверами «Центра обновления».
- Открываем «Параметры».
- Переходим в раздел «Обновление и безопасность».
- На вкладке «Центр обновления Windows» кликаем по ссылке «Просмотр журнала обновлений».
В журнале обновлений можно посмотреть номер апдейта, при установке которого появляется ошибка
- Смотрим номер обновления, при установке которого появилась ошибка 0xc1900130.
- Открываем каталог обновлений Microsoft.
- В поисковую строку вставляем номер апдейта.
- Скачиваем подходящее по разрядности обновление. В описании можно прочитать, какие конкретно функции оно добавит и какие ошибки исправит.
На жёсткий диск сохранится исполняемый файл, после запуска которого начнётся установка обновления. Никаких ошибок при этом быть не должно, потому что фактически соединение с серверами Майкрософт не выполняется.
![]() Загрузка …
Загрузка …
Post Views: 1 256
О LENOVO
-
Наша компания
-
Новости
-
Контакт
-
Соответствие продукта
-
Работа в Lenovo
-
Общедоступное программное обеспечение Lenovo
КУПИТЬ
-
Где купить
-
Рекомендованные магазины
-
Стать партнером
Поддержка
-
Драйверы и Программное обеспечение
-
Инструкция
-
Инструкция
-
Поиск гарантии
-
Свяжитесь с нами
-
Поддержка хранилища
РЕСУРСЫ
-
Тренинги
-
Спецификации продуктов ((PSREF)
-
Доступность продукта
-
Информация об окружающей среде
©
Lenovo.
|
|
|
|
OverDrive
This person is a verified professional.
Verify your account
to enable IT peers to see that you are a professional.
mace
WSUS Expert
-
check
398
Best Answers -
thumb_up
568
Helpful Votes
Update Drivers, update Firmware, update to the latest CU and the latest SSU if older than 2004. Verify there’s at least 20GB free of HDD space on the C drive, and try again.
Also verify your WSUS Setup for Windows as a Service (WaaS).
https://www.ajtek.ca/wsus/how-to-setup-manage-and-maintain-wsus-part-3-windows-as-a-service-waas-and-group-policy-administrative-templates/ Opens a new window
Was this post helpful?
thumb_up
thumb_down
Thanks Adam, I followed that guide to setup my WSUS environment.
My Drivers are all up to date, used the Lenovo Vantage software to do that. 20H2 has installed now.
I’ll double check the 2004 after my machine finishes restarting.
Was this post helpful?
thumb_up
thumb_down
![]()
Windows 10 Update Assistant Opens a new window is a better way to upgrade the Windows 10 clients. Perhaps we could have a try.
0 of 1 found this helpful
thumb_up
thumb_down
ИксУСТАНОВИТЬ НАЖМИТЕ НА СКАЧАТЬ ФАЙЛ
Сбои обновления Windows могут раздражать! С Fortect вы избавитесь от ошибок, вызванных отсутствием или повреждением файлов после обновления. Утилита поддерживает репозиторий исходных версий системных файлов Windows и использует обратный алгоритм для замены поврежденных файлов на хорошие.
- Загрузите Fortect и установите его.на вашем компьютере
- Запустите процесс сканирования инструментаискать поврежденные файлы, которые являются источником проблем
- Щелкните правой кнопкой мышиНачать ремонтдля решения проблем безопасности и производительности вашего компьютера
- Fortect был скачан пользователем0читателей в этом месяце.
Обновления являются неотъемлемой частью ОС Windows, предоставляя полезные исправления, исправления и функции безопасности для вашего устройства. Однако ошибка обновления 0xc1900131 делает невозможным обновление и установку этих исправлений.
Иногда вы получаете уведомление, что установка не может быть продолжена, поскольку хэш экземпляра не совпадает. Итак, в этой статье мы покажем вам несколько самых простых способов исправить эту ошибку в Windows 11.
Эта ошибка указывает на наличие проблемы в процессе обновления или конфигурации системы и часто вызвана одной из следующих причин:
- Поврежденные системные файлы– Повреждение может нарушить целостность обновления и помешать полному выполнению процесса.
- Недостаточно места на диске– Иногда эта ошибка вызывается нехваткой места на диске, поэтому перед обновлением мы рекомендуем получить дополнительное хранилище.
- Неверные записи реестра– Несколько файлов реестра связаны с процессом обновления. Если с этими файлами возникла проблема, вы можете столкнуться с ошибкой 0xc1900131.
- Проблемы с драйверами– Устаревшие, несовместимые или поврежденные драйверы также вызывают ошибку обновления в Windows 11.
Хотя это не исчерпывающий список, он поможет вам определить, какие решения, приведенные ниже, наиболее применимы.
Как исправить ошибку 0xc1900131?
Прежде чем приступить к каким-либо подробным исправлениям, могут быть полезны следующие обходные пути:
- Освободите место на диске– Мы рекомендуем удалить временные или ненужные файлы или получить дополнительное хранилище.
- Перезагрузите компьютер– Перезагрузка может исправить незначительные сбои, вызывающие ошибку, поэтому первым шагом может быть перезагрузка и повторная попытка.
- Используйте быстрое подключение к Интернету– Смена интернет-провайдера может помочь, поскольку медленное подключение к Интернету может привести к сбою обновления.
Если вам не удалось исправить ошибку 0xc1900131 с помощью описанных выше шагов, перейдите к более подробным решениям ниже.
1. Запустите сканирование файла
- Нажмите Windows + R, введитеcmdи нажмите Ctrl + Shift + Enter.
- Введите приведенный ниже скрипт и нажмите Enter.
sfc /scannow - Теперь запустите следующие сценарии, чтобы исправить ошибку, обнаруженную при сканировании:
DISM /Online /Cleanup-Image /CheckHealthDISM /Online /Cleanup-Image /ScanHealthDISM /Online /Cleanup-Image /RestoreHealth - Выполнение этих сценариев может занять некоторое время, но после завершения перезагрузите устройство и проверьте, существует ли ошибка обновления.


2. Запустите средство устранения неполадок Центра обновления Windows.
- Нажмите Windows + I, чтобы открытьНастройкиприложение.
- На правой панели нажмите наУстранение неполадок.
- ВыбиратьДругие средства устранения неполадок.
- Нажмите кнопкуБегатьКнопка перед Центром обновления Windows.
- Подождите, пока процесс выполнится, затем примените рекомендуемые изменения.


3. Перезапустите службы Windows.
- Нажмите Windows + R, введитеServices.mscи нажмите Ctrl + Shift + Enter.
- НайдитеФоновая интеллектуальная служба передачии дважды щелкните по нему.
- Если он не запущен, нажмитеНачинать.
- ЗапуститеЦентр обновления Windowsservice, выполнив те же действия, а затем убедитесь, что ошибка 0xc1900131 устранена.


4. Запустите утилиту проверки диска.
- Нажмите Windows + R, введитеcmdи нажмите Ctrl + Shift + Enter.
- Если вы используете жесткий диск, введите приведенный ниже сценарий и нажмите Enter:
chkdsk c: /f - Если вы используете SDD, введите приведенный ниже сценарий и нажмите Enter:
chkdsk c: /f /r /x - При возникновении ошибок жесткого диска нажмите Y, чтобы завершить процесс, а затем перезагрузите компьютер.


5. Сброс компонентов обновления
- Нажмите Windows + R, введитеcmdи нажмите Ctrl + Shift + Enter.
- Остановите жизненно важные службы, запустив приведенные ниже сценарии (возможно, вам придется подтвердить действия, нажав Y или N):
net stop bitsnet stop wuauservnet stop appidsvcnet stop cryptsvc - Перезапустите службы, введя приведенные ниже сценарии, нажимая Enter после каждого:
net start bitsnet start wuauservnet start appidsvcnet start cryptsvc - Перезагрузите компьютер.


Вот и все. В большинстве случаев вы можете исправить эту ошибку, запустив сценарии в командной строке с повышенными привилегиями. Прочтите это руководство, если Терминал не запускается.
Мы хотим услышать ваше мнение, поэтому расскажите нам в комментариях ниже, какие решения оказались для вас эффективными.
Все еще испытываете проблемы?
СПОНСОРИРОВАННЫЙ
Если приведенные выше рекомендации не решили вашу проблему, на вашем компьютере могут возникнуть более серьезные проблемы с Windows. Мы предлагаем выбрать универсальное решение, напримерФортектэффективно решать проблемы. После установки просто нажмите кнопкуПосмотреть и исправитькнопку, а затем нажмитеНачать ремонт.