После установки или обновления компонентов операционной системы Виндовс пользователи могут увидеть на экране различные ошибки. Синий «экран смерти» с кодом ошибки указывает на проблемы системного характера или сбои в работе подключенных устройств. Нередко при запуске система Windows 10 выдает ошибку, которая имеет код 0xc0000221. С чем связана неполадка и как ее устранить? Постараемся разобраться в этих вопросах.
Причина неисправности
Появление ошибки 0xc0000221 во время включения компьютера может быть вызвано разными причинами, связанными с оборудованием, процессором, системными файлами и другими элементами ОС. К основным проблемам, вызвавшим ошибку, относятся:
- Повреждение загрузочного тома, которое могло появиться в результате неожиданного завершения работы системы, внезапного сбоя питания, управления жестким диском или его поломки.
- Сбой при попытке обновления Виндовса или проникновение вредоносного ПО.
- Разделы ОЗУ имеют физические неполадки.
- Установленное приложение конфликтует с компонентами ОС.
Повреждение файлов системы.
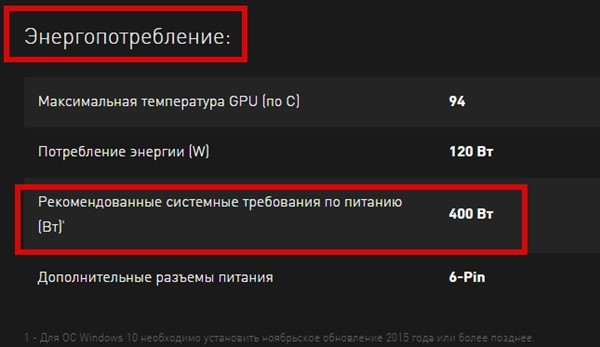
- Мощность блока питания не подходит для нормальной работы подсоединенных устройств.
Отсутствие необходимых драйверов для получения доступа к файлам Windows также становится причиной возникновения ошибки. Исправить ее можно несколькими методами с помощью загрузочной флешки с Windows 10 или другими, более простыми способами.
Исправление ошибки 0xc0000221 в Windows 10
Возможные варианты решения проблемы предполагают загрузку операционки в безопасном режиме, проверку и восстановление системы через встроенные инструменты, проверку HDD и отключение вторичного оборудования. Рассмотрим эти способы подробнее.
Загрузка в безопасном режиме
В этом параметре устройство загружается с минимальными настройками, включая основные драйверы и файлы, которые нужны для запуска.
Если в этом режиме гаджет загружается без проблем, то причина возникновения ошибки, скорей всего, кроется в ранее установленных ПО.
Для исправления неполадки пользователю нужно следовать инструкции:
- При включении ПК и загрузке системы удерживать кнопку включения, пока ПК не отключится.
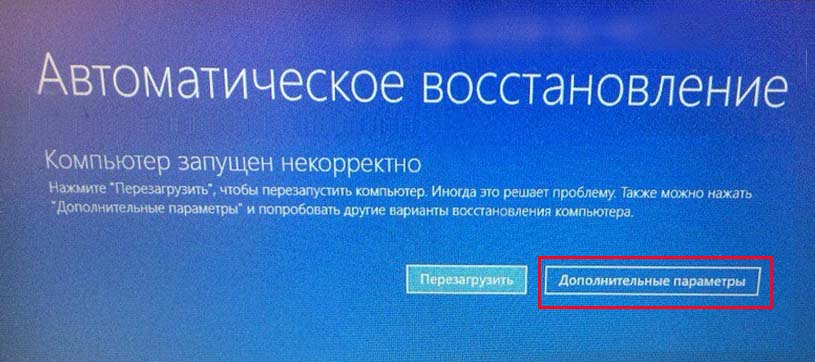
- Повторить действие трижды, пока не появится меню автоматического восстановления.
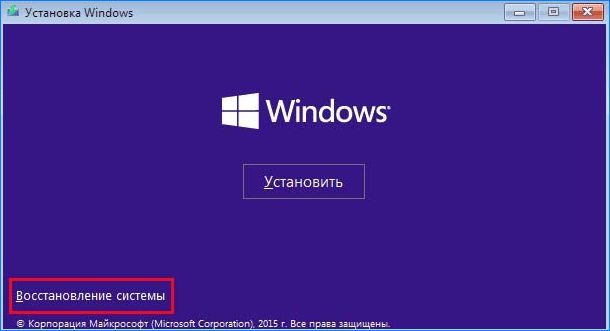
- Открыть «Восстановление системы».
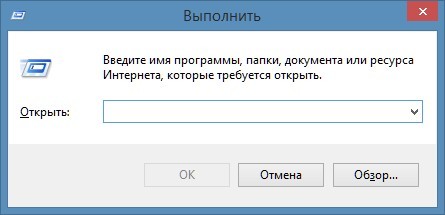
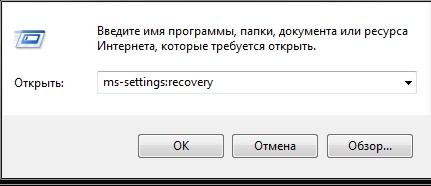
- Запустить окно «Выполнить», нажав клавиши «Win + R».
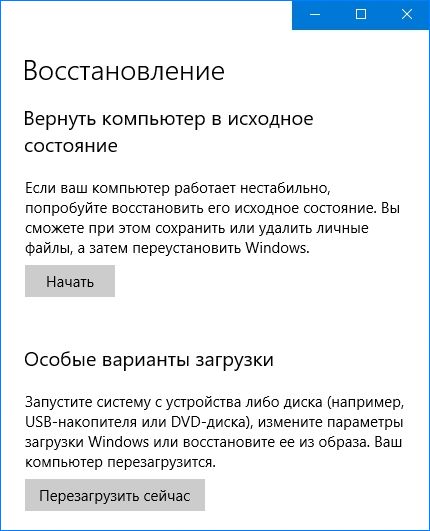
- Ввести команду: ms-settings:recovery.
- Войти в раздел «Особые варианты загрузки».
- Кликнуть «Перезагрузить сейчас».
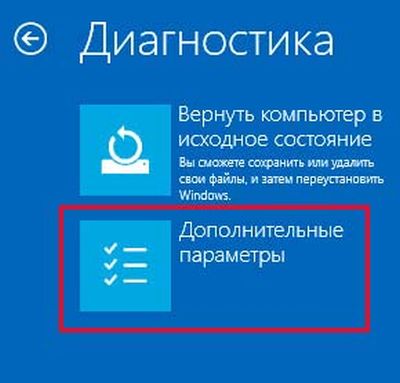
- Нажать на «Поиск и устранение неисправностей».
- Выбрать «Дополнительные параметры».
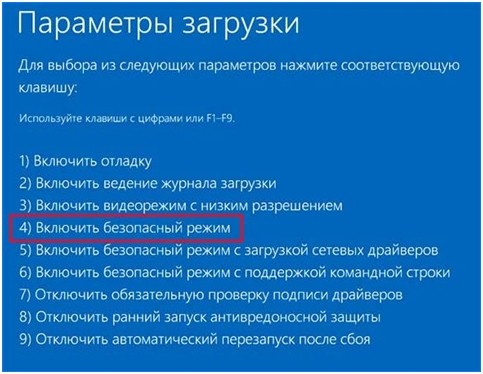
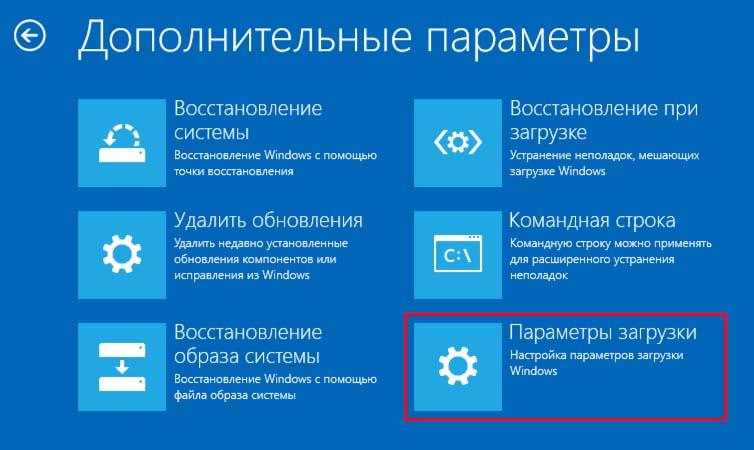
- Выбрать пункт «Параметры загрузки».
- Выполнить перезагрузку ПК.
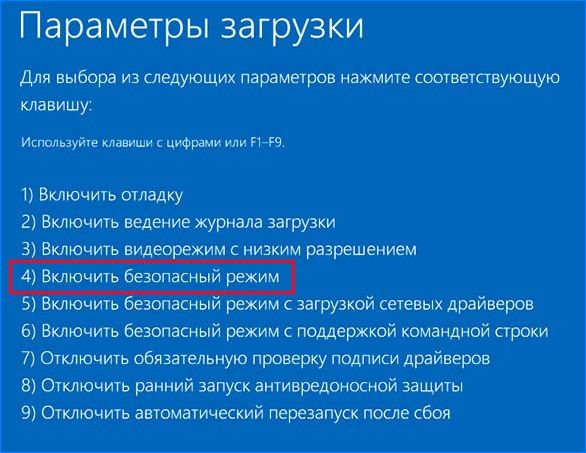
- Выбрать вариант запуска, нажав «F4», «F5» или «F6».
Если причина сбоя при запуске Виндовс связана с последними инсталлированными приложениями, то ПК запустится в этом режиме без проблем. Если же действия не помогли устранить неполадку, и код 0xc0000221 вновь отобразился на экране, значит, потребуется применить следующий способ.
Проверка и восстановление SFC, DISM и CHKDSK Error
В «десятке» предусмотрены встроенные инструменты, помогающие обнаружить системную ошибку или поврежденный файл, а затем исправить проблему. Работа предполагает использование системных файлов, сторонние утилиты не будут задействованы.
Работа выполняется согласно инструкции:
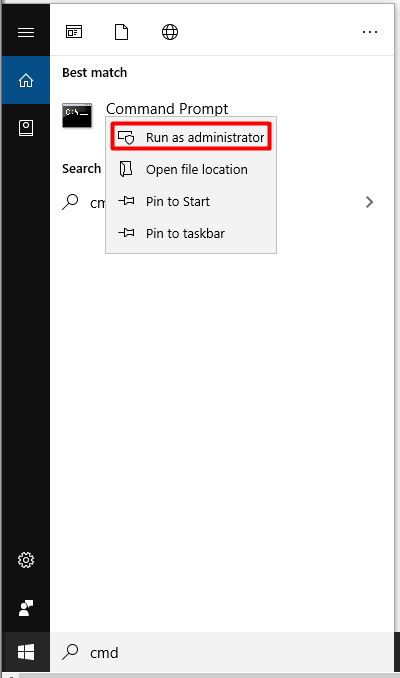
- Открыть строку поиска, ввести: cmd.
- Тапнуть ПКМ по результату, запустить софт с администраторскими правами.
- В Командной строке ввести: sfc /scannow. Нажать «Enter».
- Дождаться завершения операции, перезагрузить ПК.
Если таким способом не удалось просканировать операционку и исправить ошибку, владельцу гаджета нужно ввести новое значение: chkdsk /f C, где «C» – диск, на котором установлена ОС. Затем попробовать повторить проверку снова.
При повторном появлении неполадки юзеру нужно набрать другое значение: dism /online /cleanup-image /restorehealth. Перед выполнением операции желательно убедиться в стабильности работы интернет-сети, так как софт может поменять поврежденный файл на новый, загруженный с официального источника.
Проверьте RAM для проблем
Возможной причиной возникновения ошибки 0xc0000221 может стать повреждение участка оперативной памяти. Такие проблемы выявить непросто даже после установки усовершенствованных специальных программ.
Самый простой способ обнаружить проблему – открыть панель блока, снять один из модулей ОЗУ. Если после этого девайс запустится с одним модулем ОЗУ без проблем, можно попробовать поменять их местами. Смена местоположения планок помогает устранить проблему, когда более быстрая память перемещается за более медленной.
Для упрощения задачи можно открыть софт MemTest, созданный специально для тестирования надежности работы ОЗУ. Для выявления результата юзеру потребуется дождаться окончания проверки, которая может продолжаться несколько часов.
Удаление вторичных устройств
Одной из причин появления синего экрана нередко становится подключение дополнительного оборудования к ПК. Пользователю рекомендуется отключить дополнительную видеокарту, если таковая имеется. Также стоит отключить вторичные жесткие диски.
Если блок питания не имеет достаточно мощностей для функционирования всех устройств, то для «разгрузки» девайса юзеру потребуется отключить внешние накопители, дополнительный HDD, вторую видеокарту и другое периферийное оборудование. Если после отключения всех компонентов ПК загрузился без ошибок, пользователю потребуется последовательно подключать оборудование обратно. Таким образом удастся выявить источник возникновения неполадки.
Обычно использование одного из перечисленных методов помогает решить проблему, связанную с появлением синего экрана с ошибкой 0xc0000221. Но если способы не смогли справиться с ситуацией, остается только загрузить точку восстановления системы для переустановки Windows 10.
Обычно ошибка 0xc0000221 появляется при неудачном запуске Windows. Коды ошибок, которые начинаются «0x», указывают на проблемы системного уровня. Но неполадка с этим конкретным кодом указывает и на проблемы с оборудованием (добавлена новая планка оперативной памяти или недостаточная мощность блока питания).
Есть несколько причин, которые могут сгенерировать ошибку 0xc0000221:
- Неполадка на аппаратном уровне, возникшая после недавнего добавления новой планки ОЗУ или второго жесткого диска.
- На компьютере установлены две и более видеокарт, которые объединены по технологии SLI или CrossFire.
- Недостаточная мощность блока питания для поддержки всех подключенных устройств.
- Неполадка на системном уровне, связанная с повреждением файлов.
- Ошибка вызвана сторонней службой, которая прерывает запуск и приводит к синему экрану BSOD.
Загрузка в безопасном режиме
Сначала нужно проверить, что причина проблемы скрывается не в стороннем приложении или службе, сбой которых может привести к возникновению синего экрана BSOD. Для этого загрузим систему в безопасном режиме.
В этом режиме компьютер запускается с минимальной конфигурацией только с основными файлами и драйверами, необходимых для поддержки правильной работы ОС. Если компьютер загрузится в безопасном режиме, можно определить, что при обычном запуске виновником является программное обеспечение, которое установили перед возникновением ошибки.
Вот краткая инструкция по загрузке в безопасный режим и определении процесса, который вызывает BSOD с ошибкой 0xc0000221:
Если неполадка возникает во время запуска системы, можно принудительно вызвать экран с дополнительными параметрами. Для этого, после включения компьютера, когда система начнет загружаться нажмите и удерживайте кнопку выключения, пока ПК не выключится. Так повторите 3 раза, в последующий появится окно автоматического восстановления.
Если удается запустить систему, можно также открыть вкладку с параметрами восстановления. Откройте диалоговое окно «Выполнить» (клавиши Windows + R), впишите ms-settings:recovery. Затем нажмите кнопку «Перезагрузить сейчас» в разделе «Особые варианты загрузки».
Перейдите на вкладку «Поиск и устранение неисправностей», выберите «Дополнительные параметры».
Затем откройте раздел «Параметры загрузки» и кликните на кнопку «Перезагрузить».
В новом окне отобразится список с вариантами запуска, нажмите F4, F5 или F6 для загрузки одного из трех доступных безопасных режимов.
Если компьютер загрузится успешно в безопасном режиме, скорее всего, что служба программы, которую недавно установили, вызывает синий экран BSOD. Удалите установленные в последнее время приложения. Можно также сделать поиск проблемной программы с помощью чистой загрузки Windows, исключая каждую из процесса запуска.
Если синий экран BSOD возникает при запуске в безопасном режиме, перейдите к следующему шагу.
Сканирование утилитами SFC, CHKDSK и DISM
Теперь проверим, не возникает ли ошибка с кодом 0xc0000221 через повреждение системных файлов. Используем несколько встроенных утилит, предназначенных для исправления файлов Windows.
Инструкция по сканированию системы утилитами SFC и DISM:
В поисковой строке Windows впишите команду cmd. В результатах поиска кликните на найденную позицию правой кнопкой мыши и выберите запуск от имени администратора.
Если синий экран возникает в ходе запуска Windows, выполните первый шаг из способа 1 с трехразовой перезагрузкой. Затем перейдите по пути: Дополнительные параметры — Командная строка.
В консоли командной строки введите команду для запуска сканирования:
sfc /scannow
Эта утилита производит сканирование системной области на наличие повреждений и заменяет поврежденные файлы Windows с локально кэшированных копий.
После завершения проверки перезагрузите компьютер и посмотрите, не появляется ли ошибка с кодом 0xc0000221.
Если не удалось ее исправить, выполните указанные шаги для открытия командной строки. Затем впишите команду:
chkdsk /f C:
Утилита производит анализ диска и устраняет ошибки при их обнаружении. В строке команды нужно изменить С: на букву диска, на котором установлена ОС.
Если после проверки ошибка по-прежнему повторяется, перейдите в командную строку и введите команду:
dism /online /cleanup-image /restorehealth
Утилита DISM может заменить любой поврежденный файл Windows со свежей версии, загруженного с сервера Майкрософт. Поэтому перед началом сканирования проверьте подключение к интернету.
Перезагрузите компьютер и посмотрите, удалось ли устранить ошибку 0xc0000221 при следующем запуске.
Проверка оперативной памяти
Планки оперативной памяти также часто бывают причиной возникновения ошибки 0xc0000221. Проблемы с ОЗУ сложно определить, даже некоторые из лучших утилит по тестированию не могут обнаружить все ошибки памяти.
Лучшая и самая простая стратегия проверки – открыть системный блок и извлечь один из модулей ОЗУ (если установлено 2 планок). Если компьютер запускается без проблем с одной планкой памяти, попробуйте поменять местами положение 2-х ОЗУ – иногда проблема возникает, когда более быстрая память помещается за более медленной.
Если сомневаетесь в одной или двух планках оперативной памяти, можно запустить MemTest – но дождитесь, чтобы тестирование выполнялось по крайне мере 5 часов для получения окончательного результата.
Удаление второй видеокарты и дополнительных дисков HDD / SSD
Для устранения ошибки 0xc0000221 попробуйте отключить вторую видеокарту (если задействована технология SLI / CrossFire) или дополнительные жесткие диски. Вполне возможно, что неполадка возникает из-за того, что блок питания не имеет достаточной мощности для поддержки всех подключенных устройств.
Попробуйте «разгрузить» компьютер до минимума путем отключения – дополнительного HDD, внешнего накопителя, оптического привода DVD, второй видеокарты от SLI или CrossFire, ненужные периферийные устройства.
После включите компьютер и посмотрите, удается ли загрузить систему без ошибки 0xc0000221. Если загрузка прошла без проблем, по очереди подключите устройства, пока не удастся определить виновника.
Возврат к предыдущей точке восстановления системы
Проблема может возникнуть после установки большого обновления системы. Если после обновления Windows возникает синий экран BSOD с кодом ошибки 0xc0000221, обойти его можно с помощью точки восстановления.
Восстановление системы – это функция Windows, которая позволяет исправить широкий спектр сбоев, путем возврата в предыдущее рабочее состояние.
Перед обновлением Windows создает точку восстановления и вдруг возникнут неполадки, то можно восстановить рабочее состояние из нее.
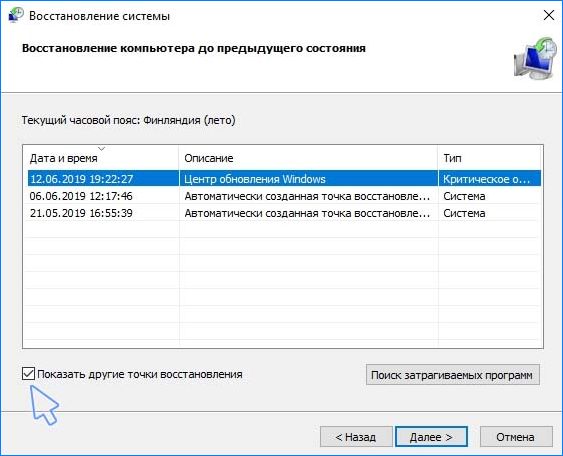
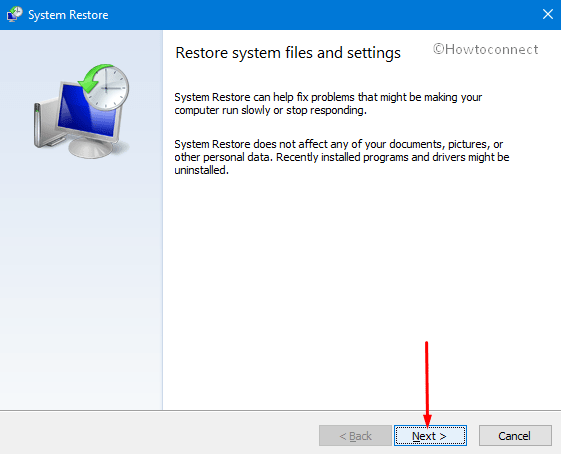
- Откройте диалоговое окно «Выполнить» клавишами Windows + R, впишите команду rstrui и нажмите на Enter для запуска мастера восстановления.
- На первом экране нажмите кнопку «Далее», чтобы перейти к разделу точек восстановления.
- На следующем экране убедитесь, что установлен флажок «Показать больше точек восстановления» для отображения всех доступных точек.
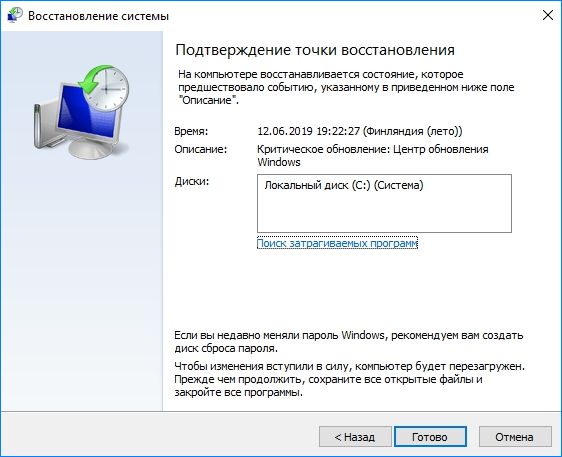
- Затем выберите точку восстановления, которая была создана до появления ошибки 0xc0000221 и нажмите «Далее» для запуска процесса. В следующем окне кликните на кнопку «Готово».
Через пару минут компьютер перезагрузится и будет восстановлено предыдущее состояние. Если состояние удачно восстановится, то компьютер не должен аварийно завершать работу с кодом ошибки 0xc0000221.
Если нет точек восстановления, перейдите к следующему шагу.
Восстановление системы
Если ни один из способов не позволил обойти ошибку 0xc0000221, возможно придется сделать чистую установку Windows. Но прежде, чем это сделаете и потеряете все личные данные, можно попробовать восстановить систему.
Восстановление системы заменит все поврежденные компоненты Windows, которые могут вызывать неполадки, свежими копиями. В отличие от чистой установки не удаляет личные файлы пользователя (документы, фотографии, видео, музыку) и установленные приложения.
Windows 10 error code 0xc0000221 will occur when your computer fails to boot. Since error 0xc0000221 will not happen at every boot attempt, you can pass through this error sometimes. However, sometimes you will be stuck in an Automatic Repair Loop and this is troublesome. MiniTool will offer you some solutions in this post.
What Triggers the Error Code 0xc0000221
When you run a Windows OS, you may encounter various kinds of BSOD error such as Amifldrv64.sys BSOD, hal.dll BSOD, error 0x80070017, etc. Recently, numerous users complain that the blue screen error 0xc0000221 often bothers them and seek for solutions.
Once the computer fails to boot, the error code: 0xc0000221 will appear with the blue screen. What causes this issue? The error 0xc0000221 can happen due to hardware issues, damaged system files, third-party applications interruptions, secondary GPU issues, etc. In addition to that, inadequate power, faulty graphics drivers, as well as newly inserted RAM can also result in the Windows 10 error code 0xc0000221.
How to Fix Error 0xc0000221
The factors above are the reasons that are found up to now behind the error 0xc0000221. Now, it’s time to fix this issue. This post will offer you corresponding methods to fix BSOD error code 0xc0000221.
Solution 1: Boot Your Computer in Safe Mode
Before trying other methods to fix the error code 0xc0000221, you should boot your computer into safe mode to check if the error is initiated by any third-party programs. If you enter the safe mode that only runs a few system applications and drivers and the error disappears, it indicates that the third-party applications cause the BSOD crash.
Tip: As your computer cannot log in as usual, you should follow this guide to enter the safe mode.
Given to that fact, you can try uninstalling any newly installed applications on your computer to fix the issue.
Solution 2: Run SFC, DISM, and CHKDSK Commands
As the error code: 0xc0000221 can occur due to system file corruption and disk errors, you can run SFC, DISM or CHKDSK commands to solve the error. To run these commands, you should ensure that your computer can boot into the safe mode. Otherwise, you cannot run them.
You can enter the safe mode by referring to the guide above and then run these commands by following steps below.
Steps for Running SFC Command
Step 1: Type cmd in the search box, and then right click on Command Prompt under the Best match list and select Run as administrator from the pop-up menu to go on.
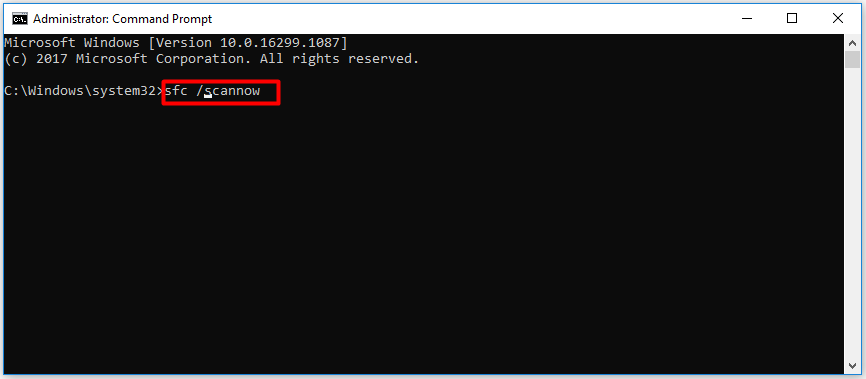
Step 2: In the elevated window, type sfc /scannow and hit Enter to execute it. In most cases, the SFC will successfully scan and repair detected system file corruption. However, it may be out of work and throw you the Windows Resource Protection Found Corrupt Files but Unable to Fix error. If so, you can try an alternative command – DISM.
Steps for Running DISM Command
Step 1: Run Command Prompt as administrator in the search box.
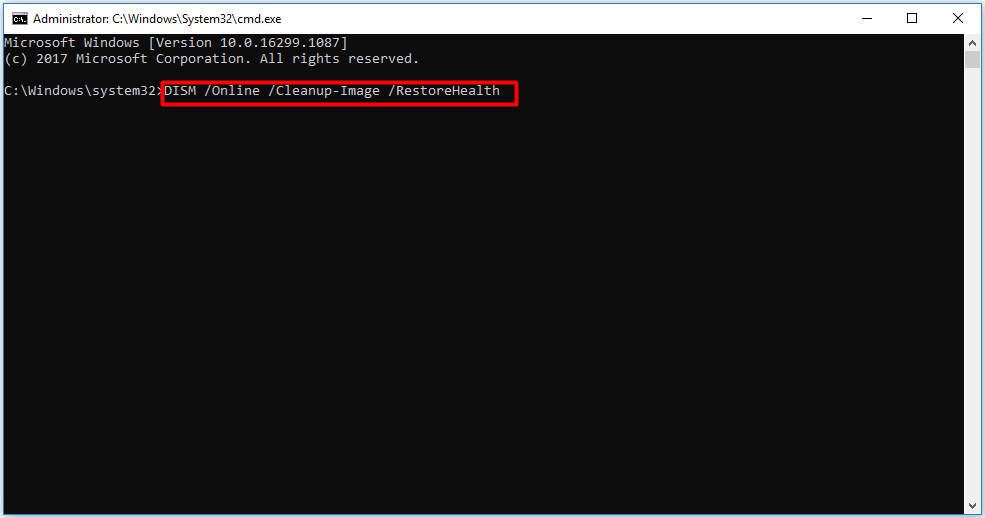
Step 2: In the next window, type DISM /Online /Cleanup-Image /RestoreHealth and press the Enter key. Then, the DISM will automatically scan and fix system file corruption on your device for you.
Steps for Running CHKDSK Command
Step 1: Similarly, run Command Prompt as administrator to start the process.
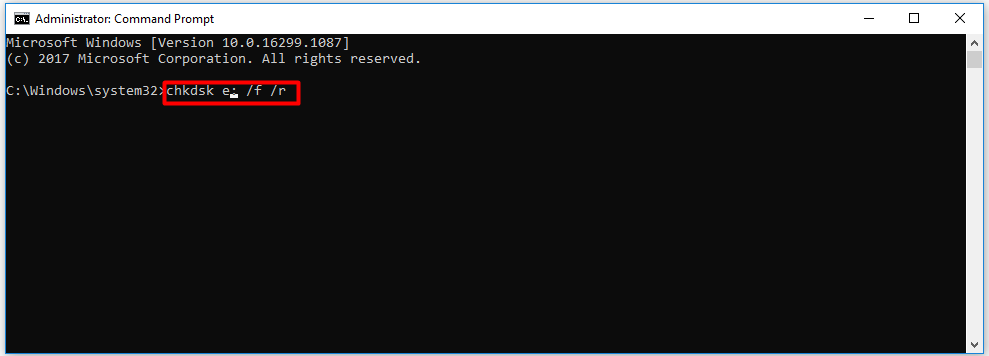
Step 2: In the pop-up window, type chkdsk e: /f /r (you should replace the e with your actual hard drive letter) and click on Enter to execute the operation.
Solution 3: Delete Junk Files
Each time you use your PC, temporary files will be created. For example, when you open a document, Microsoft Word will create temporary files that will boost the opening speed and back up your changes on the Word. If you browse Internet, the browser will download temporary Internet files. Though these files can benefit you from time-saving, they will cause trouble if they are piled up.
These temporary files will not be needed by your system or software after a long time, but they will not be deleted automatically. Hence, they will turn into junk files. If there are too many junk files on your computer, they will trigger various issues such as computer crashes (due to BSOD error), low disk warning, computer lagging, etc.
Therefore, you should delete junk file regularly to free up disk space and improve the performance of your computer. How to do that? Here are detailed steps for you.
Tip: You’d better clean up computer periodically. Alternatively, you can also optimize your device with free PC optimizers to improve computer performance.
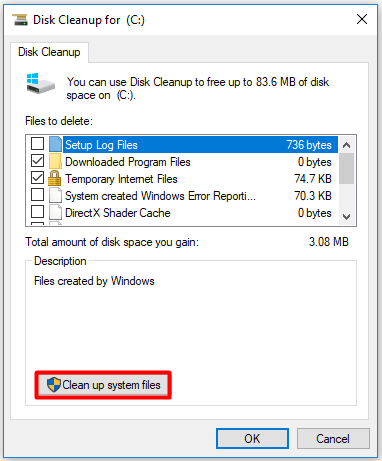
Step 1: Open the Run window, and then type cleanmgr and click on OK to go on.
Step 2: If you are prompted with any confirm window, just follow it and navigate to the window below. Then, click on Clean up system files at the bottom left corner of the window.
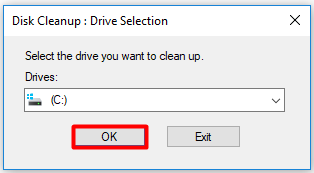
Step 3: You will be required to select a drive to clean up. Here, you just need to follow the default choice and click OK.
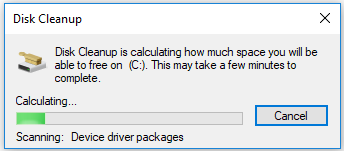
Step 4: Then, the program will calculate the amount of disk space that you can free up on the target disk.
Step 5: You will be prompted with the Disk Cleanup for window again. Click on OK and then click Delete files from the pop-up window to execute the cleanup operation.
Solution 4: Remove Any Virus or Malware on Your PC
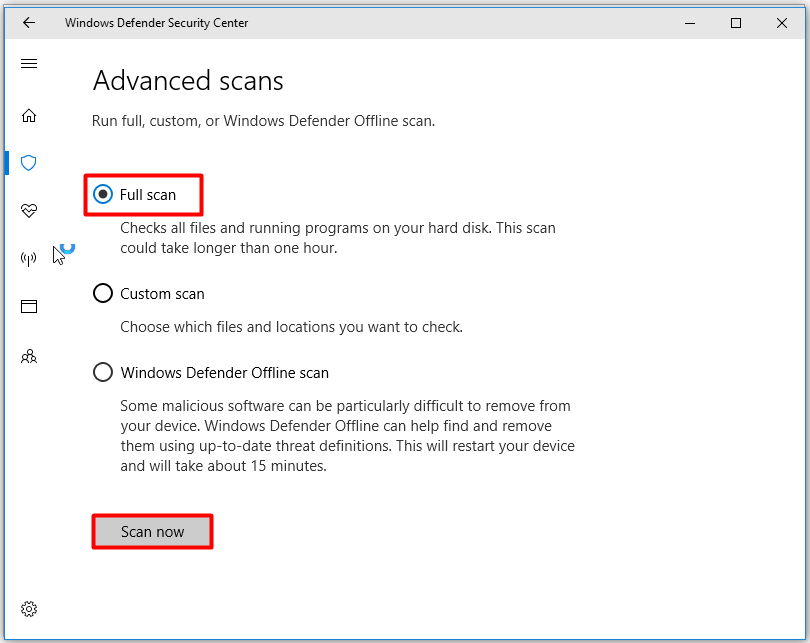
Virus or malware on your computer can attack your system, which causes the BSOD error 0xc0000221. In order to exclude this possibility, you’d better perform a full scan for your computer and remove the virus. Here are details.
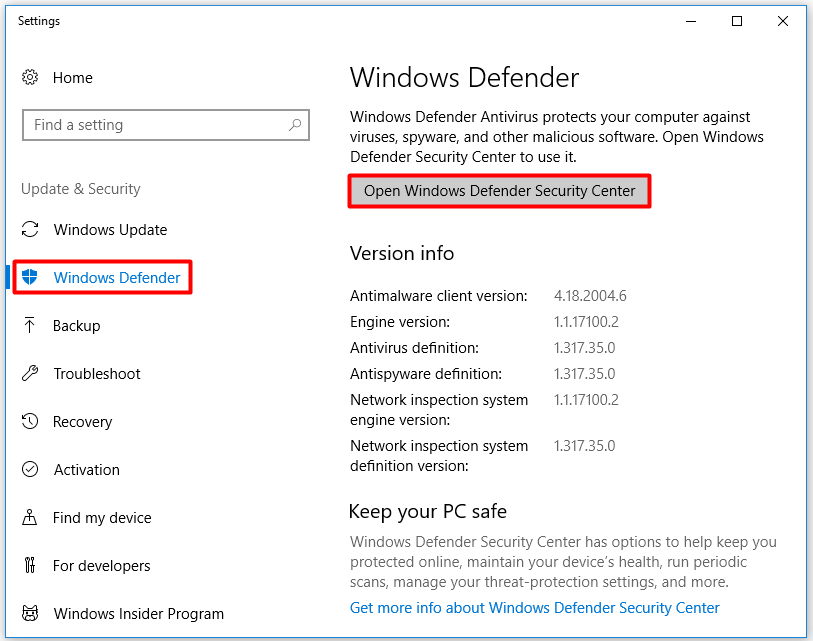
Step 1: Press Win and I keys to open the Settings window, and then navigate to the Update & Security section. After that, click on Windows Defender under the Update & Security tab, and then move to the right side of the window and click on Open Windows Defender Security Center option.
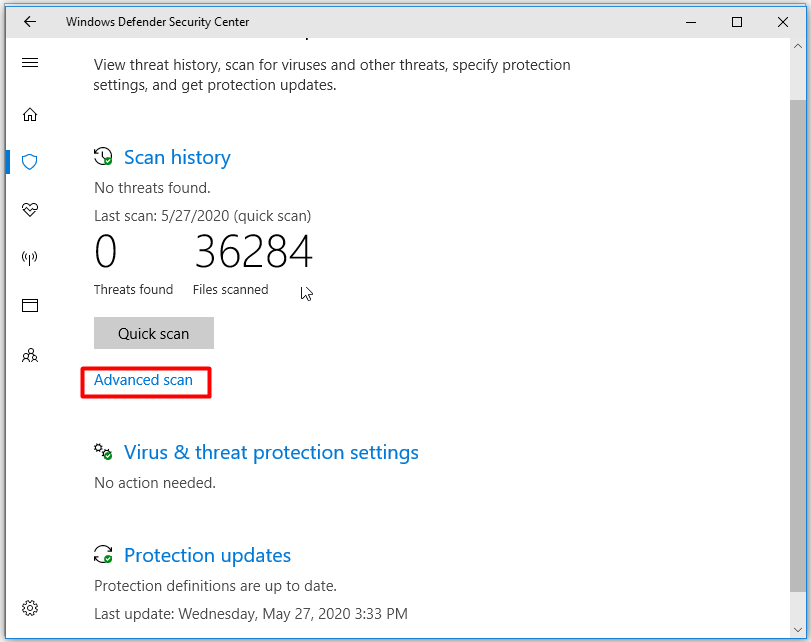
Step 2: In the elevated window, click on Advanced scan to continue.
Step 3: In the next window, choose Full scan option and click the Scan now button at the bottom of the window.
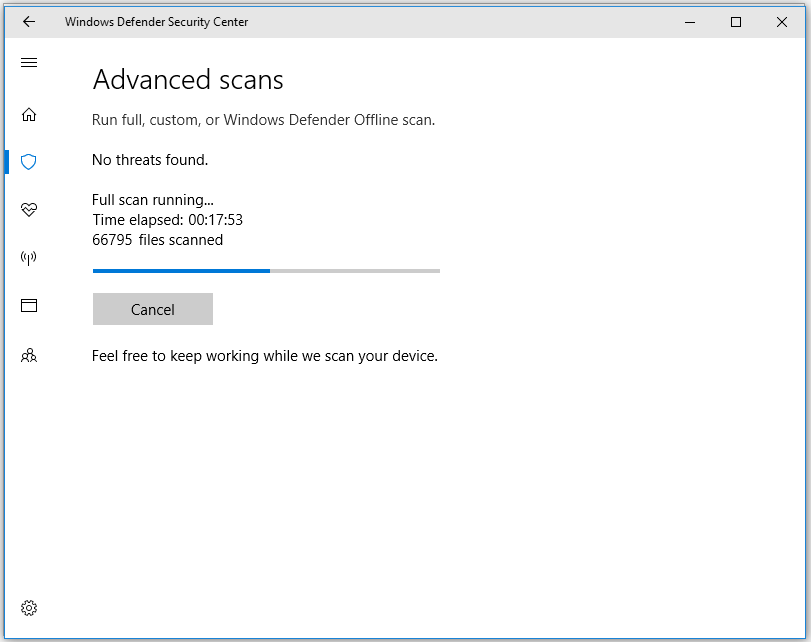
Step 4: Then, the scan will begin. As the scan process will take some time, you should wait patiently until the finish of the process.
Note: Don’t interrupt the scan process.
Step 5: After finishing scanning, you will receive 3 consecutive options. Click on Select and then click Start actions to remove all the malicious components on the system.
Solution 5: Remove Secondary GPU and External HDD or SSDS
According to user reports, the Windows 10 error code 0xc0000221 can be resolved by disconnecting all unnecessary devices that are connected to your computer. It is very likely that the issue happens because the retained power supply is not enough to sustain all connected devices.
To prove this, you can disconnect all the unnecessary devices on your PC such as secondary GPU, external hard drive, DVD optical drive, etc. After that, you can check if the error 0xc0000221 is solved by booting up your computer.
If the PC can boot up properly now, try to reconnect these devices one by one until you encounter this error again. Then, you can find the source for the error.
Top recommendation: Top 8 SSD Tools to Check SSD Health and Performance
Solution 6: Check RAM for Errors
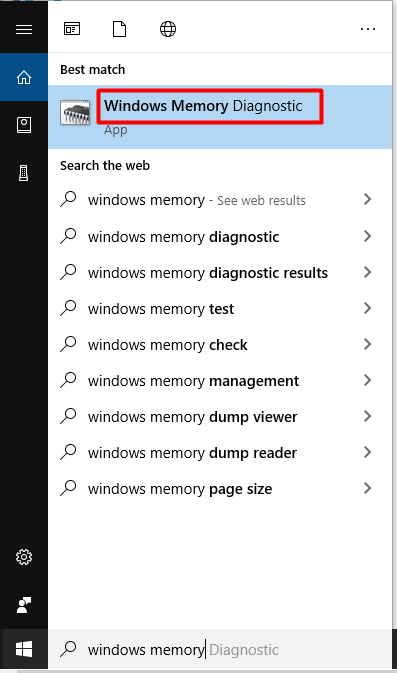
RAM is often regarded as the culprits for the Windows 10 error code 0xc0000221. Hence, it is necessary to check your RAM for errors when you encounter the blue screen error. You can do this with the Windows built-in utility – Windows Memory Diagnostic. Here are detailed steps for running this tool.
Step 1: Type windows memory and then click on Windows Memory Diagnostic under the Best match list.
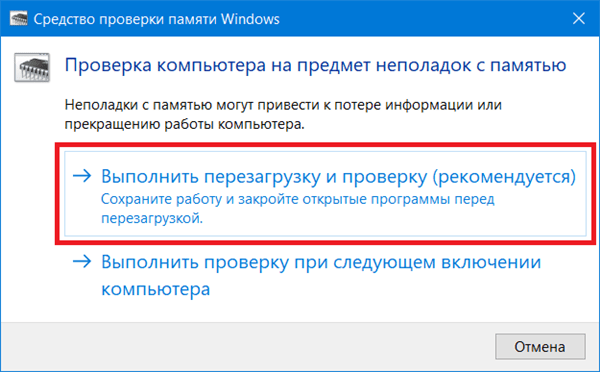
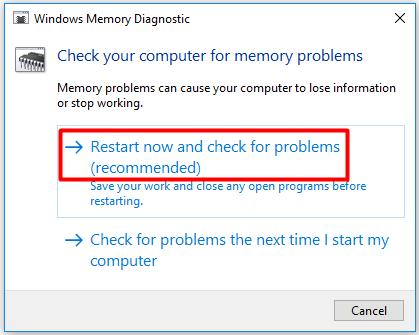
Step 2: Click the Restart now and check for problems (recommended) option from the elevated window.
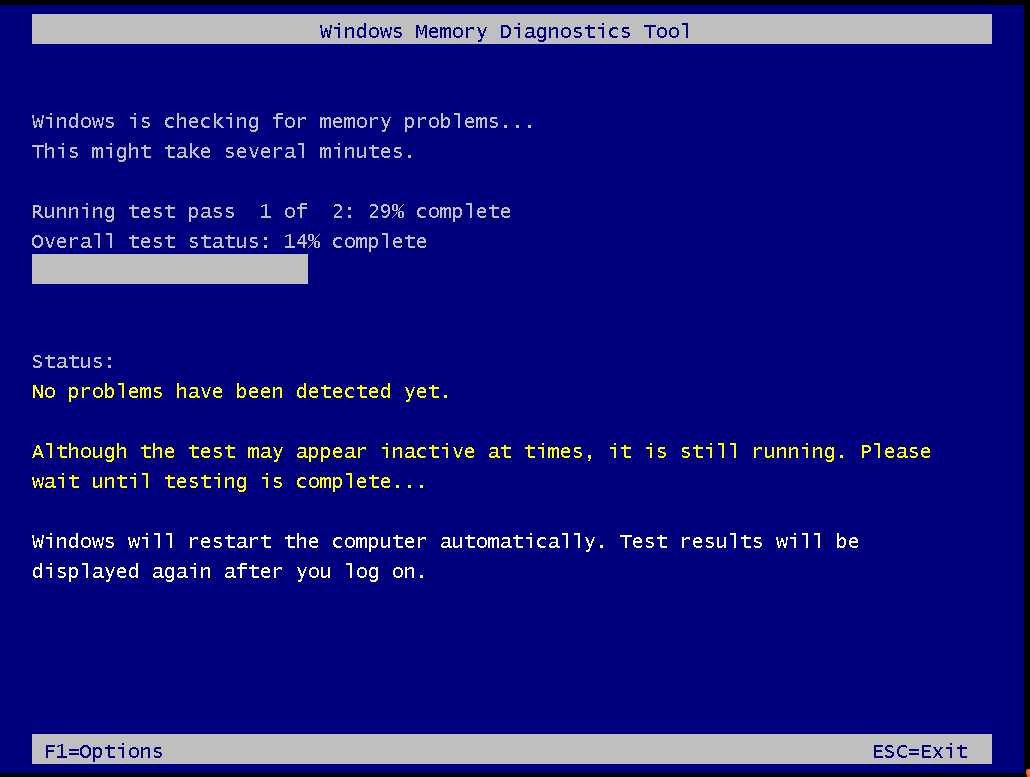
Step 3: The Windows Memory Diagnostics Tool will run automatically. You can view the process of check memory problems.
Step 4: When the testing process ends, your computer will restart automatically. You will see the test results after logging on the computer. If you cannot see it, you can follow these steps to view the results: Right click the Start menu > Event Viewer > Windows Log > System.
Solution 7: Reinstall Windows 10 System
If the error 0xc0000221 still persists after trying methods above, it’s time to reinstall your Windows operating system. This is a thorough method to fix the error. You can do this with a professional tool. MiniTool Partition Wizard is a great choice for you.
The Copy Disk and Migrate OS to SSD/HD Wizard features of this software enable you to reinstall your system easily. Besides, it also allows you to move/resize partition, convert MBR to GPT, wipe disk and scan and fix file system errors, and so on. So, it is strongly recommended that you download this program.
Recover Missing Data Due to the Error 0xc0000221
One of the most common effects of BSOD errors is that it can lead to data loss. This is terrible. Fortunately, you can recover the missing data with MiniTool Partition Wizard. The Data Recovery feature of this program allows you to recover data that is lost due to mistaken deletion, power failure and other cases.
You can download and install it by clicking the buttons below. After that, follow the given steps to recover your missing data.
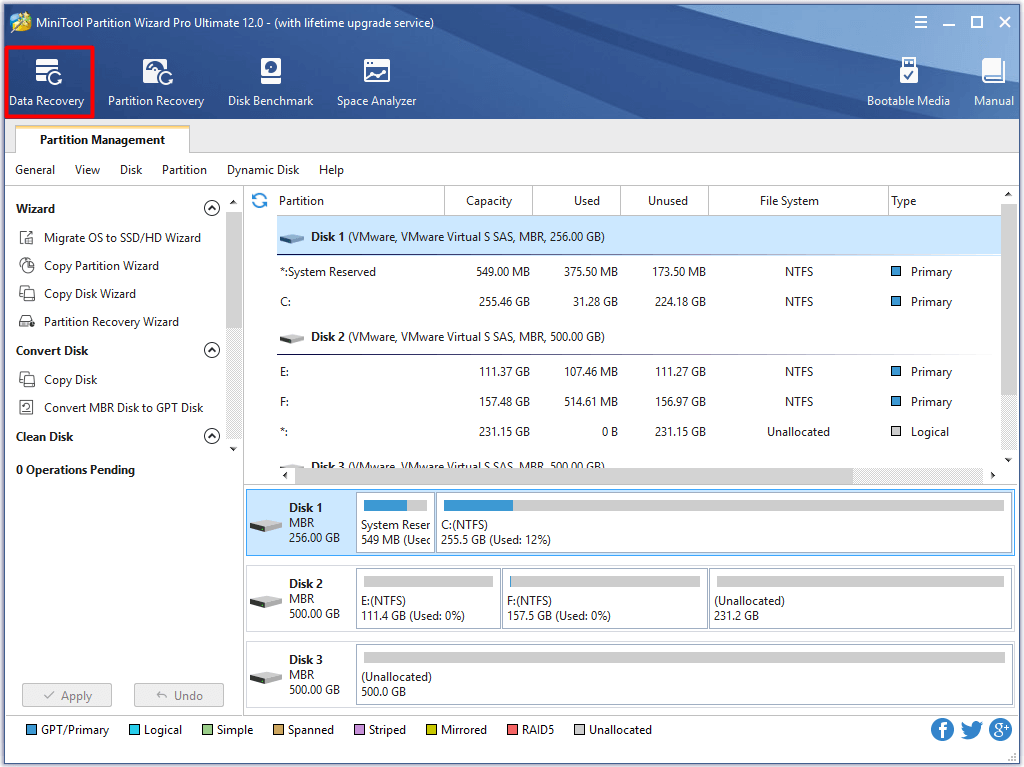
Step 1: Launch MiniTool Partition Wizard Pro Ultimate Edition to enter its main interface. Then, click on Data Recovery to start the operation.
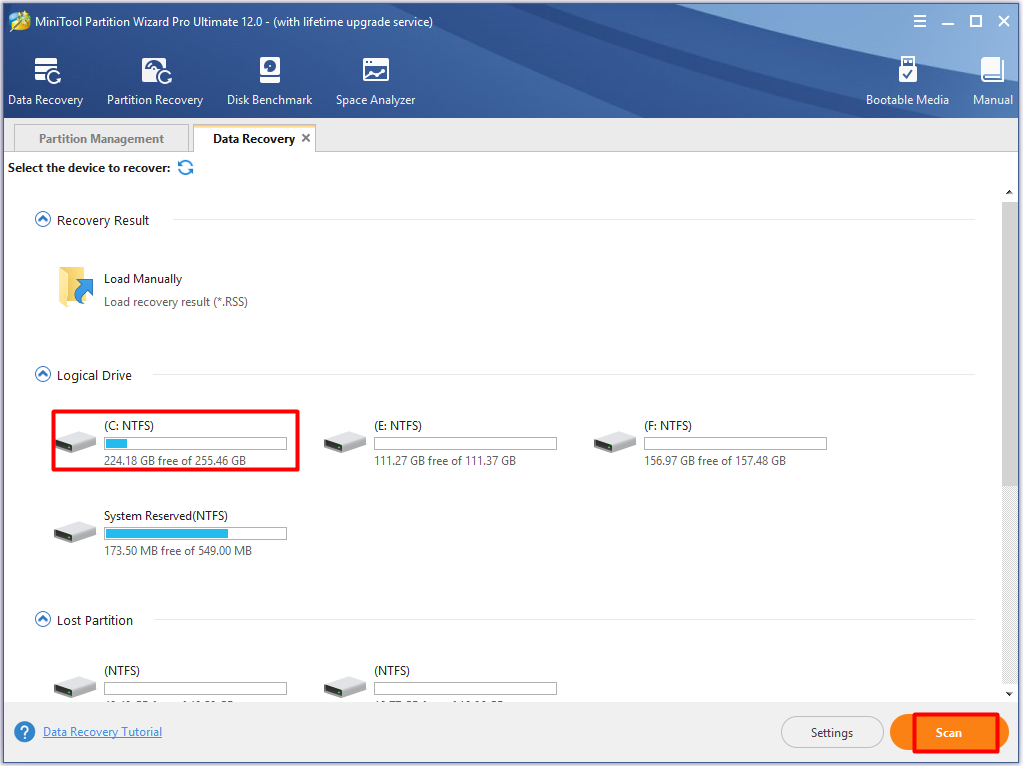
Step 2: Next, choose the drive that you would like to recover and click on the Scan button at the bottom right corner of the window.
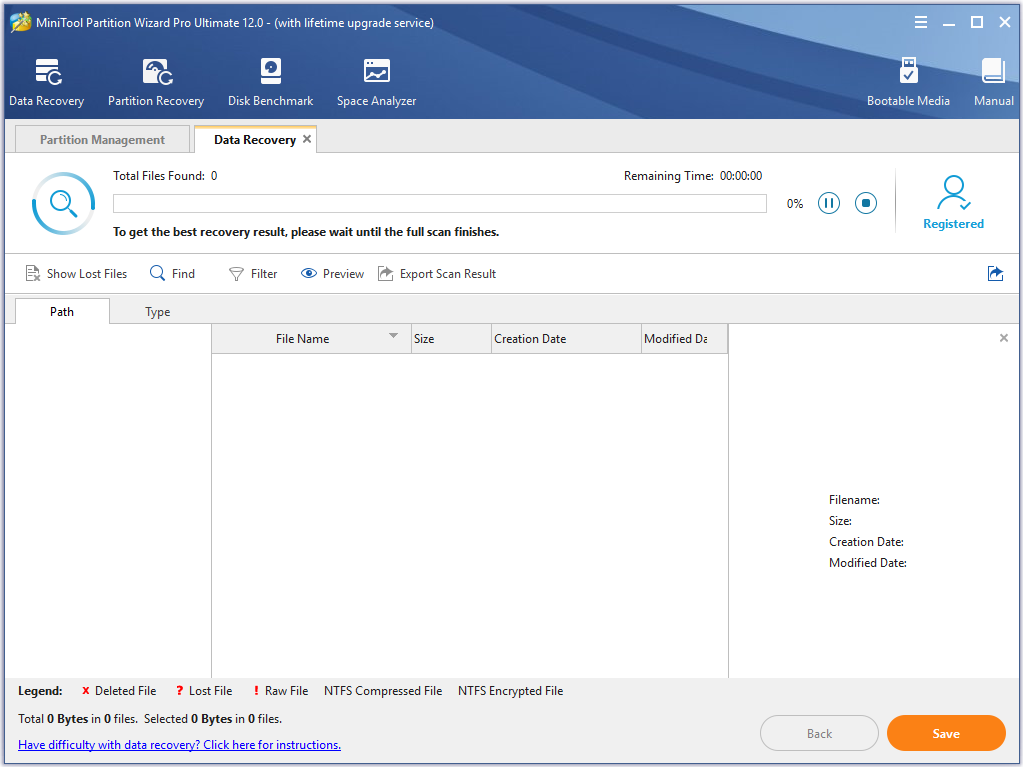
Step 3: Here, you can view the scan process.
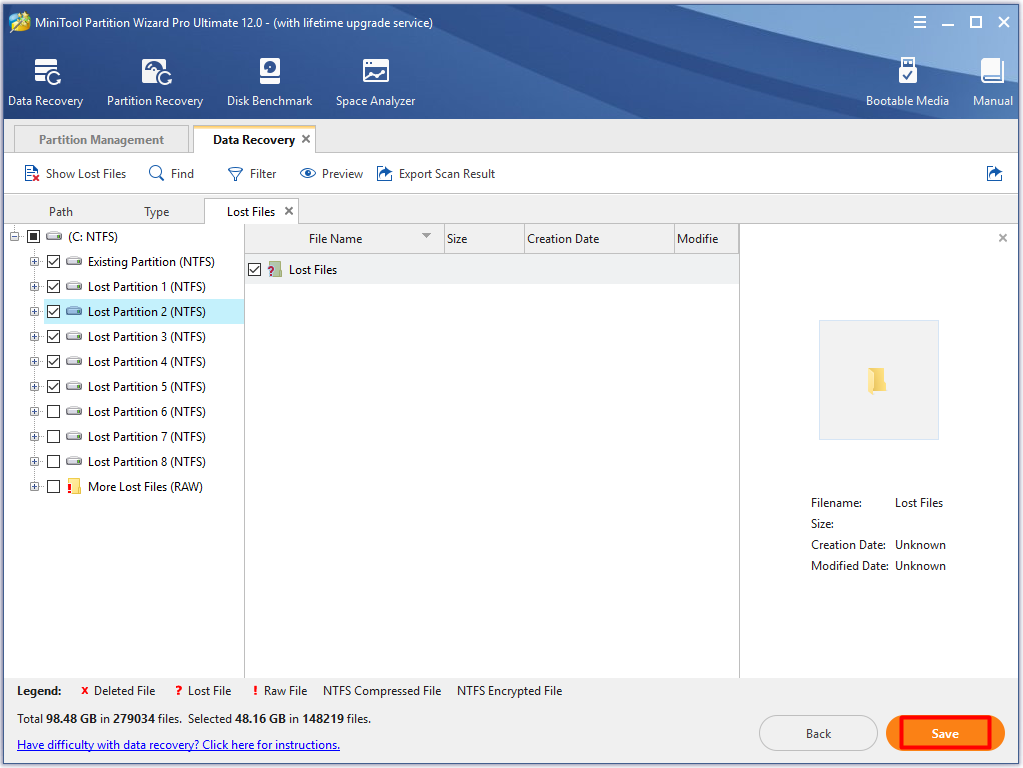
Step 4: Select the files that you would like to recover and click on the Save button.
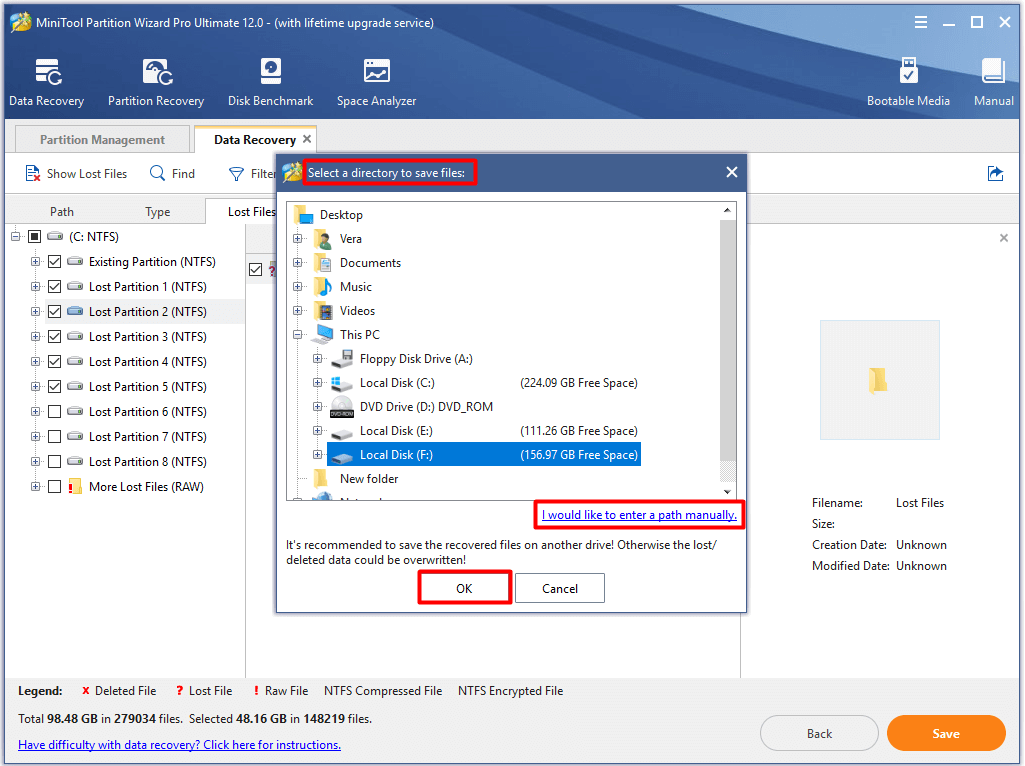
Step 5: Choose a destination for your recovered files. You can select a drive from the given options or type the place manually. Don’t choose the original drive. Otherwise, it will cause data overwritten.
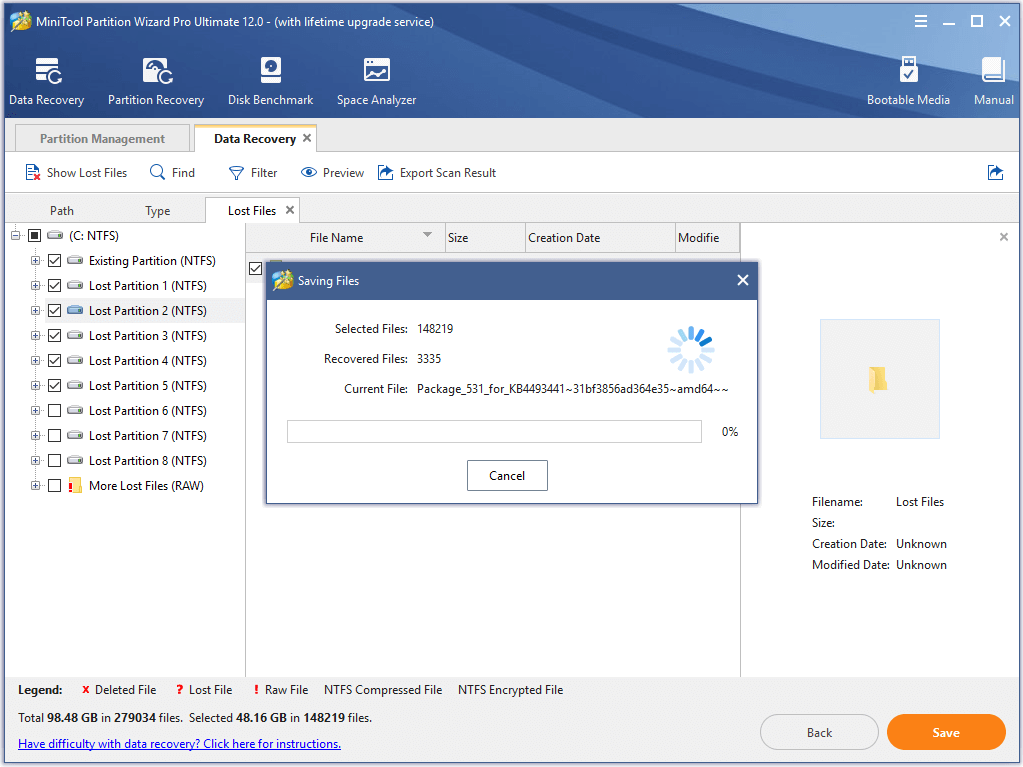
Step 6: Wait for the finish of data saving.
Top recommendation: Fixed Error: Call of Duty Modern Warfare Dev Error 6968
I successfully fixed the error code error code 0xc0000221 with methods given by MiniTool. Are you still bothered by Windows error code 0xc0000221? Read this post and pick one solution to fix the error now! Click to Tweet
Conclusion
To sum up, this post introduces you the causes behind the error code 0xc0000221, its corresponding fixes, as well as the method to recover your missing data due to the BSOD error. Now, it’s your turn to pick one method to fix the Windows 10 error code 0xc0000221.
If you have any questions about MiniTool software, please contact us by sending an email via [email protected].
В этой публикации, друзья, разберём ошибку 0xc0000221, возникающую при загрузке Windows. При такой ошибке компьютер не сможет запуститься и, соответственно, не сможет работать. Ему потребуется восстановление с использованием средств среды восстановления Windows, а в идеале – средств аварийного LiveDisk’а. Что это за ошибка, как проявляется, и как её устранить?
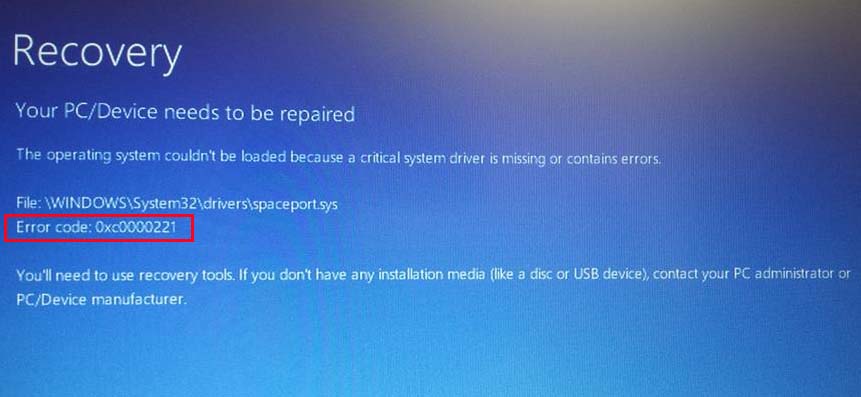
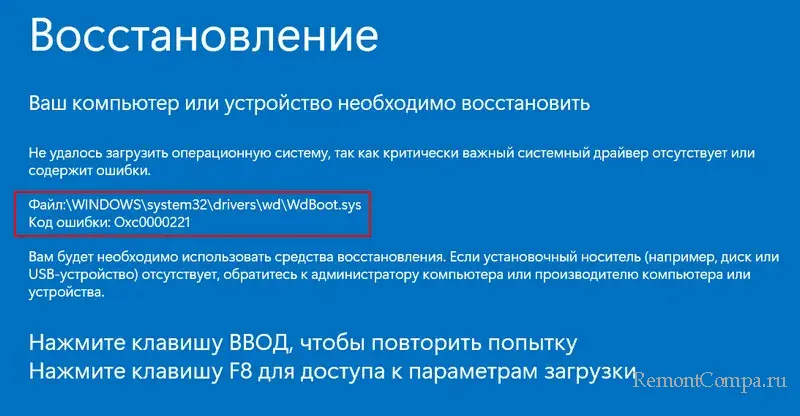
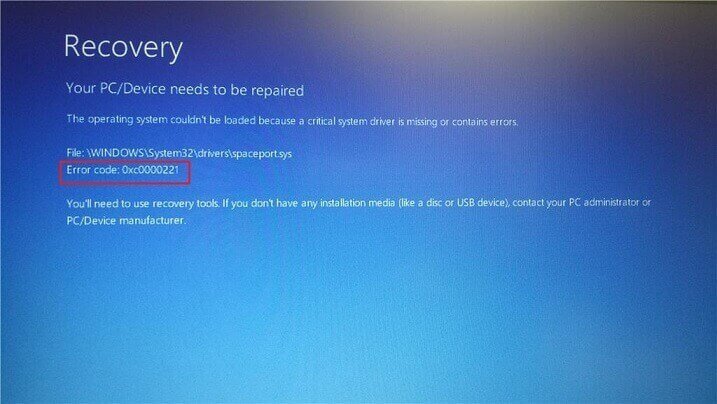
Друзья, ошибка 0xc0000221 может появляться на синем экране с надписью «Восстановление» («Recovery»), где констатируется, что компьютер нуждается в восстановлении, указывается причина — отсутствие или повреждение файлов, необходимых для загрузки операционной системы. И указывается, собственно, сама ошибка 0xc0000221.
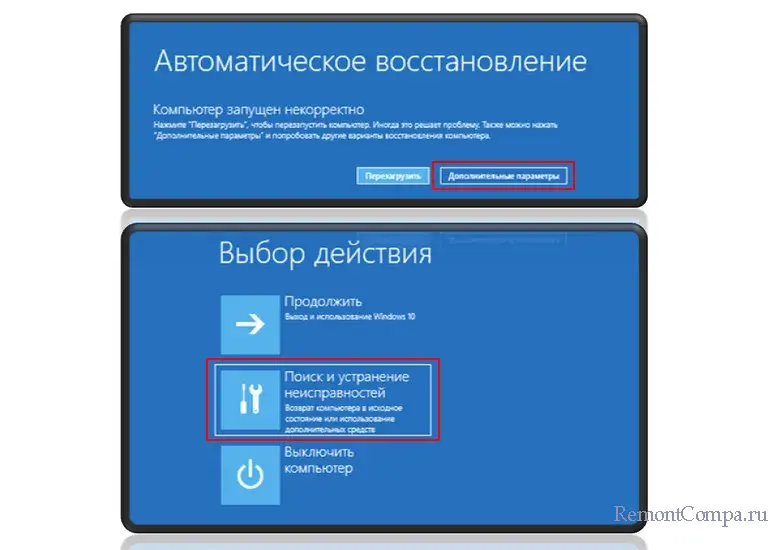
Также может быть, что эта ошибка является причиной циклического перезапуска компьютера с появлением надписи на синем экране «Автоматическое восстановление» (Automatic Repair). В процессе автоматического восстановления самой себя Windows не может устранить причину, сообщает о некорректном запуске, но перезагрузка приводит к новой попытке автоматического восстановления, которая завершается также неудачей. И так по кругу.
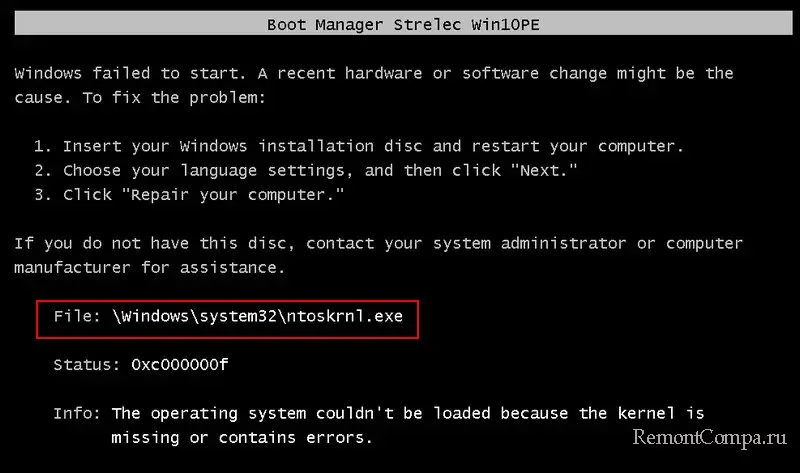
Если попробовать запустить Windows средствами WinPE 11-10-8 Sergei Strelec для случаев проблем с загрузчиком, получим указание на причинный файл, из-за которого Windows не может запуститься.
Ошибка 0xc0000221 означает, что Windows не может запуститься из-за:
- Повреждения или отсутствия одного или нескольких системных файлов, критически важных для работы операционной системы. Часто это bootmgr, winload.exe, ntoskrnl.exe, winresume.exe, hal.dll, disk.sys, wdboot.sys. Системные файлы могли быть уничтожены или повреждены в результате действия вирусов, сбоев в работе Windows и программ, наших пользовательских некорректных действий, проблем с жёстким диском;
- Конфликта с какими-то программой или драйвером;
- Проблем с оперативной памятью.
Ну и давайте теперь конкретно об инструментах и способах устранения ошибки 0xc0000221.
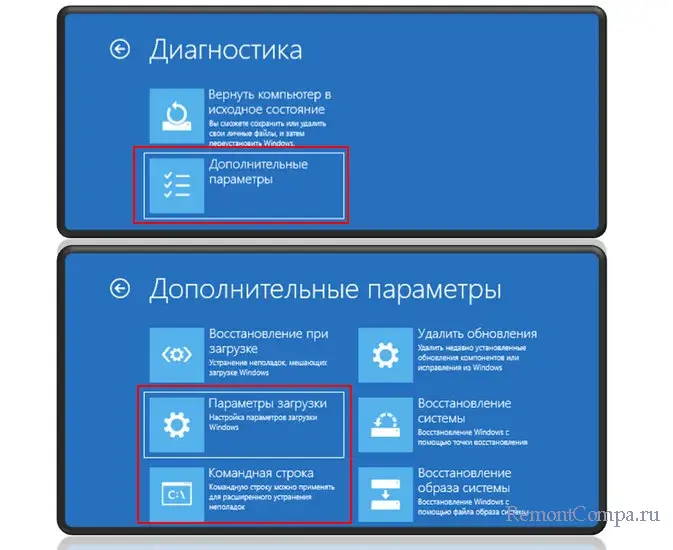
Если на компьютере запускается среда восстановления, можно попробовать её средства для реанимации Windows. Например, на экране автоматического восстановления для доступа к инструментам этой среды жмём «Дополнительные параметры». Далее — «Поиск и устранение неисправностей».
Здесь нам нужны будут «Параметры загрузки» и «Командная строка».
«Параметры загрузки» используем для запуска Windows в безопасном режиме. Безопасный режим позволит проверить, не вызвана ли ошибка конфликтом с программой или драйвером. Если в этом режиме Windows запустится, сможем выявить причинную программу или драйвер и удалить их.
Повреждение или отсутствие системных файлов, друзья, не всегда излечимо, но попробовать исправить ситуацию стоит. Для устранения этой причины используем командную строку и запускаем:
- Системную утилиту Chkdsk для проверки файловой системы;
- Восстановление целостности системных файлов.
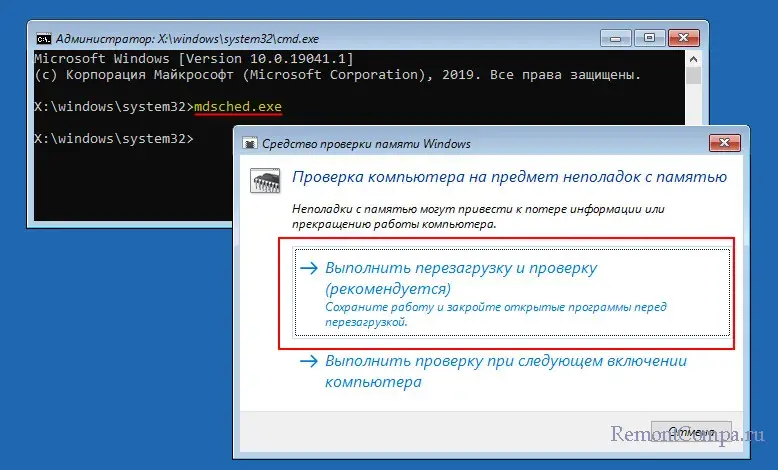
Если причиной ошибки является оперативная память, проверяем её на ошибки с помощью консольной утилиты mdsched.exe.
Больше возможностей для реанимации Windows нам предоставит аварийный LiveDisk WinPE 11-10-8 Sergei Strelec. Скачиваем его образ, записываем на флешку, загружаем с него компьютер.
С помощью инструментов WinPE 11-10-8 Sergei Strelec можно много чего предпринять:
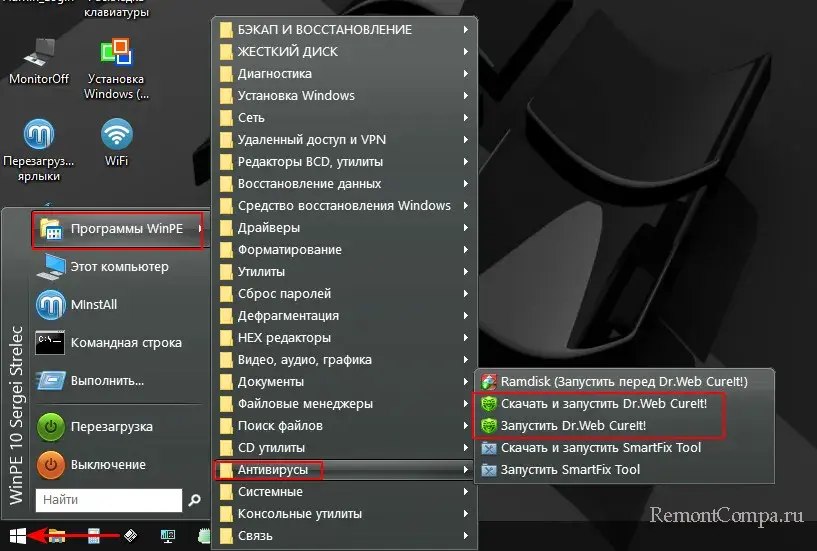
- Запустить антивирус, если компьютер заражён вирусами;
- Выполнить разными способами восстановление системных файлов Windows;
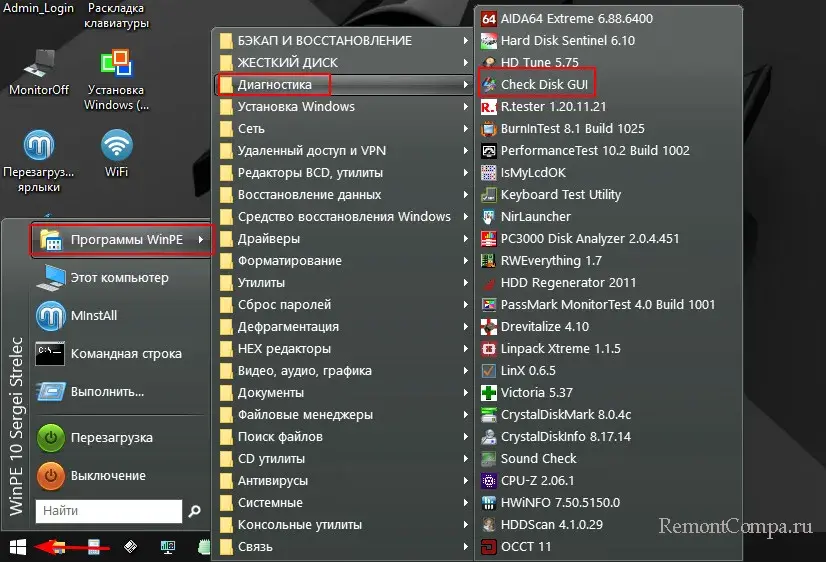
- Выполнить проверку файловой системы Chkdsk с использованием графического интерфейса утилиты;
- Запустить командную строку и с помощью утилиты mdsched.exe проверить оперативную память;
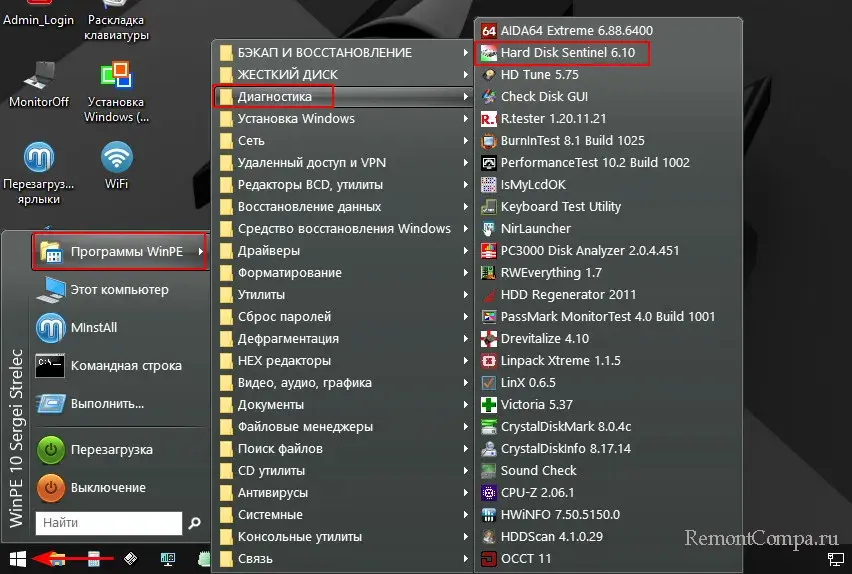
- Выполнить диагностику и тестирование поверхности жёсткого диска, например, программой Hard Disk Sentinel.
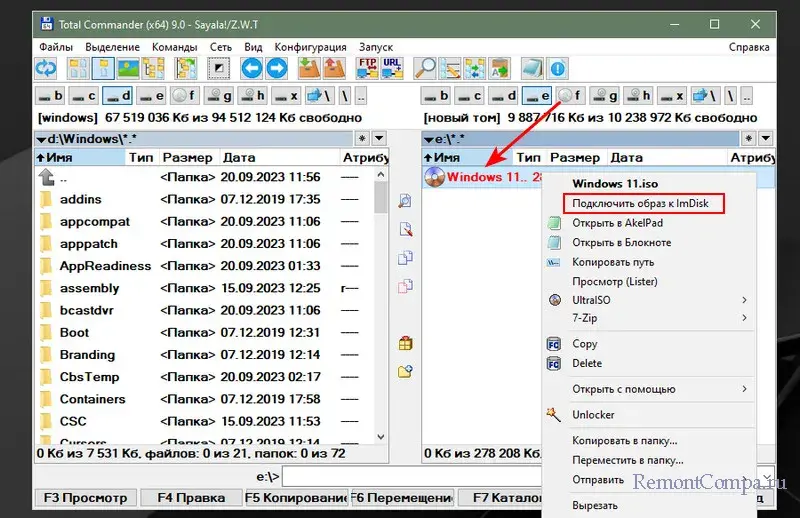
И это только средства самого WinPE 11-10-8 Sergei Strelec. Этот LiveDisk являет собой, по сути, портативную Windows. Мы можем использовать интегрированный в него браузер, выйти в Интернет, скачать любую программу, которая может устранить проблему, установить её (как в обычную Windows) и использовать. Если известен повреждённый или отсутствующий файл, из-за которого компьютер не может загрузиться, можно попробовать скачать в Интернете установочный ISO-образ используемой версии Windows, открыть образ, найти этот файл и подменить им исходный по пути его нахождения на диске Windows. Подмену без проблем осуществит присутствующий на LiveDisk’е файловый менеджер Total Commander.
В крайнем случае в среде WinPE 11-10-8 Sergei Strelec можно и переустановить Windows.
Что делать, если утилита mdsched.exe в процессе проверки оперативной памяти не смогла устранить её проблемы? Если память разогнана, можно попробовать отключить её разгон в BIOS. И можно протестировать включение компьютера с отдельными планками для выявления проблемной. Если причина подтвердится, далее, соответственно, нужно разбираться уже аппаратными проблемами памяти.
Проблемный жёсткий диск необходимо заменить.
Error Code 0xc0000221 in Windows 10 commonly occurs when your system fails to boot. Sometimes you might be able to pass through this BSOD error and get into the login screen as this does not happen on every boot. But in certain cases, the Blue Screen of Death continues to appear with error 0xc0000221 and the system gets stuck in the Automatic Repair Loop.
There are various potential culprits that lead to this issue. It can be the hardware problem, Secondary GPU trouble, system file corruption, interruption of 3rd party applications and so on. This type of error code generally indicates the system level corruption. However, insufficient power or newly inserted RAM can also be the possible reasons. So, in this article, we will deal with various commands which will help you to trace out the problematic area and fix it automatically. Let us walk through all the workarounds in details and see which one is helpful.
Here are how to fix Error Code 0xc0000221 in Windows 10 device.
Boot into Safe Mode
The first and foremost thing you need to ensure that the problem is not facilitated by any third-party program. After you boot into the Safe Mode, you can ensure that there is no interference of the 3rd party app. But if it comes out that a certain software is a reason behind this, uninstall it right away.
Note: You will need basic files and drivers while being logged in Safe Mode.
If the BSOD Error Code 0xc0000221 does not show up the sign in screen, then use the “Windows installation media” such as DVD or USB Flash drive. So, insert the one that you have in its respective port.
Note: If you are able to pass through the sign in screen, then you can navigate to Settings Recovery through Run. Press Windows and R hotkey together and type ms-settings:recovery in the blank box. Click Restart and thereafter the system will get into the Advanced Startup menu.
For reference, see the way to Boot into Safe Mode from Login Screen.
Now consecutively press any of the keys such as Esc, Delete, F2, F8, F10, F12 or Backspace as per your computer’s manufacturer.
On the BIOS settings screen choose your favorite language followed by a click on the Next button.
After this move to the bottom left and select Repair your computer option.
In the Advanced Startup screen, go ahead with Troubleshoot. Click Advanced options.
Proceeding ahead, select Startup Settings. From the list of options, choose Enable Safe Mode.
Finally, make a click on Restart option and have patience until your PC starts in Safe Mode.
After successfully going into Safe Mode, try out the below-mentioned workarounds and see which one works for you.
Uninstall Recently Installed Program
The recently installed third-party applications might be the main factor to instigate Error Code 0xc0000221. It’s likely that the service from that specific application leads to the BSOD issue. So you need to identify this program and uninstall it right away to bypass the error.
Note: Ensure to have admin authorities to carry out these changes.
Step-1: Press Win and I hotkeys in order to open the Windows Settings application on the screen.
Step-2: Here, make a click on the Apps category. Go to Apps & Features section on the left pane of the following page.
Step-3: Switch to the corresponding side, locate and select the recently installed program.
Step-4: Hit the Uninstall button and go through the onscreen guidelines to completely remove the program.
Lastly, Restart Windows 10 PC and check whether this has wiped out Error Code 0xc0000221 or not. If not then try next workarounds.
Perform an SFC Scan
Another important thing to settle Error 0xc0000221 is to unearth the fault in your System files. The missing Windows files could be the culprit behind this issue. Therefore scan the system accuracy and repair the corrupted file. For this, you need to execute a System File Checker command.
Hit “Win + R” keys simultaneously open Run dialog box.
In the void box type cmd. Press “Ctrl + Shift + Enter” keys to access an elevated Command Prompt.
If the UAC prompts up, click Yes to give consent.
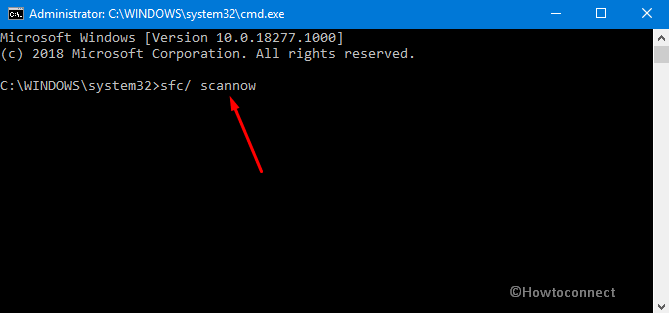
Henceforth on the black panel, type or copy/paste the given command and hit Enter key to run it right away.
sfc/ scannow
This will take a few minutes to complete the scan, so wait patiently.
After the successful execution of the command, reboot your Windows device and check whether the Error Code 0xc0000221 persists to occur or not. If you still receive the error, given an attempt to other fixes as well.
See more on this tool here – SFC /Scannow, DISM.Exe, CHKDSK.
Run CHKDSK Utility
If trying above steps does not find useful to rectify the Error Code 0xc0000221 then the issue lies in your hard disk drive. So the solution is to scan the disk’s bad sector and identify the real offender as well as repair the problem immediately. Here is how to proceed.
Go to Cortana and type Command Prompt in the search box.
Right click on the same result then select the option namely “Run as administrator” from the context menu.
Hit Yes on User Account Control to authenticate.
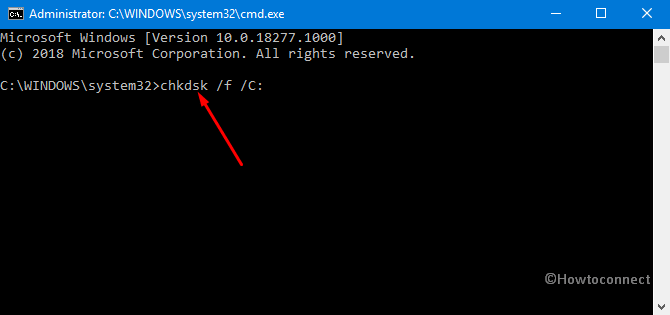
On the visible prompt, insert the following code followed by a hit on the Enter key.
chkdsk /f /C:
Note: In the above-mentioned command, chkdsk will work to check the disk. Whereas f denotes to fix the problem and C: is the disk drive where the operating system is installed. However, you can substitute the drive letter in which OS is installed on the PC.
Wait until the task is finished. Lastly, Reboot the PC and hopefully, this will overcome this BSOD issue.
Execute DISM scan
If the Error Code 0xc0000221 continues to stick in your PC then the DISM command might be a possible solution to fix this trouble. This utility command identifies the faulty Windows file and exchanges it from a new one which is downloaded from Microsoft’s official website. Here are steps to follow –
Right-click on the blank area of the taskbar and select Task Manager.
On the window that pops up, hit the File menu and choose Run new task.
Here, type cmd and ensure to tick mark the box against the option Create this task with administrative privileges. Click OK.
On succeeding window click Yes to permit the tool.
dism /online /cleanup-image /restorehealth
Note: Ensure that the internet connection is running while you execute the scan.
This command will take some time to complete scan, so wait patiently without interrupting the procedure.
Once you reboot the PC, check for the error.
Verify RAM for issues
If the above commands do nothing to overcome the Error Code 0xc0000221 then the problem might be in your RAM. It is complicated to scan the memory device but here we will discuss “Windows Memory Diagnostic” tool. It will test the whole RAM at one go easily and find the bad sectors on this device. Here is how to move ahead.
First of all, save and close all the active apps.
Thereafter go to Start and type Windows Memory in the search box.
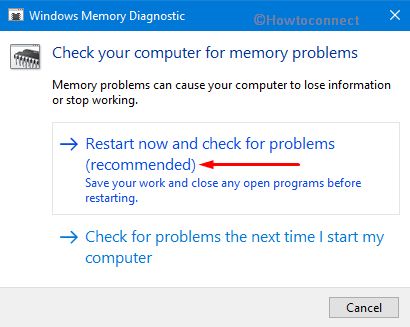
Once the result comes up, make a click on Windows Memory Diagnostic. Moving on, select the option namely “Restart now and check for problems (recommended)”.
In just a moment you will see a blue screen window on the screen which will detect memory issues. Once the memory testing gets over 100%, the system will automatically restart itself.
You can see the test result in the notification area of the taskbar after signing up on your PC.
The same outcome could be carried out by navigating to the path: Right-click Start Menu => Event Viewer => Windows Log => System.
Hope this time it has managed to fix the Error Code 0xc0000221 on your Windows 10 device.
Remove Secondary GPU and External HDDs or SSDs
Several users on Windows forum have mentioned that the Error Code 0xc0000221 could get rectified by disconnecting all the unnecessary drives attached to your Desktop. There is a probability that there is a power issue which is not able to bear the power required for different drives.
All you have to do is to detach Secondary HDD, External HDD, DVD optical drive, Secondary GPU or Sound Speakers etc. and see whether doing this solves this bug on your computer. If your PC is now able to boot up properly without generating any BSOD, then try to reconnect them back one by one. In this way, you can identify the real reason leading to this situation.
If the above method doesn’t carry out any changes, try other fixes mentioned below.
Use Previous System Restore Point
If you have created a “System Restore Point” earlier on your PC, this might rescue you from this issue. It has been found that this problem could get generated if crashed “Windows Update” is causing random BSOD crashes. “System Restore Point” is a nice feature which will bring back your computer to an earlier point where it was working completely fine.
Note: If you don’t have any restore points, you can skip this and move to the next solution.
Right-click on Start and choose Run option.
On the Run box, type rstrui in the void box and click OK so that System Restore wizard opens up.
Here in the “System Restore” wizard, perform a hit on Next to generate your PC’s Restore.
In order to view more restore options, make a click on the checkbox against the box “Show more restore points” and click Next to go ahead.
Here select the latest restore point and hit Finish to let start this process.
Note: Make sure you have saved and closed all running applications before going through this procedure.
Perform a Clean Install
If all the above fixes went up nothing to help you, we strongly suggest you perform a “clean install” of Windows OS on your PC. However, make certain to keep a backup of your ‘personal files’ and applications as this prospect can lose your data. Installing clean Operating System could also solve the issue as this is the last resort but you can go for repair install as this will save time as well as data.
If you execute a clean install, this will swap any broken Windows Components which might have gone corrupted. Moreover, it will give you options to either keep all the files or remove everything.
That’s all!!!
Repair any Windows problems such as Blue/Black Screen, DLL, Exe, application, Regisrty error and quickly recover system from issues using Reimage.


