Если вы получаете код ошибки 0xA00F4244 NoCamerasAreAttached или получаете сообщение о том, что не удается найти или запустить камеру, запустите средство устранения неполадок Камера Windows, чтобы попытаться устранить проблему.
Если средство устранения неполадок не устраните проблему, перейдите к разделу «Камера» не работает в Windows.
Нужна дополнительная помощь?
Нужны дополнительные параметры?
Изучите преимущества подписки, просмотрите учебные курсы, узнайте, как защитить свое устройство и т. д.
В сообществах можно задавать вопросы и отвечать на них, отправлять отзывы и консультироваться с экспертами разных профилей.
While you are in a online meeting with your office colleagues and you get camera error code 0xa00f4244! It is so frustrating not to view your boss’s presentation or listen to the audio.
But a quick fix can always do the trick for Windows 10/11.
There are various reasons for error 0xa00f4244 on your Lenovo or Dell laptop camera not working.
First check the basic settings of your camera app in Windows 11/10. Though the interface is different in both the cases, you should find the privacy setting that is blocking the camera feature.
In most cases, you can fix webcam error code 0xa00f4244, by giving camera access in Windows settings.
Update your webcam driver to the latest one that supports Windows 11/10. Reset camera app settings and troubleshoot Microsoft Store apps if nothing works.

- Troubleshoot Camera App Error Code 0xa00f4244
- Windows Camera App Error code 0xa00f4244
- 0xa00f4244 nocamerasareattached
- Why do you receive camera error code 0xa00f4244 on Windows 11/10?
- How to Allow Camera Access to your Windows 10 App?
- Reset Camera App to fix Error code 0xa00f4244 on Windows 10
- Fix error code camera 0xa00f4244
- Fix 0xa00f4244 Lenovo Camera Error on Windows 11/10
- Other Solutions to Fix Error code 0xa00f4244
Troubleshoot Camera App Error Code 0xa00f4244
When you have a webcam on your laptop or external one, apps like Skype, Google Meet, WhatsApp can access them. But when you receive no cameras are attached 0xa00f4244 windows 11, it means that the app doesn’t have permission to access your hardware.
In some cases, the webcam itself may be broken. In such cases, you need to replace it.
To fix this kind of error on Windows 11/10 camera app, first you need to change a few settings.
- Open the Settings app by pressing the Win + I keys together.
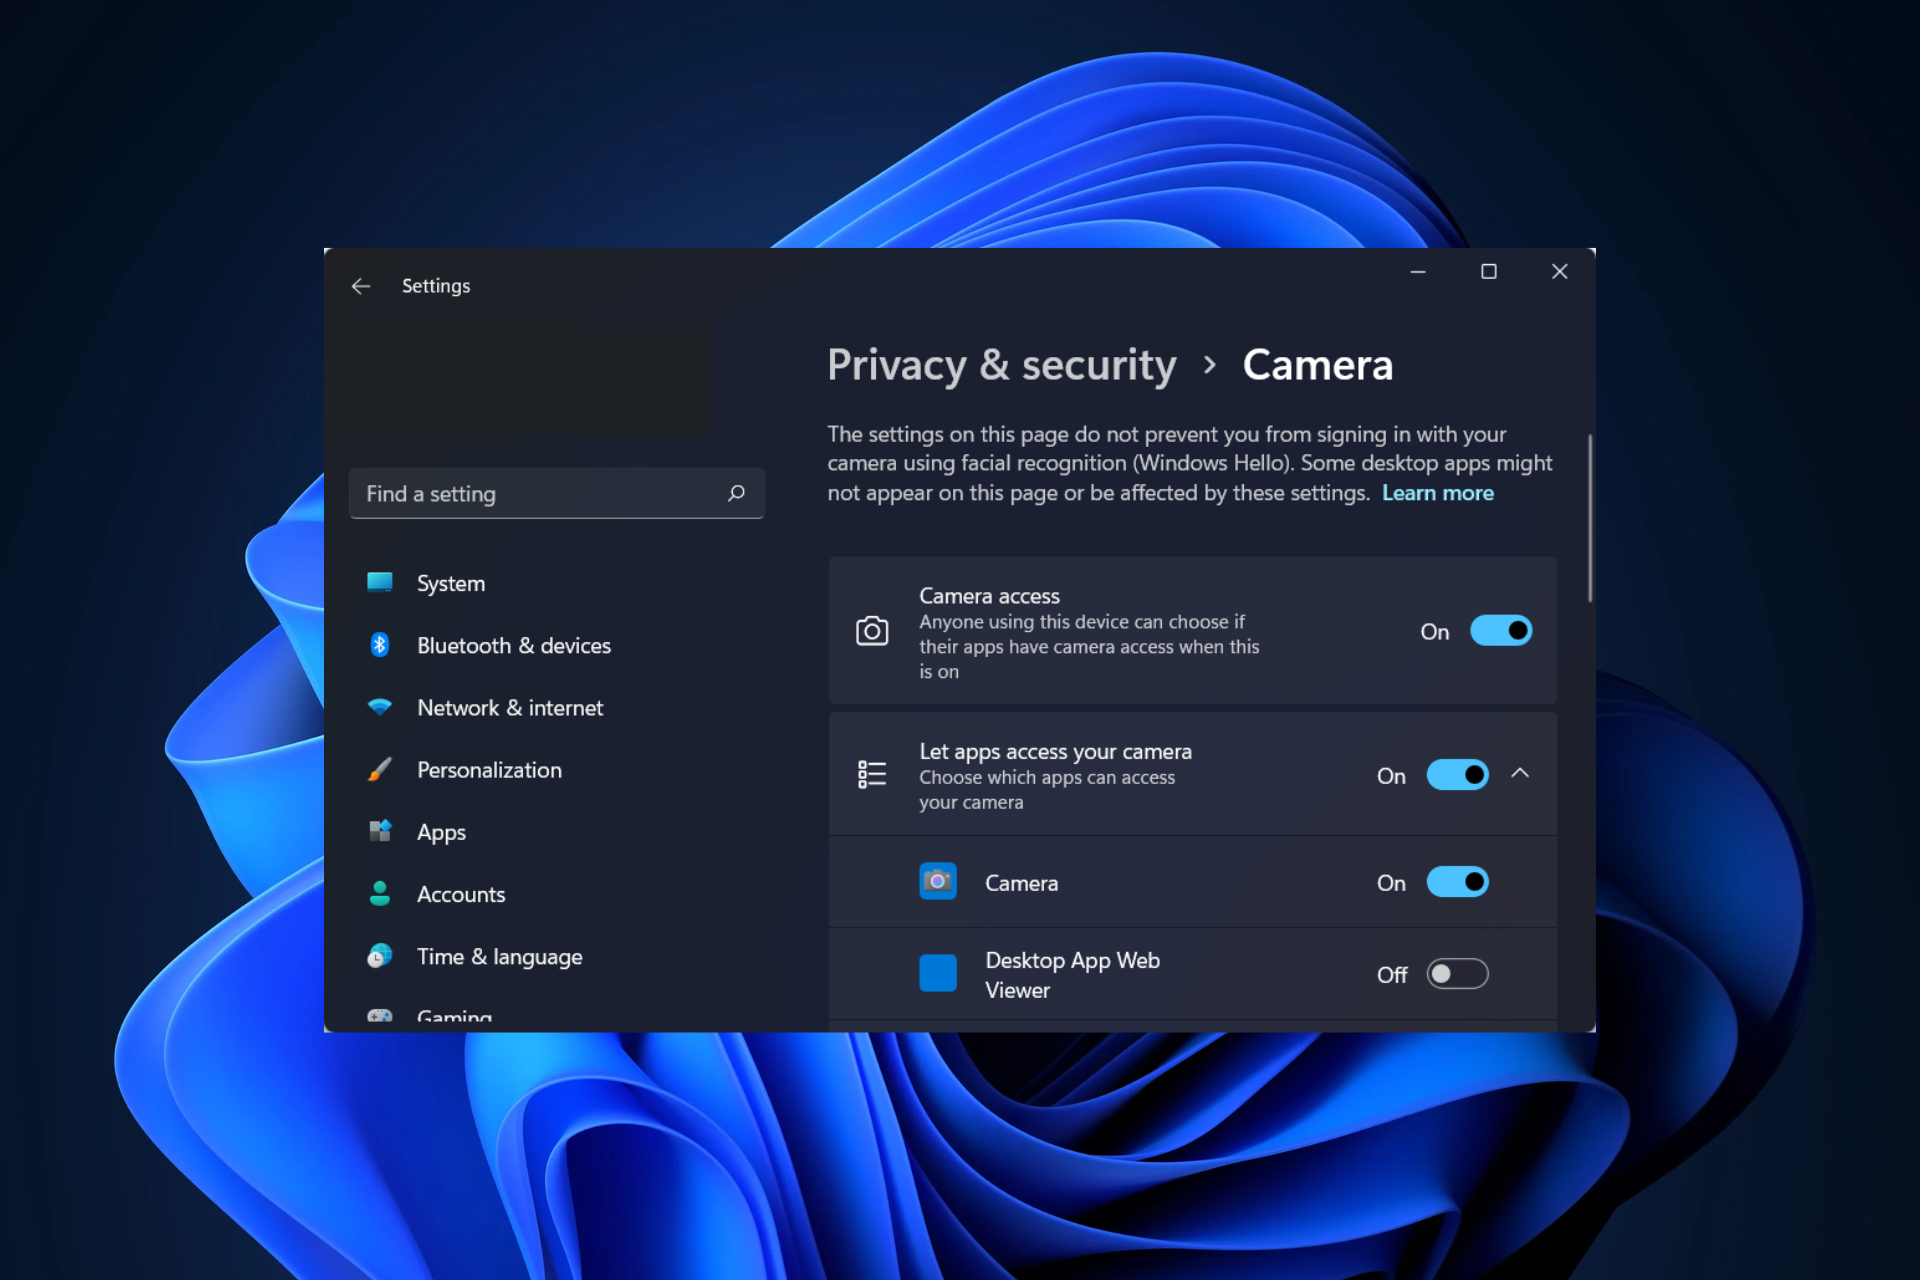
- Click on Privacy & Security. Scroll through on the right hand side, till you reach App permissions.
- Click the Camera app. Let apps access your camera.
- Turn on the Camera option.

This is a basic setting in Windows 11 that will allow apps to access your camera if its working.
0xa00f4244 nocamerasareattached
In this case, you have to check the drivers of the camera. For example, if you are using a lenovo model, then download the drivers from the respective model and laptop.
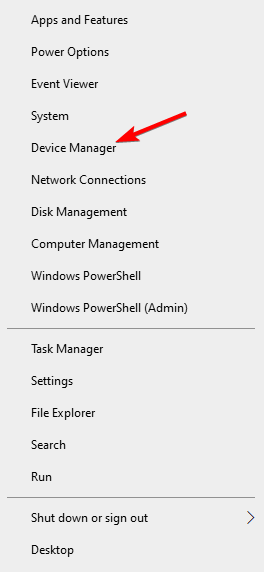
- Open Device Manager. You can search in the search box.
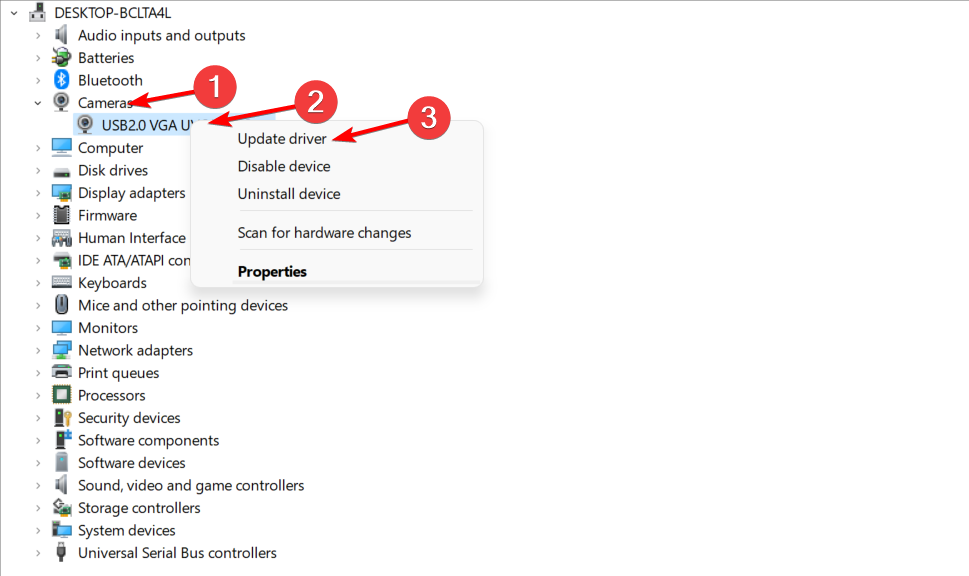
- In the list under Cameras or Imaging Devices, you can see your camera.
- Right-click the device and update drivers.
- You can also browse to the location of your drivers and install it.
- You can scan the hardware to find the camera device.

Why do you receive camera error code 0xa00f4244 on Windows 11/10?
The reasons can be plenty. For example, Lenovo laptops have a Vantage app that has another layer of privacy setting that blocks access to the camera. It is different from standard Windows privacy settings.
Web Camera is old one
Another common error is not updating the camera driver software to the latest version of Windows 11/10. The hardware could be a legacy one, which doesn’t have support for the new OS.
Camera Access blocked
You could have blocked access to the camera in Windows settings. You should let the office apps use your camera. If it is OFF mode, then you have blocked access.
System files are corrupt
Sometimes, the system files get corrupt during hibernate, sleep and power failure. In that case, you need to troubleshoot the camera app in Windows 11/10.
How to Allow Camera Access to your Windows 10 App?
Just follow these steps in Windows 10. It should be similar in Windows 11 also.
- Press the Win + I keys together to open the Settings app.
- Click on Privacy.

- App permissions > Camera. On the right-hand side there are several settings.

- Turn the option – Allow apps to access your camera.

- Below that another setting – Choose which Microsoft Store apps can access your camera.

- If you want to select apps for the camera, then turn ON the option for your Zoom or office app.


Reset Camera App to fix Error code 0xa00f4244 on Windows 10
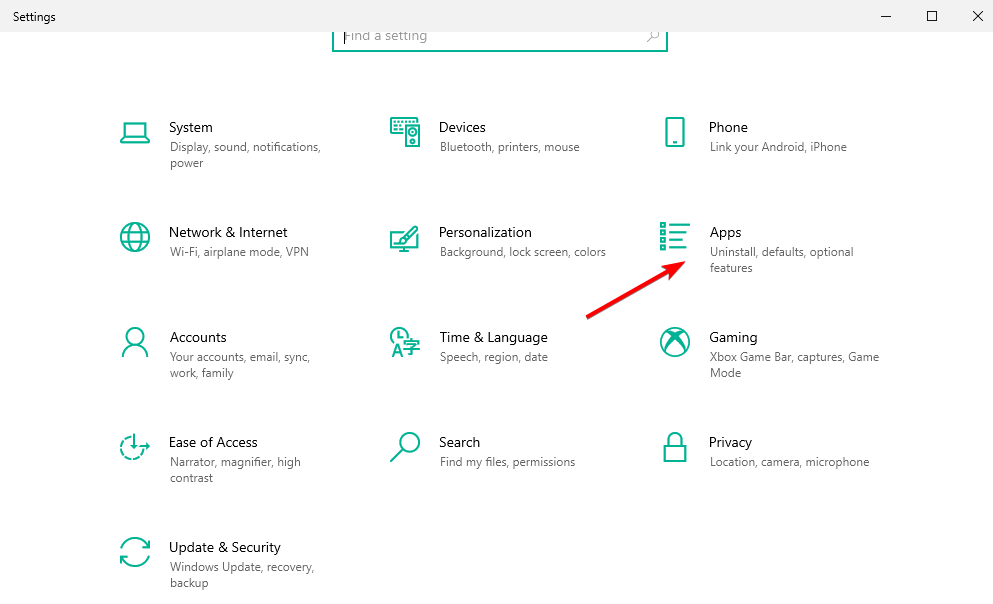
- In the settings home screen, click on Apps.
- Apps & features > Camera. Click on it.

- The Advanced options label is visible. Click on it.

- On the next screen, Click on the Reset button.


Fix error code camera 0xa00f4244
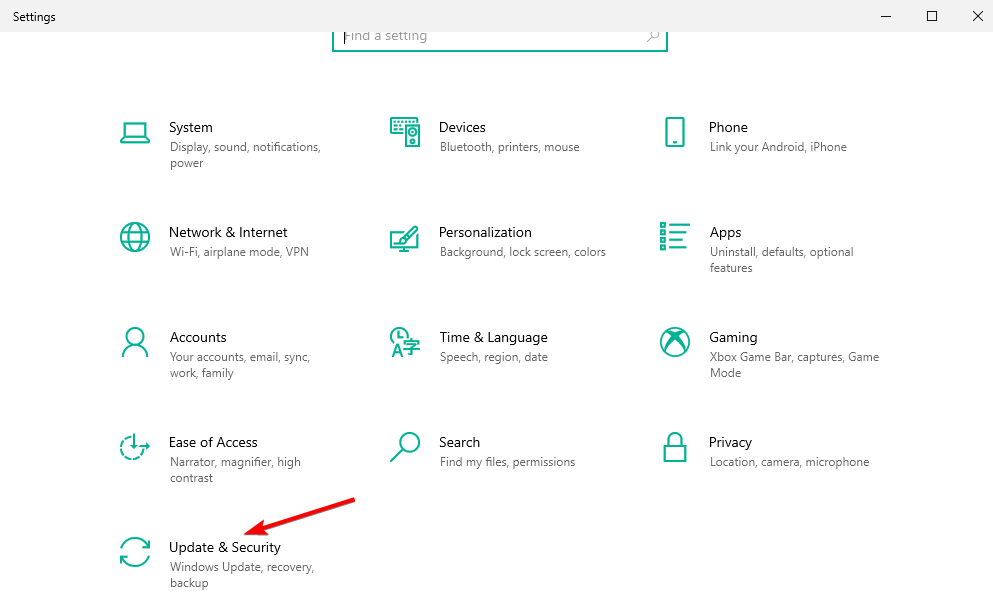
- Settings > Update & Security > Troubleshoot > Additional Troubleshooters.
- Windows Update and Windows Store Apps are two troubleshooting options.

- Run both the troubleshooter. See if it fixes the camera app problem.
- Also check Fix #1 after this.


This will reset the settings to default. It should fix any registry or corrupt system files not allowing the camera to work in Windows 10/11.
Fix 0xa00f4244 Lenovo Camera Error on Windows 11/10
There is an app called Lenovo Vantage that gets pre-installed on your Windows 11/10. A typical privacy mode is enabled by default. So, your camera is not given access to all your apps.
This is on top of the Privacy settings of Windows 11/10. You just have to disable that Privacy mode in the Lenovo Vantage app. It should make the camera error code 0xa00f4244 go away.

Other Solutions to Fix Error code 0xa00f4244
You can do a malware scan of your pc or laptop. It will remove any viruses that are preventing the connection between the camera and office app.
Check if the camera hardware is working properly or not. Update the camera drivers from the manufacturer page. If that doesn’t work, use the default drivers provided by Microsoft update on Windows 11/10.

Palla Sridhar is the writer and admin for WindowsTechIt.com. His primary focus is to write comprehensive how-tos and solutions guides for Windows 11, 10, Skype, Outlook, HDMI, Redmi, Facebook, Google, Tech Apps and LinkedIn.
Third-party driver updaters are more widely used
by Aleksandar Ognjanovic
Aleksandar’s main passion is technology. With a solid writing background, he is determined to bring the bleeding edge to the common user. With a keen eye, he always… read more
Updated on
- The 0xa00f4244 nocamerasareattached error code from the Camera app usually appears if the application can’t detect your webcam properly.
- Microsoft still doesn’t have an official solution for the no cameras attached issue, but our guide will help you.
- A possible fix for this issue is to check your drivers and update them by using a Windows tool.
XINSTALL BY CLICKING THE DOWNLOAD
FILE
A camera as a device holds a firm place in Windows 10 and Windows 11 but even built-in cameras on laptops or third-party cameras misbehave occasionally. Such is the case with the Windows Camera App Error Code 0xa00f4244 NoCamerasAreAttached.
Windows users have the built-in Windows 10 or 11 Camera application as their default camera software. It is a very simple application that lets you test out your camera capabilities, take quick snapshots, and record video footage.
If you have problems with your camera application or with other related apps that use the device, we advise you follow the guide below to see how to check camera permissions, reset your camera, and more.
The most common camera-related error Windows 10 and 11 users encounter goes by the code 0xa00f4244 and it comes with the We can’t find your camera message.
Luckily, when there’s a problem – there’s a solution. Or, a few of them, just to be certain. So, make sure to check them out and reclaim your camera usability back in a few easy steps.
What does the Windows Camera App error code 0xa00f4244 mean?
There are a few possible explanations for the Windows camera app error code 0xa00f4244. This error happens because the application for your camera was not installed correctly. And the system was unable to identify its presence.
Alternatively, it’s possible that the camera is being blocked by your antivirus program, which you can opt to uninstall and choose a better antivirus software that doesn’t interfere with safe processes.
How do I fix the error 0xa00f4244 NoCamerasAreAttached?
- What does the Windows Camera App error code 0xa00f4244 mean?
- How do I fix the error 0xa00f4244 NoCamerasAreAttached?
- 1. Check drivers
- 2. Make sure you turn on the Camera app
- 3. Run the Store Apps Troubleshooter
- 4. Scan for malware
- 5. Reset the camera app
- 6. Tweak the registry
- 7. Repair the Microsoft Store
- 8. Use a third-party camera app
- How can I fix 0xa00f4244 nocamerasareattached on Windows 11?
- On what devices does the no camera attached 0xa00f4244 error occur?
- How do I fix my laptop camera not found?
- How to stop antivirus from blocking my camera?
1. Check drivers
- To fix the 0xa00f4244 nocamerasareattached error in Windows 11/10. Right-click the Start menu and choose Device Manager.

- Navigate to Cameras and expand the sub-menu in order to see your camera, then right-click on the camera device and select Update driver.

If your driver is up to date but the issue is resilient, there’s a chance the latest driver update broke the camera for you. In this case, we advise you to try and roll back the camera driver.
- Right-click the Start menu and choose Device Manager.
- Navigate to Cameras and expand to sub-menu in order to see your camera, then right-click on the camera device and open Properties.
- In the Driver tab, click on the Roll Back Driver button. The 0xa00f4244 nocamerasareattached error in Windows 10 will be fixed.

Finally, the fact that you have a proper driver may not suffice. Namely, generic drivers aren’t exactly the best fit for the job.
True, sometimes Windows Update will provide you with the official drivers, but it’s always the safest bet to download drivers from the official site of the equipment manufacturer.
If you want to save time, you can use dedicated driver updater software. This type of tool will scan your whole PC and identify any outdated drivers and install the latest versions available.

Outbyte Driver Updater
To ensure a complete scan process with thorough reports of your system and the drivers within it.
2. Make sure you turn on the Camera app
- Type settings in the taskbar and open the Settings panel then head to the Privacy section.
- Select Camera. If it says Camera access for this device is off, click on the Change button and toggle the button corresponding to Allow apps to access your camera to On.


Alternatively, if you want to be more precise, you can scroll down and select the exact apps that you want to grant camera access to. Generally here’s where you will find your Camera app and other apps that use your camera such as VOIP apps.
How we test, review and rate?
We have worked for the past 6 months on building a new review system on how we produce content. Using it, we have subsequently redone most of our articles to provide actual hands-on expertise on the guides we made.
For more details you can read how we test, review, and rate at WindowsReport.
For each app, you will have to toggle the On/Off button according to your preferences.
3. Run the Store Apps Troubleshooter
- Press Windows + I to open the Settings app then choose Update & Security.

- Select Troubleshoot from the left pane.
- Scroll to the bottom and click on Windows Store Apps.
- Click on the Run the troubleshooter button.


If Windows detects any malfunctions or problems within your Camera app, it will provide a report at the end of the troubleshooting scan.
This report will let you know what can be done about the issue. In most cases, if any problem is found, the troubleshooter will give you easy-to-follow prompts on how to solve it, you just have to follow along.
After running the troubleshooter, check if the Windows Camera App Error Code 0xa00f4244 is still present in the Camera app.
4. Scan for malware
- First, open Windows Defender from the notification area.
- Choose Virus & threat protection.
- Select Scan Offline.

- Your PC will restart and the scanning procedure should commence.
- After that, open Windows Defender again and select Virus & threat protection.
- Open Virus & threat protection settings and enable the Cloud-based protection.

If you want to benefit from more advanced security features and get more accurate scan results, we strongly recommend you use a third-party antivirus along with the Windows Defender.
The built-in app is a very good and strong utility, but professional antivirus tools have higher detection rates and protect your PC on all fronts.
You can nowadays find plenty of light and highly functional antiviruses that will protect you in real-time without taking a toll on your PC’s speed.
The scan process is pretty straightforward for most antiviruses and highly similar to what we did in Windows Defender.
5. Reset the camera app
Resetting the camera eliminates all app-related data, allowing it to work as new. Many Windows 10 and Windows 11 users report that this trick fixed their we can’t find your camera 0xa00f4244 error.
- Type settings in the taskbar and open the Settings panel then go to Apps.
2. Select Apps and features from the left menu, then locate your Camera app and click on it.
3. Click on Advanced options.
4. Scroll down and click on the Reset button.
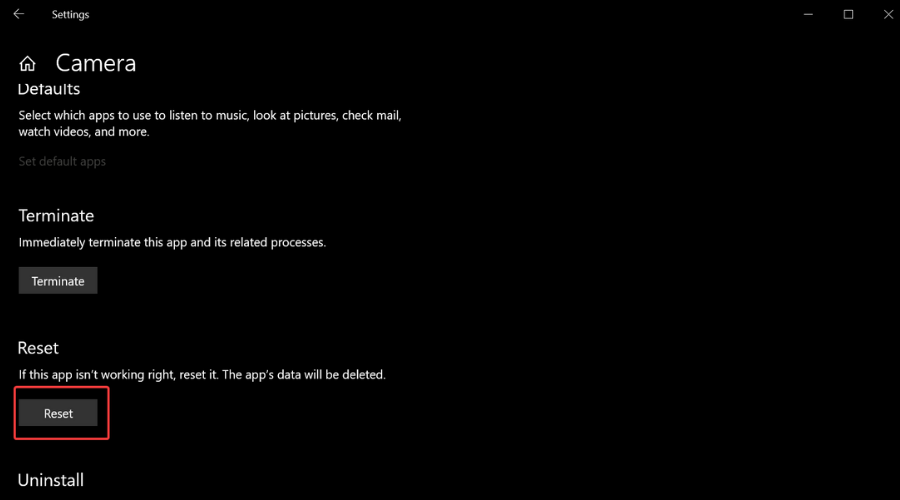
5. The we can’t find your camera error will be fixed.
- FIX: Can’t Take Photos With Camera App in Windows 10/11
- How to fix webcam error code 0xa00f4243(0xc00d3704)
- Fix: Camera not showing in Device Manager
- How to fix error 0xa00f4292 on Windows 10/11
6. Tweak the registry
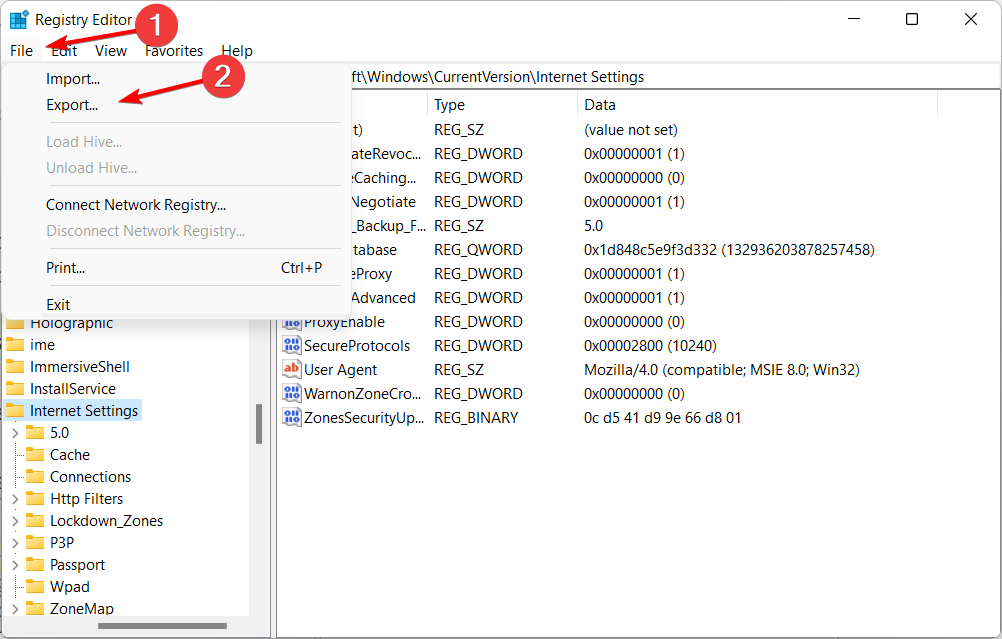
- In the Windows Search bar, type regedit, then right-click the Registry Editor and run it as an administrator.
- Click on File, choose Export, and backup your registry. If something goes wrong, you can restore it with ease. In addition, you can create a Restore Point, just in case.

- Now, follow this path for 32 bit system:
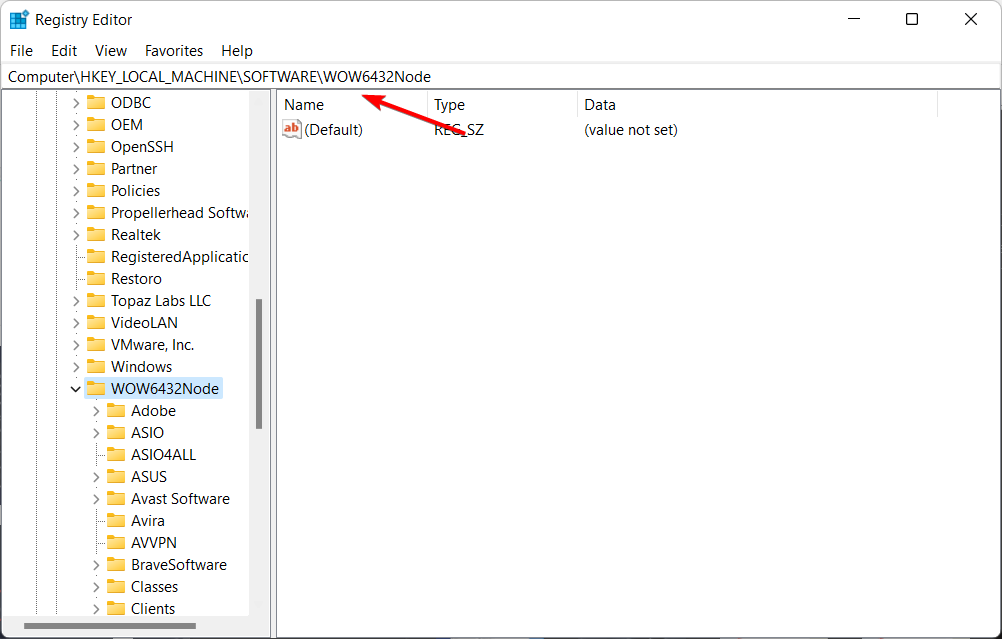
Computer\HKEY_LOCAL_MACHINE\SOFTWARE\Microsoft\Windows Media Foundation\Platform - And for 64-bit system:
Computer\HKEY_LOCAL_MACHINE\SOFTWARE\WOW6432Node\Microsoft\Windows Media Foundation\Platform - Right-click in the right window and choose New and select DWORD (32-bit) Value.
 Value")
- Name this value EnableFrameServerMode.
- Right-click and choose to Modify this newly created registry value then set its value to 0 (zero) and save changes.
- Restart your PC and you should be good to go.
 Value")
Because of the difference in encoding standard certain cameras just won’t work in Windows 10 or Windows 11, and that can lead to error 0xa00f4244 in the Camera app, but this registry change should fix that.
7. Repair the Microsoft Store
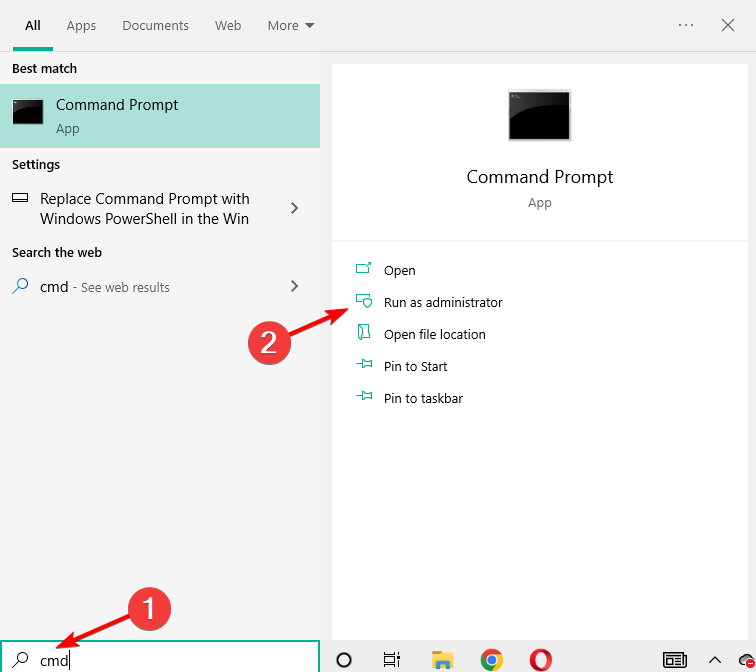
- Type cmd in Windows search and click on Run as administrator to start Command Prompt with full privileges.

- Type the following commands and press Enter after each one:
net stop bits
net stop wuauserv
net stop appidsvc
net stop cryptsvc
Del "%ALLUSERSPROFILE%\Application Data\Microsoft\Network\Downloader\*.*"
rmdir %systemroot%\SoftwareDistribution /S /Q
rmdir %systemroot%\system32\catroot2 /S /Q
regsvr32.exe /s atl.dll
regsvr32.exe /s urlmon.dll
regsvr32.exe /s mshtml.dll
netsh winsock reset
netsh winsock reset proxy
net start bits
net start wuauserv
net start appidsvc
net start cryptsvc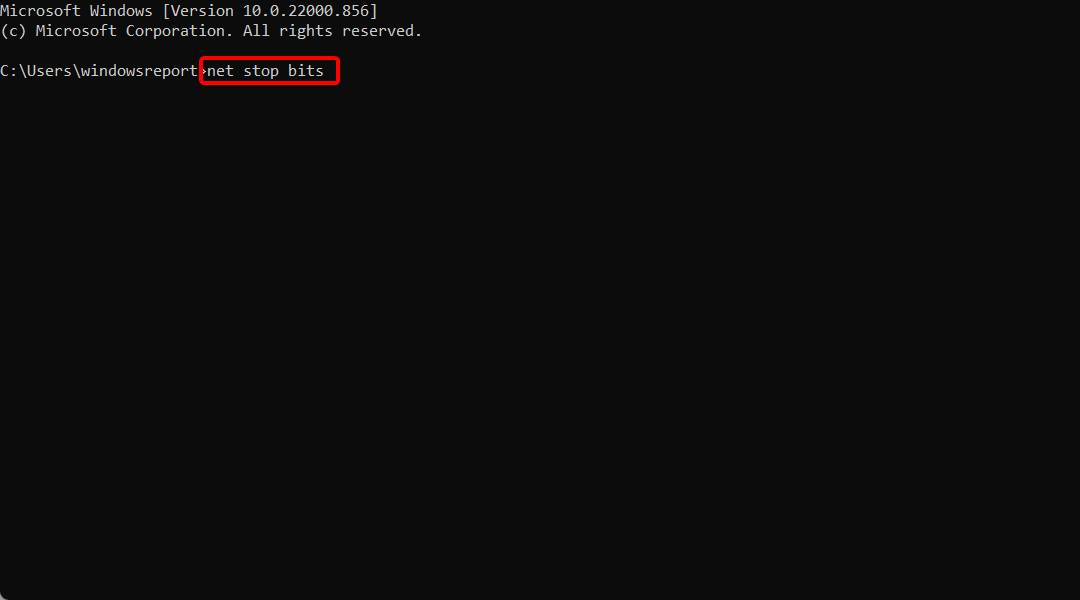
Hopefully, this solution will fix Microsoft Store and all its components and your camera will be recognized, so that you never see the Windows Camera App Error Code 0xa00f4244 again.
8. Use a third-party camera app
Finally, if none of the presented solutions sufficed, we can only recommend trying and switching to an alternative camera app.
Most of them are not Metro-style apps and they come with their own formatting software and, occasionally, drivers as well. Of course, the best of them all is the one provided by the OEMs themselves.
That should be it. We hope that you managed to sort the Windows Camera app error code 0xa00f4244.
How can I fix 0xa00f4244 nocamerasareattached on Windows 11?
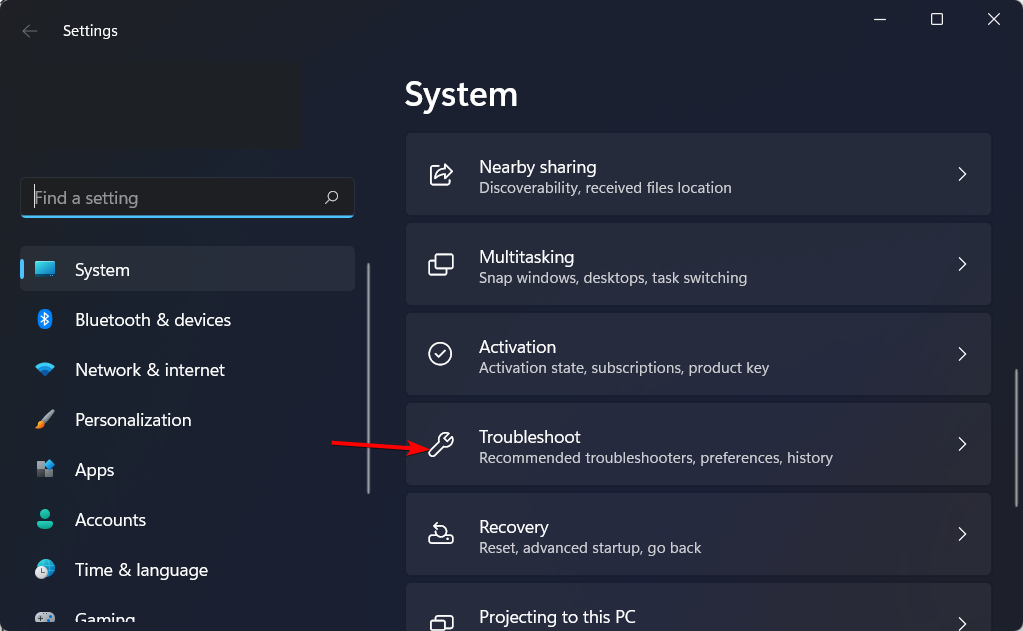
- Press Windows + I then scroll down to the Troubleshoot section and select it.

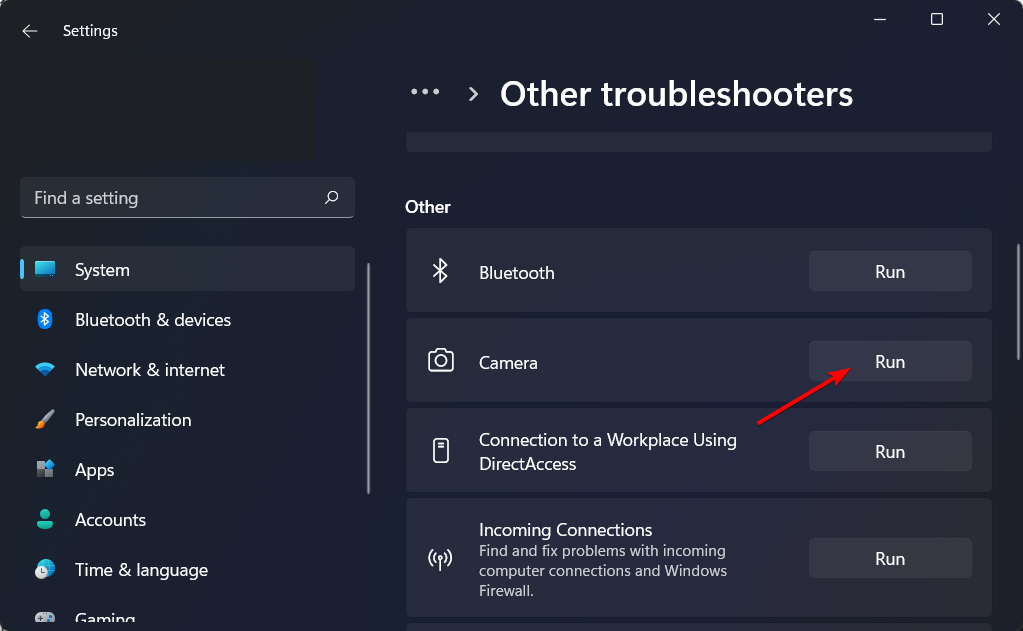
- Click Other troubleshooters.
- Scroll down the click the Run button next to the Camera troubleshooter.
By running the Windows 11 built-in Camera troubleshooter, you may find detailed information about what went wrong with your camera, and how to fix it.
On what devices does the no camera attached 0xa00f4244 error occur?
According to user reports, we can’t find your camera 0xa00f4244 error message seems to be more prevalent for the following laptop manufacturers:
- 0xa00f4244 NoCamerasAreAttached on Dell – Ensure that the camera is turned on by going into the BIOS of your Dell laptop and selecting the appropriate option. You can either restart the computer or turn it back on.
- Surface Pro 0xa00f4244 NoCamerasAreAttached – The error number 0xa00f4244 NoCamerasAreAttached is often triggered when the Windows Camera app is disabled, as this is the most common cause.
- Acer 0xa00f4244 NoCamerasAreAttached – It is recommended that you delete the camera driver and then reinstall it.
- 0xa00f4244 NoCamerasAreAttached on Asus – Make sure to run the Windows camera troubleshooter.
- MSI 0xa00f4244 NoCamerasAreAttached – The error number 0xa00f4244 NoCamerasAreAttached comes from the Camera app, and it typically displays when the application is unable to recognize your webcam in the correct manner.
- 0xa00f4244 NoCamerasAreAttached on HP – In order to resolve this issue, verify that the webcam is the active device, remove and reinstall any applications you currently have, put your webcam through its paces, and finally, bring the webcam drivers up to date.
- Samsung 0xA00F4244 NoCamerasAreAttached – To save time, you may use a dedicated driver updater which we’ll mention below.
- 0xa00f4244 NoCamerasAreAttached on Lenovo – Your privacy settings are preventing the camera from working properly.
If you use any of these and encounter the issue, make sure to check out all the solutions presented in the guide below, as they should remediate the issue and allow you to use your camera app with no problem.
- How to Type Accents on Windows 11
- Fix: EXCEPTION_ILLEGAL_INSTRUCTION Error on Windows 11
- Delayed Write Failed Error on Windows 11: How to Fix it
- How to Remove Windows Copilot on Windows 11
- How to Pin a Batch File to Taskbar on Windows 11
How do I fix my laptop camera not found?
The camera on a laptop can be put into a variety of functions; however, the two most common ones are taking pictures and participating in online video chats, such as those found on Skype or Google Hangouts.
However, there is no guarantee that the built-in camera on the laptop will always start up or function in the way that was originally intended for it too. Videoconferencing apps, as may be anticipated, are more likely to be negatively affected than other types of apps.
When making a video chat on a laptop, one of the most important pieces of hardware to have is a camera that works. Thus we recommend that you check out our dedicated post on how to fix your laptop camera in 9 easy ways.
How to stop antivirus from blocking my camera?
While security software is necessary, it’s also a fact that it can occasionally get in your way and block legitimate processes and apps.
That might just as well be your case with your very own guarding acting overzealously.

NOTE
How do I unblock my camera with antivirus?
➡ First of all, make sure you granted permissions for apps to access the camera as shown in our solution no 2.
➡ Next, access your antivirus settings and set an exception rule to always allow the camera app through.
The precise setup will vary according to your software provider, but you needn’t worry, the terminology and functionality will be similar to the Microsoft Defender antivirus, so it’s pretty intuitive.
If you have additional issues, questions, or suggestions in regard to the 0xa00f4244 NoCamerasAreAttached error, make sure to tell us about that in the comments section below.
![]()
Covid-19 has ushered in the age of working from home. Online video call meetings have become the wheel on which the workplaces move forward in this new era. The quintessential cog in this whole system of online meets is your webcam. That’s right, that small little circle at the head of your laptop is the reason why you can continue to be productive even in uncertain times. The last thing one would want is your webcam to go awry and show up an error code, least of all camera error code 0xa00f4244. This particular webcam-related error means that your PC can’t detect the webcam and thus can’t proceed further. In this situation, you must be aware of how to make your device free of this error code and that’s precisely what we are going to tell you in this guide. So let’s begin!

Part 1: Overview of Error Code 0xa00f4244
1. What does Error Code 0xa00f4244 Mean?
Whenever you see a pop-up that reads, ‘0xa00f4244 nocamerasareattached’ it simply means that your device or the application that you are trying to run the camera on, can’t detect your webcam. The right step forward would be to get to the root of the problem and fix it.
2. Why is there a Camera Error Code 0xa00f4244?
The 0xa00f4244 error can be due to multiple reasons. It is essential to know which, as that will decide the path we take to rectify it. This error can occur if the camera application is installed improperly, if the camera drivers are out of date, due to various encoding standards or viruses. It can also take place if your webcam is disabled, alternating camera settings or it can be a case of your antivirus blocking the camera application.
Part 2: How to fix Camera Error Code 0xa00f4244?
There are a lot of possibilities behind the occurrence of the error code 0xa00f4244(0xc00d36d5) but there are also a lot of solutions.
Solution 1: Make sure the camera app is Enabled
Sometimes, it’s as simple as forgetting to enable your camera app. Here’s how you can enable it.
- Open your settings Window. You can do this by pressing the Win + I button together.
-
Click on the Privacy tab located in the bottom row.

-
Select the Camera from the list of options on the left side and turn it on if it’s turned off.
Solution 2: Scan for malware
Keeping your PC clean is important as viruses can be a reason your device is showing this error code.
- Open the Windows Defender app.
-
Next, select the Virus and threat protection tab.
- Start scanning the PC by clicking on the Scan offline button.
- Your PC will restart and will undergo the scan. Once it is completed you have to open the Windows Defender app again and enable ‘Cloud-based protection’ and you are all set.
Solution 3: Update the camera driver
Up-to-date drivers mean a smooth-running device. Error codes like camera reserved by another app are more prone to happen in the presence of outdated drivers. Update your drivers with these simple steps.
-
Open the Device Manager by right-clicking on our Start Menu and selecting Device Manager.

- Once you are inside, click on Imaging Devices. This will lead to a menu from which you have to right-click on ‘Camera Device’
-
From the list of options, click on the ‘Update Driver’ option and update it.
- After the update is complete you can open your webcam to see if it is working.
If your webcam driver was already updated, the overwriting of the same update can cause some problems. In this case, you can roll back the recently installed update to correct this.
- Open the Device Manager as mentioned above and expand the Imaging Devices menu.
- Right-click on the Camera Device and select Properties.
- You can roll back the update by clicking on the ‘Roll Back Driver Option’ in the Driver tab.
Solution 4: Make sure the camera app is Enabled
Sometimes when Windows shows up with we can’t find your camera error, troubleshooting can come in handy. To run it,
- Open your Settings window and click on the Update and Security tab.
- From the list of actions in the left pane select the Troubleshoot option.
-
Scroll down and select ‘Store Apps’ and then click on the ‘Run the Troubleshooter’ button.
The troubleshooter will come up with any errors and solutions if any, after the scan.
Solution 5: Tweak registry
As mentioned in the list of reasons for the no cameras attached 0xa00f4244 error, different encoding standards may cause the error. One of the ways in which you can get ahead of this issue is by tweaking the registry.
- In the Windows search bar type ‘Regedit’ and click on search. Do a right-click on the Registry Editor and from the options select Run as Administrator.
- Now, click on File and select Export, and back up the registry. To ensure that we don’t lose any valuable data we can put up restore points by clicking on ‘Restore Point’.
-
Follow the lead as follows:
32-bit System
HKEY_LOCAL_MACHINESOFTWAREMicrosoftWindows media foundation platform
64-bit System
HKEY_LOCAL_MACHINESOFTWAREWOW6432NodeMicrosoftWindows media foundation platform
-
Right Click in the right window pane and select New. Press on DWORD (32) Value from the New Menu.
- Right-click again and select ‘Modify’. Keep the registry value as 0 and save the changes you’ve made.
- Restart your device. This should make the error at hand go away.
Solution 6: Reset the camera
After trying out all the above options, if your PC is still saying that we can’t find your camera 0xa00f4244 then it’s time to reset your camera.
-
Open the Settings Window on your PC and click on Apps.
-
From the left pane, choose the Default Apps, and once inside it click on the Camera.
-
Now from further options, click on Advanced options. In this window, you’ll see the Reset option. Press it to rest the camera app and you are done.

Bonus: How to Repair Corrupted Videos/Photos in Windows 10/11?
With computers, issues can crop up unannounced. Often, fixing one issue leads to another and these issues usually threaten to corrupt our precious data and make it unusable. But no more because the Tenorshare 4DDiG Data Recovery app can clean any file and repair it as soon as you press the button. With its powerful ability to repair any kind of blurred, pixelated, corrupted photos and videos it is the answer to all your data recovery problems. Let’s look at how you can make full use of it in simple steps.
-
Select a Loaction
Once you’ve downloaded the app, open it and select Photo repair/ Video repair present at the bottom of the screen according to the files you want to be repaired.
-
Add and repair
Start adding the corrupted photos and videos you want to repair and then tap repair.
-
Preview and save
Once the files are repaired you can preview the files and then click on Export to save them in a particular location.
There you go, all of your files are now repaired.
FAQs
1. How do I reinstall my built-in camera on Windows 10
If Windows 10 can’t find the camera then you can reinstall it by simply downloading it again from the Microsoft Store.
2. How do I get Windows 10 to recognize my camera?
You can get Windows 10 to recognize your camera by updating the drivers of your webcam, reinstalling the camera app, tweaking the registry, or enabling your webcam if it’s disabled.
3. How do I fix the no-camera attached error?
You can fix the no camera are attached error by the following methods,
- Make sure the camera app is Enabled
- Scan for malware
- Update the camera driver
- Run the troubleshooter
- Tweak registry
- Reset the Camera
Conclusion:
In this digital era, a problem with your webcam can wreak havoc in your professional life. But lucky for you, we have laid out all that you need to know to get out of an error 0xa00f4244 situation in our guide above. And if you ever find that your data has been corrupted during all of this don’t shy away from using the Tenorshare 4DDiG data recovery and repair app!
William Bollson (senior editor)
William Bollson, the editor-in-chief of 4DDiG, devotes to providing the best solutions for Windows and Mac related issues, including data recovery, repair, error fixes.
Some users report that when they’re trying to launch the Camera app in Windows 11, its shows error code 0xa00f4244 instead of opening. The full error message reads:
We can’t find your camera. Check to make sure that it’s connected and installed properly, that it isn’t being blocked by anti-virus software, and that your camera drivers are up to date. If you need it, here’s the error code: 0xA00F4244 <NoCamerasAreAttached> or (0xC00D36D5) (0xC00DABE0)

Usually, Camera app error code 0xA00F4244 appears because of faulty hardware if your PC has an integrated camera. In case, you’re using an external webcam, then it’s not connected properly. Apart from that, it’s also possible that camera drivers are outdated.
Camera error is common among all types of Windows 11, recently I started receiving reports from users that they were seeing this error especially after upgrading to Windows 11 from Windows 10 or reinstalling Windows 11.
As discussed above, the error message appears but the Camera hardware is faulty, before making a final verdict, we would like to suggest users try the solutions suggested below in this blog post that might fix this camera issue in Windows 11.
So without further delay, let’s get started:
Camera Troubleshoot
Windows 11 offers users a troubleshooting tool for the Camera app. So before doing anything else, use that tool and check if this fixes the issue. Here’s how you can use it:
Click on the Search icon and type Troubleshoot Other problems and when it appears in search results, click to open it.

On the Troubleshoot settings page, locate the Camera and then click the Run button next to it. Follow the on-screen instructions and let troubleshooter detect and fix the issue.
If it fails or shows your issue found, then head over to the following method.
Turn-ON/OFF Camera using Physical Button
The majority of the laptops come with a physical button to turn on or off the Camera. In case, it’s OFF, then that could be a reason why you’re seeing a camera error. So first of all, confirm this thing:
Below we’ll share how you can turn on the camera for the majority of PC manufacturers.
- For MSI laptops, Fn + F6
- For ASUS laptops, F10 or Fn + F10
- For HP laptops, there’s a Kill Switch button, you need to slide to the ON position. You can find it on the left or right side of the laptop.
- For Lenovo Laptops, F8 or Fn + F8
You can try these key combos, or you can also search on the internet to find if your device has a particular key combo assigned to turn on or off-camera.
In case, you’re sure that the camera is ON from your end and still an error appears, then head over to the next method.
Check Camera Privacy Settings
Sometimes Camera Privacy settings are turned off and as a result, you see this error message. Confirm if it’s ON. For that,
Click on the Search icon and type “Camera Privacy Settings” and when the same System settings appear in search results, click to open it.

Here, you need to make sure Camera access option is ON. Also confirm that the Let app access your camera is also ON, and Camera entry under it is ON as well.
If all is good here, then head over to the following method.
Reset Camera Settings
Sometimes inappropriate camera settings set by users can trigger the issue. To reset and check if this fixes the issue:
Click on the Search icon and type Manage camera and the same results appear, click to open it.
On the Camera settings page, under Connected camera’s you will get all the cameras connected to your device. It could be an integrated camera or external camera. Select the one.

On the next screen, check if a particular camera is working on not. There’s a preview box for it.

If it’s not working, then head over to Default image settings and locate the Reset default camera settings option. Here, click on the Reset settings button and follow the instructions.
Reset Camera app in Windows 11
Sometimes resetting the Camera app fixes the issue. So you should try this as well. Here’s how you can do that:
Click on the Search icon and type “Add and Remove apps” and when the System setting appears in search results, click to open it.
From the list, locate Camera and then click on the three dots icon and select Advanced options.

On the next page, click on the Terminate button and then click the Repair button, then click Reset button.

After that reboot your computer and check if this fixes the issue.
Uninstall and Reinstall Camera Drivers
Sometimes Camera drivers are not compatible or get corrupt and as a result, the system fails to detect the camera and throws the error message. In this situation, uninstall the current Camera drivers and download the latest version of drivers from manufacturer’s website.
Press WIN + X key combo and from the WINX menu select Device Manager.
In the Device Manager, locate Camera (if entry is missing, then it’s highly possible that your device lacks drivers or the Camera is faulty).
Double-click on the Cameras and you will find the Camera connected to your PC. Right-click and select Uninstall, if asked for confirmation click Yes.

After that, head over to your PC manufacturer’s website and download the latest drivers and install it.
Reboot your computer. Most of the time, doing this fixes the issue. If it also fails to fix the issue, then we’re getting one step close to confirms that the Camera hardware is faulty.
Check Camera Settings in BIOS
We would like to tell you that not all PCs support managing Cameras from BIOS. Usually, this functionality is available in business class PCs and lets users disable or enable the camera or webcam system-wide.
So if your device support this functionality only then this method is applicable to you. You can enter your device into bios and check if it’s available or not.
In my Dell PC it is listed under System configuration > Miscellaneous device > Enable Camera, like show in the screenshot.

Similarly, you can check for the same option for your device on the website.
Make sure the option is checked if not check it, click Apply, and reboot your computer. After that check if this fixes the issue or not.
Disable Antivirus Problem Temporarily.
If you’re not using any third-party antivirus program, then skip this method. Otherwise, whatever anti-virus program you’re using disable it temporarily and see if the camera works.
After that, check if there are settings related to blocking the access or permission to use the camera. If yes, turn it OFF.
Uninstall Recent Update
In case, Camera was working properly but after installing a particular Windows update it stop working, then its highly possible that there’s some compatibility issue with the content of the update and camera drivers.
In this situation, we recommend you check the windows update history in Windows 11 and uninstall the problematic updates from Windows 11 until the latest update is available.
Check Bluetooth and Camera Settings (New Solution 2022)
Lots of our readers facing this issue suggested that the Bluetooth option was OFF in the Settings app. While other group settings Integrated Camera was disabled. Moving the switch to the ON position helps in fixing the issue for them. So you also try this solution as well
Launch the Settings app by pressing the WIN + I key combination
In the Settings app, select Bluetooth & devices. On the right side, confirm Bluetooth is set to ON. If it was OFF, then make this change and check if this fixes the issue.

Else, perform an extra step; on the same settings page, click on the Camera option.

On the Camera settings page, you will find a list of Camera devices connected to your device. Make sure, Camera is enabled.
Last Resorts
If all the methods suggested above fail to fix the Camera issue in Windows 11, then the last resort is to repair upgrade Windows 11 using iso image or reset Windows 11 without keeping data.
If this also fails to fix the issue, then reinstall Windows 11.
In that also fail, then, unfortunately, the Camera is faulty and in this situation, you need to contact the device manufacturer’s hardware engineer for further assistance.
That’s all about this blog post. If any of the solutions help in fixing the issue or you know any other solution that helps you and we missed to cover in this blog post, then don’t hesitate to share with us so that other users can use it.
As an independent platform, it takes a lot of effort to create and curate quality content daily. Our content is totally funded by users like you.
Therefore, if you find information on this website useful, we kindly ask for your support in maintaining the longevity of our platform. If each person who benefits from our website contributes, we can secure a brighter future for our website.
Donate on Paypal or Buy us a coffee if you find the information shared in this blog post useful. Mention ‘Coffee’ in the Subject. So that I can thank you
