
В какой-то момент в процессе работы в Windows можно обнаружить, что при попытке открыть окно «Защита системы», появляется окошко с ошибкой восстановления 0x81000203 или 0x81000202.

Произошла ошибка программы восстановления системы. Попробуйте повторно запустить программу восстановления. (0х81000203)
или

Служба теневого копирования тома, используемая восстановлением системы, не работает. Дополнительная информация содержится в журнале событий. (0х81000202)
На картинке ниже видно, что при такой ошибке функция восстановления системы Windows не может найти диски.

Зачем вообще открывать окно «Защита системы»? Дело в том, что именно здесь можно управлять параметрами восстановления системы: включать / отключать функцию, создавать контрольные точки для отката в будущем, восстанавливать Windows на дату работоспособного состояния.
Применив рекомендации, что указаны ниже, вы исправите проблему с созданием точки восстановления с ошибками 0x81000203 или 0x81000202.
В первую очередь, вспомните, не пользовались ли вы программами, с помощью которых можно отключать различные службы. Подобные программы часто могут быть причиной появления таких ошибок. Давайте приступим к их исправлению.
Шаг 1. Откройте «Службы», для этого на клавиатуре нажмите комбинацию клавиш Win+R, введите services.msc, щелкните ОК.

Шаг 2. В окне Службы найдите «Теневое копирование тома», щелкните по нему дважды мышкой.

Шаг 3. Обратите внимание на тип запуска, если «Отключена», то выберите тип запуска – «Вручную», щелкните по кнопке Применить, затем нажмите на кнопку Запустить, дождитесь завершения запуска, после чего кликните ОК.

Ошибка восстановления 0х81000203 или 0х81000202 должна уйти, но бывает, что не у всех. Если вы в их числе, то проделайте аналогичные действия со службами «Планировщик заданий» и «Программный поставщик теневого копирования (Microsoft)».
Using Backup and Restore to back up your system or files for computer protection but receive a Volume Shadow Copy Service error? This post shows you some specific Windows VSS errors and the corresponding solutions, and an easy way to keep PC safe so that you can easily restore the computer to its previous state in case of system accidents.
What Is Volume Shadow Copy Service (VSS)
Shadow Copy is a technology in Microsoft Windows, allowing users to make manual or automatic backups/snapshots of computer volumes or files. It is also known as Volume Snapshot Service, Volume Shadow Copy Service or VSS.
What is VSS? Microsoft defines it as follows:
“The Volume Shadow Copy Service (VSS) is a set of COM interfaces that implements a framework to allow volume backups to be performed while applications on a system continue to write to the volumes.”
This service requires the file system to be NTFS so as to create and store shadow copies. And the copies can be created by any Windows component using this technology on local, external and removable volumes or network locations, such as when creating a scheduled Windows backup or automatic system restore point.
If this service is stopped, all components depending on the service are still not working. And you may encounter some Volume Shadow Copy service errors in Windows 10/8/7 when backing up or restoring OS. Besides, VSS errors may also happen on Windows Server 2008, Server SBS 2011, Server 2012, etc.
In the following paragraphs, we will walk you through some specific errors as well as the solutions in Windows PCs.
Fix Volume Shadow Copy Service Errors Windows 10/8/7
VSS errors are various according to different Windows operating systems (PC OS and Server) and situations. Here we will show you some common errors in Windows 10/8/7 when creating a Windows system image and doing a system restore.
Case 1: Volume Shadow Copy Service Not Working Well When Backing up Windows
Volume Shadow Copy Service Error 0x80042302 during Backup
Recently we received the feedback saying backing up Windows to a new external hard drive but failed with error message 0x80042302. The details are as follows:
“The backup application could not start due to an internal error:
A Volume Shadow Copy Service component encountered an unexpected error. Check the Application event log for more information. (0x80042302).”
Solution
In this case, the problem is that the Volume Shadow Copy Service is disabled. Thus, the best solution is to set this service to Automatic.
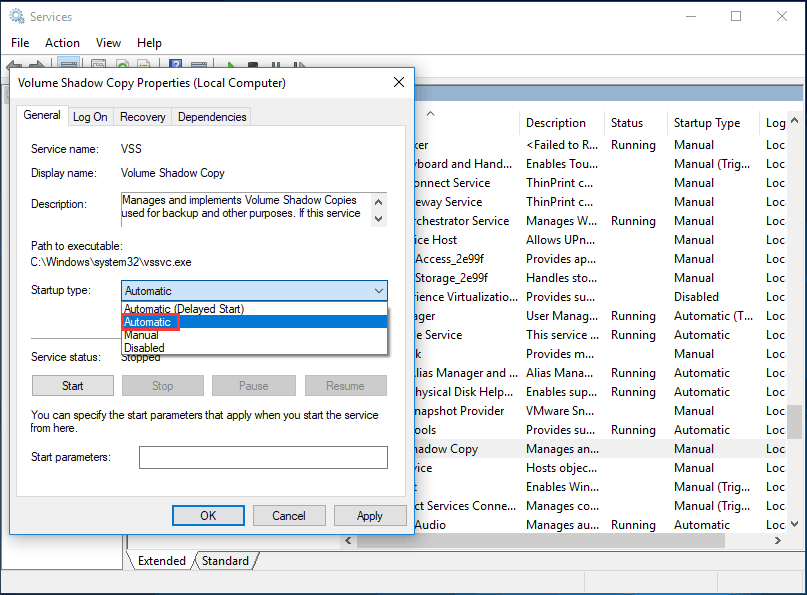
Step 1: Press “Win + R” keys to open the Run Window.
Step 2: Type msc to enter service interface.
Step 3: Find Volume Shadow Copy and choose Properties from the right-click menu.
Step 4: Change the Startup type to Automatic.
Step 5: Click Start, Apply, and OK to enable Volume Shadow Copy and make it run on your PC.
After that, you can try to back up your Windows 10/8/7 computer to check whether Volume Shadow Copy Service error 0x80042302 still exists.
A Volume Shadow Copy Service Operation Failed
Sometimes Shadow Copy issue happens with errors like 0x807800A1 & 0X800423F4 when creating a system image backup. The information is as shown below:
“A Volume Shadow Copy Service operation failed. Please check “VSS” and “SPP” application event logs for more information. (0x807800A1).
Additional Information:
The writer experienced a non-transient error. If the backup process is retried, the error is likely to reoccur. (0X800423F4).”
This issue often happens on Windows 10/8/7 computer due to some reasons, for example, VSS service may be stopped, antivirus or Windows firewall is enabled or hard drive has errors. Well then, what’re the solutions to this problem? Three ways are offered.
Solutions
Way 1: Check and Enable Volume Shadow Copy Service
Step 1: Similarly, you need to enter Services page by inputting services.msc in the Run window.
Step 2: Find Volume Shadow Copy to set the startup type to Automatic.
Step 3: If the Service Status is stopped or paused, click Start.
Step 4: Enter the Dependencies tab, check the dependency services that are required for Volume Shadows Copy Service to run.
Step 5: Go back to General, click Apply and OK
Way 2: Disable Antivirus and Windows Firewall
For antivirus, right click this program to choose Disable.
Note: In most cases, you shouldn’t disable the antivirus for the protection against viruses and security. To fix Volume Shadow Copy Service error, you can disable it temporarily. Then check whether the issue still occurs and re-enable it as soon as you’ve done.
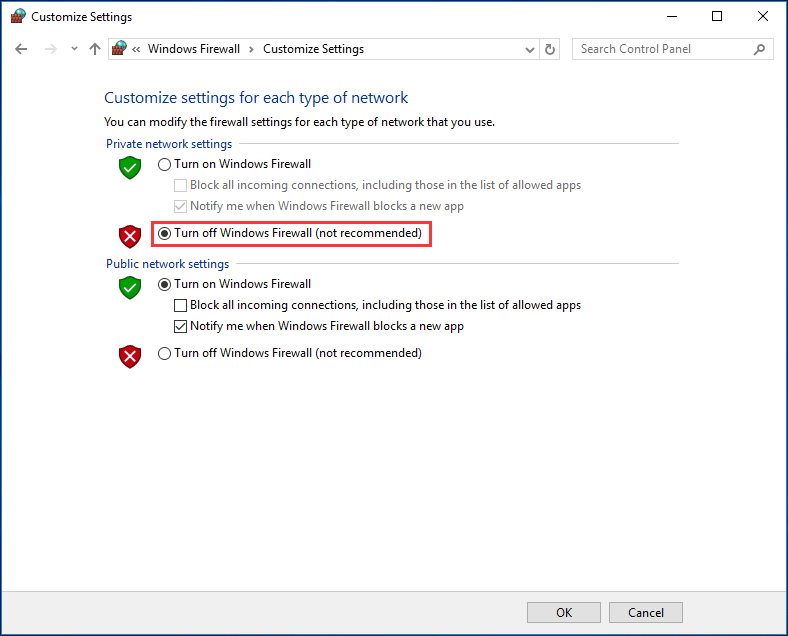
For Windows firewall, go to Control Panel > System and Security > Windows Firewall. Then, click Turn Windows firewall on or off option and choose Turn off Windows Firewall (not recommended) from Private/Public network settings. Finally, click OK.
Way 3: Check Hard Drive Errors
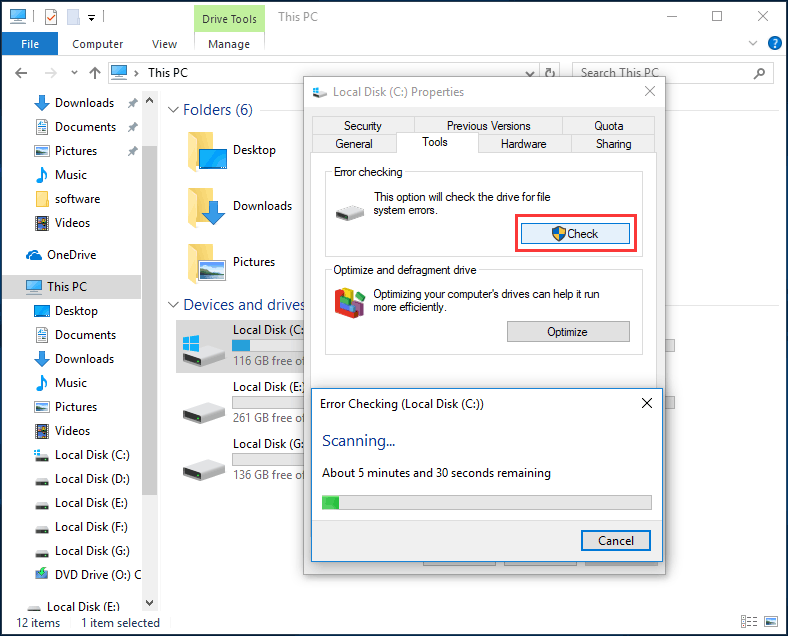
- To do this, you can enter Windows Explorer, right-click one partition you want to check for errors (usually C) to choose Properties.
- Under the Tools tab, click the Check(Windows 10/8) or Check Now (Windows 7) button followed by Scan drive.
- Then, follow the instructions to perform a check.
Also, use the command prompt “chkdsk” to do this work.
Tip: Besides, the third-party partition management software named MiniTool Partition Wizard has offered two features – Check File System and Surface Test, respectively enabling you to check & fix file system errors and check bad errors.
MiniTool Partition Wizard FreeClick to Download100%Clean & Safe
If you are getting the message – a Volume Shadow Copy Service operation failed, just try these three solutions to fix this Windows VSS error.
Case 2: Volume Shadow Copy Service Not Working Well When Restoring System
In addition to Windows 7/8 or Windows 10 VSS errors during backup, sometimes you might find the Volume Shadow Copy Service is not working with an error code like 0x81000202 or 0x80042302 during system restore although you have created a system image successfully beforehand.
Volume Shadow Copy Service Error 0x81000202
Here is the common error code 0x81000202:
“There was an unexpected error in the property page:
The Volume Shadow Copy service used by System Restore is not working. For more information view the event log…”
If you close the property page and try again, this system restore error 0x81000202 will appear again. Is there any way to fix it? Of course, here are three possible ways.
Solutions
Way 1: Change System Restore Setting
- Input msc in the Run window.
- Go to Computer ConfigurationAdministrative TemplateSystemSystem Restore.
- In the right pane, set the Turn off System Restore policy to Not configured.

Way 2: Enable Volume Shadow Copy
The steps are simple and we have mentioned this solution which is the same as the above Volume Shadow Copy Service errors. Thus, here we won’t repeat it.
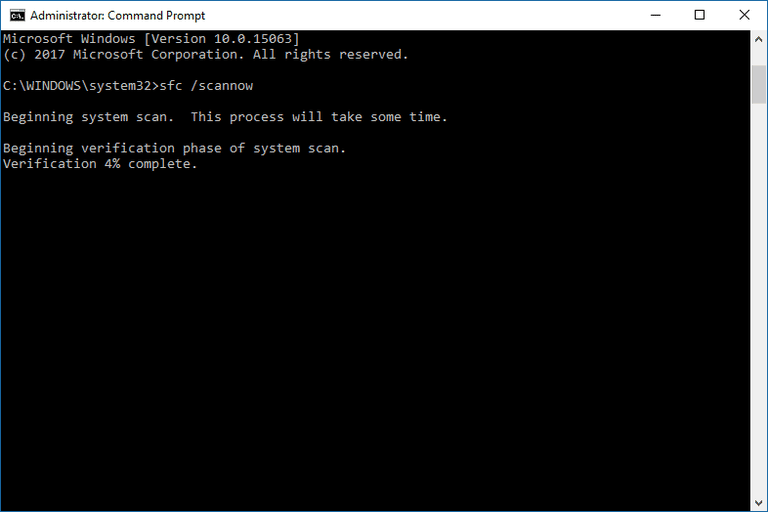
Way 3: Perform a System File Checker Scan(SFC) on Your Computer.
SFC tool can help you to scan system files, and replace incorrect versions of the system files with the correct versions. To perform a system file check can be helpful to fix Shadow Copy Service error 0x81000202.
- Run CMD as administrator.
- Type sfc /scannow.
Volume Shadow Copy Service Error 0x80042302 during System Restore
In addition to the Volume Shadow Copy service used by system restore is not working error, sometimes you fail to restore the system with the error message “System Restore does not appear to be functioning correctly on this system. A Volume Shadow Copy Service component encountered an unexpected error…(0x80042302)”
Related article: 4 Solutions to System Restore Does Not Appear to Be Functioning
When encountering system image restore failed volume shadow copy service issue, you can still fix it.
Solutions:
Way 1: Set Volume Shadow Copy Service to Automatic
Way 2: Run SFC
These two ways are the same as the methods to error code 0x81000202 in Windows 7/8/10, thus, we won’t repeat them.
Way 3: Perform a Clean Boot
If the 0x80042302 error is triggered when opening the System Restore utility, it can be fixed by a clean boot. Follow these steps:
Step 1: Open the Run window, and type msconfig.exe.
Step 2: Under the General tab, uncheck the Load startup items from the Selective startup menu.
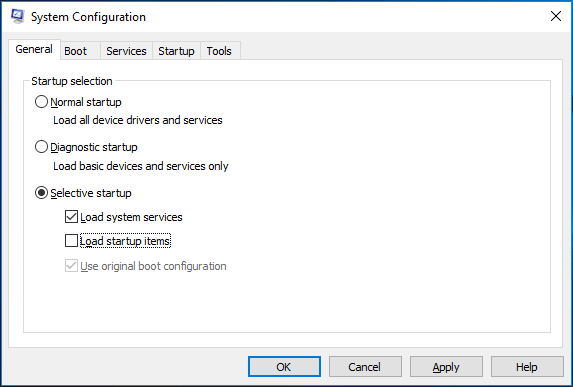
Step 3: In the Service tab, check Hide all Microsoft services and then click Disable all.
Step 4: Click OK and Restart.
In this part, we have shown you four VSS errors which happen when you are creating a system image or performing a system restore with the Windows built-in backup and restore utility. By following the corresponding solution, probably you can fix it.
Click to Tweet
Tip: Additionally, Microsoft Volume Shadow Copy Service might be not working with other error messages such as access is denied, unexpected error deviceiocontrol, etc. You can view the VSS logs to analyze the issues. Of course, the solutions are different based on different errors. Here, we won’t show you them.
But recently some of you turn to us for help, saying “is there anyone alternative to Windows Backup and Restore so as to effectively create a system image and restore the image“. The answer is yes. Here, we will show you one free backup software from MiniTool Solution Ltd.
Shadow Copy Service Alternative Software for Windows 10/8/7
MiniTool ShadowMaker, the reliable and free backup software, is specialized in backing up Windows operating system, partition and the entire disk for Windows 10/8/7 users.
As an excellent backup solution, this freeware lets you not only create scheduled backups by setting the specific time point but also set incremental and differential backups for the only changed or newly added data.
In the event of system accidents, the image file is available to restore the system to its previous state with simple clicks.
As the alternative to Windows built-in backup utility using Volume Shadow Copy Service, MiniTool ShadowMaker is worth recommending.
Want to quickly and successfully back up your OS without Volume Shadow Copy Service error? Now, get the Trial Edition of this backup software for 30-days free trial.
MiniTool ShadowMaker TrialClick to Download100%Clean & Safe
Back up Windows 10/8/7
Step 1: After completing the installation of this tool on your computer, open it to the main interface.
Tip: This free backup software only backs up the computer in the same LAN via remote control.
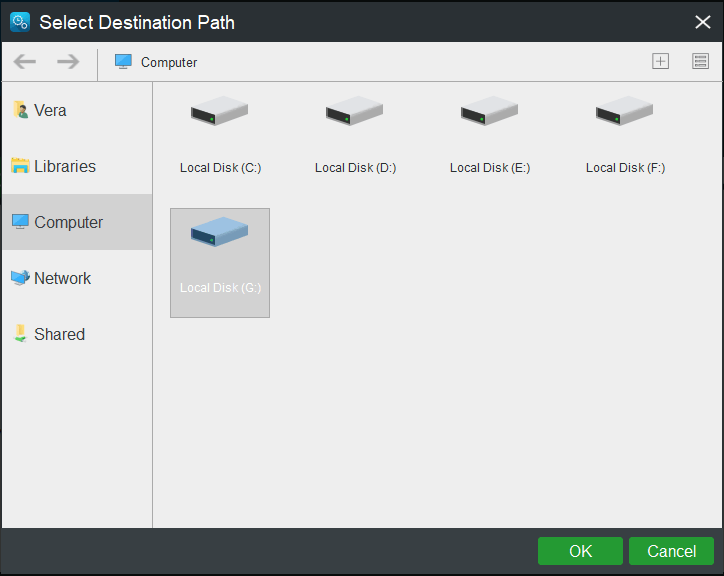
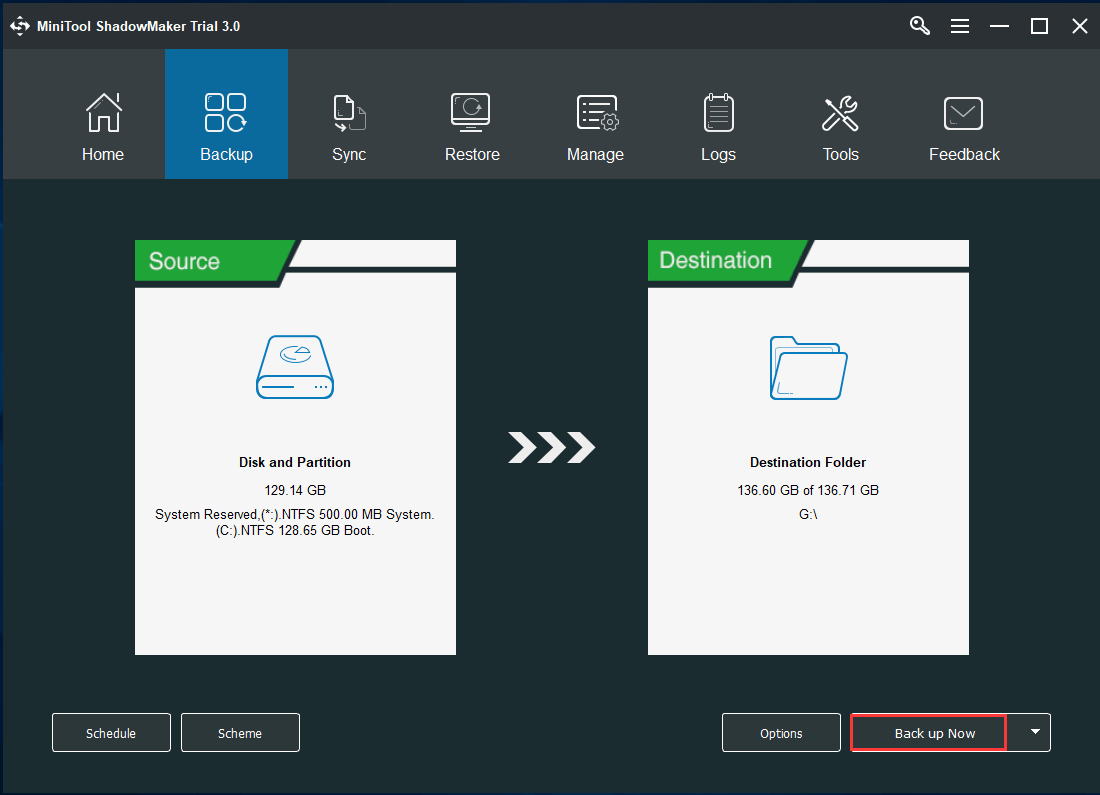
Step 2: It’s the time to choose the partitions you want to backup and decide the location you want to save the image to.
Just enter the Backup tab, and you can view this free backup software has checked the drives required for Windows to run. If you need to create a system disk image, enter the Source section to select all system partitions.
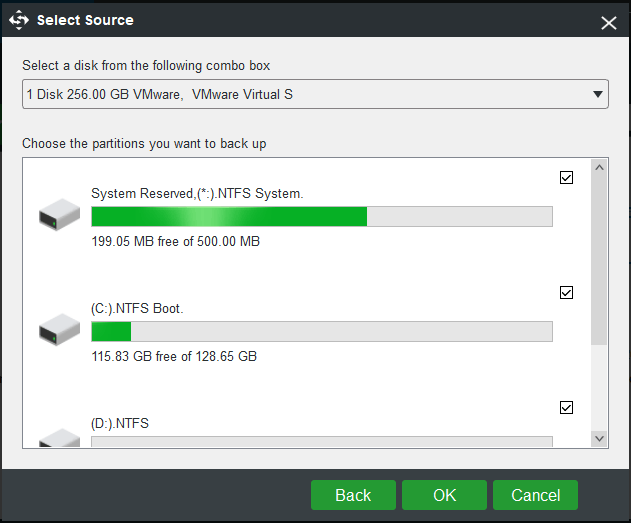
As to the destination storage path, an external hard drive, USB flash drive, or NAS can be available. Usually, we choose to create image files on the external drive.
Hot article: The Best Practice: 3-2-1 Backup Strategy for Home Computers
Step 3: Go back to the Backup interface, and click Back up Now button finally.
Tip:
1. Automatic backup is supported by MiniTool ShadowMaker. If you want to back up your computer on a regular basis, just use its Edit Schedule feature in Manage page after a full backup is completed.
2. In addition, the incremental and differential backup can also be created in Manage page by this free backup software. For more information, read 3 Types of Backup: Full, Incremental, Differential – MiniTool.
Restore System from an External Hard Drive
MiniTool ShadowMaker is helpful to restore your computer in case of unexpected disaster, which can avoid Volume Shadow Copy Service error 0x81000202 or 0x80042302 during system restore. How to do this job?
Tip: First of all, please use the Media Builder feature of MiniTool ShadowMaker to create a bootable disc to boot your computer. Then, you can start a system recovery in WinPE.
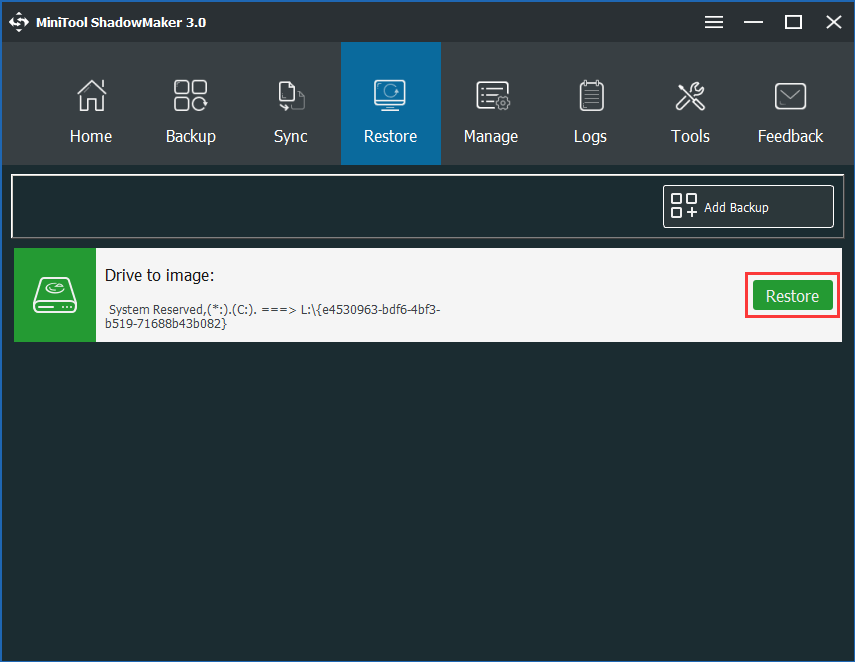
Step 1: In the Restore page, find the system image or system disk image you have created and click Restore button.
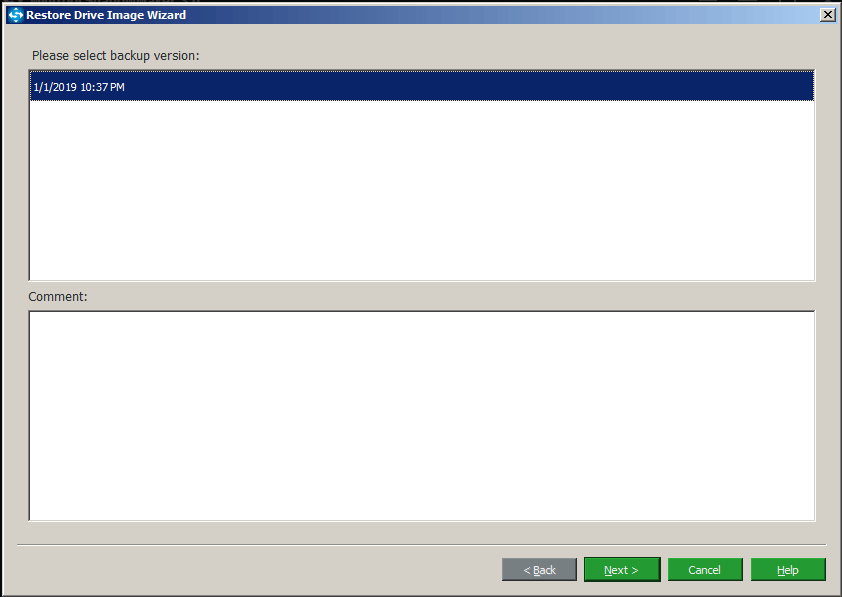
Step 2: The backup time will be shown, choose the backup version and click Next to continue.
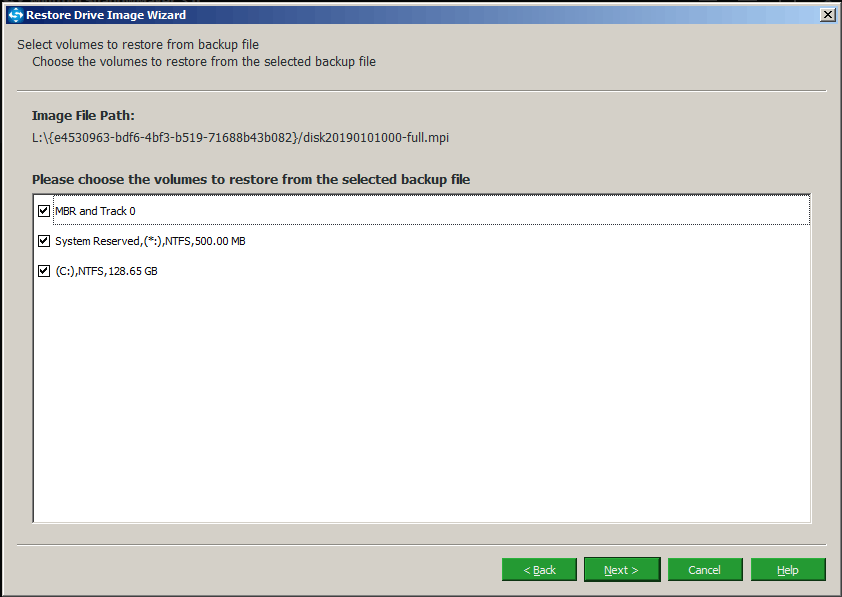
Step 3: Next, choose all system partitions as well as MBR and Track 0 to restore. Or else, the computer won’t be bootable.
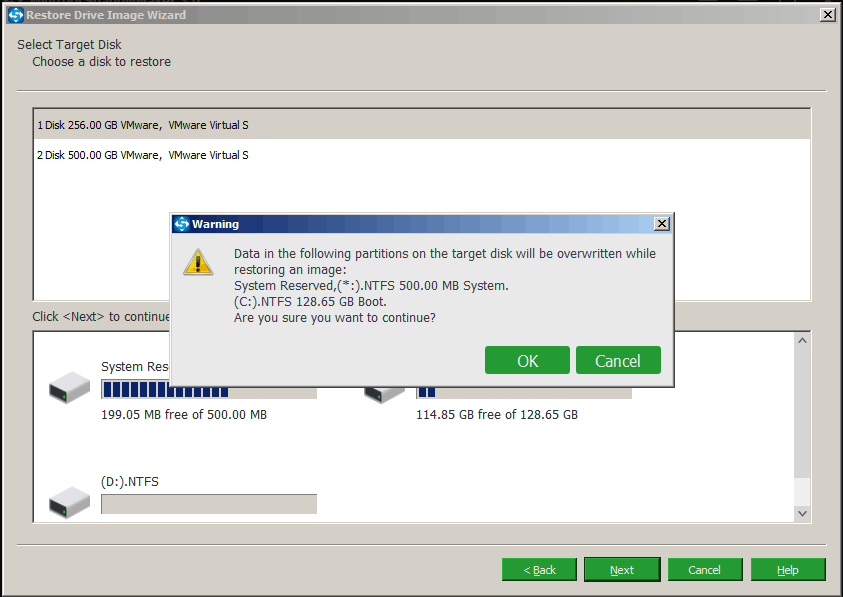
Step 4: Choose the disk you want to restore the image file to and this freeware will tell you the drives that will be overwritten during restoration. Click OK to the next step.
Step 5: Now the software is performing the system image recovery process. After the operation, restart your computer and it can run properly.
“Windows 10 Shadow Copy error is common. To avoid it, I need free backup software to back up OS. Finally, I find MiniTool ShadowMaker and it is really worth using. “Click to Tweet
Conclusion
Having a Volume Shadow Copy Service error in Windows 10/8/7 during system backup or system restore using the built-in backup and restore utility? Try the solutions as mentioned above based on the specific error code to fix your problem.
To avoid Microsoft Volume Shadow Copy errors during PC backup and restore using Windows built-in tool, use MiniTool ShadowMaker to back up your PC! Now, free download this backup software.
MiniTool ShadowMaker TrialClick to Download100%Clean & Safe
Have some suggestions for the VSS errors? Or encounter some problems when using our backup software? Now, tell us by leaving your idea in the following zone or sending it to [email protected].
Если при попытке включить, настроить или создать системную точку восстановления в Windows вы получаете ошибку с кодом 0x81000203 или 0x81000202, впору проверить работу служб «Теневое копирование тома» и «Программный поставщик теневого копирования». В норме первая должна иметь тип запуска «Вручную», тип запуска второй должен быть «Автоматически (отложенный запуск)».
Но может статься и такое, что служба окажется поврежденной или ее вообще не будет в списке оснастки управления службами. В первую очередь это касается поставщика теневого копирования, которая, если верить тому, что говорят и пишут в ветках форумов столкнувшиеся с проблемой пользователи, почему-то страдает чаще.
Восстановление программного поставщика теневого копирования
В таком случае вы можете попробовать пересоздать службу вручную, не прибегая к ее импорту из исправной Windows.
Запустите от имени администратора классическую командную строку и выполните вот такую команду:
sc create swprv binPath= C:\Windows\System32\svchost.exe DisplayName= «Имя службы» type= own start= demand error= normal depend= rpcss obj= LocalSystem
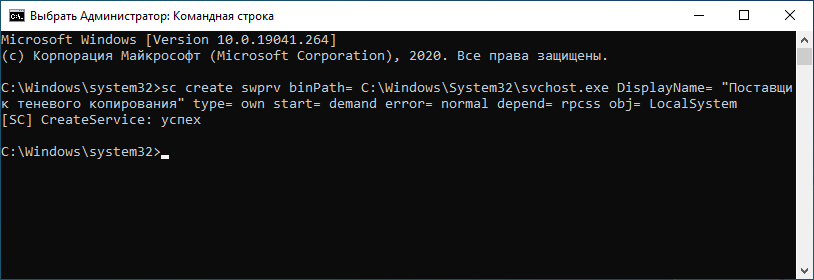
Значение параметра DisplayName может быть как оригинальным, то есть «Программный поставщик теневого копирования», так и произвольным. Если команда вернет ошибку «Указанная служба уже существует», удалите поврежденную службу командой sc delete swprv и повторите команду создания.
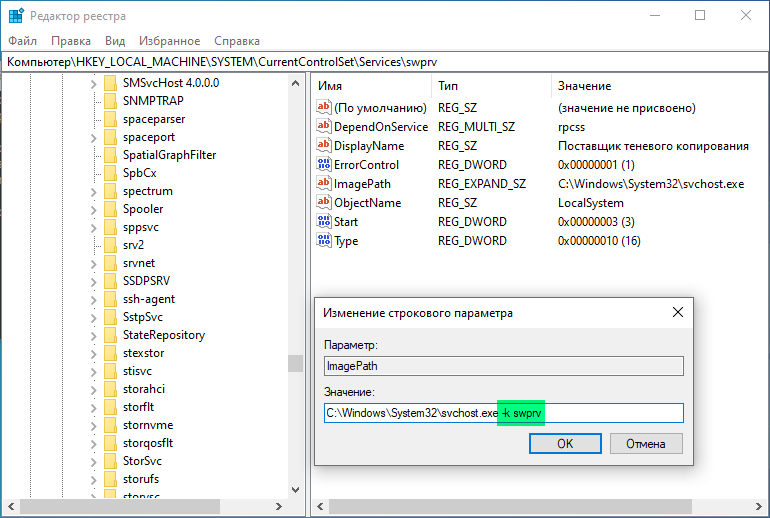
Служба создана, осталось немного подправить ее настройки в реестре.
Откройте редактор реестра командой regedit в разделе HKLM\SYSTEM\CurrentControlSet\services\swprv, отыщите справа параметр ImagePath и кликните по нему дважды, чтобы открыть окошко редактирования его значения.
Добавьте через пробел в конец пути к исполняемому файлу svchost.exe ключ -k swprv, вот так:
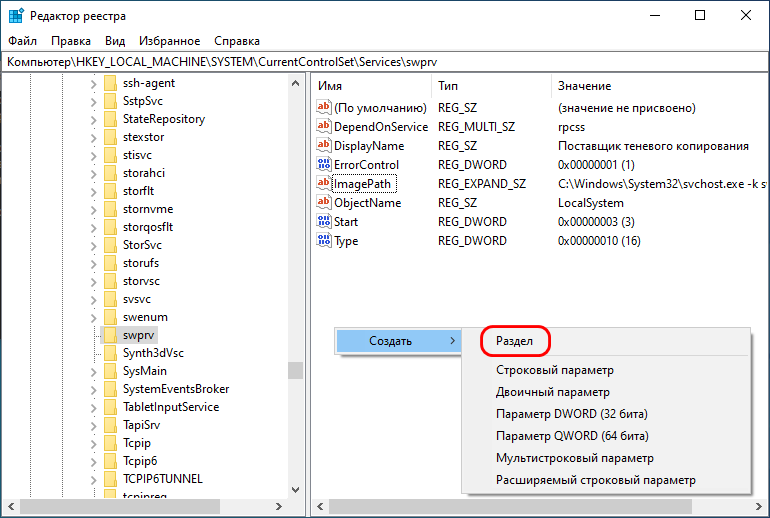
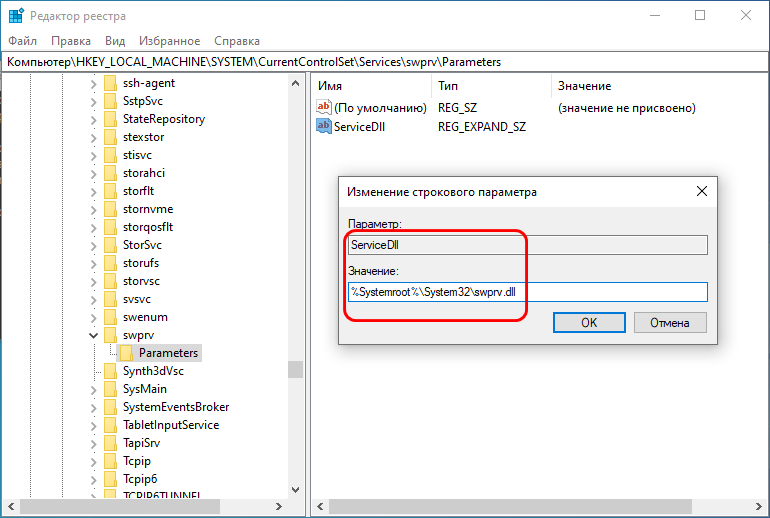
Затем создайте в подразделе swprv вложенный подраздел и назовите его Parameters.
В свою очередь, в нем создайте расширяемый строковый параметр ServiceDll и установите в качестве его значения путь %Systemroot%\System32\swprv.dll.

Готово, осталось проверить работу службы.
Откройте оснастку управления службами, найдите службу «Программный поставщик теневого копирования» и откройте ее свойства.
Тип запуска выберите «Автоматически (отложенный запуск)» и тут же запустите, чтобы убедиться в ее нормальной работе.
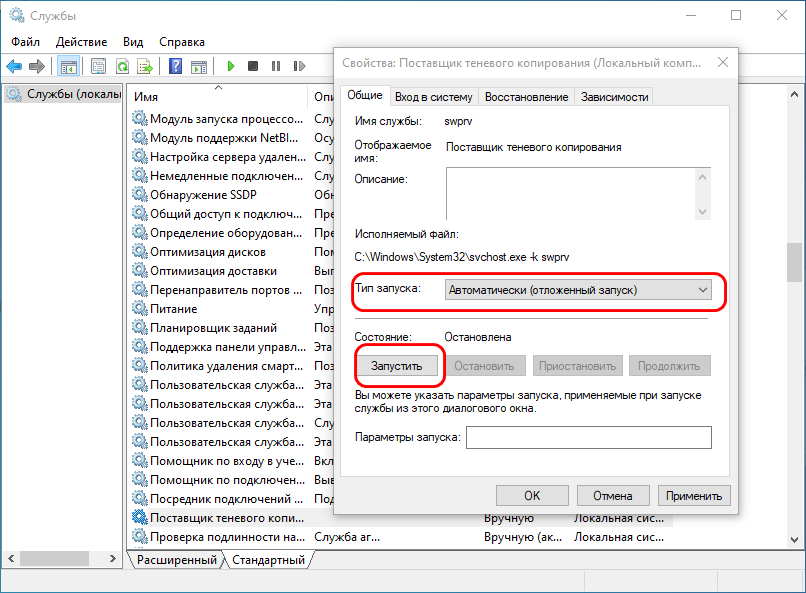
После этого можно будет приступать к проверке работы функции создания точек восстановления.
![]() Загрузка…
Загрузка…
Ошибки при создании или восстановлении точки восстановления могут быть причиной серьезных проблем на вашем компьютере. Одна из таких ошибок, с которой могут столкнуться пользователи Windows 10, — 0x81000202. Если вы сталкиваетесь с этой ошибкой, необходимо принять незамедлительные меры для ее устранения, чтобы защитить свою систему и сохранить важные данные.
Ошибка 0x81000202 может возникать по нескольким причинам, включая поврежденные системные файлы, проблемы с драйверами или неправильные настройки системы. Часто причина ошибки может быть связана с конфликтами программного обеспечения или отсутствием доступа к необходимым ресурсам.
В данной статье мы рассмотрим несколько методов исправления ошибки при создании точки восстановления Windows 10 0x81000202. Каждый из этих методов несложен и доступен для пользователей с любым уровнем опыта. Следуйте нашим инструкциям, чтобы успешно устранить проблему и вернуть функцию создания точки восстановления на свой компьютер Windows 10.
Важно: прежде чем начать исправление ошибки 0x81000202, рекомендуется создать резервную копию всех важных данных. В случае непредвиденных проблем или ошибок вы сможете восстановить свою систему и не потерять важную информацию.
Содержание
- Проверка диска на ошибки с помощью инструмента CHKDSK
- Отключение антивирусного ПО временно для проверки
- Очистка временных файлов и папок
- Проверка службы теневого копирования и технологии VSS
Проверка диска на ошибки с помощью инструмента CHKDSK
Для запуска CHKDSK в Windows 10 выполните следующие шаги:
- Откройте командную строку, щелкнув правой кнопкой мыши на кнопке «Пуск» и выбрав «Командная строка» из контекстного меню.
- В командной строке введите команду «chkdsk C: /f» и нажмите клавишу Enter. Здесь «C:» — это буква диска, который вы хотите проверить. Используйте другую букву, если вам нужно проверить другой диск.
- CHKDSK начнет проверку диска на наличие ошибок и исправление найденных проблем.
- По окончании проверки диска перезагрузите компьютер, чтобы завершить процесс.
Проверка диска с помощью CHKDSK может занять некоторое время в зависимости от размера и состояния диска. В процессе проверки будет отображаться информация о текущем состоянии и прогрессе операции.
Если проверка диска обнаружит и исправит какие-либо ошибки, это может помочь решить проблему с созданием точки восстановления Windows 10 и ошибкой 0x81000202.
Если после проверки диска проблема не была решена, рекомендуется обратиться за помощью к специалистам технической поддержки или посетить форумы сообщества пользователей Windows для получения дополнительной информации и советов.
Отключение антивирусного ПО временно для проверки
Перед тем, как отключить антивирусное ПО, обратите внимание, что это делается на ваш собственный риск. Отключите антивирусное программное обеспечение только временно на время проверки, и после этого обязательно включите его обратно.
Чтобы временно отключить антивирусное ПО, следуйте этим шагам:
| Шаг | Инструкции |
|---|---|
| 1 | Щелкните правой кнопкой мыши по иконке антивирусной программы в системном трее (обычно в правом нижнем углу экрана). |
| 2 | Выберите опцию «Отключить» или «Выключить» из контекстного меню. |
| 3 | В открывшемся окне подтвердите отключение антивирусного ПО на указанный период времени. Точные инструкции и параметры могут отличаться в зависимости от вашего антивирусного ПО. |
После того, как антивирусное ПО будет отключено, попробуйте создать точку восстановления в Windows 10 снова. Если ошибка 0x81000202 не повторится, это может означать, что ваше антивирусное ПО было причиной проблемы.
После тестирования и проверки создания точки восстановления, не забудьте включить антивирусное программное обеспечение обратно на вашем компьютере. Защита от вредоносных программ и вирусов – очень важный аспект безопасности компьютера, поэтому будьте осторожны, когда отключаете или меняете настройки антивирусного ПО.
Очистка временных файлов и папок
Чтобы очистить временные файлы и папки, следуйте этим шагам:
- Откройте «Пуск» и введите «Очистка диска» в строке поиска. Нажмите «Очистка диска» из результатов поиска.
- Выберите диск, на котором вы хотите выполнить очистку, и нажмите «OK».
- В появившемся окне «Очистка диска» выберите файлы, которые вы хотите удалить, и нажмите «OK».
- Если вам потребуется освободить еще больше места, нажмите на кнопку «Очистить системные файлы».
Кроме того, вы также можете вручную очистить временные файлы и папки, следуя этим шагам:
- Откройте «Проводник» и перейдите к диску, на котором вы хотите очистить временные файлы и папки.
- Откройте папку «Пользователи» и выберите свою учетную запись.
- Откройте папку «AppData» и затем «Local».
- В папке «Local» вы увидите различные подпапки, содержащие временные файлы и папки. Выберите все файлы и папки и удалите их.
После очистки временных файлов и папок перезагрузите компьютер и попробуйте создать точку восстановления снова. Ошибки при создании точки восстановления Windows 10 0x81000202 могут быть вызваны загромождением системы временными файлами, поэтому очистка их может помочь исправить проблему.
Примечание: Перед удалением файлов и папок убедитесь, что они действительно временные и необходимы для работы других программ или процессов на вашем компьютере.
Проверка службы теневого копирования и технологии VSS
Для проверки состояния службы теневого копирования и технологии VSS следуйте инструкциям:
- Откройте меню Пуск, введите «services.msc» в поле поиска и нажмите Enter для открытия окна служб.
- Найдите службу «Служба теневого копирования тома» в списке служб.
- Правой кнопкой мыши нажмите на службу и выберите «Свойства».
- Убедитесь, что служба запущена. Если это не так, нажмите кнопку «Запуск» и установите режим запуска на «Автоматически».
- Перейдите на вкладку «Восстановление» и убедитесь, что для каждого тома выбрано «Автоматическое восстановление».
- Нажмите кнопку «Применить» и «ОК», чтобы сохранить изменения.
После выполнения этих действий перезапустите компьютер и попробуйте создать точку восстановления снова. Если проблема не решена, попробуйте другие методы исправления ошибки 0x81000202, описанные в нашей статье.