Ошибка 0x803c0103 возникает при запуске средства устранения неполадок Центра обновления Windows 10. Как правило, пользователи сталкиваются с этой ошибкой в том случае, если у них не получается установить новые (или отложенные) обновления для своей системы и они решаются запустить уже упомянутое средство устранения неполадок.
Что вызывает появление ошибки 0x803c0103
Ошибка 0x803c0103 — крайне тревожная проблема, а все из-за того, что она появляется в средстве, которое должно как раз устранять эти самые проблемы. Завидев такой код перед собой и потеряв возможность обновлять свою ОС, многие пользователи впадают в панику — не нужно этого делать! Для начала нам с вами нужно понять, почему вообще возникает 0x803c0103.
- Повреждения системных файлов. Средство устранения неполадок и Центр обновления для своей работы задействуют безумное количество всевозможных системных файлов Windows 10. Если с этими файлами что-то произойдет, то есть шанс, что ни средство, ни Центр обновления не смогут корректно выполнять возложенные на них задачи. К счастью, Майкрософт не дураки — они оснастили свои ОСы специальными инструментами, которые способны восстанавливать целостность системных файлов.
- Компоненты Центра обновления находятся в «мертвой петле». В некоторых случаях службы и компоненты Центра обновления могут наглухо зависнуть, так сказать, в своеобразной мертвой петле. Открывая Центр обновления или средство устранения неполадок, система пытается получить доступ к повисшим элементам, однако ей это не удается — пользователь получает соответствующую ошибку, например, 0x803c0103.
- Банальный баг операционной системы. Бывает и такое, что средство устранения неполадок показывает вам ту или иную ошибку просто из-за того, что в Windows 10 возник какой-то странный баг, который препятствует нормальной работе некоторых компонентов ОС. Как правило, избавиться от такого бага можно с помощью элементарной перезагрузки.
Как избавиться от ошибки 0x803c0103
Мы настоятельно рекомендуем выполнять методы в том порядке, в котором мы указали их ниже. Поверьте, вам действительно не нужно переустанавливать свою ОС всякий раз, когда у вас не получается установить то или иное обновление для Windows 10.
Метод №1 Перезагрузка ПК
Самый простой и, на удивление, эффективный метод устранения ошибки 0x803c0103 — элементарная перезагрузка компьютера. Попробуйте перезапустить свой ПК, после чего снова запустите средство устранения неполадок и проверьте наличие ошибки. Кроме того, после перезагрузки можете сразу запустить обновление ОС: проблемы с установкой апдейтов могли разрешиться сами собой.
Метод №2 SFC и DISM — средства восстановления Windows
Средство устранения неполадок и Центр обновления могут перестать работать, если некоторые из системных файлов Windows 10 были повреждены, изменены, перемещены или удалены. Кстати, последние четыре пункта могут произойти по вине вирусов и вредоносного программного обеспечение — мы рекомендуем вам прямо сейчас запустить сканирование антивирусом. Так или иначе повреждение системных файлов необходимо как-то исправлять, верно? Тут на выручку идут такие полезные утилиты, как SFC и DISM.
Первая утилита сканирует системные файлы на наличие повреждений и устраняет последние, если это возможно, вторая — ищет повреждения в хранилище компонентов и образе системы, после чего точно также пытается их устранить. Пользоваться обеими утилитами очень и очень просто — мы покажем вам, как это сделать.
SFC для восстановления системных файлов
- Нажмите на клавиатуре комбинацию Win+R, чтобы открыть окошко «Выполнить».
- Вставьте в пустую поисковую строчку окна значение «CMD» (без кавычек) и нажмите комбинацию CTRL+SHIFT+ENTER.
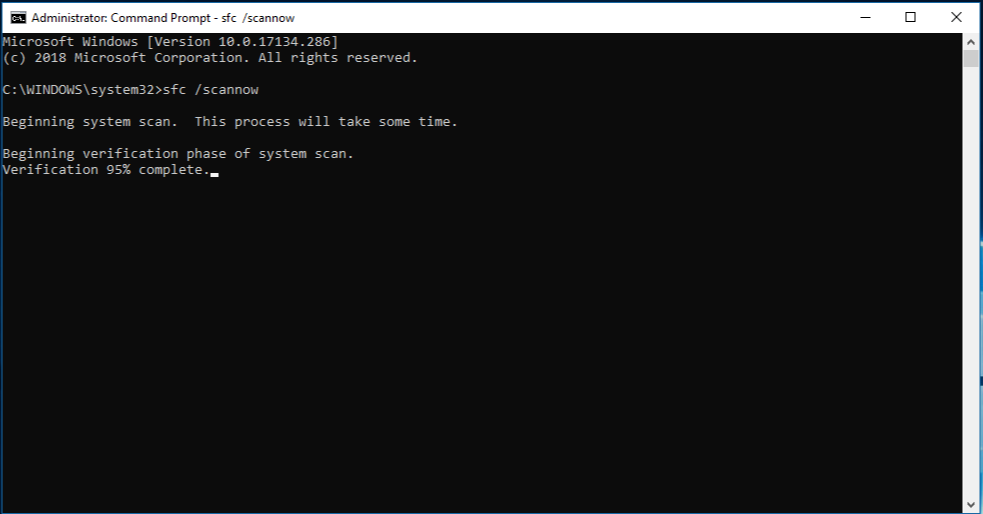
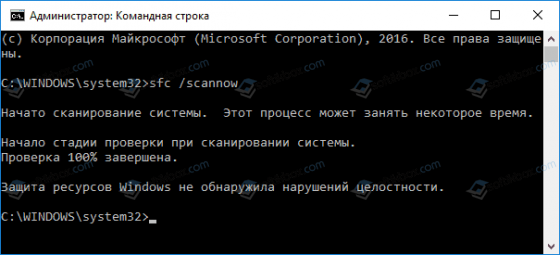
- Открыв перед собой системную консоль (от имени администратора), вставьте в нее команду «sfc /scannow» (без кавычек) и нажмите ENTER.
- Подождите несколько минут (или дольше), ознакомьтесь с результатами работы утилиты и перезагрузите компьютер.
DISM для восстановления хранилища компонентов и образа системы
- Нажмите на клавиатуре комбинацию Win+R, чтобы открыть окошко «Выполнить».
- Вставьте в пустую поисковую строчку окна значение «CMD» (без кавычек) и нажмите комбинацию CTRL+SHIFT+ENTER.
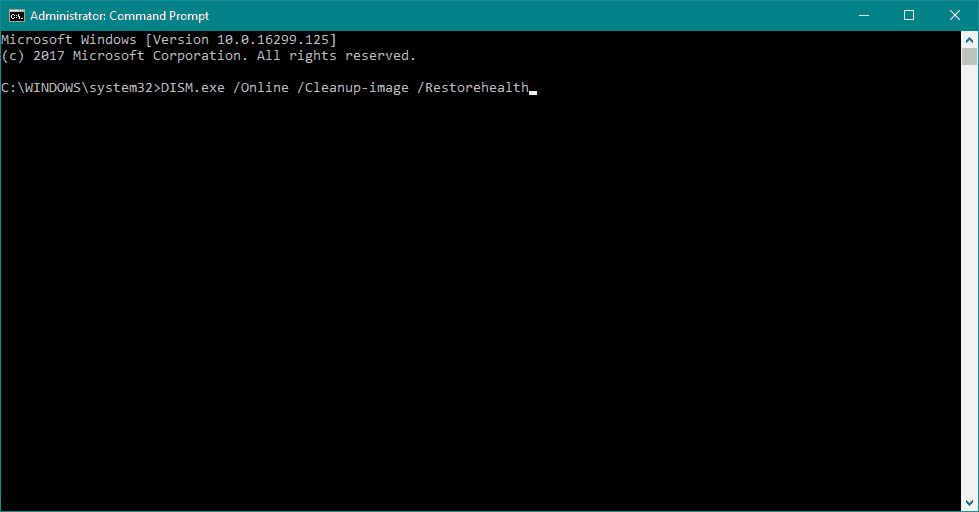
- Открыв перед собой системную консоль (от имени администратора), вставьте в нее команду «Dism /Online /Cleanup-Image /CheckHealth» и нажмите ENTER.
- Ознакомьтесь с результатами проверки, после чего вставьте в консоль команду «Dism /Online /Cleanup-Image /ScanHealth» и нажмите ENTER.
- Снова ознакомьтесь с результатами сканирования, затем вставьте команду «Dism /Online /Cleanup-Image /RestoreHealth» и нажмите ENTER.
- Подождите завершения восстановления и перезагрузите ПК.
Важно отметить, что для выполнения некоторых из указанных выше команд может потребоваться достаточно большое количество времени. Проще говоря, вам, возможно, придется набраться терпения. Как только закончите работать с SFC и DISM, проверьте, была ли устранена ошибка 0x803c0103 в средстве устранения неполадок и исчезли ли проблемы в Центре обновления Windows 10.
Метод №3 Запуск точки восстановления системы
Раньше ни со средством устранения неполадок, ни с Центром обновления не возникало никаких проблем? Тогда, возможно, вы имеете дело с конфликтом, который возник между системными компонентами Windows 10 и сторонним программным обеспечением. Рекомендуем воспользоваться точкой восстановления, чтобы вернуть свою систему к более стабильному состоянию.
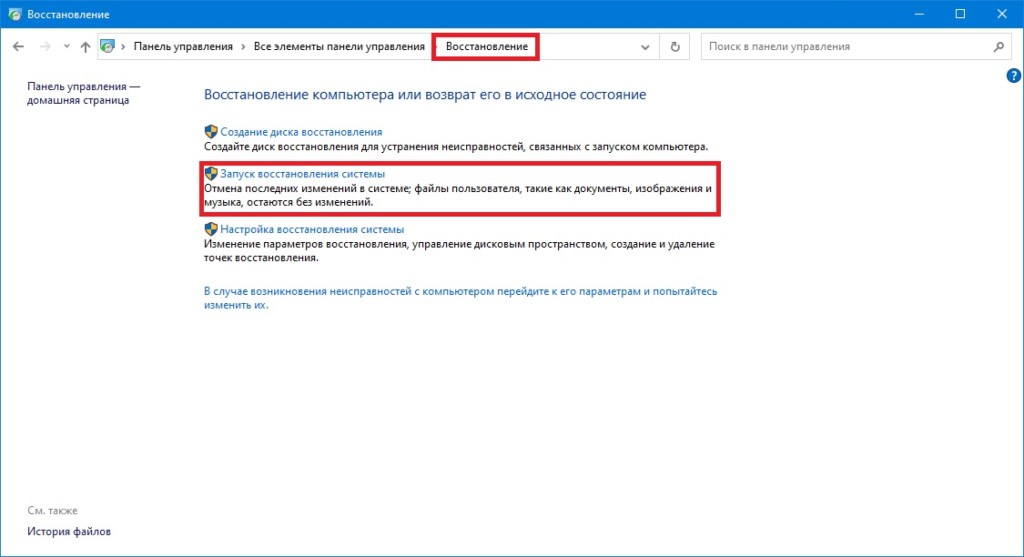
- Нажмите Win+R для вызова окошка «Выполнить».
- Пропишите в пустой строке значение «control» и нажмите ENTER.
- Измените режим просмотра на «Крупные значки».
- Перейдите в Панели управлении в раздел «Восстановление».
- Кликните на пункт «Запуск восстановления системы».
- Теперь нажмите на кнопку «Далее», выберите подходящую точку восстановления и нажмите еще раз «Далее».
- И наконец-то, нажмите на кнопку «Готово», чтобы начать восстановления системы.
Важно отметить, что во время восстановления ОС ваш компьютер автоматически перезагрузится. Как только зайдете в систему, проверьте наличие ошибки 0x803c0103.
Метод №4 Починка компонентов Центра обновления
Неполадки в средстве устранения неполадок и самом Центре обновления могли быть вызваны некорректной работой тех или иных компонентов этого самого Центра обновления. Решается такая проблема с помощью сброса компонентов ЦО. Сброс компонентов ЦО Windows 10 — это достаточно простой процесс, несмотря на заявления некоторых пользователей в сети.
Осуществить подобный сброс можно как вручную, так и в полуавтоматическом режиме. Мы рекомендуем вам не тратить свое время, и воспользоваться вторым вариантом.
Полуавтоматический сброс компонентов Центра обновления
- Создайте на своей Рабочем столе (или любом другом удобном вам месте) самый обычный текстовый файл. Не знаете, как это сделать? Нажмите ПКМ на пустое место и выберите пункты «Создать→Текстовый документ».
- Откройте созданный файл и вставьте в него следующий скрипт:
:: Run the reset Windows Update components.
 :: void components();
 :: /*************************************************************************************/
 :components
 :: —— Stopping the Windows Update services ——
 call :print Stopping the Windows Update services.
 net stop bitscall :print Stopping the Windows Update services.
 net stop wuauservcall :print Stopping the Windows Update services.
 net stop appidsvccall :print Stopping the Windows Update services.
 net stop cryptsvccall :print Canceling the Windows Update process.
 taskkill /im wuauclt.exe /f
 :: —— Checking the services status ——
 call :print Checking the services status.sc query bits | findstr /I /C:»STOPPED»
 if %errorlevel% NEQ 0 (
 echo. Failed to stop the BITS service.
 echo.
 echo.Press any key to continue . . .
 pause>nul
 goto :eof
 )call :print Checking the services status.sc query wuauserv | findstr /I /C:»STOPPED»
 if %errorlevel% NEQ 0 (
 echo. Failed to stop the Windows Update service.
 echo.
 echo.Press any key to continue . . .
 pause>nul
 goto :eof
 )call :print Checking the services status.sc query appidsvc | findstr /I /C:»STOPPED»
 if %errorlevel% NEQ 0 (
 sc query appidsvc | findstr /I /C:»OpenService FAILED 1060″
 if %errorlevel% NEQ 0 (
 echo. Failed to stop the Application Identity service.
 echo.
 echo.Press any key to continue . . .
 pause>nul
 if %family% NEQ 6 goto :eof
 )
 )
 call :print Checking the services status.sc query cryptsvc | findstr /I /C:»STOPPED»
 if %errorlevel% NEQ 0 (
 echo. Failed to stop the Cryptographic Services service.
 echo.
 echo.Press any key to continue . . .
 pause>nul
 goto :eof
 ):: —— Delete the qmgr*.dat files ——
 call :print Deleting the qmgr*.dat files.
del /s /q /f «%ALLUSERSPROFILE%\Microsoft\Network\Downloader\qmgr*.dat»
call :print Deleting the old software distribution backup copies.
del /s /q /f «%SYSTEMROOT%\winsxs\pending.xml.bak»
)
if exist «%SYSTEMROOT%\SoftwareDistribution.bak» (
rmdir /s /q «%SYSTEMROOT%\SoftwareDistribution.bak»
)
if exist «%SYSTEMROOT%\system32\Catroot2.bak» (
rmdir /s /q «%SYSTEMROOT%\system32\Catroot2.bak»
)
if exist «%SYSTEMROOT%\WindowsUpdate.log.bak» (
del /s /q /f «%SYSTEMROOT%\WindowsUpdate.log.bak»
)
takeown /f «%SYSTEMROOT%\winsxs\pending.xml»
attrib -r -s -h /s /d «%SYSTEMROOT%\winsxs\pending.xml»
ren «%SYSTEMROOT%\winsxs\pending.xml» pending.xml.bak
)
if exist «%SYSTEMROOT%\SoftwareDistribution» (
attrib -r -s -h /s /d «%SYSTEMROOT%\SoftwareDistribution»
ren «%SYSTEMROOT%\SoftwareDistribution» SoftwareDistribution.bak
if exist «%SYSTEMROOT%\SoftwareDistribution» (
echo.
echo. Failed to rename the SoftwareDistribution folder.
echo.
echo.Press any key to continue . . .
pause>nul
goto :eof
)
)
if exist «%SYSTEMROOT%\system32\Catroot2» (
attrib -r -s -h /s /d «%SYSTEMROOT%\system32\Catroot2»
ren «%SYSTEMROOT%\system32\Catroot2» Catroot2.bak
)
if exist «%SYSTEMROOT%\WindowsUpdate.log» (
attrib -r -s -h /s /d «%SYSTEMROOT%\WindowsUpdate.log»
ren «%SYSTEMROOT%\WindowsUpdate.log» WindowsUpdate.log.bak
)
call :print Reset the BITS service and the Windows Update service to the default security descriptor.
sc.exe sdset bits D:(A;;CCLCSWLOCRRC;;;AU)(A;;CCDCLCSWRPWPDTLOCRSDRCWDWO;;;BA)(A;;CCDCLCSWRPWPDTLCRSDRCWDWO;;;SO)(A;;CCLCSWRPWPDTLOCRRC;;;SY)S:(AU;FA;CCDCLCSWRPWPDTLOCRSDRCWDWO;;WD)
sc.exe sdset cryptsvc D:(A;;CCLCSWLOCRRC;;;AU)(A;;CCDCLCSWRPWPDTLOCRSDRCWDWO;;;BA)(A;;CCDCLCSWRPWPDTLCRSDRCWDWO;;;SO)(A;;CCLCSWRPWPDTLOCRRC;;;SY)S:(AU;FA;CCDCLCSWRPWPDTLOCRSDRCWDWO;;WD)
sc.exe sdset trustedinstaller D:(A;;CCLCSWLOCRRC;;;AU)(A;;CCDCLCSWRPWPDTLOCRSDRCWDWO;;;BA)(A;;CCDCLCSWRPWPDTLCRSDRCWDWO;;;SO)(A;;CCLCSWRPWPDTLOCRRC;;;SY)S:(AU;FA;CCDCLCSWRPWPDTLOCRSDRCWDWO;;WD)
call :print Reregister the BITS files and the Windows Update files.
regsvr32.exe /s atl.dll
regsvr32.exe /s urlmon.dll
regsvr32.exe /s mshtml.dll
regsvr32.exe /s shdocvw.dll
regsvr32.exe /s browseui.dll
regsvr32.exe /s jscript.dll
regsvr32.exe /s vbscript.dll
regsvr32.exe /s scrrun.dll
regsvr32.exe /s msxml.dll
regsvr32.exe /s msxml3.dll
regsvr32.exe /s msxml6.dll
regsvr32.exe /s actxprxy.dll
regsvr32.exe /s softpub.dll
regsvr32.exe /s wintrust.dll
regsvr32.exe /s dssenh.dll
regsvr32.exe /s rsaenh.dll
regsvr32.exe /s gpkcsp.dll
regsvr32.exe /s sccbase.dll
regsvr32.exe /s slbcsp.dll
regsvr32.exe /s cryptdlg.dll
regsvr32.exe /s oleaut32.dll
regsvr32.exe /s ole32.dll
regsvr32.exe /s shell32.dll
regsvr32.exe /s initpki.dll
regsvr32.exe /s wuapi.dll
regsvr32.exe /s wuaueng.dll
regsvr32.exe /s wuaueng1.dll
regsvr32.exe /s wucltui.dll
regsvr32.exe /s wups.dll
regsvr32.exe /s wups2.dll
regsvr32.exe /s wuweb.dll
regsvr32.exe /s qmgr.dll
regsvr32.exe /s qmgrprxy.dll
regsvr32.exe /s wucltux.dll
regsvr32.exe /s muweb.dll
regsvr32.exe /s wuwebv.dll
call :print Resetting Winsock.
netsh winsock reset
call :print Resetting WinHTTP Proxy.
proxycfg.exe -d
) else (
netsh winhttp reset proxy
)
call :print Resetting the services as automatics.
sc.exe config wuauserv start= auto
sc.exe config bits start= delayed-auto
sc.exe config cryptsvc start= auto
sc.exe config TrustedInstaller start= demand
sc.exe config DcomLaunch start= auto
call :print Starting the Windows Update services.
net start bits
net start wuauserv
net start appidsvc
net start cryptsvc
net start DcomLaunch
call :print The operation completed successfully.
pause>nul
goto :eof
:: /*************************************************************************************/ - Нажмите на пункт «Файл» в строке меню окна Блокнота и выберите «Сохранить как…».
- Выберите удобное для вас расположение, например, Рабочий стол или системный раздел диска.
- Задайте файлу имя «Сброс_компонентов_Центра_обновления» и расширение «.bat».
Заметка: активируйте параметр «Расширения имен файлов» в настройках Проводника Windows 10 (вкладка «Вид»).
- Кликните кнопку «Сохранить», когда все будет готово.
- Нажмите на созданный файл «Сброс_компонентов_Центра_обновления.bat» ПКМ и выберите «Запуск от имени администратора».
- Подождите завершения процесса сброса компонентов Центра обновления, после чего ваш ПК будет перезагружен автоматически.
Ручной сброс компонентов Центра обновления
Если по какой-то причине скрипт выше не сработал на вашем компьютере, то вы всегда можете сбросить компоненты ЦО своими силами. Данный процесс может занять у вас какое-то время, а поэтому убедитесь, что вам никто и ничто не будет мешать.
- Нажмите ПКМ на Пуск и выберите «Командная строка (администратор)».
- Поочередно вводите все нижеуказанные команды, нажимая ENTER после каждой из них:
- net stop bits
- net stop wuauserv
- net stop cryptsvc
- Del «%ALLUSERSPROFILE%\Application Data\Microsoft\Network\Downloader\qmgr*.dat»
- Ren %Systemroot%\SoftwareDistribution\DataStore DataStore.bak
- Ren %Systemroot%\SoftwareDistribution\Download Download.bak
- Ren %Systemroot%\System32\catroot2 catroot2.bak
- sc.exe sdset bits D:(A;;CCLCSWRPWPDTLOCRRC;;;SY)(A;;CCDCLCSWRPWPDTLOCRSDRCWDWO;;;BA)(A;;CCLCSWLOCRRC;;;AU)(A;;CCLCSWRPWPDTLOCRRC;;;PU)
- sc.exe sdset wuauserv D:(A;;CCLCSWRPWPDTLOCRRC;;;SY)(A;;CCDCLCSWRPWPDTLOCRSDRCWDWO;;;BA)(A;;CCLCSWLOCRRC;;;AU)(A;;CCLCSWRPWPDTLOCRRC;;;PU)
- cd /d %windir%\system32
- regsvr32.exe atl.dll
- regsvr32.exe urlmon.dll
- regsvr32.exe mshtml.dll
- regsvr32.exe shdocvw.dll
- regsvr32.exe browseui.dll
- regsvr32.exe jscript.dll
- regsvr32.exe vbscript.dll
- regsvr32.exe scrrun.dll
- regsvr32.exe msxml.dll
- regsvr32.exe msxml3.dll
- regsvr32.exe msxml6.dll
- regsvr32.exe actxprxy.dll
- regsvr32.exe softpub.dll
- regsvr32.exe wintrust.dll
- regsvr32.exe dssenh.dll
- regsvr32.exe rsaenh.dll
- regsvr32.exe gpkcsp.dll
- regsvr32.exe sccbase.dll
- regsvr32.exe slbcsp.dll
- regsvr32.exe cryptdlg.dll
- regsvr32.exe oleaut32.dll
- regsvr32.exe ole32.dll
- regsvr32.exe shell32.dll
- regsvr32.exe initpki.dll
- regsvr32.exe wuapi.dll
- regsvr32.exe wuaueng.dll
- regsvr32.exe wuaueng1.dll
- regsvr32.exe wucltui.dll
- regsvr32.exe wups.dll
- regsvr32.exe wups2.dll
- regsvr32.exe wuweb.dll
- regsvr32.exe qmgr.dll
- regsvr32.exe qmgrprxy.dll
- regsvr32.exe wucltux.dll
- regsvr32.exe muweb.dll
- regsvr32.exe wuwebv.dll
- netsh winsock reset
- net start bits
- net start wuauserv
- net start cryptsvc
- Закончив вводить команды, перезагрузите ПК.
Войдя в систему, попробуйте обновить свою Windows 10. Если у вас снова возникли проблемы, то откройте средство устранения неполадок и проверьте наличие ошибки 0x803c0103.
Метод №5 Возвращение ПК в исходное состояние (+ альтернативные решения)
Бывает и такое, что все вышеуказанные методы окажутся бесполезными — что же делать в таком случае? По правде говоря, у вас осталось не то что бы много вариантов. Во-первых, вы можете собственноручно установить проблемное обновление, воспользовавшись услугами каталога Центра обновления Майкрософт. Во-вторых, вы можете пропустить установку определенного обновления в Центре обновления.
Ну и в третьих, вы можете запустить возвращение ПК к исходному состоянию, что, по сути, является своеобразной переустановкой Windows 10 без потери личных данных (тут по выбору). Итак, вот что вам нужно сделать:
- Нажмите на клавиатуре комбинацию Win+I, чтобы открыть окошко «Параметры».
- Перейдите в раздел «Обновление и безопасность», потом — в подраздел «Восстановление».
- Кликните на кнопку «Начать» под пунктом «Вернуть компьютер в исходное состояние».
- Выберите пункт «Сохранить мои файлы» и следуйте дальнейшим инструкциям на экране.
Внимание: ваш ПК будет автоматически перезагружен в процессе восстановления. Как только войдете в систему, проверьте, были ли решены проблемы с Центром обновления, а также исчезла ли ошибка 0x803c0103 из средства устранения неполадок.
18.12.2017
Просмотров: 16454
При обновлении операционной системы или при попытке установить новое обновление на Windows 10 может возникнуть ошибка с кодом 0x803c0103 или аналогичная с кодом 0x800b0109. Свидетельствует она о том, что некоторое оборудование и его программное обеспечение несовместимо с новыми компонентами Windows 10.
Читайте также: Ошибка 0x80300024 при установке Windows 10
Способы исправления ошибки 0x803c0103 на Windows 10
На официальном форуме Майкрософт при возникновении ошибки с кодом 0x803c0103 рекомендуют в первую очередь перезапустить ПК и повторить попытку через некоторое время с выключенным антивирусом. Во многих случаях это помогает исправить неполадку.
Мы же предлагаем следующие варианты решения ошибки с кодом 0x803c0103 на Windows 10:
- Жмём «Пуск», выбираем «Панель управления». Находим раздел «Устранения неполадок».
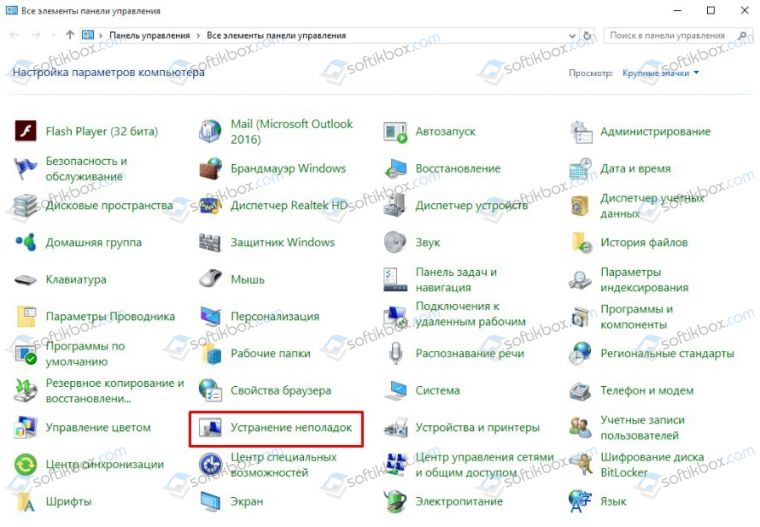
- Из списка выбираем «Средство устранения неполадок Центра обновления Windows 10».
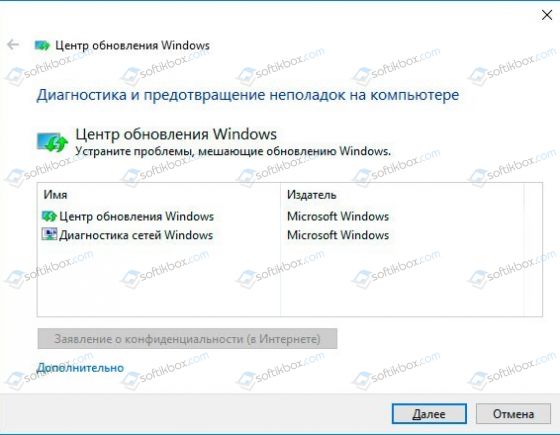
- Ожидаем, пока утилита проверит систему, обнаружит и исправит неполадки.
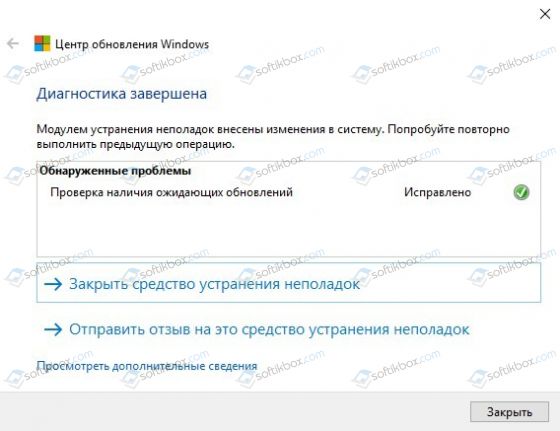
- После исправлений нужно перезагрузить компьютер.
Также, многим пользователем Windows 10 при возникновении ошибки с кодом 0x803c0103 помогла утилита DISM.exe. Для её запуска необходимо выполнить следующее:
- Запускаем командную строку с правами Администратора.
- Вводим команду «dism.exe /online /cleanup-image /restorehealth».
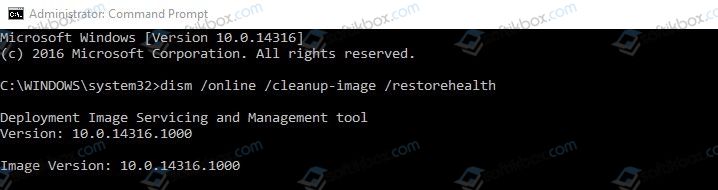
- После проверки перезагружаем систему.
В качестве диагностических методов стоит запустить з правами Администратора утилиту sfc. Для этого в командной строке вводим «sfc /scannow».
В случае, если это не помогло решить проблемы, нужно выполнить чистую загрузку Windows 10 и, поочередно включая службы и приложения, определить виновника неполадки. Часто, установленные программы могут конфликтовать с новыми компонентами операционной системы.
На чтение 5 мин. Просмотров 2.3k. Опубликовано
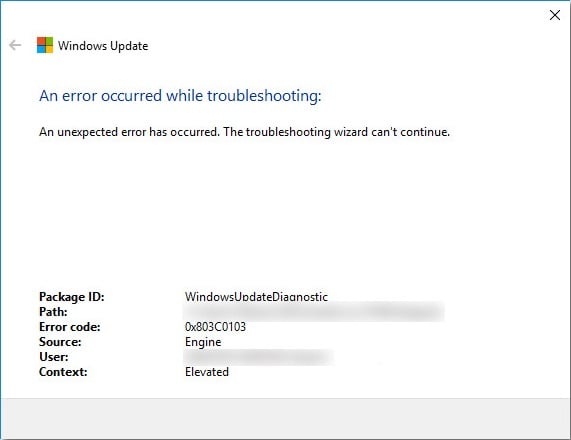
Обновления Windows 10 иногда весьма проблематичны. Есть десятки различных ошибок, связанных с обновлениями, преследующих пользователей с первого дня. А поскольку обновления в Windows 10 являются обязательными, скорее всего, рано или поздно вы столкнетесь с одной из ошибок. После возникновения ошибки большинство пользователей обращаются за встроенным средством устранения неполадок. Тем не менее, кажется, что есть ошибка с самим средством устранения неполадок обновления, и это происходит с помощью кода 0x803c0103 .
Если эта или аналогичные ошибки вас беспокоят при запуске средства устранения неполадок обновления, попробуйте выполнить приведенные ниже шаги, чтобы устранить их.
Содержание
- Как исправить ошибку обновления 0x803c0103
- Решение 1 – Запустите SFC и DISM
- Решение 2 – Сброс службы обновлений
- Решение 3. Используйте загружаемое средство устранения неполадок
- Решение 4 – Сбросить этот ПК
Как исправить ошибку обновления 0x803c0103
- Запустите SFC и DISM
- Сбросить службы обновления
- Используйте загружаемое средство устранения неполадок
- Сбросить этот ПК
Решение 1 – Запустите SFC и DISM
Давайте начнем с обычного решения, когда какой-либо системный инструмент не может предоставить. Если некоторые из основных файлов Windows повреждены, есть вероятность, что некоторые встроенные функции будут повреждены. Это не редкость для Центра обновления Windows для Windows 10, который имеет тенденцию ломать ПК влево и вправо. Пользователи, которые столкнулись с ошибкой обновления, а затем попытались запустить средство устранения неполадок, попробовали это из первых рук.
Когда что-то подобное происходит, нам нужно проверить систему на наличие коррупции. Принесло ли это вам последнее неоптимизированное обновление или что-то еще под рукой – не имеет значения. Важно то, что у вас есть все необходимые инструменты, чтобы исправить это прямо здесь. Первым инструментом является средство проверки системных файлов, которое сканирует и устраняет повреждения системы. Другой переводит ту же задачу на другой уровень и называется «Обслуживание образов развертывания и управление ими» или «DISM». Они работают лучше всего в сочетании.
Вот как запустить SFC и DISM на вашем ПК:
- В строке поиска Windows введите cmd. Щелкните правой кнопкой мыши по командной строке и запустите ее с правами администратора.
-
В командной строке введите sfc/scannow и нажмите Enter.

-
После этого введите следующую команду и нажмите Enter после каждого:
- DISM/онлайн/Cleanup-Image/ScanHealth
-
DISM/Online/Cleanup-Image/RestoreHealth
- Когда процедура закончится, перезагрузите компьютер.


- ЧИТАЙТЕ ТАКЖЕ: Исправлено: Sfc/scannow останавливается в Windows 10
Решение 2 – Сброс службы обновлений
Если мы избегаем предположения, что обновление само по себе плохо администрируется, у нас остаются некоторые внутренние проблемы, которые вы должны проверить. А именно, возможно, файлы обновлений, хранящиеся на вашем ПК, повреждены или связанные службы не будут запускаться при необходимости.
Если это так, мы предлагаем сброс указанных служб и повторную загрузку файлов обновлений, хранящихся в папке SoftwareDistribution. Вот что вам нужно сделать:
- В строке поиска Windows введите cmd .
- Нажмите правой кнопкой мыши Командную строку и запустите ее от имени администратора.
-
В командной строке введите следующие команды и нажмите Enter после каждого:
-
- net stop wuauserv
- чистые стоповые биты
- net stop cryptsvc
- ren C: WindowsSoftwareDistribution SoftwareDistribution.old
- ren C: WindowsSystem32catroot2 Catroot2.old
- net start wuauserv
- чистые стартовые биты
- net start cryptsvc
-
- После этого проверьте обновления еще раз.
- ЧИТАЙТЕ ТАКЖЕ: ИСПРАВЛЕНИЕ: при загрузке средства устранения неполадок произошла ошибка
Решение 3. Используйте загружаемое средство устранения неполадок
Если встроенный модуль устранения неполадок обновления не работает, мы предлагаем использовать загружаемую альтернативу, предоставленную Microsoft. Этот инструмент, теоретически, должен полностью заполнить встроенный модуль устранения неполадок обновления. Он не требует установки, и вы можете запустить его, как только он будет загружен. Следует выполнить поиск ошибок, связанных с обновлением, и исправить их соответствующим образом.
Если вы не уверены, где его взять и как его запустить, вот полное пошаговое объяснение:
- Загрузите средство устранения неполадок Центра обновления Windows здесь.
-
Щелкните правой кнопкой мыши на инструменте и запустите его от имени администратора.
- Следуйте инструкциям и перезагрузите компьютер после применения исправления.

Решение 4 – Сбросить этот ПК
Наконец, если ни один из предыдущих шагов не помог вам устранить ошибку, мы предлагаем сбросить ваш ПК до заводских значений.Я сделал это сам несколько раз после инсайдерского обновления, которое полностью разрушило мою систему или сделало некоторые из ключевых функций недоступными.
После сброса все работало просто отлично. И, самое главное, вы можете сохранить свои файлы и настройки. Ошибки, подобные 0x803c0103, обычно влияют на пользователей, которые обновились до Windows 7/8.1. Таким образом, чистая переустановка является еще одним вариантом, который вы могли бы рассмотреть.
- ЧИТАЙТЕ ТАКЖЕ: полное исправление: зависание заводских настроек Windows 10
Вот как можно восстановить заводские настройки вашего компьютера:
- Нажмите клавишу Windows + I , чтобы вызвать приложение Настройки .
- Откройте раздел Обновление и безопасность .
- Выберите Восстановление на левой панели.
-
В разделе « Сбросить этот компьютер » нажмите «Начать».
- Сохраните ваши файлы и начните процесс восстановления.

С учетом сказанного мы можем завершить эту статью. Надеемся, что один из перечисленных шагов помог вам устранить ошибку устранения неполадок 0x803c0103. Если у вас есть какие-либо вопросы или предложения, не стесняйтесь сообщить нам в разделе комментариев ниже.
by Aleksandar Ognjanovic
Aleksandar’s main passion is technology. With a solid writing background, he is determined to bring the bleeding edge to the common user. With a keen eye, he always… read more
Updated on
- Windows 10 Updates are occasionally quite troublesome.
- Here’s how to reset your PC to factory settings: Press Windows key + I to summon the Settings app.
- If completely removing it from your PC is required, be sure to use the best uninstaller software of the moment.

Windows 10 Updates are occasionally quite troublesome. There are dozens of different update-related errors plaguing users from day one.
And, since updates are mandatory in Windows 10, chances are you’ll run into one of the errors sooner or later. After the error occurs, most users will reach for the built-in troubleshooter.
However, there seems to be an error with the Update Troubleshooter itself and it goes by the 0x803c0103 code.
If this or similar errors bother you while running the Update Troubleshooter, make sure to try the steps below in order to resolve it.
How can I fix update error 0x803c0103?
1. Run SFC and DISM
Let’s start with the usual solution whenever any system tool fails to deliver. If some of the essential Windows files are corrupted, chances are that certain built-in features will get broken.
This isn’t uncommon for Windows Update for Windows 10, which tends to break PCs left and right. Users who experienced the update error and then tried running the troubleshooter, have tasted this first hand.
When something like this happens, we need to check the system for corruption. Whether the last unoptimized update brought this upon you, or it’s something else at hand – it doesn’t matter.
What matters is that you have all the tools you need to fix it right there. The first tool is the System File Checker, which scans and resolves system corruption.
How we test, review and rate?
We have worked for the past 6 months on building a new review system on how we produce content. Using it, we have subsequently redone most of our articles to provide actual hands-on expertise on the guides we made.
For more details you can read how we test, review, and rate at WindowsReport.
The other one takes the same task to another level and it’s called Deployment Image Servicing and Management or DISM. They work best when combined.
Here’s how to run SFC and DISM on your PC:
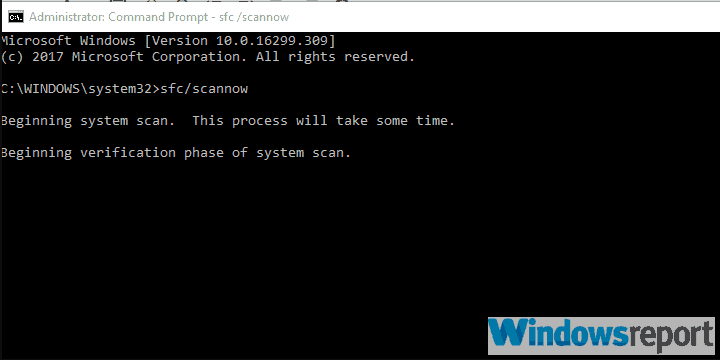
- In the Windows Search bar, type cmd. Right-click click on Command Prompt and run it as admin.
- In the command-line, type sfc/scannow and press Enter.

- After its done, type the following command and press Enter after each:
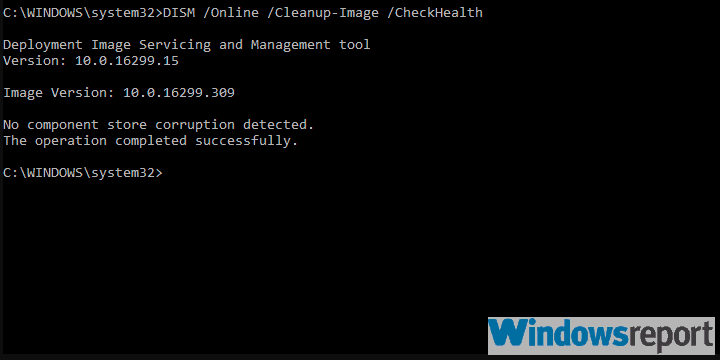
- DISM /online /Cleanup-Image / ScanHealth
- DISM /Online /Cleanup-Image /RestoreHealth
- When the procedure ends, restart your PC.
Alternatively, you can rely on third-party tools that can restore your PC from crashes or errors like the one here.
Plus, you have the benefits of optimizing your PC processes and repairing the various system or programs malfunctions. Thus resolve update errors immediately with software like Fortect.
⇒ Get Fortect
2. Reset Update services
If we avoid the premise that the update in itself is badly administered, we are left with some internal issues you should check up.
Namely, maybe the update files stored on your PC are corrupted or the associated services won’t start when needed.
If that’s the case, we suggest resetting the said services and redownloading the update files stored in the SoftwareDistribution folder. Here’s what you need to do:
- In the Windows Search bar, type cmd.
- Right-click the Command Prompt and run it as an administrator.
- In the command-line, type the following commands and press Enter after each:
- net stop wuauserv
- net stop bits
- net stop cryptsvc
- ren C:WindowsSoftwareDistribution SoftwareDistribution.old
- ren C:WindowsSystem32catroot2 Catroot2.old
- net start wuauserv
- net start bits
- net start cryptsvc
After that, check for updates again.
3. Use a downloadable troubleshooter
If the built-in Update Troubleshooter won’t work, we suggest using a downloadable alternative provided by Microsoft. This tool should, in theory, completely fill in for the built-in Update Troubleshooter.
It doesn’t require installation and you can run it as soon as it’s downloaded. It should scan for update-related errors and fix them accordingly.
If you’re not sure where to get it and how to run it, here’s the whole step-by-step explanation:
- Download Windows Update Troubleshooter from here.
- Right-click on the tool and run it as administrator.

- Follow the instructions and restart your PC after the fix is applied.
4. Reset this PC
Finally, if none of the previous steps helped you resolve the error at hand, we suggest resetting your PC to factory values.
I’ve done it myself multiple times after an insider update that completely ruined my system or made some of the key features inaccessible.
After the reset, everything worked just fine. And, most importantly, you get to keep your files and settings. Errors like the 0x803c0103 usually affect users who upgraded over Windows 7/8.1.
So a clean reinstallation is another option you might consider.
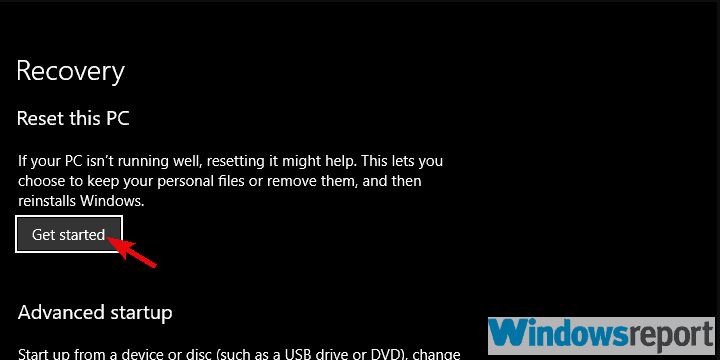
Here’s how to reset your PC to factory settings:
- Press Windows key + I to summon the Settings app.
- Open the Update & Security section.
- Select Recovery from the left pane.
- Under Reset this PC, click Get started.
- Keep your files and start the restoration process.
With that said, we can conclude this article. Hopefully, one of the enlisted steps helped you address the troubleshooter error 0x803c0103.
In case you have any questions or suggestions, feel free to tell us in the comments section below.
If completely removing it from your PC is required, be sure to use the best uninstaller software of the moment.
- How do I run Windows Troubleshooter?
To do so, follow this path Start > Settings > Update & Security > Troubleshoot. If you can’t open the Setting app, take a look at this article to solve opening Settings issues.
- Is Windows 10 repair tool safe?
Microsoft developed a troubleshooter program and a repair tool specifically to help you with all sorts of problems. The Windows 10 repair tool is safe, so don’t hesitate to try it out.
![]()
When running Windows update troubleshooter, you may encounter the error code 0x8030c0103. Then what may cause the Windows 10 update error code 0x803c0103? What are the 0x803c0103 fixes? This post from MiniTool will show you the solutions.
What Causes the Windows 10 Troubleshooter Error 0x803c0103?
Some computer users complain that they failed to update Windows 10 and they receive an error while troubleshooting. The error always comes with the code 0x803c0103. Here is a real example.
Cannot receive updates – Microsoft or others. Followed advice and tried to use troubleshooter for updates. It stopped with the following error code 0x803C0103. Help! From answers.microsoft.com
In general, when coming across the error code 0x803c0103, it means that the Windows 10 update is failed. In addition, the Windows 10 update error code 0x803c0103 may be caused by the damaged or misconfigured Windows system files which could bring a risk to your computer.
So, in the following section, we will show you how to fix this Windows update troubleshooter 0x803c0103 error so as to update Windows to the latest version successfully.
6 Ways to Fix the Windows 10 Troubleshooter Error Code 0x803c0103
Solution 1. Run SFC and DISM Tools
As we have mentioned in the above part, the corrupted system files will lead to Windows update failure such as encountering the Windows update troubleshooter 0x803c0103 error. So, in order to fix this Windows update error, scan and fix the corrupted system files first.
Now, here is the tutorial.
Step 1: Type the Command Prompt in the search box of Windows and choose the best-matched one. Right-click it and choose Run as administrator to continue.
Step 2: In the pop-up window, type the command sfc /scannow and hit Enter to continue.
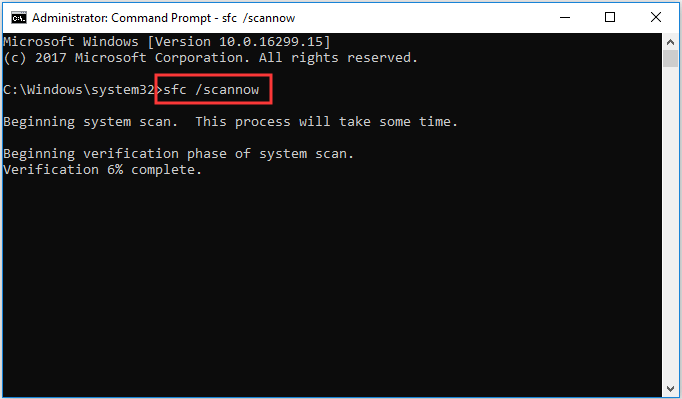
Step 3: Please do not close the command line window until you see the message verification 100% completed.
After that, reboot your computer and run Windows update again and check whether the Windows 10 update error code 0x803c0103 is solved.
If the sfc scannow command does not work, you can run the DISM tool to scan and fix the corrupted files again.
Step 4: Then type the following commands and hit Enter to continue.
DISM /online /Cleanup-Image / ScanHealth
DISM /Online /Cleanup-Image /RestoreHealth
When it is finished, reboot your computer and run Windows update again to check whether the 0x803c0103 Windows 10 is solved.
If this solution is not effective, you can try other solutions.
Solution 2. Download Another Windows Update Troubleshooter
The error code 0x803c0103 occurs when you are running Windows update troubleshooter. So, in order to fix it, you can choose to download another Windows update troubleshooter from the Microsoft.
Now, we will show you the tutorial.
Step 1: Click here to download the Windows update troubleshooter. You can choose to download anyone according to your current Windows version.
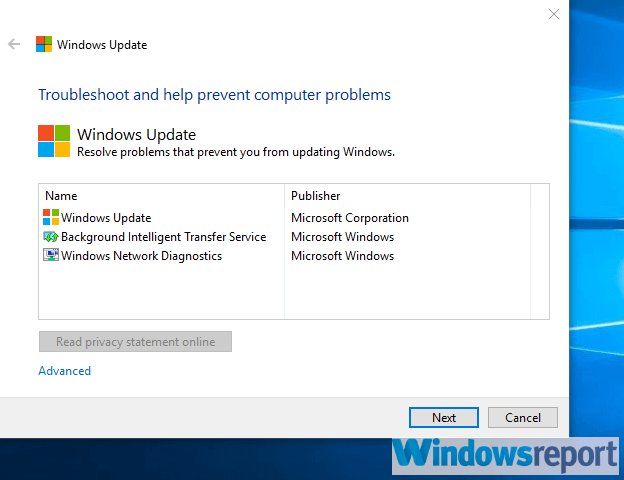
Step 2: Then run it on your computer. Select Windows Update and click Next to continue.
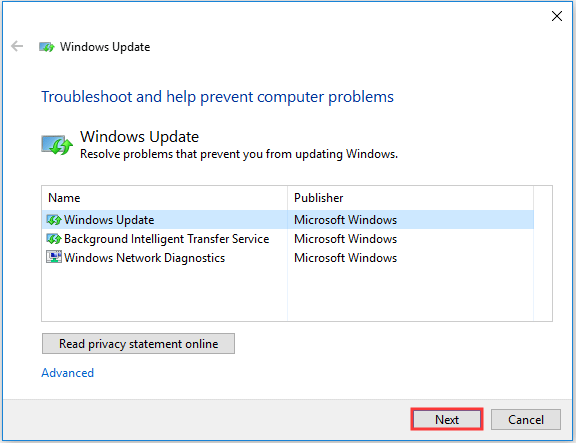
Step 3: Next, Windows Update troubleshooter will begin to detect the problem on your computer. And then click Try troubleshooting as an administrator to continue.
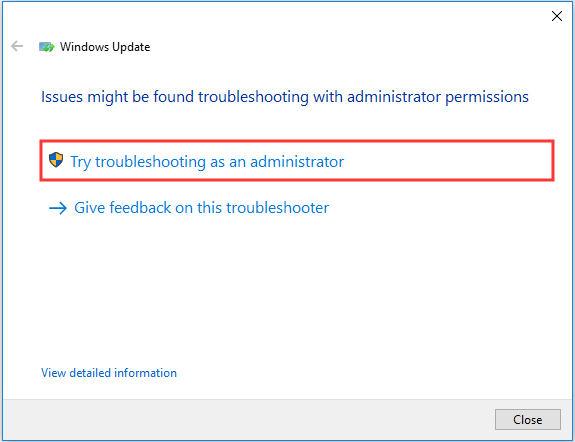
Next, you can follow the instructions to go on. When it is finished, you can check whether the Windows update troubleshooter error 0x803c0103 still occurs.
If this solution doesn’t take effect, try the following solutions.
Solution 3. Scan the Virus on Your Computer
The Windows update error 0x803c0103 may also be caused by the virus. On the other hand, the virus on your computer may lead to damaged system files. Hence, in order to fix the Windows 10 update error code 0x803c0103, you can check the virus on your computer.
To check the virus on your computer, you can use the Windows built-in tool – Windows Defender or the third-party antivirus software, such as the Avast.
In this post, we will show you how to use the Windows Defender to scan and remove the virus on your computer.
Now, here is the tutorial.
Step 1: Press Windows key and I key together to open Settings. After entering its main interface, choose Update & Security to continue.
Step 2: Then click Windows Defender tab on the left panel and choose Open Windows Defender Security Center to continue.

Step 3: Then choose Virus & threat protection to continue.
Step 4: In the pop-up window, click Quick scan to continue.
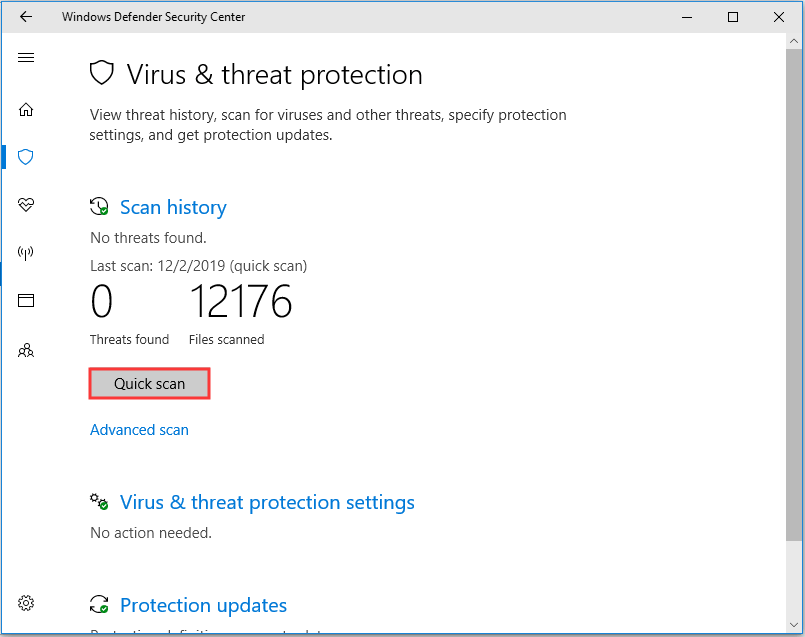
After the scanning process is finished, reboot your computer and run Windows update again and check whether the error code 0x803c0103 is solved.
Solution 4. Reset Windows Update Component
If the above solutions cannot fix the error 0x803c0103 Windows 10, you can try resetting Windows update components. Resetting Windows update components may solve some internal problems.
Now, here is the tutorial.
Step 1: Type Command Prompt in the search box of Windows and choose the best-matched one. Then right-click it to choose Run as administrator to continue.
Step 2: In the pop-up window, type the following commands and hit Enter to continue after each command.
- net stop wuauserv
- net stop bits
- net stop cryptsvc
- ren C:WindowsSoftwareDistribution SoftwareDistribution.old
- ren C:WindowsSystem32catroot2 Catroot2.old
- net start wuauserv
- net start bits
- net start cryptsvc
When the process is finished, reboot your computer and run Windows update again to check whether the error code 0x803c0103 is solved.
If this solution doesn’t take effect, you can go on the following methods.
Solution 5. Perform a System Restore
This is another available solution for you to fix the Windows update troubleshooter 0x803c0103 error. In this solution, you can perform a system restore. But the precondition to perform a system restore is that you have created a restore point before.
So, if there is no previously created restore point on your computer, you need to try other solutions.
Now, here is the tutorial.
Step 1: Type create a restore point in the search box of Windows and choose the best-matched one. Then click it to enter its main interface.
Step 2: In the System Protection tab, click System Restore… to continue.
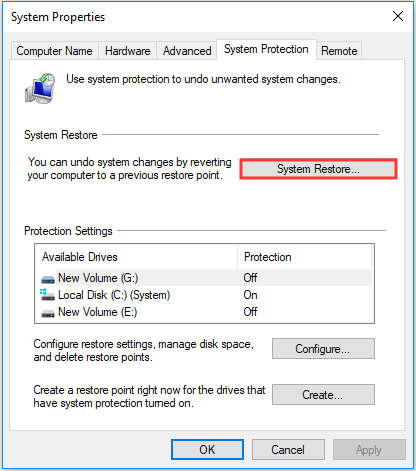
Step 3: Then click Next to continue.
Step 4: Select one restore point and choose Next to continue. If there are too many restore points, you can choose it according to the creating time.

Step 5: At last, confirm the restore settings and click Finish to continue. Please note that do not interrupt the restore process until it is finished. Otherwise, the restore process will fail.
When the system restore process is finished, reboot your computer and check whether the error code 0x803c0103 is solved.
Apart from the system restore points, if you can also restore your computer to a previous state with the system image created before.
Solution 6. Reset the Computer
If all the above solutions do not work, resetting the computer is a choice. In general, resetting the computer is able to solve almost system problems. So, if none of the solutions can fix the error code 0x803c0103, you can choose to reset the computer. However, before going ahead, please back up all your important files so as to avoid data loss.
Now, we will show you how to reset your computer.
Step 1: Press Windows key and I key together to open Settings. Then choose Update & Security to continue.
Step 2: In the pop-up window, click Recovery, and choose Restart now under Advanced startup to continue.

Step 3: Then you will enter the Windows Recovery Environment. Click Troubleshoot > Reset this PC to continue.
Step 4: Next, you can choose to keep your files or remove everything on PC. It is recommended to choose to Keep my files.
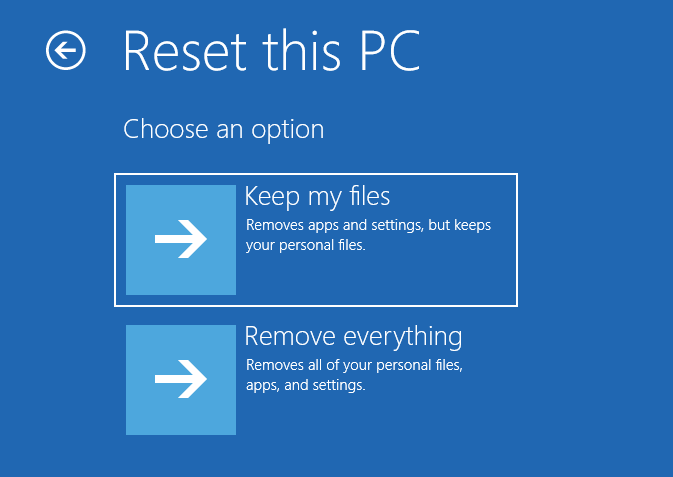
After that, follow the instruction to continue. When the resetting is finished, the error code 0x803c0103 will be removed from your computer.
Besides resetting the PC, you can also choose to reinstall the operating system.
After resolving the Windows 10 update error 0x803c0103, is it finished? Of course not, you can keep on your reading to find more Windows tips.
I encountered the error code 0x803c0103 and asked for help on the Internet. Thanks to this post. I successfully solved this error and I’d like to share it with more friends. Click to Tweet
What to Do After Solving Error Code 0x803c0103?
After fixing the error code 0x803c0103, what should you do? It is recommended to create a system image. Meanwhile, you may ask why you should create a system image. As a matter of fact, there are several advantages to do that.
- First, you can restore your computer to a normal state when encountering problems such as Windows 10 update error code 0x803c0103 with the created system image. Restore your computer to a normal state directly can save a lot of time.
- Second, creating a system image is an effective way to safeguard your computer and files.
Hence, with so many advantages, it is strongly suggested that you create a system image now. To create a system image, you can use the professional backup software – MiniTool ShadowMaker.
MiniTool ShadowMaker enables you to back up files, folders, disks, partitions, and the operating system. It also enables you to clone OS from HDD to SSD.
So, download MiniTool ShadowMaker Trial from the following button or choose to purchase an advanced edition.
MiniTool ShadowMaker TrialClick to Download100%Clean & Safe
Now, we will show you how to create a system image with the professional backup software.
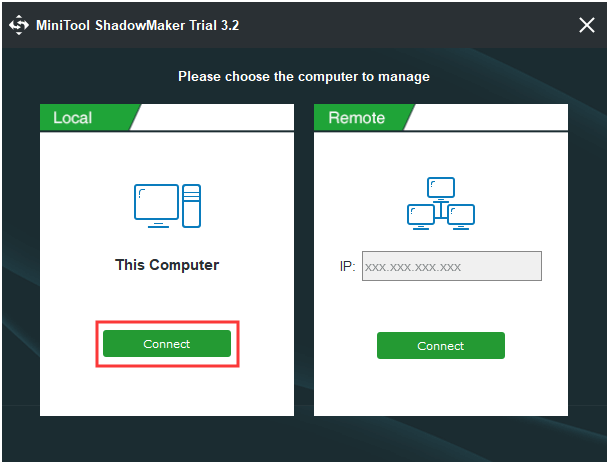
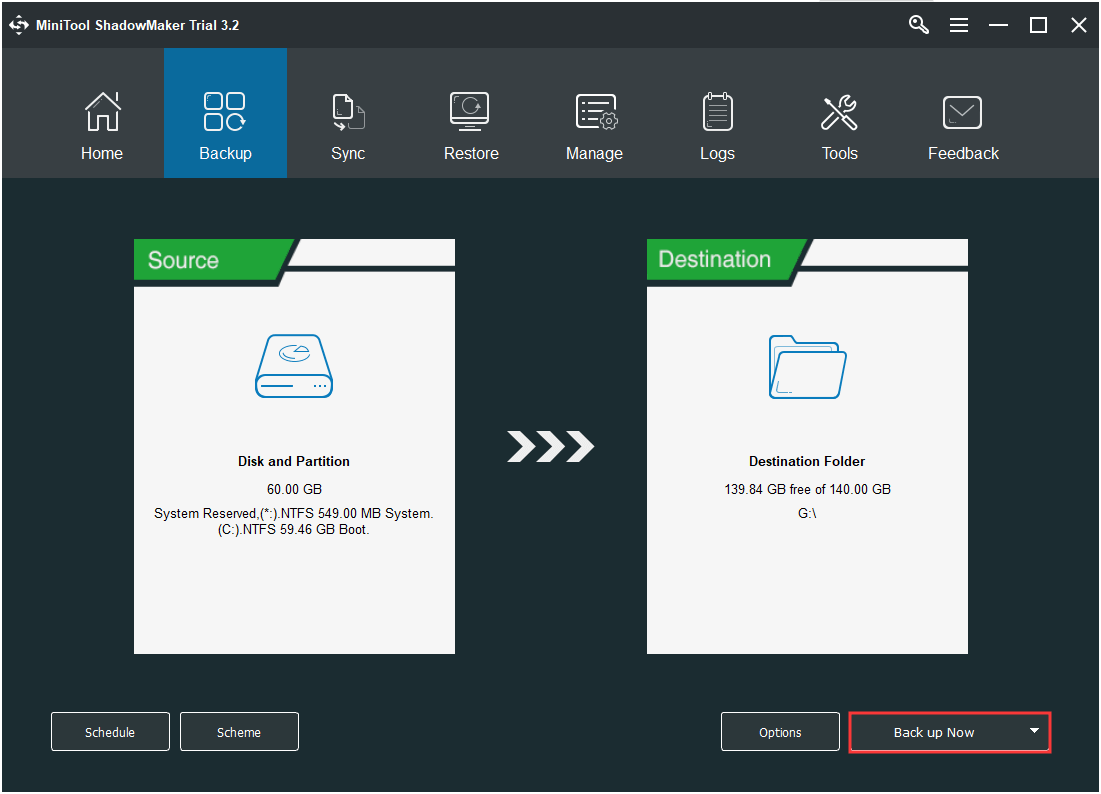
Step 1: Download MiniTool ShadowMaker, install and launch it. Click Keep Trial, and click Connect in This Computer to enter its main interface.
Step 2: After entering its main interface, go to the Backup page. MiniTool ShadowMaker is designed to back up the operating system, so it chooses the OS as the backup source by default. If you want to change backup source, click Source module to continue.
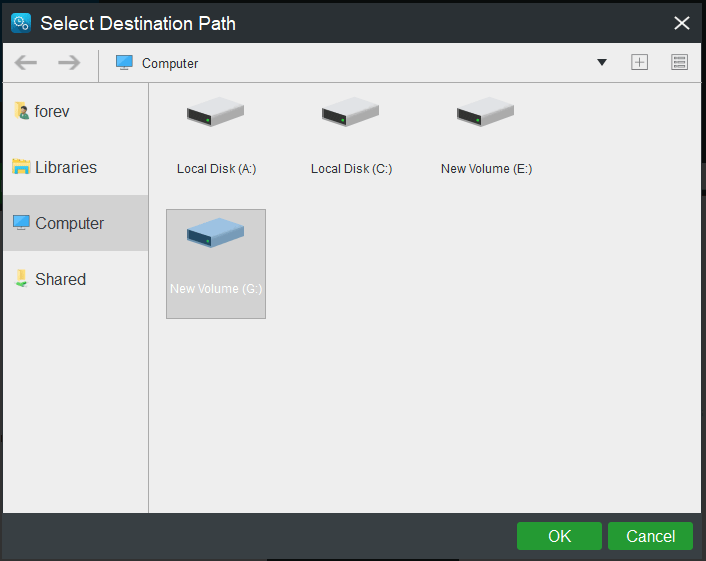
Step 3: Click Destination module to choose the backup destination. Here are four available paths including Administrator, Libraries, Hard drives and the Shared folder. It is recommended to choose the external hard drive as the backup source.
Step 4: After selecting the backup source and destination, you can perform the backup task immediately. Click Back up Now to continue.
When the backup process is finished, the system image is successfully created. When you encounter the Windows update troubleshooter 0x803c0103 error again or some other system errors, use the system image to restore your computer to a normal state directly.
So, creating a system image would be a great and effective way to safeguard your computer and files.
MiniTool ShadowMaker TrialClick to Download100%Clean & Safe
Bottom Line
In conclusion, this post has introduced what the error code 0x803c0103 is and how to fix this Windows update error with 6 solutions. If you encountered the same error, try these solutions.
If you have any better solution to fix this Windows 10 Windows update diagnostic error code 0x803c0103, you can share it in the comment zone.
If you have any problem with MiniTool ShadowMaker, please feel free to contact us via the email [email protected] and we will apply to you as soon as possible.