Проблемы с установкой операционной системы случаются не только у новичков, но бывают и у профессионалов. Например, при установке Windows 10 может появится коварная ошибка 0x80300001, сообщающая о том, что установщик не может выполнить действия так как компьютер не поддерживает необходимый режим загрузки. Как исправить эту ошибку? Как правило, решение заключается в необходимости перенастройки системы BIOS UEFI, после чего установка идёт «как по маслу».
Всё дело в используемых разметках. Например, Windows 10 x32 можно установить как на обычный MBR, так и на GPT, а вот 64-битную версию системы можно поставить только на GPT. А для корректной работы этой разметки необходимо правильно настроить BIOS. В противном случае как раз при установке и возникает ошибка 0x80300001.
Порядок действий:
1. Сначала Вам необходимо зайти в BIOS UEFI при запуске компьютера.
2. Далее находим указанные ниже настройки и выставляем им вот такие параметры:
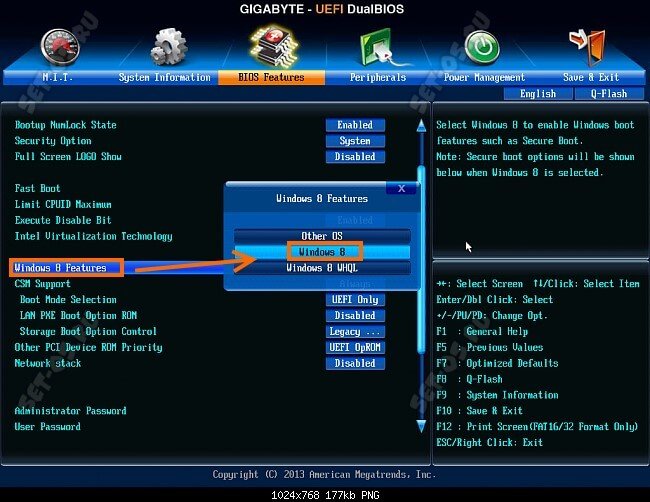
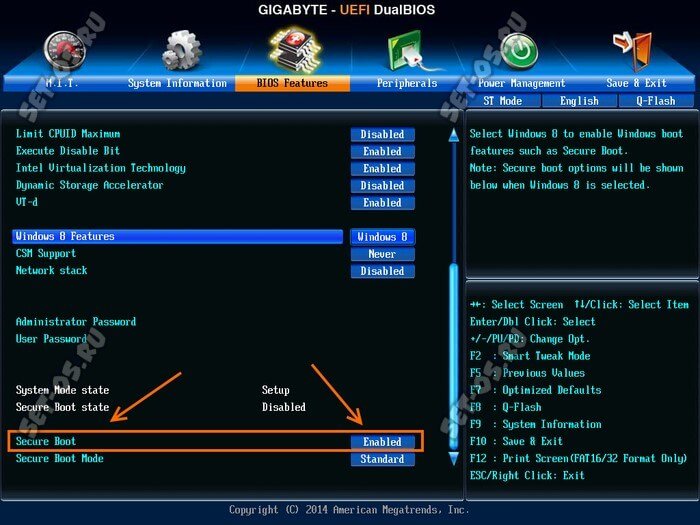
— Включение режима совместимости. На самых новых материнских платах со свежим ПО он называется Windows 10 Features и в нём надо выбрать вариант Windows 10.
На более старых версиях BIOS параметр называется Windows 8 Features и соответственно надо ставить значение Windows 8.
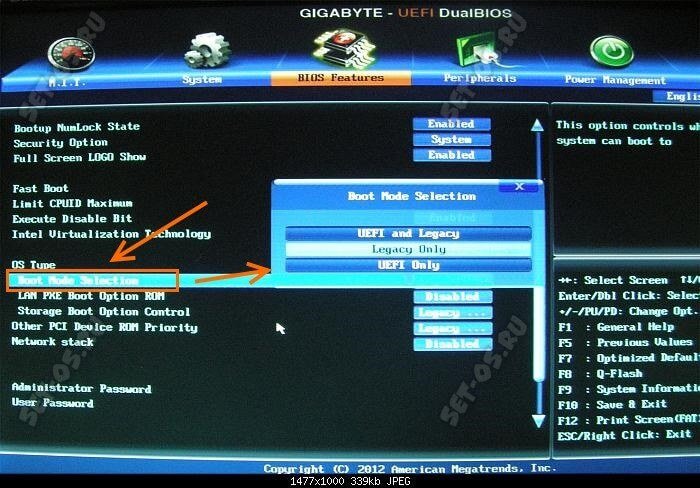
— Изменение режима загрузки. Находим и выставляем вот такие параметры:
Storage Boot Option Control >> UEFI only
Boot Mode Selection >> UEFI Only
Этим Вы указываете оборудованию, что необходимо использовать только режим UEFI.
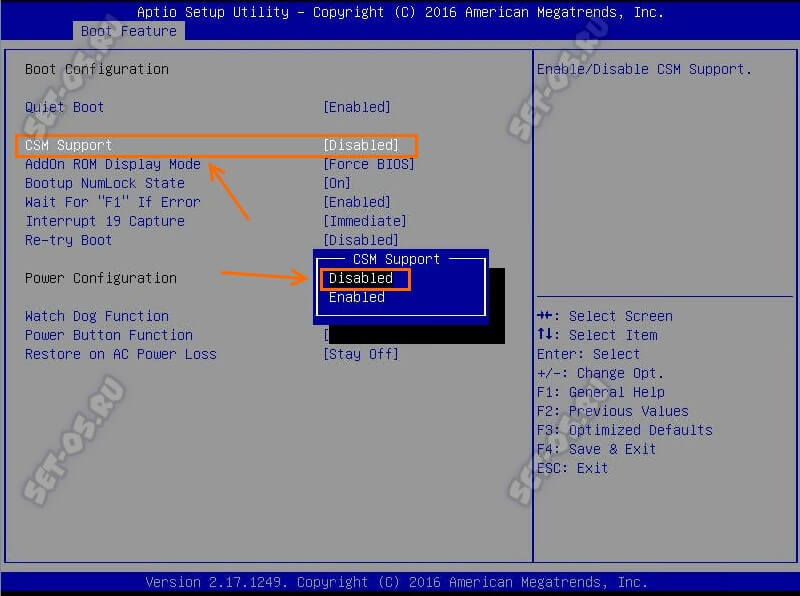
— Отключение поддержки CSM. Этот модуль поддержки совместимости используется для загрузки старых операционных систем, а стало быть нам не нужен. Находим параметр CSM Support и ставим значение Disabled (На некоторых материнских платах — Never).
— Включаем защищённую загрузку. Это специальный модуль защиты, предотвращающий запуск неподписанного кода в целях защиты от подмены загрузчика. Очень часто он отключен пользователем ранее или вообще деактивирован изначально. Включаем его. Для этого найдите параметр Secure Boot и поставьте ему значение Enabled.
3. После всех этих манипуляций обязательно сохраните настройки UEFI BIOS и перезагрузитесь. Обычно после этого ошибка 0x80300001 при установке Windows 10 пропадает и дальше ОС отлично устанавливается.
Примечание: Если ошибка 0x80300001 возникает при установке Windows 7 после того, как на ПК была установлена «десятка», то в этом случае необходимо выполнить все действия с точностью до наоборот.
При установке операционной системы Windows могут возникать различные ошибки, которые становятся причиной неудачной установки. Одна из таких ошибок — 0x80300001, которая обычно возникает при попытке установить систему на новый жесткий диск. Эта ошибка может быть вызвана различными причинами, такими как неправильная конфигурация BIOS или неполадки в самом жестком диске. В этой статье мы рассмотрим несколько способов, которые помогут исправить ошибку 0x80300001 и успешно установить операционную систему Windows на жесткий диск.

- Что означает ошибка 0x80300001?
- Что важно сделать перед исправлением ошибки 0x80300001?
-
Как исправить ошибку 0x80300001 при установке Windows?
- Способ 1: Проверьте целостность носителя установки
- Способ 2: Отключите все лишние устройства
- Способ 3: Измените настройки SATA-контроллера
- Как восстановить нужные файлы в случае удаления?HOT
- Часто задаваемые вопросы
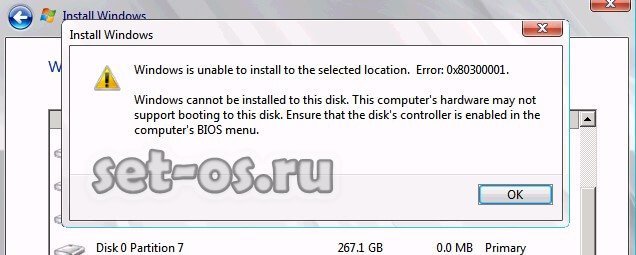
Ошибка 0x80300001 является одной из наиболее распространенных проблем, возникающих при установке операционной системы Windows. Обычно она происходит во время попытки установки системы на новый жесткий диск, и ее сообщение гласит: «Windows не может установить выбранные разделы диска. Причина ошибки 0x80300001». В такой ситуации установка системы останавливается, и пользователь не может продолжить работу с компьютером.
Основной причиной ошибки 0x80300001 является неправильная конфигурация BIOS. BIOS отвечает за управление жестким диском и его разделами. Если он настроен неправильно, то система не сможет определить жесткий диск и его разделы, что приведет к ошибке.
Также, данная ошибка может быть вызвана неполадками в самом жестком диске, например, если на диске есть поврежденные сектора или он не отформатирован.
Что важно сделать перед исправлением ошибки 0x80300001?
Перед тем, как исправить ошибку 0x80300001, важно сделать несколько ключевых действий. В первую очередь, необходимо убедиться, что все пользовательские данные и файлы на компьютере были сохранены и скопированы на другой носитель, такой как внешний жесткий диск или облачное хранилище. Это особенно важно, если есть подозрения на неисправность диска, так как исправление ошибки может потребовать форматирования жесткого диска, что приведет к удалению всех файлов.
Также перед исправлением ошибки 0x80300001, необходимо проверить жесткий диск на наличие повреждений и ошибок. Для этого можно воспользоваться специальными программами для проверки диска, такими как CHKDSK. Это позволит определить, есть ли какие-либо проблемы с диском, такие как поврежденные секторы или ошибки файловой системы. Если такие проблемы обнаружены, то их необходимо решить перед продолжением установки операционной системы.
Если же ошибки 0x80300001 вызваны неправильной конфигурацией BIOS, то перед исправлением необходимо убедиться, что настройки заданы правильно. Для этого можно воспользоваться инструкцией к материнской плате или обратиться за помощью к специалисту.
Наконец, если ни один из вышеперечисленных методов не помогает, то можно попробовать выполнить установку операционной системы с использованием другого установочного диска или USB-накопителя. Иногда проблемы возникают из-за повреждений на диске или некорректно записанного образа операционной системы.
В целом, перед исправлением ошибки 0x80300001 важно провести все необходимые проверки и сохранить важные файлы, чтобы избежать их потери. Если проблему не удается решить самостоятельно, то лучше обратиться к профессионалам, которые помогут исправить ошибку и установить систему на компьютере.
Как исправить ошибку 0x80300001 при установке Windows?
Ошибка 0x80300001 во время установки Windows может возникать по разным причинам, но, как правило, связана с проблемами чтения диска или USB-накопителя, на котором располагается образ операционной системы. Ниже приведены три способа, которые могут помочь исправить эту ошибку.
Способ 1: Проверьте целостность носителя установки
1.Если у вас установочный диск или USB-накопитель, проверьте их на наличие повреждений или ошибок чтения. Для этого можно воспользоваться инструментом проверки диска, который доступен в настройках BIOS или UEFI. Если обнаружены ошибки, попробуйте скопировать образ операционной системы на новый носитель или скачайте новый образ с официального сайта Microsoft.
Способ 2: Отключите все лишние устройства
2.Иногда проблема может быть связана с неправильной работой дополнительных устройств, подключенных к компьютеру. Попробуйте отключить все USB-устройства, кроме необходимых для установки операционной системы, и повторите попытку установки.
Способ 3: Измените настройки SATA-контроллера
3.Некоторые пользователи сообщают, что удалось убрать ошибку 0x80300001 путем изменения настроек SATA-контроллера в BIOS. Вам может потребоваться включить режим совместимости SATA или изменить режим работы контроллера на AHCI. Однако перед изменением настроек SATA-контроллера убедитесь, что у вас есть все необходимые драйверы для вашего жесткого диска.
Часть 4: Как восстановить нужные файлы в случае удаления?
Если в процессе установки или в другом случае были удалены важные файлы, не стоит паниковать. Существуют различные программы, которые помогают восстановить удаленные данные. Одной из таких программ является 4DDiG Windows Data Recovery. 4DDiG Windows Data Recovery – это универсальная программа для восстановления данных, которая помогает вернуть удаленные файлы с жестких дисков, USB-накопителей, карт памяти и других устройств хранения информации. Эта программа имеет простой и интуитивно понятный интерфейс, что делает процесс восстановления данных максимально удобным для пользователей.
С помощью 4DDiG Windows Data Recovery вы можете быстро сканировать диск или другое устройство хранения информации и найти все удаленные файлы. Программа поддерживает различные типы файлов, такие как документы, фотографии, видео, аудио, архивы и многие другие. Особенностью 4DDiG Windows Data Recovery является возможность выборочного восстановления файлов. Это значит, что вы можете выбрать только те файлы, которые вам нужны, а не восстанавливать все найденные данные. Кроме того, программа предоставляет возможность предварительного просмотра файлов перед их восстановлением, что помогает убедиться в том, что найденные файлы соответствуют тем, которые были удалены.
4DDiG Windows Data Recovery также обеспечивает защиту данных, которые были восстановлены, путем сохранения их на другом диске или накопителе, чтобы избежать случайного удаления в будущем. В целом, 4DDiG Windows Data Recovery – это мощный инструмент для восстановления удаленных данных, который может помочь вам быстро вернуть потерянные файлы. Однако, чтобы увеличить шансы на успешное восстановление данных, не забывайте про регулярное создание резервных копий важных файлов.
- Восстановление поврежденных / удаленных / потерянных / отформатированных файлов с SD-карты / USB-накопителя / внешних устройств и т.д.
- Восстановление потерянных файлов с компьютеров Windows и Mac.
- Поддержка более 1000 типов файлов, таких как фотографии, видео, аудио, документы и многое другое.
- Быстрое сканирование со 100% безопасностью.
- После загрузки и установки 4DDiG Windows Data Recovery на свой компьютер, запустите программу и выполните сканирование или всего диска, на котором находились удаленные файлы.
- Если необходимо восстановить определенный тип файлов, то укажите его и нажмите на кнопку “Сканирование выбранных типов файлов”; В результатах сканирования находим удаленные файлы – для проверки возможности восстановления используем предпросмотр:
- Выбираем файлы и жмем «Восстановить», Указываем место для сохранения файлов.
Часть 5: Часто задаваемые вопросы
Рассмотрим самые распространенные вопросы, возникающие у пользователей при установке операционной системы.
1. Что значит ошибка 0x8007025d?
Ошибка 0x8007025d в операционной системе Windows обычно указывает на проблему с установкой или копированием файлов, возможно, вызванную повреждением диска или неправильным подключением к компьютеру. Также проблема может возникнуть из-за нерабочего образа системы или простой нехватки места для установки.
2. Как исправить ошибку 0x8007045d?
Ошибка 0x8007045d может возникать при копировании файлов из-за проблем с жестким диском или USB-накопителем. Чтобы ее исправить, можно попробовать изменить настройки BIOS или заменить некачественный накопитель.
3. Что делать если при установке Windows выдает ошибку?
Если при установке Windows появляется ошибка, можно попробовать перезагрузить компьютер, проверить наличие повреждений на диске или USB-накопителе, отключить ненужные устройства и использовать инструменты для восстановления системы. Если проблема не устраняется, можно обратиться за помощью к специалистам.
Заключение
Ошибка 0x80300001 при установке Windows может возникать по разным причинам, таким как неисправность диска, неправильные настройки BIOS или неподдерживаемый формат диска. Для исправления этой ошибки можно использовать различные методы, такие как замена некачественного носителя, отключение ненужных устройств, изменение настроек BIOS и использование инструментов для восстановления системы. В любом случае, перед выполнением каких-либо действий рекомендуется сделать резервную копию важных данных и обратиться к специалистам, если необходимо. Если вы случайно потеряете или удалите файлы данных компьютера во время этого процесса, мы рекомендуем вам использовать Tenorshare 4DDiG data recovery для восстановления ваших данных.
Tenorshare 4DDiG Data Recovery
4DDiG — это ваш непревзойденный выбор для восстановления всех потерянных данных на компьютере Windows / Mac после различных сценариев потери, таких как удаление, форматирование, RAW и т.д. с более высокой вероятностью успеха.
Скачать Бесплатно
Скачать Бесплатно
Купить Сейчас
Купить Сейчас
The Windows error 0x80300001 probably happens when you are installing Windows on your computer. To help you solve this error, MiniTool Partition Wizard provides you with a couple of feasible methods in this post. You can have a try.
When you are trying to install Windows OS on another hard drive instead of the system partition, you are likely to get the Windows installation error 0x80300001. This error often comes out with either of the following error messages:
- Windows is unable to install to the selected location
- we couldn’t install Windows in the location you chose
Note:
If you receive the “we couldn’t install Windows in the location you chose 0x80300001” error message, just click here to find out some solutions.
Once you run into Windows error 0x80300001, you will be prevented from completing the Windows installation process successfully. Therefore, you’d better work this error out as soon as possible. Here, we summarize several useful methods for fixing the error 0x80300001. Just keep reading and figure out how to solve it.
Method 1: Remove All the Unnecessary Hard Drives
If you have other hard drives connected to your PC, certain conflicts between hard drives will be caused. That’s why you get stuck in the Windows installation error 0x80300001. To solve this error, you ought to disconnect all the hard drives (except the one you determine to install the OS) including the HHDs, SSDs, SATA DVD-ROM drives as well as any removable USB devices (other than your mouse and keyboard).
Once done, restart your PC to see if the installation can be finished. If the “Windows is unable to install to the selected location error 0x80300001” persists, then you should go on with other solutions.
Method 2: Use Another USB Port
If you receive the Windows installation error 0x80300001 while attempting to install Windows with a Windows installation USB drive, it may indicate that you use the wrong USB port. In this case, you can try fixing this error by inserting the USB drive into a different USB port.
Method 3: Modify the Boot Order
It’s possible for you to experience the “Windows is unable to install to the selected location error 0x80300001” if the hard drive where you are trying to install the Windows OS is not at the top of the system’s boot order. To fix this error, you should get into BIOS and change the boot order. The following is a step-by-step guide for this operation.
Step 1: Reboot your computer and enter BIOS.
Step 2: Go to the Boot tab. Then locate the destination hard drive and set it as the first boot order with the on-screen instructions.
Step 3: After that, press F10 to save the changes and exit BIOS.
Step 4: Restart your PC and try the Windows installation again to see if the Windows error 0x80300001 disappears.
Method 4: Change Your BIOS Settings
The Windows installation error 0x80300001 may appear due to incorrect BIOS settings as well. Therefore, to solve this error, you need to modify certain settings in the BIOS setup.
- Enable the AHCI or RAID mode: This error will happen if the SATA controller mode is misconfigured. So, you can try fixing it easily by changing the mode to AHCI or RAID. To figure out the difference between AHCI and RAID, read this post: AHCI VS RAID: Which One Should I Choose for Better Performance?
- Disable CSM support: The CSM (Compatibility Support Module) support is not required while installing a new Windows OS. Hence, you’d better disable it to avoid unnecessary issues.
- Enable Secure Boot: By doing so, you are likely to fix the Windows installation error too.
After you apply the above changes, reboot your system and try the installation once more. The operation may finish smoothly this time.
Method 5: Format the Partition
If the partition you choose to install the Windows OS contains some data, the Windows installation process will be disrupted and shows you an error message like “we couldn’t install Windows in the location you chose 0x80300001” or “Windows is unable to install to the selected location error 0x80300001”.
On this occasion, you should format the target partition to solve this annoying error. To do this, follow the steps below.
Step 1: Start your computer normally to make a backup of the destination partition. This will help you avoid data loss.
Step 2: Insert the Windows installation media and boot your system into the Windows Setup screen.
Step 3: Follow the on-screen instructions to advance the installation process.
Step 4: When you reach the screen asking you “Where do you want to install Windows?”, select the partition you want to format and then click Format.
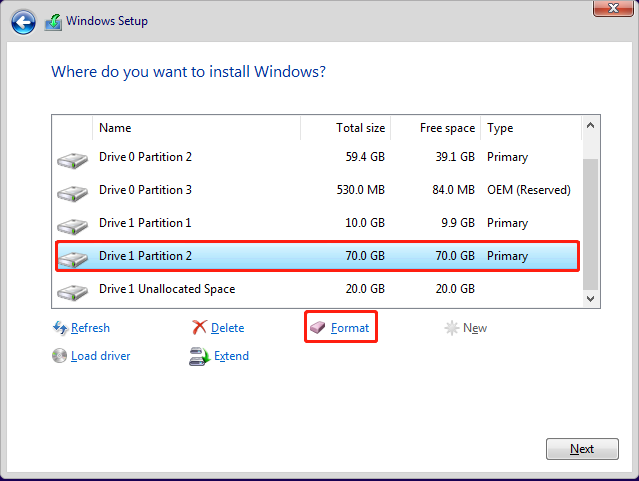
Step 5: Click OK to confirm the operation when a warning window pops up.
Step 6: Wait for the end of the formatting process. Then click Next to continue installing Windows to see if the error is resolved.
Method 6: Recreate the Partition
Be faced with the Windows error 0x80300001, you can also try deleting the destination partition and recreating a new partition. In case of data loss, you need to back up the partition in advance. After that, follow the guide below.
Step 1: Go to the Where do you want to install Windows? screen and select the partition you want to delete.
Step 2: Click Delete and then OK to remove this partition.
Step 3: The partition will become the unallocated space after it is deleted. Select the unallocated space and then click New.
Tips:
You can try selecting the unallocated space to install Windows to see if the error 0x80300001 disappears.
Step 4: Decide the size of the partition. Then click Apply to execute the operation. 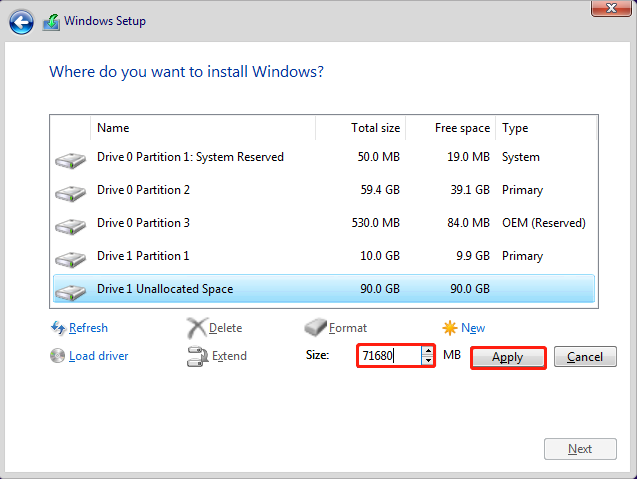
Step 5: Once the new partition is created, perform a format for it. Then select the partition and click Next to carry out the Windows installation.
Method 7: Delete All Partitions
After the “Windows is unable to install to the selected location error 0x80300001” happens, another method you can try is to delete all partitions on the disk where the selected Windows installation partition is located. To ensure you can finish this operation, there are two ways available.
Note: This operation will clean your disk. So, you’d better make a backup too before the process begins.
Way 1: Use Diskpart
Diskpart is a Windows built-in utility that allows you to manage your hard drives using command lines. Here is how to delete all partitions with diskpart.
Step 1: On the Windows Setup screen, press Shift + F10 to open Command Prompt.
Step 2: Once the Command Prompt window prompts, type diskpart to open this utility.
Step 3: Type the following commands and then press Enter after each to execute them:
- list disk
- select disk * (* is the number of the disk you select to install Windows)
- clean
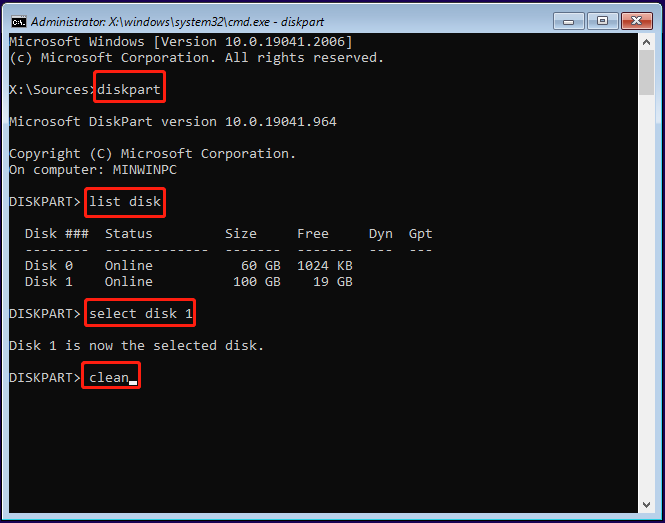
Step 4: After the process ends, exit Command Prompt. You will see the whole disk is shown as unallocated space.
Way 2: Use MiniTool Partition Wizard
Diskpart is a convenient tool to perform operations on your partitions and disks. However, sometimes it may trouble you with certain issues like Diskpart Clean not working. In such cases, maybe you should consider using an easy-to-use third-party partition manager. Here, we’d like to recommend MiniTool Partition Wizard to you.
MiniTool Partition Wizard is a professional partition managing program that enables you to create/format/delete partitions, copy/wipe disks, migrate OS to SSD/HD, and more. With this program, you are able to delete all partitions on the disk with a few clicks. The following are detailed steps.
Delete All Partitions
Step 1: Download and install MiniTool Partition Wizard. Then launch it to enter the main interface.
MiniTool Partition Wizard FreeClick to Download100%Clean & Safe
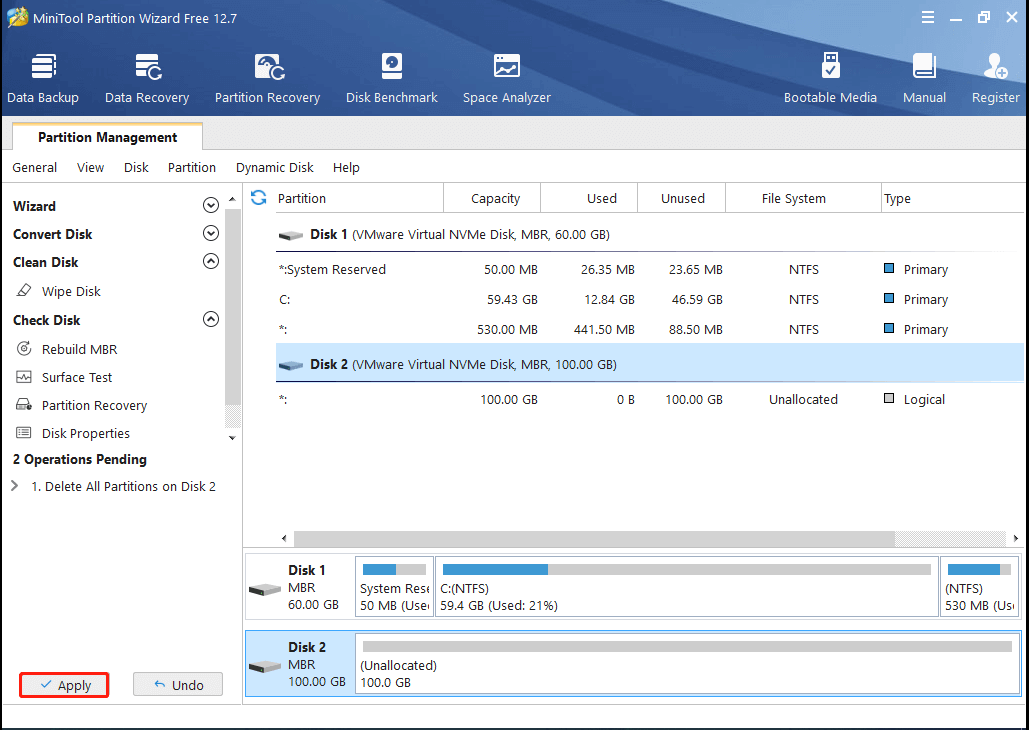
Step 2: Highlight the target disk and then select Delete All Partitions from the left action panel. Alternatively, just right-click the target disk and select Delete All Partitions.
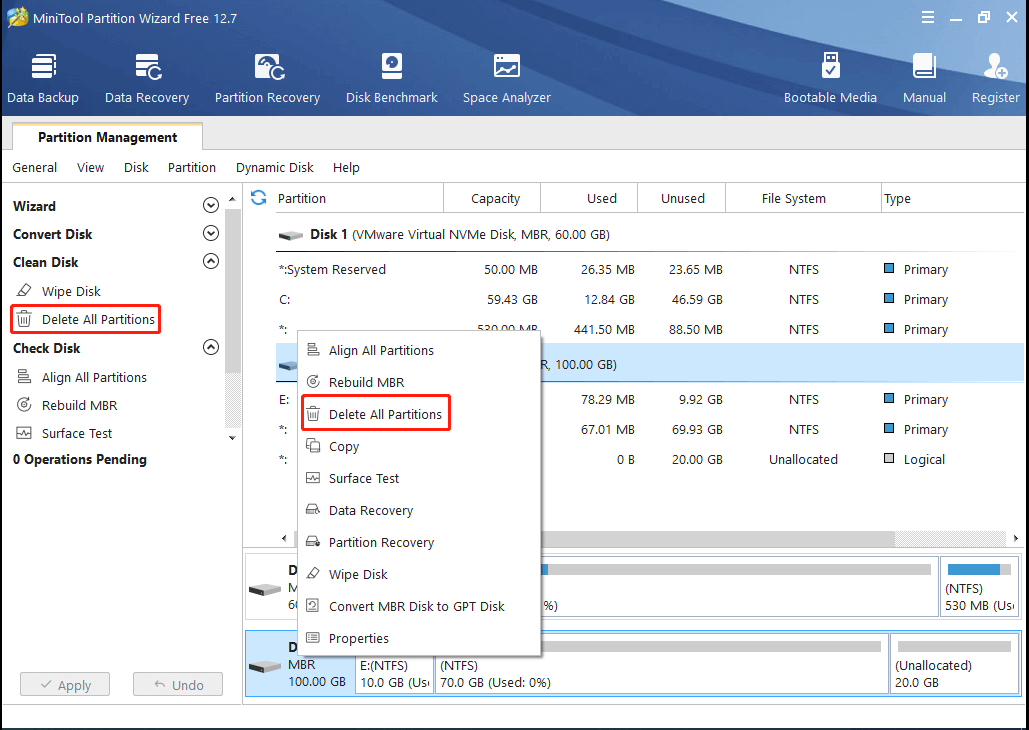
Step 3: Click Yes in the pop-up window to continue.
Step 4: Finally, click Apply to carry out the operation.
Wipe Disk
Step 1: Launch MiniTool Partition Wizard to get into its main interface.
Step 2: Right-click the disk where you want to install Windows. Then select Wipe Disk from the list.
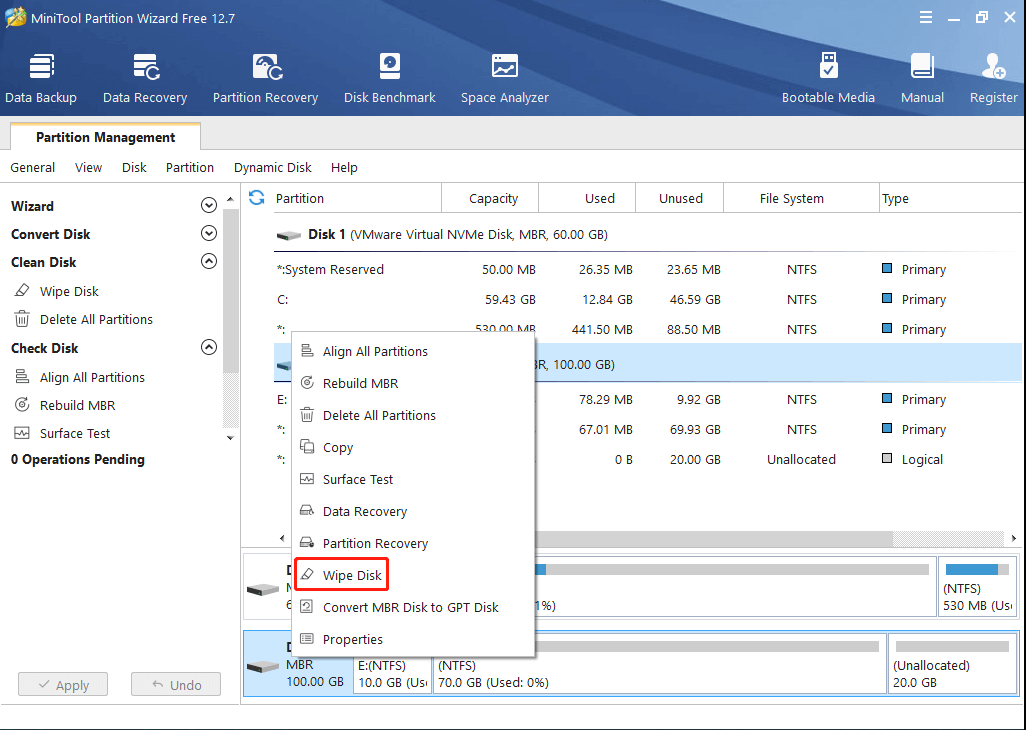
Step 3: In the next window, select a wiping method and then click OK.
Tips:
You are suggested to choose the former two options because they will take less time.
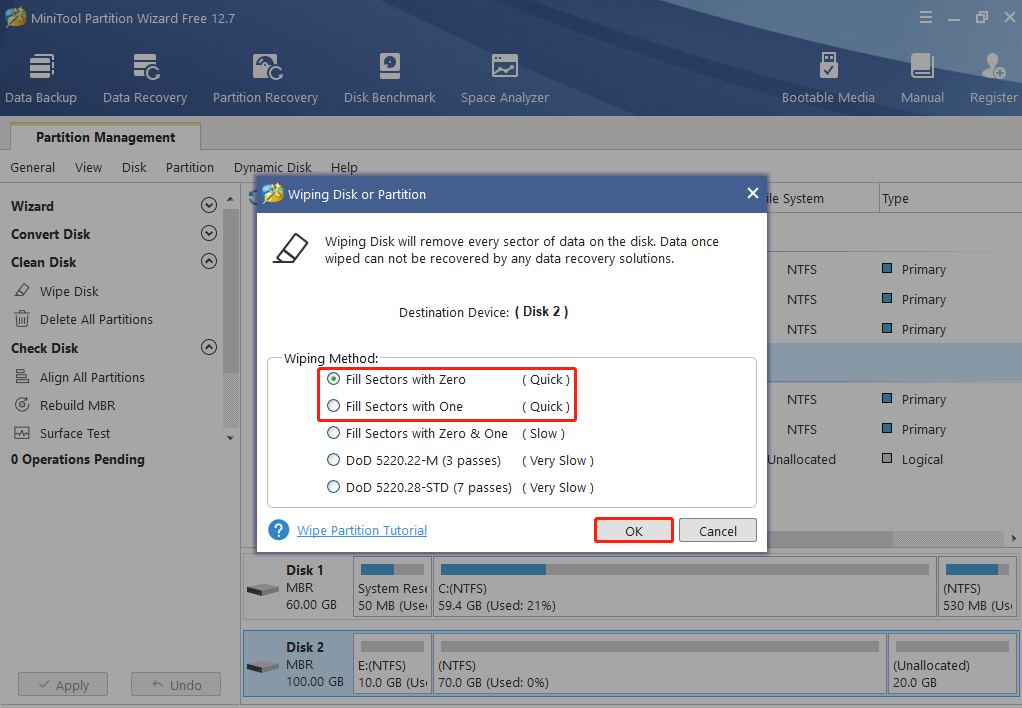
Step 4: You can see the target disk is presented as unallocated space. Click Apply to perform the changes.
Method 8: Re-insert the Windows DVD
During the Windows installation process, you may be required to insert another disk to install the needed drivers. If you forget to connect the Windows installation DVD back, you will probably experience the Windows error 0x80300001. On this occasion, you can fix this error simply by reinserting the Windows installation media.
Step 1: After loading and installing the required drivers from the driver CD, remove it.
Step 2: Re-insert the Windows installation DVD and then click Refresh.
Step 3: After that, click New to create a new partition for the Windows installation.
Step 4: Select the newly created partition and click Next to go ahead and process the Windows installation.
I failed to install Windows with the error 0x80300001. I surfed the Internet for effective solutions and eventually resolved this error after reading this post. I’d like to share it with you if you are stumped by the same error.Click to Tweet
Bottom Line
Are you bothered by the Windows installation error 0x80300001? If so, you can find out some workable solutions in this post. If you have any problems with this error, you can leave a message in the following comment part.
With anything confused while using MiniTool Partition Wizard, you can contact us via [email protected]. We will make reply to you as soon as possible.
Most users reported that when they tried installing Windows 7, Windows Vista, or Windows 10 on their newly bought SSD, they encountered several errors while performing a fresh installation with their USB sticks.
These errors could be “Setup was unable to create a new system partition or locate an existing partition.
See the “Setup log files for more information” or “Windows is unable to install to the selected location. Error: 0x80300001”

If you also face the error 0x80300001 on your system, continue reading this blog. Here, we have mentioned various amazing fixes to resolve this annoying error. These methods will assist you in installing Windows to the desired location effortlessly.
The main key to solving the error 0x80300001 is eliminating all storage devices, excluding the drive where you like to make a new system partition for installing Windows 7, Windows Vista, or Windows 10.
To install Windows on your system, go through the following instructions.
Part 1: Try Unplugging SATA Drives to Fix 0x80300001
This is the first method users should try to face the 0x80300001 error. Because users face this problem, the common setup is if they own a SCSI drive or more SATA drives than on various SATA controllers.
To fix this Windows 0x80300001 issue, follow the instructions as follows.
PS: Learn more about how to remove Windows passwords.
Steps to Resolve the Error:
The “Windows is unable to install to the selected location” issue could be very frustrating for users who desperately want to install Windows 10 on their computers. If you want to do the same, follow the steps:
Step 1: Shut Down the System
In the first place, shut down your system.
Step 2: Disconnect All Hard Disks
Next, disconnect all internal hard disks, excluding the one where you have to install Windows 10.
Step 3: Remove USB Devices
Remove USB devices, if any, except the installation stick of Windows 10, your keyboard, and your mouse.
Step 4: Start the System
Now, you need to start your computer.
Step 5: Install Windows
Once turned on, you need to install Windows 10.
Step 6: Shut Down the System
You have to shut down your system again.
Step 7: Connect Hard Disks
Lastly, connect your hard disks and USB sticks again to the system.
While disconnecting USB sticks, check for all USB sticks and even look for mini USB sticks if there are any stuck on your computer’s back. Now, check if the error 0x80300001 persists on your system.
PS: If you are bothered with the Tab key not working error, click to fix them now.
Part 2: Remove USB Sticks to Fix 0x80300001
If the above method did not fix the error 0x80300001 on your system, then try this method. Here, you must follow the above method’s first five steps.
So, power on your system and unplug all of your SATA drives, including SATA DVD-ROM drives, other than the primary ones.
For better results, it is best to unplug USB storage devices from the system, such as external hard drives and others. Once done, you need to follow the steps below to eliminate this annoying issue.
Steps to Fix the Error 0x80300001 on Your Windows PC:
Go through the instructions below to resolve the “Windows is unable to install to the selected location” issue or the 0x80300001 error.
Step 1: Remove SSD Partitions
Firstly, you have to delete existing partitions on the new SSD, if any. Before you do so, ensure that you do not have any data saved to the disk.
Step 2: Remove USB Sticks
Next, you need to eliminate the system’s USB stick for Windows 10 installation.
Step 3: Click on ‘Refresh’
Now, you need to tap on the ‘Refresh’ tab.
Step 4: Insert USB Stick
Next, you have to insert your USB once again stick.
Step 5: Tap on ‘Refresh’
Click on ‘Refresh’ once again.
Step 6: Select ‘Next’
Lastly, tap on ‘Next’ and then finish the installation. Now, you have to see if you are still getting the Windows installation error while installing Windows on your system. If yes, then it is time to opt for the next method.
Also read: How to fix can’t read from source file or disk issue easily.
Part 3: Re-insert the Windows DVD to Fix 0x80300001
If the above method does not work for you, try this one. Firstly, you need to insert the installation DVD of Windows 7 and boot up the same to the setup display.
Next, navigate to the location where you need to choose a partition and tap on the ‘Load Driver’ option.
Move ahead, put a DVD or CD in the driver, and find the storage controller driver. You will receive a message saying, “Windows cannot be installed on this disk.” Ignore this text.
Now, re-insert your Windows DVD into the driver. Ensure to tap on the Refresh link. After that, select ‘Advanced Drive Options’ and make a new partition depending on your preferred size.
Tap O.K. when Windows asks you to perform several actions, and then you will see a new partition and one primary partition. Users who already have the partition setup can move ahead and select the same.
Now, select the primary partition and tap on ‘Next.’ The setup process will continue effortlessly. Please note that it will probably resolve issues on computers that use RAID controllers featuring AHCI support.
Part 4: Modify Boot Order
For users not employing RAID, the issue could be associated with the disk, which is not a boot disk.
Here, they should note that the Windows installation will fail if the DVD or CD they are trying to install Windows is not their boot disk.
To check which disk is their boot disk, users need to navigate to their BIOS.

Users can look for the steps to reach their BIOS and modify the boot order for their computers online. They want to move the disk they want to install Windows 10 on to the list’s top.
FAQs (Frequently Asked Questions)
Q1: What is Error 0x80300001?
Error 0x80300001 is an error code that often occurs during the installation or upgrade of an operating system, particularly Windows. It usually indicates disk-related issues or problems with disk partitions.
Q2: What causes Error 0x80300001?
Error 0x80300001 can be caused by various factors, including incompatible hardware, incorrect BIOS settings, or disk-related issues such as incompatible disk formats or corrupted partitions.
Q3: How can I fix Error 0x80300001?
To fix Error 0x80300001, you can try the following troubleshooting methods:
- Verify disk and partition compatibility.
- Check BIOS settings.
- Disconnect external devices.
- Update disk drivers.
- Run Disk Cleanup and Check Disk utility.
- Modify disk configuration with DiskPart.
Q4: Can I fix Error 0x80300001 without technical expertise?
Yes, you can fix Error 0x80300001 without extensive technical expertise by following the step-by-step solutions provided in this guide. These methods are designed to be user-friendly and accessible to individuals of all technical backgrounds.
Q5: Is there a risk of data loss when fixing Error 0x80300001?
Yes, modifying disk configurations using tools like DiskPart carries a risk of data loss if not performed correctly. It’s crucial to back up important data before attempting any disk-related operations.
Q6: What should I do if none of the solutions work?
If none of the solutions provided in this guide resolve Error 0x80300001, it’s advisable to seek assistance from a qualified technician or contact the support channels of your computer or operating system manufacturer for further guidance.
Conclusion
So, these are some amazing fixes to resolve the error 0x80300001. All of these four methods will fix the “Windows is unable to install to the selected location” issue effectively and efficiently.
Now, try them out and fix this frustrating issue in no time.
Installing Windows these days is usually not a very difficult process. However, certain glitches and errors can hamper the installation procedure.
This article talks about error code 0x80300001, which can show up during the Windows installation procedure. The error deals with Windows’ installation location. We’ll be talking about its causes and how you can fix this situation.
Also read: How to install and use Zsh in Windows 10?
What causes the Windows 10 install error 0x80300001?
If you’re trying to install a 64-bit version of Windows on any partition apart from where Windows is already installed (C:/), you’ll run into this error. This error is common in situations where you’re trying to install a fresh copy of Windows on another drive (SSD, for example) when you’ve already got Windows running on the current disk.
Here are four methods you can try to fix the error.
Unplug all SATA drives
If you’ve got multiple SATA drives attached to your PC, it’s a good idea to try and remove all the drives except the one you want to use for your Windows installation.
This involves your HDDs, SSDs, SATA DVD and even any removable USB device, including a keyboard or mouse that you’ve got connected to your machine. There should only be one drive connected when you start the installation.
Doing so will resolve any drive or location-based conflicts that can cause 0x80300001 error. Once the installation is complete, you can plug all your drives back in again.
Also read: Where are Chrome bookmarks located in Windows 10?
Modify the boot order
The BIOS on each machine maintains a boot order list that tells the system which storage drive to boot from. If you’ve got your main drive as the primary boot device, you can get this error when trying to install Windows on any other drives.
The solution is actually quite simple. All you have to do is change the boot order so that your empty drive comes before the main one. Note that Windows will still boot from the main drive as of right now because there isn’t any OS installed in the new drive.
At this point, you can try running the Windows installer again and you should be able to resolve the 0x80300001 error.
Also read: How to map and access Webdav drive in Windows 10?
Remove all USB sticks
Sometimes, any lingering USB storage devices attached to your machine can cause conflicts with the Windows installation process and show the 0x80300001 error. To resolve this, make sure that you’ve removed all internal and external SATA drives just like we did in the last step.
Moving forward, format your new drive and get rid of any partitions on that drive. Now remove the Windows installation USB drive from your system and click the refresh tab.
Plug the USB stick back into your machine and hit the refresh tab again. Finally, click the next button, and your installation should proceed as normal.
Also read: How to fix Windows update error 8007000E?
Using the Windows DVD
This is the last resort to fix the 0x80300001 error in Windows. We will need a Windows installation DVD and boot our machine from the same. Once you’re on the partition selection screen, click on the Load Driver button.

Insert the storage controller driver CD or DVD. You may see a message saying Windows cannot be installed on this disk, but it’s safe to ignore the warning.
Now re-insert the Windows installation DVD, click on Refresh, followed by Advanced Drive Options. Here you’re going to make a new partition for your new Windows installation.
Once you’re done making the partition, you can go ahead and continue with your Windows installation.
Also read: How to fix error 0x80070718 in Windows?