Во время установки одного или нескольких обновлений для Windows 8.1 и 10 можно наткнуться на ошибку 0x80246010. Как правило, данная ошибка возникает по следующим причинам:
- баг в работе Центра обновления Windows;
- службы, участвующие в процессе обновления системы, не работают;
- повреждение системных файлов.
В сегодняшней статье мы во всех подробностях расскажем вам, как избавиться от ошибки 0x80246010 и нормально обновить свою Windows.
Решаем ошибку 0x80246010

Метод №1 Запуск средства устранения неполадок
Первым делом вам необходимо запустить в своей Windows системное средство устранения неполадок Центра обновления. Верно, некоторые из вас могут знать, что данное средство срабатывает не в каждом случае, но попробовать определенно нужно.
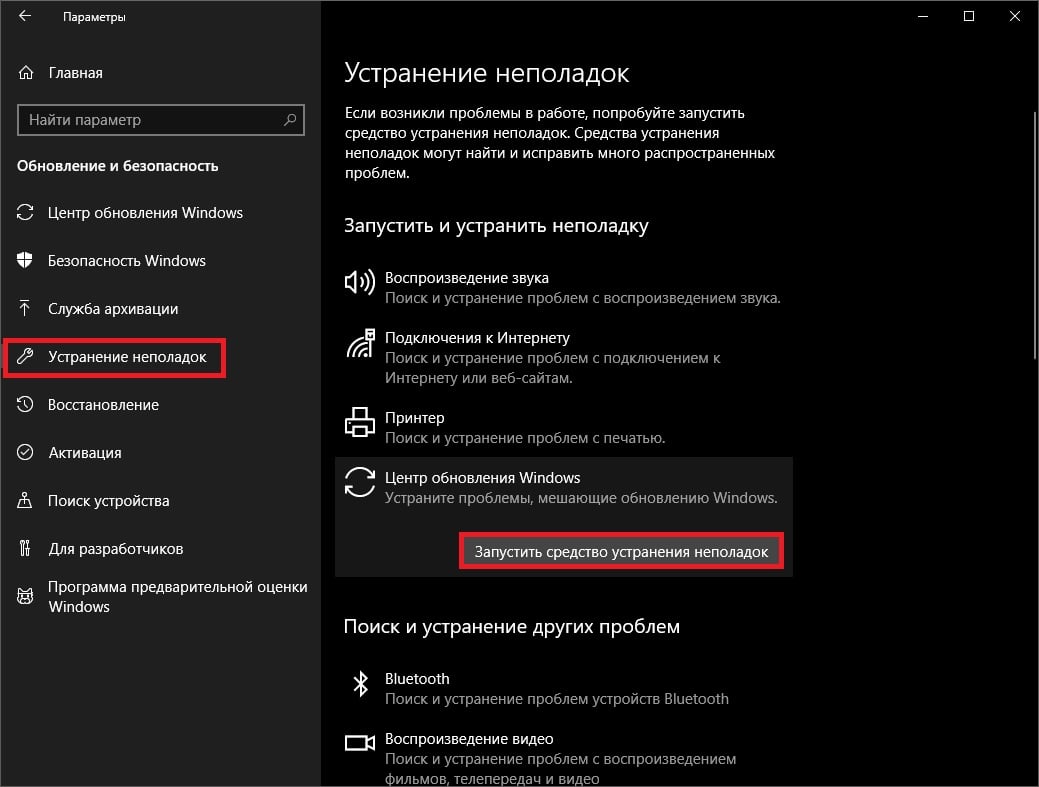
Нажмите правой кнопкой мыши на Пуск и выберите пункт «Параметры». Далее откройте раздел «Обновление и безопасность», а затем перейдите в подраздел «Устранение неполадок». Найдите в предоставленном списке Центр обновления Windows, выберите его и нажмите на кнопку «Запустить средство устранения неполадок».
Подождите, пока средство просканирует ваш ПК на наличие неполадок с Центром обновления, а затем нажмите на кнопку «Применить это исправление» либо следуйте другим инструкциям, чтобы попытаться разрешить ошибку 0x80246010.
Метод №2 Установка обновление вручную
Вы всегда можете исключить Центр обновления (WU) из процесса обновления системы, установив проблемный апдейт собственноручно. Для начала вам нужно понять, при установке какого обновления возникает ошибка.
Откройте параметры системы, а затем перейдите в: Обновление и безопасность→Центр обновления Windows. Теперь кликните на строчку «Просмотр журнала обновлений». Внимательно осмотрите журнал и найдите обновление, возле которого «красуется» ошибка 0x80246010.

Копируйте название обновления и его номер куда в удобное место на компьютере, например, в текстовый файл на Рабочем столе, после чего перейдите по этой ссылке на страничку Каталога Центра обновления Майкрософт.
Впишите номер обновления в поисковую строку на сайте и кликните на кнопку «Найти». Выберите подходящий апдейт и списка найденных обновлений и нажмите «Загрузить». Все, что вам остается — это запустить скачанный MSU-файл и следовать инструкциям на экране (если они будут), чтобы установить обновление.
Метод №3 Включение всех важных для WU служб
Бывает и такое, что некоторые службы, активно участвующие в процессе обновления Windows, перестают по той или иной причине работать в системе. Вам нужно подкорректировать настройки этих служб, а затем перезагрузить компьютер.
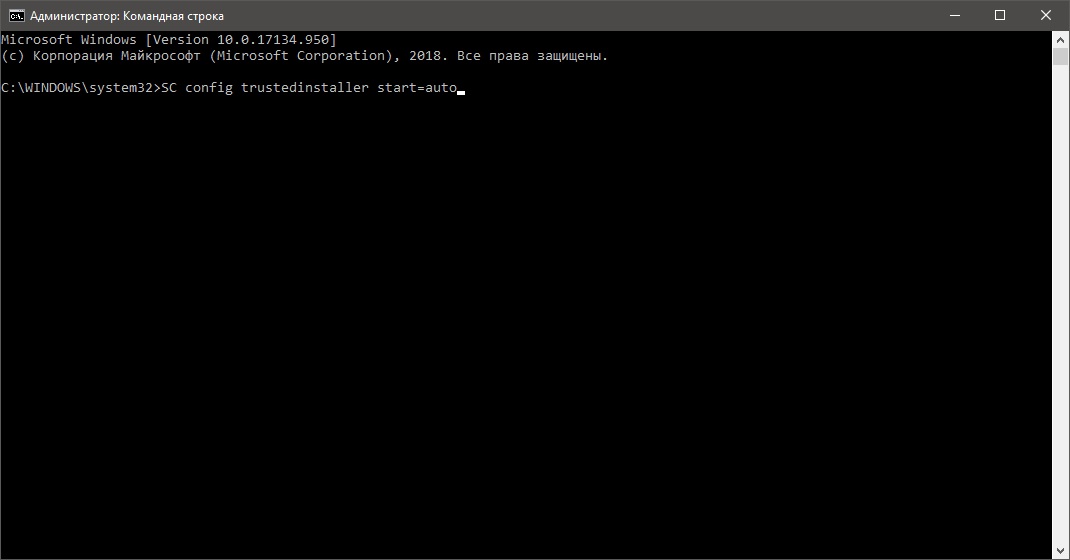
Нажмите ПКМ на Пуск и выберите «Командная строка (администратор)». Теперь выполните в ней следующий набор команд:
- SC config trustedinstaller start=auto
- SC config bits start=auto
- SC config cryptsvc start=auto
Как только закончите с вводом команд, закройте окошко и перезагрузите компьютер. Попытайтесь еще раз обновить Windows и посмотрите, была ли устранена ошибка 0x80246010.
Метод №4 Сброс компонентов Центра обновления
Если ничего из вышеуказанного вам не помогло, то пора переходить в «тяжелой артиллерии». Сейчас мы займемся с вами сбросом всех компонентов Центра обновления Windows. Некоторые пользователи проводят данный процесс вручную, но рекомендуем воспользоваться удобным BAT-файлом.
Итак, создайте у себя на Рабочем столе обычный текстовый файл, после чего вставьте в него весь список команд:
:: Run the reset Windows Update components.
:: void components();
:: /*************************************************************************************/
:components
:: —— Stopping the Windows Update services ——
call :print Stopping the Windows Update services.
net stop bitscall :print Stopping the Windows Update services.
net stop wuauservcall :print Stopping the Windows Update services.
net stop appidsvccall :print Stopping the Windows Update services.
net stop cryptsvccall :print Canceling the Windows Update process.
taskkill /im wuauclt.exe /f:: —— Checking the services status ——
call :print Checking the services status.sc query bits | findstr /I /C:»STOPPED»
if %errorlevel% NEQ 0 (
echo. Failed to stop the BITS service.
echo.
echo.Press any key to continue . . .
pause>nul
goto :eof
)call :print Checking the services status.
sc query wuauserv | findstr /I /C:»STOPPED»
if %errorlevel% NEQ 0 (
echo. Failed to stop the Windows Update service.
echo.
echo.Press any key to continue . . .
pause>nul
goto :eof
)call :print Checking the services status.
sc query appidsvc | findstr /I /C:»STOPPED»
if %errorlevel% NEQ 0 (
sc query appidsvc | findstr /I /C:»OpenService FAILED 1060″
if %errorlevel% NEQ 0 (
echo. Failed to stop the Application Identity service.
echo.
echo.Press any key to continue . . .
pause>nul
if %family% NEQ 6 goto :eof
)
)call :print Checking the services status.
sc query cryptsvc | findstr /I /C:»STOPPED»
if %errorlevel% NEQ 0 (
echo. Failed to stop the Cryptographic Services service.
echo.
echo.Press any key to continue . . .
pause>nul
goto :eof
):: —— Delete the qmgr*.dat files ——
call :print Deleting the qmgr*.dat files.del /s /q /f «%ALLUSERSPROFILE%\Application Data\Microsoft\Network\Downloader\qmgr*.dat»
del /s /q /f «%ALLUSERSPROFILE%\Microsoft\Network\Downloader\qmgr*.dat»:: —— Renaming the softare distribution folders backup copies ——
call :print Deleting the old software distribution backup copies.cd /d %SYSTEMROOT%
if exist «%SYSTEMROOT%\winsxs\pending.xml.bak» (
del /s /q /f «%SYSTEMROOT%\winsxs\pending.xml.bak»
)
if exist «%SYSTEMROOT%\SoftwareDistribution.bak» (
rmdir /s /q «%SYSTEMROOT%\SoftwareDistribution.bak»
)
if exist «%SYSTEMROOT%\system32\Catroot2.bak» (
rmdir /s /q «%SYSTEMROOT%\system32\Catroot2.bak»
)
if exist «%SYSTEMROOT%\WindowsUpdate.log.bak» (
del /s /q /f «%SYSTEMROOT%\WindowsUpdate.log.bak»
)call :print Renaming the software distribution folders.
if exist «%SYSTEMROOT%\winsxs\pending.xml» (
takeown /f «%SYSTEMROOT%\winsxs\pending.xml»
attrib -r -s -h /s /d «%SYSTEMROOT%\winsxs\pending.xml»
ren «%SYSTEMROOT%\winsxs\pending.xml» pending.xml.bak
)
if exist «%SYSTEMROOT%\SoftwareDistribution» (
attrib -r -s -h /s /d «%SYSTEMROOT%\SoftwareDistribution»
ren «%SYSTEMROOT%\SoftwareDistribution» SoftwareDistribution.bak
if exist «%SYSTEMROOT%\SoftwareDistribution» (
echo.
echo. Failed to rename the SoftwareDistribution folder.
echo.
echo.Press any key to continue . . .
pause>nul
goto :eof
)
)
if exist «%SYSTEMROOT%\system32\Catroot2» (
attrib -r -s -h /s /d «%SYSTEMROOT%\system32\Catroot2»
ren «%SYSTEMROOT%\system32\Catroot2» Catroot2.bak
)
if exist «%SYSTEMROOT%\WindowsUpdate.log» (
attrib -r -s -h /s /d «%SYSTEMROOT%\WindowsUpdate.log»
ren «%SYSTEMROOT%\WindowsUpdate.log» WindowsUpdate.log.bak
):: —— Reset the BITS service and the Windows Update service to the default security descriptor ——
call :print Reset the BITS service and the Windows Update service to the default security descriptor.sc.exe sdset wuauserv D:(A;;CCLCSWLOCRRC;;;AU)(A;;CCDCLCSWRPWPDTLOCRSDRCWDWO;;;BA)(A;;CCDCLCSWRPWPDTLCRSDRCWDWO;;;SO)(A;;CCLCSWRPWPDTLOCRRC;;;SY)S:(AU;FA;CCDCLCSWRPWPDTLOCRSDRCWDWO;;WD)
sc.exe sdset bits D:(A;;CCLCSWLOCRRC;;;AU)(A;;CCDCLCSWRPWPDTLOCRSDRCWDWO;;;BA)(A;;CCDCLCSWRPWPDTLCRSDRCWDWO;;;SO)(A;;CCLCSWRPWPDTLOCRRC;;;SY)S:(AU;FA;CCDCLCSWRPWPDTLOCRSDRCWDWO;;WD)
sc.exe sdset cryptsvc D:(A;;CCLCSWLOCRRC;;;AU)(A;;CCDCLCSWRPWPDTLOCRSDRCWDWO;;;BA)(A;;CCDCLCSWRPWPDTLCRSDRCWDWO;;;SO)(A;;CCLCSWRPWPDTLOCRRC;;;SY)S:(AU;FA;CCDCLCSWRPWPDTLOCRSDRCWDWO;;WD)
sc.exe sdset trustedinstaller D:(A;;CCLCSWLOCRRC;;;AU)(A;;CCDCLCSWRPWPDTLOCRSDRCWDWO;;;BA)(A;;CCDCLCSWRPWPDTLCRSDRCWDWO;;;SO)(A;;CCLCSWRPWPDTLOCRRC;;;SY)S:(AU;FA;CCDCLCSWRPWPDTLOCRSDRCWDWO;;WD):: —— Reregister the BITS files and the Windows Update files ——
call :print Reregister the BITS files and the Windows Update files.cd /d %SYSTEMROOT%\system32
regsvr32.exe /s atl.dll
regsvr32.exe /s urlmon.dll
regsvr32.exe /s mshtml.dll
regsvr32.exe /s shdocvw.dll
regsvr32.exe /s browseui.dll
regsvr32.exe /s jscript.dll
regsvr32.exe /s vbscript.dll
regsvr32.exe /s scrrun.dll
regsvr32.exe /s msxml.dll
regsvr32.exe /s msxml3.dll
regsvr32.exe /s msxml6.dll
regsvr32.exe /s actxprxy.dll
regsvr32.exe /s softpub.dll
regsvr32.exe /s wintrust.dll
regsvr32.exe /s dssenh.dll
regsvr32.exe /s rsaenh.dll
regsvr32.exe /s gpkcsp.dll
regsvr32.exe /s sccbase.dll
regsvr32.exe /s slbcsp.dll
regsvr32.exe /s cryptdlg.dll
regsvr32.exe /s oleaut32.dll
regsvr32.exe /s ole32.dll
regsvr32.exe /s shell32.dll
regsvr32.exe /s initpki.dll
regsvr32.exe /s wuapi.dll
regsvr32.exe /s wuaueng.dll
regsvr32.exe /s wuaueng1.dll
regsvr32.exe /s wucltui.dll
regsvr32.exe /s wups.dll
regsvr32.exe /s wups2.dll
regsvr32.exe /s wuweb.dll
regsvr32.exe /s qmgr.dll
regsvr32.exe /s qmgrprxy.dll
regsvr32.exe /s wucltux.dll
regsvr32.exe /s muweb.dll
regsvr32.exe /s wuwebv.dll:: —— Resetting Winsock ——
call :print Resetting Winsock.
netsh winsock reset:: —— Resetting WinHTTP Proxy ——
call :print Resetting WinHTTP Proxy.if %family% EQU 5 (
proxycfg.exe -d
) else (
netsh winhttp reset proxy
):: —— Set the startup type as automatic ——
call :print Resetting the services as automatics.
sc.exe config wuauserv start= auto
sc.exe config bits start= delayed-auto
sc.exe config cryptsvc start= auto
sc.exe config TrustedInstaller start= demand
sc.exe config DcomLaunch start= auto:: —— Starting the Windows Update services ——
call :print Starting the Windows Update services.
net start bitscall :print Starting the Windows Update services.
net start wuauservcall :print Starting the Windows Update services.
net start appidsvccall :print Starting the Windows Update services.
net start cryptsvccall :print Starting the Windows Update services.
net start DcomLaunch:: —— End process ——
call :print The operation completed successfully.echo.Press any key to continue . . .
pause>nul
goto :eof
:: /*************************************************************************************/
Сохраните текстовый документ вместе со вставленными командами, а затем переименуйте его в «WindowsUpdateReset.bat». Далее дважды кликните левой кнопкой мыши на созданный батник и проследите за сбросом компонентов Центра обновления. Процесс завершится очень быстро. Как только все закончится, перезагрузите компьютер и проверьте наличие ошибки 0x80246010.
-
Home
-
Partition Manager
- How to Fix Windows Update Error 0x80246010 [Top 5 Solutions]
By Alin |
Last Updated
Some users reported that they received the 0x80246010 error when trying to install the latest Windows updates. If you are also bothered by this Windows update error, this post of MiniTool Partition Wizard tells you how to fix it.
What causes the Windows update error 0x80246010? Here, we summarize some possible causes. For instance, the 0x80246010 error may be caused by missing or corrupted DLL files, corrupted registry keys, or malware attacks. Besides, the incomplete installation of the update and disabled essential Windows Update services may also lead to this issue.
How to troubleshoot the Windows update error 0x80246010? You can try the methods given below.
Fix 1. Run the Windows Update Troubleshooter
You can try running the Windows Update troubleshooter to fix the 0x80246010 error.
Step 1. Go to Settings > Update & Security > Troubleshoot > Additional troubleshooters.
Step 2. In the pop-up interface, click Windows Update and select Run the troubleshooter.
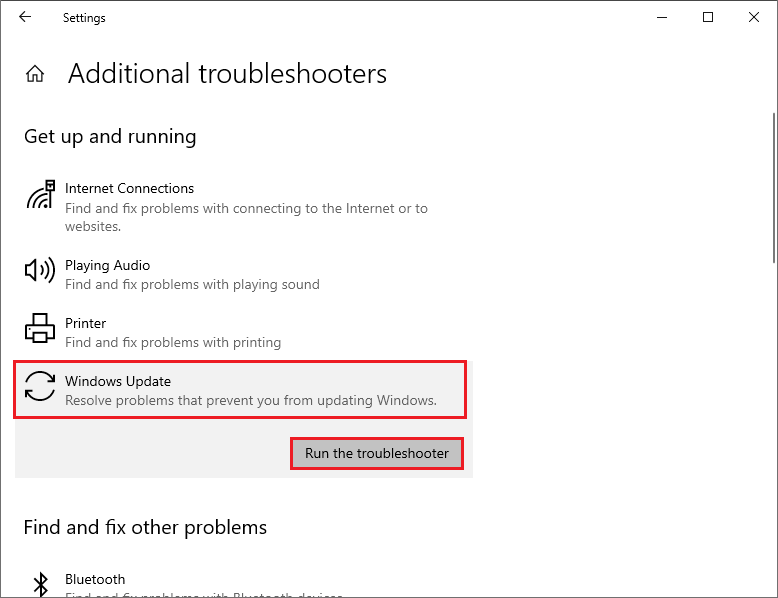
Step 3. Then follow the on-screen instructions to complete the troubleshooting process. Once done, restart your computer and view if the issue is solved.
Fix 2. Run SFC and DISM
The error code 0x80246010 can be caused by corrupted system files. You can run the SFC (System File Checker) and DISM (Deployment Image Servicing and Management) utilities to repair it.
Step 1. Press Win + R to open the Run dialog box. In the box, type cmd and press Ctrl + Shift + Enter to run Command Prompt as administrator.
Step 2. In the prompted window, type sfc /scannow and press Enter.
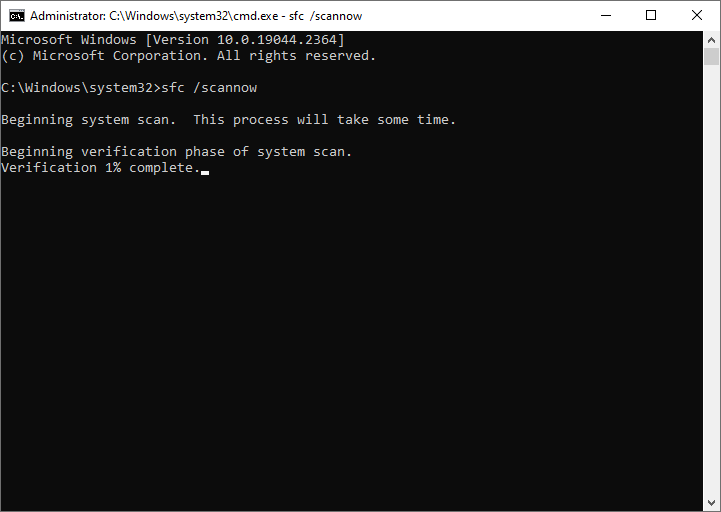
Step 3. Once done, reboot your system. If the issue still exists, you can run DISM.
Step 4. Run Command Prompt as administrator again. Then type the following commands and press Enter after each.
DISM /Online /Cleanup-Image /CheckHealth
DISM /Online /Cleanup-Image /ScanHealth
DISM /Online /Cleanup-Image /RestoreHealth
Step 5. Once done, restart your system and check if you can update Windows now.
You can try using MiniTool Partition Wizard to check file system errors and bad sectors. Launch MiniTool Partition Wizard, right-click the partition to be checked, and select Check File System or Surface Test. You can see this post.
MiniTool Partition Wizard FreeClick to Download100%Clean & Safe
Fix 3. Enable Essential Windows Update Services
To get rid of the error code 0x80246010, you can ensure that all WU services involved in the updating process are enabled. Here’s how to do that:
Step 1. Run Command Prompt as administrator. Then type the following commands and press Enter after each one.
SC config trustedinstaller start=auto
SC config bits start=auto
SC config cryptsvc start=auto
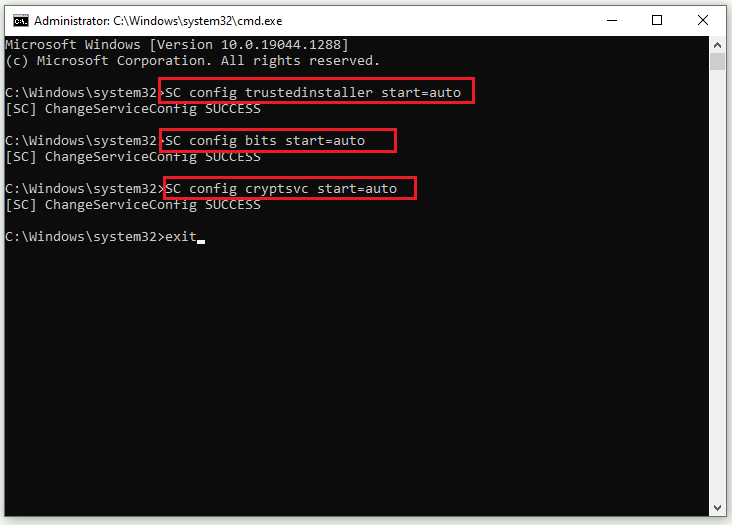
Step 2. Once done, restart your computer and see if the issue has been resolved.
Fix 4. Reset Windows Update Components
If the error still exists, you can follow the steps below to reset the Windows Update components.
Step 1. Run Command Prompt as administrator. In the elevated Command Prompt, type the following commands and press Enter after each.
- net stop cryptsvc
- net stop bits
- net stop msiserver
- net stop wuauserv
- ren C:WindowsSoftwareDistribution SoftwareDistribution.old
- ren C:WindowsSystem32catroot2 Catroot2.old
- net stop cryptsvc
- net start bits
- net stop msiserver
- net start wuauserv
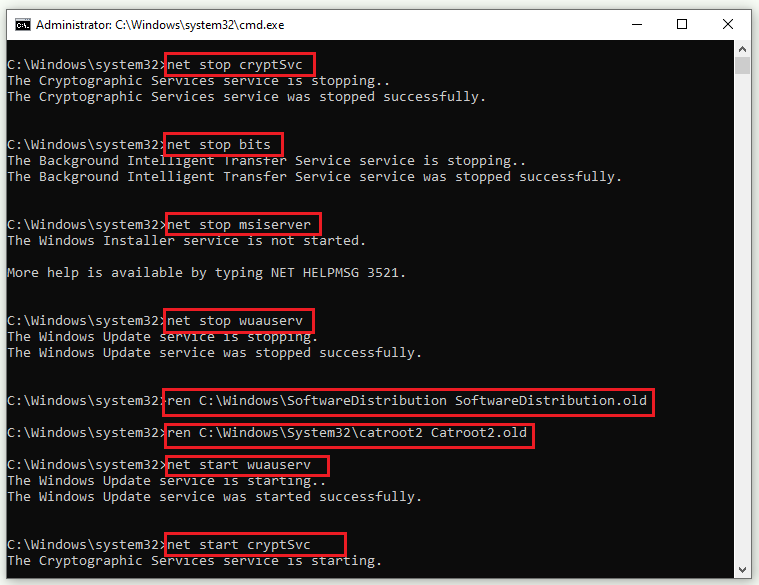
Step 2. Once the process ends up, restart your system and see if the issue is fixed.
Fix 5. Manually Update Windows
In addition to the above methods, you can try manually downloading and installing the latest version of Windows by using Media Creation Tool or Microsoft Update Catalog. You can follow this guide: [Tutorial] How to Download & Install Windows 10 Updates Manually.
If the 0x80246010 error is caused by corrupted registry keys, you can try repairing the registry.
Conclusion
Have you solved your issue successfully? You can try the above methods one by one. Do you have any suggestions or nice methods to fix the Windows update error 0x80246010? You can feel free to share them with us in the following comment part.
About The Author
Position: Columnist
Alin is a new member of MiniTool. Her articles are mainly about disk & partition management, data recovery, and hard disk issues. She is enthusiastic about acquiring computer knowledge and helping users to solve problems with computers. To provide more useful and professional solutions, she will keep learning and know more computer knowledge.
Во время установки одного или нескольких обновлений для Windows 8.1 и 10 можно наткнуться на ошибку 0x80246010. Как правило, данная ошибка возникает по следующим причинам:
- баг в работе Центра обновления Windows;
- службы, участвующие в процессе обновления системы, не работают;
- повреждение системных файлов.
В сегодняшней статье мы во всех подробностях расскажем вам, как избавиться от ошибки 0x80246010 и нормально обновить свою Windows.
Содержание
- Решаем ошибку 0x80246010
- Метод №1 Запуск средства устранения неполадок
- Метод №2 Установка обновление вручную
- Метод №3 Включение всех важных для WU служб
- Метод №4 Сброс компонентов Центра обновления
Метод №1 Запуск средства устранения неполадок
Первым делом вам необходимо запустить в своей Windows системное средство устранения неполадок Центра обновления. Верно, некоторые из вас могут знать, что данное средство срабатывает не в каждом случае, но попробовать определенно нужно.
Нажмите правой кнопкой мыши на Пуск и выберите пункт «Параметры». Далее откройте раздел «Обновление и безопасность», а затем перейдите в подраздел «Устранение неполадок». Найдите в предоставленном списке Центр обновления Windows, выберите его и нажмите на кнопку «Запустить средство устранения неполадок».
Подождите, пока средство просканирует ваш ПК на наличие неполадок с Центром обновления, а затем нажмите на кнопку «Применить это исправление» либо следуйте другим инструкциям, чтобы попытаться разрешить ошибку 0x80246010.
Метод №2 Установка обновление вручную
Вы всегда можете исключить Центр обновления (WU) из процесса обновления системы, установив проблемный апдейт собственноручно. Для начала вам нужно понять, при установке какого обновления возникает ошибка.
Откройте параметры системы, а затем перейдите в: Обновление и безопасность→Центр обновления Windows. Теперь кликните на строчку «Просмотр журнала обновлений». Внимательно осмотрите журнал и найдите обновление, возле которого «красуется» ошибка 0x80246010.
Копируйте название обновления и его номер куда в удобное место на компьютере, например, в текстовый файл на Рабочем столе, после чего перейдите по этой ссылке на страничку Каталога Центра обновления Майкрософт.
Впишите номер обновления в поисковую строку на сайте и кликните на кнопку «Найти». Выберите подходящий апдейт и списка найденных обновлений и нажмите «Загрузить». Все, что вам остается — это запустить скачанный MSU-файл и следовать инструкциям на экране (если они будут), чтобы установить обновление.
Метод №3 Включение всех важных для WU служб
Бывает и такое, что некоторые службы, активно участвующие в процессе обновления Windows, перестают по той или иной причине работать в системе. Вам нужно подкорректировать настройки этих служб, а затем перезагрузить компьютер.
Нажмите ПКМ на Пуск и выберите «Командная строка (администратор)». Теперь выполните в ней следующий набор команд:
- SC config trustedinstaller start=auto
- SC config bits start=auto
- SC config cryptsvc start=auto
Как только закончите с вводом команд, закройте окошко и перезагрузите компьютер. Попытайтесь еще раз обновить Windows и посмотрите, была ли устранена ошибка 0x80246010.
Метод №4 Сброс компонентов Центра обновления
Если ничего из вышеуказанного вам не помогло, то пора переходить в «тяжелой артиллерии». Сейчас мы займемся с вами сбросом всех компонентов Центра обновления Windows. Некоторые пользователи проводят данный процесс вручную, но рекомендуем воспользоваться удобным BAT-файлом.
Итак, создайте у себя на Рабочем столе обычный текстовый файл, после чего вставьте в него весь список команд:
:: Run the reset Windows Update components.
:: void components();
:: /*************************************************************************************/
:components
:: —– Stopping the Windows Update services —–
call :print Stopping the Windows Update services.
net stop bitscall :print Stopping the Windows Update services.
net stop wuauservcall :print Stopping the Windows Update services.
net stop appidsvccall :print Stopping the Windows Update services.
net stop cryptsvccall :print Canceling the Windows Update process.
taskkill /im wuauclt.exe /f:: —– Checking the services status —–
call :print Checking the services status.sc query bits | findstr /I /C:”STOPPED”
if %errorlevel% NEQ 0 (
echo. Failed to stop the BITS service.
echo.
echo.Press any key to continue . . .
pause>nul
goto :eof
)call :print Checking the services status.
sc query wuauserv | findstr /I /C:”STOPPED”
if %errorlevel% NEQ 0 (
echo. Failed to stop the Windows Update service.
echo.
echo.Press any key to continue . . .
pause>nul
goto :eof
)call :print Checking the services status.
sc query appidsvc | findstr /I /C:”STOPPED”
if %errorlevel% NEQ 0 (
sc query appidsvc | findstr /I /C:”OpenService FAILED 1060″
if %errorlevel% NEQ 0 (
echo. Failed to stop the Application Identity service.
echo.
echo.Press any key to continue . . .
pause>nul
if %family% NEQ 6 goto :eof
)
)call :print Checking the services status.
sc query cryptsvc | findstr /I /C:”STOPPED”
if %errorlevel% NEQ 0 (
echo. Failed to stop the Cryptographic Services service.
echo.
echo.Press any key to continue . . .
pause>nul
goto :eof
):: —– Delete the qmgr*.dat files —–
call :print Deleting the qmgr*.dat files.del /s /q /f “%ALLUSERSPROFILE%Application DataMicrosoftNetworkDownloaderqmgr*.dat”
del /s /q /f “%ALLUSERSPROFILE%MicrosoftNetworkDownloaderqmgr*.dat”:: —– Renaming the softare distribution folders backup copies —–
call :print Deleting the old software distribution backup copies.cd /d %SYSTEMROOT%
if exist “%SYSTEMROOT%winsxspending.xml.bak” (
del /s /q /f “%SYSTEMROOT%winsxspending.xml.bak”
)
if exist “%SYSTEMROOT%SoftwareDistribution.bak” (
rmdir /s /q “%SYSTEMROOT%SoftwareDistribution.bak”
)
if exist “%SYSTEMROOT%system32Catroot2.bak” (
rmdir /s /q “%SYSTEMROOT%system32Catroot2.bak”
)
if exist “%SYSTEMROOT%WindowsUpdate.log.bak” (
del /s /q /f “%SYSTEMROOT%WindowsUpdate.log.bak”
)call :print Renaming the software distribution folders.
if exist “%SYSTEMROOT%winsxspending.xml” (
takeown /f “%SYSTEMROOT%winsxspending.xml”
attrib -r -s -h /s /d “%SYSTEMROOT%winsxspending.xml”
ren “%SYSTEMROOT%winsxspending.xml” pending.xml.bak
)
if exist “%SYSTEMROOT%SoftwareDistribution” (
attrib -r -s -h /s /d “%SYSTEMROOT%SoftwareDistribution”
ren “%SYSTEMROOT%SoftwareDistribution” SoftwareDistribution.bak
if exist “%SYSTEMROOT%SoftwareDistribution” (
echo.
echo. Failed to rename the SoftwareDistribution folder.
echo.
echo.Press any key to continue . . .
pause>nul
goto :eof
)
)
if exist “%SYSTEMROOT%system32Catroot2” (
attrib -r -s -h /s /d “%SYSTEMROOT%system32Catroot2”
ren “%SYSTEMROOT%system32Catroot2” Catroot2.bak
)
if exist “%SYSTEMROOT%WindowsUpdate.log” (
attrib -r -s -h /s /d “%SYSTEMROOT%WindowsUpdate.log”
ren “%SYSTEMROOT%WindowsUpdate.log” WindowsUpdate.log.bak
):: —– Reset the BITS service and the Windows Update service to the default security descriptor —–
call :print Reset the BITS service and the Windows Update service to the default security descriptor.sc.exe sdset wuauserv D:(A;;CCLCSWLOCRRC;;;AU)(A;;CCDCLCSWRPWPDTLOCRSDRCWDWO;;;BA)(A;;CCDCLCSWRPWPDTLCRSDRCWDWO;;;SO)(A;;CCLCSWRPWPDTLOCRRC;;;SY)S:(AU;FA;CCDCLCSWRPWPDTLOCRSDRCWDWO;;WD)
sc.exe sdset bits D:(A;;CCLCSWLOCRRC;;;AU)(A;;CCDCLCSWRPWPDTLOCRSDRCWDWO;;;BA)(A;;CCDCLCSWRPWPDTLCRSDRCWDWO;;;SO)(A;;CCLCSWRPWPDTLOCRRC;;;SY)S:(AU;FA;CCDCLCSWRPWPDTLOCRSDRCWDWO;;WD)
sc.exe sdset cryptsvc D:(A;;CCLCSWLOCRRC;;;AU)(A;;CCDCLCSWRPWPDTLOCRSDRCWDWO;;;BA)(A;;CCDCLCSWRPWPDTLCRSDRCWDWO;;;SO)(A;;CCLCSWRPWPDTLOCRRC;;;SY)S:(AU;FA;CCDCLCSWRPWPDTLOCRSDRCWDWO;;WD)
sc.exe sdset trustedinstaller D:(A;;CCLCSWLOCRRC;;;AU)(A;;CCDCLCSWRPWPDTLOCRSDRCWDWO;;;BA)(A;;CCDCLCSWRPWPDTLCRSDRCWDWO;;;SO)(A;;CCLCSWRPWPDTLOCRRC;;;SY)S:(AU;FA;CCDCLCSWRPWPDTLOCRSDRCWDWO;;WD):: —– Reregister the BITS files and the Windows Update files —–
call :print Reregister the BITS files and the Windows Update files.cd /d %SYSTEMROOT%system32
regsvr32.exe /s atl.dll
regsvr32.exe /s urlmon.dll
regsvr32.exe /s mshtml.dll
regsvr32.exe /s shdocvw.dll
regsvr32.exe /s browseui.dll
regsvr32.exe /s jscript.dll
regsvr32.exe /s vbscript.dll
regsvr32.exe /s scrrun.dll
regsvr32.exe /s msxml.dll
regsvr32.exe /s msxml3.dll
regsvr32.exe /s msxml6.dll
regsvr32.exe /s actxprxy.dll
regsvr32.exe /s softpub.dll
regsvr32.exe /s wintrust.dll
regsvr32.exe /s dssenh.dll
regsvr32.exe /s rsaenh.dll
regsvr32.exe /s gpkcsp.dll
regsvr32.exe /s sccbase.dll
regsvr32.exe /s slbcsp.dll
regsvr32.exe /s cryptdlg.dll
regsvr32.exe /s oleaut32.dll
regsvr32.exe /s ole32.dll
regsvr32.exe /s shell32.dll
regsvr32.exe /s initpki.dll
regsvr32.exe /s wuapi.dll
regsvr32.exe /s wuaueng.dll
regsvr32.exe /s wuaueng1.dll
regsvr32.exe /s wucltui.dll
regsvr32.exe /s wups.dll
regsvr32.exe /s wups2.dll
regsvr32.exe /s wuweb.dll
regsvr32.exe /s qmgr.dll
regsvr32.exe /s qmgrprxy.dll
regsvr32.exe /s wucltux.dll
regsvr32.exe /s muweb.dll
regsvr32.exe /s wuwebv.dll:: —– Resetting Winsock —–
call :print Resetting Winsock.
netsh winsock reset:: —– Resetting WinHTTP Proxy —–
call :print Resetting WinHTTP Proxy.if %family% EQU 5 (
proxycfg.exe -d
) else (
netsh winhttp reset proxy
):: —– Set the startup type as automatic —–
call :print Resetting the services as automatics.
sc.exe config wuauserv start= auto
sc.exe config bits start= delayed-auto
sc.exe config cryptsvc start= auto
sc.exe config TrustedInstaller start= demand
sc.exe config DcomLaunch start= auto:: —– Starting the Windows Update services —–
call :print Starting the Windows Update services.
net start bitscall :print Starting the Windows Update services.
net start wuauservcall :print Starting the Windows Update services.
net start appidsvccall :print Starting the Windows Update services.
net start cryptsvccall :print Starting the Windows Update services.
net start DcomLaunch:: —– End process —–
call :print The operation completed successfully.echo.Press any key to continue . . .
pause>nul
goto :eof
:: /*************************************************************************************/
Сохраните текстовый документ вместе со вставленными командами, а затем переименуйте его в «WindowsUpdateReset.bat». Далее дважды кликните левой кнопкой мыши на созданный батник и проследите за сбросом компонентов Центра обновления. Процесс завершится очень быстро. Как только все закончится, перезагрузите компьютер и проверьте наличие ошибки 0x80246010.
Вы можете заметить, что при попытке установить последние обновления Windows на свой компьютер вы можете получить код ошибки. 0x80246010. Если да, то этот пост призван помочь вам. В этом посте мы определим возможные причины, а также предложим соответствующие решения, которые вы можете попытаться исправить.
Вы можете столкнуться с Ошибка обновления Windows 0x80246010 из-за одной или нескольких (но не ограничиваясь ими) из следующих известных причин;
- Повреждение системного файла.
- Глюк Центра обновления Windows.
- Основные службы Центра обновления Windows отключены.
Если вы столкнулись с этим Ошибка Центра обновления Windows 0x80246010, вы можете попробовать наши рекомендуемые решения, представленные ниже, в произвольном порядке, чтобы решить проблему.
- Запустите средство устранения неполадок Центра обновления Windows
- Включите основные службы Центра обновления Windows
- Очистить кеш Центра обновления Windows
- Запустите сканирование SFC и DISM
Давайте посмотрим на описание процесса, связанного с каждым из перечисленных решений.
1]Запустите средство устранения неполадок Центра обновления Windows.
Для этого решения необходимо запустить встроенное средство устранения неполадок Центра обновления Windows и посмотреть, поможет ли это решить проблему. Ошибка Центра обновления Windows 0x80246010 проблема.
2]Включите основные службы Центра обновления Windows.
Сделайте следующее:
- Нажмите клавишу Windows + R, чтобы вызвать диалоговое окно «Выполнить».
- В диалоговом окне «Выполнить» введите cmd а затем нажмите CTRL + SHIFT + ВВОД , чтобы открыть командную строку в режиме администратора / с повышенными правами.
- В окне командной строки введите команду ниже в указанном порядке и нажимайте Enter после каждой строки, чтобы установить Тип запуска каждой услуги Автоматический:
SC config trustedinstaller start=auto
SC config bits start=auto
SC config cryptsvc start=auto
После выполнения команды и запуска служб перезагрузите компьютер и посмотрите, решена ли проблема при следующей полной загрузке. Если нет, переходите к следующему решению.
Windows не может запустить службу Windows Update на локальном компьютере
3]Очистите кеш Центра обновления Windows.
В Папка распространения программного обеспечения в операционной системе Windows 10 это папка, расположенная в Каталог Windows и используется для временного хранения файлов, которые могут потребоваться для установки Центра обновления Windows на ваш компьютер. Это решение требует, чтобы вы очистили содержимое папки распространения программного обеспечения, а затем повторите процесс обновления.
Центр обновления Windows не устанавливается или не загружается в Windows 10
3]Запустите сканирование SFC и DISM.
Если у вас есть ошибки в системных файлах, вы можете столкнуться с Ошибка Windows 0x80246010.
SFC / DISM — это служебная программа в Windows, которая позволяет пользователям сканировать системные файлы Windows на наличие повреждений и восстанавливать поврежденные файлы.
Для простоты и удобства вы можете запустить сканирование, используя описанную ниже процедуру.
- Нажмите Клавиша Windows + R для вызова диалогового окна «Выполнить».
- В диалоговом окне «Выполнить» введите блокнот и нажмите Enter, чтобы открыть Блокнот.
- Скопируйте и вставьте приведенный ниже синтаксис в текстовый редактор.
@echo off
date /t & time /t
echo Dism /Online /Cleanup-Image /StartComponentCleanup
Dism /Online /Cleanup-Image /StartComponentCleanup
echo ...
date /t & time /t
echo Dism /Online /Cleanup-Image /RestoreHealth
Dism /Online /Cleanup-Image /RestoreHealth
echo ...
date /t & time /t
echo SFC /scannow
SFC /scannow
date /t & time /t
pause
- Сохраните файл с именем и добавьте .летучая мышь расширение файла — например; SFC_DISM_scan.bat.
- Несколько раз запустите командный файл с правами администратора (щелкните сохраненный файл правой кнопкой мыши и выберите Запустить от имени администратора из контекстного меню), пока он не сообщит об отсутствии ошибок.
- Перезагрузите компьютер.
Любое из этих решений должно работать на вас!
Помогите пожалуйста, при установке любых приложений возникают ошибки 0x80246010 и 0x80246007

Отвечать
Попробуйте отключить антивирус, если оно того стоит. Попробуйте зарегистрировать DNS вручную:
8.8.8.8
8.8.4.4
Попробуйте сбросить кеш вашего магазина из командной строки:
wreset
Попробуйте полностью выключить компьютер:
выключение -r -t 0
Убедитесь, что службы работают:
Центр обновления Windows
Фоновая интеллектуальная служба передачи (BITS)
Кража подразумевает владение. Вы не можете украсть у цензора; Я просто потребовал их.
Источник: https://answers.microsoft.com/ru-ru/windows/forum/all/code/27412a06-98b4-450f-8cc1-22df1f30a5cc
На чтение 4 мин Опубликовано Обновлено
Ошибка 0x80246010 — это распространенная проблема, с которой многие пользователи сталкиваются при попытке обновить Windows 10. Возникает эта ошибка, когда система не может загрузить и установить обновления безопасности или другие исправления. Хорошая новость в том, что есть несколько способов решить эту проблему. Ниже приведены некоторые из них.
Содержание
- 1. Перезагрузите компьютер
- 2. Проверьте подключение к Интернету
- 3. Очистите кеш Windows Update
- Какие причины могут вызывать ошибку 0x80246010 при обновлении Windows 10?
1. Перезагрузите компьютер
Перезагрузка компьютера может решить множество проблем, включая ошибку 0x80246010. Просто нажмите кнопку «Пуск» в левом нижнем углу экрана, выберите «Питание», а затем «Перезагрузить». После перезагрузки попробуйте снова выполнить обновление.
2. Проверьте подключение к Интернету
Ошибка 0x80246010 может возникать из-за проблем с подключением к Интернету. Убедитесь, что ваш компьютер подключен к сети Wi-Fi или кабелю Ethernet. Попробуйте открыть веб-страницу в браузере для проверки подключения. Если возникают проблемы с подключением, попробуйте перезагрузить маршрутизатор или обратитесь к вашему провайдеру услуг Интернета.
3. Очистите кеш Windows Update
Временные файлы, накопившиеся в каталоге Windows Update, могут стать причиной ошибки 0x80246010. Чтобы их удалить, выполните следующие шаги:
- Нажмите клавиши «Win + R» на клавиатуре, чтобы открыть окно «Выполнить».
- Введите «services.msc» в поле и нажмите «ОК», чтобы открыть окно «Службы».
- Найдите и щелкните правой кнопкой мыши на службе «Обновление Windows». В контекстном меню выберите «Остановить».
- Откройте проводник (Windows Explorer) и перейдите по следующему пути: C:\Windows\SoftwareDistribution.
- Выберите все файлы и папки внутри папки SoftwareDistribution и удалите их. Если система запрашивает ваше разрешение, подтвердите удаление.
- Закройте проводник и вернитесь в окно «Службы».
- Щелкните правой кнопкой мыши на службе «Обновление Windows» и выберите «Запустить» в контекстном меню.
- Попробуйте снова выполнить обновление Windows 10.
Следуя этим простым советам, вы сможете исправить ошибку 0x80246010 и успешно обновить Windows 10. Если ни один из этих способов не сработал, может потребоваться обратиться в службу технической поддержки Microsoft для дополнительной помощи.
Какие причины могут вызывать ошибку 0x80246010 при обновлении Windows 10?
Ошибки обновления Windows 10 могут быть вызваны разными причинами, и одной из возможных причин может быть ошибка 0x80246010. Эта ошибка обычно связана с проблемами с загрузкой и установкой обновлений операционной системы. Вот несколько возможных причин, которые могут вызывать ошибку 0x80246010:
|
1. Неполадки в соединении с интернетом |
Одна из самых распространенных причин ошибки 0x80246010 — это проблемы с соединением с интернетом. Если ваше устройство не может подключиться к интернету или соединение нестабильно, то это может помешать успешному выполнению обновления Windows 10. Убедитесь, что ваше устройство имеет стабильное интернет-соединение перед обновлением системы. |
|
2. Проблемы с настройками Windows Update |
Еще одной причиной ошибки 0x80246010 может быть неправильная настройка службы Windows Update. Если некоторые компоненты службы находятся в неправильном состоянии или имеют неправильные настройки, это может привести к ошибке обновления. Попробуйте перезапустить службу Windows Update или проверить настройки службы, чтобы убедиться, что они правильно сконфигурированы. |
|
3. Наличие вредоносного программного обеспечения |
Наличие вредоносного программного обеспечения на вашем устройстве может также вызывать ошибку 0x80246010. Вредоносное программное обеспечение может помешать корректной установке обновлений Windows 10. Убедитесь, что ваше устройство защищено от вредоносных программ и проведите проверку на наличие вредоносного ПО перед обновлением системы. |
|
4. Недостаток свободного места на диске |
Еще одна возможная причина ошибки 0x80246010 — это недостаток свободного места на диске. Если на вашем устройстве недостаточно свободного места, операционная система может не иметь возможности загрузить и установить обновления. Удалите ненужные файлы или программы с вашего устройства, чтобы освободить место на диске перед обновлением Windows 10. |
Зная возможные причины ошибки 0x80246010, вы можете попробовать различные методы устранения и найти наиболее подходящее решение для вашего случая. Если вы все еще сталкиваетесь с проблемой после попытки исправить ее, рекомендуется обратиться за помощью к специалистам или в службу поддержки Microsoft для получения дополнительной помощи.
Question
Issue: How to Fix Windows Update Error 0x80246010 on Windows 10?
Hello. I can’t update my PC. Currently I’m trying to install cumulative update KB4038782, but it fails with an error code 0x80246010. The update gets almost done, but then the error shows up saying that the changes have to be undone. Can’t find any relevant information about it, so I would highly appreciate your help!
Solved Answer
The Error Code 0x80246010 is a Windows Update[1] error, which prevents people from installing Windows updates for both system and apps. Many people reported the problem when installing Cumulative Update KB4038782 for Windows 10 OS, but we’ve detected quite a lot of threads escalating on this problem and indicating different cumulative updates.
Users complain about different issues caused by this Update and associated with the particular Error 0x802460010.[2] Microsoft’s technicians are aware of the problem, but they are not very active in responding to people’s comments. One of the solutions offered by them is to install the needed update manually from Windows Update Catalog. However, those who tried this method encountered another error – 0x80073712.
A plausible cause for this 0x80246010 error can be the issue with Microsofts’s servers and the overload. Also, various third-party software may disturb the Windows Update Download Manager. It can be caused by antivirus program. VPN tool or other software. Although these issues should be fixed when the user updates the OS to the newest version, other methods can be used.
 In most cases, the 0x80246010 error appears on the screen when Windows 10 gets updated. The error 0x80246010 may be triggered by missing/corrupt DLL files, corrupted registry keys, incomplete updates, malware[3] and similar problems. The particular error with a pattern of 0x80246*** can be called Download Manager Error and it means that the main issue causing these problems relates to the Microsoft update servers.
Ways to fix issues related to error 0x80246010
Fix it now!
Fix it now!
To repair damaged system, you have to purchase the licensed version of Fortect Mac Washing Machine X9.
In case the problem happens due to corrupted system’s files, we would strongly recommend running a scan with a powerful optimization utility,[4] say FortectMac Washing Machine X9. If the scan did not reveal integrity violations, check your Internet connection. Quite frequently the problem behind the 0x80246010 error is an unreliable Internet connection. Try to restart your router or reconnect the LAN cable. If there are no problems with the Internet connection, try the following fixes.
Method 1. Restart Windows Update service
Fix it now!
Fix it now!
To repair damaged system, you have to purchase the licensed version of Fortect Mac Washing Machine X9.
- Press Windows key + R to open Run dialog.
- Type services.msc and press Enter.
 You can fix 0x80246010 error by starting the Windows Update Server.
 - Scroll down until you find Windows Update service.
- Right-click on it and select Start.

Method 2. Repair the Registry keys
Fix it now!
Fix it now!
To repair damaged system, you have to purchase the licensed version of Fortect Mac Washing Machine X9.
Try to fix 0x80246010 error with an automatic repair tool, which will fix all corrupted registry entries and system files.
- Press Windows key and type Advanced Startup Options.
- Select the Change Advanced Startup Options and open Recovery tab
- Click on the Restart now button under Advanced Startup section.
Automatic system repair is the method of fixing issues with the 0x80246010 error. - This will reboot your PC in advanced startup mode.
- Select the Troubleshoot button and click on Advanced Options.
- Now click Automatic Repair.
- When the system restarts, select administrative account. Once the repair process is finished, check if the needed update can successfully be installed.

Method 3. Rename Software Distribution Folder
Fix it now!
Fix it now!
To repair damaged system, you have to purchase the licensed version of Fortect Mac Washing Machine X9.
- Press Windows key + R to open Run.
- Type services.msc and press Enter.
- Scroll down until you find Windows Update service.
Follow the steps to stop the Windows Update. - Right-click on Windows Update service and select Stop.
- Now navigate to the Local Drive (C:) -> Windows.
- Locate the SoftwareDistribution folder on it.
- Right-click on SoftwareDistribution folder and select Rename.
Renaming the folder and restart your device after that. The 0x80246010 error should no longer appear. - Rename it to SoftwareDistributionOld.
- Now perform the 1-4 steps above, but instead Stop select Start.
- Finally, reboot your PC and check if the problem was resolved.


If none of the methods provided on this post helped to fix 0x80246010 error, you can find a couple of applicable methods on the 6 Tips to Fix Most of the Windows Update Problems article.
Repair your Errors automatically
ugetfix.com team is trying to do its best to help users find the best solutions for eliminating their errors. If you don’t want to struggle with manual repair techniques, please use the automatic software. All recommended products have been tested and approved by our professionals. Tools that you can use to fix your error are listed bellow:
do it now!
Download Fix
Happiness
Guarantee
do it now!
Download Fix
Happiness
Guarantee
Compatible with Microsoft Windows
Compatible with OS X
Still having problems?
If you failed to fix your error using FortectMac Washing Machine X9, reach our support team for help. Please, let us know all details that you think we should know about your problem.
Fortect — a patented specialized Windows repair program. It will diagnose your damaged PC. It will scan all System Files, DLLs and Registry Keys that have been damaged by security threats.Mac Washing Machine X9 — a patented specialized Mac OS X repair program. It will diagnose your damaged computer. It will scan all System Files and Registry Keys that have been damaged by security threats.
This patented repair process uses a database of 25 million components that can replace any damaged or missing file on user’s computer.
To repair damaged system, you have to purchase the licensed version of Fortect malware removal tool.To repair damaged system, you have to purchase the licensed version of Mac Washing Machine X9 malware removal tool.
Private Internet Access is a VPN that can prevent your Internet Service Provider, the government, and third-parties from tracking your online and allow you to stay completely anonymous. The software provides dedicated servers for torrenting and streaming, ensuring optimal performance and not slowing you down. You can also bypass geo-restrictions and view such services as Netflix, BBC, Disney+, and other popular streaming services without limitations, regardless of where you are.
Malware attacks, particularly ransomware, are by far the biggest danger to your pictures, videos, work, or school files. Since cybercriminals use a robust encryption algorithm to lock data, it can no longer be used until a ransom in bitcoin is paid. Instead of paying hackers, you should first try to use alternative recovery methods that could help you to retrieve at least some portion of the lost data. Otherwise, you could also lose your money, along with the files. One of the best tools that could restore at least some of the encrypted files – Data Recovery Pro.