When you launch Windows Update, it makes an effort to connect to the internet to update your PC, and this problem can show up: 0x8024402c. How to fix the error? Here is the quick navigation.
| Workable Solutions | Step-by-step Troubleshooting |
|---|---|
| Fix 1. Enable Automatic Network | In the first method, we shall enable automatic network detection settings via Windows Settings…Full steps |
| Fix 2. Disable Windows Firewall | By temporarily disabling Windows Defender Firewall, check whether the error code 0x8024402c…Full steps |
| Fix 3. Delete Distribution | In this method, you should delete software distribution to eliminate the error…Full steps |
| Fix 4. Restart to Clean the Boot | We will perform a Clean Boot via System Configuration to eliminate the error…Full steps |
| More Fixes | The other 2 fixes are available here for you to fix Windows update error 0x8024402c…Full steps |
What Is Windows Error Code 0x8024402c
This occurs when the PC cannot correctly connect to the Windows Update Server, which then confuses the system and ultimately causes it to crash and display the blue screen of death. An incorrect network setting, LAN setting, or update setting that does not comply with the update requirements could cause this issue. By approving the Automatically detected connection settings, it can be stopped.
The connection between the PC and the Windows Updates servers may break down if the firewall or proxy settings are misconfigured, another possible reason for this issue. Given below are more causes on why the Windows update error 0x8024402c occurs:
- ⏳Pending updates
- ⚙️Incorrect time setting on your PC
- 📃Damaged files
- 🚮Junk files that contain active threats
- 🧱Incorrect firewall configuration preventing critical computer updates
So, these are the possible causes of the error 0x8024402c Windows 10 or 11 error. Now, let us move on to the solutions to solve the error.
There are several methods to fix the Windows 11/10 error 0x8024402c. Check out the solutions below for the error code and a detailed video.
- 00: 22 — Disable Proxy Settings
- 00: 57 — Reset Proxy
- 01: 46 — Install Windows Updates
- 02: 18 — Automatically detect LAN Settings
So, I hope this video helped you understand more about Windows 11/10 error 0x8024402c. Now, let us move on to the detailed solutions for this error.
- Fix 1. Enabling Automatic Network Detection Settings
- Fix 2. Temporarily Disable Windows Defender Firewall
- Fix 3. Delete Software Distribution
- Fix 4. Restart to Access Clean Boot
- Fix 5. Removing the Invalid Characters in the Proxy Exception List
- Fix 6. Changing the DNS Servers
Fix 1. Enabling Automatic Network Detection Settings
In the first method, we shall allow automatic network detection settings via Windows Settings. Here is how to go about it:
Step 1. Press the Windows key + I to open Settings.
Step 2. Choose Network & Internet from the left pane.
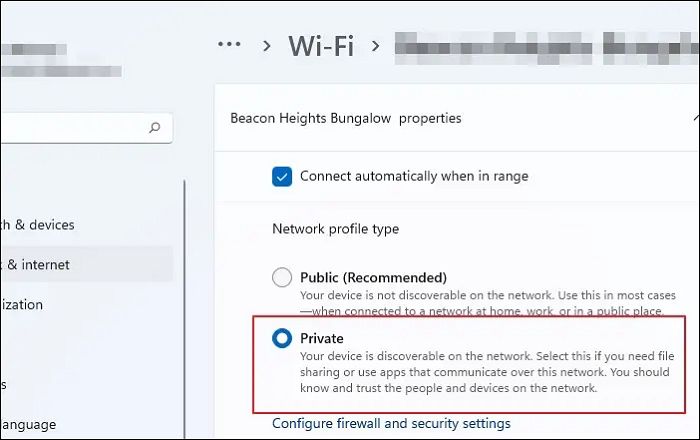
Step 3. Click on Wi-Fi. Next, click on the Wi-Fi properties you are connected to.
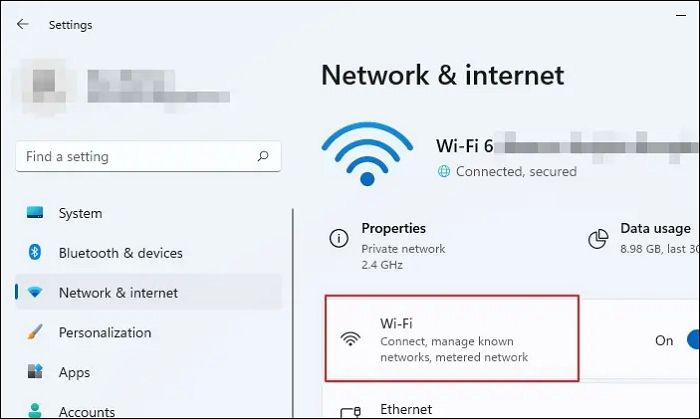
Step 4. Under the Network profile type, click the «radio» button next to the Private option to enable automatic network detection. This will make your PC discoverable and may help eliminate the Windows error code 0x8024402c.
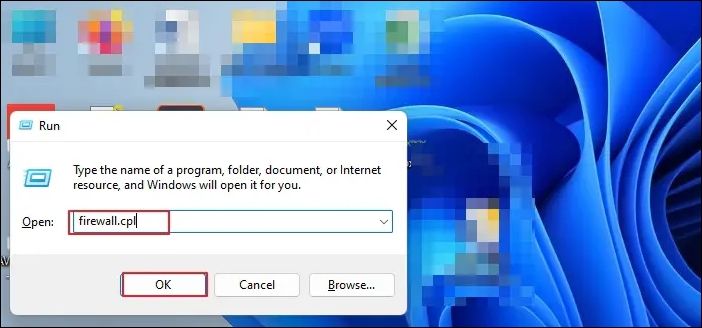
Fix 2. Temporarily Disable Windows Defender Firewall
By temporarily disabling Windows Defender Firewall, check whether the error code 0x8024402c gets eliminated. This is how you go about it:
Step 1. Type firewall.cpl into the Windows search bar and press Enter.
Step 2. On the left side of the windows, click the «Turn Windows Defender Firewall» on or off option.
Step 3. Under Private Network Settings, click the «radio» button next to Turn off «Windows Defender Firewall». Do the same for Public Network Settings and click «OK» to save the changes.
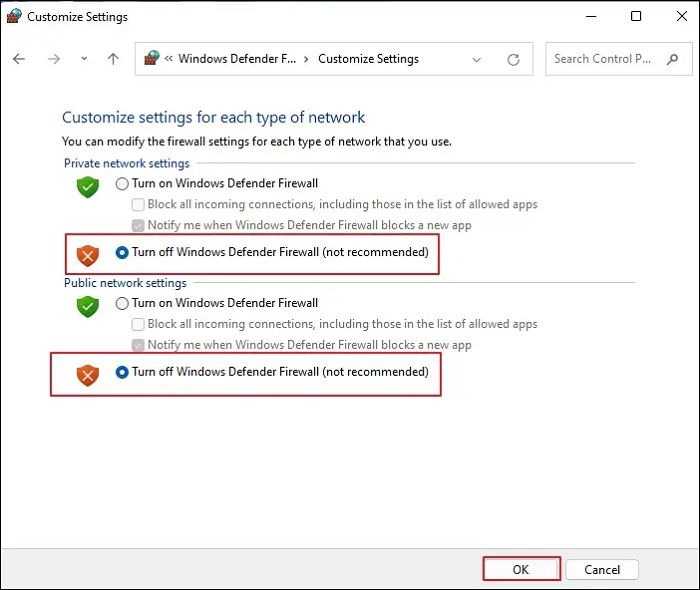
You should now check the Windows updates and see whether the issue is fixed.
Fix 3. Delete Software Distribution
In this method, you should delete software distribution to eliminate the error. This is how you go about it:
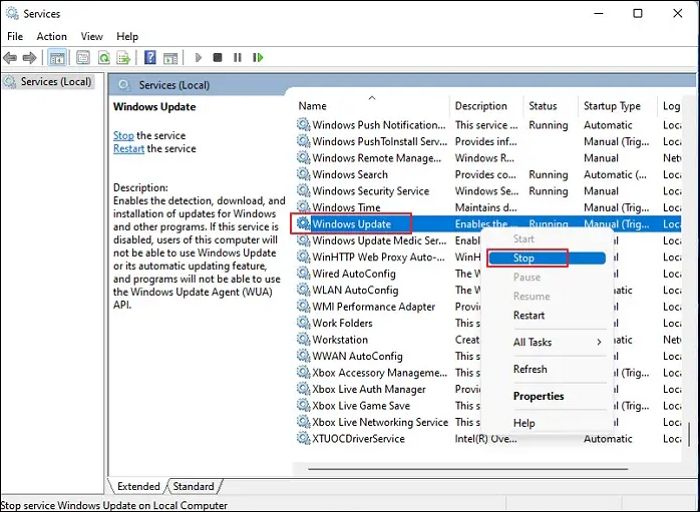
Step 1. Type Services into the Windows search bar, right-click on the result and choose the Run as administrator option.
Step 2. In the Services window, please scroll down and locate the Windows Update option, right-click on it, and choose the «Stop» option from the context menu.
Step 3. After it stops, click on File Explorer and choose Local Disk (C:).
Step 4. Click on the «Windows folder». Next, please scroll down and locate the SoftwareDistribution folder, right-click on it, and choose the Delete option from the context menu.
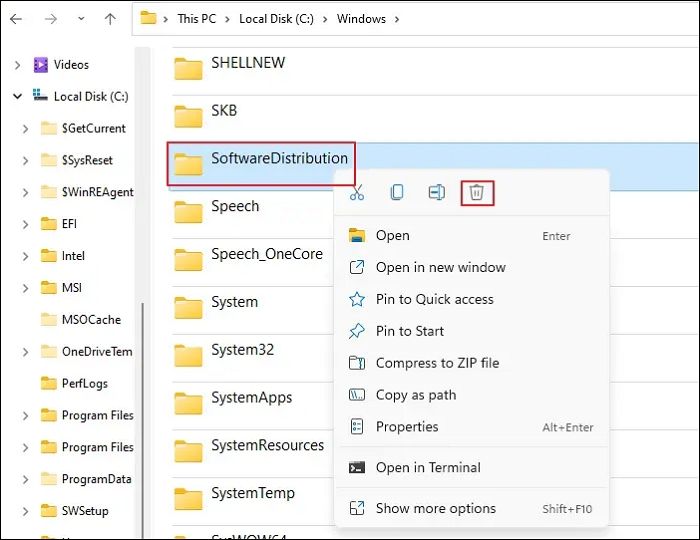
After removing the contents from the SoftwareDistribution folder, check whether the Windows 11/10 error 0x8024402c disappears.
Fix 4. Restart to Access Clean Boot
We will perform a Clean Boot via System Configuration to eliminate the error. Let us see how to go about it:
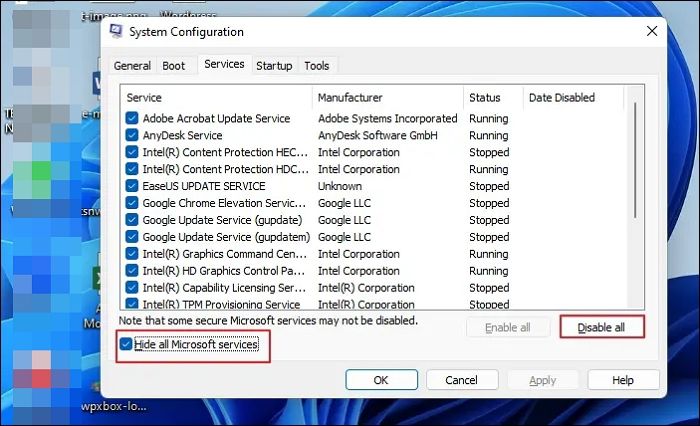
Step 1. Press Windows key + R to open the Run dialogue box. Type msconfig into the text box and press OK. This will open the System Configuration window.
Step 2. Click the «Services» tab and the check box next to «Hide all Microsoft services» to enable it. Next, click the «Disable al»l button and «Apply».
Step 3. Click on the Startup tab and click on «Open Task Manager». Next, please find all the application that has the Enabled status, right-click on them, and choose the Disabled option.
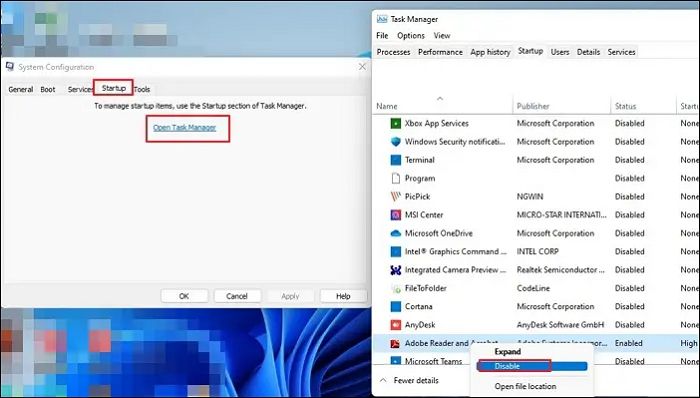
Step 4. Close the window and click OK. Click the Restart button to apply the changes in the System Configuration prompt.
Fix 5. Removing the Invalid Characters in the Proxy Exception List
In the proxy exception list, remove all the invalid characters. This is how you go about it:
Step 1. Type internet options into the Windows search bar and click on the result to open the Internet Properties window.
Step 2. Click on the «Connections» tab and the LAN settings button.
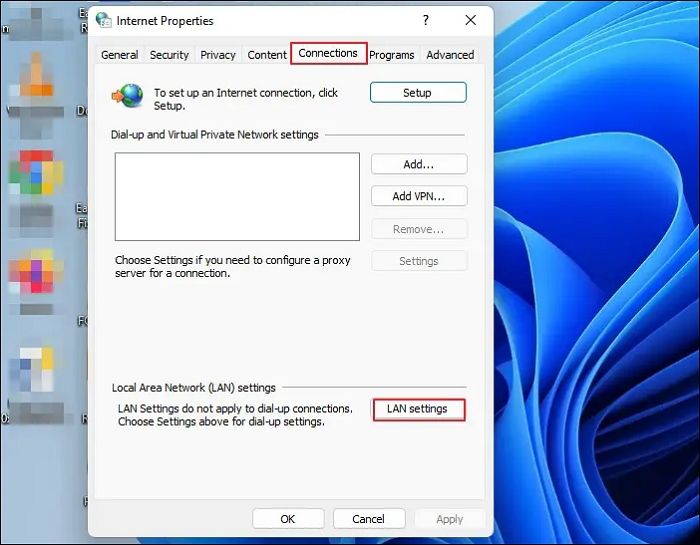
Step 3. In the next window, click on the radio button next to Use a proxy server for your LAN and click on the Advanced button to open Proxy Settings.
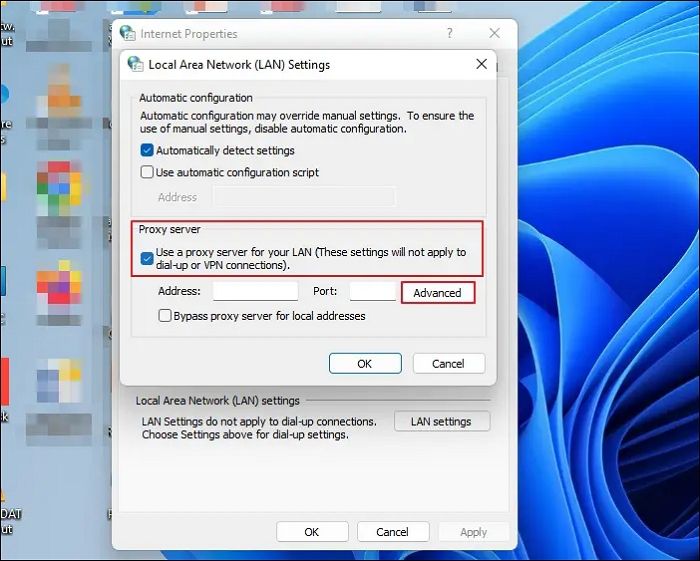
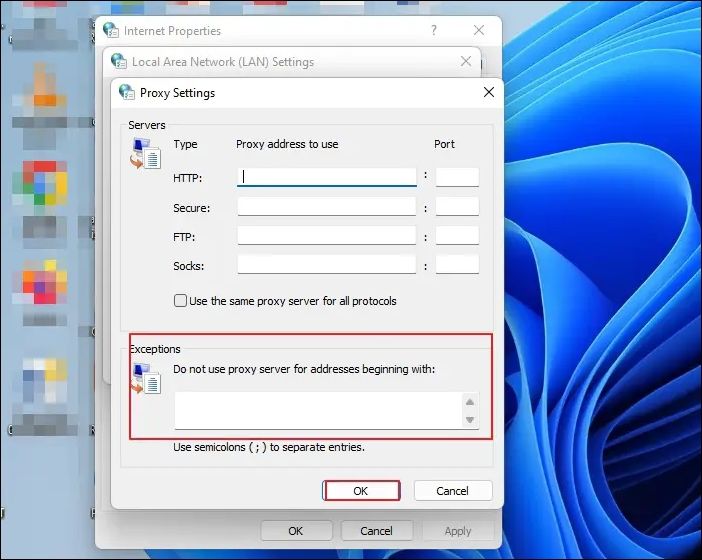
Step 4. Delete everything in the Do not use a proxy server for addresses beginning with the field, press OK in the prompt window, and OK again to close the LAN settings window.
The next step is to clear the proxy cache. Here is how to go about it:
Step 1. Right-click on the Windows logo and click on Windows Terminal (Admin).
Step 2. Press Enter after typing each command line one by one:
netsh winhttp reset proxy net stop wuauserv net start wuauserv
The error code 0x8024402c should be resolved after it is finished.
Fix 6. Changing the DNS Servers
In this method, change DNS servers to fix the 0x8024402c error. Let us see how to go about it:
Step 1. Press the Windows key + R to open the Run command box and type ncpa.cpl into the text box and press Enter to open the Wi-Fi-Status window.
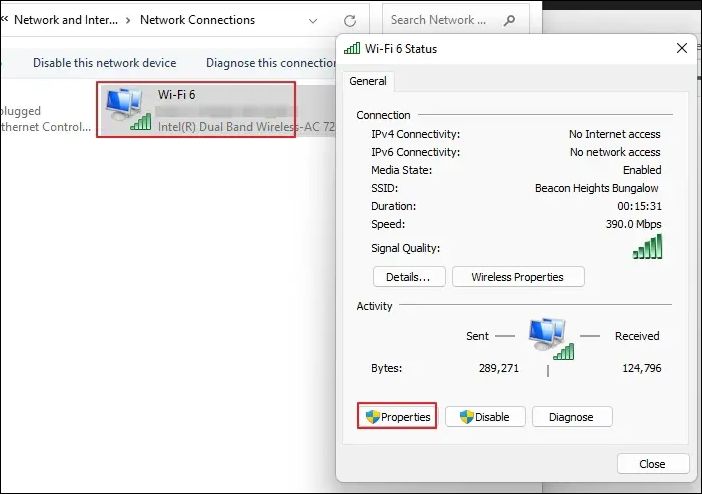
Step 2. Click on the Properties button. Next, locate the Internet Protocol Version 4 option and double-click on t to open its properties.
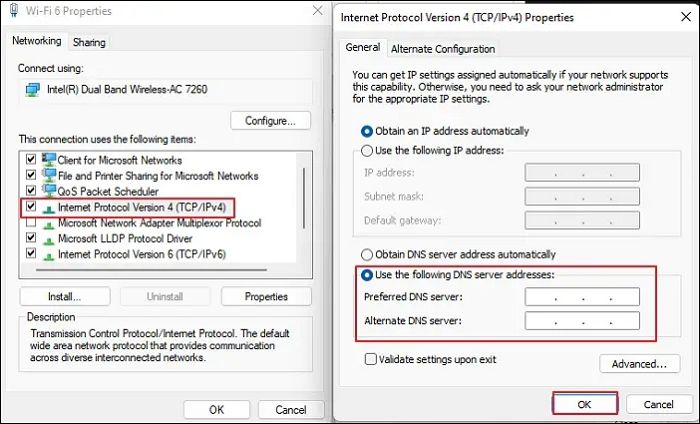
Step 3. Click on the radio button next to Use the following DNS server addresses and type in the following addresses:
- Preferred DNS server: 8.8.8.8
- Alternate DNS server: 8.8.4.4
Step 4. Click OK to update the changes and check whether the Windows error code 0x8024402c has disappeared.
Windows users have proved the efficacy of these fixes. If one of the methods helps fix the Windows update error 0x8024402c, share it on Facebook, Twitter, Instagram, and other social media platforms!
How to Recover Data When Fixing Error 0x8024402c
Windows users may lose data after fixing error code 0x8024402c. So, to recover deleted files from Windows 11/10/8/7, I recommend using EaseUS Data Recovery Wizard. It was created to aid in the recovery of data lost as a result of a file system malfunction, system crashes, and unintended file deletion. Even novice users can recover files quickly because of the software’s user-friendly interface.
EaseUS Data Recovery Wizard
- It can recover lost photos, videos, music files, documents, and other files with simple clicks.
- This software recovers data from external hard drives, SSD, USB flash drive, and pen drive.
- It makes restoring a partition’s data simple, even if it has been completely lost or the system cannot recognize it.
Download it now and follow the guide below to restore data from your PC quickly.
Note: To guarantee a high data recovery chance, install EaseUS data recovery software on another disk instead of the original disk where you lost files.
Step 1. Launch EaseUS Data Recovery Wizard on your Windows 11, Windows 10, Windows 8, or Windows 7 computer. Select the disk partition or storage location where you lost data and click «Scan».

Step 2. This recovery software will start scanning the disk to find all lost and deleted files. When the scan process completes, click «Filter» > «Type» to specify lost file types.

Step 3. Preview and restore lost Windows files. You can double-click to preview the scanned files. Then, select the target data and click the «Recover» button to save them to another safe spot in the PC or an external storage device.

Conclusion
The abovementioned techniques can resolve the Windows Update error code 0x8024402c.
You can also consider setting up a time sync between your PC and the internet, then restarting Windows Updates. When updates stop working due to malware, you can run security software. You should also be aware that Windows Updates is a compassionate application; if it has problems, the system will be adversely affected and may start to run slowly or improperly. So, follow the solutions given in this article carefully for a smooth and successful completion of the Windows update without any errors.
Also, note that after fixing the error code 0x8024402c, you may lose some data on your PC. So, download and use the data recovery tool EaseUS Data Recovery Wizard to save all your lost files. So that is it! I hope this article helped you resolve the error code issue!
Windows Update Error Code 0x8024402c FAQs
Do you have more questions on the Windows update error code 0x8024402c? Check out the frequently asked questions and their answers given below:
1. What does 0x8024401c mean?
You might encounter various issues when connecting to Microsoft’s Windows Update servers. It usually happens when you attempt to install updates, but the proxy, firewall, or other network settings are incorrect. 0x8024402C is one of these error codes. The error code is displayed on the screen when a user checks for updates.
2. How do I get rid of the error-checking drive?
On your Windows PC. Right-click on the Windows logo and choose Windows Terminal (Admin). Click Yes on User Account Control prompt and type chkdsk into the Windows Terminal window. Press Enter. CHKDSK will scan for drive errors and let you know if it finds any issues that need repair. Remember that it will not fix the errors without a command.
3. What does the Windows Update client fail to detect with error 0x8024402c?
An incorrect network setting, LAN setting, or update setting that does not comply with the update requirements could cause this issue. By approving the Automatically detected connection settings, it can be stopped.
4. What is error 0x8024402c for feature installation?
Not sure what this is feature installation. Kindly send me a message about it.
There are several causes for the Error Code 8024402c. The system may throw a message like “windows could not search for new updates”.
To fix this error you can make use of the Troubleshooting tool in Control Panel. It will try to make amends to the Windows Update Database Corruption and provides a fix it solution. Let the troubleshoot tool run for a few seconds and analyze the problem.
Then finally, it will ask to apply the fix it. You just do it and the problem is resolved.

Windows update service not running in windows 7 64 bit is another cause. Then you have to check the relevant update services like BITS, WSUS etc. You must have disabled it or some other software application might have done it.
Windows 8.1 won’t find updates if code 8024402c pops up. The message will show as if this is because of unknown reason. But in many cases, this is because a third-party firewall or app is preventing the Update service from accessing the Internet.

In 2015 also, when you try to update Windows 10 this might cause you to rethink about upgrades.
If you apply the first weapon mentioned above, a progress indicator showing a green tick mark for several issues are shown. It also includes that the Windows update components must be repaired.
To resolve your issue in any Windows OS, you have to find the root cause. Once that is fixed, you can easily download the updates.

Some of the causes for this error code are –
- You can have an erroneous character in the proxy override settings.
- If you are using a third-party firewall like ZoneAlarm, Sygate, Sunbelt, Comodo, you may have wrongly configured it.
- In Windows 10, if you are using a VPN like HotSpot Shield, Zenmate, Avast Internet Security etc then the above error may occur.
- Workstation in Office that work behind a corporate ISA server can also face this issue.
- For corporate networks like Facebook, Google, Microsoft etc, if autoproxy is not enabled then also you may have this problem.
- Corrupted registry entries. If you have made any changes to the registry or did any tweaks, this can also cause Error Code 8024402c.
- Infection of Virus or Malware. If you plugged in a pen drive from a corrupted system, you can have viruses. Also, if you have downloaded too many adware programs, they can cause malware. These are also some causes for the above error code.
-
General Fixes
- How to Deal with Error Code 8024402c in Windows Server 2012?
- How to Fix Error Code 8024402c in Windows Server 2008?
- How to Iron Out Error Code 8024402c in Windows 10?
- How to Work Out Error Code 8024402c in Windows 8.1?
- How to Figure Out Fix for Error Code 8024402c in Windows 7?
- Conclusion
General Fixes
The common solutions in any OS are the following –
Fix #1
First make sure you have the following websites white-listed in your Firewall.
- https://*.windowsupdate.microsoft.com
- http://download.windowsupdate.com
- http://*.windowsupdate.microsoft.com
Fix #2
For erroneous character in proxy override settings, you can do the following.
Select the LAN settings option in the “Internet Options” of Control Panel. If “Proxy Server” is enabled, then select the “Advanced” button. Delete everything in the “Exceptions” text box. Now press Win + R and in the Run window, type “proxycfg -d” and press ENTER.
- Type the command “net stop wuauserv” and press ENTER.
- Finally, type “net start wuauserv” and press ENTER.
You have cleared the proxy cache. Now try the Windows Update or Windows 10 download again. You should see success.
Fix #3
If VPN is the source of error, just disable and directly connect to the Internet. Now download Windows 10. After the update is successful, then enable your VPN again.
Fix #4
If you are behind an ISA server, you should configure the Firewall settings. Select the Firewall Client for your third-party software. Select the configure option. Now check the box that says “automatically detect firewall server”. Click on “Update Now” button. Restart your Windows 10 update or other updates.
Fix #5
First do a complete scan and cleaning of your computer using an antivirus like Kaspersky, ESET NOD32, Panda, Avast, AVG etc. You can also use Malwarebytes Anti-Malware to remove the adware.
Fix #6
Since this is an update error, you can download the update troubleshooter fix from Microsoft.
https://support.microsoft.com/en-in/instantanswers/512a5183-ffab-40c5-8a68-021e32467565/windows-update-troubleshooter
You need to download the fix file from the above link and run it as an “Adminstrator”. Accept the license and then on the next screen click on “Detect problems and apply the fixes (Recommended).”
Let the troubleshooter program complete its execution. Then restart the PC. See if this resolves the Error Code 8024402c in your Windows 7 or 8.1 or 10 computer.
Fix #7
You need to configure your proxy settings properly. Open command prompt with elevated privileges.
- Type the command “netsh winhttp import proxy source=ie” in the prompt before hitting Enter.
- Disable proxy in Network Settings unless you receive a message indicating that there is no proxy server.

Fix #8
You can also reset and re-register the Windows Update components. You can do this by following these tutorials.

- http://www.sevenforums.com/tutorials/91738-windows-update-reset.html
- https://support.microsoft.com/en-us/kb/971058
You generally keep the “Automatic Updates” on in your system. This will automatically download the updates whenever there are new updates. This is most likely to happen on every Tuesday. Sometimes, you may face this dreaded Error Code 8024402c.
There is a quick fix for it using registry settings.
First run “regedit” in the Run box (Win + R). This will open the Registry Editor. Then go to HKEY_LOCAL_MACHINE\Software\Policies\Microsoft\Windows\WindowsUpdate\AU and update the value of UseWUServer from 1 to 0.

In the second step, open “Services” and restart the Windows Update service.
This usually resolves the problem of the current error code. But it also can fix Error Code 80072EE2.
How to Fix Error Code 8024402c in Windows Server 2008?
Source: https://theorypc.ca/2013/05/
You may get this issue while applying Windows Update. The source of this error cannot be easy to diagnose. The updates can be Office updates or any other Microsoft program. Even if you check the Event Viewer – software feature of Windows and look at the BITS-client logs, it is not easy to fix it.
So you need to enable analytics and debug logs. The results are produced in a WinHTTP log file. You need to re-execute the Windows Update and check the log, to find the reason for this error – 8024402c.
The common reason would be the Update going to the wrong server – like wswsus02.YYYY.ab.ca. For example, you might have used this server earlier and later updated with a new IP. So in order that Windows Update picks the right server, you need to apply the following commands.
esentutl /p %windir%securitydatabasesecedit.sdb /o
Gpupdate /force
After this trick is applied, your Windows Update service will use the Microsoft servers instead of the WSUS server. Then reboot the server. You could also run the net stop and net start commands.
Then Windows Update will download the required updates with success.
How to Iron Out Error Code 8024402c in Windows 10?
You may have faced this error, when you try to download the Windows 10 update. It may show up a progress of 50 or 80% and then show this 8024402c error. Otherwise, you may fail in installing updates with this error.
The common reason for Error Code 8024402c is prevention of Windows Updates Services (SVCHOST) accessing the internet properly. Some of the programs that can do this are – firewalls, web accelerators, internet security, antivirus programs, anti-spyware software, proxy servers etc. Generally, Windows 10 is available as an update. So, first check if your firewall or Antivirus software is blocking access. Try to disable your default firewall or anti-spyware or anti-virus for the time-being.
You can do this in Windows 10 as follows.
Control Panel > Windows Firewall Turn Windows Firewall on or off and then select Turn off Windows Firewall:
Then try to run the Windows 10 update again. This time Windows Update will try to connect to Microsoft server. The download of Windows 10 will resume normally again, once this is done.
[alert]
Note: Be careful once you disable firewall and anti-virus or internet security. Generally, this is not recommended, but only when you have compatibility problems, this is required. So it is better you restrict your PC and Internet activities, during this weak period of disabled services.
[/alert]
Turn your security software or Windows firewall, once the Windows 10 Update process is complete.
You can also stop and restart your Windows Update service. This can be done in the following way.
Just open your command prompt with administrator privileges and type the net stop wuauserv command to stop the Windows update service and then net start wuauserv to restart the latter. You can also do using the Services program.
Press Win + R keys and type “services.msc” in the dialog box. There you will find a service called “Windows Update”. You can restart it. Otherwise, you can stop it and start again.
How to Work Out Error Code 8024402c in Windows 8.1?
You can try the above steps first to resolve the error.
But @Shivam15 on Tomshardware found a clean solution for this problem.
You just have to use Google DNS servers 8.8.8.8 and 8.8.4.4 to fix Error Code 8024402c in Windows 8.1. You just have to update the above server list in your ISP settings.
How to do this in Windows 8.1?
You can follow these steps.
- Move the mouse to the bottom right-hand corner. In the Charms bar, go to Settings > Control Panel. You can also press the Win key and type “Control Panel”. It will appear in the Search.
- From it, you can navigate to Network and Internet > Network and Sharing Center > Change adapter settings. You can also right-click the Wi-Fi or Ethernet icon at the bottom right-hand corner and select “Open Network and Sharing Center” and then select the same.
- You can select the Network Adapter. For example, it can be Wi-Fi adapter or Ethernet Adapter.
- To change the settings for an Ethernet connection, right-click Local Area Connection >Properties.
- To change the settings for a wireless connection, right-click Wireless Network Connection> Properties.
- If you are asked for administrator credentials, you need to provide them.
- Choose the “Networking” tab if it’s not selected by default.
- Under This connection uses the following items, select Internet Protocol Version 4 (TCP/IPv4) or Internet Protocol Version 6 (TCP/IPv6) and then click Properties.

- A pop-up window will open. Click Advanced and select the DNS tab. If there are any DNS server IP addresses listed there, note them for further use.

- Now give the IP addresses of the Google DNS servers:
- For IPv4: 8.8.8.8 and/or 8.8.4.4.
- For IPv6: 2001:4860:4860::8888 and/or 2001:4860:4860::8844.
- For IPv6-only: you can use Google Public DNS64 instead of the IPv6 addresses in the previous point.
- Disconnect from Internet and restart again.
- Test whether error code 8024402c is gone and updates are working fine.
How to Figure Out Fix for Error Code 8024402c in Windows 7?
A user on sevenforums @ countkenshin had a similar problem. He tried different solutions like disabling the Windows firewall and Anti-virus. He also uninstalled all the security and windows updates, hoping that Windows will automatically fix it. But there was no success.
Then he did this to fix the problem.
- Type “services.msc” in the Run window (Win + R) and find the Windows Update service. Stop it.
- Go to C:\Windows\ and find the SoftwareDistribution folder. Rename to something like SoftwareDistribution.old
- Restart the Windows Update service.
- Click the “Check for Updates” button on the Windows Update screen.
- Windows will perform the check – it may take some time, so leave it running. Eventually it will successfully complete.
- Once the updates are downloaded, you can delete the SoftwareSistribution.old folder.
Conclusion
Generally the Error Code 8024402c resolves itself when you stop and restart the Windows Update service. If not, you can try any of the solutions mentioned above. Sometimes, just cleaning the junk in your system, can also fix the problem. For this you can do a registry clean using CCleaner and fix any errors that is causing the malfunction of your updates.
You can also try the Microsoft update troubleshooter to fix this error code. You can also reset the Windows Update components as provided by Redmond itself. Other solutions are tailored for specific cases.
If you still not able to solve the problem, please leave a comment in the section below. I’ll try to find a solution, using my expertise.

Palla Sridhar is the writer and admin for WindowsTechIt.com. His primary focus is to write comprehensive how-tos and solutions guides for Windows 11, 10, Skype, Outlook, HDMI, Redmi, Facebook, Google, Tech Apps and LinkedIn.
Ошибка 0x8024402c делает неисполнимым установку апдейтов ОС. Это вызвано следующими факторами:
- задействование прокси сервера;
- блокирование соединения антивирусом или файрволом.
Способы решения ошибки 0x8024402c
Решается проблема следующими способами:
- Отключение приложений, которые блокирую сетевые подключения. Предпочтительней всего сделать неактивными или удалить на время обновления антивирус и файрвол (брандмауэр).
- Отключение прокси. Запустите Internet Explorer и следуйте по пути: «Свойства браузера» => «Подключения» => «Настройка сети». Убедитесь, что стоит галочка в строке «Использовать прокси…». Переходьте в раздел «Дополнительно» и проверьте, что во всех строках там нет каких-либо значений. Подтверждаем действием нажатием Ок в двух открытых окнах. Перегружаем ПК и ошибка 0x8024402c исчезнет.
Windows Update error 8024402C (Windows could not search for new updates – Errors found 8024402C) while checking for updates is commonly caused by invalid network settings or invalid update settings. The problem also occurs if your computer was connected to a local network (LAN) and managed by a Windows Server Update Services (WSUS).

This tutorial contains detailed instructions on how to resolve In order to fix the Windows Update error 0x8024402C in Windows 8, 7 or Vista.
How to fix Error code 0x8024402C in Windows Update.
Solution 1. Run the Windows Update Troubleshooter.
1. Navigate to Windows Control Panel, set the ‘View By’ to Small icons and open Troubleshooting.

2. In Troubleshooting options, click View all.

3. Open the Windows Update.

4. Click Next to troubleshoot Windows update problems.

5. When the troubleshooting process is complete, close the troubleshooter.
6. Restart your computer and see if the Error code 8024402C is resolved.
Solution 2. Change the DNS servers.
Some IPS causes errors with Windows Update. So try to manually add a public DNS server (e.g. Google DNS) on your network connection.
1. Press Windows ![]() + R keys to open the run command box.
+ R keys to open the run command box.
2. Type ncpa.cpl and press Enter.

3. Double click at your active Network Adapter.
4. Click Properties.

5. Open ‘Internet Protocol Version 4 (TCP/IPv4)’ Properties.

6. Select «Use the following DNS server addresses:» and type the following Google’s public DNS server addresses:
- 8.8.8.8
- 8.8.4.4

7. Press OK twice to exit Network settings.
8. Restart your computer and check for updates again.
Solution 3. Configure Automatic Updates client to connect directly to the Windows Update site on the Internet.
1. Press Windows ![]() + R keys to open the run command box.
+ R keys to open the run command box.
2. Type regedit and press Enter.

3. In Windows registry editor locate the following key:
HKEY_LOCAL_MACHINE\SOFTWARE\Policies\Microsoft\Windows\WindowsUpdate\AU

Note: If you don’t find the WindowsUpdate key you have to create it: Right click on Windows key (on the left pane) and select New > Key. Give the name: WindowsUpdate. Then right click at «WindowsUpdate’ & perform the same operation to create the AU key.

4. At the right double click to open the UseWUServer value and change the Value data from 1 to 0.

Note: If you don’t find the UseWUServer value you have to create it: Right click on the right pane and select New > DWORD (32-bit) Value. Give the name: UseWUServer.

5. Press OK to apply changes and exit from Registry Editor.

That’s all folks! Did it work for you?
Please leave a comment in the comment section below or even better: like and share this blog post in the social networks to help spread the word about this solution.
If this article was useful for you, please consider supporting us by making a donation. Even $1 can a make a huge difference for us.

Table of Contents
- Scenario
- Symptom
- Troubleshooting
- Solution
Scenario
Consider a client workstation that it is using a WSUS Server that is located in the DMZ behind Forefront TMG. This WSUS Server is not a domain member. There is a group policy specifying the WSUS Server name as shown below:

Symptom
When the client workstation is running Windows Update it receives an error 0x8024402c, which appears in the Windows Update log (check KB902093 for default location) as shown below:

Troubleshooting
During the course of troubleshooting of this issue the following items were validated:
- The DNS Server correctly had an entry for the WSUS Server
- The DC was able to resolve the WSUS Server name.
- The client was able to resolve the WSUS Server name using nslookup command, but it was not able to resolve when using ping command.
To better understand what it was happening the following steps were done on the client workstation:
- Ran ipconfig /flushdns
- Started Netmon capture.
- Ran the command ping srvwus.crop.contoso.com.
- Stopped the capture.
On the netmon capture it was possible to see that the answer from the DNS Server came incorrectly as shown below:
![]()
At this point, we know that name resolution works fine and that the client is able to talk to the DNS Server. To isolate potential name resolution issue we tried to ping to SRVWSUS using the IP address and got the result below:

This indicates that the local machine didn’t know what to do with that request.
Solution
The client workstation was missing the IP address of the default gateway. Once we added the default gateway the client workstation was able to obtain updates.