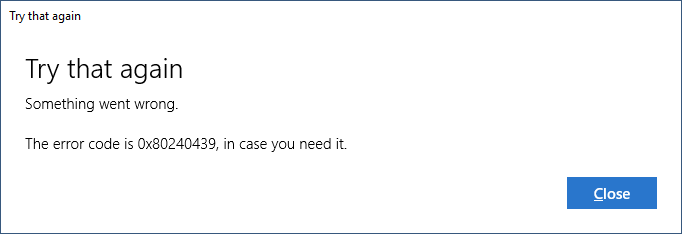
Many users encounter problems when they try to receive updates on Windows 11 and 10. When you start Windows update checking for updates, it Stops after a little time and you see Error 0x80240439. In this way, the Windows update quits working every time and keeps failing on Windows 10 and 11.
0x80240439 Error Code Windows 11 or 10 Update probably occurs due to corrupt cache or concerned service malfunctioning. A large number of users are consistently complaining about this windows update not working issue. A few simple steps can help them to fix this problem including resetting cache and troubleshooting.
You can see instructions on both of the subjects whether it is Reset Update Cache or Troubleshooting in the variant webpages. In addition, the below-written simple steps will also help you to resolve windows update doesn’t download.
Method 1 – Reset Windows Update Cache
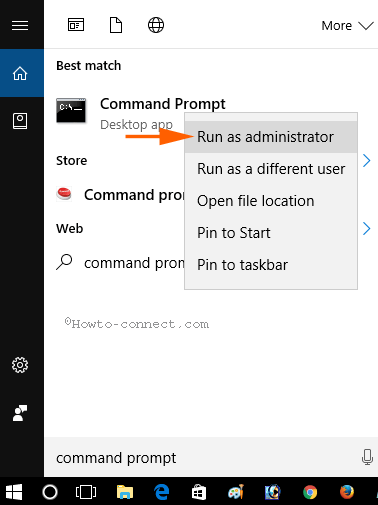
Step 1 – Click Start icon, type command prompt. You view Command prompt option right at the top. Right click on this option and then choose “Run as administrator“, the first one, from the list.
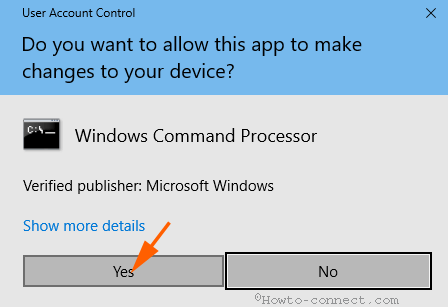
Step 2 – Soon, you see UAC pop up, select Yes to agree with it.
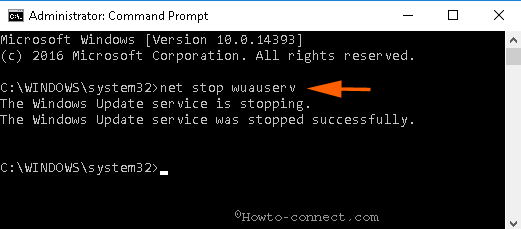
Step 3 – Copy the below given commands one by, paste into the command prompt and press Enter each time.
net stop wuauserv
net stop appidsvc
net stop cryptsvc
Step 4 – Click Win & R altogether, copy C:\Windows\SoftwareDistribution\Download, paste into the run and click Enter.
Step 5 – Select all the items available in the directory and press Delete.
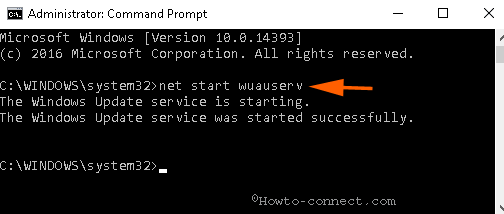
Step 6 – Now copy the under written commands successively, paste into the command prompt and click Enter for each one separately.
net start wuauserv
net start appidsvc
net start cryptsvc
Reboot the PC and check if you have solved 0x80240439 Error Code Windows 10 Update.
Method 2 – Run Troubleshooter to Fix 0x80240439 Error Code Windows 11, 10
If the 1st method fails to repair Windows update error 0x80240439, attempt Troubleshooter.
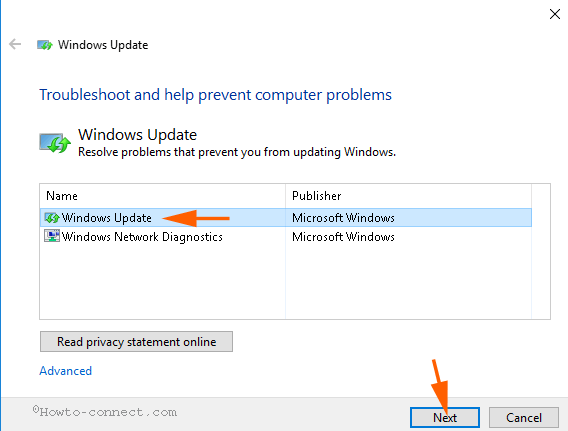
Step 1 – Click Windows 10 update troubleshoot and grab it from the page.
Step 2 – Select Windows update from the appearing Wizard and click Next to start troubleshooting.
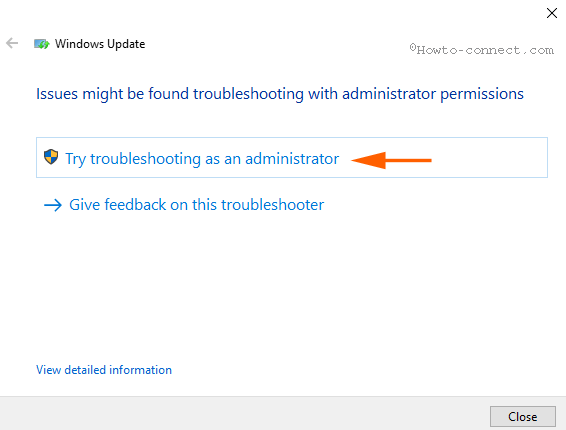
Step 3 – On the Next screen, Select Try troubleshooting as an administrator.
Step 4 – The troubleshooting will start and after a short interval of time, you will get two options, Apply this fix and Skip this fix. Select Apply this fix from these options.
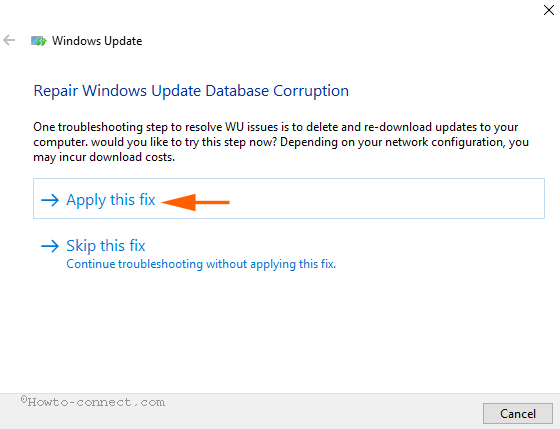
Soon you will see the list of the fixed issues on the wizard.
Finally, test the 0x80240439 Error Code Windows 10 Update if it is fixed.
In case, these methods don’t settle the mess up then run Windows Store app troubleshooter since this has worked as game-changers for many users.
Conclusion
So, these are the methods to fix 0x80240439 Error Code Windows 10 Update. Although this issue is very obnoxious hence you may need to run SFC and DISM tools later on. But many users have resolved with the above methods as well.
Repair any Windows problems such as Blue/Black Screen, DLL, Exe, application, Regisrty error and quickly recover system from issues using Reimage.
Ошибка 0x80240439 уже около года, так сказать, «терроризирует» пользователей Windows 10. Если быть более точным, то ошибка возникает в Windows Store. Появляется проблема при попытке загрузить что-либо из магазина. Однако загрузка останавливается на каком-то моменте и в вас кидают это сообщение об ошибке.
Из-за чего возникает подобная гадость — достоверно не известно. Однако много энтузиастов предполагают, что дело может заключаться в некоторых осложнениях при обновлениях Windows, поврежденных системных файлов, кэше Windows Store и других серьезных несоответствий в системе.
Согласно отзывам пользователей, старые решения этой ошибки не являются более действенными. Но сообщество Microsoft уже смогло все-таки найти методы для ее исправления.
Исправляем ошибку 0x80240439
Метод №1 Очистка кэша приложения Windows Store
Для того чтобы выполнить очистку кэша для Windows Store, сделайте следующие действия:
- Нажмите комбинацию клавиш Win+X и выберите из контекстного меню «Командная строка(администратор)».
- В открывшейся «Командной строке» впишите команду dism /online /cleanup-image /startcomponentcleanup и нажмите Enter.
- После этого начнется процесс очистки кэша, который может занять некоторое время. По окончанию этой операции, перезагрузите компьютер.
Метод №2 Загрузка всех доступных обновлений для Windows
- Нажмите комбинацию клавиш Win+S и впишите «Панель управления». Или можете нажать правой кнопкой мыши по «Пуск» и выберите ее там.
- Далее перейдите в «Система и безопасность» -> «Центр обновления Windows».
- Кликните на «Проверка обновления» и система автоматически насчет поиск доступных обновлений.
- Если Windows найдет какие обновления, то нажмите «Обновить сейчас».
- Как только процесс обновления закончится, перезагрузите компьютер и проверьте, исчезла ли ошибка 0x80240439.
Метод №3 Обновить Windows вручную
Для выполнения ручного обновления, вы должны скачать средство для создания носителя. Для этого вы можете пройти по этой ссылке. После того как загрузите нужную утилиту, сделайте следующие действия:
- Нажмите на утилиту правой кнопкой мыши и запустите ее от имени Администратора.
- После этого выберите «Обновить этот ПК сейчас» и нажмите «Дальше».
- Если вы проводите этот процесс в первый раз, то вам нужно будет ввести лицензионный ключ продукта.
- Кликните на опцию «Изменить», чтобы выбрать какие данные вы хотите сохранить на вашем устройстве.
- И наконец-то, нажмите «Установить».
После выполнение этих шагов, вы вероятней всего избавитесь от ошибки 0x80240439.
Ошибка 0x80240439 в Windows 10 может возникнуть во время обновления операционной системы или загрузки приложений из Магазина Windows. Эта ошибка может быть вызвана различными причинами, включая проблемы с подключением к интернету, неправильными настройками Windows Update или проблемами с файлами системы. Если вы столкнулись с этой ошибкой, не волнуйтесь — в этой статье мы расскажем, как можно исправить эту проблему.
Перед тем, как приступить к исправлению ошибки 0x80240439, важно убедиться, что у вас есть стабильное интернет-соединение. Проверьте, подключены ли вы к сети Wi-Fi или Ethernet, и убедитесь, что соединение работает нормально.
После проверки подключения к интернету, следующим шагом будет выполнение некоторых базовых действий для исправления ошибки. Начните с перезагрузки компьютера — это простое действие может помочь решить некоторые проблемы с системой. Если перезагрузка не помогла, попробуйте отключить временно антивирусное программное обеспечение и брандмауэр, поскольку они могут блокировать доступ к серверам обновлений.
Если базовые действия не помогли, можно попробовать выполнить команду Windows Update Troubleshooter. Это встроенный инструмент, который может автоматически искать и исправлять общие проблемы с обновлениями Windows. Чтобы запустить Troubleshooter, перейдите в «Настройки» -> «Обновление и безопасность» -> «Требования к системе» и нажмите на ссылку «Запустить поиск проблем». Дождитесь завершения поиска и выполните все рекомендуемые действия.
Содержание
- Типичные причины и симптомы ошибки 0x80240439
- Проблемы с интернет-соединением
- Отключенная служба Windows Update
- Неподходящие настройки прокси-сервера
Типичные причины и симптомы ошибки 0x80240439
Ошибка 0x80240439 встречается при обновлении Windows 10 и может быть вызвана несколькими причинами. Рассмотрим наиболее типичные из них:
1. Отсутствие интернет-подключения. Одной из основных причин возникновения ошибки 0x80240439 является отсутствие стабильного интернет-соединения. Проверьте подключение к сети и попробуйте повторить попытку обновления.
2. Проблемы с настройками прокси-сервера. Если вы используете прокси-сервер для доступа в интернет, проблемы с его настройками могут вызывать ошибку 0x80240439. Проверьте настройки прокси-сервера или временно отключите его и повторите обновление.
3. Несовместимость антивирусного программного обеспечения. Некоторые антивирусные программы или брандмауэры могут блокировать процесс обновления Windows и вызывать ошибку 0x80240439. Временно отключите антивирусное программное обеспечение и повторите попытку обновления.
4. Нарушенная работа службы Windows Update. Сбои или неправильная настройка службы Windows Update также могут вызывать ошибку 0x80240439. Проверьте работу службы и убедитесь, что она запущена и работает без ошибок.
Теперь давайте рассмотрим некоторые возможные симптомы ошибки 0x80240439:
1. Сообщение об ошибке при запуске обновления. Одним из типичных симптомов является появление сообщения об ошибке, указывающее на код ошибки 0x80240439 при попытке запустить обновление Windows.
2. Неудачные попытки загрузки обновлений. При возникновении ошибки 0x80240439 обновления могут не загружаться и оставаться в статусе «Не удалось». Это может происходить из-за проблем с обновлением или соединением с серверами обновлений.
3. Замедление работы компьютера. Если система не может установить обновления из-за ошибки 0x80240439, это может привести к замедлению работы компьютера или возникновению других проблем с производительностью.
Учитывая вышеперечисленное, важно определить и устранить причины ошибки 0x80240439, чтобы обновления Windows успешно загружались и устанавливались.
Проблемы с интернет-соединением
Проблемы с интернет-соединением могут быть одной из возможных причин, по которой возникает ошибка 0x80240439 при обновлении Windows 10. В данном случае, ошибка указывает на проблему с загрузкой и установкой обновлений системы.
Вот несколько распространенных проблем с интернет-соединением, которые возможно стоит проверить:
- Подключение к Интернету — убедитесь, что ваш компьютер или устройство имеет активное и стабильное подключение к Интернету. Попробуйте открыть веб-страницу или другое приложение, чтобы убедиться, что ваше соединение работает правильно.
- Wi-Fi-сигнал — если вы используете Wi-Fi, убедитесь, что сигнал сети сильный и надежный. Плохой сигнал Wi-Fi может вызвать проблемы с загрузкой и установкой обновлений.
- Проводное подключение — если вы используете проводное подключение, проверьте, что кабель надежно подключен и не поврежден.
- Блокировка файрволом или антивирусом — проверьте, что ваш файрвол или антивирус не блокирует доступ к серверам обновлений Windows. Убедитесь, что обновления Windows имеют разрешение на доступ к Интернету.
Если у вас возникают проблемы с интернет-соединением, рекомендуется проверить все вышеперечисленные аспекты и убедиться, что ваше соединение работает нормально. Это может помочь исправить ошибку 0x80240439 и позволить вам успешно загрузить и установить обновления Windows 10.
Также, вы можете попробовать выполнить дополнительные шаги из руководства для решения ошибки 0x80240439, чтобы устранить любые другие возможные проблемы при обновлении Windows 10.
Отключенная служба Windows Update
Если вы столкнулись с ошибкой 0x80240439 при попытке обновления Windows 10, одной из возможных причин может быть отключенная служба Windows Update.
Служба Windows Update отвечает за загрузку и установку обновлений операционной системы. Если эта служба выключена, Windows не сможет обновиться до последней версии и исправить ошибку 0x80240439.
Чтобы включить службу Windows Update, выполните следующие шаги:
- Откройте панель управления Windows, нажав клавишу Win + X и выбрав «Панель управления» из списка.
- В поисковой строке в верхнем правом углу панели управления введите «службы».
- Щелкните по результату «Службы».
- В открывшемся окне найдите службу «Windows Update» в списке служб.
- Щелкните правой кнопкой мыши на службе «Windows Update» и выберите «Свойства».
- На вкладке «Общие» убедитесь, что тип запуска службы установлен на «Автоматически».
- Если служба в данный момент выключена, нажмите кнопку «Запустить» рядом с полем «Состояние службы» и подождите, пока служба будет запущена.
- Нажмите кнопку «Применить», а затем «OK», чтобы сохранить изменения.
После включения службы Windows Update перезапустите компьютер и попробуйте обновиться снова. Ошибка 0x80240439 должна быть исправлена, и вы сможете успешно загрузить и установить все доступные обновления Windows 10.
Неподходящие настройки прокси-сервера
Если вы используете прокси-сервер и получаете ошибку 0x80240439, возможно, что настройки прокси-сервера неподходящие или несовместимые с обновлениями Windows. Чтобы исправить эту проблему, следуйте инструкциям ниже:
- Откройте меню «Пуск» и выберите «Настройки».
- В открывшемся окне «Настройки» выберите раздел «Сеть и Интернет».
- На левой панели выберите «Прокси».
- В разделе «Ручная настройка прокси-сервера» убедитесь, что параметры прокси-сервера правильные. Вы можете обратиться к своему системному администратору или провайдеру интернет-услуг для получения корректных настроек прокси-сервера.
- Если вы не используете прокси-сервер, убедитесь, что параметр «Использовать прокси-сервер» выключен.
- После внесения изменений нажмите кнопку «Сохранить».
- Перезапустите компьютер и попробуйте установить обновления Windows еще раз.
Если проблема не решена, попробуйте обратиться к технической поддержке Microsoft или проверить настройки вашей антивирусной программы, которая также может быть причиной ошибки 0x80240439.
Download Windows Speedup Tool to fix errors and make PC run faster
If you’re encountering the error code 0x80240439 when installing updates on your Windows 10 PC, then this post is intended to help you. In this post, we will provide the appropriate solutions you can try to remediate the issue.

If you’re faced with this Windows Update error 0x80240439, you can try our recommended solutions in the order presented below to resolve the issue.
- Run Windows Update Troubleshooter
- Clear the Windows Update cache
- Perform SFC and DISM scan
- Perform a Fresh Start or Cloud Reset
Let’s take a look at the description of the process involved concerning each of the listed solutions.
1] Run Windows Update Troubleshooter
This solution requires you to run the inbuilt Windows Update Troubleshooter and see if that helps to resolve the issue.
2] Clear the Windows Update cache
The Software Distribution folder in Windows 10 operating system is a folder located in the Windows directory and used to temporarily store files that may be required to install Windows Update on your computer.
Clear the contents of the Software Distribution folder and see if that helps to resolve the issue.
3] Perform SFC and DISM scan
If you have system file errors, you may encounter the problem.
The SFC/DISM is a utility in Windows that allows users to scan for corruptions in Windows system files and restore corrupted files.
For ease and convenience, you can run the scan using the procedure below.
- Press Windows key + R to invoke the Run dialog.
- In the Run dialog box, type notepad and hit Enter to open Notepad.
- Copy and paste the syntax below into the text editor.
@echo off
date /t & time /t
echo Dism /Online /Cleanup-Image /StartComponentCleanup
Dism /Online /Cleanup-Image /StartComponentCleanup
echo ...
date /t & time /t
echo Dism /Online /Cleanup-Image /RestoreHealth
Dism /Online /Cleanup-Image /RestoreHealth
echo ...
date /t & time /t
echo SFC /scannow
SFC /scannow
date /t & time /t
pause
- Save the file with a name and append the .bat file extension – eg; SFC_DISM.bat.
- Repeatedly run the batch file with admin privilege (right-click the saved file and select Run as Administrator from the context menu) until it reports no errors.
- Restart your PC.
On boot, try updating again. If the error persists, continue with the next solution.
4] Perform a Fresh Start or Cloud Reset
At this point, if the problem is still unresolved, it’s most likely due to some kind of system corruption that cannot be resolved conventionally. In this case, you can try Fresh Start, In-place upgrade repair to reset every Windows component. Also, if you’re running Windows 10 version 1909 and later, you can try Cloud Reset and see if that helps.
Any of these solutions should work for you!
Obinna has completed B.Tech in Information & Communication Technology. He has worked as a System Support Engineer, primarily on User Endpoint Administration, as well as a Technical Analyst, primarily on Server/System Administration. He also has experience as a Network and Communications Officer. He has been a Windows Insider MVP (2020) and currently owns and runs a Computer Clinic.
If you are a Windows 10/11 user who has encountered the Windows 10/11 Update error 0x80240439, you have arrived at the appropriate resource to find solutions for this issue.
According to some Windows 10/11 users, the error code appears while downloading apps from the Windows Store. Others reportedly failed to download anything.
While Windows 10/11 Update errors are common, this does not mean you just have to leave them unfixed. In most cases, when left unresolved, these error codes may mess with your system settings, affect system performance, and possibly corrupt important files.
If you don’t want all this to happen, make sure you act quickly. Identify the causes to make it easier to find a fix. This applies to all Windows 10/11 Update error codes, including the error 0x80240439.
What Causes Windows Update Error 0x80240439?
First off, what are the causes behind the error code 0x80240439? Well, there are many possible reasons behind it. The most common ones include corrupted Windows files, incomplete installation of a Windows Update, and a broken Windows Update.
For some users, performing a Windows Update can quickly resolve the issue. But for others, it resulted in more problems in their system settings. While resetting the date and time has fixed the issue for them, others had to do a complete file cleanup.
Windows Update Error 0x80240439 Fixes You Can Try
So, what should you do if you encounter the Windows Update error 0x80240439? We suggest that you read on.
Fix #1: Check the date and time settings
There are times when your system’s date and time go out of sync, causing issues with downloading apps from the Windows Store.
To fix this, you can sync your date and time using the wreset command or perform the reset manually. Here’s how:
- Click the Start menu.
- Into the search bar, input cmd.
- Hit Enter.
- Right-click on the first most relevant search result and select Run as Administrator.
- Into the command line, input wsreset and hit Enter.
At this point, your date and time settings should already be corrected. Alternatively, you can manually reset your date and time settings. Follow the instructions below:
- Click Start.
- Go to Control Panel.
- Navigate to Date and Time.
- Select Change Date and Time and set the correct date and time.
- Hit OK.
- Next, change the time zone and be sure you select the appropriate time zone.
- Hit OK.
If you have already changed your date and time settings but the error code persists, then we suggest you proceed with the next fixes.
Fix #2: Clear the Windows Component Store files
Microsoft has introduced the Windows Component Store to support functions that are essential for the updating and customization of Windows. When the files in this location are corrupted, issues with downloading files from the Windows Store may arise.
To avoid errors and issues with the Windows Store, some Windows 10/11 users clean up the Windows Component Store files. Here’s how to do it:
- Right-click on the Start menu.
- Select Command Prompt (Admin).
- Into the command line, input this command: dism /online /cleanup-image /startcomponentcleanup.
- Hit Enter.
- Wait for the process to complete.
- Reboot your PC and try downloading apps from the Windows Store once again.
Fix #3: Perform a Windows Upgrade
The Windows 10/11 error 0x80240439 may sometimes surface if there is a problem with the Windows Update utility. Upgrading to the latest Windows version may fix the problem.
To update Windows 10/11 automatically, follow these steps:
- Go to Settings.
- Select Updates & Security.
- Click Windows Update and hit the Check for Updates button.
- Wait as your system completes and installs the download.
Should you wish to perform the upgrade manually, try these steps:
- Download the Media Creation Tool.
- Choose the Download Tool option and select Run as Administrator.
- Agree to the License terms by hitting Accept.
- Click Next.
- The Media Creation Tool will then start downloading Windows 10/11. Once done, the wizard will take you through the entire update process.
- Now, if you are performing a Windows Upgrade for the first time, you will be asked to provide a product key. Otherwise, proceed to the next step.
- When Windows 10/11 is ready to install, a recap of everything you have done will be shown. If you want to keep your personal files and apps, tick the Keep Personal Files Only option.
- Hit Install.
- Once the Upgrade is done, your system will reboot.
- Try to download apps once again from the Windows Store.
Fix #4: Perform an SFC and DISM scan
System file errors can also cause the 0x80240439 error to occur. Luckily, fixing system file errors is easy as pie, thanks to the SFC/DISM utility. This tool allows users to scan any corrupted Windows system files and restore those that have been corrupted.
To perform an SFC and DISM scan, follow the steps below:
- Launch the Run dialog by pressing the Windows + R keys.
- Into the text field, input notepad and hit Enter. This will open Notepad.
- Copy-paste the commands below:
@echo off date /t & time /t echo Dism /Online /Cleanup-Image /StartComponentCleanup Dism /Online /Cleanup-Image /StartComponentCleanup echo … date /t & time /t echo Dism /Online /Cleanup-Image /RestoreHealth Dism /Online /Cleanup-Image /RestoreHealth echo … date /t & time /t echo SFC /scannow SFC /scannow date /t & time /t pause
- Save the file and add the .bat file extension. For instance, you can save it as SFC_DISM.bat.
- Run the file with administrator privilege. Do this by right-clicking on it and selecting Run as Administrator. Repeat this step until no more errors appear.
- Reboot your PC.
Fix #5: Contact Microsoft Store Support
If you really need to get the error code fixed as soon as possible, you may opt to visit the official Microsoft Store Support page for answers or contact their team for assistance.
Conclusion
If you ever see the error code 0x80240439 once again, then you know what to do. Start with the easier solutions, such as changing your date and time settings. If none of them works, proceed with the more complicated ones. However, if you are not that tech-savvy, entrust the task to experts to avoid further issues.
What other Windows 10/11 Update error codes have you encountered? Share your experience in the comments.
Give us some love and rate our post!