Код ошибки обновления Windows 0x80240438 появляется, когда не удается установить обновление в Windows 10 или 11. Код гласит: «При установке обновлений возникли некоторые проблемы, но мы попробуем позже. При повторной попытке снова выскакивает ошибка.
Давайте посмотрим на методы устранения неполадок, которые могут помочь решить проблему раз и навсегда.
Ошибка обновления 0x80240438 обычно возникает, когда программы безопасности в системе блокируют обновления, ложно считая их угрозой.
Эта проблема может возникать как с брандмауэром Windows, так и со сторонними антивирусными решениями. В любом случае, единственное решение — временно отключить программу безопасности, а затем установить обновление. Мы настоятельно рекомендуем вернуть программу безопасности, так как в противном случае ваша система подвергнется нескольким угрозам.
Вот как вы можете отключить брандмауэр Windows:
- Нажмите Win + I, чтобы открыть приложение «Настройки».
- Выберите Конфиденциальность и безопасность на левой панели.
- Перейдите в правую часть окна и перейдите в раздел «Безопасность Windows» > «Брандмауэр и защита сети».
Доступ к настройкам безопасности Windows
- Выберите свой сетевой профиль из (доменная сеть, частная сеть и общедоступная сеть).
- Перейдите в раздел Брандмауэр Microsoft Defender и отключите переключатель.
- После этого закройте окно и попробуйте установить обновление еще раз.
Если вы используете стороннее решение, вы можете просто щелкнуть его значок на панели задач. Выберите Отключить > Отключить до следующего перезапуска. После этого перейдите в приложение «Настройки» и снова установите обновление.
2. Запустите средство устранения неполадок обновления.
Средство устранения неполадок с обновлениями также может помочь вам исправить ошибки при загрузке и установке обновлений Windows. Microsoft разработала его специально для выявления, устранения и выявления потенциальных проблем в системе, которые могут вызвать проблему.
Вот как вы можете запустить средство устранения неполадок обновления:
- Нажмите клавиши Win + I вместе, чтобы открыть настройки Windows.
- Выберите Система на левой панели.
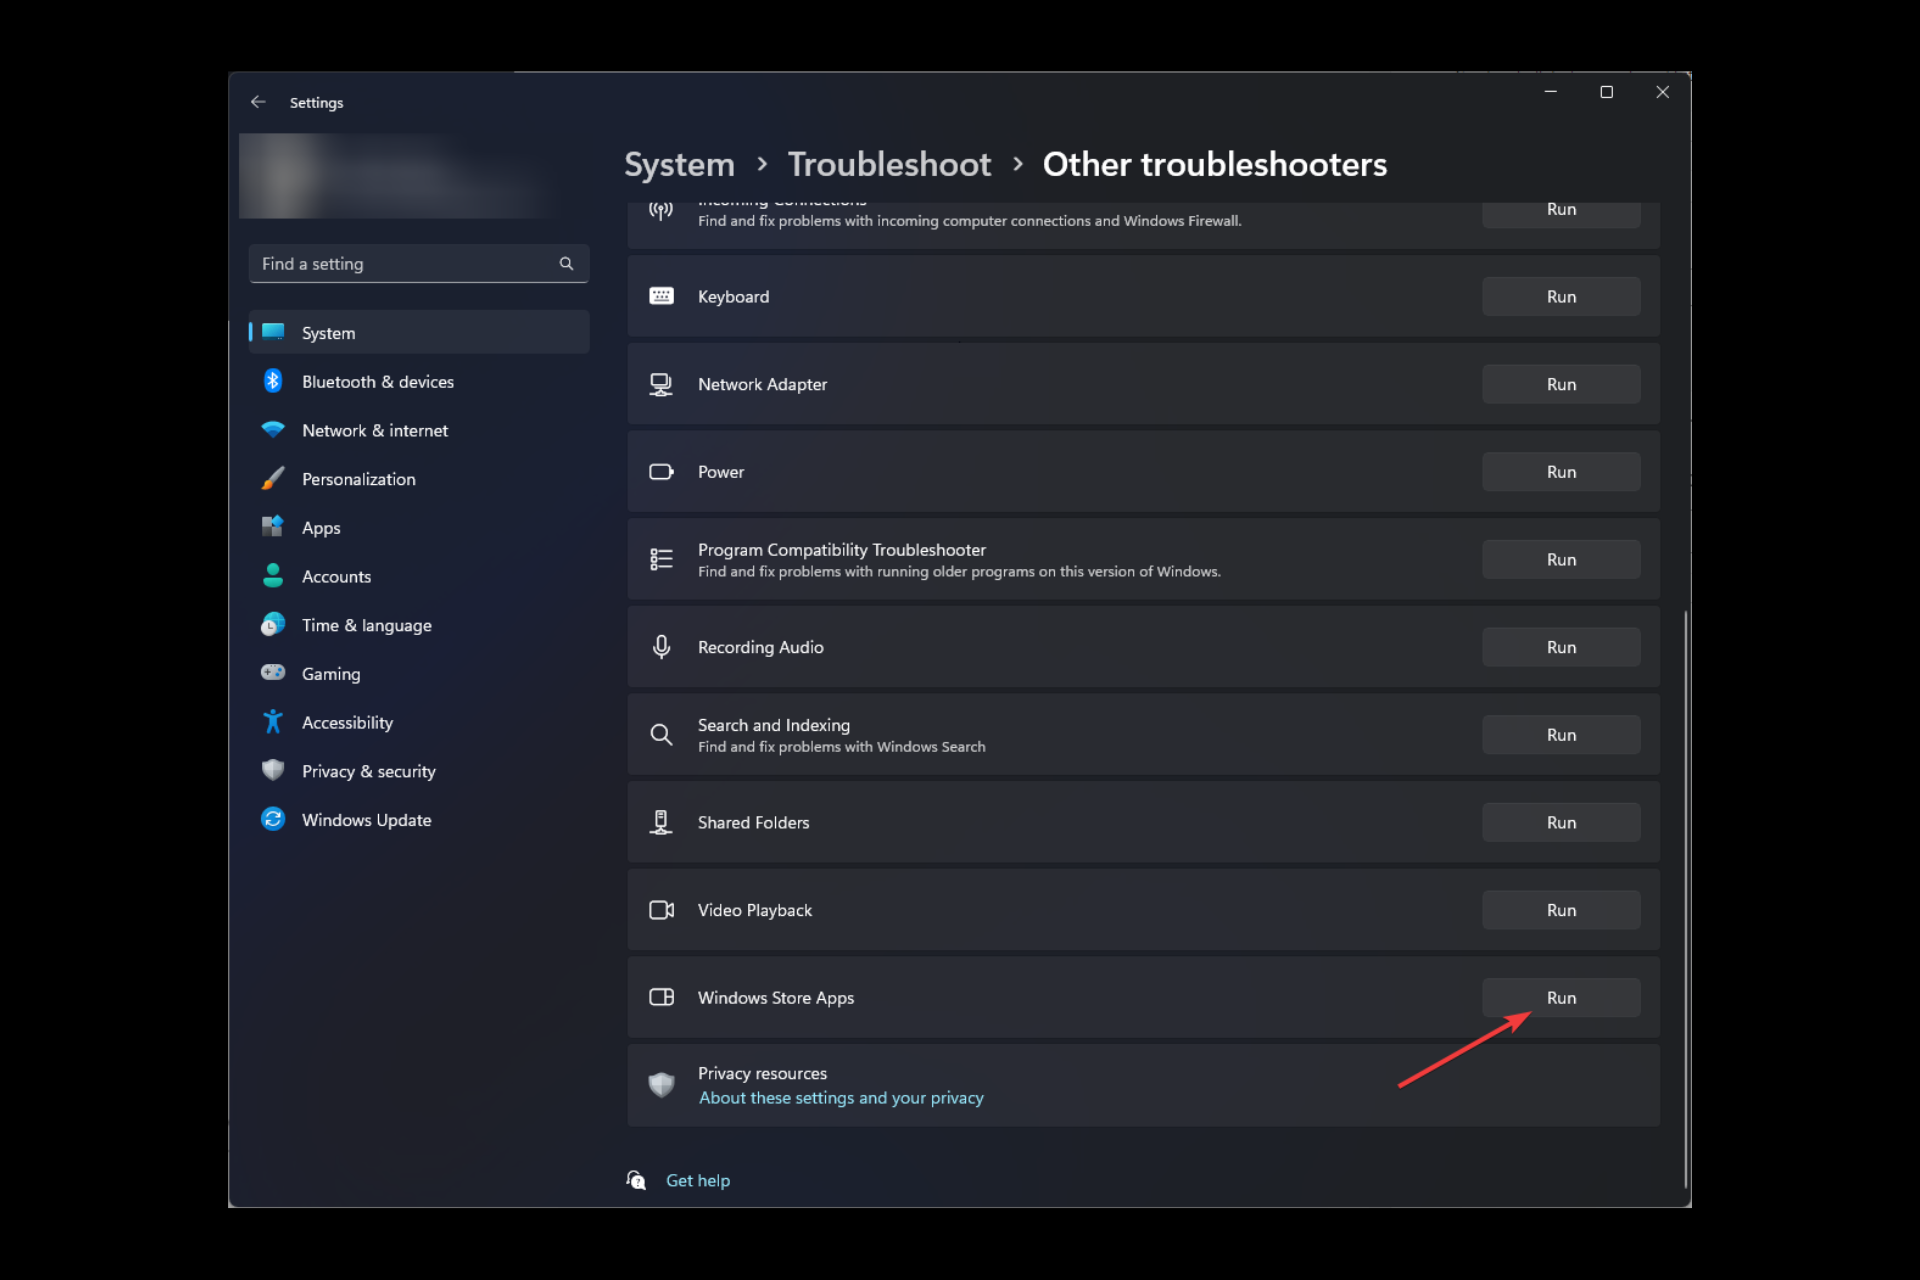
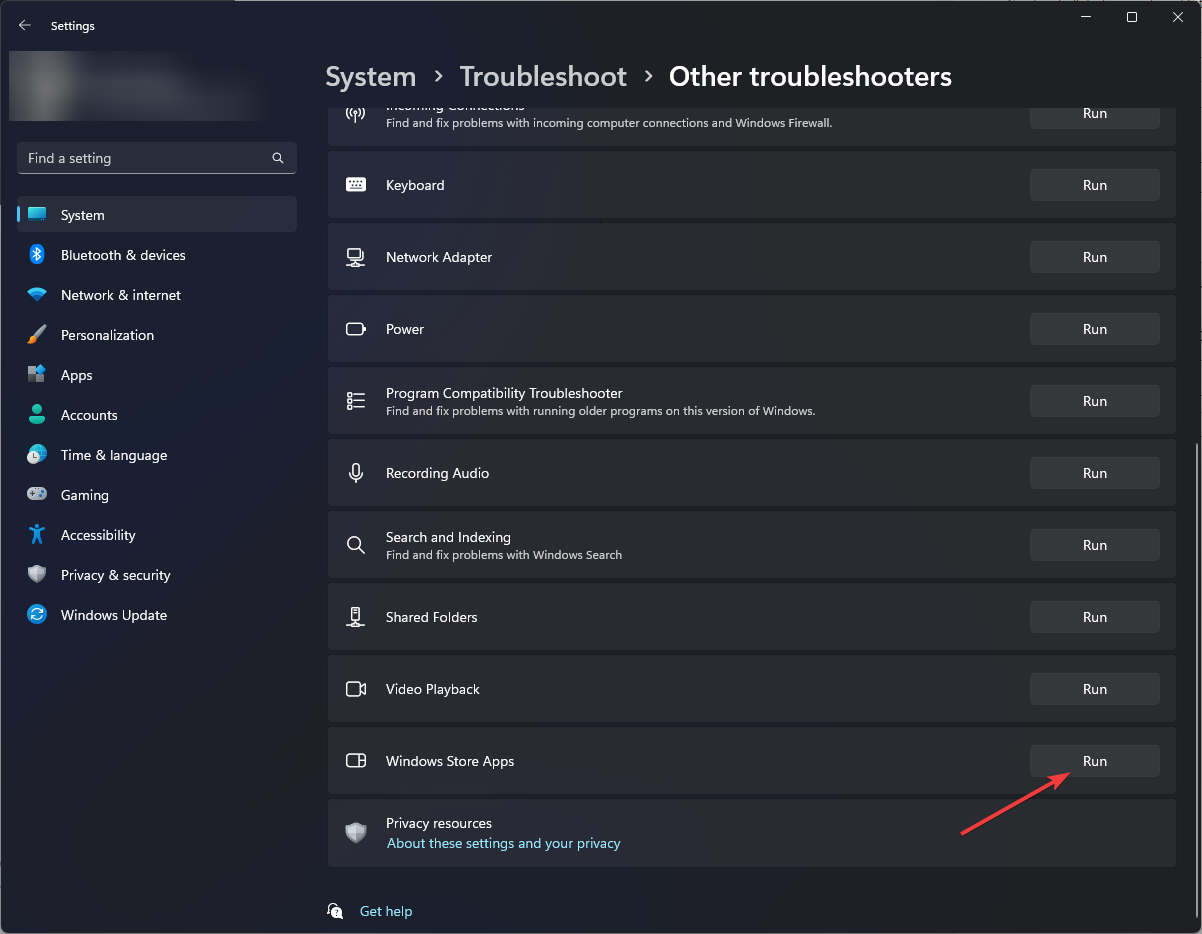
- Выберите «Устранение неполадок» > «Другие средства устранения неполадок».
- В следующем окне появится средство устранения неполадок Центра обновления Windows. Нажмите на кнопку Run для него, и он начнет работать.
Запуск средства устранения неполадок Центра обновления Windows
- Подождите, пока средство устранения неполадок выполнит поиск ошибок. Если он обнаружит какие-либо проблемы, он уведомит вас, и вы можете нажать «Применить это исправление», чтобы применить рекомендуемое решение.
- Если средство устранения неполадок не может определить проблему, нажмите «Закрыть средство устранения неполадок» и перейдите к следующему способу.
3. Установите обновление вручную
Если вы не можете установить обновления с помощью приложения «Настройки», вы также можете сделать это вручную, используя каталог обновлений Microsoft. Служба обновлений Microsoft предоставляет список запущенных обновлений. Вы можете найти обновления программного обеспечения Microsoft, драйверы и исправления в одном месте.
Вот все, что вам нужно сделать:
- Запустите браузер и перейдите в каталог обновлений Microsoft.
- Используя поле поиска в верхней части экрана, введите номер КБ целевого обновления.
Найдите номер КБ обновления
- Теперь вы сможете просмотреть список подходящих опций в каталоге. Нажмите кнопку «Загрузить», чтобы выбрать нужное обновление для вашего устройства.
Загрузка обновления Windows из каталога Microsoft
- После загрузки обновления нажмите на него, чтобы установить.
- Следуйте инструкциям на экране, чтобы завершить процесс установки.
4. Запустите сканирование системы
В случае коррупционных ошибок или вирусов проблему могут решить встроенные утилиты, разработанные Microsoft.
В этой ситуации мы будем использовать средство проверки системных файлов (SFC) и DISM (обслуживание образов развертывания и управление ими). Утилита SFC просканирует защищенные системные файлы на наличие потенциальных проблем. Если какой-либо из файлов поврежден, он заменит их здоровым аналогом.
DISM, с другой стороны, является более мощным инструментом, чем SFC, и в основном отвечает за восстановление поврежденного образа системы.
Вот как вы можете запустить утилиты SFC и DISM:
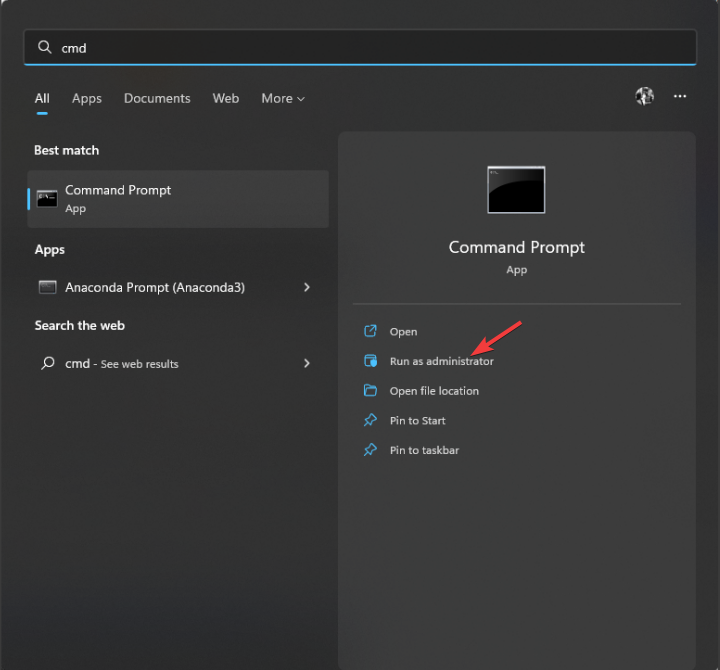
- Нажмите cmd в области поиска на панели задач и нажмите «Запуск от имени администратора».
- В окне командной строки выполните следующую команду:
sfc/scannowРазверните сканирование SFC
- После выполнения команды SFC выполните команду DISM:
DISM/онлайн/cleanup-image/restorehealthВосстановление системных файлов
После выполнения команды попробуйте снова установить целевое обновление.
5. Отключить IPV6
Пользователи также смогли решить проблему, отключив интернет-протокол версии 6.
IPv6 (Интернет-протокол версии 6) является шестой версией Интернет-протокола и заменяет IPv4. Он предоставляет уникальные IP-адреса для устройств, подключенных к Интернету. Иногда это может вызвать проблемы с установкой обновлений в Windows.
Вот как вы можете отключить его, чтобы решить проблему с сетевым диском:
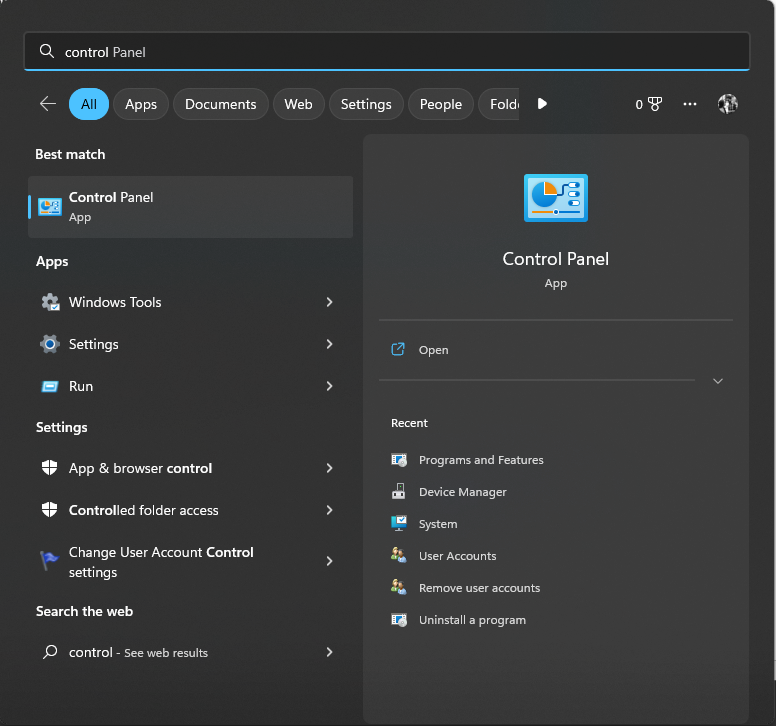
- Введите Панель управления в поиске Windows.
- Выберите Сеть и Интернет в следующем окне.
Доступ к настройкам сети и Интернета
- Перейдите в Центр управления сетями и общим доступом и выберите «Изменить настройки адаптера».
- Откройте «Сетевые подключения» и щелкните правой кнопкой мыши Wi-Fi.
- Выберите Свойства.
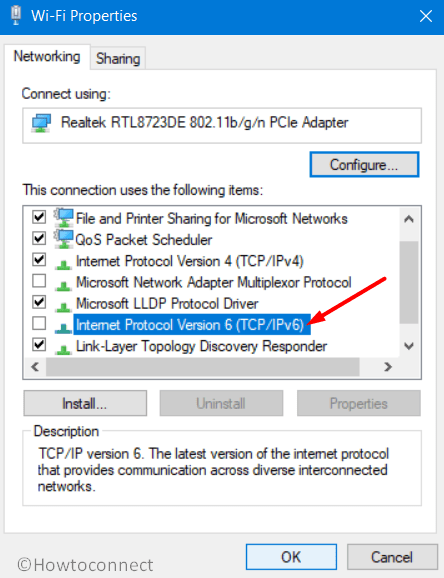
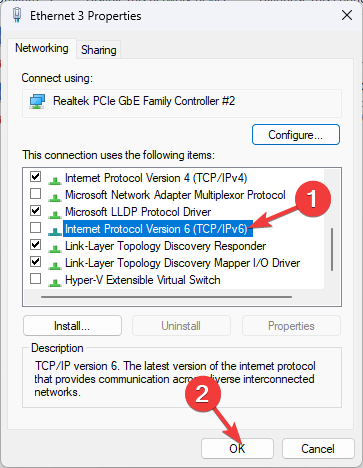
- В диалоговом окне «Свойства» перейдите на вкладку «Сеть» и найдите параметр IPV6.
- Снимите флажок для него и нажмите OK, чтобы сохранить изменения.
Снимите флажок с опции IPV6.
Надеюсь, это решит проблему.
The Error 0x80240438 is a recently occurring bug that appears when users try to update their Windows 10 OS or install apps via Microsoft Store. As there is an interlinkage between the store app and the update section, the error remains the same for both. There are primarily three different reasons that lead to this error on Windows 10. They are – Enabled Firewall, Use of IPV6 for the net connectivity, and manually connecting to a Proxy.
Temporarily turning off the Firewall, disabling IPV6, and the use of a manual proxy should resolve the error code 0x80240438. If not, run the update troubleshooter, modify the windows update group policy, or tweak the registry DOWRD key. In this post, we discuss 10 different approaches to correct this issue that are applicable to all Windows 10 Build versions. Let’s explore the solutions in detail –

To solve the Error code 0x80240438 in Windows 10, try the following suggestions –
Fixes List
- Disable Third-party Antivirus Program
- Disable Windows Firewall/ Windows Security
- Manually install the Standalone Package
- Run Windows Update Troubleshooter
- Disable IPV6
- Disable Proxy
- Modify Windows Update features Group Policy
- Reset Windows Update Folders
- Clear Microsoft Store Cache
- Tweak Registry Editor
1] Remove Third-party Antivirus Program
Using a third-party anti-malware program may cause the update or Store error 0x80240438 on Windows 10 PC. This is because there exist two different applications that perform similar tasks i.e. Windows Security. Since you can’t remove the latter one as being the in-built app, you should uninstall the 3rd party antivirus program. Anyways, Windows Defender works quite effectively, unlike its predecessors.
- Hit the Win icon and scroll down to locate the antivirus in the Apps list.
- Make a right-click on the matching result and hit the Uninstall button.
- If the UAC window prompts, tap Yes to confirm this uninstallation.
Note: If you don’t want to uninstall the software, disable it by visiting the Settings page.
- Make sure to reboot your PC as there are leftover files that don’t delete even after the program deletion.
2] Disable Windows Firewall/ Windows Security
Windows Firewall aims to provide maximum security by blocking any files that it finds suspicious. This is very helpful in keeping malicious invaders away. However, this may sometimes block the monthly patch resulting in an error message like 0x80240438. You must check whether this indeed is the case before applying any other fixes. To do so, temporarily disable Windows Firewall using the below steps –
- Press Win + S to start the Search bar, type Windows Firewall and click the top result.
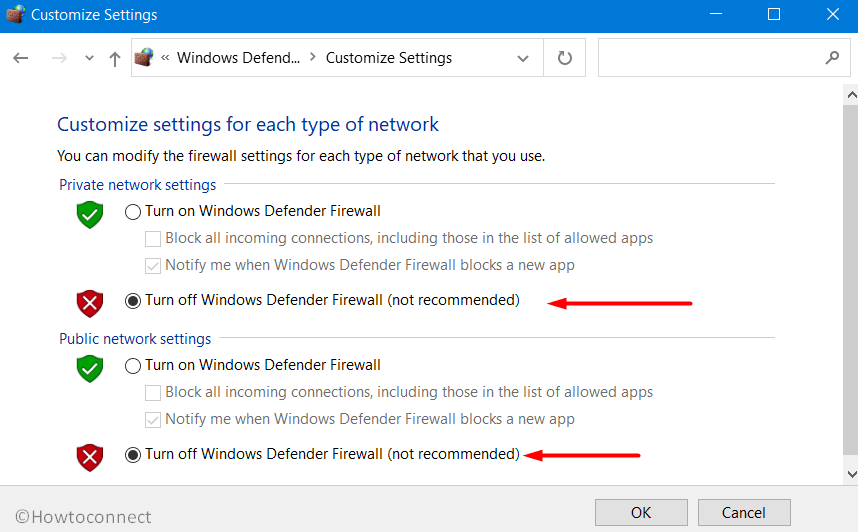
- On the next user interface, click “Turn Windows Defender Firewall on or off“.
- Choose to “Turn off Windows Firewall (not recommended)” under both networks i.e. Private and Public.

- Hit OK to confirm this action. Now, check if the error 0x80240438 resolves or not while opening the Store app/updating Windows 10 OS.
3] Manually install the Standalone Package
Microsoft releases security as well as non-security cumulative updates very often on the patch Tuesday. Since you are already encountering an update error, you may download and install the standalone package that comes with each CU. Here’s how to proceed –
- If you are a Windows 11 user, switch to this article on how to manually download and install the latest cumulative updates on your computer.
Get the name of a Recent CU
- Jointly Press Win+I to launch the Settings app.
- Select Update & Security thereafter Windows Update on the succeeding screen.
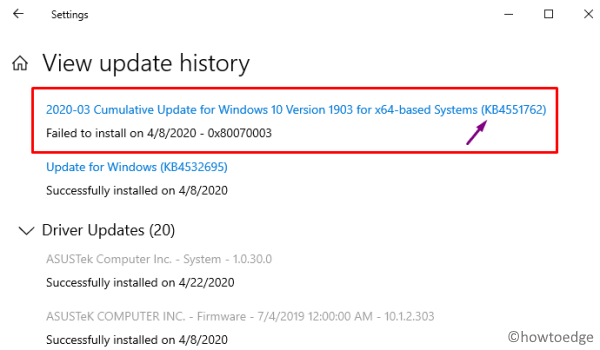
- On the right pane, scroll down and click View Update History.
- Here, you can get a list of all cumulative updates – successful or failed ones.
- Note the failed patch number and move to the next section.
Download the Standalone Package
- Open any of your web browsers and visit Microsoft Update Catalog.
- At the search bar, paste the failed knowledge base number (noted down above) and press Enter.
- A list containing all the matching CUs will appear afterward.
- Click the Download button next to the most suited and latest update as per your system architecture.
- When a new window appears, click the first link to download the .msu file. Wait for a while as this is a relatively big file.
- Once over, go to the Download folder and double-click the set-up file to start installing the standalone package.
4] Run Windows Update Troubleshooter
Windows 10 includes an in-built utility that can troubleshoot any update-related issues. If the error 0x80240438 is still appearing, run the troubleshooter to find and repair the underlying cause. Here are the essential steps to work upon –
Windows 11:
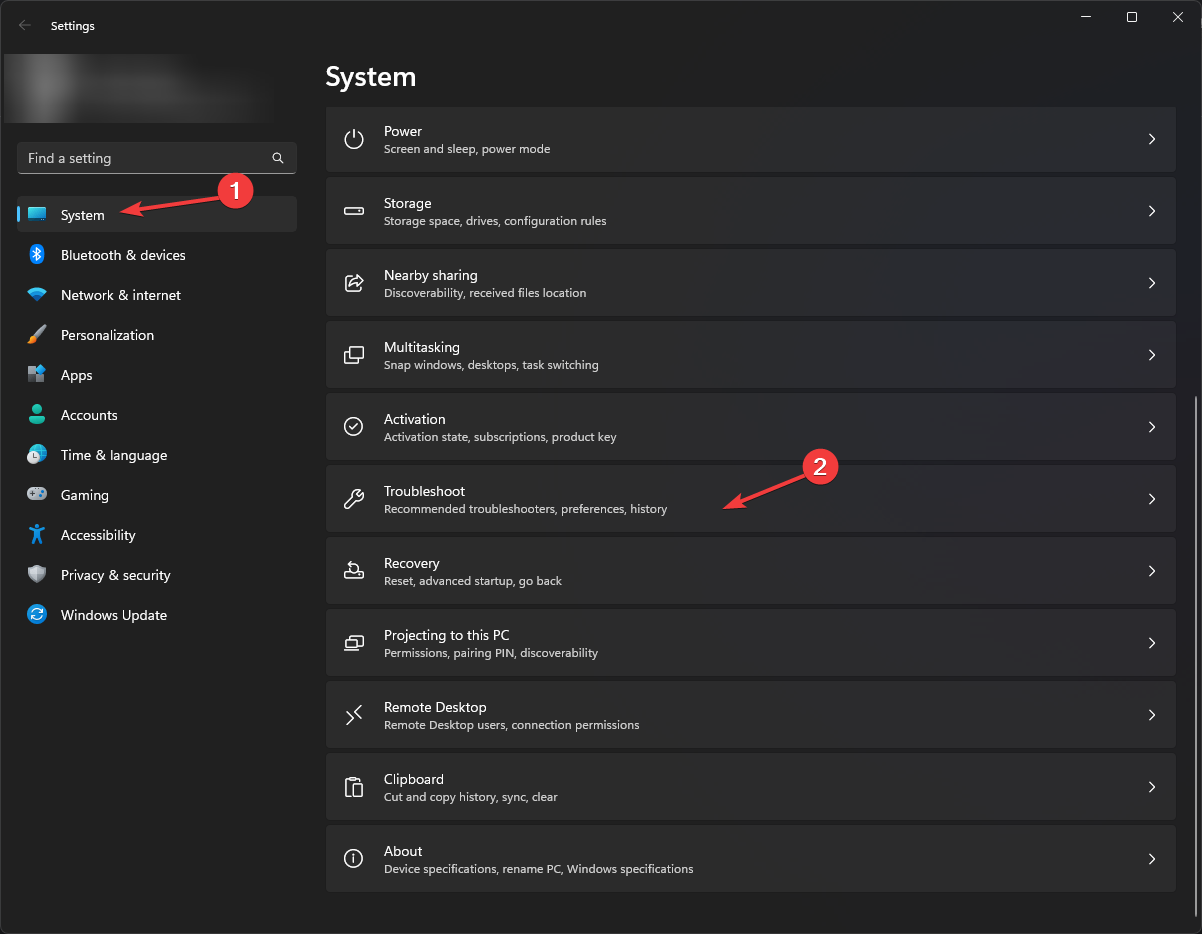
- Go to Settings and click System on the left pane.
- Head over to the right side, scroll down, and click Troubleshoot.
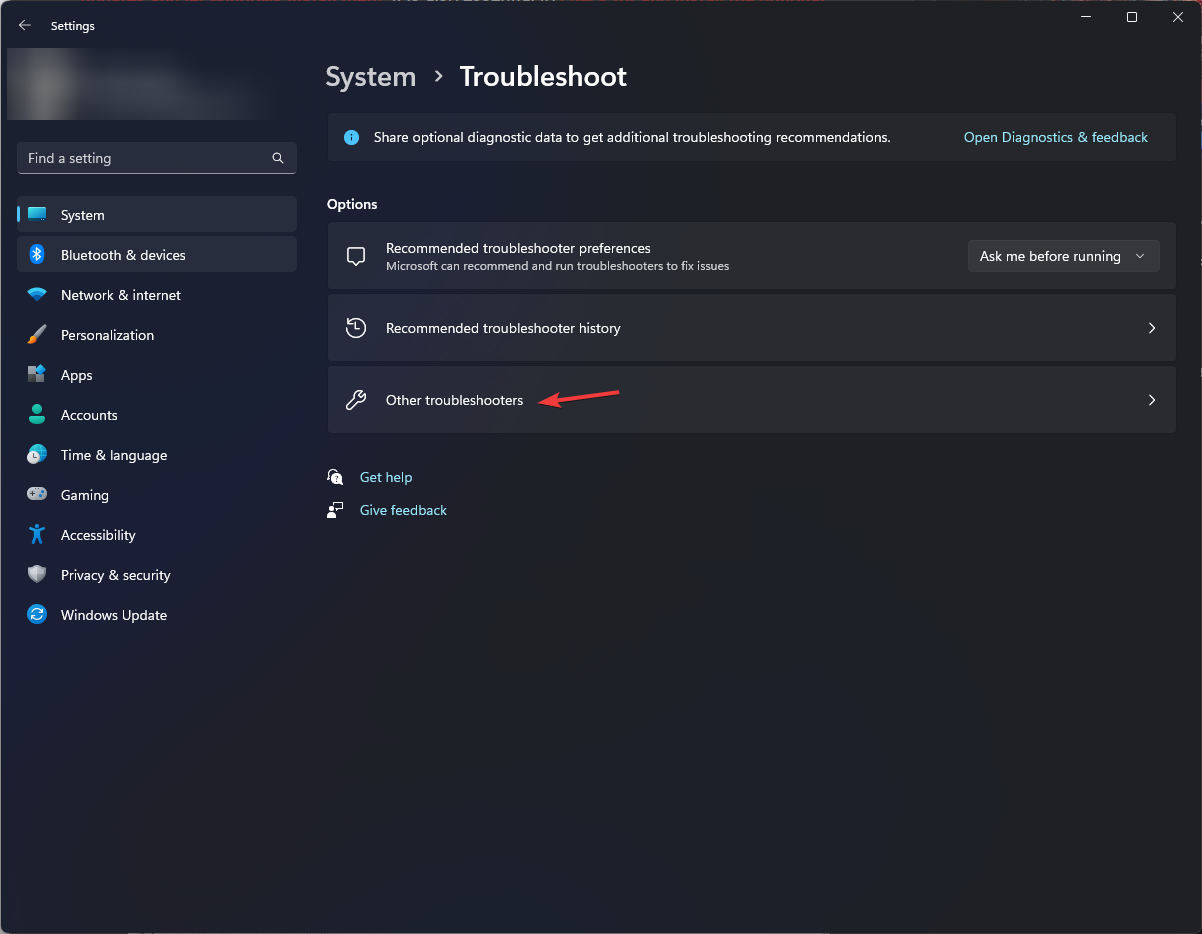
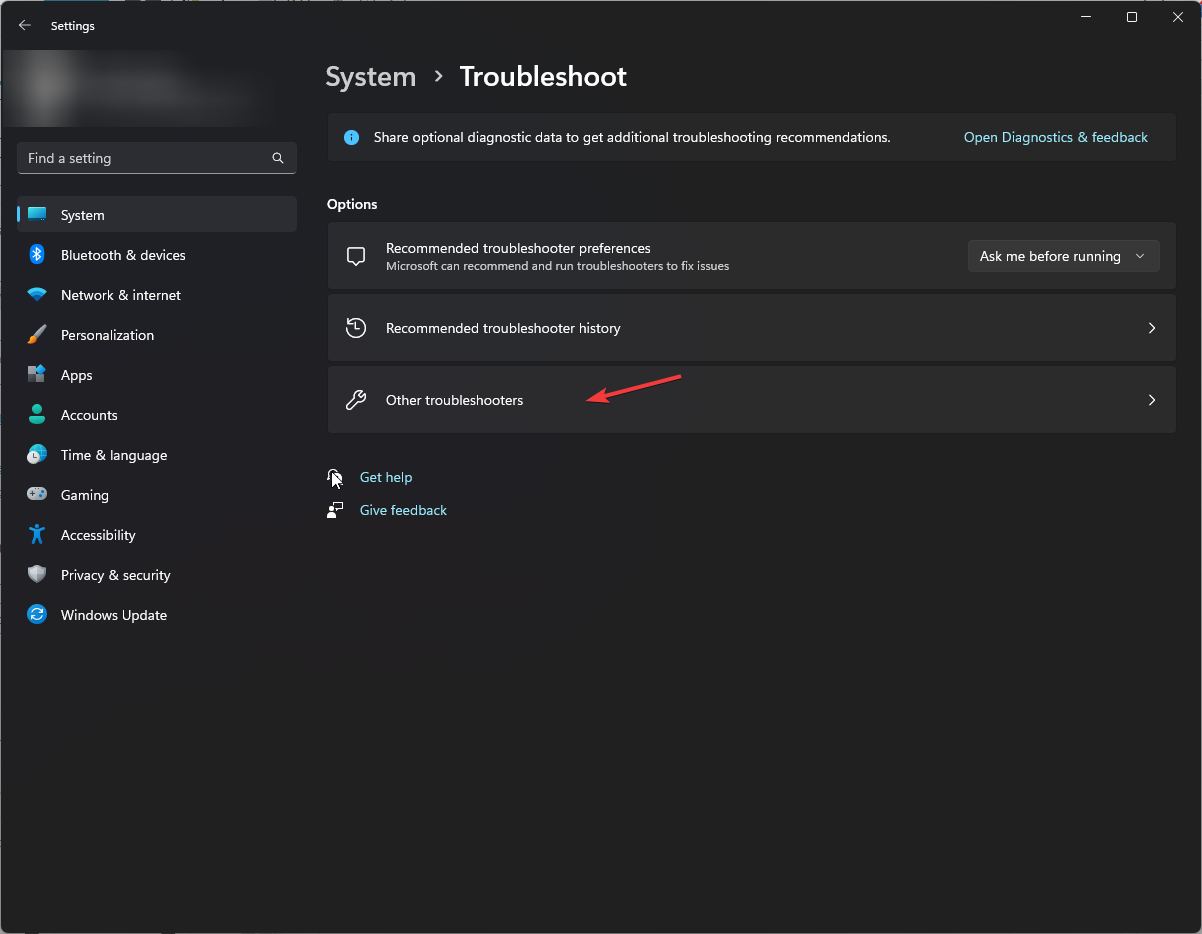
- When this expands, click Other troubleshooters.
- Locate Windows update under “Most frequent”, and hit the Run button.
- Now, wait while this tool diagnoses and resolves the issue automatically.
Windows 10:
- Jointly press WinKey + I to start the Settings app.
- Select Update & Security thereafter Troubleshoot on the succeeding window.
- Jump to the right side and click to expand the Windows Update section.
- Hit Run the troubleshooter to start looking for any update errors.

- Follow the instructions as they appear in the remaining process.
Once over, Restart the PC so that changes performed may become effective.
5] Disable IPV6
Several users have confirmed that disabling IPV6 under the Network settings resolves error 0x80240438 on their PCs. That’s why we have included this in the list of solutions and the procedure is as follows –
- Launch the control panel and reach out to the following location –
Control Panel\Network and Internet\Network Connections
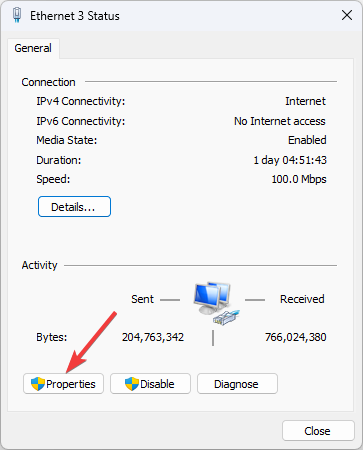
- Make a click on the internet connection (currently in use to access net connectivity) and hit Properties.

- Next, uncheck the box left to “Internet Protocol Version 6 (TPC/IPV6)” and tap OK.

- Make sure to Reboot your PC so as to apply the recent changes.
From the next login, you must be able to update Windows 10 OS or launch Microsoft Store.
6] Disable Proxy
Connecting the PC to a proxy often causes bugs and issues. So, if you are still experiencing the error 0x80240438 while opening the Store app, try once to disable the Proxy. Here are the steps to work upon –
- Press Win+Q hotkey altogether to start the Search box and type “Proxy”.
- Click the top result to launch the Proxy Settings window.
- Move to the right panel and scroll down to “Manual Proxy Setup“.
- Turn off the toggle switch next to “Use a Proxy server” and click the Save button.

Note: If you use a script address, make sure to disable this as well.
- Restart your PC and check whether this error resolves after the next login or not.
7] Modify Windows Update features Group Policy
If the error 0x80240438 still persists, you should modify the Windows Update features group policy. On different Windows 10 forums, this solution is widely accepted. That’s why we are including this method as well –
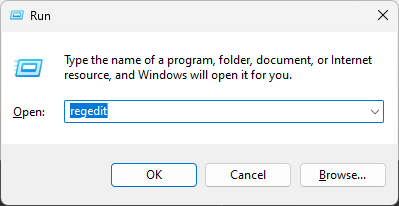
- Right-click on the Win icon and select Run.
- Type
gpedit.mscat the empty text box and press Enter. - When the Group Policy window comes into view, browse to the below address –
User Configuration > Administrative Templates > Windows Components > Windows Update
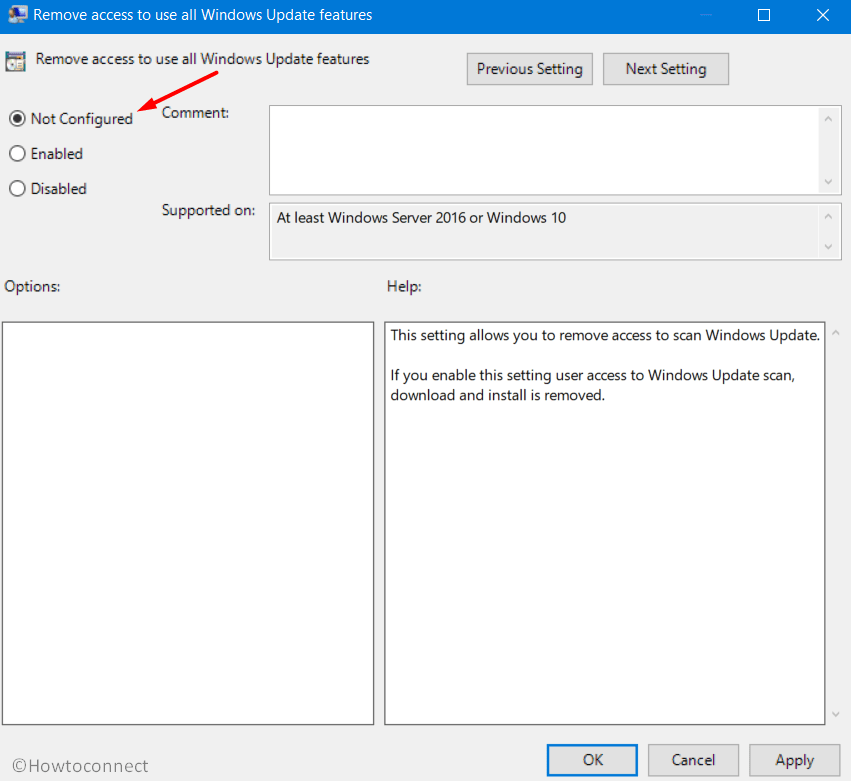
- Move to the adjacent right side and scroll down to locate “Remove Access To Use All Windows Update Features“.
- Once found, double-click on it to open its respective window. Mark the checkbox next to “Not configured” and hit OK.
- Restart your computer so as to implement the changes from the next login.
8] Reset Windows Update Folders
The existing contents inside the SoftwareDistribution and Catroot2 folders may also cause the error 0x80240438 on Windows 11 or 10 PC. To get rid of this nagging issue, you must clean these two update folders accomplishing the below steps –
- Press Win & R to invoke the Run dialog.
- Type cmd at the void, hold Ctrl+Shift and press Enter to launch the Command Prompt as Admin.
- When the UAC window prompts, tap Yes to authorize the access.
- Now, execute the following codes one after another. Make sure to press the Enter key after each command.
net stop bits
net stop wuauserv
net stop appidsvc
net stop cryptsvc
- The above codes will stop the essential update services, now run the below codes to rename certain services –
rmdir %systemroot%\SoftwareDistribution /S /Q
rmdir %systemroot%\system32\catroot2 /S /Q
- Subsequently, configure your network connectivity using the following commands –
netsh winsock reset
netsh winsock reset proxy
- After successfully executing the above codes, restart the services that you have previously stopped.
net start bits
net start wuauserv
net start appidsvc
net start cryptsvc
- Finally, Restart your system and check whether the update error code 0x80240438 gets solved or not.
9] Clear Microsoft Store Cache
Note: This workaround is primarily for Microsoft Store-related error 0x80240438. If you are receiving the error message while performing Windows 10 update, you may skip this solution.
As time passes by, a huge amount of cache piles up in Windows Store. If you don’t clear these unnecessary data, you may end up receiving the error 0x80240438. So, go through the below steps to clear the Store cache –
- Launch the Run dialog, type
wsresetat the void, and press the Enter key. - The Windows console appears immediately afterward clearing off the stored cache.
- When the command prompt finishes the task, Microsoft Store will start without any error code.

10] Tweak Registry Editor
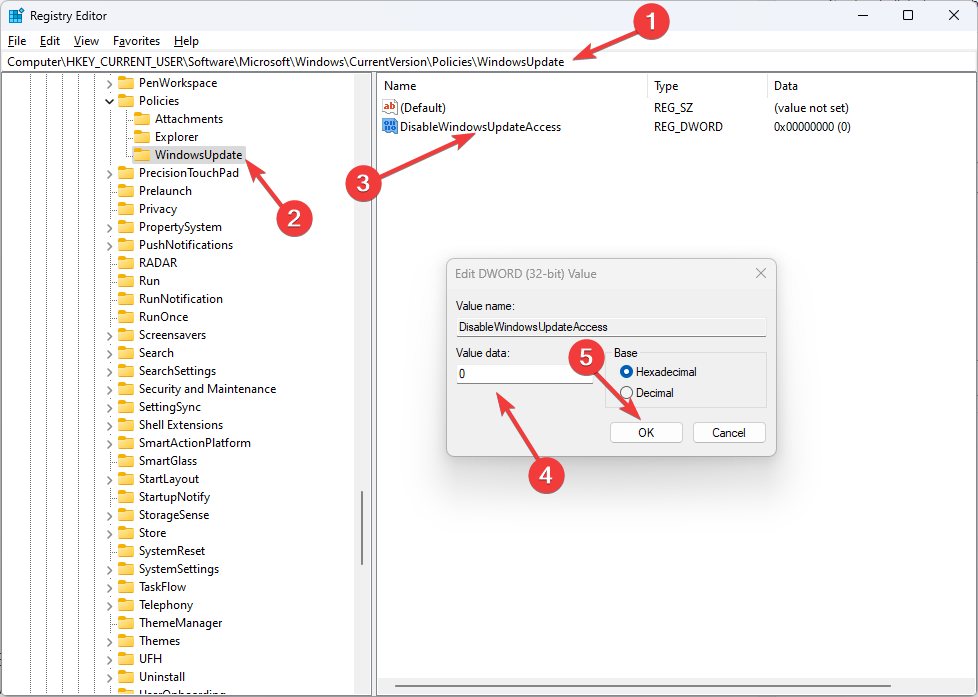
If you are still getting the error 0x80240438 on your computer, modifying the “DisableWindowsUpdateAccess” entry inside the registry may resolve this bug. Here’s how to perform this task –
- Press Winkey + R altogether to start the Run dialog. Type
regeditat the void and press Enter to invoke the Registry Editor. - Using the key ladder on the left pane, reach out to the below path –
HKEY_CURRENT_USER\Software\Microsoft\Windows\CurrentVersion\Policies\WindowsUpdate
- Head over to the right side and locate “DisableWindowsUpdateAccess“.
- Click on this DWORD entry twice and put “0” at its value data.

- Click OK and Restart Windows 10 to implement the above changes.
That’s it, I hope the above fixes do help to resolve the Update and Store Error 0x80240438 on your Windows 11/10 device. If you have any queries or suggestions related to this article, do tell us in the comment section.
В системе Windows 10 нередко возникает ошибка (код 0x80240438) при попытке обновления или скачивания приложений через магазин Виндовс. Такая ошибка (и похожие — 0x80073cf9, 0x803F7003 и пр.) не даёт возможности обращаться в магазин для каких-то приобретений (в том числе закачки софта и пакетов обновлений). В этой статье мы рассмотрим возможные пути решения проблемы.

Способы устранения ошибки магазина в Windows 10
Антивирусы
Если вами были установлены дополнительные антивирусные утилиты, то попробуйте их временно отключить. Возможно, магазин Windows 10 блокируется под их влиянием.
Файл hosts
Если вами когда-то устанавливались утилиты для пресечения «шпионской деятельности Майкрософт», то нужно знать, что такие программы вносят изменения в файл hosts, обусловливающий работу интернета. Это также могло повлиять на ваш доступ в магазин Windows 10.
Перезагрузка
Банальная перезагрузка компьютера, которую вы не сделали после внесения в систему каких-либо изменений, зафиксирует вступление их в силу, и магазин Windows 10 после этого может возобновить правильную работу.
Дата и время
Как это ни покажется парадоксальным, но проверьте дату и время, установленные на вашем компьютере.
Тип учётной записи
Иногда магазин Windows 10 возвращается в рабочее состояние при изменении её из «Учётной записи Майкрософт» в локальную:

Настройки брандмауэра
Действенным, но требующим особой аккуратности способом решения проблемы является сброс настроек Windows Firewall, после чего остаются исключительно стандартные принципы доступа к сети. Легко эту операцию провести вводом из строки команд:

ВАЖНО. Работа некоторых сетевых приложений может быть нарушена, так как правила для них прописывались при инсталляции. Необходима в таком случае их переустановка.
Сброс и выход из профиля
Магазин Windows 10 может восстановиться после выхода из него и последовательного выхода/входа в свою учётную запись. Сначала покидаем магазин, в строке поиска вводим wsreset и эту команду запускаем администратором:

Вас не должен смущать вид (возможно, долгий промежуток времени) висящей строки Windows 10 — это выполняется команда. Результатом её выполнения должен быть запуск Windows application store (Магазин приложений Виндовс).
Если загрузка приложений не происходит — попробуйте по кнопке «выйти» из своего профиля, закройте appstore. Затем снова войдите в Магазин Windows 10 и ещё раз активируйте учётную запись в нём:

Неполадки Виндовс
Немаловажным в этой ситуации будет проведение диагностики и ликвидация внутренних ошибок средствами самой Windows 10. Для этого в «Панели управления» выберите «Поиск… проблем», если поле «Просмотр» настроено на «Категории». Если же «Просмотр» настроен на «Значки», то выбирать следует «Устранение неполадок»:

Укажите нужные категории для отработки:

После этой процедуры не забудьте о перезагрузке. Дополнительную информацию об ошибках центра обновлений Виндовс (в том числе для версии 10) можно прочесть здесь https://support.microsoft.com/ru-ru/help/10164/fix-windows-update-errors.
Переустановка
Если Виндовс Appstore вами был удалён, но директория WindowsApps осталась нетронутой, то начните вводить в окне поиска PowerShell. После его появления запустите его от имени администратора.

Далее, должен последовать набор команды в строке и активирование её клавишей «Ввод»:

Если ввод выполнен верно, то «Виндовс Store» появится в панели задач:

Надеемся, что наша статья помогла вам решить проблему загрузки обновлений или приложений с ресурса Windows application store. Обновляйтесь, скачивайте приложения.
Задавайте нам свои следующие вопросы. Пишите о своём опыте, оставляйте комментарии. Читайте наши новые статьи.
One of the common issues that users come across while updating Windows or installing apps through Microsoft Store is Error Code 0x80240438. Most of the time, both Store and Windows Update encounter the same error code as they have an interlinked delivery mechanism. As each operating system has multiple characteristics, so the culprit of the issue also varies.
Some of the possible causes that put a hindrance in the Windows Update and Store service are proxy settings, Windows Firewall, IPV6, and more. Regardless of the versions of Windows 10 or 11 you are using, the resolutions will be same. So in the article, we will discuss some of the most verified workarounds to resolve bug code 0x80240438. Find out the solutions –
Here is How to Fix Windows 11/10 Update Error Code 0x80240438 –
1] Install the Windows Update Manually
Microsoft is very much keen to release cumulative updates and features quite regularly packing latest modifications and fixes for bugs and issues. Most of these files start downloading and installation follows automatically in presence of an active internet connection. Error code 0x80240438 appears while the Windows Update feature is autonomous and this is just a cumulative patch, unlike feature update. Hence, we can proceed to install the update patch manually using below guidelines –
- Press Windows key and type in – update history.
- Hit – Enter.
- Explore the list of successful and failed updates.
- Check for the failed updates and then navigate to Microsoft Update Catalog.
- Here, search for the KB that got failed to install. Once you see it, download the compatible architecture and install the file manually.
2] Use the Windows Update Troubleshooter
Windows 10 and 11 Update Error code 0x80240438 comes in when the system encounters difficulties in installing related cumulative patch. Many of the similar drawbacks kept on haunting the users over the ages. To eradicate this issue, Microsoft came up with brand new idea of Windows Update Troubleshooter. The tool guides us on how to resolve a specific error that happens while installing an update. Here is how to use the tool –
For Windows 10
- Press Win+I hotkeys at once to launch the Windows Settings app.
- Click on the Update & Security tile to pass forward in the succeeding page.
- When the page arrives, select Troubleshoot from the left pane.
- Jump to alongside right and click – Additional troubleshooters.
- Select Windows Update option from there.
- Hit Run the Troubleshooter button from the expanded pane.

- The utility will now start looking for update errors in the system. It will also provide guidelines to solve the issue accordingly.
- Follow the instructions shown in the display to complete the process.
For Windows 11
- Right-click Start button and choose – Settings.
- Move to the right of Settings page.
- Scroll down a bit and click – Troubleshoot.
- Select – Other troubleshooters.
- From the next page, click Run present beside Windows update.
3] Disable Windows Firewall
Having an active security solution often can be detrimental for an update patch to be installed automatically as the tool will detect the file as malware. Windows Firewall provides us real-time protection against malicious invaders and offers maximum security. However, the same can also cause Error code 0x80240438 in Windows 10 and 11. In order to fix the error, we can disable Windows Firewall temporarily until the issue goes off. Here is how to disable the Windows Firewall –
- Open the Taskbar Search pressing Win+Q hotkey together.
- Type Windows Defender Firewall in the empty text space. Select the app after arriving in the result.
- Moving on to the app UI, click Turn Windows Defender Firewall on or off from left pane.
- After a new window unveils, click the radio button against Turn off Windows Firewall (not recommended) option for both the networks on this page.
- Click the OK button and save these changes and there will not be any more 0x80240438 update error.
4] Uninstall Third-party anti-malware tool
Like the Windows Security, any other third party application may often block an update patch and eventually users encounter 0x80240438 error. Moreover, keeping a 3rd party anti-malware solution may be detrimental parallel to Windows Security. So, make room to uninstall security solutions from outside sources right away using the below steps –
- Right-click on Start icon and choose Apps and Features from appearing Win+X menu.
- When the Apps Settings will open up, reach out to the third party security solution on the right pane.
- Select the same and hit Uninstall from expanded pane.
- When UAC prompts for permission, click Yes and follow on-screen guidelines until the process ends.
- Finally, reboot Windows to implement the modifications.
5] Disable IPV6 from Windows
Various forums are evident that disabling IPV6 resolves Error code 0x80240438 in Windows 11 and 10. Therefore we may also give it a try following below instructions –
- Press Win + R keys and invoke the Run dialog box.
- Type ncpa.cpl and click OK button located on wizard to open up Network connections window.
- Moving on to the new window, do a right-click on the internet connection that is connected to your computer.
- Select Properties option from appearing menu.
- Jump to another popup window and uncheck the box against Internet Protocol Version 6 (TPC/IPv6).
- Click on OK button from bottom area and save changes.
- Lastly, reboot the device and check if the error exists in the system when a new session begins.
6] Tweak Group Policy Editor
Tweaking policy in the Group Policy Editor will let you remove access from Windows Update. Enabling the settings will remove all the Windows Update features from system. Many users have confronted that they have fixed Error code 0x80240438 tweaking the policy. Follow the below guidelines to complete the task –
- Invoke the Run dialog and type gpedit.msc in its empty text box.
- Press Enter key to open Group Policy Editor and navigate to below path –
User Configuration > Administrative Templates > Windows Components > Windows Update
- Upon reaching to Windows Update, jump on the alongside right pane.
- Hereby, make a double click on Remove Access To Use All Windows Update Features.
- Select the radio button against Not Configured.
- If you see it is enabled, configure one of the below notification options –
0 = Do not show any notifications – This setting will remove all access to Windows Update features, and no notifications will be shown.
1 = Show restart required notifications – It will display notifications about restarts that are required to complete the installation.
- Click the OK button finally and close the Group Policy Editor window.
- Restart Windows PC to make changes effective.
7] Disable Proxy server connection
Disable Proxy server connection may also be pretty helpful in eliminating Error code 0x80240438 in Windows 11 and 10. To do so, follow the below steps –
- Press Windows key, type internet options and hit Enter key to access Internet Properties.
- Jump into the Connections tab.
- Move out to Local Area Network (LAN) settings area and click the LAN Settings.
- Upon opening a new settings page, uncheck the box that reads Use a proxy server for your LAN (These settings will not apply to dial-up or VPN connections) under Proxy Server section.
- Click the OK button and later on, reboot Windows to make the changes effective.
8] Clear off Microsoft Store Cache
Windows Update Error code 0x80240438 resembles the Microsoft Store issue as well hence, clearing the Store cache might help. Follow the below guidelines to clear the cache –
- Open Run dialog box pressing Windows key and R.
- Type wsreset in the void text space and press Enter.
- The Command Prompt will open up in a few moments and take over the task.
- Once the process ends, Command Prompt window will close automatically and open Microsoft Store.
See – How to Reset Cache of Windows Store
9] Rename Windows Store cache folder
If the Error code 0x80240438 is evolved from Microsoft Store, renaming the Store Cache folder will resolve the setback. For that –
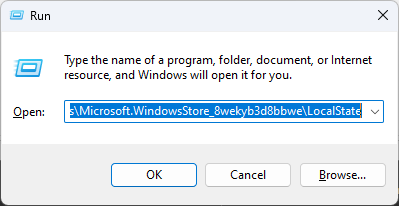
- Get access to Run and enter following text in its empty search box and press Enter key eventually –
%localappdata%\\Packages\\Microsoft.WindowsStore_8wekyb3d8bbwe\\LocalState- Locate the cache folder, make a right-click on the same, and choose Rename option from menu.
- Name it as cache.old and hit Enter to save it.
- If you don’t find the cache folder in LocalState, make a right-click on empty space and choose New > Folder.
- Enter the name Cache and close File Explorer.
- Now open Windows Settings app and head over to Troubleshoot page.
For Windows 10, Go to Settings => Update & Security => Troubleshoot => Additional troubleshooters.
Windows 11 users, navigate to Settings => Troubleshoot (right column) => Other troubleshooters.
- Reach out to the Windows Store App and hit Run the Troubleshooter or Run button.
- After finishing the process, the error will resolve hopefully.
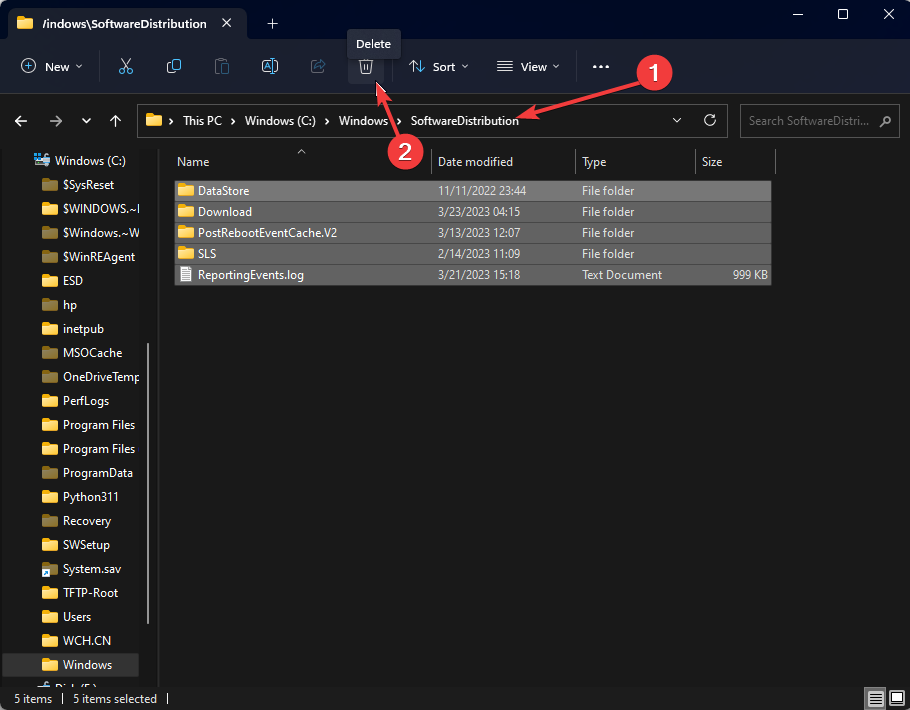
10] Remove everything from of C:\\Windows\\SoftwareDistribution folder
Some contents in the SoftwareDistribution folder may often be a cause for Error code 0x80240438 in Windows 10 and 11. In order to resolve the issue, delete everything from this folder going through below process –
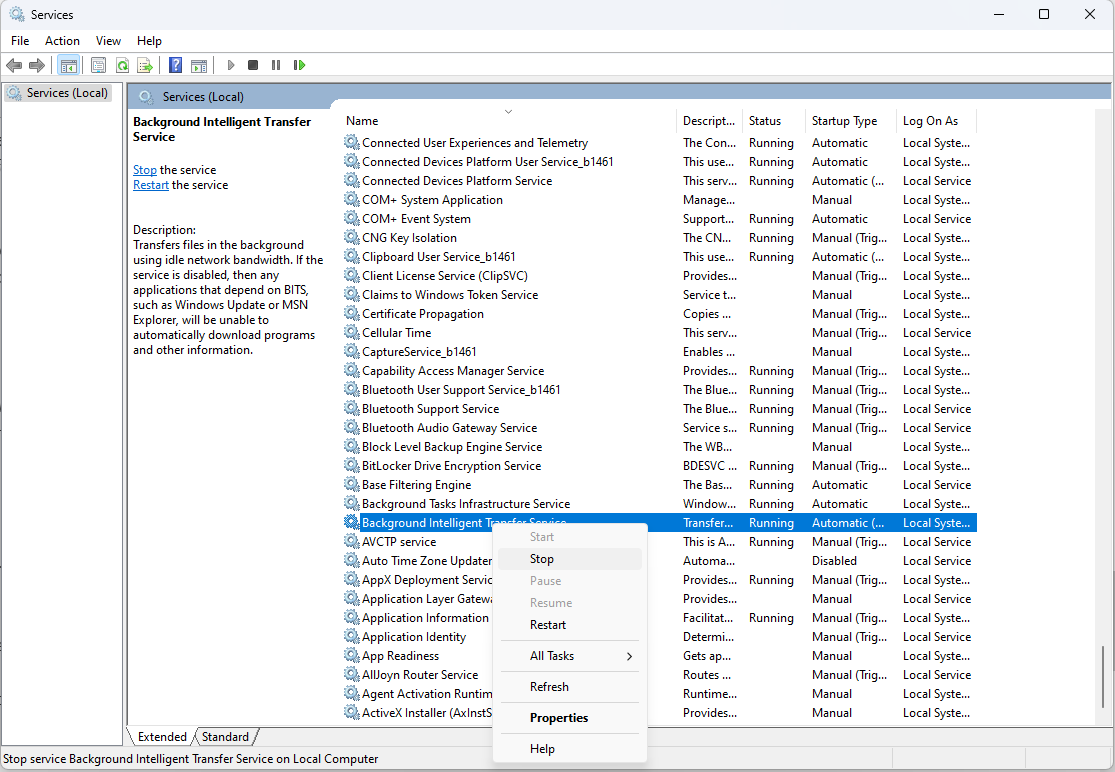
- Open the Taskbar Search, write services in the void text box, and press Enter to launch the application.
- Move out for Background Intelligent Transfer Service, make a right-click on it and select Stop.
- Close the Services app and open File Explorer pressing Win+E hotkey at once.
- In the upcoming window, navigate to the “C:\Windows\SoftwareDistribution” folder.
- Select all items pressing Ctrl+A hotkey at once and press Delete key on the keyboard.
- Reboot Windows and when the system will load back, we can expect the error will resolve.
11] Modify Registry Editor
Modifying the DWORD value of “DisableWindowsUpdateAccess” is found to resolve Error code 0x80240438 in Windows 11 and10 easily. Follow the below guidelines to accomplish –
- Do a right-click on Start and select Run.
- In the empty text box of the wizard, type regedit and hit Enter to access Registry Editor.
- Navigate to the below directory in left-wing –
HKEY_CURRENT_USER=>Software=>Microsoft=>Windows=>CurrentVersion=>Policies=>WindowsUpdate- On the right pane of WindowsUpdate locate the DWORD DisableWindowsUpdateAccess.
- Make a double click on the same and set the value data as 0.
- Click OK and Restart Windows to implement registry settings.
- After the new session will begin, hopefully, there will be no more 0x80240438 error.
Methods:
1] Install the Windows Update Manually
2] Use the Windows Update Troubleshooter
3] Disable Windows Firewall
4] Uninstall Third party anti-malware tool
5] Disable IPV6 from Windows
6] Tweak Group PolicyEditor
7] Disable Proxy server connection
8] Clear off Microsoft Store Cache
9] Rename Windows Store cache folder
10] Remove everything from of C:\\Windows\\SoftwareDistribution folder
11] Modify Registry Editor
That’s all!!
Repair any Windows problems such as Blue/Black Screen, DLL, Exe, application, Regisrty error and quickly recover system from issues using Reimage.
Run Windows Store apps troubleshooter first
by Srishti Sisodia
Srishti Sisodia is an electronics engineer and writer with a passion for technology. She has extensive experience exploring the latest technological advancements and sharing her insights through informative… read more
Updated on
- The Windows Store update error could have occurred if the IPV6 is enabled but not supported by your ISP.
- This guide will cover all the potential fixes to resolve the issue.
Many users have reported that they faced this issue while updating Windows OS or apps on Microsoft Store.
In this guide, we will discuss some expert-recommended solutions to fix the issue right after talking about the causes.
How we test, review and rate?
We have worked for the past 6 months on building a new review system on how we produce content. Using it, we have subsequently redone most of our articles to provide actual hands-on expertise on the guides we made.
For more details you can read how we test, review, and rate at WindowsReport.
What is 0x80240438?
0x80240438 is a Windows Update error code that typically indicates a problem with the Windows Update service or the associated software components.
What causes the Windows Store error 0x80240438?
There are various reasons why you see 0x80240438 while updating the computer; some of the common ones are mentioned here:
- Network connectivity issues – If your internet connection is slow or has a weak signal, it could prevent you from updating Windows apps, hence the error.
- Third-party security software interference – Third-party antivirus software can interfere with normal Windows functioning, including the update process. Therefore, you get this error.
- Damaged system files – If system files are corrupt or missing, it can prevent the Windows update service from running correctly. Hence you get this error.
- Old or incompatible drivers – If your device drivers are outdated or incompatible with your Windows version, it could cause all kinds of issues.
- Windows update service issue – If there are problems such as incorrect configuration, outdated components, or corrupted files, it can cause an error.
What can I do to fix the Windows Store error 0x80240438?
Before engaging in advanced troubleshooting steps, you should consider performing the following checks:
- Disable the firewall temporarily.
- Restart your computer.
1. Disable IPV6
- Press the Windows key, type Control Panel, and click Open.

- Select Category as View by and click Network & Internet.

- Double-click the network connection, and on the next page, select Properties.

- Remove the checkmark next to Internet Protocol Version 6 (TCP / IPv6).

- Click OK to confirm the changes.

2. Rename the Windows Store cache folder
- Press Windows + R to open the Run dialog box.
- Type the following command, replace the username with the user account name, and click OK:
C:\Users\username\AppData\Local\Packages\Microsoft.WindowsStore_8wekyb3d8bbwe\LocalState
- Locate and select the Cache folder, and rename it to Cache.old.

- If you don’t find the folder, create a folder and name it Cache.
- Press Windows + I to open Settings.
- Go to System, and click Troubleshoot.

- Now select Other troubleshooters.
- Go to the Windows Store Apps and click Run.
- Follow the onscreen instructions to complete the process.


3. Run the Windows Store Apps troubleshooter
- Press Windows + I to open the Settings app.
- Go to System, and click Troubleshoot.
- Now select Other troubleshooters.
- Go to the Windows Store Apps and click Run.
- Follow the onscreen instructions to complete the process.
- High GPU Usage but Low FPS: 8 Ways to Fix This Issue
- Microsoft Paint Cocreator: A complete guide on the new AI tool
- Cash App Error 400: How to Quickly Fix It
- Windows 11 adds more apps to the share links feature
4. Disable BITS and delete the SoftwareDistribution folder
- Press Windows + R to open the Run console.
- Type services.msc and click OK to open the Services app.
- Locate and right-click Background Intelligent Transfer Service and select Stop.

- Press Windows + E to open Windows Explorer.
- Navigate to this path:
C:\Windows\SoftwareDistribution - Select all the content in the SoftwareDistribution folder and click the Delete icon.

- Now go to the Services app, right-click Background Intelligent Transfer Service, and select Start.


5. Clear Windows cache
- Press Windows + R to open the Run console.
- Type wsreset.exe and click OK to reset the Windows Store cache.
- Once the process is finished, your Microsoft Store app will restart.

6. Use the Registry Editor
- Press Windows + R to open the Run box.
- Type Regedit and click OK to open Registry Editor.
- Navigate to this path:
Computer\HKEY_CURRENT_USER \Software \Microsoft \Windows \CurrentVersion \Policies\WindowsUpdate - Locate DisableWindowsUpdateAccess, and double-click it.

- Change the Value data from 1 to 0.
- Restart your computer to let the changes take effect.
7. Use the Command Prompt
- Press the Windows key, type CMD, and click Run as administrator.

- Type the following commands one by one and press Enter after every command:
sfc\scannowDISM /online /cleanup-image /restorehealth - Copy and paste the following commands one by one and press Enter after every command:
netsh winhttp reset proxynet stop wuauservnet start wuauserv - Restart your computer and check if the issue persists.
So, these are methods you can follow to fix the 0x80240438 error on your Windows computer. Try them and let us know what worked in the comments section below.
![]()