В сегодняшнем материале мы будем рассматривать очередную ошибку, возникающую во время обновления операционной системы от компании Майкрософт — 80240016. Ни для кого не секрет, что различные версии ОС Windows просто таки наполнены всевозможными багами, ошибками и проблемами. Чтобы избавляться от них, разработчики не сидят на месте — и выпускают огромное количество обновлений. Однако, что остается делать простому пользователю, когда даже во время обновления системы тот сталкивается с ошибкой, в нашем случае, 80240016?
Что же, есть несколько методов, которыми потенциально можно от нее избавиться, и мы их рассмотрим в этом статье. Итак, стоит заметить, что ошибка 80240016 представляет собой крайне старый код, который успешно кочует с одной версии ОС Windows в другую. Увидеть его можно в Windows 7, Windows 8 и даже Windows 10. На более новых системах код может дополняться «0x», но сути это не меняет.
Причины: какие они для кода ошибки 80240016? На этот вопрос крайне затруднительно ответить. В принципе, можно попытаться выстроить список из потенциальных причин, способных вызвать ошибку 80240016. Давайте же посмотрим на него:
- проблемы с сетевым подключением на компьютере;
- повреждение системных файлов, участвующих в процессе обновления;
- повреждение компонентов Центра обновления Windows;
- приостановка работы служб Центра обновления Windows;
- установочные файлы предыдущих обновлений вступили в конфликт с установочными файлами нового обновления;
- антивирус или брандмауэр, как сторонние, так и системные вариации, заблокировали процесс загрузки файлов обновления либо их самих уже в системе.
Помимо вышеуказанного списка, могут существовать и другие причины. Хорошо, мы в должной мере ознакомились с ошибкой 80240016, так что теперь пора посмотреть, что можно сделать, чтобы та исчезла из вашей системы. Нижеуказанные методы — выполняйте в том порядке, в каком вам удобнее, так как это не имеет значения.
Как исправить ошибку 80240016 на Windows 7/8/10
Убедитесь, что ваше сетевое подключение в порядке
Первое, на что вам следует обратить внимание — это состояние вашего Интернет-подключения. Разумеется, для загрузки последних обновления Windows вам потребуется иметь доступ в Интернет. Читая эти строки, вы наверняка задаетесь вопросом: ну я ведь как-то перешел на эту ссылку, так причем тут доступ к Интернету? Дело в том, что ошибки подобной 80240016 могут также возникать и по причине нестабильного сетевого соединения, т.е. в один момент — доступ есть, а в другой — его нет. Проверьте, присутствует ли у вас стабильный доступ в Интернет. Если же оказалось, что с сетевым подключением и правда не все в порядке — вы нашли источник проблемы.
Проверка службы Центра обновления
Если служба Центра обновления была деактивирована или приостановлена, по какой-то причине, то это вполне могло вызвать ошибку 80240016. Сделать такую пакость могло много чего: стороннее программное обеспечение, баг в операционной системе, вирус и прочее. Тем не менее вы запросто можете проверить состояние этой службы в соответствующем компоненте вашей системы. Итак, чтобы выполнить проверку и запуск службы Центра обновления, вам потребуется сделать следующее:
- нажмите комбинацию клавиш Windows+R;
- впишите команду services.msc;
- нажмите Enter;
- найдите в списке службу «Центр обновления Windows»;
- кликните по ней дважды левой кнопкой мыши;
Перед вами откроется окно с состоянием указанной службы. Хорошенько осмотритесь и убедитесь, что та работает. Если вы заметили, что в строке состояния указано об остановке службы — нажмите на кнопку «Запустить». Далее выставьте в строке типа запуска опцию «Автоматически» и сохраните изменения в параметрах службы. Перезапустите свой компьютер и попробуйте запустить процесс обновления системы повторно. Если служба была деактивирована — это разрешит проблему.
Восстановление поврежденных системных файлов
Ок, давайте теперь убедимся с вами, что ошибка 80240016 не возникла по вине поврежденных системных файлов. В вашей системе встроена одна небольшая утилита под названием System File Check, которая как раз таки может просканировать системные файлы и восстановить их. Впрочем, последнее сделать она будет только тогда, когда это возможно, что, зачастую, представляется возможным. Итак, чтобы запустить утилиту System File Check, вам нужно выполнить следующие шаги:
- нажмите Windows+X;
- выберите пункт «Командная строка(администратор)»;
- впишите команду sfc /scannow;
- нажмите Enter;
Как только вы нажмите на Enter, в окошке Командной строки запустится процесс сканирования системных файлов. Это может занять какое-то время — наберитесь терпения. После окончания сканирования системных файлов в том же окошке перед вами появятся результаты. Если в них будет указано, что были обнаружены и исправлены повреждения — перезапустите свой компьютер и проверьте, была ли устранена ошибка 80240016.
Отключение антивируса и брандмауэра
Следующей нашим способом станет отключение антивируса и брандмауэра. Несмотря на полезнейший функционал, которое предоставляет своим пользователям это программное обеспечение, оно может также и вызывать определенные проблемы. Например, сторонний антивирус мог заблокировать загруженные файлы устанавливаемого обновления, вследствие чего и возникла ошибка 80240016. Что же касается брандмауэра — он мог заблокировать сетевое подключение к серверам Майкрософт, на которых как раз находятся установочные файлы загружаемых обновлений.
Итак, чтобы проверить причастность этого ПО, вам нужно попросту отключить антивирус, а затем посмотреть, исчезнет ли проблема. Отключить сторонний антивирус можно по разному, например, через значок в панели уведомлений. Однако, со сторонним ПО вам так или иначе придется разбираться самостоятельно. Возможно, вам даже понадобится удалить антивирус со своего компьютера. Что же касается брандмауэра — мы можем показать вам, если вы пользуетесь системным ПО.
Чтобы отключить Брандмауэр Windows, сделайте следующее:
- нажмите Windows+R;
- впишите control;
- нажмите на Enter;
- откройте элемент «Брандмауэр Защитника Windows»;
- нажмите на ссылку «Включение и отключение брандмауэра Защитника Windows»;
- поставьте галочки напротив отключения общественной и локальной сети;
- сохраните изменения в параметрах Брандмауэра Windows.
Как только антивирус и брадмауэр перестанут функционировать, попробуйте запустить обновление Windows и посмотрите, была ли устранена ошибка 80240016.
Восстановление компонентов Центра обновления
Давайте попробуем кое-что более серьезное — сброс компонентов Центра обновления Windows. Возможно, какие-то компоненты были повреждены либо изменены, что и вызвало оговариваемую проблему. Чтобы выполнить сброс компонентов, вам нужно сделать следующее:
- нажмите Windows+X;
- выберите «Командная строка(администратор)»;
- впишите следующий набор команд:
- net stop bits
- net stop wuauserv
- net stop appidsvc
- net stop cryptsvc
- Del «%ALLUSERSPROFILE%\Application
- Data\Microsoft\Network\Downloader\qmgr*.dat»
- Ren %systemroot%\SoftwareDistribution SoftwareDistribution.bak
- Ren %systemroot%\system32\catroot2 catroot2.bak
- del /f /s /q %windir%\windowsupdate.log
- sc.exe sdset bits D:(A;;CCLCSWRPWPDTLOCRRC;;;SY) (A;;CCDCLCSWRPWPDTLOCRSDRCWDWO;;;BA) (A;;CCLCSWLOCRRC;;;AU) (A;;CCLCSWRPWPDTLOCRRC;;;PU)
- sc.exe sdset wuauserv D:(A;;CCLCSWRPWPDTLOCRRC;;;SY) (A;;CCDCLCSWRPWPDTLOCRSDRCWDWO;;;BA) (A;;CCLCSWLOCRRC;;;AU) (A;;CCLCSWRPWPDTLOCRRC;;;PU)
- cd /d %windir%\system32
- regsvr32.exe /U /s vbscript.dll
- regsvr32.exe /U /s mshtml.dll
- regsvr32.exe /U /s msjava.dll
- regsvr32.exe /U /s msxml.dll
- regsvr32.exe /U /s actxprxy.dll
- regsvr32.exe /U /s shdocvw.dll
- regsvr32.exe /U /s Mssip32.dll
- regsvr32.exe /U /s wintrust.dll
- regsvr32.exe /U /s initpki.dll
- regsvr32.exe /U /s dssenh.dll
- regsvr32.exe /U /s rsaenh.dll
- regsvr32.exe /U /s gpkcsp.dll
- regsvr32.exe /U /s sccbase.dll
- regsvr32.exe /U /s slbcsp.dll
- regsvr32.exe /U /s cryptdlg.dll
- regsvr32.exe /U /s Urlmon.dll
- regsvr32.exe /U /s Oleaut32.dll
- regsvr32.exe /U /s msxml2.dll
- regsvr32.exe /U /s Browseui.dll
- regsvr32.exe /U /s shell32.dll
- regsvr32.exe /U /s atl.dll
- regsvr32.exe /U /s jscript.dll
- regsvr32.exe /U /s msxml3.dll
- regsvr32.exe /U /s softpub.dll
- regsvr32.exe /U /s wuapi.dll
- regsvr32.exe /U /s wuaueng.dll
- regsvr32.exe /U /s wuaueng1.dll
- regsvr32.exe /U /s wucltui.dll
- regsvr32.exe /U /s wups.dll
- regsvr32.exe /U /s wups2.dll
- regsvr32.exe /U /s wuweb.dll
- regsvr32.exe /U /s scrrun.dll
- regsvr32.exe /U /s msxml6.dll
- regsvr32.exe /U /s ole32.dll
- regsvr32.exe /U /s qmgr.dll
- regsvr32.exe /U /s qmgrprxy.dll
- regsvr32.exe /U /s wucltux.dll
- regsvr32.exe /U /s muweb.dll
- regsvr32.exe /U /s wuwebv.dll
- regsvr32.exe /s vbscript.dll
- regsvr32.exe /s mshtml.dll
- regsvr32.exe /s msjava.dll
- regsvr32.exe /s msxml.dll
- regsvr32.exe /s actxprxy.dll
- regsvr32.exe /s shdocvw.dll
- regsvr32.exe /s Mssip32.dll
- regsvr32.exe /s wintrust.dll
- regsvr32.exe /s initpki.dll
- regsvr32.exe /s dssenh.dll
- regsvr32.exe /s rsaenh.dll
- regsvr32.exe /s gpkcsp.dll
- regsvr32.exe /s sccbase.dll
- regsvr32.exe /s slbcsp.dll
- regsvr32.exe /s cryptdlg.dll
- regsvr32.exe /s Urlmon.dll
- regsvr32.exe /s Oleaut32.dll
- regsvr32.exe /s msxml2.dll
- regsvr32.exe /s Browseui.dll
- regsvr32.exe /s shell32.dll
- regsvr32.exe /s Mssip32.dll
- regsvr32.exe /s atl.dll
- regsvr32.exe /s jscript.dll
- regsvr32.exe /s msxml3.dll
- regsvr32.exe /s softpub.dll
- regsvr32.exe /s wuapi.dll
- regsvr32.exe /s wuaueng.dll
- regsvr32.exe /s wuaueng1.dll
- regsvr32.exe /s wucltui.dll
- regsvr32.exe /s wups.dll
- regsvr32.exe /s wups2.dll
- regsvr32.exe /s wuweb.dll
- regsvr32.exe /s scrrun.dll
- regsvr32.exe /s msxml6.dll
- regsvr32.exe /s ole32.dll
- regsvr32.exe /s qmgr.dll
- regsvr32.exe /s qmgrprxy.dll
- regsvr32.exe /s wucltux.dll
- regsvr32.exe /s muweb.dll
- regsvr32.exe /s wuwebv.dll
- netsh winsock reset
- netsh winhttp reset proxy
- net start bits
- net start wuauserv
- net start appidsvc
- net start cryptsvc
Перезагрузите свой компьютер, а затем проверьте, была ли устранена ошибка 80240016.
Question
Issue: How to fix Windows update error 0x80240016?
Hello. I tried updating Windows, but every time I receive an error with a code 0x80240016. I have tried restarting my PC and trying again, but that did not work. Do you know what could fix this problem?
Solved Answer
Although Windows is one of the most popular operating systems around the world, it does not come without any issues. Windows needs to be constantly updated, to receive the necessary security patches[1] and other fixes. If that fails, users might experience performance issues like lags and crashes. Sometimes the cause of system issues is the updates themselves.
Some of them can corrupt system files, that later need to be fixed manually. Microsoft has created built-in automatic troubleshooters that that can fix many errors themselves, but that is not the case with the 0x80240016 update error. Users encounter the 0x80240016 error when they need to install a critical, cumulative, or feature update on their Windows 10 computer. This issue is reported to occur with a variety of different KB updates. Some of the examples could be KB5005565, KB3198586, and KB4056892.
The thing is, a lot of different things could be blocking an update from a successful installation, and the troubleshooting can be frustrating. One of the most common causes is corrupted system files, as we mentioned above, a glitch, or an overprotective firewall. No matter what it is, we will guide you through this process step-by-step.

Most often, error 0x80240016 indicates that Windows is missing some files required by Windows Update to perform the update. When an error code such as this appears, Windows cannot finish updating the operating system. Other common reasons may include incorrect user input and accidentally deleted files from the registry that now cause system malfunctions.
Troubleshooting manually could take a while because it is unclear what is causing the issue, so you can try using an automatic solution FortectMac Washing Machine X9 to avoid going through all of the possibilities. The repair tool can identify the damaged system components, fix BSODs,[2] and registry issues by scanning the system. This software could also be used to free up space by clearing cookies and cache,[3] which should boost the device’s performance.
Below you will find a few manual methods that could fix the Windows update error 0x80240016 and let you update your system. Note that this will take a while, so please follow all of the steps very carefully:
Method 1. Run Windows Update Troubleshooter
Fix it now!
Fix it now!
To repair damaged system, you have to purchase the licensed version of Fortect Mac Washing Machine X9.
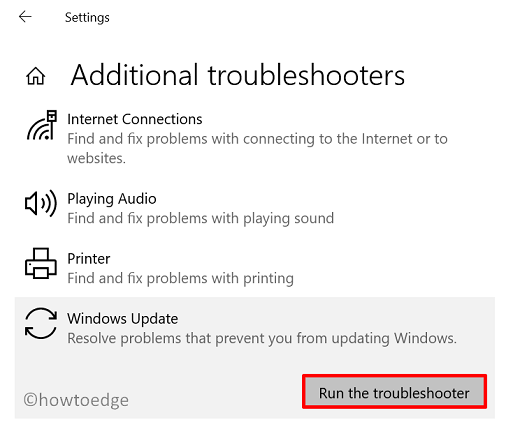
One of the first things you should do is use the built-in Windows Update Troubleshooter to see if it can take care of the problem for you:
- Select Start and go to Settings
- Choose Update & Security
- Click Troubleshoot and Additional troubleshooter

- Select Windows Update and Run the troubleshooter
- Restart
Method 2. Repair Corrupted System Files and Check Disk
Fix it now!
Fix it now!
To repair damaged system, you have to purchase the licensed version of Fortect Mac Washing Machine X9.
Use Command Prompt commands to repair system file corruption:
- Open Command Prompt as administrator
- Use the following command and press Enter:
sfc /scannow

- Reboot your system
- If SFC returned an error, then use the following command lines, pressing Enter after each:
DISM /Online /Cleanup-Image /CheckHealth
DISM /Online /Cleanup-Image /ScanHealth
DISM /Online /Cleanup-Image /RestoreHealth
Ensure that your disk is not damaged. You can perform checks using Administrative Command Prompt:
- If you are using an HDD as your main driver (where your operating system is installed – C: by default), use the following command and press Enter:
chkdsk c: /f - If you are using SSD, use this command:
chkdsk c: /f /r /x - If you receive an error, type in Y and hit Enter
- Restart your device to perform the check
Method 3. Reset every Windows Update Component
Fix it now!
Fix it now!
To repair damaged system, you have to purchase the licensed version of Fortect Mac Washing Machine X9.
- Open Command Prompt as administrator again

- Copy and paste the following commands, pressing Enter after each:
net stop bits
net stop wuauserv
net stop appidsvc
net stop cryptsvc
Del “%ALLUSERSPROFILE%\\Application Data\\Microsoft\\Network\\Downloader\\*.*”
rmdir %systemroot%\\SoftwareDistribution /S /Q
rmdir %systemroot%\\system32\\catroot2 /S /Q
regsvr32.exe /s atl.dll
regsvr32.exe /s urlmon.dll
regsvr32.exe /s mshtml.dll
netsh winsock reset
netsh winsock reset proxy
net start bits
net start wuauserv
net start appidsvc
net start cryptsvc - Restart your PC.
Method 4. Use System Restore
Fix it now!
Fix it now!
To repair damaged system, you have to purchase the licensed version of Fortect Mac Washing Machine X9.
If this error started to occur after a Windows Update installation, you can revert your system to a healthy point before the botched installation occurred. To do this, you can use the System Restore tool:
- Go to the search field in your taskbar and type system restore, and press on Create a restore point
- You will be taken to the System Properties window and the System Protection tab
- Click on System Restore...
- Restore system files and settings will pop up, click on Next

- Choose a restore point
- Click on Scan for affected programs (this will give you a list of which programs will be deleted and which might be automatically restored)
- Close the windows and then click on Next
- The final confirmation window will show the restore point you chose, click on Finish to begin the process
Method 5. Turn off Windows Defender Firewall
Fix it now!
Fix it now!
To repair damaged system, you have to purchase the licensed version of Fortect Mac Washing Machine X9.
Certain security Windows Updates will fail to install if Windows Firewall is currently performing a background security check. Try temporarily disabling it:
- Press Windows key + R to open up a Run dialog box
- Type windowsdefender in the text box and press Enter to open up the Windows Security menu
- Scroll down and click on the Virus & threat protection tab, then go ahead and click on the Manage settings hyperlink

- Disable the toggle associated with Firewall & Network protection
- Go all the way back to the first Windows Security window, then click on Firewall & Network Protection
- Disable the toggle Windows Defender firewall
- Restart your PC
Method 6. Perform a Repair Install
Fix it now!
Fix it now!
To repair damaged system, you have to purchase the licensed version of Fortect Mac Washing Machine X9.
- Download the Windows 10 ISO file
- Now mount the ISO file
- Double-click on the file setup.exe to start the repair, install from the mounted drive
- When the installation provides the License Terms, read them and click Accept
- Windows 10 will now check for updates and will install the ones available

- When all is set, click Install
- When the installation is complete, follow the on-screen instructions
Repair your Errors automatically
ugetfix.com team is trying to do its best to help users find the best solutions for eliminating their errors. If you don’t want to struggle with manual repair techniques, please use the automatic software. All recommended products have been tested and approved by our professionals. Tools that you can use to fix your error are listed bellow:
do it now!
Download Fix
Happiness
Guarantee
do it now!
Download Fix
Happiness
Guarantee
Compatible with Microsoft Windows
Compatible with OS X
Still having problems?
If you failed to fix your error using FortectMac Washing Machine X9, reach our support team for help. Please, let us know all details that you think we should know about your problem.
Fortect — a patented specialized Windows repair program. It will diagnose your damaged PC. It will scan all System Files, DLLs and Registry Keys that have been damaged by security threats.Mac Washing Machine X9 — a patented specialized Mac OS X repair program. It will diagnose your damaged computer. It will scan all System Files and Registry Keys that have been damaged by security threats.
This patented repair process uses a database of 25 million components that can replace any damaged or missing file on user’s computer.
To repair damaged system, you have to purchase the licensed version of Fortect malware removal tool.To repair damaged system, you have to purchase the licensed version of Mac Washing Machine X9 malware removal tool.
To stay completely anonymous and prevent the ISP and the government from spying on you, you should employ Private Internet Access VPN. It will allow you to connect to the internet while being completely anonymous by encrypting all information, prevent trackers, ads, as well as malicious content. Most importantly, you will stop the illegal surveillance activities that NSA and other governmental institutions are performing behind your back.
Unforeseen circumstances can happen at any time while using the computer: it can turn off due to a power cut, a Blue Screen of Death (BSoD) can occur, or random Windows updates can the machine when you went away for a few minutes. As a result, your schoolwork, important documents, and other data might be lost. To recover lost files, you can use Data Recovery Pro – it searches through copies of files that are still available on your hard drive and retrieves them quickly.
-
Home
-
Partition Manager
- How to Repair Windows Update Error 0x80240016 [Full Guide]
By Alin |
Last Updated
Are you bothered by the error code 0x80240016 on your PC? It is a common Windows update error that appears when users try to install a critical, cumulative, or feature update. What causes the Windows update error 0x80240016? How to fix it? This post of MiniTool Partition Wizard gives you the answers and some feasible fixes.
Why Does the Windows Update Error 0x80240016 Occur
The 0x80240016 error occurs for different reasons. Here, we summarize some possible causes of this issue below.
- Corrupted or missing system files
- Corrupted Windows update
- Overprotective firewall
- Badly cached Windows update data
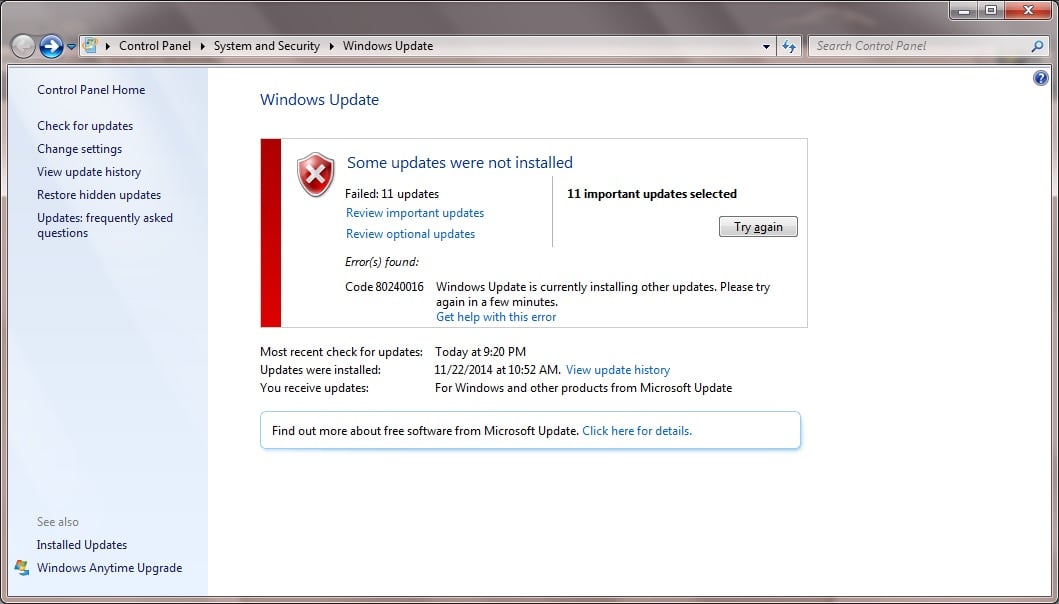
Unable to install Windows Update. Error code 0x80240016.
—from Microsoft Community
After knowing the causes of the error code 0x80240016, you can follow the methods given below to fix this issue.
Fix 1. Run the Windows Update Troubleshooter
First, you can try rebooting your computer. After restarting, if the 0x80240016 error still exists, you can follow the detailed steps below to run the Windows Update troubleshooter.
Step 1. Go to Settings > Update & Security > Troubleshoot > Additional troubleshooters.
Step 2. In the pop-up window, click Windows Update and select Run the troubleshooter.
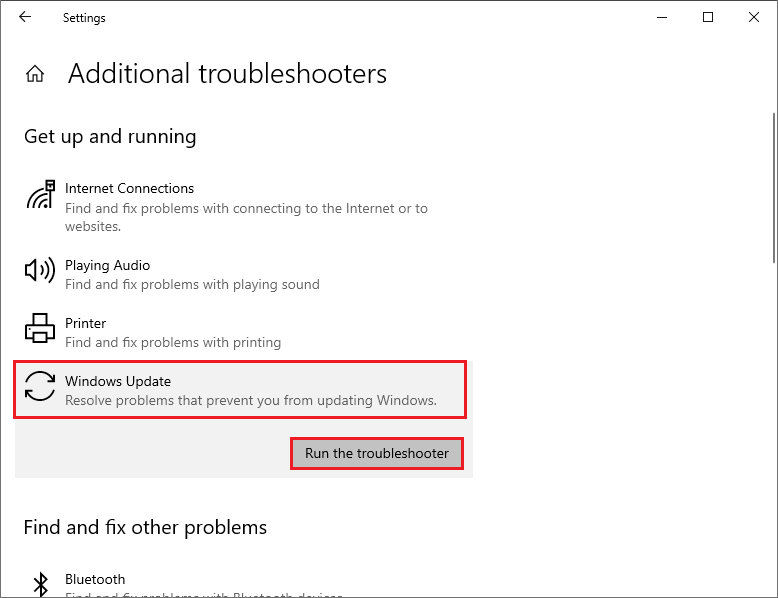
Step 3. Then follow the on-screen wizard to complete troubleshooting. Once done, reboot your system and check if the error is solved.
Fix 2. Reset Windows Update Components
Besides, you can try resetting Windows Update components with the following guide.
Step 1. Press Win + R to open the Run command box. In the box, type cmd and press Ctrl + Shift + Enter to run Command Prompt as administrator.
Step 2. In the pop-up window, type the following commands and press Enter after each.
- net stop bits
- net stop wuauserv
- net stop appidsvc
- net stop cryptsvc
- Del “%ALLUSERSPROFILE%Application DataMicrosoftNetworkDownloader*.*”
- rmdir %systemroot%SoftwareDistribution /S /Q
- rmdir %systemroot%system32catroot2 /S /Q
- exe /s atl.dll
- exe /s urlmon.dll
- exe /s mshtml.dll
- netsh winsock reset
- netsh winsock reset proxy
- net start bits
- net start wuauserv
- net start appidsvc
- net start cryptsvc
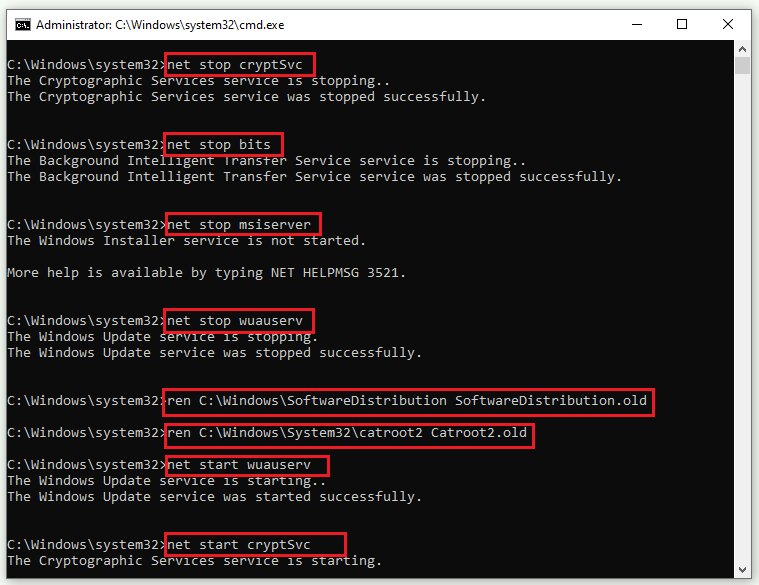
Step 3. Once done, restart your PC and check if the issue is solved.
Fix 3. Repair Corrupted System Files and Check the Disk
To get rid of the Windows update error 0x80240016, you can check if there are any bad sectors on your disk and try repairing corrupted system files. Follow the detailed steps below.
Step 1. Run Command Prompt as administrator. In the prompted window, type the following command.
sfc /scannow
Step 2. Once done, reboot your system. If the issue still exists, run Command Prompt as administrator again and type the following commands. Press Enter after each one to execute the commands.
- DISM /Online /Cleanup-Image /CheckHealth
- DISM /Online /Cleanup-Image /ScanHealth
- DISM /Online /Cleanup-Image /RestoreHealth
Step 3. Then you can run CHKDSK to repair the hard drive error.
Sometimes, there may be some issues with the CHKDSK utility such as CHKDSK not working. Here, we recommend you use a CHKDSK alternative – MiniTool Partition Wizard to check file system errors and bad sectors.
MiniTool Partition Wizard FreeClick to Download100%Clean & Safe
Download MiniTool Partition Wizard, install and launch it to get its main interface. Then right-click the partition to be checked and select Check File System or Surface Test. Follow the on-screen wizard to complete the process. For more specific information, you can view the following guide.
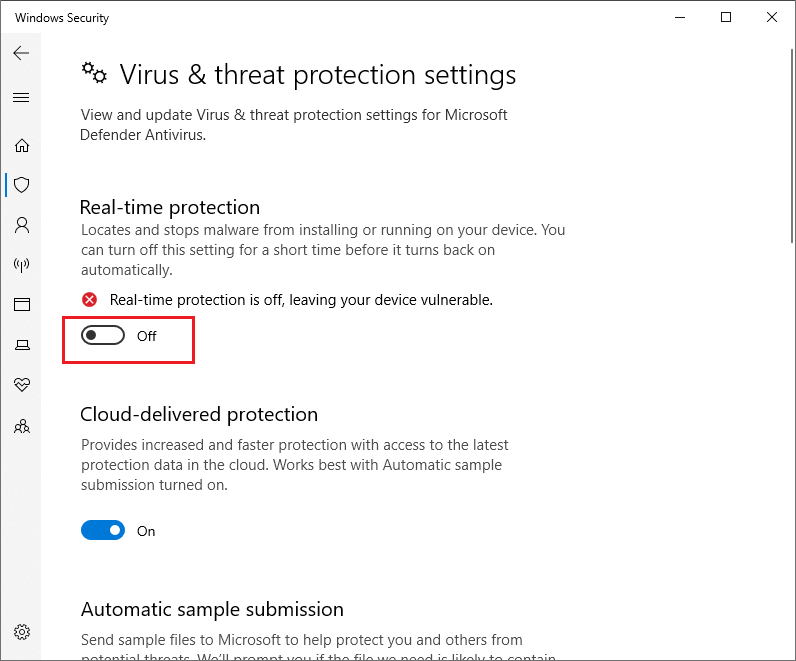
Fix 4. Run Antivirus Scan
Besides, you can try scanning your system for viruses to fix the 0x80240016 error. You can also use third-party antivirus software to run an antivirus scan. If there is no virus detected on your system, you can try disabling Windows Firewall temporarily with the steps below.
Step 1. In the Run box, type windowsdefender://threat/ and press Enter to open Windows Security.
Step 2. In the pop-up window, click Manage settings under the Virus & threat protection settings section.
Step 3. Then turn off Real-time protection. Once done, reboot your computer and check if the issue is fixed.
Besides, you can try performing a system restore to repair the error code 0x80240016.
Conclusion
Getting the Windows update error 0x80240016 solved successfully? This post has summarized several methods to help you fix the 0x80240016 error. You can feel free to try them one by one. If you have any suggestions or better ideas, you can leave a message in the following comment part.
About The Author
Position: Columnist
Alin is a new member of MiniTool. Her articles are mainly about disk & partition management, data recovery, and hard disk issues. She is enthusiastic about acquiring computer knowledge and helping users to solve problems with computers. To provide more useful and professional solutions, she will keep learning and know more computer knowledge.
- Remove From My Forums
-
Вопрос
-
исправить ошибку код 80240016
Ответы
-
Попробуйте это:
http://windows.microsoft.com/ru-ru/windows7/windows-update-error-80240016
Ошибка 80240016 Центра обновления Windows
Если во время установки обновлений Центр обновления Windows выдает ошибку 80240016, это означает, что выполняется другая установка. Дождитесь окончания установки и повторите попытку установки обновлений. Если нет уверенности в том, какие
программы или устройства устанавливаются или обновляются, для получения сведений о выполнении проверьте область уведомлений, рабочий стол или панель задач, чтобы узнать, запущен ли мастер установки. Если проблема повторяется,
запустите средство устранения неполадок Центра обновления Windows.Если устранить проблему не удалось, выполните следующие действия.
Остановка и перезапуск системной программы
-
Закройте все открытые окна Центра обновления Windows и Центра обновления Майкрософт.
-
Нажмите кнопку Пуск
 и введите в поле поиска
Командная строка. -
В списке результатов щелкните правой кнопкой мыши компонент
Командная строка и выберите команду Запуск от имени администратора.
Если отображается запрос на ввод пароля администратора или его подтверждения, укажите пароль
или предоставьте подтверждение. -
В окне командной строки введите следующие команды. Нажимайте клавишу ВВОД после каждой команды:
net stop wuauserv
net start wuauserv
-
Чтобы закрыть окно Командная строка, введите команду
Exit и нажмите клавишу ВВОД. -
Снова запустите Центр обновления Windows.
Не ищи Бога, не в камне, не в храме — ищи Бога внутри себя. Ищущий, да обрящет.
-
Помечено в качестве ответа
15 марта 2015 г. 13:26
-
-
-
Помечено в качестве ответа
Dmitriy VereshchakMicrosoft contingent staff
15 марта 2015 г. 13:26
-
Помечено в качестве ответа
 и введите в поле поиска
 Если отображается запрос на ввод пароля администратора или его подтверждения, укажите пароль
In this guide, we will discuss the probable reasons behind Update Error Code 0x80240016 and five different ways to solve it on Windows 10 PC. So, if you are struggling with this issue and not being able to upgrade your device, follow and apply the workarounds included in this tutorial.
An update-related issue mostly occurs due to damaged/missing system files, stopped essential services, or corrupted Windows 10 Image. To fix them, you may run an SFC or DISM scan, restart the required services, or Run Windows Update Troubleshooter. This bug may also occur when there is no space left inside the Cache Folders. You may fix it by purging the two main folders i.e. SoftwareDistribution and Catroot2 on the root drive. Let’s explore the solutions in somewhat more detail –

Ways to solve Update Error 0x80240016
In order to get rid of the Error Code 0x80240016 in Windows 10, you may try following the below solutions one after another. Each of the methods discussed below are well tested and will help you to solve this problem.
1] Troubleshoot Windows Update
Run Windows Update Troubleshooter is the perfect tool if you are not able to update Windows. This will find and repair the underlying causes behind the 0x80240016 error. Even if it doesn’t solve the persisting problem, it will guide ways to overcome the issue at hand. Here’s how the process goes –
- First of all, navigate to the path below –
Settings (Win + I) > Update & Security
- Select Troubleshoot on the left pane and move to the right pane.
- Here, you will find a link – Additional troubleshooters. Click once over it.
- Subsequently, hit Windows Update under the “Get up and running” section.
- On the extended pane, click over the option – Run the troubleshooter.
- Next, follow the on-screen instructions to complete the remaining steps.
When you complete troubleshooting your PC, see if it indeed resolves the 0x80240016 issue or not.
2] Fix System File or Windows Image Corruption
The presence of corrupted system files may stop your computer from getting updates. To ensure this is not the case, you should perform an SFC scan. Follow these steps to check your system files for possible corruption –
- Launch Command Prompt as an Administrator.
- When the UAC window comes into the display, hit Yes.
- Type “
sfc/scannow” on the elevated console and press Enter.

- Let this tool find and repair the damaged system files it found during the scan.
- This whole process might take 15-20 minutes, so wait patiently.
- Once this is over, reboot your PC.
Check if the error resolves when Windows 10 reloads or not. A corrupted Windows Image may also prevent your device from being upgraded. In order to check if this indeed is the case or not, you may take the help of the DISM tool. Here’s how to perform a Windows Image check for possible issues –
- Press Win + R to start the Run dialog.
- Type “cmd”, and press Ctrl + Shift + Enter altogether to open CMD having administrative privileges.
- Hit Yes on the User Account Control window.
- When Command Prompt launches, type the following and press Enter –
DISM /Online /Cleanup-Image /RestoreHealth

- Wait for this code to finish restoring your PC health. When it does, there won’t be any problem related to Windows Image. Check if this helps to get rid of the 0x80240016 bug on your device.
3] Clear Update Folders
Sometimes, such errors occur not because of some update-related issues but due to accumulated files inside the Update Cache folders. So, you must check and purge these folders to avoid any problems including error code 0x80240016. Here’s how to purge these folders –
First of all, you need to find the folders that may start update-related issues on Windows 10. There are basically two such folders and you may locate them at the following paths –
- SoftwareDistribution – C:\Windows
- Catroot2 – C:\Windows\System32
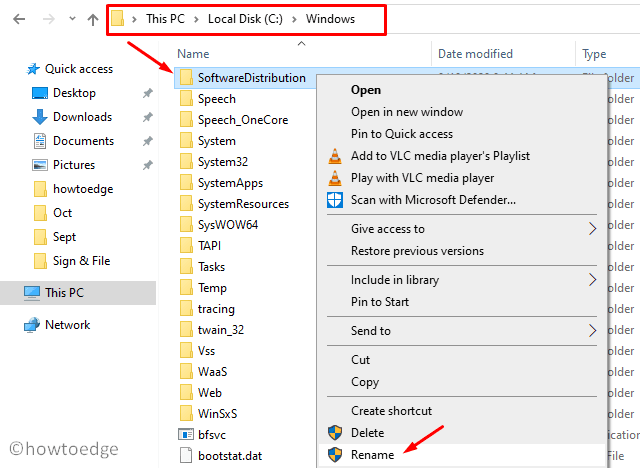
Just visit the above paths separately, and look for the above-mentioned cache folders in the search bar. When found, you have two options i.e. delete them entirely or change their names to FolderName.old. Whichever option you choose, make sure to stop the update services beforehand so as to avoid any further issues. Here are the codes you must run on an elevated Command Prompt (Admin) to stop essential services.
net stop bits
net stop wuauserv
net stop cryptsvc
After you are done with renaming the cache folders, make sure to execute these command to restart the services that you have stopped earlier –
net start bits
net start wuauserv
net start cryptsvc
Now that you have reset update components, check if the problem resolves or is still occurring on your PC.
4] Manually update Windows 10
At times, update errors don’t go that easy. If you too are experiencing problems resolving an update error code, you may install the buggy update manually as well. Whenever Microsoft releases security or optional update, it also uploads a standalone package corresponding to that particular update. You may find the executable at Update Catalog. If you don’t know how to proceed, read this guide on how to manually install Windows 10 updates.
5] Use System Restore Points
In case you had created a restore point on your PC sometime back, you may use this backup to revert your device. Here’s how to use a system restore point on Windows 10.
If you hadn’t created a backup of your personal files or folders, you don’t have any option other than clean installing Windows 10.