Hello,
I was installing docker which failed, asking me to activate virtualization then reboot (Hyper-V feature is not enabled). But it does not managed to activate it.
First, I need to say that virtualization is enabled in bios, and available under Task Manager and systeminfo.exe (4 entries indicate a Yes). The hardware is of course compatible: Lenovo Yoga X1.
But, when I go into Program and Features and select Hyper-V, which is currently not selected and not installed, I quicky face the error 0x80073701: The referenced assembly could not be found.
So I executed some commands I found to do the same, using the command line:
DISM.exe /Online /Cleanup-Image /CheckHealth and Dism.exe /online /Cleanup-Image /StartComponentCleanupThen DISM.exe /Online /Cleanup-Image /RestoreHealth and sfc /scannow
Again, error 0x800f081f
The source files could not be found.
Use the «Source» option to specify the location of the files that are required to restore the feature. For more informat
ion on specifying a source location, see http://go.microsoft.com/fwlink/?LinkId=243077.
I also tried with Windows 10 ISO mounted on D: , then : DISM /Online /Cleanup-Image /RestoreHealth /Source:esd:D:\sources\install.esd:1 /LimitAccess
Same error 
I managed to find out that there are some errors in C:\Windows\Logs\CBS\CBS.log
2017-03-14 16:50:52, Info CBS Repr: Not able to find replacement manifests for package Package_1204_for_KB3185614~31bf3856ad364e35~amd64~~10.0.1.5 from any local
source
(… lots of these)
2017-03-14 16:50:52, Info CBS Repr: Not able to find replacement file for component wow64_microsoft-windows-r..xwddmdriver-wow64-c_31bf3856ad364e35_10.0.10586.0_none_3dae054b56911c22,
file opencl.dll from any local source
2017-03-14 16:50:52, Info CBS Exec: Download qualification evaluation, business scenario: Manual Corruption Repair
2017-03-14 16:50:52, Info CBS Exec: Clients specified using local source only.
2017-03-14 16:50:52, Info CBS Repr: The system configuration is not qualified for Windows Update download, skip WU.
2017-03-14 16:50:52, Info CBS Failed to collect payload and there is nothing to repair.[HRESULT = 0x800f081f — CBS_E_SOURCE_MISSING]
2017-03-14 16:50:52, Info CBS Failed to repair store. [HRESULT = 0x800f081f -CBS_E_SOURCE_MISSING]
2017-03-14 16:50:52, Info CBS
=================================
Checking System Update Readiness.
CBS Catalog Missing Package_1204_for_KB3185614~31bf3856ad364e35~amd64~~10.0.1.5
(… lots of that)
CSI Payload Corrupt wow64_microsoft-windows-r..xwddmdriver-wow64-c_31bf3856ad364e35_10.0.10586.0_none_3dae054b56911c22\opencl.dll
Repair failed: Missing replacement payload.
Summary:
Operation: Detect and Repair
Operation result: 0x800f081f
Last Successful Step: Entire operation completes.
Total Detected Corruption: 43
CBS Manifest Corruption: 42
CBS Metadata Corruption: 0
CSI Manifest Corruption: 0
CSI Metadata Corruption: 0
CSI Payload Corruption: 1
Total Repaired Corruption: 0
CBS Manifest Repaired: 0
CSI Manifest Repaired: 0
CSI Payload Repaired: 0
CSI Store Metadata refreshed: True
Total
Operation Time: 138 seconds.
Any help would be greatly appreciated, I really would need Hyper-V enabled on my laptop but my only quick option here seems to be a complete reinstall as I do not manage to figure out what is wrong, on my own !
Thanks,
Guillaume
-
Изменено
14 марта 2017 г. 17:12
Windows 10: Hyper-V Won’t enable «Error code: 0x80073701» (Windows 10 Pro on AMD CPU x64-based),…
Discus and support Hyper-V Won’t enable «Error code: 0x80073701» (Windows 10 Pro on AMD CPU x64-based),… in Windows 10 Installation and Upgrade to solve the problem; (1) Hyper-V Won’t enable «Error code: 0x80073701, missing assembly code» (Windows 10 Pro on AMD CPU x64-based).
(2) I followed suggestion from this…
Discussion in ‘Windows 10 Installation and Upgrade’ started by MsVictimAgain, Mar 5, 2019.
-
Hyper-V Won’t enable «Error code: 0x80073701» (Windows 10 Pro on AMD CPU x64-based),…
(1) Hyper-V Won’t enable «Error code: 0x80073701, missing assembly code» (Windows 10 Pro on AMD CPU x64-based).
(2) I followed suggestion from this site, and checked the C:/Windows/CBS/CBS.log. It points to error when «exec resolving» KB4483234
(3) I checked my PC update history, KB4483234 is not there.
(4) I looked up KB4483234 on Microsoft web site, it was released December 2018 and was part of KB4477137.
(5) I can see KB4477137 in my PC’s update history.
(6) Microsoft web site’s article suggested me to re-install the KB4477137 through Control Panel/Check Updates. But I cannot: neither be able to install it nor uninstall it, probably because multiple updates applied after this update. The «uninstall» button just not show up for this update in Control Panel.
(7) Is there a way I can fix this problem and enable Hyper-V?

-
Hyper-V Won’t enable «Error code: 0x80073701» (Windows 10 Pro)
I have Windows 10 Pro along with an AMD 8350, 8GB of ram, and meet all of the requirements for Hyper-V Requirements (used the systeminfo command and shows all as yes). Every time I go to enable it it spits out «The referenced assembly could
not be found. Error code: 0x80073701″ -
Hyper-V Won’t enable «Error code: 0x80073701» (Windows 10 Pro)Have a look at
How to resolve the error 0x80073701(ERROR_SXS_ASSEMBLY_MISSING) when you are installing a service pack or updateYou might be missing a service pack or functionality
Check the above and see if you have all the Hyper-V features turned on like my system.
Have you checked you bios for everything set correctly read
Virtualization disabled in BIOS
Try setting up in power-shell
Virtualization: Create Hyper-V Virtual Machines with Windows PowerShell
Your system info output is significantly different
-
Hyper-V Won’t enable «Error code: 0x80073701» (Windows 10 Pro on AMD CPU x64-based),…
Hyper-V Won’t enable «Error code: 0x80073701» (Windows 10 Pro)I have found that Hyper-V is broken when removing Virtual Box, because shared files are wrongly removed in the un-install. I tried to enable Hyper-V under
10240/TP build 10532 Win 10 Pro and it failed.These errors are all recorded in the Windows Feedback
for Win 10 Pro
I switched off, unticked, all the Hyper V Features off on my current release TP 10525.
The features were removed and restarted. Next I enabled, ticked the boxes and the files were searched and features installed. The restart saw the screen reconfiguring Hyper-V to 30% then restart, continued to78% stalled then finally go to 100% and restarted.
Now Hyper V back and I can run the VS2015 community RC Android emulator again. During the start-up/install of VS 2015 RC the Hyper-V is check for all the functionality of emulator.I cannot go back to build RTM 10240 Pro for technical reasons
Have you tried search box or the Hyper-V client download maybe the missing files are loaded
Using Windows 10 Client Hyper-V

Hyper-V Won’t enable «Error code: 0x80073701» (Windows 10 Pro on AMD CPU x64-based),…
-
Hyper-V Won’t enable «Error code: 0x80073701» (Windows 10 Pro on AMD CPU x64-based),… — Similar Threads — Hyper Won’t enable
-
Windows 10 error code: 0x80073701
in Windows 10 Installation and Upgrade
Windows 10 error code: 0x80073701: Whenever I tried to download an update on Windows, I keep getting error code: 0x80073701.
Any fixes? Thanks.https://answers.microsoft.com/en-us/windows/forum/all/windows-10-error-code-0x80073701/ef2c5706-9a0d-4e1f-a85a-93e175e902b1
-
BSOD Windows 1909 Hyper-V enabled +++ with AMD virtualisation technology enabled
in Windows 10 BSOD Crashes and Debugging
BSOD Windows 1909 Hyper-V enabled +++ with AMD virtualisation technology enabled: DPC WATCHDOD VIOLATION. Sometimes the hp laptop boots and loads windows other times it just bsod’s with stop error DPC WATCHDOD VIOLATION.If I disable AMD virtualisation in cmos settings it boots fine, but I require the hyper-v features for testing.
AMD64
Ryzen 3…
-
Update KB4522355 for Win 10 v.1903 x64 results in error code 0x80073701
in Windows 10 Installation and Upgrade
Update KB4522355 for Win 10 v.1903 x64 results in error code 0x80073701: What do I do?https://answers.microsoft.com/en-us/windows/forum/all/update-kb4522355-for-win-10-v1903-x64-results-in/de8564fa-9f18-4be7-89a5-80344819d2a5
-
Update for Windows 10 Version 1903 for x64-based Systems (KB4505903) — Error 0x80073701.
in Windows 10 Installation and Upgrade
Update for Windows 10 Version 1903 for x64-based Systems (KB4505903) — Error 0x80073701.: I’m running Windows 10 version 1903. When attempting to apply the latest update, I get the following error:2019-07 Cumulative Update for Windows 10 Version 1903 for x64-based Systems (KB4505903) — Error 0x80073701.
I’ve examined all listed fixes for this error code,…
-
Windows 10 Version 1903 for x64-based Systems (KB4503293) — Error 0x80073701
in Windows 10 Installation and Upgrade
Windows 10 Version 1903 for x64-based Systems (KB4503293) — Error 0x80073701: The cumulative update for Windows 10 Version 1903 isnt getting installed on my system. This the second pc that has been having issues with windows updates not being installed…. -
Hyper-V on windows 10 Pro
in Windows 10 BSOD Crashes and Debugging
Hyper-V on windows 10 Pro: Hi,I have a problem setting up Hyper-V on windows 10 professional. I tryed many steps including: using powershell to enable hyper-v features, using advanced program setup dialog and using DISM. The hyper-v software is installed, but cant run any contrainer, saying…
-
Hyper-V enabling failed with error code 0x800F0831
in Windows 10 Virtualization
Hyper-V enabling failed with error code 0x800F0831: Hi ,I’m trying to enable Hyper-V Management tools and Platform so the User can use Hyper-V manager but it failed with message » Windows couldn’t complete the requested changes. Please reboot and try again. Error code 0x800F0831″.
I’ve rebooted the pc and checked the…
-
Hyper-V enabled but not accessible in Windows 10 Home?
in Windows 10 Virtualization
Hyper-V enabled but not accessible in Windows 10 Home?: I have Windows 10 Home — I double checked this under Settings > System > About. Under System Information, I can see that somehow I have Hyper-V (which I read wasn’t a feature in Windows 10 Home) enabled. I’m trying to install a Kali VM but I can’t disable these features… -
Nested Hyper-V using AMD Chipsets?
in Windows 10 Virtualization
Nested Hyper-V using AMD Chipsets?: Anybody heard rumors about when MS might work with AMD to provide nested Hyper-V capability? They provide now only with Intel.45553
Users found this page by searching for:
-
hyper-v 0x80073701
,
-
unable to remove hyper-v feature error 0x80073701
,
-
0x80073701 hyper-v windows 10
,
- the referenced assembly could not be found: 0x80073701,
- error code 0x80073701 hyper-v,
- 0x80073701 hyper-v,
- 80073701 hyper-v,
- 80073701 update error hyper v,
- hyper-v 0x80073701,
- Hyper-V Error 0x80070103,
- 0x80073701 install hyper v,
- error code 0x80073701 hyper-v disable,
- hyper v 0x80073701,
- hyperv error 80073701,
- hyper v the referenced assemblycould not be found error 0x80073701
Для решения различных проблем с ПК мы рекомендуем DriverFix:
Это программное обеспечение будет поддерживать ваши драйверы в рабочем состоянии, тем самым защищая вас от распространенных компьютерных ошибок и сбоев оборудования. Проверьте все свои драйверы сейчас за 3 простых шага:
- Скачать DriverFix (проверенный файл загрузки).
- Нажмите Начать сканирование найти все проблемные драйверы.
- Нажмите Обновите драйверы чтобы получить новые версии и избежать сбоев в работе системы.
- DriverFix был загружен 0 читатели в этом месяце.
Если вы видите ошибку «Сборка не найдена» внутри Hyper-V, вы не единственный пользователь с этой проблемой. Эта ошибка возникает при различных настройках системы.
Это заставляет нас сделать вывод, что проблема связана с отсутствующим или поврежденным файлом либо внутри вашего программного обеспечения Hyper-V, либо внутри вашей операционной системы Windows 10.
Вот что сказал один пользователь об этой проблеме на Форумы суперпользователей:
Я пытаюсь установить Docker, но, к сожалению, Windows решила, что я не буду этого делать. Чтобы он заработал, мне нужно активировать функцию Hyper-V.
Указанная сборка не может быть найдена. Ошибка 0x80073701. Как мне это исправить?
Читайте дальше, чтобы узнать, что делать, чтобы раз и навсегда решить эту проблему и вернуться к обычному использованию Hyper-V.
Попробуйте эти методы, чтобы исправить ошибку сборки не найдена внутри Hyper-V в Windows 10
1. Запустите команду DISM внутри PowerShell
- нажмите Победа + X клавиши на клавиатуре -> выберите PowerShell (администратор).
- Скопируйте и вставьте следующую команду в окно командной строки:
DISM.exe / Онлайн / Очистить изображение / Scanhealth - Нажмите Входить.
- Подождите, пока процесс завершится.
- Выполните следующую команду в том же окне командной строки:
DISM.exe / Online / Cleanup-image / Restorehealth - Нажмите Входить для запуска команды.


2. Запустить команду проверки системных файлов
- Нажмите Победа + X -> выбрать PowerShell (администратор) из списка.
- Внутри окна PowerShell -> скопируйте и вставьте эту команду: sfc / scannow -> пресса Входить.
- Проверка системных файлов вашего ПК займет некоторое время.
- Дождитесь завершения процесса и переходите к следующему методу.

5 лучших программ резервного копирования для Hyper-V в 2019 году
3. Удалите все дополнительные языковые пакеты из ОС Windows 10.
- Нажмите Победа + X ключи -> выбрать PowerShell (администратор) в открывшемся меню.
- Внутри командной строки -> введите команду: Lpksetup / u -> хит Входить.
- Это откроет Установить или удалить языки отображения панель.
- Выберите языковой пакет, который хотите удалить -> щелкните значок Следующий кнопка.
- После того, как ваша система загрузит деинсталлятор, вам нужно будет перезагрузите ваш компьютер чтобы завершить процесс.

4. Восстановите ОС Windows 10 с помощью файла ISO
Скачивание Windows ISO:
-
Загрузите ISO-файл Windows 10.
- Смонтируйте ISO-файл на свой компьютер и откройте раздел.

Запустите программу установки Windows:
- Прокрутите список файлов -> запустите setup.exe файл, чтобы начать установку Windows 10.
- Нажмите да на Подсказка UAC.
- Windows начнет подготовку к установке.
- Нажмите на Изменение способа загрузки обновлений программой установки Windows ссылка на сайт.
- Выбирать Не прямо сейчас в следующем открывшемся окне «Обновления».
- Следуйте инструкциям на экране.
- Выберите Храните личные файлы и приложения вариант.
- Дождитесь завершения процесса восстановления Windows, а затем проверьте, решена ли проблема.
Методы, представленные в этой статье об исправлении, доказали свою эффективность большим количеством пользователей. Мы надеемся, что это руководство помогло и вам.
Пожалуйста, не стесняйтесь сообщить нам, было ли это так, или если у вас есть какие-либо предложения, используя раздел комментариев ниже.
In most cases, downloading and installing the most recent Windows updates should be straightforward. Click the “Check for updates” button, then wait for your computer to download and install the updates. Unfortunately, it’s not always as simple as that.
Automatically Fix Error Code 0x80073701
Recommended: To easily install drivers automatically, use the tool below.
The Windows Error Code 0x80073701 may stop you from downloading and installing the most recent Windows updates. Let’s have a look at how to get it fixed.
What Causes the Windows Error 0x80073701
If you’ve received this message on your computer, it indicates a problem with your system’s functionality. Error code 0x80073701 is one of the problems people might have if they installed or uninstalled programs and applications that didn’t work right or didn’t work at all.
The process could have left corrupt data, files, or cookies in the computer, which caused the system to go unstable and display the error code 0x80073701.
Other possible reasons include an improper method of shutting down the computer caused by a power outage or someone with limited technical information mistakenly removing a critical system file.
Windows Update Error 0x80073701 Troubleshooting Methods
Making changes to Windows system files and configurations runs the risk of making the whole system unbootable. Whenever a user is unsure of their technical abilities, we strongly suggest using a unique tool designed to fix Windows errors such as the “0x80073701” error code.
Automatically Fix the Windows Update Error 0x80073701 With Fortect
Fortect is an automatic system optimization application that scans and fixes Windows issues like the error 0x80073701 and automatically updates outdated drivers that your system requires to function correctly.
- Download and install Fortect:
Download Now
- Click on Start Scan to let Fortect analyze what needs to be performed on your computer.

- Once the scan is complete, click Start Repair to fix any issues or update your computer’s outdated drivers or system files.
After Fortect has completed the repair and updates on the incompatible drivers or system files, restart your computer.
- See More: Fix Error Code 43
Manually Troubleshoot the Windows Update Error 0x80073701
You can perform several methods to try and fix the Windows Error Code 0x80073701. However, depending on the situation, you might get it fixed using the simplest troubleshooting method. We will go over all the troubleshooting methods you can perform, starting from the easiest to perform to the more advanced ones.
First Method – Restart Your Computer
Restart your computer. Restarting a computer is often the initial step in resolving strange technological issues. Save any files and close any open programs and applications before proceeding to avoid any loss of files.
Your computer will function more smoothly if you reboot it now and then. It clears the memory and cookies, ending any tasks consuming RAM.
Second Method – Check for New Windows Updates
Some problems with the server may have caused the Windows error code 0x80073701 for a short time. In this case, you can check for new Windows updates again, and hopefully, the server issues have already been resolved.
- Press the “Windows” key on your keyboard and press “R” to bring up the run line command type in “control update,” and press enter.

- Click on “Check for Updates” in the Windows Update window. If no updates are available, you should get a message saying, “You’re Up to Date.”

- If the Windows Update Tool finds a new update for your computer, let it install automatically and wait for it to complete. You may be required to restart your computer to install new updates.

Third Method – Launch the Windows Update Troubleshooter
If you’re having trouble using the Windows Updates, you can use the Microsoft Windows Update Troubleshooter. The Windows Update Troubleshooter will determine if any issues prevent your machine from downloading and installing Windows Updates.
The program can either automatically correct the problem, or you can opt to view the corrections and decide whether or not to implement them.
- Press the “Windows” key on your keyboard and press “R.” This will open a small window where you can type “control update” in the run command window.
- When a new window opens, click “Troubleshoot” and “Additional Troubleshooters.”
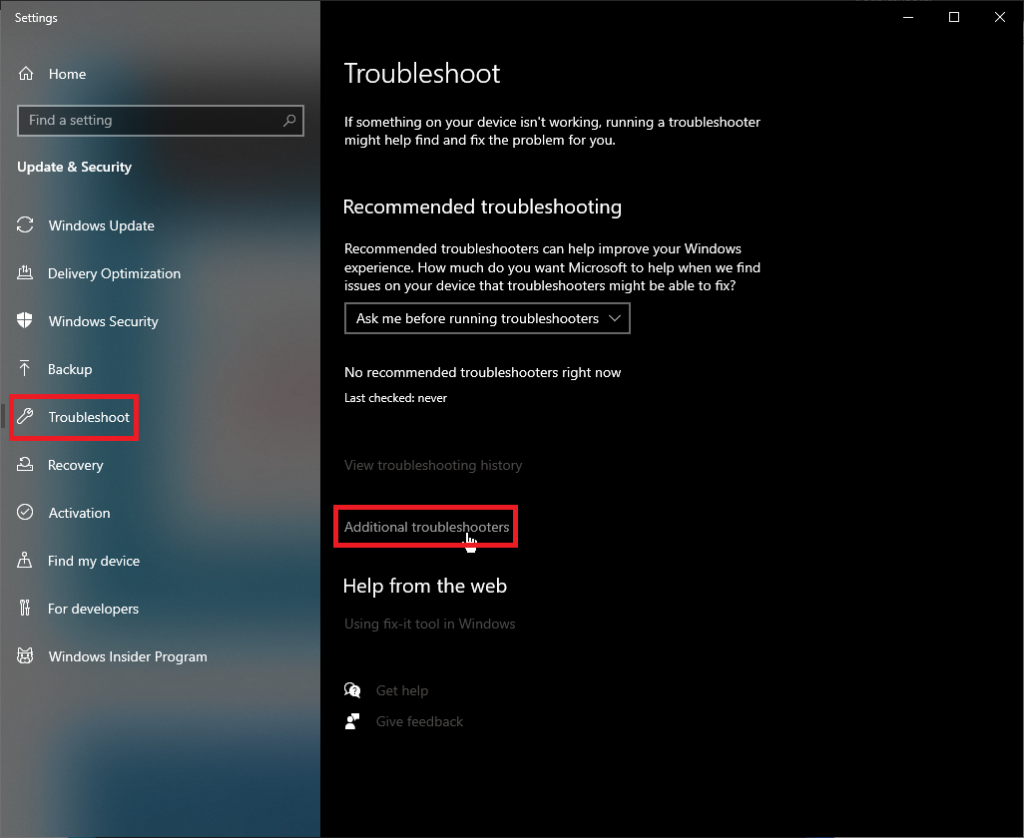
- Next, click “Windows Update” and “Run the Troubleshooter.”

- At this point, the troubleshooter will automatically scan and fix errors in your PC. Once done, you can reboot and check if you are experiencing the same error.

- After the detected issues have been fixed, restart your computer and run the Windows updates to see if the Windows error code 0x80073701 has been fixed.
Fourth Method – Use the Windows System File Checker (SFC)
Windows SFC is an integrated program in Windows that analyzes and gathers information on any corrupt or missing system files. The SFC (System File Checker) checks the integrity and effectiveness of all protected Windows system files and replaces outdated, damaged, altered, or newer versions.
- Hold down the “Windows” key and press “R,” and type “cmd” in the run command line to open the command prompt. Hold the “ctrl and shift” keys together and hit enter. Click “OK” on the next window to open an elevated command prompt.

- Type “sfc /scannow” in the command prompt window and enter. SFC will now check for corrupted Windows files. Wait for the SFC to complete the scan and restart the computer. Once done, run the Windows Update tool to check if the issue has been fixed.

- Once the scan is complete, make sure to restart your computer.
Fifth Method – Run the Deployment Image Servicing and Management (DISM) Tool
If Windows SFC cannot restore the damages found on your computer, the DISM utility can resolve as many errors as possible. In addition to scanning and repairing the effectiveness of Windows images, the DISM program may also change Windows installation media.
- Hold down the “Windows” key and press “R,” and type “cmd” in the run command line to open a command prompt. Hold the “ctrl and shift” keys together and press enter. Click “OK” on the next window to open an elevated command prompt.
- The command prompt window will open, type in the following command “DISM.exe /Online /Cleanup-image /Restorehealth” and then hit “enter.”

- The DISM utility will start scanning and fixing any errors. However, if the DISM cannot acquire files from the internet, try to use the installation DVD or bootable USB drive. Insert the media and type the following commands: DISM.exe/Online /Cleanup-Image /RestoreHealth /Source:C:RepairSourceWindows /LimitAccess
Note: Replace “C:RepairSourceWindows” with the path of your media device
Wrap Up
If you see an error code 0x80073701 with Windows Update, try to reboot your computer and recheck for updates. If that doesn’t fix it, use the Command Prompt, and run the Update Troubleshooter, SFC, and DISM. If the problem persists, consider using Fortect to automatically scan and repair Windows issues on your computer and improve its overall usability.
Frequently Asked Questions about Windows Update Error 0x80073701
If I run the system file checker will it fix error 0x80073701?
If you run the system file checker, it may be able to fix the error code 0x80073701. However, it is also possible that the system file checker will be unable to fix the error. If you are unsure whether the system file checker can fix the error, you may want to try running it and see if it can fix it.
Do corrupted system files cause the error 0x80073701?
System files can become corrupted for various reasons, including malware infections, power surges, and hardware failures. When system files are corrupted, it can cause errors like 0x80073701. While it’s possible that corrupted system files could cause the error code 0x80073701, there are other potential causes.
How to restart the Windows update service?
To restart the windows update service, one must first open the services window. Then, locate the service named “Windows Update” and right-click on it. After that, select the option to “restart the service.
Will DISM online cleanup image command fix the windows update error?
The dism online cleanup image command is a tool that can be used to fix errors that occur during the Windows Update process. The command will scan the image for problems and attempt to fix them. In most cases, the command will be able to fix the error and allow the update to proceed successfully.
How do I fix component store corruption?
There are a few ways to fix component store corruption. One way is to use the Component Store Corruption Repair Tool. This tool will scan your computer for component store corruption and attempt to fix it.
Another way is to use the Deployment Image Servicing and Management (DISM) tool. This tool can be used to repair component store corruption. Finally, you can use the System File Checker (SFC) tool.
How do you resolve the error 0x80073701 when installing a service pack or updating win 10?
There are a few ways to resolve the error 0x80073701 when installing a service pack or updating on Windows 10. One way is to run the Windows Update Troubleshooter.
This will automatically detect and fix any problems with your Windows Update settings. Another way is to reset the Windows Update components manually.
What does sp1 error code 0x80073701 mean?
The error code 0x80073701 is a general SP1 installation error code that indicates a problem with the Windows servicing store. The servicing store is a repository of files that install and update Windows components.
When the servicing store becomes corrupted, it can cause problems with installing or updating Windows. There are several ways to fix this error, but the most common is to use the Microsoft System Update Readiness Tool.
0x80073701 when adding hyper v?
The 0x80073701 error code is a standard error when adding the Hyper-V role to a Windows Server. Several factors, including an incorrect or corrupt registry key, incorrect file permissions, or an incorrect security descriptor can cause this error.
What Is ERROR_SXS_ASSEMBLY_MISSING on Windows 10?
The error message “ERROR SXS ASSEMBLY MISSING” on Windows 10 means that a required operating system component is missing. This can be due to various reasons, such as a corrupt or incomplete installation or a missing critical file.
This error can be resolved in most cases by reinstalling the affected component. However, if the problem persists, it may be necessary to contact Microsoft support for further assistance.
Can missing or corrupted files cause Windows update errors?
If missing or corrupted files are present on a computer, they can potentially cause errors when Windows attempts to update. These errors may manifest as either system instability or failure to install updates correctly.
In some cases, both types of issues can occur. To avoid potential problems, it is recommended that users ensure that all their files are in good working order before attempting to run a Windows update.
Will error 0x80073701 cause Windows update service to fail?
If the 0x80073701 error is present, it may cause the Windows Update service to fail. This is because the 0x80073701 error may prevent the Windows Update service from being able to access and retrieve the necessary files and updates.
As such, it is recommended that users fix the 0x80073701 error to ensure that the Windows Update service can run properly.
Where is the system configuration window?
The system configuration window can be found by going to the start menu and selecting “control panel.” Select “system” and click on the “advanced” tab.
Once you are in the advanced tab, you will see a button that says “environment variables.” Click that button until you find the “Path” variable.
Where is the software distribution folder?
The software distribution folder is on the computer’s hard drive and contains the files necessary to install and run the software. The folder is typically named “dist” or “distribution.
How to run the DISM online cleanup image in the command prompt?
You must open the command prompt to run the DISM online cleanup image command. Once the command prompt is open, you must type in the following command “dism online cleanup image” and enter. This will start the process of cleaning up your image.
Can system restore repair Windows update error 0x80073701?
If you’re experiencing the 0x80073701 error code when trying to run Windows Update, it’s likely because of a corrupted system file. One possible fix is using the System Restore feature to revert your system to a previous state.
System Restore will undo any recent changes that may be causing the problem. To use System Restore, open the Control Panel and select “System.” Click “System Protection” on the left-hand side, then click “Create.
How to fix Windows update error 0x80073701 from the command line tool?
There are a few ways to fix the windows update error 0x80073701. One way is to use the command line tool. To do this, open the command prompt and type in “sfc /scannow.”
This will scan your system for any corrupt files and replace them. Another way to fix this error is to run the “DISM” tool. This tool will repair any corrupt files on your system.
What is Windows update error code 0x80080005?
Windows Update Error Code 0x80080005 is an error code that typically appears when users try to install an update or patch. It is caused by incorrect permissions or registry entries or a conflict between different versions of the same software. To resolve this issue, users should check their registry permissions, attempt to reset Windows Update, or delete the Windows Update Cache files. Additionally, users should check if their antivirus software is blocking the update and ensure that their system is up to date with the latest Windows Updates.
WINDOWS function Installing Hyper-V error 0x80073701 solution
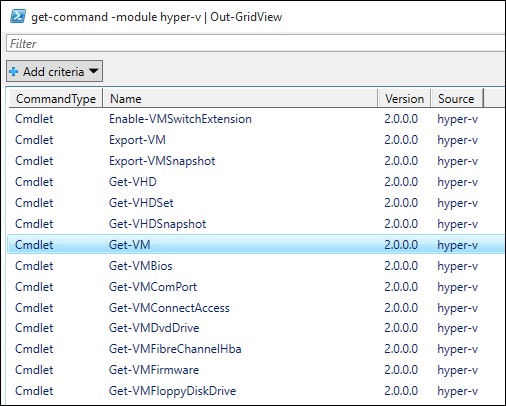
Enable Hyper-V using PowerShell
-
Open the PowerShell console as an administrator.
-
Run the following command:
PowerShell copy
Enable-WindowsOptionalFeature -Online -FeatureName Microsoft-Hyper-V -All
If you can’t find this command, make sure you run PowerShell as an administrator.
After the installation is complete, please restart.
refer to:Enable Hyper-V | Microsoft Docs on Windows 10
Intelligent Recommendation

Hyper-V copy function
The Hyper-V Replica function built into Window Server 2012 (Hyper-V Replica), with the help of the Hyper-V Replica function, administrators can copy Hyper-V virtual machines from a Hyper-V host on the…

Windows Server 2012 R2 — Open Hyper-V function
First, install Windows Server 2012 R2 system This test is to do in VMware WorkStation 10, first create a virtual machine, where the system operating system is set to Hyper-V (not supported), and other…
More Recommendation

Install windows server Hyper-v
Install windows server Hyper-v At present, server virtualization technology is very popular. Major vendors have also launched their own server virtualization products, such as VMware’s Vcenter, Cri’s …
Use Hyper-V and Windows PowerShell
useHyper-VwithWindows PowerShell Now that you understand the deploymentHyper-V, The basics of creating a virtual machine and manage these virtual machines, let’s explore how to usePowerShellAutomates …
Install Hyper-V on Windows 10
Version requirements: Windows 10 Enterprise, Professional or Education Open the PowerShell console as an administrator. Run the following command: If you cannot find this command, make sure you run Po…

How to stop Hyper-V on Windows
How to stop Hyper-V on Windows How to stop Hyper-V on Windows? The following videos show how to stop Hyper-V on Windows. You can deactivate Hyper-V on your computer through any of the following method…