0x80071ab1 (ОШИБКА_LOG_GROWTH_FAILED) — это ошибка Windows, о которой становится известно после попытки установить обновления, связанные с .NET Framework 3.5. Известно, что это происходит в Windows 11 — новой версии ОС, выпущенной Microsoft совсем недавно. Пользователи могут внезапно увидеть эту ошибку в любой момент установки обновления. Повторная попытка выполнить процесс снова, скорее всего, приведет к той же ошибке без дальнейшего развития. Как и многие другие проблемы такого рода, код 0x80071ab1 может быть вызван повреждением или отсутствием системных файлов, сбоем или повреждением компонентов обновления Windows, а также другими системными проблемами. Ниже мы прольем свет на все возможные причины, а также на решения для них. Следуйте внимательно, так как некоторые методы потребуют дополнительного внимания и самоотверженности.

Скачать средство восстановления Windows
Скачать средство восстановления Windows

Существуют специальные утилиты для восстановления Windows, которые могут решить проблемы, связанные с повреждением реестра, неисправностью файловой системы, нестабильностью драйверов Windows. Мы рекомендуем вам использовать Advanced System Repair Pro для исправления «Ошибка Центра обновления Windows 0x80071ab1» в Windows 11, Windows 10, Windows 8 или Windows 7.
1. Запустите средство устранения неполадок Центра обновления Windows.
Первый и, возможно, самый простой способ обойти эту проблему — использовать встроенные функции устранения неполадок Windows. Windows 11 унаследовала эту способность сканировать различные сектора на наличие потенциальных проблем и немедленно их исправлять от предыдущих поколений Windows. Обязательно попробуйте его, прежде чем переходить к другим решениям ниже.
- Нажмите Windows Key + I кнопки вместе и перейдите к Система на левой панели.
- Найдите и откройте Устранение неполадок справа. Затем нажмите Другие средства устранения неполадок.
- Рядом с Центр обновления Windows на правой панели нажмите Run и следуйте инструкциям на экране.
Windows уведомит вас, если какие-либо проблемы были решены. Примените найденные исправления и попробуйте загрузить и установить то же обновление, с которым у вас возникли проблемы.
2. Проверьте целостность системных файлов.
Мы упоминали, что отсутствующие или поврежденные системные файлы могут быть причиной возникновения таких ошибок. Таким образом, было бы неплохо перепроверить вашу файловую систему и убедиться, что ничего не пропало. Мы собираемся использовать как SFC (проверка системных файлов), так и DISM (обслуживание образов развертывания и управление ими), чтобы проверить, существует ли такая проблема. Оба сканирования помогут нам обнаружить и восстановить отсутствующие компоненты, если таковые имеются. Обязательно используйте оба сканирования, поскольку они могут по-разному влиять на решение ошибки. Вот как:
С помощью SFC
- Нажмите на лупу поиска и введите Терминал Windows
- Щелкните по найденному правой кнопкой мыши и выберите Запуск от имени администратора. Согласитесь с действием.
- После открытия консоли введите
sfc /scannowкоманду и нажмите Enter. - Когда процесс восстановления будет завершен, перезагрузите компьютер.
С помощью DISM
- Откройте тот же раздел Терминал Windows мы делали выше.
- Скопируйте и вставьте эту команду
DISM.exe /Online /Cleanup-image /Restorehealth. - Нажмите Enter и подождите, пока Windows закончит сканирование и исправление.
- После этого перезагрузите компьютер и снова установите обновление.
После завершения обоих этих сканирований попробуйте снова запустить установку обновлений. Если это не окупится, перейдите к другим альтернативным решениям ниже.
3. Убедитесь, что служба Центра обновления Windows запущена.
Чтобы центр обновления Windows работал правильно, важно также включить его службу. Мы рекомендуем вам проверить это, выполнив следующие несколько шагов:
- Нажмите Windows Key + R кнопки вместе и вставьте
services.msc. - После открытия найдите и щелкните правой кнопкой мыши по службе под названием Центр обновления Windows из списка. Выберите Объекты.
- Затем, рядом с Тип запуска, выберите Автоматически и нажмите на Start . Если нажать на эту кнопку нельзя и все кажется рабочим, значит служба Центра обновления Windows запущена и не нуждается в какой-либо настройке.
- Наконец, нажмите Применить и OK чтобы сохранить данные изменения.
- Перезагрузите компьютер и проверьте, изменилось ли что-то в лучшую сторону.
4. Сбросьте компоненты Центра обновления Windows.
Если вы продолжаете сталкиваться с той же ошибкой 0x80071ab1, несмотря на использование описанных выше методов, то восстановление всех компонентов Центра обновления Windows с нуля может быть хорошим вариантом. Это позволит воссоздать обновленные компоненты с нуля, убедившись, что ни один из них не поврежден или не содержит ошибок. Вся процедура включает перезапуск служб BITS, Cryptographic, MSI Installer и Windows Update, а также переименование некоторых папок обновлений (SoftwareDistribution и Catroot2). Эти папки содержат временные файлы, необходимые для реализации обновлений Windows. Исходя из этого, мы заставим Windows удалить поврежденные элементы и снова создать компоненты, связанные с обновлением. Для этого следуйте приведенным ниже инструкциям.
Вручную
- Открытые Командная строка , введя
- Щелкните правой кнопкой мыши по Командная строка , а затем выбрать Запуск от имени администратора.
- Скопируйте и вставьте этот список команд одну за другой, нажимая Enter после каждой. (Это действие отключит службы, ответственные за Обновления Windows)
- После этого введите следующую команду и нажмите Enter также. Он удалит qmgr * .dat файлы.
- Затем мы должны переименовать вышеупомянутые папки. Просто вставьте эти команды, нажимая Enter после каждой.
- Теперь вставьте и выполните эти команды ниже. Они сбросят как службы BITS, так и службы Windows Update.
- Затем выполните этот список команд одну за другой, чтобы перерегистрировать все важные DLL-файлы.
- Вы также должны выполнить сброс Winstock, еще одну важную часть этого процесса. Просто вставьте эту команду
- Наконец, все, что осталось сделать, это вернуть отключенные службы. Введите эти команды так же, как мы делали ранее.
- На этом все. Перейдите в центр обновления Windows и попробуйте выполнить установку снова.
cmd в поисковую петлю.
net stop bits
 net stop wuauserv
Del “%ALLUSERSPROFILE%Application DataMicrosoftNetworkDownloaderqmgr*.dat”
ren %Systemroot%\SoftwareDistribution\DataStore DataStore.old
 ren %Systemroot%\SoftwareDistribution\Download Download.old
 ren %Systemroot%\System32\catroot2 catroot2.old
sc.exe sdset bits D:(A;;CCLCSWRPWPDTLOCRRC;;;SY)(A;;CCDCLCSWRPWPDTLOCRSDRCWDWO;;;BA)(A;;CCLCSWLOCRRC;;;AU)(A;;CCLCSWRPWPDTLOCRRC;;;PU)
 sc.exe sdset wuauserv D:(A;;CCLCSWRPWPDTLOCRRC;;;SY)(A;;CCDCLCSWRPWPDTLOCRSDRCWDWO;;;BA)(A;;CCLCSWLOCRRC;;;AU)(A;;CCLCSWRPWPDTLOCRRC;;;PU)
 cd /d %windir%\system32
regsvr32.exe atl.dll
 regsvr32.exe urlmon.dll
 regsvr32.exe mshtml.dll
 regsvr32.exe shdocvw.dll
 regsvr32.exe browseui.dll
 regsvr32.exe jscript.dll
 regsvr32.exe vbscript.dll
 regsvr32.exe scrrun.dll
 regsvr32.exe msxml.dll
 regsvr32.exe msxml3.dll
 regsvr32.exe msxml6.dll
 regsvr32.exe actxprxy.dll
 regsvr32.exe softpub.dll
 regsvr32.exe wintrust.dll
 regsvr32.exe dssenh.dll
 regsvr32.exe rsaenh.dll
 regsvr32.exe gpkcsp.dll
 regsvr32.exe sccbase.dll
 regsvr32.exe slbcsp.dll
 regsvr32.exe cryptdlg.dll
 regsvr32.exe oleaut32.dll
 regsvr32.exe ole32.dll
 regsvr32.exe shell32.dll
 regsvr32.exe initpki.dll
 regsvr32.exe wuapi.dll
 regsvr32.exe wuaueng.dll
 regsvr32.exe wuaueng1.dll
 regsvr32.exe wucltui.dll
 regsvr32.exe wups.dll
 regsvr32.exe wups2.dll
 regsvr32.exe wuweb.dll
 regsvr32.exe qmgr.dll
 regsvr32.exe qmgrprxy.dll
 regsvr32.exe wucltux.dll
 regsvr32.exe muweb.dll
 regsvr32.exe wuwebv.dll
netsh winsock reset
net start bits
 net start wuauserv
5. Используйте Media Creation Tool.
Если по-прежнему нет никаких сигналов в пользу решения проблемы, мы рекомендуем вам попробовать Media Creation Tool — отличную утилиту Microsoft, предназначенную для получения последних доступных обновлений в обход традиционных методов. Если вы изо всех сил пытаетесь установить обновление .NET 3.5 Framework, вам следует попробовать Media Creation Tool. Следуйте инструкциям ниже:
- Сначала вам нужно скачать утилиту с веб-сайта Microsoft.
- Затем запустите загруженный файл.
- После того, как вы согласитесь с Условиями использования, вам будет предложено два варианта на выбор. Выберите Обновить этот компьютер сейчас.
- Выберите Сохранить личные файлы чтобы они не пострадали.
- Наконец, запустите процесс и дождитесь его завершения.
- Надеюсь, этот метод помог вам справиться с ошибкой 0x80071ab1.
Итоги
Обычно это основной набор решений, которые каждый должен попробовать при возникновении таких ошибок, как 0x80071ab1. Мы надеемся, что они помогли вам забыть о боли, которую вы испытывали из-за того, что не могли кормить свою систему новыми доступными обновлениями. Если есть что-то еще, с чем, по вашему мнению, мы можем вам помочь, выполните поиск на нашем веб-сайте, чтобы найти подходящую статью для других проблем, которые вас интересуют. Мы создаем множество контента, чтобы наши пользователи были в курсе и всегда были довольны решениями. .
Ошибка 0x80071AB1 неприятна из-за того, что она не позволяет установить .NET Framework 3.5, без которого не будет работать большинство других программ. Также она может появляться, если пользователь пытается обновить свою операционную систему. Похоже, это довольно популярная и новая ошибка, поэтому о ней известно немного. Тем не менее уже удалось найти несколько эффективных процедур решения. Вроде бы, они работают у большинства пользователей, но мы продолжаем следить за развитием событий.
«Не удалось создать пространство в журнале диспетчера транзакционных ресурсов. Состояние сбоя было записано в журнале событий.
Код ошибки: 0x80071AB1″
Как исправить ошибку 0x80071AB1 на Windows 11?
Установка .NET Framework 3.5 обычно проходит успешно после обновления Windows, но здесь тоже нас может поджидать та же самая ошибка. Если за ней не стоит серьезная поломка системных файлов, должна сработать другая тактика обновления. Это и будет наш первый способ. Если проблема серьезнее, тогда воспользуйтесь второй процедурой.
Обновление Windows 11 на месте
Инструкция по обновлению:
- Создаем загрузочную флешку и подключаем ее к компьютеру. Для этого используйте ISO образ с официального сайта.
- Жмем комбинацию Win + E и переходим в раздел с нашей флешкой.
- На смонтированном накопителе запускаем файл Setup.exe и выдаем необходимое для него разрешение.
- Жмем на кнопку «Изменить способ загрузки обновлений программой установки», затем жмем «Не сейчас» — «Далее» — «Применить».
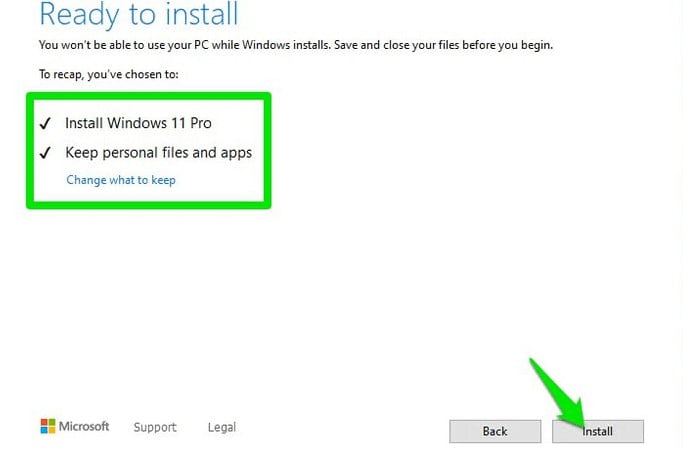
- Когда появится окно «Установка» нажимаем на «Изменить, что сохранить» и выбираем «Сохранить личные файлы и приложения».
- Жмем на «Установить» и теперь можем попробовать заново установить .Net Framework.
Эту инструкцию неоднократно рекомендовали пользователи. Ссылка на оригинал.
Устранение ошибок
Есть алгоритм действий, который срабатывает у пользователей:
- Удалить содержимое каталогов C:\Windows\SoftwareDistribution\Download\ — там могут быть проблемные обновления, которые не удается установить.
- Просканировать DISM. Вам требуется выполнить серию команд: DISM /Online /Cleanup-image /StartComponentCleanup, DISM /Online /Cleanup-Image /ScanHealth и DISM /Online /Cleanup-Image /RestoreHealth.
- Сканировать SFC. Команда sfc /scannow.
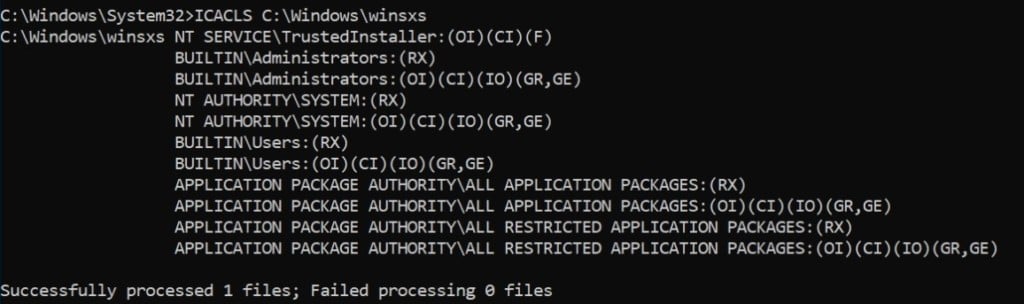
- Сканирование chkdsk C: и icacls c:/windows/winsxs.
- Перезагрузить компьютер.
Скорее всего на одном из этапов будет сообщение, что были исправлены некоторые проблемы. После этого стоит попробовать провести установку .Net Framework или обновление Windows 11.
Now Windows 11 has grown to be one of the most valuable Operating Systems. This latest version of Microsoft’s Operating System includes many features that users have long requested. However, in the midst of all the features, many users complained of a 0x80071AB1 error while trying to install the .NET Framework. This .NET Framework is a crucial for running certain apps on the system.
Anyway, with the help of some basic tricks, you can get rid of the same error. If you are also affected by the Error Code 0x80071AB, you can follow this guide until the end to get all the potential fixes. So instead of wandering around the internet, move down to get all the detailed solutions. Let’s have a look.
Fix 1: Run Windows Troubleshooter:
If you are getting the Error Code 0x80071AB1 on Windows 11, then as a first try to resolve the same, you need to run the Windows built-in troubleshooter. To do so,
- Firstly, open the Settings app by pressing Windows + I altogether.
- Then select System from the left pane menu and click on the Troubleshooter option.
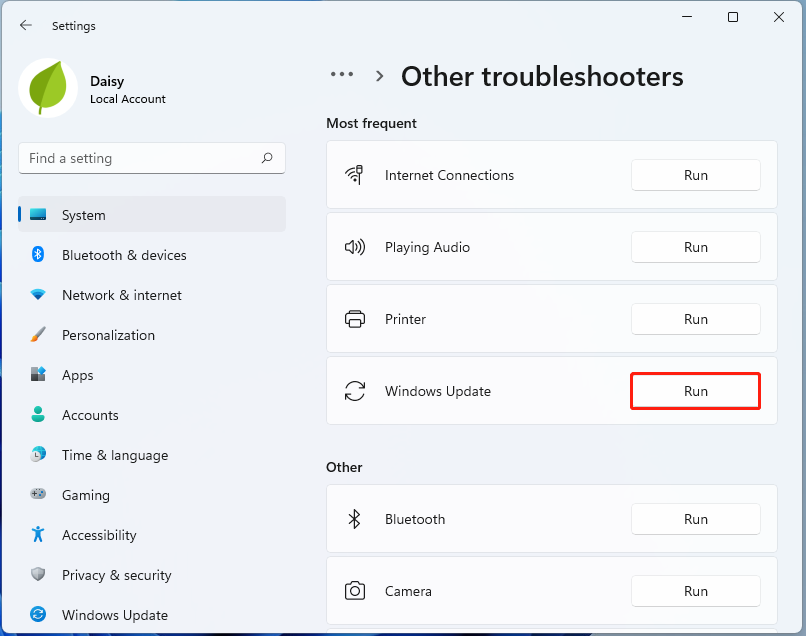
- Inside the new window, click on the Other troubleshooters.
- And scroll down and click on the Run button beside the Windows Update option.
- Finally, try again to install .Net Framework on your system.
Fix 2: Update Windows:
Sometimes outdated Windows might be the main reason for the Error Code 0x80071AB1 on Windows 11. Here the best effective solution is updating your Windows to the latest version. To do so,
- Firstly, open the Settings app by pressing Windows + I altogether.
- Inside Settings, click on the Windows Update from the left pane menu.

- Then click on the Check for updates option.
- Finally, try again to install .Net Framework on your system.

Fix 3: Run SFC Scan:
The corrupted or damaged system files might cause to arise the Error Code 0x80071AB1 on Windows 11 screen. In this scenario, you need to run the SFC tool to repair those corrupted files. To do so,
- Firstly, type cmd in your system search box and open the Command Prompt window from the search result.
- Inside Command Prompt, type the following commands and press Enter,
Sfc /scannow
- Once you have executed the above command, restart the system and check the result.
Fix 4: Run DISM Scan:
Another solution to tackle the Error Code 0x80071AB1 on Windows 11 is running a DISM scan to restore corrupted system files. To do so,
- Firstly, type cmd in your system search box and open the Command Prompt window from the search result.
- Inside Command Prompt, type the following commands and press Enter,
DISM /Online /Cleanup-Image /CheckHealth
DISM /Online /Cleanup-Image /ScanHealth
DISM /Online /Cleanup-Image /RestoreHealth
- After executing the above commands, restart the system and check now you can install the .Net Framework.
Fix 5: Restart Windows Update Service:
Sometimes simply restarting the Windows Update service might help you to resolve the Error Code 0x80071AB1 on Windows 11. To do so,
- Firstly, press Windows + R to open the RUN dialog box, type services.msc, and click on OK.
- Inside the Services window, locate and select Windows update.
- Double-click on the Windows Update service and select the Properties window.

- In the Properties window, set Startup type as Automatic and Service status as Start.
- Finally, click on Apply and OK button and try again to install .Net Framework.

Fix 6: Run In-Place Upgrade:
Some suffered users finally managed to escape from the Error Code 0x80071AB1 on Windows 11 by running in-place upgradation. So we strongly recommend you to try the same. To do so,
Note: Save your data to any external drive or USB before beginning this process.
- Firstly, create a Bootable USB drive and connect the drive to the system.
- Then press Windows + E simultaneously to open File Explorer on your screen, then double-click on the Bootable USB drive.
- Inside the USB drive window, double-click on the Setup.exe file.
- If any prompt appears, you can click on the Yes button.
- In the newly opened window, click on the Change how Setup downloads updates link.

- On the next window, click on the radio button beside the Not right now and then click on the Next button.
- Then in the deceleration window, click on the Accept button.

- Now from the Install window, click on Change what to keep link.
- In the next screen, select the Keep personal files and apps option.
- Finally, click on the Install button. Once done, restart the system and try to install the .Net Framework again.


Fix 7: Install Windows 11 Installation Assistant:
At times, installing the Windows 11 Installation Assistant might help you to resolve the Error Code 0x80071AB1. To do so,
- Firstly, open your browser and open the Windows 11 Installation Assistant download page.

- Then you need to click on the Download Now button.
- On the next screen, if any updates are available, Windows will let you know, then you can click on Accept and Install button.
- Finally, restart your system and check still you are facing the discussed error.

Fix 8: Reset Windows Update Components:
If any of the above solutions do not help you, then you need to reset the Windows Update component. To do so,
- Firstly, type cmd in your system search box and open the Command Prompt window from the search result.
- Inside Command Prompt, type the following commands and press Enter after each command,
net stop bits
net stop wuauserv
net stop appidsvc
net stop cryptsvc
Del “%ALLUSERSPROFILE%\\Application Data\\Microsoft\\Network\\Downloader\\*.*”
rmdir %systemroot%\\SoftwareDistribution /S /Q
rmdir %systemroot%\\system32\\catroot2 /S /Q
regsvr32.exe /s atl.dll
regsvr32.exe /s urlmon.dll
regsvr32.exe /s mshtml.dll
netsh winsock reset
netsh winsock reset proxy
net start bits
net start wuauserv
net start appidsvc
net start cryptsvc
- Once executed all the commands, restart the system and see now you can install .Net Framework on your system.
So, these are all about Error Code 0x80071AB1 on Windows 11 and its dependable fixes. However, if you have any queries or doubts after reading this article, then please leave a comment in the below-given comment box.
Many Windows 11 users encounter 0x80071AB1 (ERROR_LOG_GROWTH_FAILED) when trying to install a .NET Framework version or a pending Windows update. This post from MiniTool provides some feasible and useful solutions for you to fix the error.
.NET Framework is a software development framework for building and running applications on Windows. Some Windows 11/10 users report that they receive the error message – 0x80071AB1 (ERROR_LOG_GROWTH_FAILED) when trying to install the .NET Framework version on Windows Update.
Also see:
- How to Check .NET Framework Version on Windows 10 [3 Methods]
- Microsoft .NET Framework 3.5 Download & Install for Windows 10/11
Like many other issues of this nature, the 0x80071AB1 code can be caused by corrupted or missing system files, faulty or corrupt Windows update components, and other system issues. Next, we will introduce how to get rid of the 0x80071AB1 error code on Windows 11/10.
Fix 1: Run Windows Update Troubleshooter
Windows Update Troubleshooter is a practical built-in tool that enables you to detect and fix errors related to corrupted updates or other Windows updates issues. So, you can try running the troubleshooter to check if any issues can be detected and fixed. Here’s a tutorial.
Step 1: Press Win + I to open the Settings window, and then select System from the left vertical menu and click on Troubleshoot from the right menu.
Step 2: Click Other troubleshooters to expand all troubleshooters, and then click Run next to the Windows Update section.
Step 3: Now, this troubleshooter will scan issues associated with the Windows Update components. If any fixes are identified, click on Apply this fix and follow the on-screen instructions to complete the repair.
Fix 2: Install the Pending Updates Manually
Another way to complete the installation would be to download it from the Microsoft Update Catalog and then install it manually. Follow the guide below:
Step 1: Open Settings again and click Windows Update.
Step 2: Go to the Update history. Check if there are failed .NET Framework Update numbers.
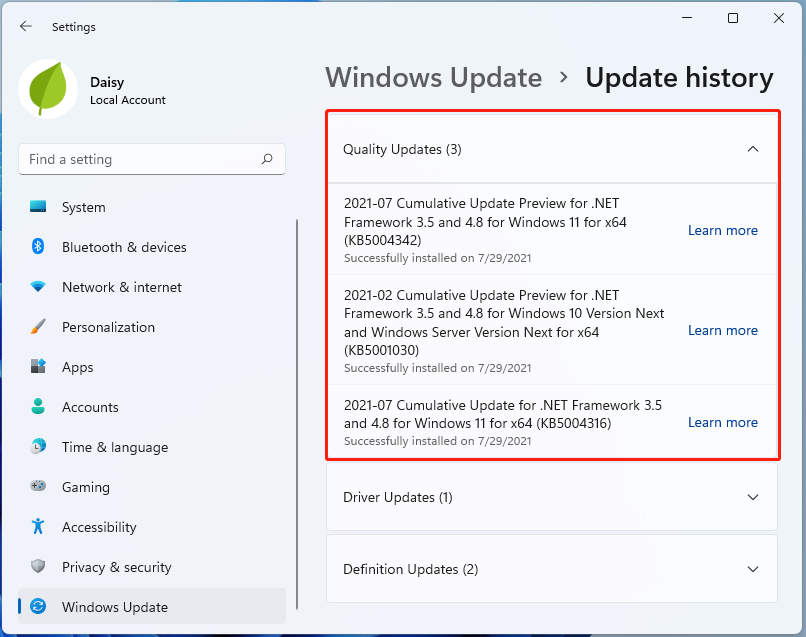
Step 3: Copy the failed update number. Go to Microsoft Update Catalog and search for the update number.
Step 4: Download it on your PC. Then double click to launch the installer and then update it.
Fix 3: Run an SFC or DISM Scan
Another common cause for 0x80071AB1 Windows 11 is related to your system files. To scan and repair your system files, you can try running an SFC (System File Checker) or DISM (Deployment Image Servicing and Management) scan. Here is how to do that:
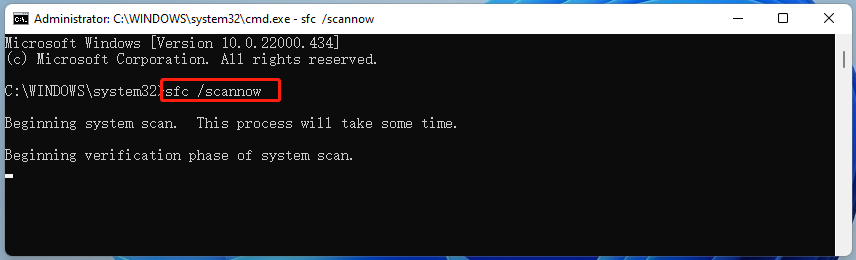
Step 1: Type cmd in the search box on the taskbar, and then right-click the Command Prompt app and select Run as administrator.
Step 2: Type sfc /scannow command in the elevated command prompt. This process may take you much time to scan, please wait patiently.
Step 3. If the SFC scan doesn’t work, you can try running the command below in the elevated Command Prompt window.
- Dism /Online /Cleanup-Image /CheckHealth
- Dism /Online /Cleanup-Image /ScanHealth
- Dism /Online /Cleanup-Image /RestoreHealth
Once done, reboot your PC and check if the installing error code 0x80071AB1 gets fixed.
Fix 4: Reset Windows Update Components
At times, it is useful to fix Windows 11 install error 0x80071AB1 by resetting Windows Update components. Follow the instructions blew to do so:
Step 1: Run Command Prompt with admin privileges.
Step 2: In the CMD popup, type the following commands in turn and press Enter after each one to execute the operations:
net stop bits
net stop wuauserv
net stop appidsvc
net stop cryptsvc
Del “%ALLUSERSPROFILE%\\Application Data\\Microsoft\\Network\\Downloader\\*.*”
rmdir %systemroot%\\SoftwareDistribution /S /Q
rmdir %systemroot%\\system32\\catroot2 /S /Q
regsvr32.exe /s atl.dll
regsvr32.exe /s urlmon.dll
regsvr32.exe /s mshtml.dll
netsh winsock reset
netsh winsock reset proxy
net start bits
net start wuauserv
net start appidsvc
net start cryptsvc
Fix 5: Enable Microsoft .NET Framework 3.5
One of the most effective solutions to install error – 0x80071AB1 Windows 11 is to make sure Microsoft .NET Framework 3.5 is enabled. This is because the update process may be interrupted by that component. Follow the steps below:
Step 1: Press Windows and R to open the Run dialog, type appwiz.cpl in the textbox and click OK.
Step 2: In the Programs and Features interface, click the Turn Windows features on or off link.
Step 3: Check the .NET Framework 3.5 (includes .NET 2.0 and 3.0) box. Besides, expand this item and make sure the associated boxes for Windows Communication Foundation HTTP Activation and Windows Communication Foundation Non-HTTP Activation are also selected.

Step 4: Click OK to save the change. Then, check for Windows updates to see if install error – 0x80071AB1 is removed from Windows 11.
Fix 6: Run the WU AutoUpdate Client
As it turns out, the 0x80071AB1 can also occur due to a scenario in which a key Windows Update dependency (WU Auto Update) is behind inhibited by a third-party process or by some type of system file corruption. Follow the instructions below to enforce this method from an elevated PowerShell window:
Step 1: Press Windows + R keys together to open the Run dialog box.
Step 2: Next, type powershell inside the text box, then press Ctrl + Shift + Enter to open the elevated PowerShell command window.
Step 3: At the User Account Control window, click Yes to grant admin access.
Step 4: Inside the elevated PowerShell window, type the following command and press Enter:
wuaclt.exe / updatenow
Step 5: Once the first command is processed successfully, type exit and press Enter once again.
Step 6: Then, restart your computer and see if the problem is fixed once the next startup is complete.
In case the same kind of 0x80071AB1 error is still popping up when you attempt to install a .NET infrastructure update, move down to the next method below.
Fix 7: Restart the Windows Update service
Sometimes simply restarting the Windows Update service might help you to resolve the error code 0x80071AB1 on Windows 11. To do so,
Step 1: Press the Windows and R keys at the same time to open the Run dialogue box. Type services.msc and click OK to open the Services application.
Step 2: From the list of applications, right-click Windows Update to select Stop.
Step 3: Next, open File Explorer and go to C:\Windows\SoftwareDistribution. Remove all the files in the folder.
Step 4: Go back to Services and right-click Windows Update again. This time click Restart.
Once done, restart the computer and check if the 0x80071AB1 error is eliminated.
When the 0x80071AB1 error code appears, you can try using the Windows 11 Media Creation Tool to reinstall your Windows. Here is how to do that:
Tip: Before you start the following steps, you had better back up all the important files on your system disk. This post – How to Backup Files on Windows 10? Try These Top 4 Ways maybe is what you need.
Step 1: Download the Windows 11 Media Creation Tool from Microsoft‘s official website.
Step 2: Navigate to the media creation tool you’ve downloaded > run it > accept the license terms.
Two options are offered in the What do you want to do window.

Option 1: Upgrade This PC Now
- Check Upgrade this PC now and click Next.
- Wait while it’s downloading Windows 11. The speed depends on your PC and the internet connection.
- Wait for the settings and configurations verification.
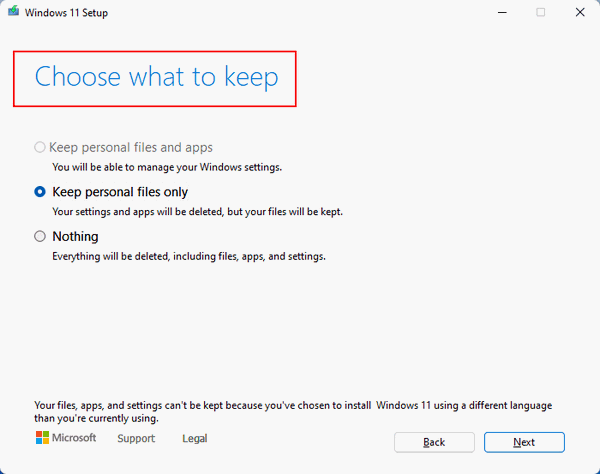
- Choose to Keep personal files and apps, Keep personal files only, or keep Nothing. Then, click Next.
- Follow the on-screen instructions to finish installing Windows 11 on your PC.
Option 2: Create Installation Media
- Check Create installation media (USB flash drive, DVD or ISO file) for another PC and click Next.
- Select Language, Edition, and Architecture manually or check Use the recommended options for this PC.
- Click Next.
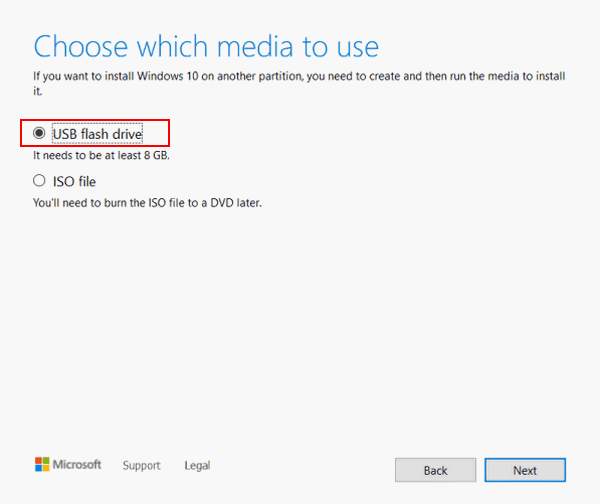
- In the Choose which media to use page, please select USB flash drive or ISO file. Please connect the USB drive you prepare in advance if you select a USB flash drive.
- Click Next and follow the on-screen instructions to finish the rest steps.
Suggestion: Back up Your PC Before Updating Windows 11
Before any operations to the Windows operating system like Windows update, it is advised to back up your PC since Windows updates can lead to some issues. Besides, PC backup and recovery can guarantee minimized system downtime. Also, you can choose to back up your data regularly to keep files safe.
To do this work, MiniTool ShadowMaker is a good assistant that can be compatible with Windows 11/10/8/8.1/7. With it, you can back up and restore files, folders, disks, partitions, and Windows systems. Besides, you can use it to clone your hard drive and sync files.
This backup software offers a Trial Edition that allows a 30-day free trial for all backup features. If you want to use it permanently, get its Pro Edition. Now you can download and try MiniTool ShadowMaker to back up your system.
MiniTool ShadowMaker TrialClick to Download100%Clean & Safe
Step 1: Launch MiniTool ShadowMaker Trial Edition in Windows 11.
Step 2: Go to the Backup interface, you can see system partitions are selected as the backup source. If you need to back up files, click Source > Folders and Files to select items you want to back up.
Step 3: You only need to click Destination to choose a path to save the system image file.
Step 4: Click Back up Now to execute the backup task at once.

After that, you are advised to click Tools > Media Builder to create a bootable medium with a USB hard drive, USB flash drive, or CD/DVD disc.
Bottom Line
Are you bothered by the annoyance: install error – 0x80071AB1 Windows 11? If you run into the error code during the update process, try the solutions above to easily get rid of that trouble. If you have any other ways to solve the update issue, leave a comment below. Thanks in advance.
It is true that Windows 11 is the most advanced release from Microsoft, but it still has flaws, especially those that affect basic functionality. A similar error 0x80071AB1 (ERROR_LOG_GROWTH_FAILED) is encountered here when trying to install or update the Microsoft .NET framework. In some cases, this issue may also occur while installing a pending Windows update. In this article, we have explained how Microsoft’s .NET Framework works and given the best methods to solve the 0x80071AB1 error in Windows 11.

To fix Update Error 0x80071ab1 in Windows 11, do the following:
- Run Windows Update troubleshooter
- Manually Install Windows Updates
- Reset Windows Update components
1] Run the Windows Update Troubleshooter
The Windows Update troubleshooter detects and repairs problems automatically when a problem occurs with Windows 11. To run this tool, follow these steps:

- Right-click on the Start menu and select the Settings option.
- Go to System > Troubleshoot > Other troubleshooters.
- Next to Windows Update, click on the Run button.
- It may take a little time to complete the task.
Once it completes, restart your computer and try to install the updates.
2] Manually Install Windows Updates
This error can also occur when there are issues with the Windows Update servers. For such an instance, you would have to download & install any pending update on your computer, and then check whether it works.
- Press the Windows+I keys to open the Settings menu.
- From the left pane, click Windows Updates > Update history.
- Note down the KB number of the recent failed update.
- Then go to the Microsoft Update Catalog page.

- Type the KB number in the search box and press Enter.
- Once you find the suitable version for your Windows, download and install it.
- Now restart your computer and check if it works.
3] Reset Windows Update Components
If none of the above methods work, there may be a problem with Windows Update that ultimately prevents your computer from properly installing new updates. In such a case, you can try resetting all Windows Update components and see if everything is working fine now.
What causes Error 0x80071AB1?
We investigated this issue closely and identified a few underlying factors that may be causing error 0x80071AB1. Below is a list of possible culprits:
- If your PC lacks a key infrastructure, you may encounter this problem when trying to install a .NET framework update.
- If Windows Update is somehow corrupt, you may see this error when trying to install a pending update.
- It is likely that you will be dealing with a glitch affecting a required dependency on a WU that will prevent you from installing new updates.
- All temporary files associated with a Windows Update are stored in the SoftwareDistribution folder. If this folder has been corrupted, then you should expect to encounter Windows Update error 0x80071AB1.
- This problem can also occur if the main executable responsible for downloading and installing new software updates for your OS (WU AutoUpdate) is unavailable.
- Error 0x80071AB1 can also be a result of corrupt system files.
Read Next:
- [Solved] How to Fix Windows Update Error 0x80070002
- How to Fix Windows Upgrade Error Code 0x80090011